We’re helping a couple who aren’t strangers to do-it-yourself projects.
Matt and Lindsey Binion bought their mid-1950s house in the midtown area of Mobile, Ala., a few years ago and have been busy making it their own ever since.
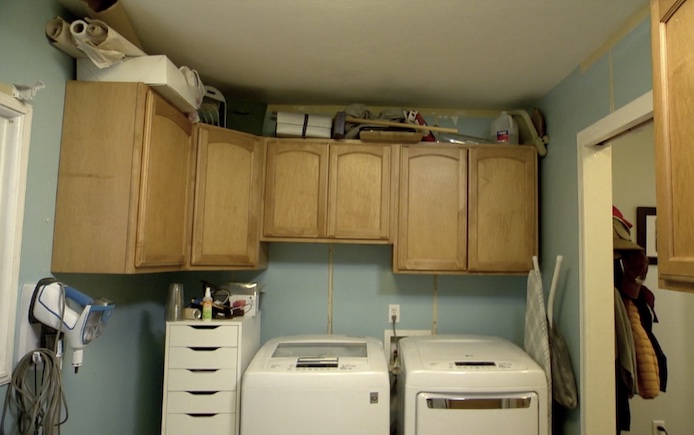
After completely renovating their kitchen because of a water leak, they installed their old kitchen cabinets in the laundry room to give it a bit of a facelift. However, its overall look and functionality need some improvement. So, we’re here to help!
The Projects
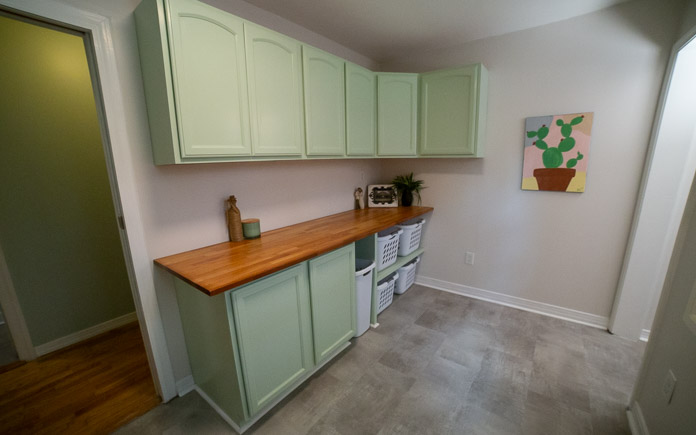
The new cabinet configuration works with the room instead of against it. (3 Echoes Content Studio)
Rearrange the Cabinets
Matt and Lindsey were on the right path when they repurposed the old kitchen cabinets for storage, but their configuration just wasn’t working for the room.
There were large gaps between the cabinets and the walls, and items ended up being placed all around. The room was treated more like an indoor garage than a laundry room.
So, we reposition them and remove some to create storage that makes sense for what the couple needed from it.
Then we sand, prime and paint the cabinets a fresh new color.
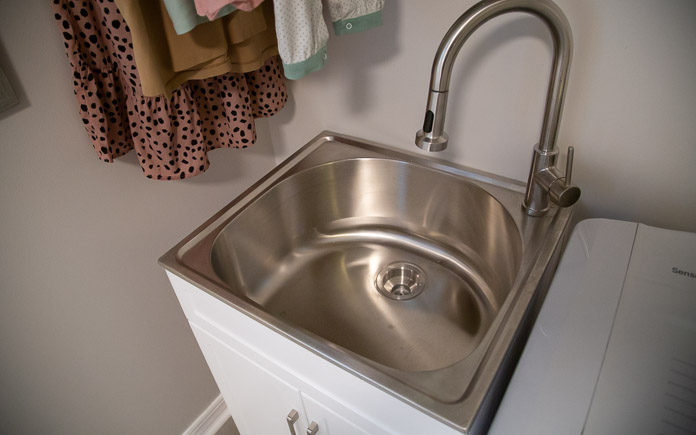
Lindsay won’t have to wash clothes in the kitchen sink now that she has a utility sink in the laundry room. (3 Echoes Content Studio)
Add a Utility Sink
In a house with four boys, a laundry room with a utility sink is a must.
Lindsey has been using their new kitchen sink to wash their boys’ muddy clothes after sports practices. And after handwashing, she has no place to hang clothes to dry.
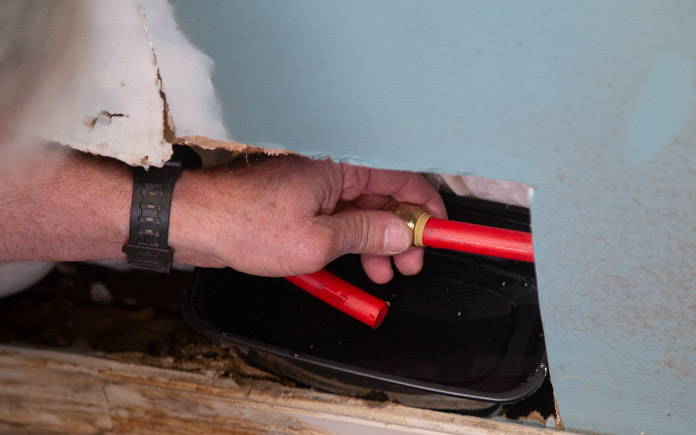
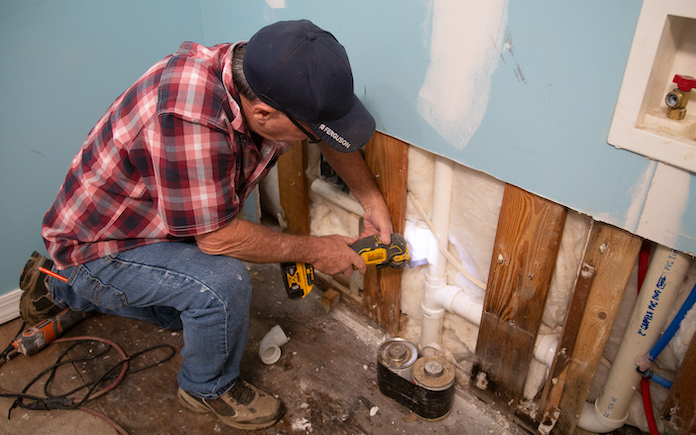
To install the utility sink, we first moved the water and dryer so we could access the plumbing. Unfortunately, we found some water damage behind the wall.
Unbeknownst to the couple, water had been dripping from the cross-linked polyethylene, or PEX, line for a few days. We immediately cap the line with a Sharkbite cap until the plumber arrives to install the sink.
Our plumber uses an oscillating saw to cut the PVC pipe so it can be rerouted to the sink. (3 Echoes Content Studio)
When our plumber arrives, we cut a hole in the drywall so he can access the pipes and reroute them to the spot the sink will be. The plumber then runs the new drain line for the sink and extends the water supply lines from the spot where we capped the leak.
We then replace the drywall around the new pipes and finally install the laundry sink cabinet and sink.
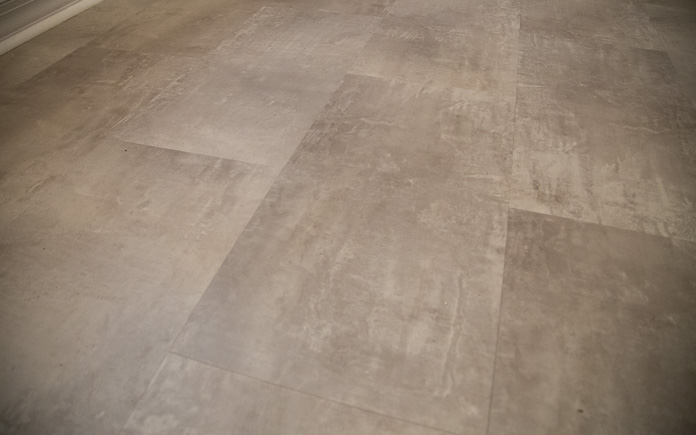
The luxury vinyl tile is the same flooring in the kitchen, so now the two rooms are connected. (3 Echoes Content Studio)
Replace Flooring
The tile grout on the laundry room floor is coming loose, so we’re going to replace it with some leftover luxury vinyl tile that the couple used in their kitchen renovation.
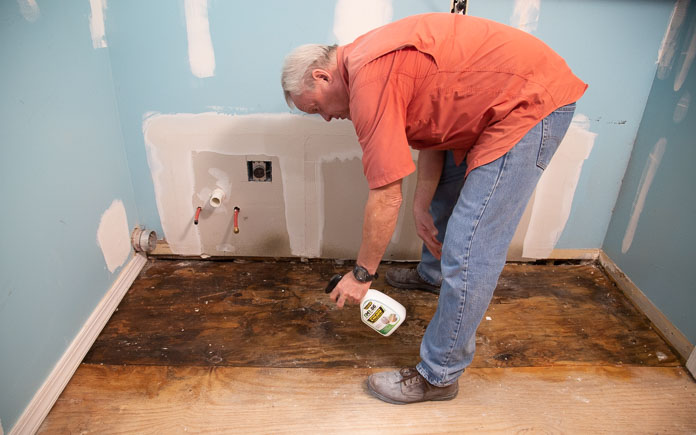
Thankfully, we caught the water leak in the hex pipe just in time for us to treat the subfloor with antimicrobial spray and let it dry overnight. (3 Echoes Content Studio)
After we remove the tiles and backer board with a pry bar, we find a wet spot on the subfloor where the PEX pipe was leaking. Because we caught the water leak early, we won’t have to replace the subfloor. We use some dehumidifiers and fans to dry it out overnight, and then treat it with an antimicrobial spray to make sure no mold comes up through the floor.
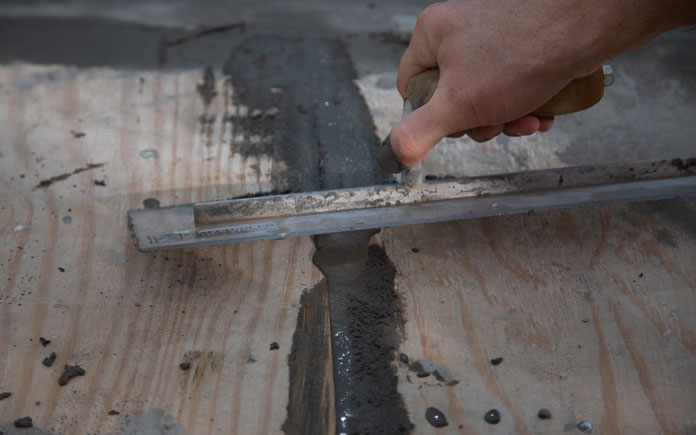
To level out the subfloor, we mix some floor patch compound that he spreads over the surface to fill in low spots and smooth out the transitions. We then installed the rectangular luxury vinyl tile long-ways in the room to complement the narrow room.
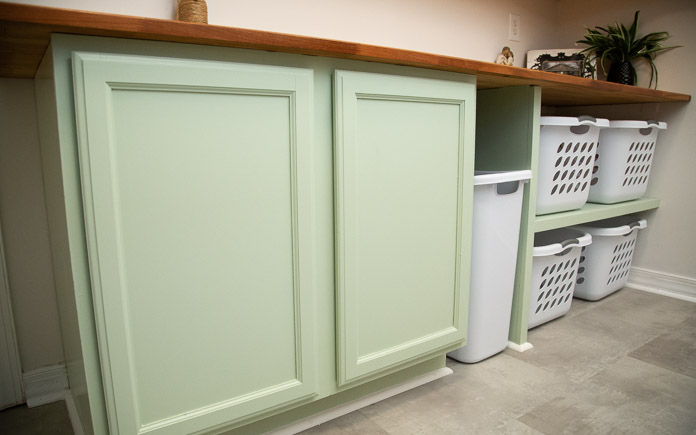
The new cabinet has room for everyone’s laundry basket, plus plenty of countertop space for folding. (3 Echoes Content Studio)
Install Countertops and Cubbies
Matt and Lindsey used a piece of plywood as a makeshift countertop for the repurposed kitchen cabinets. But, the plywood wasn’t a prime surface for folding laundry, so the couple was forced to pile laundry in the living room and fold them from their couch.
To make this counter space more functional, we first install 1-by-2 cleats to support a new butcher block countertop as well as a shelf unit that will organize the kids’ laundry baskets.
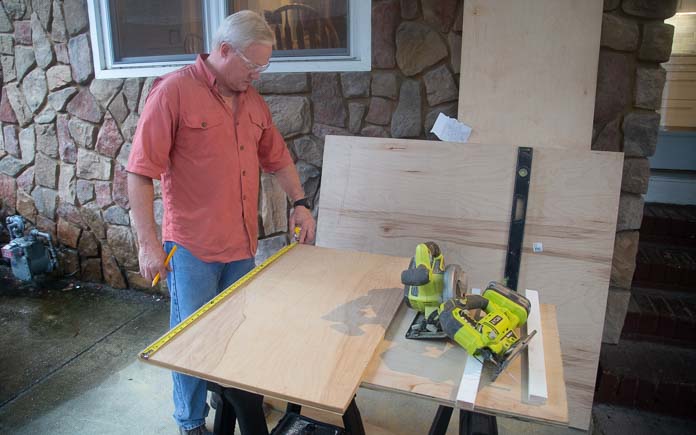
We use 3/4-inch plywood and 1×2 boards to create the cubbies for the laundry baskets. (3 Echoes Content Studio)
For our shelf unit, we cut our wood pieces on a table saw outside and assemble them with nails and wood glue. We then attach them to the cleat we installed next to the base cabinets.
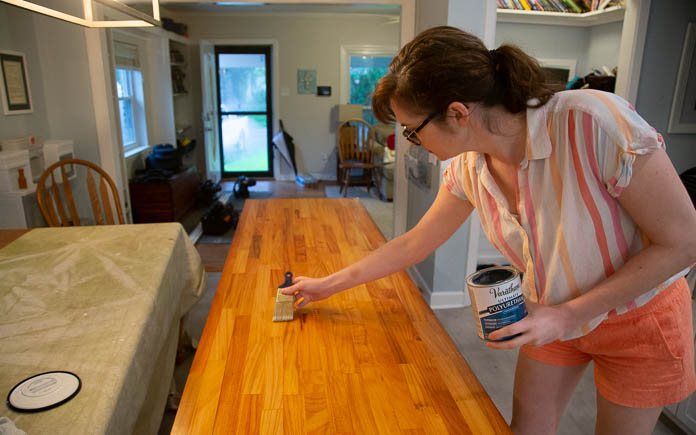
Polyurethane seals the butcher block countertop so it’s more durable. (3 Echoes Content Studio)
Next, Lindsey coats the butcher block with polyurethane. After that’s dry, we install the countertop over the shelving unit and base cabinets.
Matt and Lindsey had a decent-sized laundry room with lots of storage space, but because it had been thrown together with salvage materials from an emergency kitchen renovation, the surfaces all looked a little worse for wear and the room lacked the thoughtful organization and visual appeal they really wanted for the space.
But now, the old recycled cabinets have a clean new look and a simplified layout that works with the room rather than overpowering it. The new luxury vinyl tile flooring has replaced the old cracked ceramic tiles and connects the room to the rest of the house.
The laundry sink makes the family’s everyday chores easier and less stressful, especially with the hanging space directly above it and the new countertop is both attractive and useful for a family with lots of laundry to fold.
Plus. We did it all for less than $2,000 in materials.
Other Tips From This Episode
Products Featured in This Episode
This page contains affiliate links. If you purchase a product from these links, we will earn a small commission at no additional cost to you.
The tile we’re using has a built-in pad so there’s no need to install an underlayment. Start in a corner of the longest wall in the room, placing the tiles with the tongue side out.
The tongue on luxury vinyl tile is the small flat edge on one side of the tile that’s angled to lock into the bottom side of another tile (the groove side).
Cut the outer boards down to ensure you have equal-sized pieces on either side of the room. (3 Echoes Content Studio)
To ensure we have equal-sized cut pieces on either side of the room, we cut our first row of tiles down to 8 and 3/4 inches.
Luxury vinyl tile expands and contracts, so give it some room by spacing it about 3/8 of an inch away from the wall. (3 Echoes Content Studio)
Space each piece about 3/8 of an inch from the wall so there’s room for expansion. For this luxury vinyl tile, we’re aligning them with the base molding because it’s a little wider than that measurement.
On the first row, you’ll only need to snap the end joints together. For the next row, align the end joint then tilt the tile down so the longer joint lines up.
Staggering the rows prevents unattractive gaps between the luxury vinyl tile. (3 Echoes Content Studio)
Offset each new row by half from the previous one before tapping both joints in place with a rubber mallet.
You don’t have to use a saw to cut luxury vinyl tile. Simply score it with a utility knife and snap it off. (3 Echoes Content Studio)
When you need to cut the tile, simply align the tile and mark the edges at the obstacle, then connect the lines using a speed square. Cuts can be made with a saw or with a utility knife to score and snap the tiles.
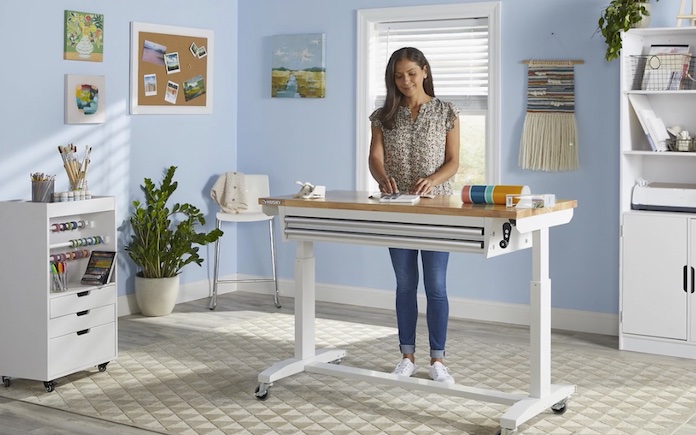
Adjustable-height desks are popular these days in offices all over the country and now you can have that same flexibility with your workbench with Husky’s new adjustable workbench.
Research suggests there are health benefits to alternating between standing and sitting throughout the day because it both decreases body discomfort and increases blood flow. Husky’s Adjustable-Height Work Table has an ergonomic design that could also reduce eye and back strain and boost your productivity.
This page contains affiliate links. If you purchase a product from these links, we will earn a small commission at no additional cost to you.
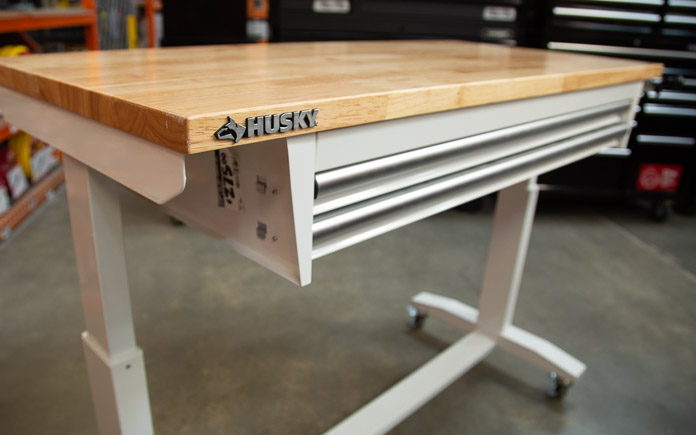
The Husky Adjustable-Height Work Table is a multi-functional adjustable workbench. Its manual crank can raise the table to 36 inches high and lower it to 26 inches.
The 52-by-24-inch solid wood top offers 1,200 square inches of workspace and has a protective coating so your surface looks newer longer.
The table is designed to support up to 300 pounds and the overhang allows you to attach a vise or clamps to secure your work.
The Husky adjustable workbench has two wide drawers that have plenty of storage space. Plus, the drawers can hold up to 35 pounds, so you can fill them with your frequently used tools and accessories.
This adjustable workbench can be used outside the garage. (The Home Depot)
Flexible for Any Work Space
This workbench has plenty of uses around the home, office, hobby room or garage.
Locking polypropylene castors on the Husky adjustable workbench allow for easy movement wherever you need to work.
Don’t need to move your workspace around? The workbench comes with four leveling feet, so you can make it stationary.
The crossbar support can be installed in two different locations, depending on your preference.
Install the support at the center of the table for an open, two-sided work area. Or, install it along the back of the legs to allow you the versatility of stowing your tool storage and rolling cabinets underneath to further organize your workspace.
Watch the video to learn all about this Best New Product!
This week, we’re transforming a breezeway that looks almost accidental into a more inviting entrance.
Delane Caldwell’s breezeway to her front door is just a narrow hallway to the backyard, but we’re going to find a way to incorporate it more as a living space.
The Projects
Grinding the concrete smooths out the uneven surfaces of the patchwork slabs. (3 Echoes Content Studio)
Refinish the Concrete Slab
The concrete in the breezeway looked like a patchwork of slabs. So, to create a uniform-looking slab, we smooth the concrete surface with a grinder.
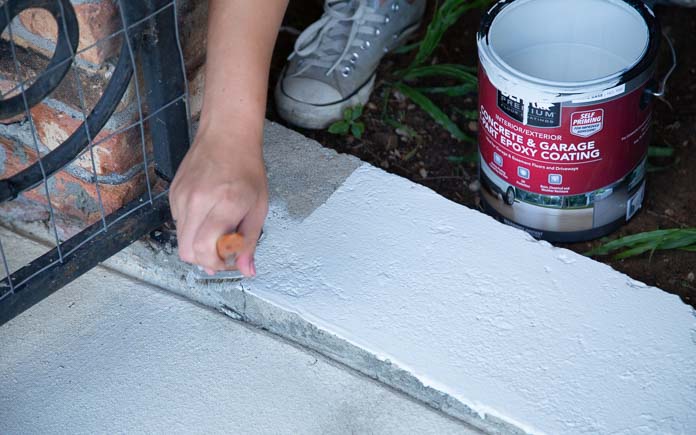
Coating the breezeway with concrete epoxy paint creates a uniform color throughout the breezeway. (3 Echoes Content Studio)
After we sweep the dust away and rinse the slab off with a water hose, we paint the new smooth slab with a base coat of white epoxy paint.
After the base coat dries, we pop a chalk layout line on the slab to start our stenciling.
This stencil pattern is based on traditional Portuguese Azulejos tile designs. We used black epoxy paint to fill in the tile pattern on the concrete.
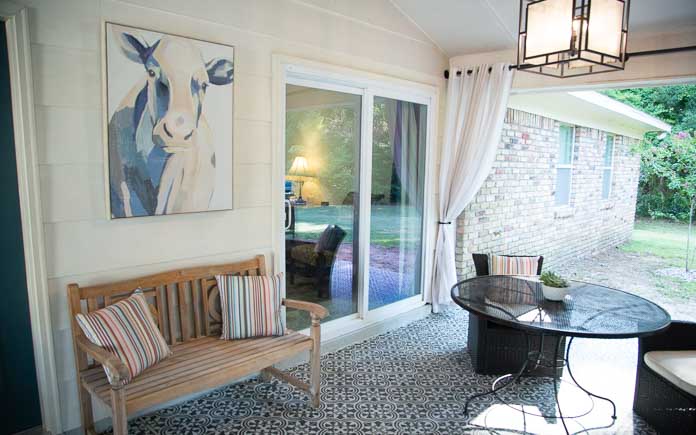
Curtains make this space feel more like an outdoor living room than a breezeway. (3 Echoes Content Studio)
Hang Curtains
To make the breezeway feel more like a living space, we remove the chain link fence at the end and add curtains.
The fence posts are set in concrete, so to remove them, we’ll need some leverage. After digging up the dirt around the base, we place a concrete block next to the post to act as a fulcrum for our shovel.
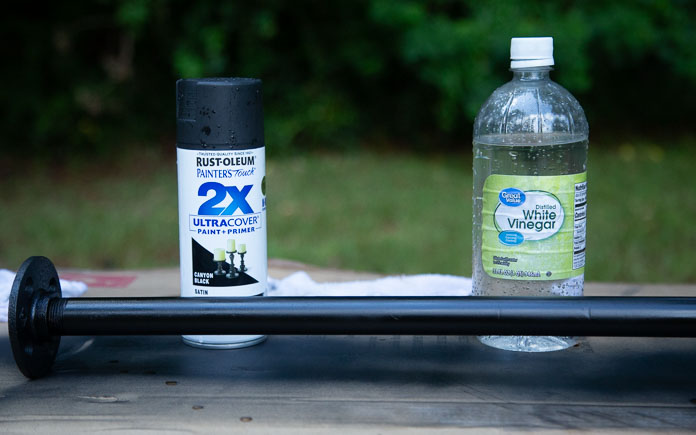
To make the curtain rod wide enough to fill the breezeway, we connected two galvanized pipes together with a tee fitting. (3 Echoes Content Studio)
Our curtains are going to hang the curtains from a galvanized threaded rod. We first measure the breezeway to ensure our rod is long enough to span the entire opening.
Etching the galvanzied pipe with vinegar ensures the spray paint will stick. (3 Echoes Content Studio)
Before we install the rod, we paint it black to match the wrought iron. But, before we can paint, we have to etch the rod with vinegar to ensure the spray paint adheres to it.
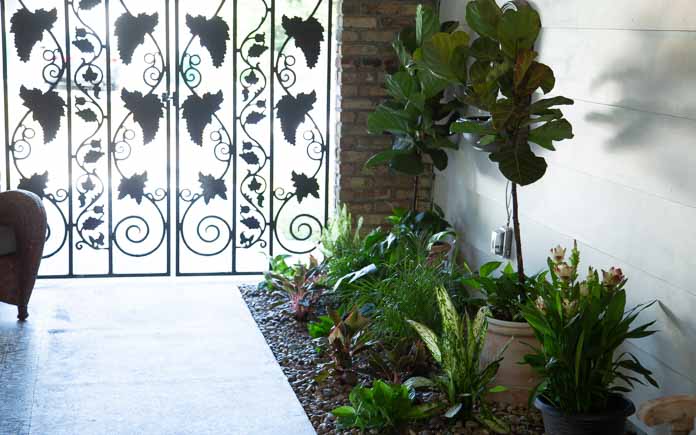
Green leafy plants with varying heighth add depth and breadth to the garden space. (3 Echoes Content Studio)
Fill Garden Bed
Our next project is to transform the garden bed inside the breezeway from a dirt pit to a green oasis.
We add a mix of green, leafy plants to fill the once-defunct garden space.
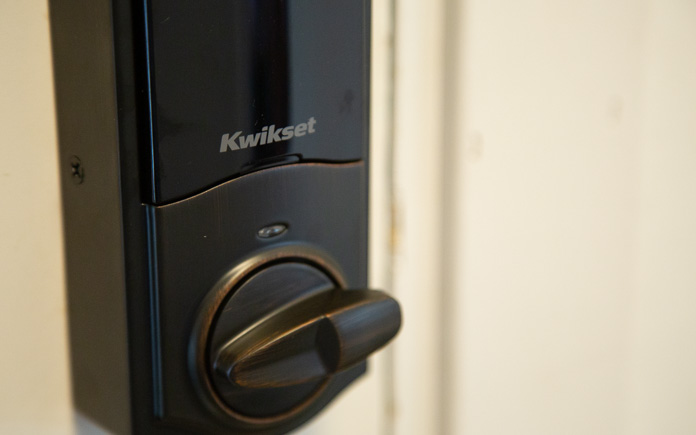
We surprised Delane with a smart lock deadbolt to not only dress up her front door but also make her home a little more secure.
The Kwikset Halo Touch Wi-Fi Fingerprint Smart Lock uses Delane’s unique fingerprint to open and lock her front door. This single-cylinder deadbolt also can be locked or unlocked by using the keypad or key from the outside as well as the turn button from the inside.
The smart lock has built-in Wi-Fi that connects directly to the home Wi-Fi network and smartphone for a secure smart home that does not require a third-party smart home hub, panel or subscription.
We also:
Touched up the paint on ironwork with spray paint
Painted front door and patio door dark teal
Today’s Homeowner TV host Danny Lipford and co-host Chelsea Lipford Wolf pose with Delane Caldwell and her father, Tim Caldwell. (3 Echoes Content Studio)
Post-Production Thoughts
Delane’s breezeway is the main entrance to her home, but before it had a very tired and haphazard feel to it the random collection of different slabs on the floor only left visitors with questions about what the space was supposed to be.
The sad empty planting bed made the house feel a lot older than it actually was, and the chain link fence made it feel more like a cage than a relaxing space.
But now, the whole Space is taken on the field of a courtyard in a fancy hotel the consistency of the stencil floor ties everything together from the wrought iron gates to the lush green planting beds.
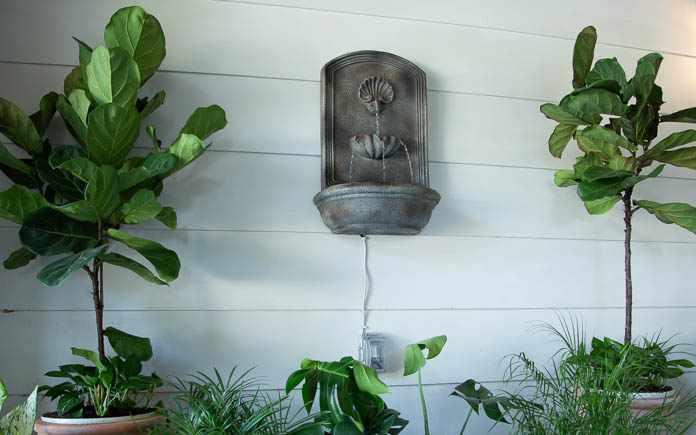
The door adds a pop of color while the fountain adds a cool visual element and a peaceful soundtrack for the space.
The simple curtain rod and the curtains frame the backyard and somehow make it all feel like a resort and we did it all for less than $1,200.
No matter how well you build a wooden fence gate, they all share a common problem over time — the tendency to sag over time.
A sagging gate doesn’t just make your fence look old and unattractive — it’s also a hazard for children and pets.
Wide gates are no exception, and possibly are more susceptible to sagging. For example, this fence gate is five and a half feet wide, and I’ve tried everything over the years. I replaced the hinges with larger hinges. I installed the steel braces in each corner. Still, it didn’t work.
Instead of fighting gravity, prop the sagging gate up when it’s closed or open with a caster.
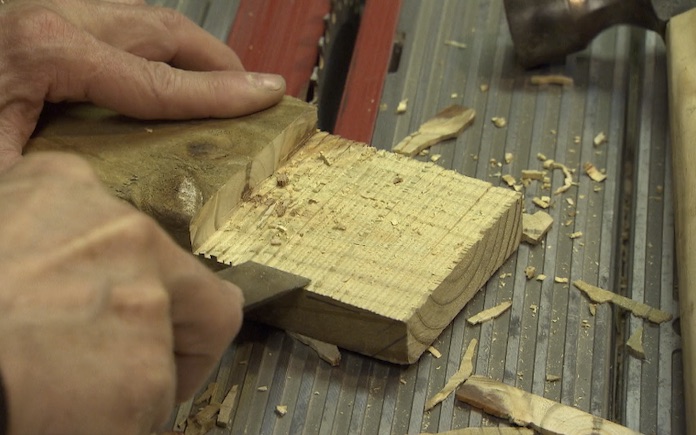
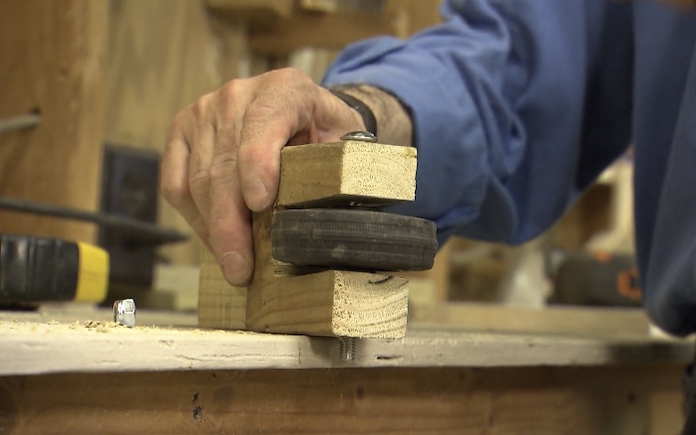
The caster is made from a simple two-by-four pressure-treated block. Here’s how to build it:
A wood scraper smooths the edges of the two-by-four so it rests neatly against the horizontal fence gate support board. (3 Echoes Content Studio)
Cut a notch in the back of the two-by-four pressure-treated board to create a shoulder so it rests under the horizontal rail of the gate.
Cut the notch wide enough for the caster wheel to roll without any blockage. (3 Echoes Content Studio)
Then, cut another notch in the bottom to hold the caster. Drill a hole through the notch for a coverage bolt to go through to secure the caster to the block.
The notch on the back of the two-by-four keeps the caster wheel from sticking too far out from the gate. (3 Echoes Content Studio)
Finally, secure the caster block to the horizontal support board with four two-inch long galvanized screws.
Now when the gate is open or closed, the caster, not the hinges, completely supports it.