Energy tax credits have been around for a while, but thanks to the Inflation Reduction Act, you can now save even more.
The new Energy Efficient Home Improvement Credit is available to homeowners in the United States as an incentive to encourage the use of renewable energy sources.
This credit can help offset the cost of installing clean energy systems in homes and businesses.
Starting in January 2023, eligible homes can use the high-efficiency tax credit for electrical panel upgrades and wiring. (BanksPhotos, Getty Images Signature)
Energy-Efficient Home Improvement Credit Breakdown
The Inflation Reduction Act increased the tax credit percentage for installing some energy-efficient equipment. For example, you can now receive 30 percent of the cost of installing insulation, energy-efficient windows and doors and more.
New energy tax credits cover part of the cost of home battery storage and electrical panel upgrades. Also new in 2023 is a tax credit for having a home energy audit.
Review the table below or go to whitehouse.gov/cleanenergy to see everything included in the new energy tax credits.
Using energy tax credits to purchase a heat pump is a smart way to save money on energy costs while helping reduce your carbon footprint. (jpproductions, Getty Images)
Products Eligible for Inflation Reduction Act Tax Credits
‘Clean’ electricity products
Solar panels for electricity from a provider in your area.
Home backup power battery storage with a capacity of 3 kWh or greater.
Heating, cooling, and water heating
Electric or natural gas heat pumps; electric or natural gas heat pump water heaters; central air conditioners; natural gas or propane or oil water heaters; natural gas or propane or oil furnaces or hot water boilers that meet or exceed the specific efficiency tiers established by the Consortium for Energy Efficiency.
Solar water heating products certified for performance by the Solar Rating Certification Corporation or a comparable entity endorsed by the state government in which the product is installed.
Other energy efficiency upgrades
(blackwaterimages, Getty Images Signature)
How to Claim Inflation Reduction Act Tax Credits
Homeowners who purchase energy and other efficient appliances and products can take advantage of these clean energy tax credits.
To claim them, homeowners must file their taxes using IRS Form 5695 and provide proof of the purchase, like invoices and receipts.
You can claim the same or varying credits year after year with new products purchased. However, some credits have an annual limit, so check the table above to make sure you don’t go over.
Additionally, these credits may have limits and expiration dates, so it’s best to check with the relevant tax authorities for the most updated information.
This week, hear how to replace rotten soffit and keep an old paint color from showing through. (LindaCharlton, Getty Images Signature/georgejportfolio, Canva)
Hour 1
Hear how to keep an old paint color from showing through, what to do about peeling paint on a bathtub and more.
Covering Old Paint Color
Proper prepwork and the right primer is key to making sure the old paint color won’t show through the new. (georgejportfolio, Canva)
A homeowner is trying to change the paint color in a room, but the old color keeps coming back.
“I have now put three coats of primer on the walls, and the old color is still shining through. Is there anything I can do to cover up that paint successfully?”
There are a few steps you can take to try to improve the coverage of the primer:
Sand the walls: Sanding the walls will create a rough surface for the primer to adhere to, which may improve its coverage. Be sure to wipe down the walls with a damp cloth to remove any dust after sanding.
Use a high-quality, high-adhesion primer: Some primers are specifically formulated to adhere to difficult surfaces, such as glossy paint or oil-based paint. Using a high-quality, high-adhesion primer may improve the coverage of the old paint.
Use bonding primer: Bonding primer, also known as adhesion primer or glue primer, is a type of primer that is specifically formulated to adhere to difficult surfaces. It is designed to bond to surfaces that are otherwise hard for paint to stick to, such as glossy paint, metal, or plastic. Be sure to allow each coat to dry thoroughly before applying the next.
Tint the primer: This type of primer has been mixed with a small amount of paint pigment to give it a slight color. Tinted primer can be used to help cover up dark colors or imperfections on a surface, or to improve the overall appearance of the finished paint job.
If the paint is still showing through, you may need to paint the walls a dark color to conceal the old paint.
Peeling Paint on a Tub
Cracking paint on a cast iron tub can be caused by a variety of factors, including age, wear and tear, and exposure to water and other elements. (Hemera Technologies, Photo Images)
The paint is peeling like crazy in a new homeowner’s bathtub.
She says, “It has been like this since they moved in, and we’re wondering if it’s okay to take it all off.”
It is generally not a good idea to remove all of the paint from a bathtub. If the paint is peeling, it is likely that the underlying layer is not well adhered to the tub surface, which could cause further peeling and damage.
One option is to remove loose and flaking paint using a scraper or wire brush. Then, sand the surface to create a rough, porous surface for the new paint to adhere to. The tub should then be thoroughly cleaned and dried before applying a new coat of paint.
If the paint is in poor condition and cannot be salvaged, remove all of the paint and start fresh. However, this can be a time-consuming and labor-intensive process. It’s also important to be aware that the underlying surface may not be in good condition.
Before beginning any work on the tub, it is important to protect yourself and the surrounding area. Wear protective gear and cover any nearby surfaces with drop cloths.
If you are not comfortable refinishing the tub on your own, you may want to consider hiring a professional to refinish the tub for you.
Hour 2
Listen to learn the pros and cons of tankless water heaters, how to repair rotten soffit, how to keep snow from getting into ridge vents and more.
Pros and Cons of Tankless Water Heaters
Tankless water heaters are much more compact than traditional tank water heaters, making them a good choice for small homes or apartments. (djedzura, Getty Images)
A homeowner is thinking about replacing his standard water heater with an electric tankless water heater and wants to know the pros and cons.
Pros of tankless water heaters:
They can provide an endless supply of hot water: Because tankless water heaters heat water on demand, you’ll never run out of hot water.
They’re more energy efficient: Tankless water heaters only heat water when you need it, so they’re more energy efficient than traditional tank water heaters. This can result in energy savings of up to 40 percent.
They have a longer lifespan: Tankless water heaters have a longer lifespan than traditional tank water heaters because they don’t have a tank that can rust or corrode.
They’re more compact: Tankless water heaters are much more compact than traditional tank water heaters, making them a good choice for small homes or apartments.
Cons of tankless water heaters:
They have a higher upfront cost: Tankless water heaters have a higher upfront cost than traditional tank water heaters. However, the energy savings over time can offset this initial investment.
They require more maintenance: Tankless water heaters require more frequent maintenance than traditional tank water heaters. This includes cleaning the burners and replacing the filter.
They may not be suitable for large households: Tankless water heaters may not be able to provide enough hot water for large households with multiple showers and appliances running simultaneously.
They may not be suitable for homes with low water pressure: Tankless water heaters require a certain minimum water flow rate to operate effectively. If your home has low water pressure, a tankless water heater may not be a good choice.
Replacing Rotten Soffits
Left unrepaired, a rotten soffit can lead to further damage to the roof and the structure of the house. (LindaCharlton, Getty Images Signature)
A homeowner’s soffits are bowing downward and rotting. He asks: “I’m not sure what to replace them with. What do you suggest?”
It sounds like you may have an issue with the structural integrity of your soffits. Bowing and rotting soffits can be a sign of water damage or poor ventilation. If the damage is extensive, it may be necessary to replace the soffits entirely.
There are several options for replacing soffits:
Wood: Wood is a traditional material for soffits, but it requires regular painting or staining to maintain its appearance. It can also rot or become infested with pests if not properly maintained.
Vinyl: Vinyl soffits are low maintenance and resist rotting, but they may become brittle over time and can be prone to cracking in extreme temperatures.
Aluminum: Aluminum soffits are durable and resist rust, but they can be prone to dents and may require periodic painting.
Fiber cement: Fiber cement soffits are a more expensive option, but they are extremely durable and resist rotting, warping, and insect infestations.
Preventing Snow from Entering Ridge Vents
A ridge vent is designed to allow hot air and moisture to escape from the attic, helping to regulate the temperature and humidity inside the home. (skhoward, Getty Images Signature)
Snow keeps getting into a homeowner’s attic space through the ridge vents every time there is a blizzard with strong winds.
He says, “There is enough snow that I have to use a shovel to remove it. Snow gathers on the beam under the ridge vent where light bulbs are affixed. How do I alleviate this problem?”
There are a few steps you can take to prevent snow from entering your attic through the ridge vents:
Install snow guards: Snow guards are devices that are installed on the roof to prevent snow and ice from sliding off and accumulating at the eaves.
Install heat cables: Heat cables, also known as roof de-icing cables, can be installed along the eaves and the ridge to prevent snow and ice from accumulating. The cables use electricity to generate heat, which melts the snow and ice on contact.
Install a snow fence: A snow fence is a physical barrier that is installed on the roof to block the wind and prevent snow from blowing into the attic through the ridge vents.
Insulate the attic: Proper insulation in the attic can help prevent snow from melting and refreezing at the eaves, which can cause ice dams.
It may also be helpful to have a professional inspect your roof to ensure that it is properly sealed and in good condition. If the snow is entering through gaps or openings in the roof, these issues will need to be addressed in order to prevent future snow accumulation in the attic.
Best New Products
Whether you need to store frozen foods, produce, or beverages, the Vissani convertible freezer/refrigerator can handle it all. Learn more >>
Simple Solutions
Whether you need to tighten or loosen nuts or bolts, here’s the Simple Solution. (3 Echoes Content Studio)
Wrong Size Wrench? No Problem! — What do you do when an open-end wrench is a bit too large for the nut or bolt you’re trying to loosen or tighten? This happens when working on a metric fastener and you’ve only got a standard-size wrench or visa versa.
Well, you may have heard of the trick of using metal washer or coin to fill the gap in the wrench. And while that does work — sometimes — here’s a better solution:
Place the too-large wrench onto the nut or bolt and then jam a slotted screwdriver into the gap between the fastener and wrench.
The wedge-shaped tip of the screwdriver tightens up the fit and really locks the wrench in place.
To easily clean a microwave, pour 1 cup of water and 1 cup of vinegar into a bowl. (3 Echoes Content Studio)
Steam Clean Your Microwave Oven — Here’s an easy, effortless way to clean the inside of your microwave oven:
Pour a 50/50 solution of water and white vinegar into a glass bowl.
Set the bowl in the oven and microwave on high for several minutes.
Carefully remove the bowl, then scrub the inside of the oven with a scouring sponge. The steam created by the water and vinegar will loosen even the most stubborn, caked-on stains.
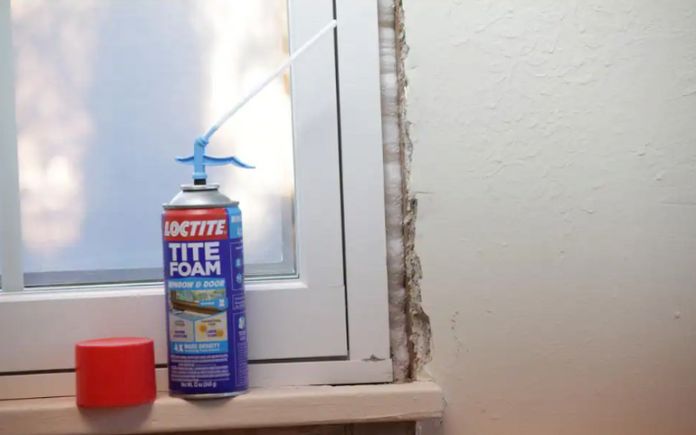
Drafty windows can be a major source of discomfort and can lead to higher energy bills. They let in cold air in the winter and hot air in the summer, making it difficult to maintain a comfortable temperature in the home.
The formula’s purified and concentrated ingredients ensure that the foam is durable enough to do its job for the long haul. It dries to a bright white finish that withstands UV rays and can be trimmed in 50 to 70 minutes.
Plus it sticks to almost any building material in your house, like wood, concrete, brick, stone, metal, PVC, and more.
2022 has been a year of incredible makeovers here at Today’s Homeowner. Here are our favorite before-and-after transformations from the past year.
This front porch now invites you to pull up a chair and enjoy the view. (3 Echoes Content Studio)
5. Front Porch Makeover
Mike and Leigh Ann have a beautiful piece of property that they share with their horses. But they felt like the front of their house lacked the visual appeal that the land it sits on deserved.
The walkway to it was incomplete and unattractive, while the front porch was a sea of dingy paint, stuck on the front of a white house. There was nothing to draw you in or make you feel welcome.
But now, the front porch is freshly painted, and even though we only added a little gray to the mix, there’s enough contrast to give the space some personality.
The rotten wood and peeling paint are gone, and so is the poorly poured sidewalk. In its place is a symmetrically arranged walkway of 12 stepping stones — made from Quikrete’s Walkmaker molds — that create a graceful transition to the porch steps.
The porch now invites you to pull up a chair and enjoy the view.
Large-format pavers make the patio seem larger than it actually is and the new fire pit is the ideal spot for entertaining. (3 Echoes Content Studio)
4. Two Patios are Better Than One
Jerry and Shay have a beautiful backyard with great shade trees and a lush lawn. But their old fire pit had seen better days and the existing patio offered few opportunities to enjoy the outdoor space. It was too small for entertaining and the monotone color palette lacked any real interest.
Now, the whole backyard has come alive with the addition of a big new patio that complements the shape of the trees while it enjoys its shade.
Large-format Pavestone pavers make the patio seem larger than it actually is and the new fire pit is the ideal spot for entertaining.
There are two large steps that create a graceful transition to the old patio, which has been revived with a new shade of stain and a bold color on the doors.
That same color on the storage shed plus some simple landscaping has transformed this yard into a spot you just can’t wait to enjoy.
Chelsea and Brandon’s bathroom is 65 years old. At that age, there’s some baggage — like the pink tub and the lack of ventilation.
The vanity was newer than that, but it really didn’t fit the style of the room and it lacked character.
But now, the bathroom is overflowing with character and grandmillennial style. The wraparound wallpaper not only creates the jewelry box feel that Chelsea was after; it also makes the pink tub look intentional.
The vent fan makes the space more functional, and the larger vanity makes it easier to use. Plus, its black finish complements the room style, and the new Fluidmaster bidet toilet seat elevates the whole room to a spa-like experience.
This bedroom has a clear purpose, which is to make guests feel right at home. (3 Echoes Content Studio)
2. Guest Bedroom Update
Corey and Grace’s extra bedroom was just that — it lacked any real identity. The hardware and paint color lifted by the previous homeowners didn’t make the welcoming statement they wanted for their guests.
But now, the guest bedroom has a clear purpose and that’s to make visitors feel right at home. The board and batten accent wall draws you into the space and the custom trim around the windows tells you they were intentional about making this room nice for you.
The floating shelves and nightstand are functional for short-term guests without taking up as much space as larger pieces of furniture. And the warm wood tones complement the cool green accent wall, just as the gold wall sconces do.
This breezeway has taken on the feel of a courtyard in a fancy hotel. (3 Echoes Content Studio)
1. A More Inviting Entrance
Delane’s breezeway is the main entrance to her home, but before, it had a very tired and haphazard feel to it. The random collection of different slabs on the floor left visitors with questions about what the space was supposed to be.
The sad empty planting bed made the house feel a lot older than it actually was. And the chain link fence made it feel more like a cage than a relaxing space.
But now, the whole space has taken on the feel of a courtyard in a fancy hotel. The consistency of the stencil floor ties everything together from the wrought iron gates to the lush green planting beds.
The door adds a pop of color while the fountain adds a cool visual element and a peaceful soundtrack for the space.
The simple curtain rod and the curtains frame the backyard and somehow make it all feel like a resort.
In this special Christmas episode, we’re playing back some of our favorite segments from the past year, as well as sharing some of our holiday traditions and memories.
How to Stack Firewood for Optimal Seasoning — Most people place firewood in one row, all the way across, and they work their way up with the same pattern. Now, there’s nothing particularly wrong with that method.
But if you want to know how to stack firewood so it’s as ready as it’s going to be for burning in your fireplace, then you’ll need to learn some new tricks.
You should stack the wood in alternating courses — that is, in opposite directions, row by row — and you continue that pattern. This way, there’s much more space for the air to circulate.