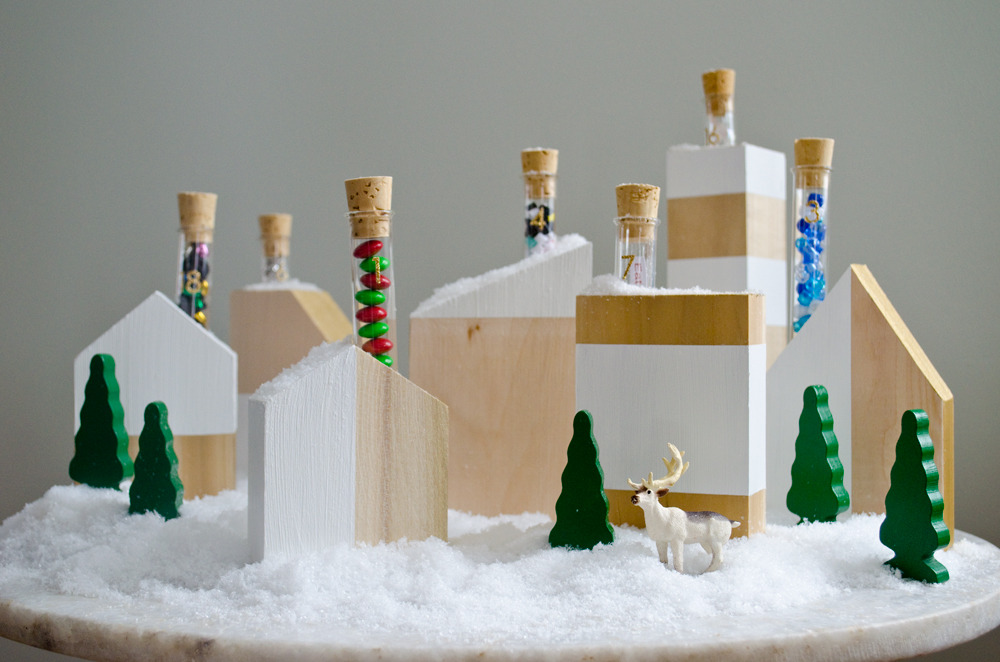
It’s advent calendar time! As I write this post, the Midwest is being walloped by a snow storm. Nothing inspires holiday decorating like many inches of snow, and to stave off decking all the halls, I created a little diy advent calendar village for our children. Read on for the full tutorial.
Using blocks of wood and test tubes, I assembled a village full of tiny treasures to help our family celebrate the season. The great thing about using test tubes is that it ensures each day’s surprise is small.
Creating your own diy advent calendar village is simple. We originally created 24 houses for this project, but the result was overwhelming, so we scaled back to a set of seven houses (to represent each week leading up to Christmas).
Cut your wood to size. Our houses ranged in size from 3.5″ to 6″ tall, and were about 2″ thick.
Drill your holes into the blocks of wood. We used a 3/4″ bit. It’s important to drill the holes before you create your angled roofs because it’s much easier to keep your holes plumb this way.
Cut angled roofs on your houses. I think it works best to create a variety of peaks, slants, angles. Because, you know, houses come in all shapes and sizes.
Lightly sand your houses.
Using painter’s tape, mark off the areas you’d like to paint on each house.
Paint your houses. We used white paint on the faces of the houses and gold paint on the rooftops.
Fill your test tubes and place them in their homes!
I used a variety of small treats to fill my tubes, and I’ll share some of my favorites with you because it was a challenge to find goodies small enough to fit inside a standard test tube.
What to put in your DIY advent calendar?
Edible Treats: Candy like M&Ms work well. Hot cocoa with marshmallows is another winner.
Crafts: I filled many tubes with beads and ribbons that came in $1 craft store sets. Some of these sets were too big to fit the test tube, so I placed only a part of them in the test tube (e.g. mini colored pencils).
Notes: In a few tubes, I placed a note indicating a special thing we’d do together as a family (e.g. “Bake cookies.”, “Wrap presents.”, “Take an evening drive to look at holiday lights.”). Notes are also a great way to incorporate a service component into your calendar (e.g. “Shop for gifts for children and donate them to Toys for Tots”). I filled the tubes containing notes with confetti to make them more festive.
The final result is a sweet village to help us count down the days until Christmas.
If you like this how-to, do us a favor and share it on Pinterest:
Thanks for helping us share this project on Pinterest!
Board and batten adds a geometric, layered look to both interior and exterior walls.
This siding and paneling style uses thin strips of wood — or battens — placed over the seams of wide boards.
You can mimic the look of board and batten on an accent wall without installing wide wood boards. Here’s how:
Because we wanted custom-sized battens, we had to cut them down from larger boards. (3 Echoes Content Studio)
For the battens, rip half-inch by 6-inch pine siding along its length to create battens that are about 2¾-inch wide.
We use the same wood for the baseboard but cut it slightly wider to match the existing baseboards. (3 Echoes Content Studio)
Use the same pine siding to frame the top and bottom of the wall. Cut the bottom piece slightly wider — at 3¼ inch — to match the height of the existing baseboards.
By using an oscillating saw, we don’t have to remove the baseboard to cut it. (3 Echoes Content Studio)
Use an oscillating saw to cut the baseboards on the adjacent walls back a half inch so the pine siding can slide in. Then, attach battens in each corner.
We’re spacing the battens 16 inches apart because that’s the typical spacing of wall studs. (3 Echoes Content Studio)
The remaining battens should be spaced on 16-inch centers. Before installing them, mark those dimensions on the wall with a pencil to be sure the spacing works before installing them.
Applying construction adhesive ensures the board will stay put in case the finishing nails don’t penetrate a stud. (3 Echoes Content Studio)
Since we can’t be sure we’ll hit studs with every batten, coat the back of each batten with construction adhesive before tacking them in place with 2-inch finish nails.
The ingeniously simple speed square is the most practical and useful hand tool for any carpenter or do-it-yourself.
Also called a rafter square, this multi-purpose triangular carpenters’ tool packs so many features into such a small tool that at first glance it might be confusing how to use it.
So, we’ve broken down its five uses for you:
Make accurate 90-degree or 45-degree cuts by lining up the saw with the edge of a speed square. (3 Echoes Content Studio)
1. Make accurate cuts. Because of its triangular shape, a speed square is great for making square crosscuts or 45-degree lines. Simply line up the edge to a board to cut the right angle every time.
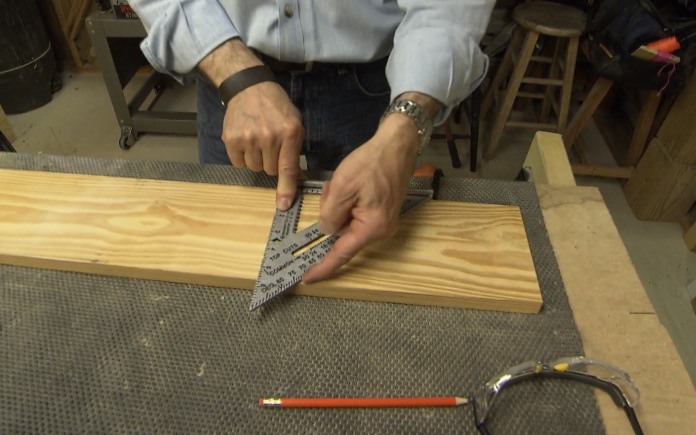
2. Mark angles. A speed square has a pivot point, so you hold it against the edge of the board and rotate it to mark any angle. For example, let’s say we want to mark a 30-degree angle. Simply hold the edge of the speed square against the edge of a board, then pivot it to line up with the 30-degree mark on the speed square.
Place a pencil in the quarter-inch notch, then slide the speed square along the board to draw a straight line. (3 Echoes Content Studio)
3. Use it as a scribing tool. Let’s say you want to make a parallel line one inch from the edge of a board. A speed square has quarter-inch notches on its inside, so you can put your pencil in the one-inch notch and slide it along the board. Then, you’ll have an even line one inch from the edge.
The diamond cutout is three and a half inches from the edge, the same width as a 2-by-4. (3 Echoes Content Studio)
4. Mark the width of 2-by-4.A speed square has a diamond cutout exactly three and a half inches to the edge of the square, which is exactly the width of a 2-by-4. So if you put your pencil in there and slide it along that line, this will is exactly the width of a two-by-four.
5. Use it as a saw guide. Probably the most useful and obviously practical application of a speed square is as a saw guide. Just take the square, hold it against the board’s edge and guide the saw right against the square. You’ll get a straight cut every time!
As a gardener and urban farmer you come to appreciate and treasure compost, or as I affectionately call it, “Black Gold”.
Composting itself is actually pretty easy and there are several methods and solutions. Whether you own a full-on farm, or live in a tiny apartment, there is no reason you can’t or shouldn’t be composting.
In a world obsessed with “greening,” it’s scary to think about how much food we throw away. A friend of mine started a small scale composting business last year by collecting food scraps from local restaurants and was able to save 111.3 tons of food waste from ending up in the dump and turned it into glorious, nitrogen rich compost. If that’s not motivation to start composting, I don’t know what is!
Here a few of the options available when composting.
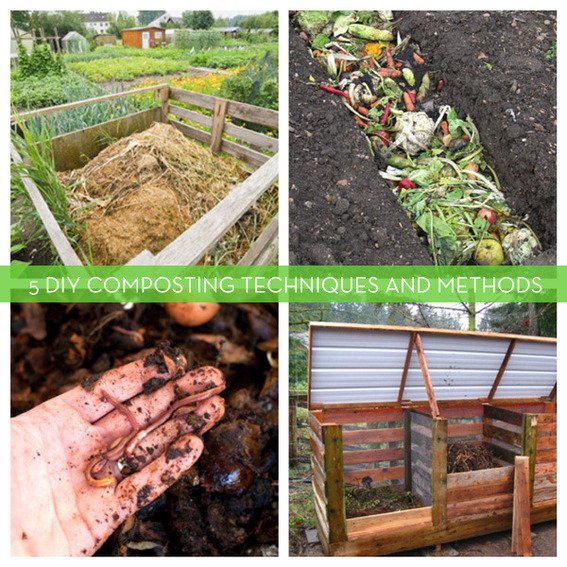
The most straightforward way of composting involves dedicating an area, usually 25 sq. ft or so to being a compost pit, any larger and it makes it pretty difficult to aerate. You start by adding layers of organic material, usually browns (old leaves, bark, etc) followed by greens (grass cuttings and vegetable scraps) topped by soil. Continue on building the layers until it’s around 4 to 5 ft high and then turn it every 2-3 days with a fork for the first month, keeping it moist, but not wet. After the first month taper off till you’re turning once or twice a month and in 3-4 months you’ll have a soil-ready compost, less if you decide to add a commercially available compost activator. See more at Nature Hacks.
Bin Composting
Also known as the “no turn” method. It’s similar to the layered method above, but the idea is you have three bins, you keep adding to the first until it’s full, then move to the next bin. While it’s the most effortless method, it’s also the longest and it can take as long as 3 years to decompose! See more at Backyard Feast
Quick Composting
If, like me, you don’t have three years to wait around you can combine the first two methods together, turning twice a week and making sure that the heap remains warm.
Trench Composting
Trenching, as discussed in our DIY garden beds post, trenching is a way of composting by digging a trench roughly 3-feet deep and filling it with compostable scraps, covering them with alternate layers of soil. Once completed leave them for 2-3months to break down and then plant your vegetables directly into the bed. See more at Good Life Garden
Worm Composting
Worm Composting, and vermicomposting yield nutrient-rich castings, and probably the most fertile soil of the above methods, the downside is that it’s not as scalable as the above methods, but perfect for small gardens and apartment dwellers. Red wriggler earthworms are used to break down kitchen scraps into these castings and nutrient-rich worm tea, which can be used as an organic fertilizer. The downside is that the worms don’t have a large appetite so you can’t feed them a lot of food at once, you should also avoid all types of citrus, meat, or onions when feeding them. The plus side is that it’s also one of the least odorous methods of composting and why it’s become popular with many apartment dwellers using it to clear off kitchen scraps.
We’ve rounded up one hundred IKEA hacks that prove you can have champagne tastes on a beer budget. Each of these hacks illustrates the power of transformation – basic warehouse pieces are cleverly altered in beautiful ways that make them feel custom. This round up has me feeling like Aladdin on a magic carpet ride – so come along with me! I can open your eyes, take you wonder by wonder, over, sideways and under on a magic IKEA hack ride. All hacks are listed in alphabetical order by their original IKEA birth name.
Note: we tried to find all of these and make sure they’re still available on IKEA.com. Some models have been discontinued, but you can usually find a similar item to substitute.