This week, we’re featuring some of the best segments that have aired over the past year on the Today’s Homeowner Radio Show. Listen to hear some of our favorite segments, as well as these Simple Solutions.
Simple Solutions
How to Condition Leather: Leather shoes, boots and furniture take a beating from moisture so it’s important to treat them with mink oil or leather conditioning cream.
The problem is that these substances are very thick and difficult to absorb into the leather.
The solution is to heat the leather with a blow dryer before rubbing in the conditioner.
The oil/cream liquefies as soon it hits the heated surface, which helps drive it deep into the leather grain.
How to Get the Most Out of Your Nail Apron: Here are three ways to improve the simple cloth nail apron.
When using a hammer holster, thread the apron string through the holster slot twice; that way, it won’t slide off the string every time you take off the apron.
Before tying off the apron strings, thread them through the belt loop on the back of your pants. That will keep the apron from slipping down.
Attach a key fob onto your utility knife so it’ll be easier to grasp and pull from the apron.
Best New Products
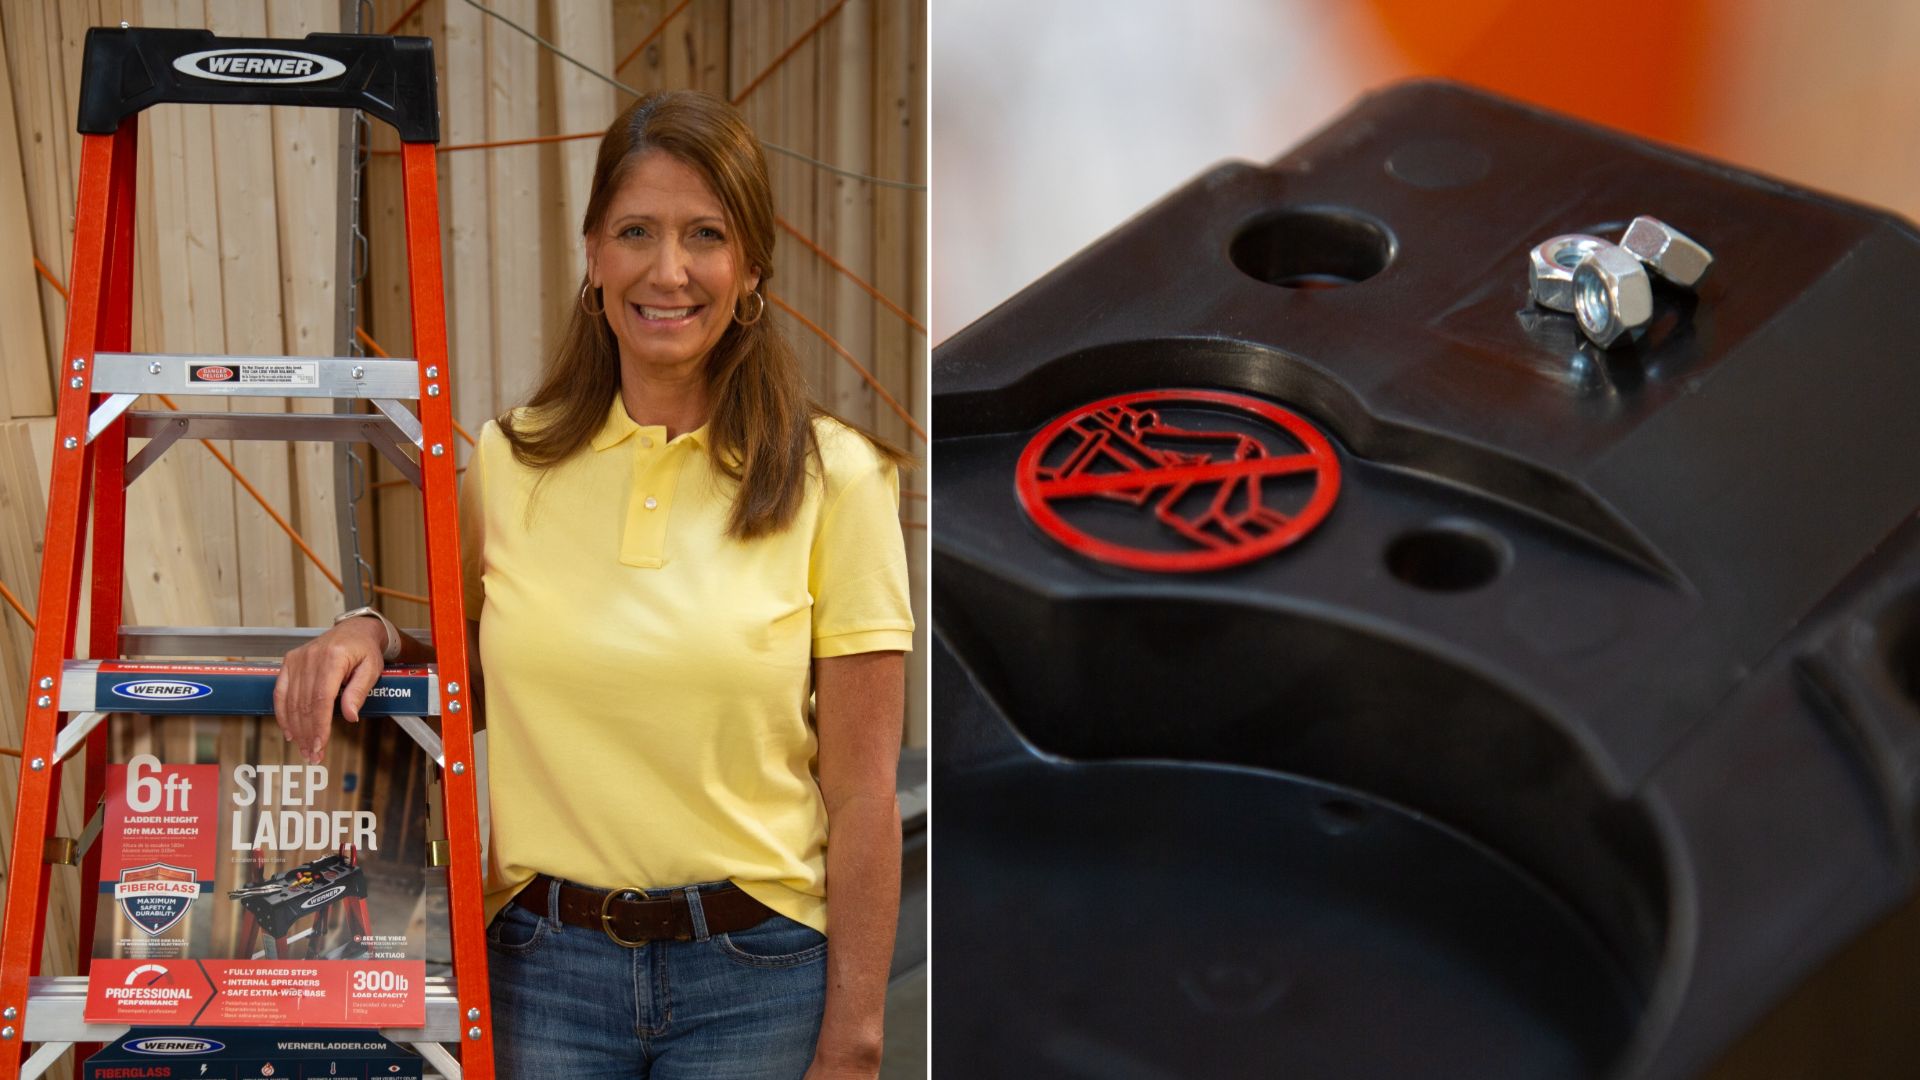
Never lose track of parts again! The Werner 6-ft. ladder features a magnetic tray, so nuts, bolts, screws and nails — anything metal — stay put. Learn more >>
Further Reading
Radio Show & Podcast: Send us your question!
If you have a comment, general question about home improvement, or something we’ve featured on Today’s Homeowner, please fill in this form:
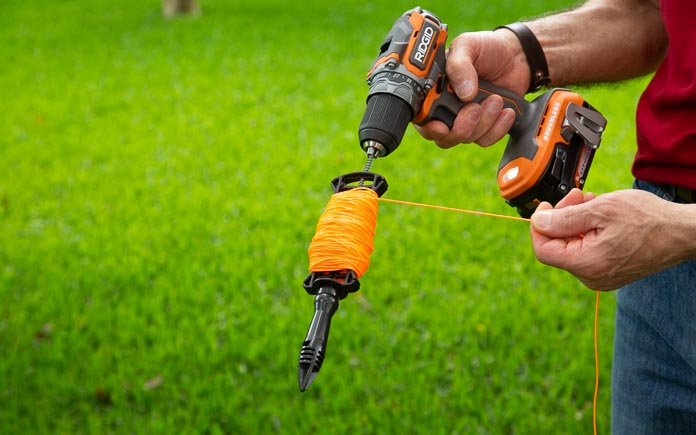
A spool of nylon string can be used for many things — general crafting, fishing and hunting, and laying mason lines.
When used for masonry, it’s one of the simplest quickest and most accurate ways to create a perfectly straight line.
That’s why a spool of nylon string is often sold as mason’s line — because brick masons use it to get nice straight brick walls.
The string is easy to unwind off the spool, but it’s not as easy to get back on after you’ve used it.
Winding it by hand back onto the spool can lead to tangles and uneven distribution. And eventually, you’ve got an unusable mess that you have to cut up.
Using a power drill to wrap nylon string around a spool will speed up the process and lessen the likelihood of tangles. (3 Echoes Content Studio)
Here’s a much better, and faster, solution:
Take a screw and drive it through the end of the plastic housing that the spool is on. Then, chuck it into a drill.
Turn on the drill to the lowest setting, and just like that, you can now use the power of the drill to put the line back on the spool.
It only takes a few seconds to wind the nylon string back onto the spool!
As you’re winding up the nylon string, slowly move it back and forth along the spool.
This way, you don’t overload one side or the other, and the string winds up neatly every time.
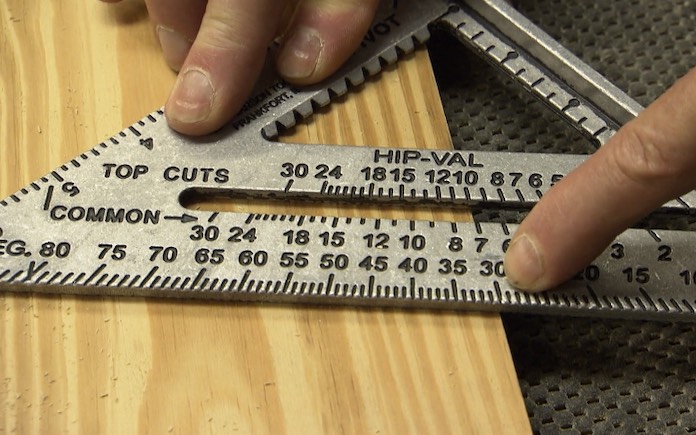
The ingeniously simple speed square is the most practical and useful hand tool for any carpenter or do-it-yourself.
Also called a rafter square, this multi-purpose triangular carpenters’ tool packs so many features into such a small tool that at first glance it might be confusing how to use it.
So, we’ve broken down its five uses for you:
Make accurate 90-degree or 45-degree cuts by lining up the saw with the edge of a speed square. (3 Echoes Content Studio)
1. Make accurate cuts. Because of its triangular shape, a speed square is great for making square crosscuts or 45-degree lines. Simply line up the edge to a board to cut the right angle every time.
2. Mark angles. A speed square has a pivot point, so you hold it against the edge of the board and rotate it to mark any angle. For example, let’s say we want to mark a 30-degree angle. Simply hold the edge of the speed square against the edge of a board, then pivot it to line up with the 30-degree mark on the speed square.
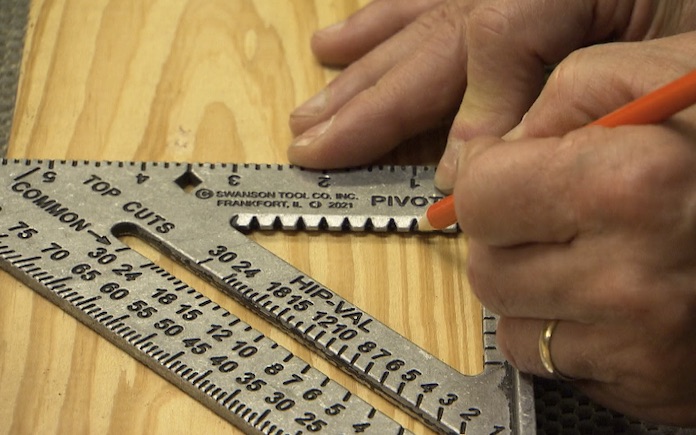
Place a pencil in the quarter-inch notch, then slide the speed square along the board to draw a straight line. (3 Echoes Content Studio)
3. Use it as a scribing tool. Let’s say you want to make a parallel line one inch from the edge of a board. A speed square has quarter-inch notches on its inside, so you can put your pencil in the one-inch notch and slide it along the board. Then, you’ll have an even line one inch from the edge.
The diamond cutout is three and a half inches from the edge, the same width as a 2-by-4. (3 Echoes Content Studio)
4. Mark the width of 2-by-4.A speed square has a diamond cutout exactly three and a half inches to the edge of the square, which is exactly the width of a 2-by-4. So if you put your pencil in there and slide it along that line, this will is exactly the width of a two-by-four.
5. Use it as a saw guide. Probably the most useful and obviously practical application of a speed square is as a saw guide. Just take the square, hold it against the board’s edge and guide the saw right against the square. You’ll get a straight cut every time!
No matter how well you build a wooden fence gate, they all share a common problem over time — the tendency to sag over time.
A sagging gate doesn’t just make your fence look old and unattractive — it’s also a hazard for children and pets.
Wide gates are no exception, and possibly are more susceptible to sagging. For example, this fence gate is five and a half feet wide, and I’ve tried everything over the years. I replaced the hinges with larger hinges. I installed the steel braces in each corner. Still, it didn’t work.
Instead of fighting gravity, prop the sagging gate up when it’s closed or open with a caster.
The caster is made from a simple two-by-four pressure-treated block. Here’s how to build it:
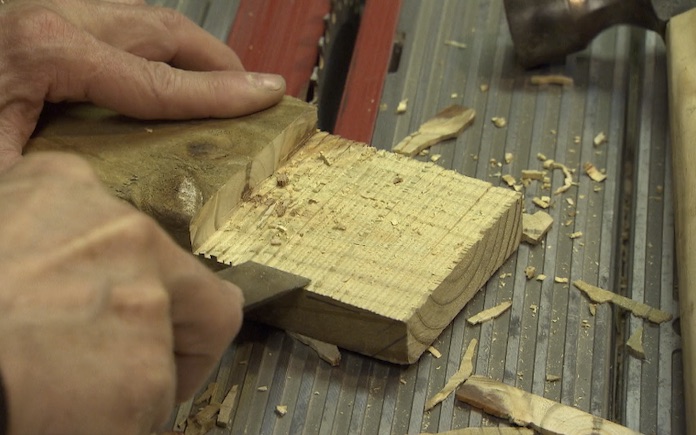
A wood scraper smooths the edges of the two-by-four so it rests neatly against the horizontal fence gate support board. (3 Echoes Content Studio)
Cut a notch in the back of the two-by-four pressure-treated board to create a shoulder so it rests under the horizontal rail of the gate.
Cut the notch wide enough for the caster wheel to roll without any blockage. (3 Echoes Content Studio)
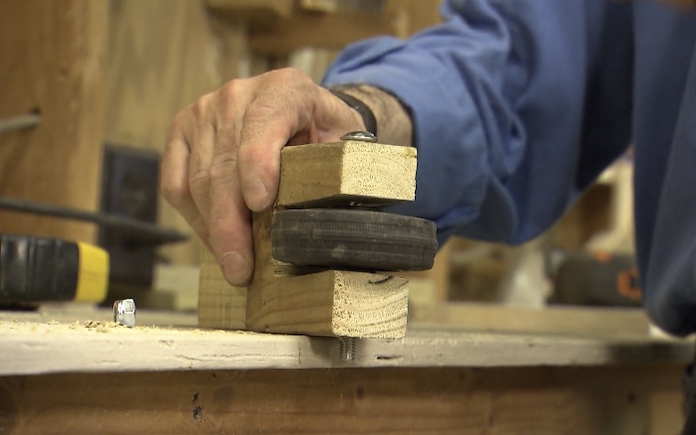
Then, cut another notch in the bottom to hold the caster. Drill a hole through the notch for a coverage bolt to go through to secure the caster to the block.
The notch on the back of the two-by-four keeps the caster wheel from sticking too far out from the gate. (3 Echoes Content Studio)
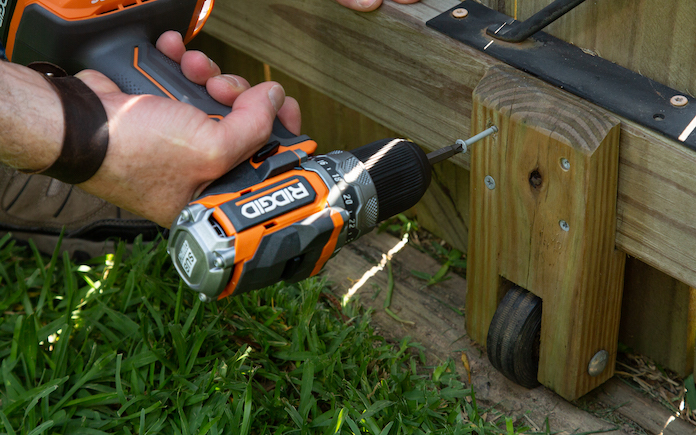
Finally, secure the caster block to the horizontal support board with four two-inch long galvanized screws.
Now when the gate is open or closed, the caster, not the hinges, completely supports it.
This week, Today’s Homeowner Radio Show co-host Joe Truini offers his Top 5 Simple Solutions for the bathroom.
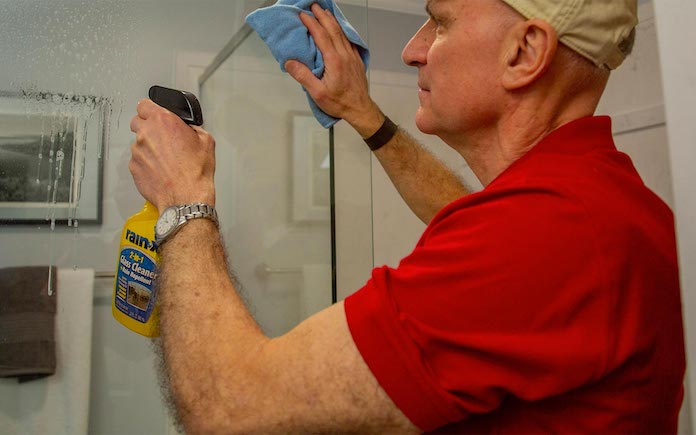
A glass cleaner that contains rain repellant will prevent water spots from appearing on shower doors. (3 Echoes Content Studio)
Water Spot Remover for Shower Doors
Does your glass shower door have water spots? They’re a pain to remove, and general cleaners simply can’t do the job. Well, here’s a secret water spot remover that you may already have without realizing it!
Nobody wants to wipe their shower door every time after they use it to prevent water spots. And let’s be honest — who has the time for that?
That’s why it helps to have the right tool for regular maintenance.
I like to use a glass cleaner with a formula that contains rain repellant — like this one. (This is an affiliate link. If you purchase this product, we will earn a small commission at no additional cost to you.)
This type of product is usually advertised for cleaning bugs and removing water spots from car or truck windshields, but that doesn’t mean it only works on these surfaces! So look in the automotive aisle if you can’t find the product near general cleaners.
Now, why does this product work over general household cleaners?
It’s because the rain-repellant formula causes water to bead up and repel off the shower door. That means your glass shower enclosure will have no water spots!
Here’s how it works: Simply spray the cleaner on the glass and use a towel to wipe it off — I always use a cotton microfiber towel.
Now you have an easy water spot remover! Not only is the glass clean, but it also repels water with no spotting.
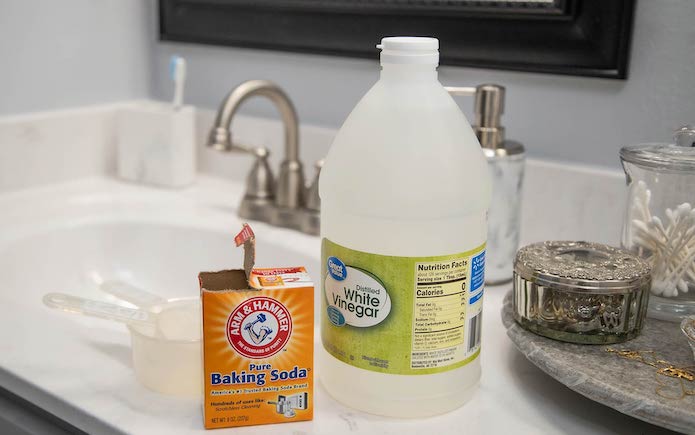
Baking soda and vinegar will deodorize and clean your sink without damaging the bath fixture. (3 Echoes Content Studio)
How to Clean and Deodorize Bath Sink
It’s not often you bring baking soda and vinegar into a bathroom, but you can use them to clean and deodorize a bathroom sink.
Sinks often become slow-draining, and they can get clogged up with soap scum and hair. They will also produce a pretty funky odor, so here’s how to get rid of that.
Start with one-third cup of baking soda. You don’t have to be too precise, but you will need to take about a third of a cup or so and dump it in the drain.
Next, take one full cup of vinegar. White vinegar is a really strong cleaning agent that you can use all over the house.
After it hits the baking soda, let it fizz down for a few minutes. Some people might use bleach here, but bleach can actually eat the finish right off of some bath fixtures, so you don’t want to use it.
After the baking soda and vinegar have calmed down a little bit, follow up with a full kettle of hot water. This will, in combination with the vinegar and the baking soda, cut through anything that might be clogging up the sink.
If you do this treatment once a month, you’ll have a really sweet-smelling sink and a free-flowing drain.
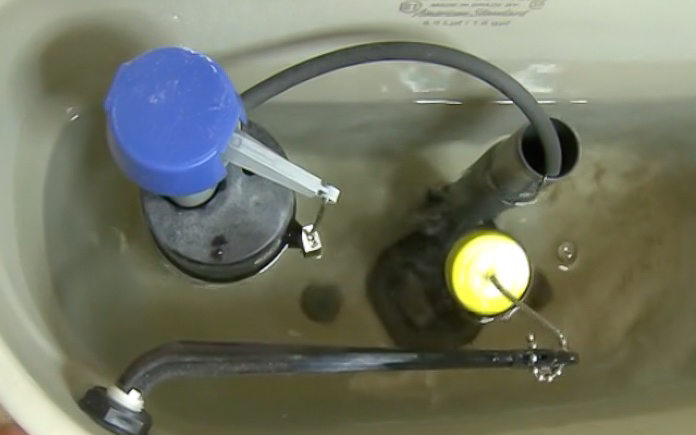
Flappers have two important jobs: They provide a seal for the toilet’s flush valve and control the volume of water released into the bowl. (3 Echoes Content Studio)
How to Replace a Toilet Flapper Valve
If you have a toilet that’s constantly running, the culprit is likely a leaky flapper valve. Over time, flapper valves may become cracked or warped, which can allow water to leak out.
Here’s how to replace it:
Turn the water off to your toilet.
Flush the water out so the tank is empty
Unhook the old flapper valve and snap on the new one.
Adjust the chain to make sure the length is correct.
Turn the water back on and flush the toilet a couple of times to make sure the flapper valve is working properly.
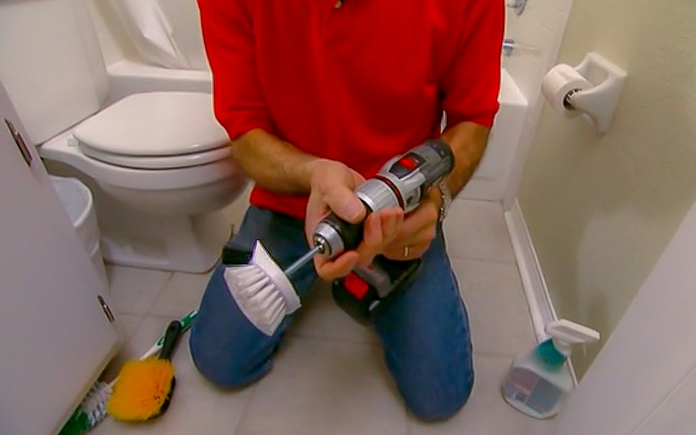
A homemade scrub brush drill attachment chucked into a drill is perfect for detailing tile floors. (3 Echoes Content Studio)
How to Power-Clean Bath Tiles
Scrub brushes work well for cleaning, but they require a lot of elbow grease. To convert a standard hand scrub brush into a power attachment for your drill:
Cut the handle off a round scrub brush.
Drill a hole in the middle of the brush.
Insert a 4-inch long machine bolt in the hole from the bristle side.
Put a washer and nut on the back side and tighten it up.
Chuck the bolt into a drill.
Run the drill at medium speed when using the scrub brush attachment.