Today’s Homeowner Radio Show Podcast | January 14, 2023

Today’s Homeowner Radio Show Podcast | January 14, 2023

Split image of a shattered glass stove cooktop and a pile of acorns in a yard
This week, learn why a glass cooktop can shatter and hear the easy way to remove acorns from your yard. (Adobe Stock/matzaball, Getty Images Signature)

Hour 1

Hear how much money you can save by installing luxury vinyl tile yourself, what to do about thermal expansion gaps in crown molding and more.

Save Big by Installing LVT Yourself

Man's arms installing luxury vinyl tile on a floor
Got a tight budget? You can save hundreds by installing luxury vinyl tile yourself. (3 Echoes Content Studio)

Luxury vinyl tile is a great option for homeowners looking for a durable, waterproof, and easy-to-clean flooring option.

Also, it’s one of the most affordable flooring options, making it a great choice for budget-conscious homeowners. Joe researched the costs and here’s what he found: 

Most people pay on average $1,400 to have 200 square feet of vinyl plank flooring installed. However, you can buy luxury vinyl for $2.50-$4 per square foot at The Home Depot.

So, if you install it yourself, it could only cost you between $500-800. That’s a saving, on average, of $600-900 over a professionally installed job!

You don’t need any special tools to install luxury vinyl tile. A box cutter is all it takes to cut the tiles.

The number one mistake people make when installing is cutting it tight against a wall. All floating floors require an expansion space — you’ll need anywhere from a quarter inch to half an inch. 

Run the luxury vinyl tile up to the baseboard and cover the gap with shoe molding. Just be sure to secure the shoe molding to the baseboard. 

Follow the directions exactly regarding any underlayment. Depending on the type you buy, the underlayment could already be attached. 

Watch: How to Easily Install Luxury Vinyl Tile


What to Do About Gaps in Crown Molding

View of a top corner of a wall with crown molding that has a gap from thermal expansion
Changes in humidity or temperature can cause gaps in crown molding. (Chris Vogler)

This is the first winter that Chris in Alabama has spent in his new home, and he’s seeing the effects of thermal expansion. Over the past months, he says significant gaps have shown up in the crown molding throughout the house.

“Should I ask my builder to correct the issue? If the gaps are filled will it cause the molding to buckle when it gets warmer?” he asks.

It’s amazing how much materials in a home expand and contract, and probably nowhere is it more evident than when you’re looking at crown molding.

These gaps will usually close on their own once warmer weather comes back around. If you have some gaps that are very pronounced, here’s what you can do:

  • Nail it in place: Use a nail gun to secure the crown molding to the wall.
  • Fill it with caulk: Instead of using traditional caulk, carefully apply an acrylic latex caulk. The trick is to barely feed it into the cracked area, so that when it does close back, it remains flexible. The gap will still appear but it won’t be as deep or as noticeable. 

Hour 2

Listen to learn the easy way to remove acorns from your yard, why a glass cooktop can shatter, what you need to do to cover terracotta tile and more.

Eliminating an Acorn Overload

Shot of hundreds of acorns on dead leaves
Removing acorns from your yard can be a tricky task, but with some patience and the right tools, you can get the job done. (matzaball, Getty Images Signature)

This is nuts! A homeowner says he has more than 250,000 acorns in his front yard.

“Besides raking, which I hate, how can I pick up the acorns? My self-propelled lawnmower doesn’t have the power to pick them up. Is there a piece of equipment suitable for the job?” he asks.

Here’s what you can use to remove from a yard:

  1. Leaf blower: A leaf blower can blow the acorns into a pile, making them easier to collect. Bonus tip: Use a tarp to contain the acorns while blowing them, making cleanup even easier!
  1. Lawn vacuum: A lawn vacuum can suck up acorns and remove them from the yard. These can be pricey, so see if you can rent one, or hire a landscaper who owns one to use in your yard. 

To eliminate this problem in the future, prevent the acorns from falling in the first place. If possible, remove the tree or prune it so that it does not produce as many acorns.

Some chemical treatments can prevent acorn production, but only a professional arborist should apply them.

Keep in mind — removing acorns can be time-consuming and you might need to repeat it as new acorns fall. Always wear safety gear to protect yourself from falling acorns and be aware of insects or critters in the acorns or hiding in the tree.


‘Why Did My Glass Cooktop Shatter?’

Dirty, Damaged Shattered Induction Stove/Glass Cooktop in Kitchen
A glass stovetop can shatter for several reasons, including sudden temperature changes, improper installation and manufacturing defects. (Adobe Stock)

A homeowner says the tempered glass on his gas cooktop suddenly shattered the other day, even though it wasn’t on and he didn’t drop anything onto it. 

“What would cause that to happen?” he asks.

Tempered glass is designed to be strong and durable, but it can shatter unexpectedly for several reasons. Some of the most common causes of tempered glass shattering include:

  • Improper installation: If the cooktop is not installed correctly, it can put stress on the glass and cause it to shatter. For instance, if the countertop is overlapping the cooktop, it could put some stress on the top, eventually causing it to shatter. 
  • Thermal stress: If the cooktop or the glass is exposed to rapid changes in temperature, such as from a hot pot being placed on a cold cooktop or vice versa, it can cause thermal stress and cause the glass to shatter.
  • Manufacturing defects: Sometimes, tempered glass can have manufacturing defects that make it more prone to shattering. If this is the case, report it to the manufacturer.

You can call a professional to replace the glass cooktop, but it might be expensive. Consider replacing it with a stove that doesn’t have a glass cooktop. 

To prevent a glass cooktop from shattering, follow these tips:

  • Don’t place a hot pot on a cold cooktop or turn the cooktop on high and immediately place a cold pot on it. This can cause thermal stress and can cause the glass to shatter.
  • Use cookware with flat bottoms to distribute heat evenly and prevent warping or bending.
  • Do not slide cookware across the cooktop, as it can scratch or chip the glass.
  • Do =n’t place heavy objects, such as cast iron pans or pressure cookers, on the cooktop as they can cause impact damage.
  • Clean the cooktop regularly with a mild detergent and a non-abrasive sponge or cloth to remove any dirt, grime or stains.
  • Use a stovetop cover to protect the cooktop from scratches or stains when not in use.
  • Do not overheat the cooktop, as it can cause the glass to overheat and shatter.
  • Always follow the manufacturer’s instructions for the care and use of your cooktop.

Covering Terracotta Tile

Terracotta tile on a kitchen floor
Terracotta tile can be cold to the touch, which may not be comfortable for some people, especially during the winter. (Michelle West)

A homeowner has terracotta tiles throughout her second-floor California condo.

“The surface is too hard, very uncomfortable!” she says. “Can we have more comfortable flooring installed on top? It seems like removal will be very expensive, disruptive and noisy.”

Because traditional terracotta flooring has such an irregular surface, you’ll want to apply a self-leveling underlayment to create a smooth, even surface for installing another type of flooring over it.

You might run into the problem of raising the floor height too much to where it can block appliances from opening or make them not level with your cabinets and counters. Check the height of the new flooring to make sure this won’t happen after you’ve installed it.

There are several options for covering terracotta tiles, including:

  1. Vinyl flooring: Vinyl flooring can be installed over the existing tiles and is durable and easy to clean.
  2. Engineered hardwood flooring: Engineered hardwood flooring can be installed over the existing tiles and provide a warm and natural look.
  3. Laminate flooring: Laminate flooring can also be installed over the existing tiles and is available in many styles and colors.
  4. Floating floor: A floating floor is a type of flooring that is not attached to the subfloor, this type of flooring can be installed over the terracotta tiles and can be made of different materials like laminate, engineered hardwood, or cork.

Consult with a professional flooring specialist to determine the best option for your specific situation.


Best New Products

Close up of a Milwaukee M12™ REDLITHIUM™ HIGH OUTPUT™ CP2.5 Battery Pack with a background image of a Milwaukee cordless drill Milwaukee’s new battery pack keeps tools powered for longer, so there’s less downtime during your projects. Learn more >>

Simple Solutions

Joe Truini siphons standing water from a bathroom sink with a water toy
Need to remove standing water from a clogged sink? This toy doubles as a siphon pump! (3 Echoes Content Studio)

Pool-Toy Plumbing Tool — Before repairing most plumbing clogs, you must first remove any standing water. Now, you could use a sponge or wet/dry vac, but here’s another option: take a kid’s water-squirting toy, commonly called a water blaster, and use it like a siphon pump. Simply place the nozzle of the toy into the water and draw back on the handle to suck up the water. Then you can squirt it into a bucket, toilet or tub. This is great for sink clogs, toilet clogs, or if you have a malfunctioning washing machine that has water standing in the tub. 

Watch: How to Remove Standing Water From a Clogged Sink

filtering paint with a window screen
Filtering paint through a window screen catches any impurities or particles. (3 Echoes Content Studio)

Paint Screen Saver — When using paint from a previously opened can, it’s best to pass the paint through a filter to screen out dried paint chips and other small bits of debris. You can buy disposable paint filters, but they’re flimsy, not reusable and the paint flows through much too slowly. Instead, use a piece of vinyl insect screening. Cut the screen about 12 or 14in. square, secure it to a new, clean paint can with three small spring clamps, and then pour the old paint through the screen. When done, rinse out the screen with a garden hose and save it for the next paint job.

Watch: How to Filter Paint Using a Window Screen


Further Reading


Radio Show & Podcast: Send us your question!

If you have a comment, general question about home improvement, or something we’ve featured on Today’s Homeowner, please fill in this form:

Today’s Homeowner Radio Show Podcast | January 7, 2023

Today’s Homeowner Radio Show Podcast | January 7, 2023

This week, hear how to replace rotten soffit and keep an old paint color from showing through. (LindaCharlton, Getty Images Signature/georgejportfolio, Canva)

Hour 1

Hear how to keep an old paint color from showing through, what to do about peeling paint on a bathtub and more.


Covering Old Paint Color

Paint roller painting blue paint over pink colored wall
Proper prepwork and the right primer is key to making sure the old paint color won’t show through the new. (georgejportfolio, Canva)

A homeowner is trying to change the paint color in a room, but the old color keeps coming back. 

“I have now put three coats of primer on the walls, and the old color is still shining through. Is there anything I can do to cover up that paint successfully?”

There are a few steps you can take to try to improve the coverage of the primer:

Sand the walls: Sanding the walls will create a rough surface for the primer to adhere to, which may improve its coverage. Be sure to wipe down the walls with a damp cloth to remove any dust after sanding.

Use a high-quality, high-adhesion primer: Some primers are specifically formulated to adhere to difficult surfaces, such as glossy paint or oil-based paint. Using a high-quality, high-adhesion primer may improve the coverage of the old paint.

Use bonding primer: Bonding primer, also known as adhesion primer or glue primer, is a type of primer that is specifically formulated to adhere to difficult surfaces. It is designed to bond to surfaces that are otherwise hard for paint to stick to, such as glossy paint, metal, or plastic. Be sure to allow each coat to dry thoroughly before applying the next.

Tint the primer: This type of primer has been mixed with a small amount of paint pigment to give it a slight color. Tinted primer can be used to help cover up dark colors or imperfections on a surface, or to improve the overall appearance of the finished paint job.

If the paint is still showing through, you may need to paint the walls a dark color to conceal the old paint.


Peeling Paint on a Tub

Dirty cast iron bathtub with paint cracking and peeling
Cracking paint on a cast iron tub can be caused by a variety of factors, including age, wear and tear, and exposure to water and other elements. (Hemera Technologies, Photo Images)

The paint is peeling like crazy in a new homeowner’s bathtub. 

She says, “It has been like this since they moved in, and we’re wondering if it’s okay to take it all off.”

It is generally not a good idea to remove all of the paint from a bathtub. If the paint is peeling, it is likely that the underlying layer is not well adhered to the tub surface, which could cause further peeling and damage.

One option is to remove loose and flaking paint using a scraper or wire brush. Then, sand the surface to create a rough, porous surface for the new paint to adhere to. The tub should then be thoroughly cleaned and dried before applying a new coat of paint.

If the paint is in poor condition and cannot be salvaged, remove all of the paint and start fresh. However, this can be a time-consuming and labor-intensive process. It’s also important to be aware that the underlying surface may not be in good condition.

Before beginning any work on the tub, it is important to protect yourself and the surrounding area. Wear protective gear and cover any nearby surfaces with drop cloths.

Read Painting a Bathtub? Here’s What You Need to Know for more information.

If you are not comfortable refinishing the tub on your own, you may want to consider hiring a professional to refinish the tub for you.


Hour 2

Listen to learn the pros and cons of tankless water heaters, how to repair rotten soffit, how to keep snow from getting into ridge vents and more.


Pros and Cons of Tankless Water Heaters

Modern gast water heater with temperature control knob
Tankless water heaters are much more compact than traditional tank water heaters, making them a good choice for small homes or apartments. (djedzura, Getty Images)

A homeowner is thinking about replacing his standard water heater with an electric tankless water heater and wants to know the pros and cons.

Pros of tankless water heaters:

  • They can provide an endless supply of hot water: Because tankless water heaters heat water on demand, you’ll never run out of hot water.
  • They’re more energy efficient: Tankless water heaters only heat water when you need it, so they’re more energy efficient than traditional tank water heaters. This can result in energy savings of up to 40 percent. 
  • They have a longer lifespan: Tankless water heaters have a longer lifespan than traditional tank water heaters because they don’t have a tank that can rust or corrode.
  • They’re more compact: Tankless water heaters are much more compact than traditional tank water heaters, making them a good choice for small homes or apartments.

Cons of tankless water heaters:

  • They have a higher upfront cost: Tankless water heaters have a higher upfront cost than traditional tank water heaters. However, the energy savings over time can offset this initial investment.
  • They require more maintenance: Tankless water heaters require more frequent maintenance than traditional tank water heaters. This includes cleaning the burners and replacing the filter.
  • They may not be suitable for large households: Tankless water heaters may not be able to provide enough hot water for large households with multiple showers and appliances running simultaneously.
  • They may not be suitable for homes with low water pressure: Tankless water heaters require a certain minimum water flow rate to operate effectively. If your home has low water pressure, a tankless water heater may not be a good choice.

Replacing Rotten Soffits

View of rotten soffit board and gutter on a home
Left unrepaired, a rotten soffit can lead to further damage to the roof and the structure of the house. (LindaCharlton, Getty Images Signature)

A homeowner’s soffits are bowing downward and rotting. He asks: “I’m not sure what to replace them with. What do you suggest?”

It sounds like you may have an issue with the structural integrity of your soffits. Bowing and rotting soffits can be a sign of water damage or poor ventilation. If the damage is extensive, it may be necessary to replace the soffits entirely.

There are several options for replacing soffits:

  • Wood: Wood is a traditional material for soffits, but it requires regular painting or staining to maintain its appearance. It can also rot or become infested with pests if not properly maintained.
  • Vinyl: Vinyl soffits are low maintenance and resist rotting, but they may become brittle over time and can be prone to cracking in extreme temperatures.
  • Aluminum: Aluminum soffits are durable and resist rust, but they can be prone to dents and may require periodic painting.
  • Fiber cement: Fiber cement soffits are a more expensive option, but they are extremely durable and resist rotting, warping, and insect infestations.

Preventing Snow from Entering Ridge Vents

Close up of a ridge vent and shingles on a roof
A ridge vent is designed to allow hot air and moisture to escape from the attic, helping to regulate the temperature and humidity inside the home. (skhoward, Getty Images Signature)

Snow keeps getting into a homeowner’s attic space through the ridge vents every time there is a blizzard with strong winds. 

He says, “There is enough snow that I have to use a shovel to remove it. Snow gathers on the beam under the ridge vent where light bulbs are affixed. How do I alleviate this problem?”

There are a few steps you can take to prevent snow from entering your attic through the ridge vents:

  • Install snow guards: Snow guards are devices that are installed on the roof to prevent snow and ice from sliding off and accumulating at the eaves.
  • Install heat cables: Heat cables, also known as roof de-icing cables, can be installed along the eaves and the ridge to prevent snow and ice from accumulating. The cables use electricity to generate heat, which melts the snow and ice on contact.
  • Install a snow fence: A snow fence is a physical barrier that is installed on the roof to block the wind and prevent snow from blowing into the attic through the ridge vents.
  • Insulate the attic: Proper insulation in the attic can help prevent snow from melting and refreezing at the eaves, which can cause ice dams.

It may also be helpful to have a professional inspect your roof to ensure that it is properly sealed and in good condition. If the snow is entering through gaps or openings in the roof, these issues will need to be addressed in order to prevent future snow accumulation in the attic.


Best New Products

Whether you need to store frozen foods, produce, or beverages, the Vissani convertible freezer/refrigerator can handle it all. Learn more >>

Simple Solutions

Joe Truini busts nuts loose with a wrench in his workshop.
Whether you need to tighten or loosen nuts or bolts, here’s the Simple Solution. (3 Echoes Content Studio)

Wrong Size Wrench? No Problem! — What do you do when an open-end wrench is a bit too large for the nut or bolt you’re trying to loosen or tighten? This happens when working on a metric fastener and you’ve only got a standard-size wrench or visa versa.

Well, you may have heard of the trick of using metal washer or coin to fill the gap in the wrench. And while that does work — sometimes — here’s a better solution:

Place the too-large wrench onto the nut or bolt and then jam a slotted screwdriver into the gap between the fastener and wrench.

The wedge-shaped tip of the screwdriver tightens up the fit and really locks the wrench in place. 

Watch: Do It! Hack Your Wrenches to Bust Nuts Loose

Cleaning microwave
To easily clean a microwave, pour 1 cup of water and 1 cup of vinegar into a bowl. (3 Echoes Content Studio)

Steam Clean Your Microwave Oven — Here’s an easy, effortless way to clean the inside of your microwave oven:

  • Pour a 50/50 solution of water and white vinegar into a glass bowl.
  • Set the bowl in the oven and microwave on high for several minutes.
  • Carefully remove the bowl, then scrub the inside of the oven with a scouring sponge. The steam created by the water and vinegar will loosen even the most stubborn, caked-on stains.

Watch: How to Steam-Clean Your Microwave in Minutes


Further Reading


Radio Show & Podcast: Send us your question!

If you have a comment, general question about home improvement, or something we’ve featured on Today’s Homeowner, please fill in this form:

This Foam Sealant is the Solution for Drafty Windows 

This Foam Sealant is the Solution for Drafty Windows 

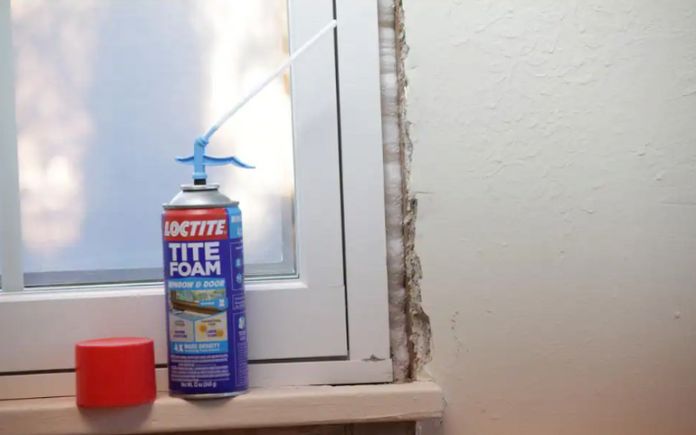
Loctite Tite Foam Sealant next to a drafty window
Loctite’s new Tite Foam Window and Door Insulating Spray Foam Sealant eliminates drafty windows and doors. (The Home Depot)

Drafty windows can be a major source of discomfort and can lead to higher energy bills. They let in cold air in the winter and hot air in the summer, making it difficult to maintain a comfortable temperature in the home.

Sealing around windows and doors is the best way to eliminate these drafts. Loctite’s new Tite Foam Window and Door Insulating Spray Foam Sealant is here to help. 


This page contains affiliate links. If you purchase a product from these links, we will earn a small commission at no additional cost to you.


Loctite Tite Foam Window and Door 12. Fl. oz. Insulating Spray Foam Sealant being applied to a door
Loctite’s Tite Foam Window and Door Insulating Spray Foam Sealant minimally expands to prevent warping door frames. (The Home Depot)

Protection Without Damage

Loctite’s Tite Foam Window and Door Insulating Spray Foam Sealant is a new generation of polyurethane-based insulating is a minimal-expanding foam with a low-pressure formula that is designed not to bow or warp window or door frames. 

It expands to fill gaps and cracks up to an inch wide, sealing out air to help save money on energy bills.

And, it solves more than just drafty windows and doors — it also keeps moisture and pests out of your home.


Loctite Window and Door 12. Fl. oz. Insulating Spray Foam Sealant applied to various building materials
Loctite TITE FOAM Window and Door Insulating Spray Foam Sealant bonds to most building materials like wood, concrete, brick, stone, metal, PVC, and more (The Home Depot)

Lasting Results

The formula’s purified and concentrated ingredients ensure that the foam is durable enough to do its job for the long haul. It dries to a bright white finish that withstands UV rays and can be trimmed in 50 to 70 minutes. 

Plus it sticks to almost any building material in your house, like wood, concrete, brick, stone, metal, PVC, and more.

Listen to learn all about this Best New Product!

Find Loctite TITE FOAM Window and Door Insulating Spray Foam Sealant at The Home Depot.


Further Reading

Ask Danny | Ep. 24: All About Whole-House Generator Installations

Ask Danny | Ep. 24: All About Whole-House Generator Installations

Today's Homeowner TV Host Danny Lipford and Batchelor's Service President Rick True

Winter storms have you worried about power outages? I’m chatting with Rick True, president of Batchelor’s Service in Mobile, Ala., an expert in whole-house generator installation.

Whole-house generator next to a home
A whole-house generator can keep your home comfortable in the event of a power outage. (Lex20, Getty Images Pro)

When did you get introduced to installing whole-house generators?

Rick: Back in the ‘80s, a buddy of mine who had a heating and air conditioning company in Birmingham, Ala., suggested to me selling generators. He said with the hurricanes we have in Mobile, Ala., it will be a great deal. 

He started selling generators because of the ice storms they have up there. Their power problems up there happen during the winter, and for us down here it’s during hurricane season. 

He sent a Generac salesman to me. At the time, Generac was the only company making home standby generators, and that’s how we got started. 

Man's hand flipping a breaker on a power box during a power outage
Aging infrastructure is leading to more and more power outages across the United States. (Guillermo Munt, Getty Images)

Infrastructure in the U.S. is aging. So, there’s a lot of opportunity for growth in the whole-house generator industry, right?

Rick: Yeah, there really is. Here’s something I learned from a manufacturer this past year when there was a real shortage of them — there’s a big demand for generators in California because of power phaseouts.

Out there, utility companies are shutting people’s power off for a couple of hours a day, so people are buying them so they can have continuous power. 

Read: Protect Your Home and Family During a Power Outage with a Generac Home Standby Generator

Split image of an open fridge with the light on and a water heater
Make sure your generator can provide power to your home’s essential appliances, like the refrigerator and water heater. (AndreyPapov, Getty Images Pro/JulNichols, Getty Images Signature)

How do you determine what size generator a home needs?

Rick: Now, all the manufacturers have an app or a calculator on their website where a homeowner can enter the square footage of their home, how many air conditioners they have, what type of dryer they have, all those kinds of questions.

The big thing is the number of 240-volt appliances you have in your home. That’s the real driver of the size requirement for a generator. Now with so many houses having LED lights, you can light a big house with not much kw of a generator. But when you start trying to run air conditioners, electric ovens and dryers, that’s when you start running up into bigger sizes.

The key things a homeowner should consider are electrical appliances that power on by themselves, like air conditioners and water heaters. If you don’t have those covered, it could trip the breaker on the generator, and then you’re out of power. 

Installation of a whole house generator at a home before hurricane season
Installing a whole-house generator can bring numerous benefits to your home, such as providing backup power to ensure your home isn’t left without electricity during a power outage. (JodiJacobson, Getty Images Signature)

A lot of people think you can only get a standby generator in a new-construction home. Do you do a lot of retrofits?

Rick: Probably 95 percent of our whole-house generator installation is on existing homes.

Before installing a whole-house generator in a home, our technicians must first assess a home’s electrical situation.

A lot of times, the electrical service needs to be upgraded before we can install the transfer switch. The transfer switch needs to go between the meter and the main panel for the house so it will transfer properly.

What do you suggest to homeowners for generator maintenance?

Rick: Most of our customers have a maintenance plan we provide for them. We change the oil, check the batteries and stuff like that. Just like you get your car tuned up a couple of times a year, that’s what we kinda do with a generator.

A liquid-cooled standby generator, the big ones that are 25 kw and above, are basically car engines. The air-cooled, the smaller ones, are like a riding lawn mower engine. They all need maintenance.

Some of our customers like to change the oil in their generators, but most people don’t feel comfortable doing that. 

What’s some advice you would give to a homeowner whose looking to buy a standby generator?

Rick: The brand you pick matters, but it’s no better than who’s going to be installing it for you. 

Research who will install it for you and make sure they have a licensed electrician to do their electrical work, and a licensed plumber to do the gas work. Find out the company has technicians that are certified by whatever manufacturer you choose. 


Further Reading

Sustainable Living: 5 Changes You Can Make Now at Home

Sustainable Living: 5 Changes You Can Make Now at Home

Sustainable living protects our ecosystem and preserves natural resources for future generations — and it improves the quality of our lives. 

Living “green” means being aware of how your actions affect the environment and those around you. Then, you can take everyday actions to improve outcomes.

This may sound like a tall order, but this lifestyle shift doesn’t need to be overwhelming. Here are some simple things you can do now to transform your home for sustainable living.

This post is sponsored by Owens Corning.


Rolls of Owens Corning PINK Next Gen Fiberglas Insulation inside a home that's under construction
Owens Corning PINK Next Gen Fiberglas Insulation has the highest recycled content in the industry. (Owens Corning)

1. Insulate Your Home

A key part of sustainable living is using only energy you need — that starts with insulating your home. Doing so will conserve energy, save you money and increase personal comfort. 

The North American Insulation Manufacturers Association estimates up to 90 percent of homes are underinsulated. So, your home probably could use more insulation! 

However, not all insulation is equal — or sustainable. Some companies use large amounts of non-renewable energy to produce their insulation, which has negative environmental impact. 

Owens Corning’s insulation is the first to be certified as made with 100-percent wind-powered electricity and reduced embodied carbon. 

“Embodied carbon refers to the carbon dioxide equivalent emitted throughout the product life-cycle, including raw material extraction, transportation, and manufacture,” the company’s website states. 

In addition to being sustainably produced and soft as cotton, it’s made with natural materials. Owens Corning PINK Next Gen Fiberglas Insulation has the highest recycled content in the industry. 

PINK Next Gen Fiberglas batts come in pre-cut lengths to save time, making them ideal for framed cavities. The batts are extra stiff, so they slide in easily and resist slumping in areas like walls. And if you need to make cuts, they split cleanly. 

To learn more, read, “This Fiberglass Insulation Offers Clean, Fast, Precise Installation.”  

After installing insulation in the attic and crawlspace, you need to prevent inside air from escaping, and outside air from getting in — here’s how to eliminate cracks and gaps: 

  • Caulk around windows and doors. Homes expand and contract due to humidity changes, so you should do this each summer and winter.
  • Check each entry door’s threshold for damage and replace a failing rubber seal — or the entire threshold — as needed.
  • Check for gaps between the threshold and the door and install door sweeps as needed. Some door sweeps attach to the bottom of the door; others are mounted inside the door.

You also can insulate electrical outlets, install or replace weatherstripping in windows and doors, and cover window air conditioners for a weather-tight seal.


Various items placed on a table and chairs outside a home for a garage sale
Garage sales are a great place to find like-new furnishings for your home. (shironosov, Getty Images)

2. Reduce, Reuse and Recycle

Living sustainably is all about keeping as much out of the landfill as you can. To do that, start with the 3 Rs — reduce, reuse, recycle.

Reduce: Ditch bottled water and install a home water filter to save money, have healthier drinking water, and help the environment. Eliminating bottled water consumption cuts down its carbon footprint left from transportation to stores and discarded plastic bottles.

Reuse: Furnishing your home? Avoid fast furniture! Like fast fashion, these furniture pieces are mass-produced and relatively inexpensive, so they’re easy to obtain and then abandon. Instead, look for second-hand furniture at online marketplaces, thrift stores and yard sales. 

Recycle: Buying new items for your home? Look for the post-consumer label. This means the product is made from recycled materials. You might be surprised at how many things are made from post-consumer recyclables — fences, playground equipment, carpet, and even roofing shingles can be created from garbage.

But to get to that post-consumer point, people need to make the simple decision to recycle at home. Hang these recycling bins on your garage wall so they’re not only out of the way but also in plain sight so you won’t forget this important step!


Electrical power strip with black cords plugged in on a wood floor
To keep electronics from using energy when they’re not in use, plug them into a power strip that you can turn on and off. (DonNichols, Getty Images Signature)

3. Unplug Devices Not in Use

Just because an electronic device is turned off doesn’t mean it’s using no power. 

Energy vampires are electronic items that suck up electricity when not in use (phantom power) — adding at least 10 percent to your monthly utility bill, according to the U.S. Department of Energy.

If you have a light switch that can turn outlets off and on, plug your biggest electronic items (such as TVs and computers) into these switch-controlled outlets, and simply flip the switch when you no longer need the device. 

Alternatively, plug media devices — some of the worst energy-sucking offenders — into a power strip and, again, control their power use with a switch.   

If neither is an option, avoid leaving your TV or computer idle; power off the flat screen and put the laptop in sleep or hibernate mode. Or simply unplug devices you’re not currently using.


Solar panels on a tile roof of a suburban home.
Solar power panels can provide electricity and heat your home’s water. (zstockphotos)

4. Use Renewable Energy Sources

Reducing dependence on non-renewable fuels is at the core of sustainable living, and there’s no better renewable energy source than the sun. 

Solar technologies convert sunlight into electrical energy through photovoltaic panels or mirrors that concentrate solar radiation, according to energy.gov. Integrating solar power into your home can be as simple as installing a single panel and battery system or as robust as having a full array of panels powering your entire home.

Solar power can provide electricity for air conditioning, lighting and appliances, and it has virtually no environmental footprint. You can also use solar power to heat your home’s water. 

Solar water-heating systems likey won’t provide all the hot water you may need, but for most folks, it can cover 50-80 percent of your hot water needs. Although these systems use some energy, the cost to operate them is only about 10 percent of a conventional water heating system.

Not ready to commit to these big-ticket solar-powered items? Start small with solar lighting to illuminate your landscape and — bonus — deter intruders from coming near your home.


A 'Little Free Library' set up in a neighborhood
A Little Free Library can foster a sense of community and promote education and literacy. (Scott Fields, Getty Images)

5. Share and Share Alike 

Sustainable living isn’t just about the environment. The three pillars of sustainability are environmental, economic and social, and one of the social goals is to educate your community. 

You can share knowledge with neighbors by passing along books you’ve read. Little Free Library, a nonprofit organization, promotes literacy, creativity and community through book exchanges.

The signature bookcase — resembling a small building — makes a Little Free Library instantly recognizable. It’s usually made of wood, mounted on a post, and has a door with a window to protect books from the elements.

Another way to share with your community is to grow a community or victory garden. Conventional food distribution with long-distance transportation to grocery stores exhausts energy and human resources. 

By growing produce, you can reduce the demand for commercially grown vegetables. Plus, if you grow enough, your can share your surplus harvest with neighbors and reduce food waste. 


These are just a few lifestyle changes you can make to live more sustainably. Find more information and tools to help reduce your impact on the environment on the EPA’s Greener Living website.


Further Reading