Choosing Grout Colors: How to Find The Best Color For Your Tile

Choosing Grout Colors: How to Find The Best Color For Your Tile

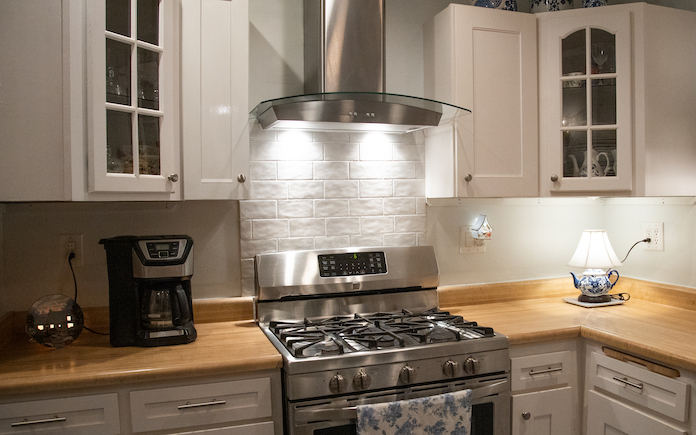
Kitchen stove and range hood with white tile backsplash
Light grout color makes this kitchen tile backsplash blend in seamlessly with the surrounding wall. (3 Echoes Content Studio)

With so many grout colors available, choosing the best one for your project can be challenging. 

This post is sponsored by Custom Building Products.

Aesthetically speaking, one of the most important decisions when choosing grout is whether it will blend with or stand out from the tile.

Light grout between light tiles can make your installation look like a single uniform piece — ideal for minimalist design. On the other hand, contrasting dark grout with light tiles makes a bold statement.  

To pick grout color based on the impact you want your finished design to have, consider the following:

In This Article


Multi-colored accent tile in white subway tile
Choose grout color based on the tiles’ style and design. (MultimediaDean/Getty Images)

Tile Design

Consider the tile’s characteristics and appearance. Then, answer these questions to ensure a successful installation: 

  • Are the tiles patterned or do they have a solid color? With patterned tile, pick a grout color that best matches the tile edges so the pattern isn’t interrupted.
  • Are they natural stone or manufactured ceramic? For more contrast with natural stone tile, pick a darker color to highlight the dark veins.
  • If it is glass tile, is it transparent or opaque? White grout accentuates clear, iridescent and translucent glass tile.
  • Are there mosaic sheets or accents, and do they contain differently-colored tiles? Pick a neutral grout that works well with all the colors, or try a grout that’s light or dark enough for contrast.

Once you’ve answered these questions, it will be easier to determine which grout color will best suit the project.


Intricate kitchen backsplash with small and large tiles behind stove
When picking grout color for a backsplash, consider coordinating the color with the countertops. (TimAbramowitz, Getty Images Signature)

Room Colors

Look beyond the colors in the tile for grout color inspiration. Consider the walls, surfaces or fixtures, and use color theory to find a grout color based on those.

Maryville University describes color theory as the art of combining colors based on the color wheel to create harmonious color schemes.

Color wheel display graphic
Complementary colors are found opposite each other on the color wheel. (Adobe Stock)

The color wheel is an arrangement of all colors on the spectrum based on their relationships. To choose a grout color, use the wheel to create a color palette and find a complementary color. 

Complementary colors are opposite each other on the color wheel. They enhance each other’s intensity when placed right next to each other, which is why they’re often used to create bold, high-contrast images that pop.

So, for instance, if your room is blue, choose a grout color with orange or yellow hues. Or if your room has shades of green, find a grout that has hints of mauve. 


Black gloved hand with brush cleaning grout on tile
Dirt and spills are more noticeable on lighter-colored grout. (makasanaphoto, Canva)

Cleaning and Maintenance

Grout color can also have a major impact on tile installation and maintenance.

A lighter-colored grout can be easier to clean off the surface of tile during installation but is more difficult to maintain in high-traffic areas. 

Dirt and spills are more noticeable, though a good sealer and cleaner can help to maintain the look of the original installation. 

Darker grouts, meanwhile, may be more challenging to clean and are more noticeable on the surface of porous tile. Pre-sealing the tile can help eliminate this issue. 

Once installed, darker grout does not show wear, dirt or damage as easily. In commercial kitchens, darker grout accents tiles and reduces the appearance of stains.


Custom Building Products Fusion Pro Grout bucket on tile during installation
Fusion Pro Grout from Custom Building Products is stain resistant — no sealing is required. (3 Echoes Content Studio)

Custom Building Products Grout Selection

Once you choose a color, the next important decision is what type of grout to use. 

Custom Building Products’ designer-inspired palette of grout colors provides 40 of the most popular shades.

Whether your installation requires a subtle color that matches the tile or a striking shade that accents your installation’s beauty, you can find the perfect grout with the performance characteristics that you need.

Grout Types

  • Fusion Pro Single Component Grout is a professional-grade sanded grout that features stain resistance with no sealing required. You don’t need to mix any other components to this grout, so it’s ready to use and easy to spread and clean. Fusion Pro can be installed in commercial and residential environments, interiors and exteriors, and on walls, floors and shower floors. Its patented formulation can be applied on all tiles and has built-in Microban antimicrobial product protection.
  • Prism Ultimate Performance Grout: Prism’s calcium Aluminate cement-based, latex polymer-modified formula offers consistent color with no shading regardless of tile type, temperature or humidity, and it will not effloresce. The rapid-setting formula results in high early strength and dense grout joints up to a half-inch. A unique blend of lightweight recycled glass and fine aggregate sand allows for a smooth consistency that is easy to spread and clean.
  • Polyblend Plus Sanded is a polymer-modified, cement-based sanded grout that produces hard, dense joints that resist shrinking, cracking, and wear. Formulated for durability, Polyblend Plus Sanded Grout accommodates 1/8- to 1/2-inch joints for interior or exterior installations, including floors, countertops, walls, ceilings, showers, fountains, and pools.
  • Polyblend Plus Non-Sanded is a polymer-modified, cement-based unsanded grout designed for highly glazed or polished tile, marble and natural stone that sanded grouts would scratch. This durable, non-shrinking grout accommodates joints up to 1/8-inch and can be used for interior or exterior installations, including floors, countertops, walls, ceilings, showers, fountains and pools.
  • SimpleGrout Pre-Mixed Grout is no-mix, no-mess alternative to traditional grout. This sanded, shrink- and crack-resistant formula also resists common household stains. SimpleGrout is easy to use, ideal for grout restoration and is available in eight colors.

Two woman spread grout on a subway tile backsplash behind a stove
Grout color may change slightly once it’s cured. (3 Echoes Content Studio)

Grout Color and Installation

No matter which grout you choose, always mix it according to the manufacturer’s instructions, if required. Improperly mixing the grout can lead to uneven color pigment distribution, which causes blotchy and inconsistently colored grout lines. 

You don’t have to mix single-component grouts like Fusion Pro and premixed grouts like SimpleGrout; the color is already evenly distributed.

Find a caulk that matches the color of your grout for use on movement joints and changes of plane like Custom’s Commercial 100% Silicone Caulk. It’s easier to match grout colors when selecting both products from the same manufacturer, as the manufacturer will have designed the products to have the same hue.

Grout usually takes several days to cure and set, so if you’re concerned about color right after installation, give it time to get its final color. 

Similarly, the color of the powder before installation and curing is different from the color of the finished plaster treated. Slight variations may occur based on mixing methods and drying conditions.


Further Reading

Today’s Homeowner Radio Podcast | September 3, 2022

Today’s Homeowner Radio Podcast | September 3, 2022

(MaryTDebs, Getty Images/pixelshot)

Hour 1

In Hour 1, learn how to extend your washing machine’s lifespan, remove white stains from brick, drain standing water from your yard and more.


How to Make Your Washer Last Longer

Washing Machine
Regular maintenance can keep your washer running longer.(stevepb/pixabay)

The average lifespan of a washing machine is only 10-15 years — about the same as a goldfish!

Here are some tips from Consumer Reports to make your washing machine last as long as possible:

  • Make sure it’s level and it stays level. Your washing machine’s drum can spin very fast, and all that vibration can wear out parts and loosen fasteners. Use a level and adjust the feet. Check it once a year to make sure it’s level. Vibration can knock it off level.
  • Don’t overdo the detergent. Too much detergent can make the washer work harder and sometimes trigger an extra rinse cycle, which extends the wash time, wastes energy, and ultimately reduces the washer’s lifespan.
  • Clean the dispenser drawer. Clean it on a regular basis. Detergent can build up in there and create extra suds, again making the washer work harder. 
  • Inspect the water hoses. If you have rubber lines, replace them with braided stainless steel. 

Removing White Stains From Brick

White stains around a stucco window on a brick home
There are multiple ways to remove these stucco stains from this brick home. (Tim Patton)

Tim Patton’s 25-year-old home in Alabama has a brick facade with white stucco wraps around the front windows. Over the years the white from the stucco has gradually stained the red brick below & around the windows. 

Power washing has not removed the white stain. He asks, “Can you recommend a product and method for removing the white stain from the brick?”

Bricks that are not sealed are very porous, so stains tend to stick on them forever. 

First, try scrubbing the spots with TSP or CLR, Calcium, Lime Rust Remover. Be sure to test it in a small spot first. 

If those don’t work, upgrade to a brick and stone cleaner like Rutland Brick & Stone Cleaner. Spray it on and scrub it with a soft-bristle brush.

If all these fail, you need to try an acid-based cleaner. Instead of using highly-corrosive muriatic acid, try Miracle Sealants Heavy-Duty Acidic Cleaner

Once you do remove the stains, seal the bricks and apply a couple of coats of paint to the stucco to lessen the likelihood of any further staining. This will keep the stucco cleaner and prevent it from depositing any residue. 


Solution for Standing Water

Standing water in a yard
Standing water can be a breeding ground for bugs. (MarieTDebs, Getty Images)

Jimmy Crocket built his house in Missouri three years ago, and beautifully landscaped his yard, However, he didn’t realize that when it rains, the water from his next-door neighbor’s yard drains into his, creating almost a pond around one of his planters. 

He asks, “How do I drain standing water that drains into my yard from my neighbor’s yard?”

If you have a lot of surface water and water that piles up all at once, a lot of time French drains won’t take care of that sufficiently and you need some type of surface drain. 

Install a trench drain system with some fiberglass basins. Direct them to the closest place gravity-wise that you can move the water. You can paint the basins to match your landscaping so they won’t be as noticeable. 

I have a similar problem at my home, and I’m doing a combination of a French drain and trench drain to catch the surface water and also get down lower with the trench. I’ll dig it about 16 inches wide and 16 inches deep, fill it with gravel, and place a perforated pipe with a membrane around it (sock pipe) so it doesn’t fill up. And on top of that will be the trench drain.

That way, the water will drop into that pipe and move underground to another area. 

Go to the tool rental center and get a Ditch Witch or a termite machine (miniature backhoe) to help you dig the trenches. Lay a piece of plastic down to place the dirt onto so clearing it off the grass is easier once you’re done. 

As always, call 811 before you dig in your yard. 


Hour 2

In Hour 2, hear tips for removing a tub from a bathroom, an easy fix for a desilvering mirror, and more.


Removing a Tub From a Bathroom

In most remodels, a tub can’t be removed in one piece. (Garrett Aitken, Getty Images Pro)

A caller is getting ready to remodel her bathroom, and taking the bathtub out is going to be a problem. She’s not sure if it’s a cast-iron or an enameled-steel tub. I was wondering if we needed to saw it in two or what we should do. Thanks

One way you can tell if a tub is iron or steel is to give it a good thump on the inside wall. If it sounds like a steel drum, then it’s steel. A cast iron will sound like a thud because it’s thick and hard. 

For some of the thin metal tubs, you’re able to break out around the top flange and disconnect the drain and work that out of there. But in so many bathrooms, there’s not enough room to tilt them up without tearing out a wall.

It’s hard to get a tub in and it’s hard to get a tub out, so breaking it up will make removing it a lot easier. 

You can use a reciprocating saw with a metal blade to cut the tub in half. Many times with cast iron tubs, it’s basically just putting on a face shield and long-sleeve shirt and going at it with a sledgehammer. Once it starts to break in the center, then you can more easily break it up into small pieces. 

Before you take the sledgehammer to it, cover it with a quilted moving pad so shards don’t fly everywhere. First hit the middle on the outside then work your way up to the top then toward the inside. You’re creating a crack up and over down the middle, and you might be able to get it out in two big pieces. 


Fix for a Desilvering Mirror

Rough edges around a mirror can be distracting. Hide them with some trim. (3 Echoes Content Studio)

Karen Dewing in Florida has three wall-sized mirrors in her master bath that have lost some of the “mirroring” close to the edges. 

She asks, “Is there any way to repair or cover these areas? The damaged spots are about 1-by-3 inches long, and I’d hate to have to replace such large mirrors just for some small areas around the outside.”

Desilvering is usually a result of moisture seeping in around the edges and causing the mirror reflection to flake off.

Use construction adhesive to attach prepainted trim boards around the mirrors to create a picture frame. This gives it a great look while also concealing the desilvering spots. Give a little more life out of those mirrors.

The silver backing doesn’t last forever. The older the mirror is the more likely it will happen. You’ll also get some spotting and 

Although you’re reducing the mirror space, it’s still a better solution than removing the mirror and replacing it. 


Best New Products

Coolaroo Wheel-Operated Light Filtering PVC Exterior Shade roll up outdoor blinds for patio Coolaroo’s cordless outdoor roll-up blinds for your patio are the safe solution for providing shade. Learn more >>

Simple Solutions

Hands using a screwdriver to adjust a door hinge
Most modern cabinet doors have self-closing hinges, but over time, the small leaf spring inside the hinge can break, and then the door won’t stay closed. (Kurhan, Getty Images)

Quick Fix for a Broken Self-Closing Hinge — Most modern cabinet doors have self-closing hinges. But over time, the small leaf spring inside the hinge can break, and then the door won’t stay closed.

Here’s a quick fix:

  • Hold the door closed with an inexpensive roller catch.
  • Mount the roller mechanism inside the cabinet and attach the latch to the door. 
Wooden spoon scooping baking soda from a jar
Use to remove stubborn odors from couches and other upholstery. (itsarasak thithuekthak, Getty Images)

Baking Soda Couch Cleaner — Here’s how to remove stubborn odors from couches and other upholstery:

  • Sprinkle a generous amount of baking soda onto the fabric.
  • Wait 20-30 minutes
  • Vacuum using the upholstery brush.

The baking soda will absorb odors and even loosen up some surface stains.


Products and Links Mentioned


Further Reading

Creating a Grandmillenial-Style Bathroom

Creating a Grandmillenial-Style Bathroom

This week, we’re creating a grandmillenial-style bathroom by incorporating modern elements to Chelsea’s mid-century main bathroom.

Chelsea plans to do a primary bathroom addition in the future, so for now, we’re updating this bathroom to accommodate her and her husband, Brandon, while keeping in mind its future use for her daughters.

For this reason, we’re keeping the pink bathtub and tile but introducing some new elements that will tie in well to this grandmillenial-style bathroom.


Grandmillenial style floral wallpaper
This granny-chic wallpaper pattern is perfect for this grandmillenial style bathroom. (3 Echoes Content Studio)

Hang Wallpaper

When Chelsea first moved into her home, she removed dated the wallpaper in the bathroom. And now, we’ve come full circle and are applying a new, modern-printed paper that will complement the bathroom’s retro elements and complete this bathroom’s modern grandmillenial design. 

We’re encasing this bathroom with literal wall-to-wall wallpaper, including the ceiling. This will give this future girl’s bathroom a jewelry-box feel. 

Danny Lipford applies drywall mud to patch holes from ceiling trim.
Patching the wall where the ceiling trim once was gives us an even surface for our wallpaper. (3 Echoes Content Studio)

First, we remove the ceiling trim so our wallpaper runs seamlessly onto the ceiling. To fill the spots behind the trim, we apply drywall mud with a putty knife to fill in the gaps left behind. 

Next, we clean the ceiling and walls with a mold killer so we have a fresh slate for the new wallpaper. 

Then, we hang the wallpaper. Here’s a step-by-step guide (link) on how to do it. 

Grandmillenial style bathroom with floral wallpaper and pink ceramic tub
Encasing the bathroom with wallpaper creat a jewelry box feel. (3 Echoes Content Studio)

Outdated bathroom vanity next to pink tile and grey tile walls
This outdated vanity offers little storage space and stands out in a bad way. (3 Echoes Content Studio)

Replace Vanity

This vanity isn’t original to the house, so it looks out of place in this bathroom. Plus, it’s a little too short and narrow. So we’re replacing it with a more functional, modern one that still works with our grandmillenial style.

To replace the vanity, we remove the toiletries stored inside and disconnect the sink plumbing. This old vanity wasn’t connected to the wall, so a firm tug is all that’s needed to detach it. 

A hole in ceramic wall tile.
The wall tile fused to the wall underneath, making it impossible to remove whole pieces. (3 Echoes Content Studio)

Before we install the new vanity, we try to salvage some of the wall tiles behind it to use for replacement tiles on the wall behind the ceramic towel holder. Unfortunately, the tile is not coming off in one whole piece.

Titebond paiter's plus caulk filling in screw holes on ceramic tile.
Grey painter’s caulk camouflages the holes left behind from the grab bar. (3 Echoes Content Studio)

We’re disappointed we can’t remove the towel bar, but when in the end, it’s still functional. The metal grab bars, however, can be removed. We remove the screws and fill the holes with grey caulk that’s a near match to the tile color.  

Removing ceramic holders with a hammer and chisel
A chisel and hammer easily knock off these ceramic holders so we have a flush surface for our vanity mirror. (3 Echoes Content Studio)

We knock off the ceramic soap and toothbrush holders above the sink so the mirror can lay flush above the vanity. 

New vanity with brushed golf faucet in a grandmillenial style bathroom
The new vanity adds more counter space and storage. (3 Echoes Content Studio)

Finally, we install a new vanity that’s taller and wider to provide more counter space and drawer storage. Here’s how we did it:

  • First, we apply some construction adhesive for extra security. 
  • Then we drill through the tile and drive screws into the studs. 
  • Next, we dry-fit the vanity top before we secure it with more construction adhesive.

Soft Spa by Fluidmaster bidet
The new bidet adds a luxury spa feature to the bathroom. (3 Echoes Content Studio)

Install a Bidet

The toilet in the bathroom is the only thing that’s been updated this century, so we keep it. However, to add some extra pizzazz, we install a bidet.


This page contains affiliate links. If you purchase a product from these links, we will earn a small commission at no additional cost to you.


We chose theFluidmaster Soft Spa Electronic Bidet Toilet Seat. It features an integrated water heater, adjustable water pressure and wand positioning, as well as a heated seat and warm air-dryer. Plus, it has a remote, so you can face forward to use it, instead of reaching behind to make adjustments.

A T-valve connects to the existing water line that supplies the water to your bidet toilet seat. (3 Echoes Content Studio)

The bidet requires a water line, so we shut off the water at the toilet to install a T-valve so both the toilet and the seat can get water from the same source.

We also:

  • Installed a ceiling vent fan
  • Replaced the light fixture
  • Added an outlet for the bidet

Brandon Wolf and Chelsea Lipford Wolf with Danny Lipford.
Brandon Wolf and Chelsea Lipford Wolf with Danny Lipford. (3 Echoes Content Studio)

Post-Production Thoughts

Chelsea and Brandon’s bathroom is 65 years old. At that age, there’s some baggage like the pink tub and the lack of ventilation.

The vanity was newer than that, but it really didn’t fit the style of the room and it lacked character.

But now, the room is overflowing with character and grandmillenial style. The wraparound wallpaper not only creates the jewelry box feel that Chelsea was after it also makes the pink tub look intentional.

The vent fan makes the space more functional, and the larger vanity makes it easier to use. Plus, its black finish complements the room style, and the new bidet toilet seat elevates the whole room to a spa-like experience.


Other Tips From This Episode 


Products Featured in This Episode


Further Reading

Making a Small, Outdated Bathroom Look Fabulous

Making a Small, Outdated Bathroom Look Fabulous

When you have a master bathroom that’s anything but, and you’re working with a limited budget, it’s time for a small bathroom remodel.

This mid-century house belongs to Logan and Hannah, who share it with their daughters Brooklyn and Dakota and, soon, another baby girl.

The growing family has a master bathroom that needs to grow too, but since it can’t, we’re making the most of what they have.


Unattractive mid-century bathroom with institutional tile floors and a basket under the sink
This bathroom looks dated and institutional. It’s not the inviting spa that it should be — but it has plenty of potential.

The Problems

Logan and Hannah’s master bathroom is not much of a master. It’s small and has a dated light fixture and medicine cabinet, tired tile, a toilet too large for the space, and an overall lack of storage.

Then there’s an oddly placed outlet that prevents Logan from entering the bathroom without getting tangled up while Hannah blow-dries her hair.

Finally, their exhaust fan sounds like a freight train when it’s turned on.

And we’re going to fix all these problems with a small bathroom remodel on this episode of Today’s Homeowner.


Old cast-iron sink in an unattractive mid-century bathroom
A sink without a vanity isn’t very functional. Every bathroom needs storage underneath.

Adding a Vanity

The sink is, well, just a sink. There’s no vanity, and that means there are no drawers, no doors, and no storage. That means Hannah has to store things in a basket under the sink — not ideal. So, the first thing we’ll do during this small bathroom remodel is replace this sink with a proper vanity.

Usually, when you have water lines coming out of a bathroom, there’s a shutoff valve. While there’s one of those near the toilet that we removed, there’s not one for the sink. That means we have to turn the water off at the street and then add shutoff valves. This is a job for the plumber, Artie.

Partially remodeled bathroom with new vanity, gold drawer pulls and knobs and no toilet
This bathroom is really coming along! It’s starting to take on the grand appearance the homeowners wanted.

He will do more than add shutoff valves; he’ll also install an offset toilet flange. This will allow us to position the toilet closer to the vanity.

But before he arrives, I’ll remove the dated ceramic cup holder and toothbrush caddy.