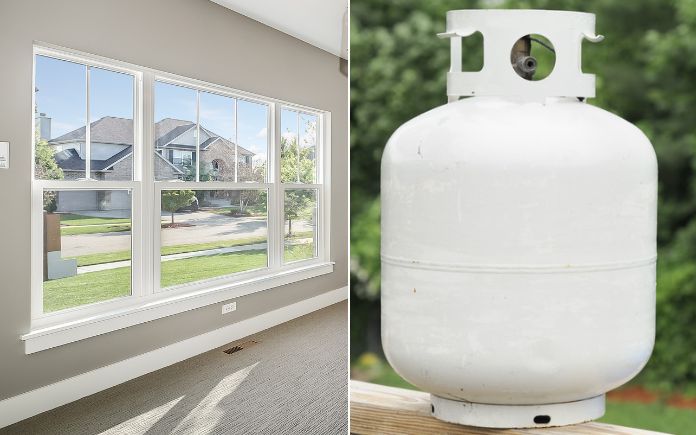
This week, hear how to replace two small windows with a large one and learn why cold weather can make propane less effective. (PC Photography, Getty Images/gmnicholas, Getty Images Signature)
Note: Audio from the latest episode of “The Today’s Homeowner Radio Show” is available Sundays after 4 p.m. CST.
Hour 1
Hear how to install laminate flooring around a door jamb, repair cracks in plaster and more.
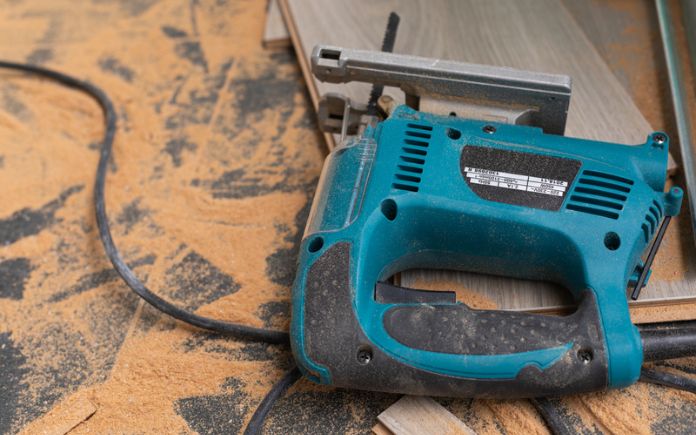
Installing Laminate Flooring Around Door Jambs
To install laminate flooring around door jambs, you’ll need to trim the jamb with a saw so the flooring can slip under it. (Ocskaymark, Getty Images)
A caller asks: “How do you cut laminate flooring to fit neatly around door jambs in a cased opening between two rooms?”
Most of the time, you’re not cutting the flooring, but you’re cutting the bottom of the jamb where it hits the floor.
A tool called a jamb saw is perfect for doing this. It’s like a circular saw, but the blade is turned 90 degrees so you can easily slide it into the jamb. You can rent one of these from a home center.
If you don’t want to rent a jamb saw, you can take a scrap piece of the flooring and put it on the subfloor against the jamb to get its exact height. If there’s any type of underlayment that goes under the laminate flooring, put that under it as well.
Then, use a reciprocating saw or a hand saw to cut a little bit off of the jamb so the flooring can slip under it. The thickness of the blade should leave enough room for the laminate flooring to expand and contract.
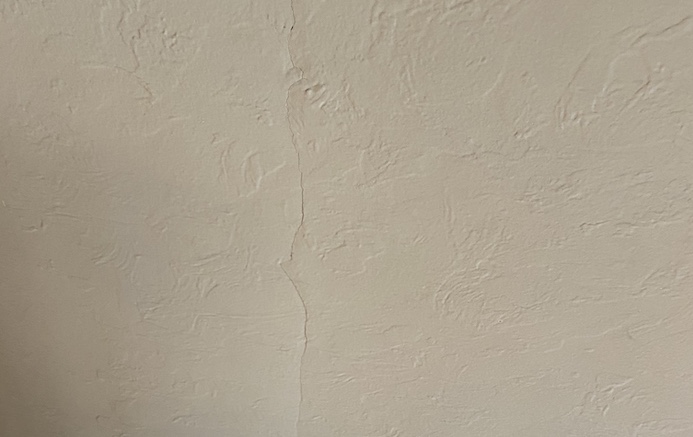
If you see a crack in your plaster, don’t panic! Small cracks can be repaired fairly easily. (Courtesy of Wes Burchell)
“What’s the best way to repair this old plaster wall?
Working with plaster is a little like working with drywall, but the final finish can be tricky to match.
The first thing you need to do is scrape out the crack using the pointed tip of a can opener. What you’re doing is widening that crack into a v-shaped opening to hold more plaster compound. Make it at least a quarter-inch wide.
Then, vacuum the dust out of the crack and clean the surface around it with a damp towel to remove any dust.
Then, you use joint compound or patching plaster to fill in the crack.
Once the crack is patched, prime and paint it to match the rest of the wall. With any paint repair, don’t just paint the repair area. Spread the paint out at least a couple of feet in each direction.
Hear a caller’s Simple Solution suggestion: how to replace two small windows with a large one, and more.
Simple Solution Suggestion
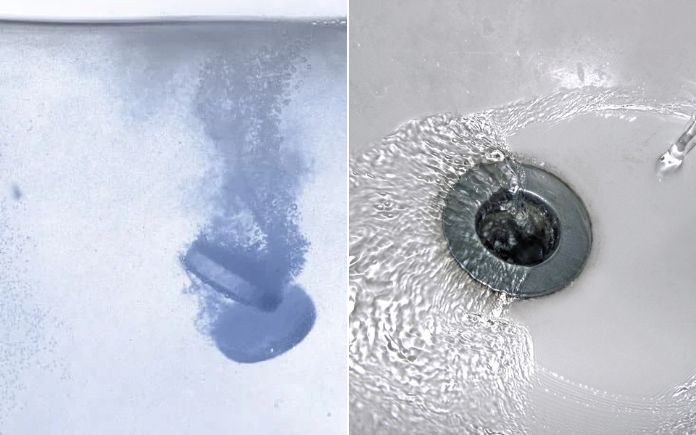
The effervescent action of denture tablets loosens buildup in a drain and makes it easier to flush away. (LdF, Getty Images Signature/laymul, Getty Images)
Diane McClaskey in Missouri has a potential Simple Solution suggestion for cleaning a sink drain.
After removing the pop-up stopper, add six to eight denture cleaning tablets to the drain, and add just a little water. Wait to let the cleaning begin, and add a little water as needed until clean.
The effervescent action will help to break up any dirt or grime and leave your sink sparkling clean!
So why would this work? The main ingredient in denture cleaning tablets is sodium bicarbonate, commonly known as baking soda.
Replacing two small windows with a large one is a great way to let in more light and improve your home’s curb appeal. (PC Photography, Getty Images)
A caller wants to replace two small windows with a larger one in her living. There’s a six-inch wall in between the windows, and she was told she needed to put in a header.
“I don’t know how to do this. Can you explain please?” she asks.
When you take a window out, you need to replace it with something to fill that void. A header basically is a 2-by-4 to a 2-by-12. A header spans horizontally above the window to support its weight. This prevents the ceiling joists, roof rafters, and anything above that might be bearing down on the window from sagging.
However, it’s a very tricky project. First, you have to access that area, and that’s done by cutting the drywall or plaster away from the inside above the upper part of the window opening so you’ll have room to cut out whatever’s there and put in the new beam.
Unless you’re very good at carpentry work, I suggest calling a professional to do this. The last thing you want is any sagging on the window down the road.
A professional can also ensure the new window is sealed properly to avoid drafts and energy loss.
Call your local home builder’s association and ask for their recommendations.
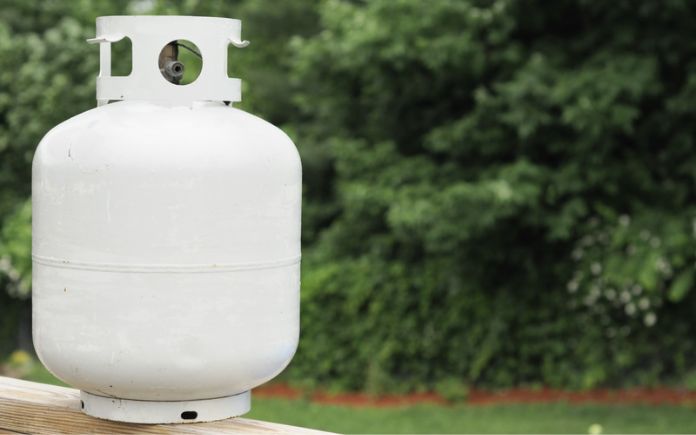
Can Cold Temps Damage a Propane Tank?
Cold temperatures can cause propane to become less effective. (gmnicholas, Getty Images Signature)
A caller says: “I have a backup propane tank that I store in my garage. It’s been there for over a year. I can’t get my grill to start with it. Does storing the tank for that long in a cold garage damage it?”
In order to keep propane in a liquid state, it has to be stored under pressure. Cold temperatures can cause the liquid propane to condense, which can then decrease the pressure inside the tank.
Propane turns to a liquid at -42 degrees C; if it gets that cold or colder, the pressure inside your propane tank will drop, eventually reaching a point where it is too low to effectively light a grill or other appliances, according to Lansing Ice and Fuel.
Bring it inside and let it warm up and check the level of gas. When in doubt, take it to get it refilled.
In the future, to keep the pressure higher, keep the tank at least 30 percent full at all times, and use a small insulated frame shelter to protect the tank from colder temperatures.
Best New Products
MSI’s new peel-and-stick backsplash gives you the look of real tile without all the hassle of a traditional thin-set application. Learn more >>
Simple Solutions
Using a power drill to wrap nylon string around a spool will speed up the process and lessen the likelihood of tangles. (3 Echoes Content Studio)
Fast and Neat Way to Wind String onto a Spool — A spool of nylon string can be used for many things — general crafting, fishing and hunting, and laying mason lines.
The string is easy to unwind off the spool, but it’s not as easy to get back on after you’ve used it. Winding it by hand back onto the spool can lead to tangles and uneven distribution. And eventually, you’ve got an unusable mess that you have to cut up. Here’s a much better, and faster, solution:
Take a screw and drive it through the end of the plastic housing that the spool is on. Then, chuck it into a drill.
Turn on the drill to the lowest setting, and just like that, you can now use the power of the drill to put the line back on the spool.
It only takes a few seconds to wind the nylon string back onto the spool! As you’re winding up the nylon string, slowly move it back and forth along the spool. This way, you don’t overload one side or the other, and the string winds up neatly every time.
A toilet bowl cleaner’s spout makes it perfect for pouring into grout lines. (3 Echoes Content Studio)
Inexpensive Alternative to Commercial Grout Cleaners — If you have tile in your home, chances are you’ve spent some time cleaning grout. While there are several grout cleaning products on the market, you might have something in your home right now that works just as well — toilet bowl cleaner.
Regular old toilet bowl cleaner that comes in a squeeze bottle can clean grout! Toilet bowl cleaner contains bleach, so it will not only lighten grout stains, but it will also kill any mold or mildew.
Plus, toilet bowl cleaner is cheaper than grout cleaner.
This week, Artie McGowan, master plumber and owner of Colony Plumbing in Mobile, Ala., is back! He’s providing answers to more common plumbing problems, like dripping faucets, long waits for hot water and more.
He’s a long-time friend of mine who’s also done hundreds of jobs for my construction company.
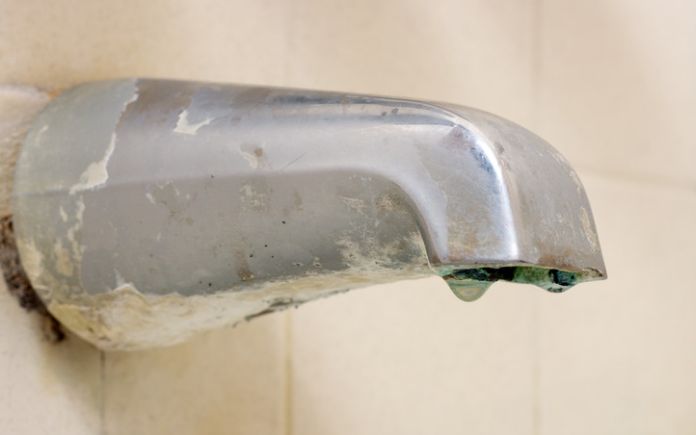
Often, it’s easier to replace a dripping tub faucet than it is to repair it. (pastorscott, Getty Images Signature)
Dripping Faucets
What should you do if water pours from a shower-tub combo’s faucet while the shower is on and water drips from the shower head when it’s off?
Artie: If it’s a tub spout, the best thing to do is replace it. Some have repair kits, but it’s usually not worth it.
Unscrew the spout, take it to Home Depot, and they’ll have a replacement for it that will more than likely match it very easily.
With older faucets that have a third handle in the middle, you’ll need to take the stem assembly out and put a backup seal on it as well as a new washer. This can get complicated, so I’d suggest calling a plumber.
Also, call a plumber if you have a newer single-lever valve that has a push button under the handle instead of a spout to divert the water.
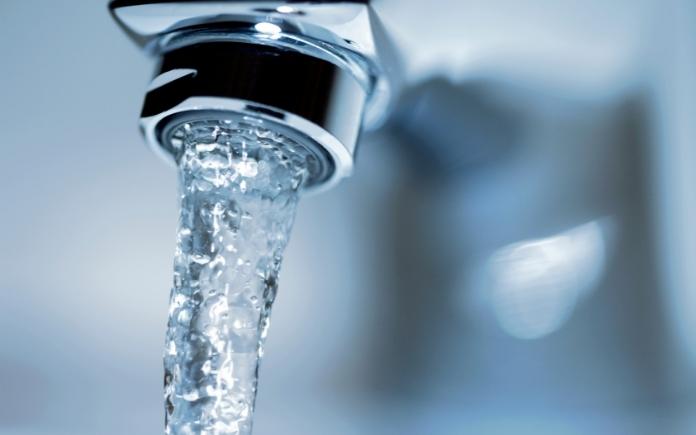
If your water takes a long time to heat up, it’s time to invest in a hybrid recirculating valve. (aristotoo, Getty Images Signature)
Long Waits for Hot Water
What’s the best way to address long wait times for hot water to reach the faucet?
Artie: If you have a tank water heater, you can install a hybrid recirculating valve on the top. Once you do that, install take a transfer valve on the faucet plumbing. This pushes the hot water gently into the cold side — that way you don’t have to run a separate recirculation line.
This gives you hot water much more quickly in bathrooms that are farther away from the water heater.
The other way, of course, is to install a recirculation line, but the problem with that is you have to find a way to snake it through the house.
Tankless water heaters nowadays have a recirculating pump already installed. If you don’t want to go tankless, you can invest in a hybrid hot water heater.
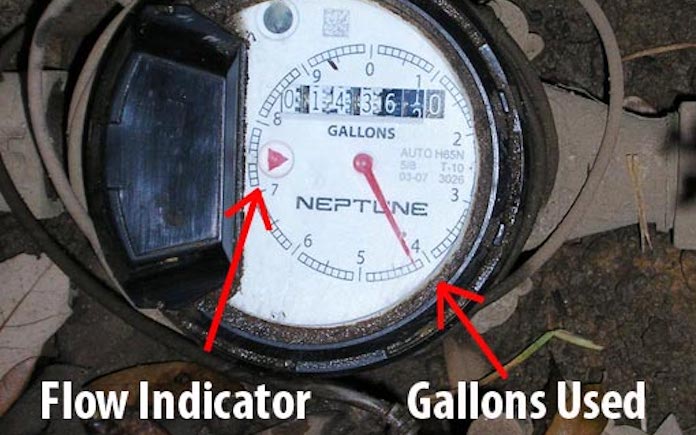
If your water meter lacks a flow indicator, write down the numbers that appear on the meter followed by the number on the hand of the large rotary dial. Check the meter again after an hour and write down any changes in the numbers or dials. (3 Echoes Content Studio)
Finding a Water Leak
What is the best way to diagnose a leak around or in your home?
Artie: I suggest turning off all the appliances that use water in your home and checking the meter. Most newer meters have a tattletale dial on them, so you can see if any water is being used when everything is turned off.
Older meters will have a triangle that turns. With the newer digital ones that you can read with the satellite, you need to close the lid and open it again. On the right, you’ll see a tattle tale number that will let you know if you’re losing any amount of water.
If after you’ve done this and you see the meter is moving, turn off the valve to the water heater. This kills half the water to the house. If the meter is still moving, then you know the problem is on the cold side and the problem could be in the yard or underneath the foundation.
If it did stop moving after you turned off the water heater, then the problem is on the hot side, and you know where to look.
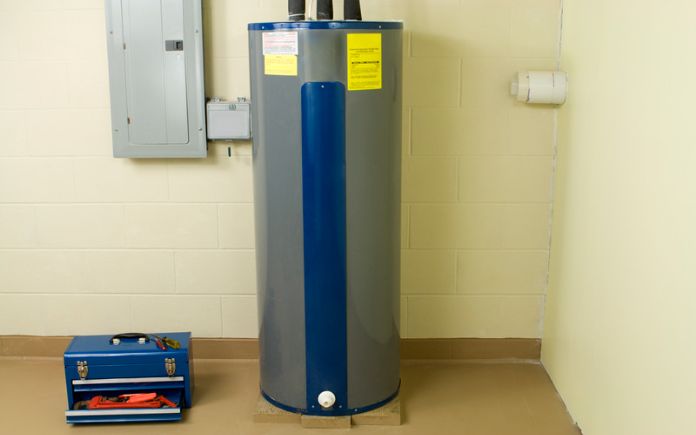
Electric water heaters take longer to recover after all the hot water has been used. (JulNichols, Getty Images Signature)
Electric vs. Gas Water Heaters
If you have a choice between an electric water heater and a gas one, which would you choose?
Artie: If gas is available, I’ll always go with gas. It recovers quicker, it’s cheaper to run and it’s much more efficient.
Electric takes longer to recover and heat up. You can wait a half hour, 45 minutes for the tank to heat back up. And if you have a large family on a 50-gallon tank, you could be waiting two hours on hot water.
Draining your water heater once a year removes sediment from the tank that can cause it to work harder and cost more to use. (3 Echoes Content Studio)
Draining a Water Heater
Why is it important to drain your water heater at least every couple of years?
Artie: Believe it or not, most people do nothing to their water heaters.
When high-velocity water is being used (pressurized water to push debris out of pipes to prevent blockage), all that crust builds up and drops to the bottom of the heater.
Even if there’s a swifter in the bottom that pushes it around to get it out of the system, it cakes up down there. And then, you’ll start to lose the efficiency of your heat.
Imagine putting a thick layer of insulation on the bottom of your tank, and the tank has to heat through that to get through the water. This is why you should drain your water heater at least every two years.
Ask a question and we could answer it on the “Today’s Homeowner Podcast!” We also may use it on our nationally syndicated radio broadcast or on todayshomeowner.com.
Simple lifestyle changes can conserve water, one of our most precious resources, and save money. (aristotoo, Getty Images Signature)
Water conservation is fast becoming a priority for many homeowners.
The Environmental Protection Agency estimates that leaks account for 9,400 gallons of water wasted each year. That’s about the amount of water needed to wash more than 300 loads of laundry.
Whether your reason for conserving water is mandated because of a drought or to combat high utility bills, adopt these simple water-saving measures to dramatically cut your home’s water usage.
Here are the 5 hot spots to tackle.
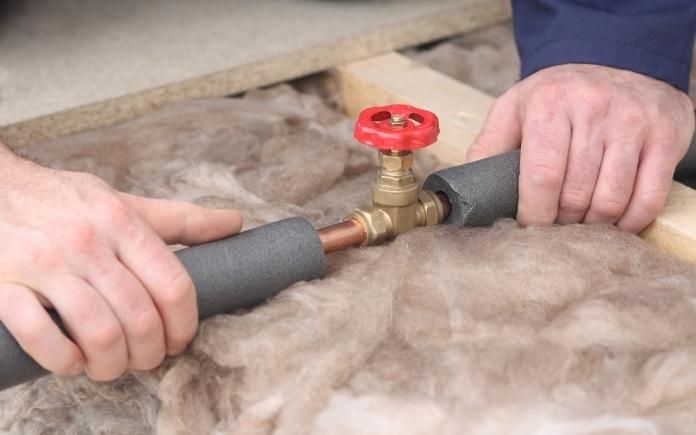
Insulating water pipes with foam helps water heat up faster, so you waste less time waiting for hot water. (nsj-images, Getty Images Signature)
1. Home Infrastructure and Appliances
To conserve more water in your home, start at the source.
First, check for leaks in the pipes. A visual inspection can quickly reveal any problems that need repairs.
In addition, read your water meter when no water is being used, then look at it again after a few hours to see if the gauge has changed.
Fixing the leak could be as simple as replacing a faucet washer, or you may discover a more serious problem such as an unseen leak in a pipe.
Here’s a win-win solution: Installing foam insulation on hot water pipes saves both water and energy by providing hot water faster and keeping it hot longer. This reduces the water wasted from running the tap to heat it up.
Finally, when replacing appliances like dishwashers or washing machines, look for models that have earned the U.S. government’s Energy Star rating, certifying they use less water and energy.
Plumbing fixtures such as faucets and toilets that carry the Environmental Protection Agency WaterSense label use, on average, 20 percent less water than conventional fixtures.
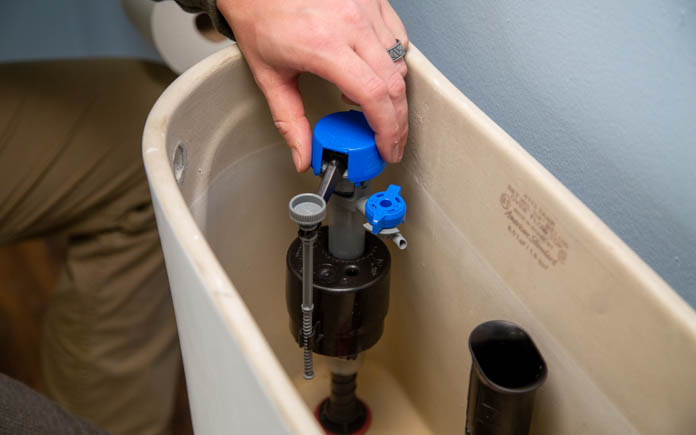
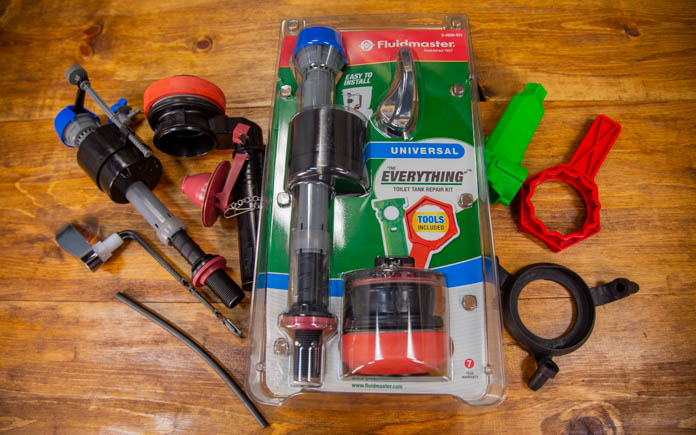
Fluidmaster’s 400H Toilet Fill Valve fixes a constantly running, noisy or slow-filling toilet and is one of the quietest fill valves available. (3 Echoes Content Studio)
2. Your Bathrooms
Toilets are the largest users of water in the home — but some of them are more efficient than others. Look on the bottom of the tank lid, or inside the tank wall, to find the date your toilet was manufactured. Toilets made before 1993 use two to three times the water of new ones.
If you have an older model, consider replacing it with a new low-flush or a dual-flush toilet that can use as little as 1 gallon per flush for maximum water conservation.
If replacing a toilet isn’t in your budget, add a few inches of gravel or sand to a plastic soft drink bottle, fill it with water, screw on the cap, and put it in the tank away from the float and flapper. The increased volume from the bottle reduces the amount of water in the tank, so less is used per flush.
If you notice your toilet refilling periodically when it hasn’t been flushed, it’s a sure sign your toilet has a leak. These leaks can waste thousands of gallons of water if not repaired.
A constantly running toilet, weak or incomplete flushing and a slow-filling tank aren’t just frustrating — they can also increase your water usage.
The DIY-friendly kit comes with a toilet fill valve, flush valve with stainless-steel bolts, Tank-To-Bowl Gasket and color-coded tools for the fastest installation possible and, if necessary, a complete tank rebuild. It eliminates the need for extra trips to the store for an unknown part or tool — and that saves time, money and frustration.
To conserve more water, change up your hygiene routine. Reducing time spent in the shower can save 2 to 5 gallons of water per minute, or GPM. Installing a water-saving showerhead will prevent thousands of gallons a year from going down the drain.
To see if you need a new showerhead, put a 5-gallon bucket in the shower and turn on the water. If it fills in less than two minutes, consider replacing the showerhead with a water-saving model that uses two GPM or less.
Finally, leaving the faucet running while you shave or brush your teeth wastes water. Turn the water off while you brush and fill the sink to rinse your razor.
Only running a dishwasher when it’s full can save nearly 320 gallons of water annually. (Irina Drazowa-Fischer, Getty Images)
3. The Kitchen
A few changes in the kitchen can significantly cut down your water usage. For instance, thaw frozen food in the refrigerator overnight instead of using a running tap of hot water — it’s not necessary.
When used properly, a dishwasher uses less water than hand-washing. Run your dishwasher only when it’s full and use water-saving settings for more efficiency. Doing this saves the average family nearly 320 gallons of water annually.
If you hand-wash, fill one side of a double sink with soapy water for washing and the other with clean water for rinsing. Letting your faucet run for five minutes while washing dishes can waste 10 gallons of water.
Also, install low-flow aerators on faucets — these reduce water flow to one gallon per minute or less.
Finally, do you drink a lot of tap water? If so, don’t keep the water running until it cools off for drinking. Instead, fill a pitcher or bottle and keep it in the fridge.
Don’t do laundry until you have enough clothes for a full load. (Oksana Vejus via Canva)
4. Your Laundry Room
Washing clothes accounts for the second-largest water use in the home. Put off doing laundry for the sake of water conservation.
Only run the washer with a full load of clothes and use the shortest cycle for lightly soiled clothing. And if you really want to reduce water use, avoid the permanent press cycle, which uses up to 5 gallons more water per load.
While washing clothes in cold water saves energy by reducing water heating, it uses the same amount of water as warm or hot settings.
Every year, we waste billions of gallons of water to keep our lawns and gardens green. Much of this water is lost due to overwatering, evaporation, poor sprinkler design or lack of maintenance.
Use a drip irrigation system or a soaker hose to reduce water use. These methods deliver water slowly and directly to the plant’s roots, and much less water is lost to evaporation.
If you have a programmable irrigation system, install a rain sensor. It will interrupt the program cycle when it rains, so you won’t overwater your lawn.
Better yet, start at the ground level to keep your water use at a minimum. Choose native and drought-tolerant plants to create a water-smart landscape that’s beautiful and efficient.
Here are some other water conservation options for the yard:
Sweep driveways, sidewalks and steps rather than hosing them down.
Wash the car with water from a bucket, or consider using a commercial car wash that recycles water.
If you have a pool, use a cover to reduce evaporation when it’s not in use.
Following these water-saving tips can reduce household water use by 30 percent or more.
Start simple by changing wasteful habits and fixing leaks, then move up to installing water-saving fixtures and appliances.
Not only will it save money, but you’ll also reduce the needless drain on one of our most precious resources.
Water conservation is fast becoming a priority for many homeowners.
The Environmental Protection Agency estimates that leaks account for 9,400 gallons of water wasted each year. That’s about the amount of water needed to wash more than 300 loads of laundry.
Whether your reason for conserving water is mandated because of a drought or to combat high utility bills, adopt these simple water-saving measures to dramatically cut your home’s water usage.
Here are the 5 hot spots to tackle.
Insulating water pipes with foam helps water heat up faster, so you waste less time waiting for hot water. (nsj-images, Getty Images Signature)
1. Check Fixtures and Appliances
To conserve more water in your home, start at the source.
First, check for leaks in the pipes. A visual inspection can quickly reveal any problems that need repairs.
In addition, read your water meter when no water is being used, then look at it again after a few hours to see if the gauge has changed.
Fixing the leak could be as simple as replacing a faucet washer, or you may discover a more serious problem such as an unseen leak in a pipe.
Here’s a win-win solution: Installing foam insulation on hot water pipes saves both water and energy by providing hot water faster and keeping it hot longer. This reduces the water wasted from running the tap to heat it up.
Finally, when replacing appliances like dishwashers or washing machines, look for models that have earned the U.S. government’s Energy Star rating, certifying they use less water and energy.
Plumbing fixtures such as faucets and toilets that carry the Environmental Protection Agency WaterSense label use, on average, 20 percent less water than conventional fixtures.
Fluidmaster’s 400H Toilet Fill Valve fixes a constantly running, noisy or slow-filling toilet and is one of the quietest fill valves available. (3 Echoes Content Studio)
2. Improve Your Toilets
Toilets are the largest users of water in the home — but some of them are more efficient than others. Look on the bottom of the tank lid, or inside the tank wall, to find the date your toilet was manufactured. Toilets made before 1993 use two to three times the water of new ones.
If you have an older model, consider replacing it with a new low-flush or a dual-flush toilet that can use as little as 1 gallon per flush for maximum water conservation.
If replacing a toilet isn’t in your budget, add a few inches of gravel or sand to a plastic soft drink bottle, fill it with water, screw on the cap, and put it in the tank away from the float and flapper. The increased volume from the bottle reduces the amount of water in the tank, so less is used per flush.
If you notice your toilet refilling periodically when it hasn’t been flushed, it’s a sure sign your toilet has a leak. These leaks can waste thousands of gallons of water if not repaired.
A constantly running toilet, weak or incomplete flushing and a slow-filling tank aren’t just frustrating — they can also increase your water usage.
The DIY-friendly kit comes with a toilet fill valve, flush valve with stainless-steel bolts, Tank-To-Bowl Gasket and color-coded tools for the fastest installation possible and, if necessary, a complete tank rebuild. It eliminates the need for extra trips to the store for an unknown part or tool — and that saves time, money and frustration.
To conserve more water, change up your hygiene routine. Reducing time spent in the shower can save 2 to 5 gallons of water per minute, or GPM. Installing a water-saving showerhead will prevent thousands of gallons a year from going down the drain.
To see if you need a new showerhead, put a 5-gallon bucket in the shower and turn on the water. If it fills in less than two minutes, consider replacing the showerhead with a water-saving model that uses two GPM or less.
Finally, leaving the faucet running while you shave or brush your teeth wastes water. Turn the water off while you brush and fill the sink to rinse your razor.
Only running a dishwasher when it’s full can save nearly 320 gallons of water annually. (Irina Drazowa-Fischer, Getty Images)
3. Make Changes in the Kitchen
A few changes in the kitchen can significantly cut down your water usage. For instance, thaw frozen food in the refrigerator overnight instead of using a running tap of hot water — it’s not necessary.
When used properly, a dishwasher uses less water than hand-washing. Run your dishwasher only when it’s full and use water-saving settings for more efficiency. Doing this saves the average family nearly 320 gallons of water annually.
If you hand-wash, fill one side of a double sink with soapy water for washing and the other with clean water for rinsing. Letting your faucet run for five minutes while washing dishes can waste 10 gallons of water.
Also, install low-flow aerators on faucets — these reduce water flow to one gallon per minute or less.
Finally, do you drink a lot of tap water? If so, don’t keep the water running until it cools off for drinking. Instead, fill a pitcher or bottle and keep it in the fridge.
Don’t do laundry until you have enough clothes for a full load. (Oksana Vejus via Canva)
4. Adjust Your Laundry Room Routine
Washing clothes accounts for the second-largest water use in the home. Put off doing laundry for the sake of water conservation.
Only run the washer with a full load of clothes and use the shortest cycle for lightly soiled clothing. And if you really want to reduce water use, avoid the permanent press cycle, which uses up to 5 gallons more water per load.
While washing clothes in cold water saves energy by reducing water heating, it uses the same amount of water as warm or hot settings.
Every year, we waste billions of gallons of water to keep our lawns and gardens green. Much of this water is lost due to overwatering, evaporation, poor sprinkler design or lack of maintenance.
Use a drip irrigation system or a soaker hose to reduce water use. These methods deliver water slowly and directly to the plant’s roots, and much less water is lost to evaporation.
If you have a programmable irrigation system, install a rain sensor. It will interrupt the program cycle when it rains, so you won’t overwater your lawn.
Better yet, start at the ground level to keep your water use at a minimum. Choose native and drought-tolerant plants to create a water-smart landscape that’s beautiful and efficient.
Here are some other water conservation options for the yard:
Sweep driveways, sidewalks and steps rather than hosing them down.
Wash the car with water from a bucket, or consider using a commercial car wash that recycles water.
If you have a pool, use a cover to reduce evaporation when it’s not in use.
Following these water-saving tips can reduce household water use by 30 percent or more.
Start simple by changing wasteful habits and fixing leaks, then move up to installing water-saving fixtures and appliances.
Not only will it save money, but you’ll also reduce the needless drain on one of our most precious resources.
This week, we’re creating a grandmillenial-style bathroom by incorporating modern elements to Chelsea’s mid-century main bathroom.
Chelsea plans to do a primary bathroom addition in the future, so for now, we’re updating this bathroom to accommodate her and her husband, Brandon, while keeping in mind its future use for her daughters.
For this reason, we’re keeping the pink bathtub and tile but introducing some new elements that will tie in well to this grandmillenial-style bathroom.
This granny-chic wallpaper pattern is perfect for this grandmillenial style bathroom. (3 Echoes Content Studio)
Hang Wallpaper
When Chelsea first moved into her home, she removed dated the wallpaper in the bathroom. And now, we’ve come full circle and are applying a new, modern-printed paper that will complement the bathroom’s retro elements and complete this bathroom’s modern grandmillenial design.
We’re encasing this bathroom with literal wall-to-wall wallpaper, including the ceiling. This will give this future girl’s bathroom a jewelry-box feel.
Patching the wall where the ceiling trim once was gives us an even surface for our wallpaper. (3 Echoes Content Studio)
First, we remove the ceiling trim so our wallpaper runs seamlessly onto the ceiling. To fill the spots behind the trim, we apply drywall mud with a putty knife to fill in the gaps left behind.
Next, we clean the ceiling and walls with a mold killer so we have a fresh slate for the new wallpaper.
Then, we hang the wallpaper. Here’s a step-by-step guide (link) on how to do it.
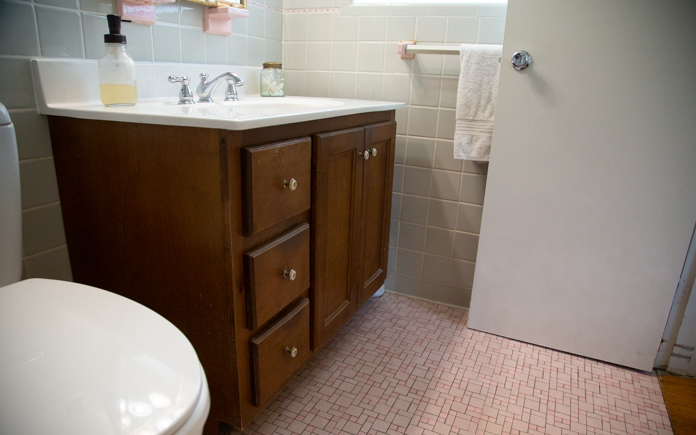
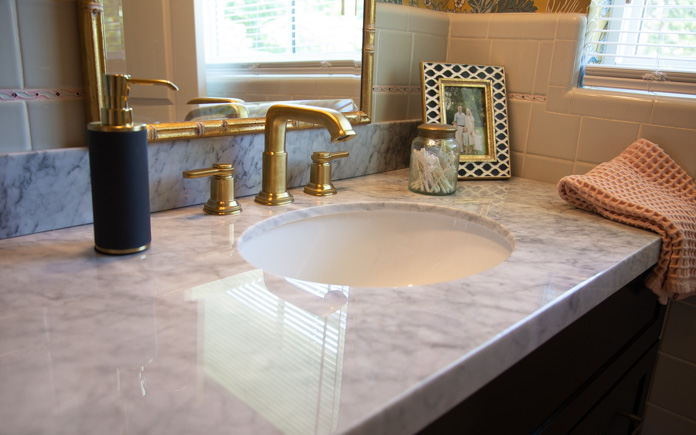
Encasing the bathroom with wallpaper creat a jewelry box feel. (3 Echoes Content Studio)This outdated vanity offers little storage space and stands out in a bad way. (3 Echoes Content Studio)
Replace Vanity
This vanity isn’t original to the house, so it looks out of place in this bathroom. Plus, it’s a little too short and narrow. So we’re replacing it with a more functional, modern one that still works with our grandmillenial style.
To replace the vanity, we remove the toiletries stored inside and disconnect the sink plumbing. This old vanity wasn’t connected to the wall, so a firm tug is all that’s needed to detach it.
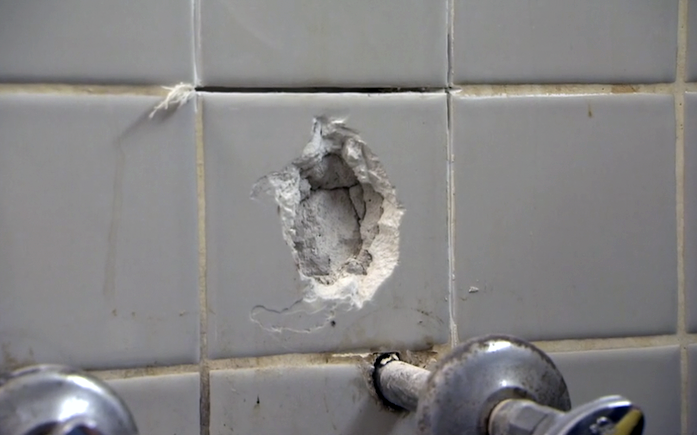
The wall tile fused to the wall underneath, making it impossible to remove whole pieces. (3 Echoes Content Studio)
Before we install the new vanity, we try to salvage some of the wall tiles behind it to use for replacement tiles on the wall behind the ceramic towel holder. Unfortunately, the tile is not coming off in one whole piece.
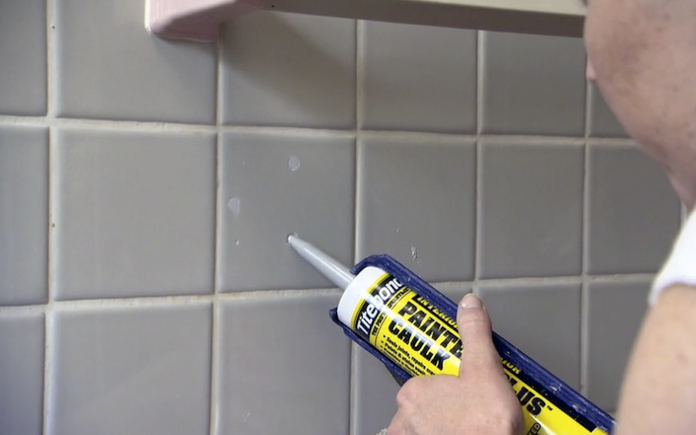
Grey painter’s caulk camouflages the holes left behind from the grab bar. (3 Echoes Content Studio)
We’re disappointed we can’t remove the towel bar, but when in the end, it’s still functional. The metal grab bars, however, can be removed. We remove the screws and fill the holes with grey caulk that’s a near match to the tile color.
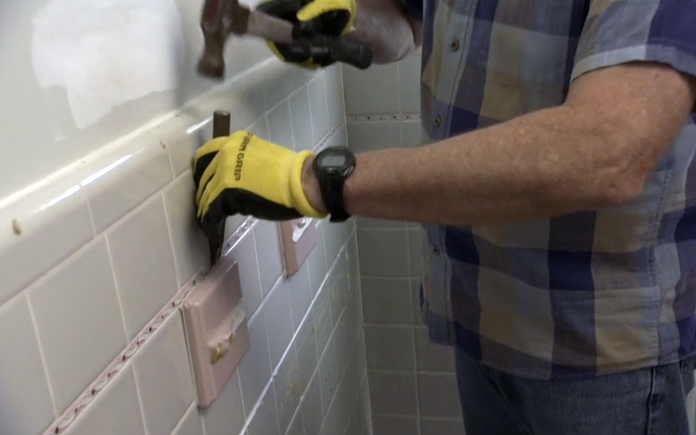
A chisel and hammer easily knock off these ceramic holders so we have a flush surface for our vanity mirror. (3 Echoes Content Studio)
We knock off the ceramic soap and toothbrush holders above the sink so the mirror can lay flush above the vanity.
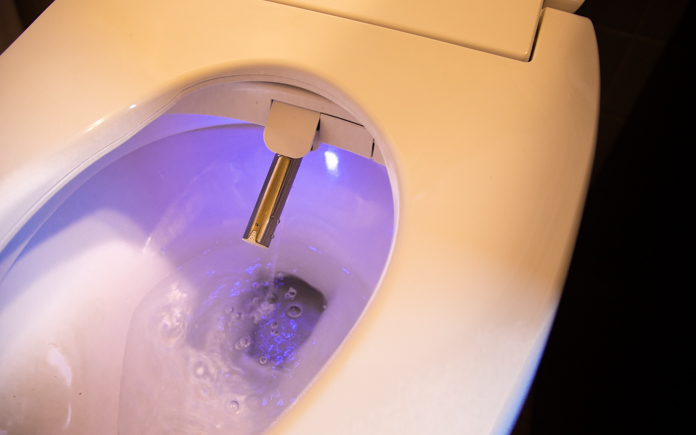
The toilet in the bathroom is the only thing that’s been updated this century, so we keep it. However, to add some extra pizzazz, we install a bidet.
This page contains affiliate links. If you purchase a product from these links, we will earn a small commission at no additional cost to you.
We chose theFluidmaster Soft Spa Electronic Bidet Toilet Seat. It features an integrated water heater, adjustable water pressure and wand positioning, as well as a heated seat and warm air-dryer. Plus, it has a remote, so you can face forward to use it, instead of reaching behind to make adjustments.
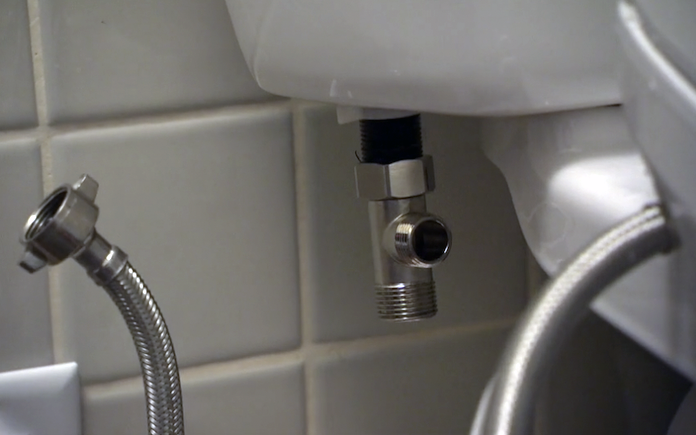
A T-valve connects to the existing water line that supplies the water to your bidet toilet seat. (3 Echoes Content Studio)
The bidet requires a water line, so we shut off the water at the toilet to install a T-valve so both the toilet and the seat can get water from the same source.
Chelsea and Brandon’s bathroom is 65 years old. At that age, there’s some baggage like the pink tub and the lack of ventilation.
The vanity was newer than that, but it really didn’t fit the style of the room and it lacked character.
But now, the room is overflowing with character and grandmillenial style. The wraparound wallpaper not only creates the jewelry box feel that Chelsea was after it also makes the pink tub look intentional.
The vent fan makes the space more functional, and the larger vanity makes it easier to use. Plus, its black finish complements the room style, and the new bidet toilet seat elevates the whole room to a spa-like experience.