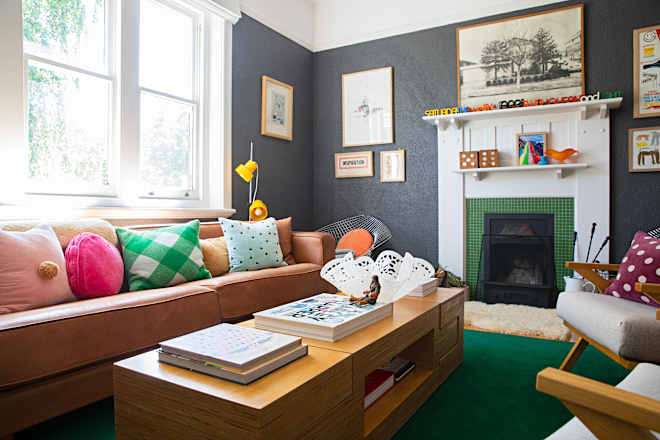
You’ll Regret Not Calling This One Pro Before the First Day of Fall
Waiting will cost you.
READ MORE…
2-Day Shipping on most products. Shop Now!
Waiting will cost you.
READ MORE…

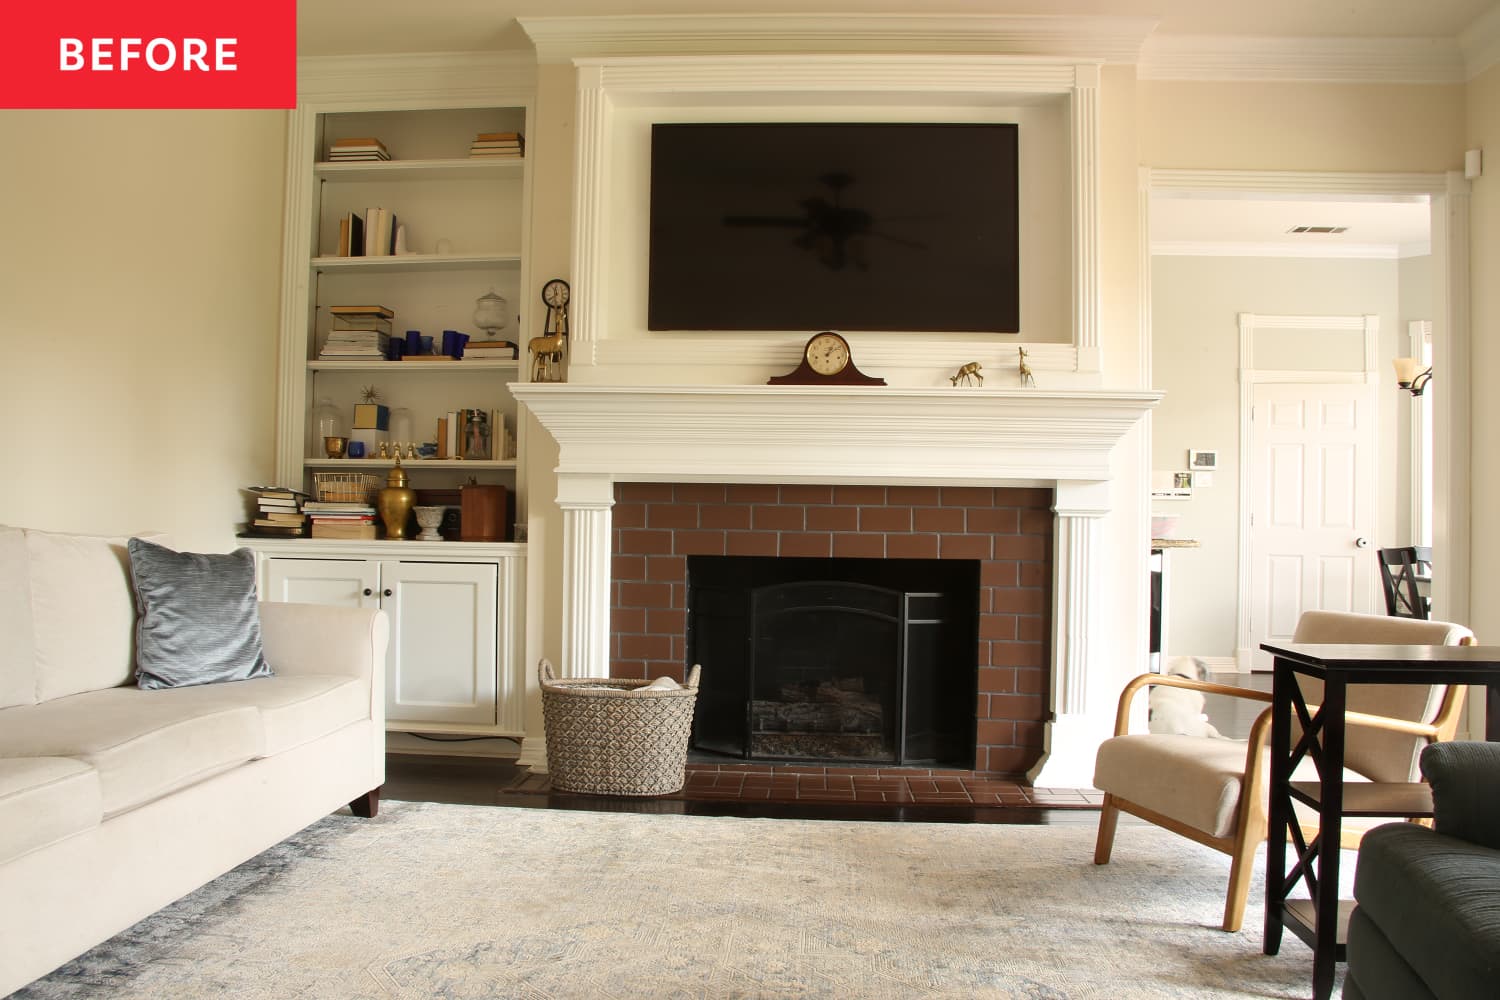
When Jessica and Nate decided that they wanted their South Dakota home to better reflect their sense of style, they called on Chelsea and Cole DeBoer to help them add some bold “ranch glam” to their outdated house. In the premiere episode of HGTV’s “Down Home Fab,” Chelsea and Cole gave the kitchen and sitting room some unique, modern updates.
While the original kitchen contained a few stylish details, the space required several updates. The cabinets were in great shape, but they needed some new color and hardware. The floors were made up of large white tiles and the island was abnormally short, which prevented the family from being able to comfortably sit or stand around it during mealtime.
For more content like this follow
With a kitchen budget of $35,000, Chelsea, Cole, and their team started by demolishing the small island and ripping up the old countertops. They removed the old flooring and later replaced it with dark, sliced french oak hardwood to help bring out the “ranch feeling.” They painted the cabinets black for an affordable way to make a big change. They also tore down the wall that had previously separated the kitchen from the dining area, which created an open concept look with lots of natural light.
Chelsea shared that she thought that “every room should have a magical moment,” so she opted to give the stove a chunky and dramatic black vent-hood-turned-statement piece that could tie everything together. She picked out butcher block countertops for the surrounding spaces and a veined quartz countertop for the new kitchen island. She also used the quartz on the backsplash for the stove. The team wrapped the base of the new island in copper and brought in four light blue chairs to help complete the look.
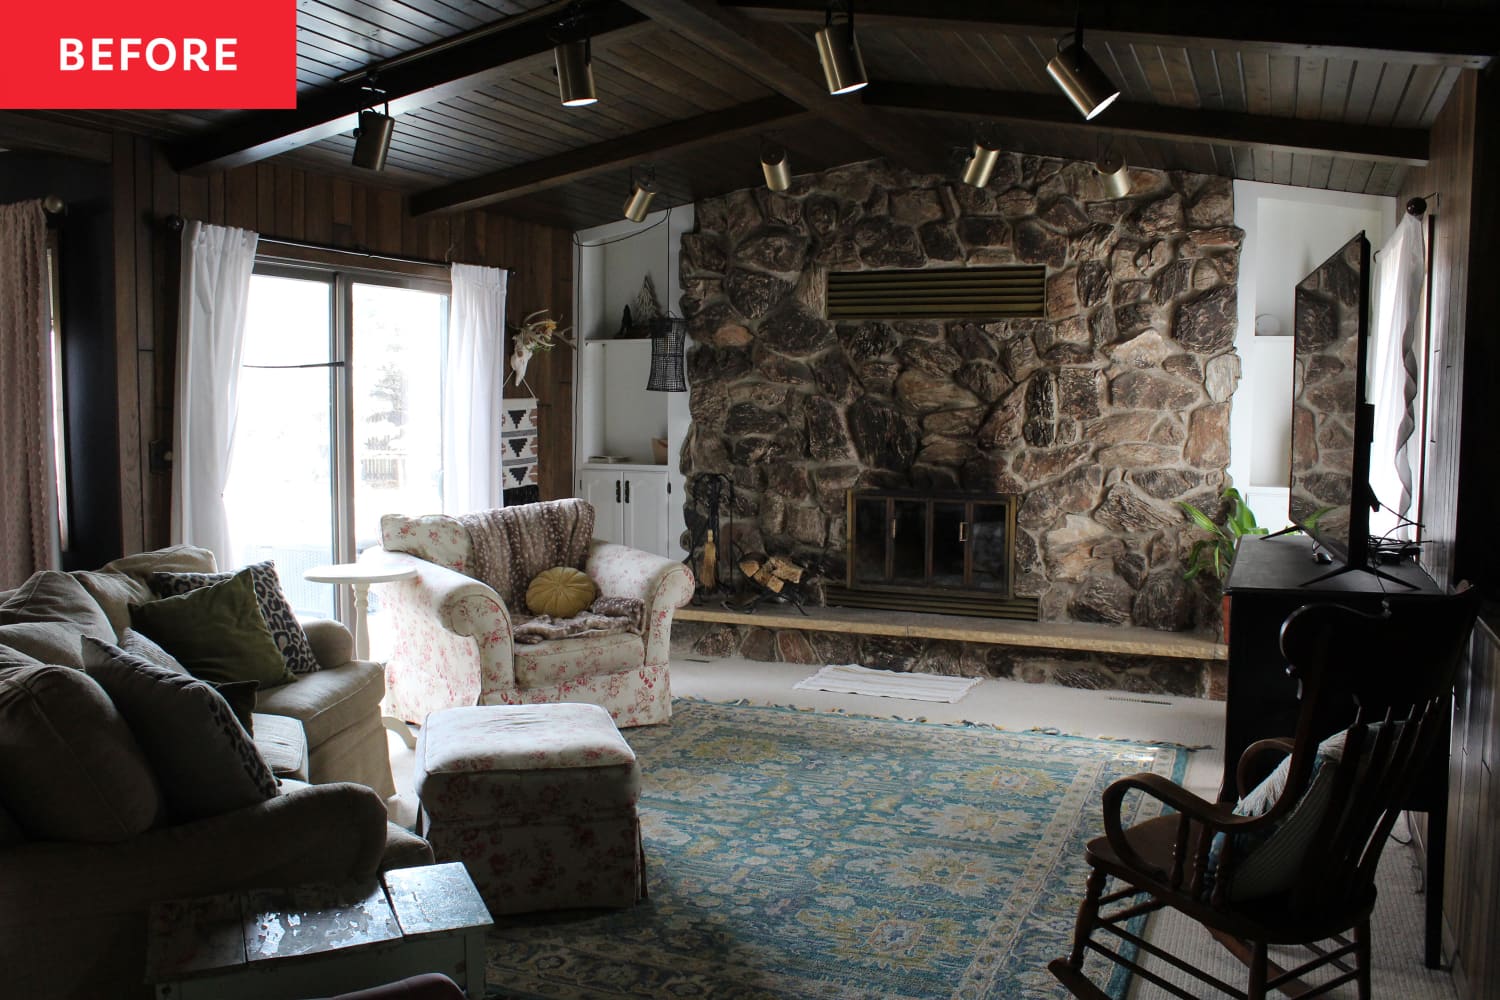
The original living room was similarly outdated. The focal point of the space was a massive wood-burning fireplace, but the room as a whole was too dark. The walls and ceiling were made out of dark wood and the floor was carpeted. “We love the wood aspect and tones to it, but something, I think, needs a little bit of a new look to it,” Nate said.
Keeping their $15,000 living room budget in mind, Chelsea and Cole added the same wooden flooring from the kitchen into the living room in an effort to add some “rustic warmth” to the space. They painted the walls and ceiling a dark green to add some warmth, but refrained from touching the ceiling beams in an effort to maintain the original cabin vibe of the space. They also installed custom antler chandeliers, which created a chic lodge feel.
The greatest transformation in the living room was the stone on the fireplace, which Chelsea and Cole chose to whitewash. While Jessica was on board for the idea, Nate was initially hesitant because he was afraid of losing the stone’s character. In a compromise, the DeBoers promised to lighten it up in a way that would keep the original texture and color variation. They used a 1:1 paint:water ratio in the whitewash to help keep it on the lighter side. The team painted the outer shelves the same dark green as the ceilings and walls before stacking the shelves with wood. They also replaced the original flagstone hearth with the same quartz that was used in the kitchen. From there, they extended the quartz into a waterfall effect, so that the hearth was completely covered.
“What you’ve done is awesome,” Nate said after seeing the living room. “It feels like ours now.”
“Down Home Fab” airs Mondays at 9 p.m. ET/PT on HGTV and discovery+.

Sarah is a staff writer at Apartment Therapy. She completed her MA in journalism at the University of Missouri and has a bachelor’s degree in journalism from Belmont University. Past writing and editing stops include HGTV Magazine, Nashville Arts Magazine, and several outlets local to her hometown, Columbia, Missouri.


Ever since I built a mantel a couple of years ago, I’m always on the hunt for fun new ways to decorate it. So as I browsed the paper aisle at my local craft store, it hit me – a folded paper tree forest! I’m a big fan of non-traditional colors, so I bought a few of my favorites and got to work. Click through to check out the full tutorial.
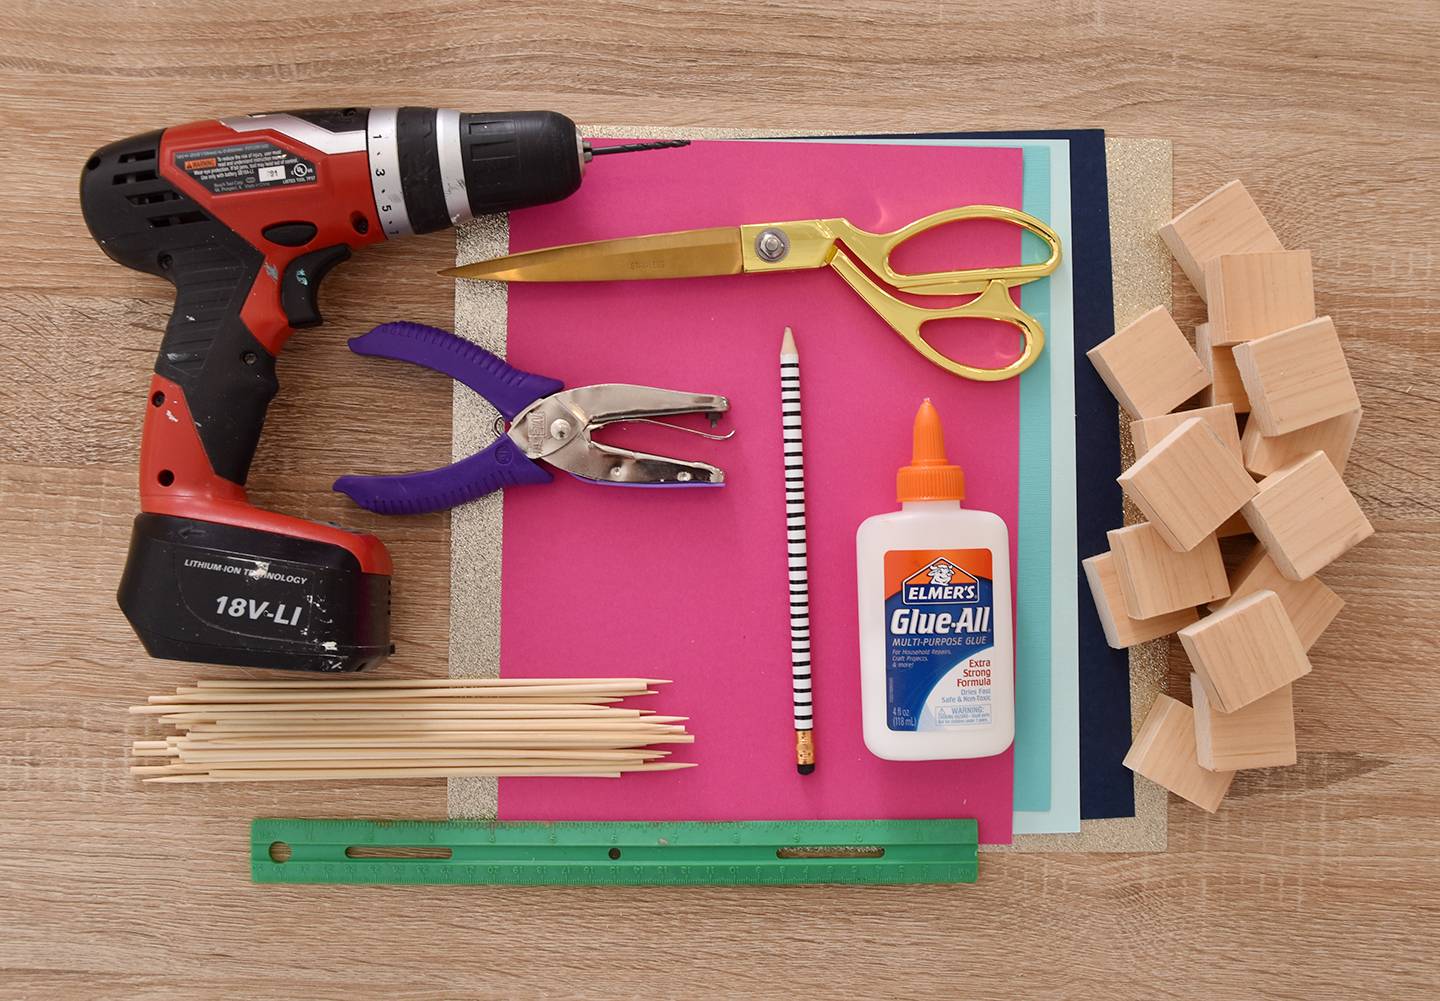
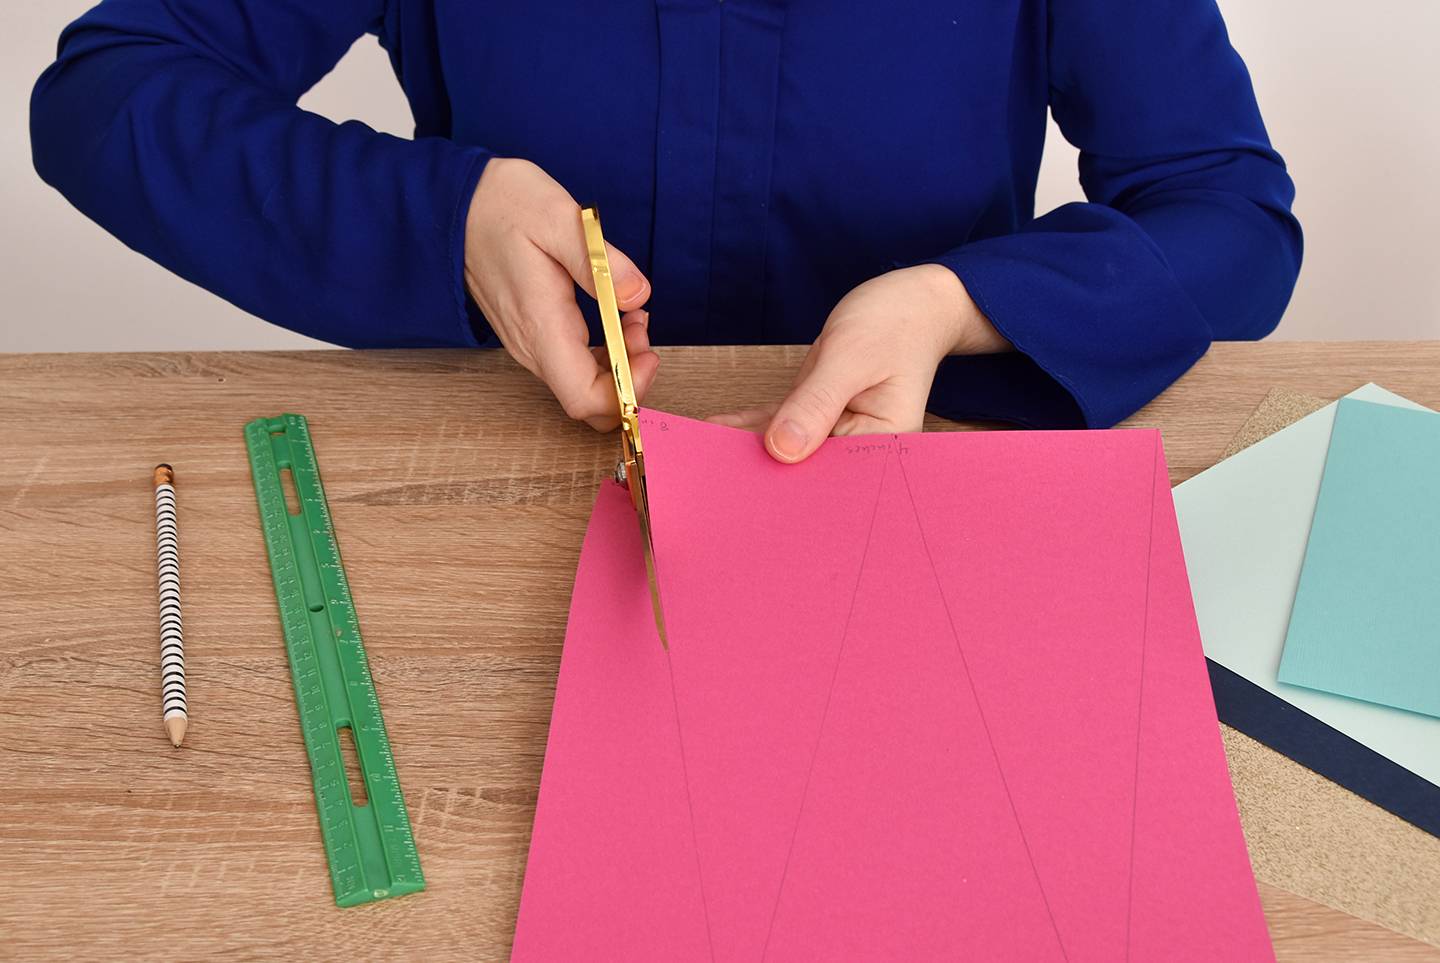
Begin by drawing tall triangles on the back of a piece of cardstock. They should be about 4 inches wide at the bottom, so if you have an 8 1/2 x 11 inch piece of cardstock, then you should make a mark at the 4 inch point along the bottom edge, and at the 8 inch point. Along the top edge, make a mark at the 2 inch point and the 6 inch point. Connect the dots from top to bottom and then cut out the triangles.

Each piece of 8 1/2 x 11 inch paper should make 3 triangles. Fold them each accordion style as shown above, making sure that each fold is about 1/2 an inch wide. Repeat this process on all of your triangles.

Next, punch a hole through the middle of the first couple of layers as shown above.

Make a mark inside the lowest hole and then punch through that spot to make sure that all of the holes are centered. Repeat this until you have made holes through the entire tree.

Alternate method: If you’re impatient like me, you may want to use your drill to make the holes instead. They do come out slightly ragged this way, however, whereas the hole punch method cuts very crisp holes. But it also takes much longer. You decide.

Drill a hole through the center of a piece of wood, stopping about half way through.
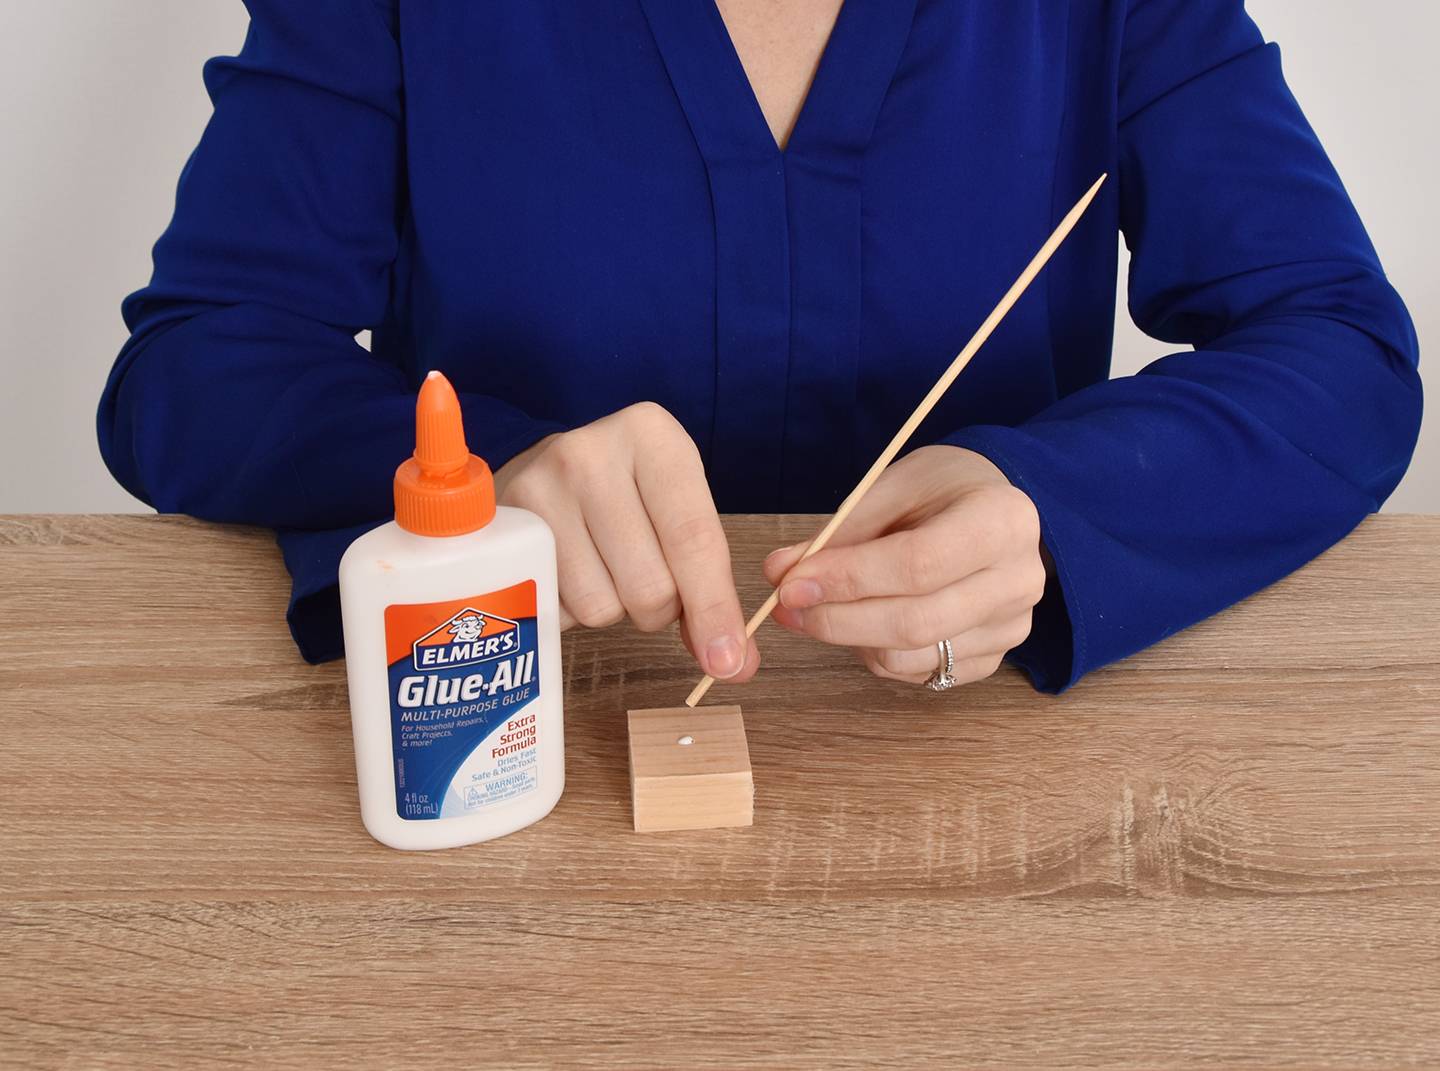
Put a tiny dot of glue in the hole and insert the skewer so that the pointy side is on the top.

Fold a paper tree back up and slip the skewer through the holes. Spread out the accordion folds so that everything looks even. Set it aside and repeat the process as many times as you like, depending on how big you want your forest to be.

The end result is super unique and festive, thanks to the glitter paper and bold colors. I love non-traditional colors, but if you’re more of a traditionalist, you might want to experiment with greens and reds.
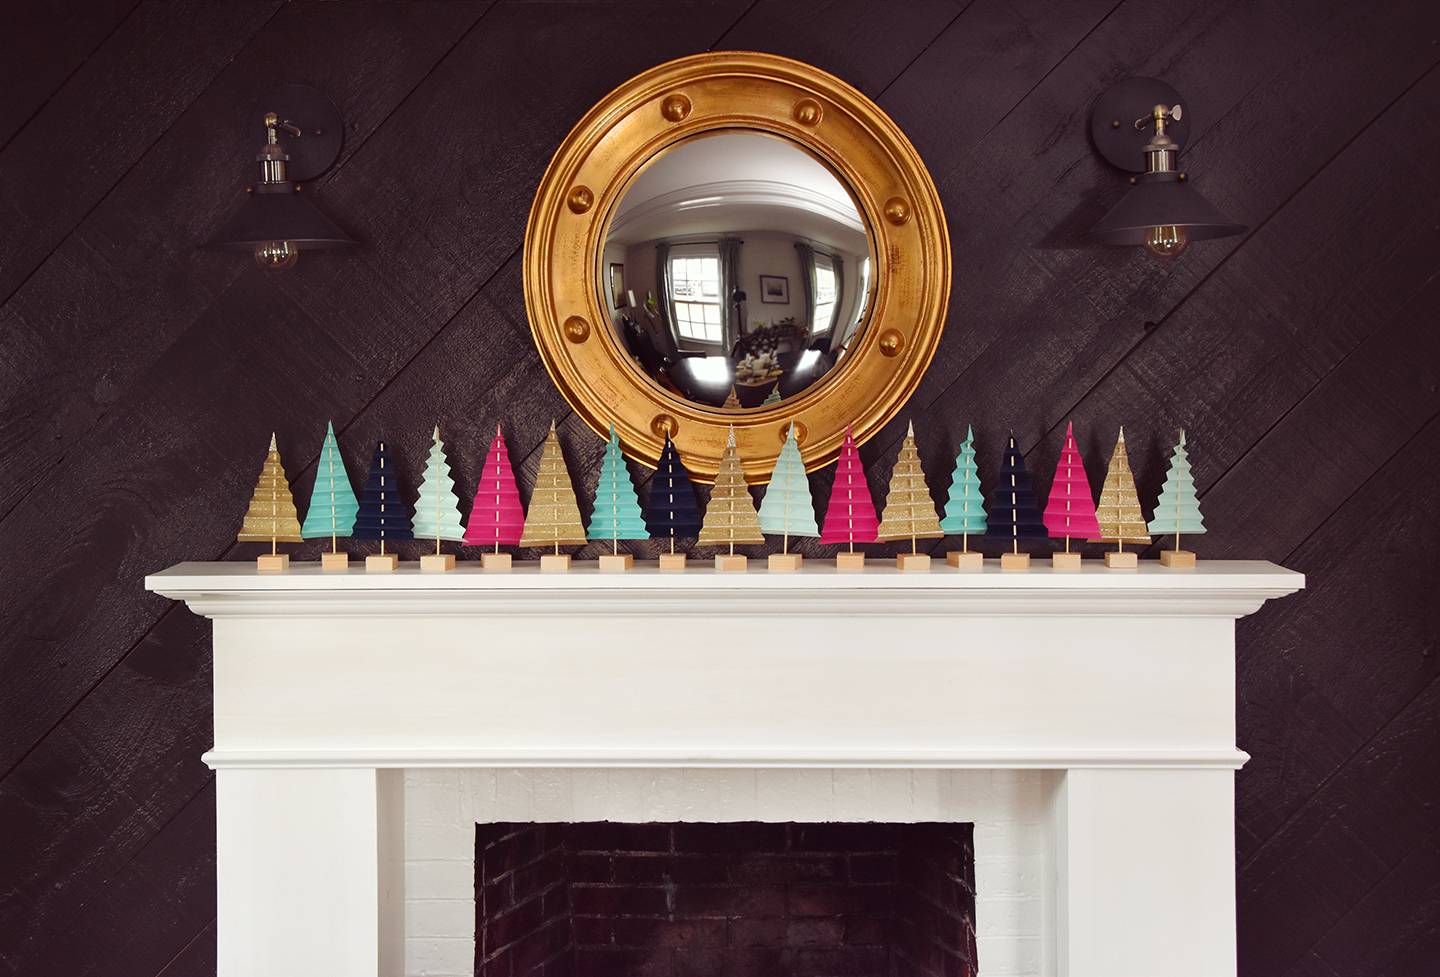
Or if you like more of a neutral look, you might consider all white and beige papers with different textures. You could use them throughout the winter if you opt for less of a holiday color scheme.

They look quite impressive lined up all together, but you could also scatter them around the house where ever you need a bit of extra holiday cheer. Happy crafting friends!


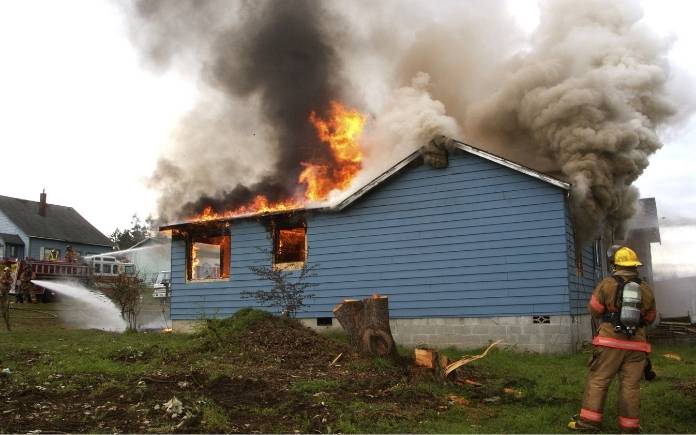
October is National Fire Prevention Month, so this week, I’m chatting with Capt. Dwight Smith and Steven Millhouse with Mobile Fire-Rescue in Alabama about their top fire safety tips for homeowners.
How do you put together a fire safety plan?
Stephen: The first thing is to actually have a plan. Many don’t even consider it until an emergency happens. You want to have a plan in place especially if you have small children or elderly people living with you as well.
Dwight: To expand on having children practice crawling, making it like a game also makes it a reality to them because it makes them familiar with what they need to do.
Direct them to feel on doors, and tell them if it feels hot, then they should go to the window.
Even though you’re teaching this to them as a game, you’re familiarizing them on how to get out of the house in case there’s a fire.
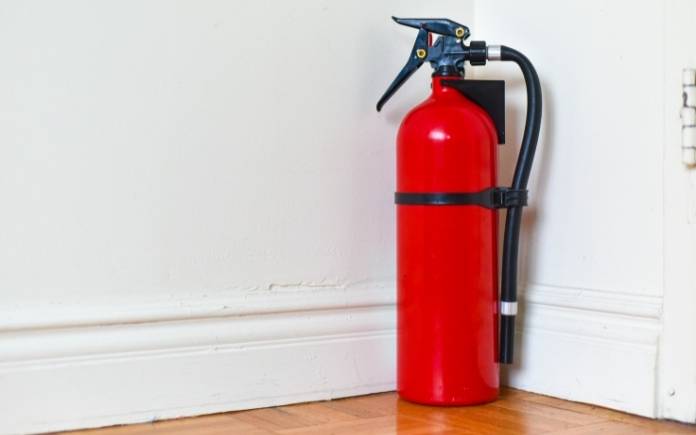
What are some fire extinguisher guidelines?
Dwight: A typical home should have at least two fire extinguishers: one for the laundry room and one for the kitchen.
Know what type of fire extinguisher you need. Fire extinguishers are categorized according to the class of fire they extinguish — Class A, Class B, Class C, Class, D, and Class K.
| Class of Fire | Description |
| Class A Fires | Fires in ordinary combustible materials, such as wood, cloth, paper, rubber, and many plastics. |
| Class B Fires | Fires in flammable liquids, combustible liquids, petroleum greases, tars, oils, oil-based paints, solvents, lacquers, alcohols, and flammable gases. |
| Class C Fires | Fires that involve energized electrical equipment. |
| Class D Fires | Fires in combustible metals, such as magnesium, titanium, zirconium, sodium, lithium, and potassium. |
| Class K Fires | Fires in cooking appliances that involve combustible cooking media (vegetable or animal oils and fats). |
In most cases, homeowners need a multiple-purpose fire extinguisher, which is classified as A, B and C.

What are some of the hazards that lead to a house fire?
Stephen: The number one cause of fires in a home is unattended cooking. This usually happens in the kitchen, but depending on the time of year it could happen outside.
During football season and summer when people are grilling, a fire could easily happen outside. If you’re using a deep frier, grill or smoker, you can’t cook if you’re not in that area.
As a fire safety precaution, stay there and attend to whatever you’re cooking, and have an outdoor fire extinguisher nearby, so you’re prepared in case something happens.
Also, before you leave your home, add making sure your iron and oven are off to your mental checklist of things you need to do.
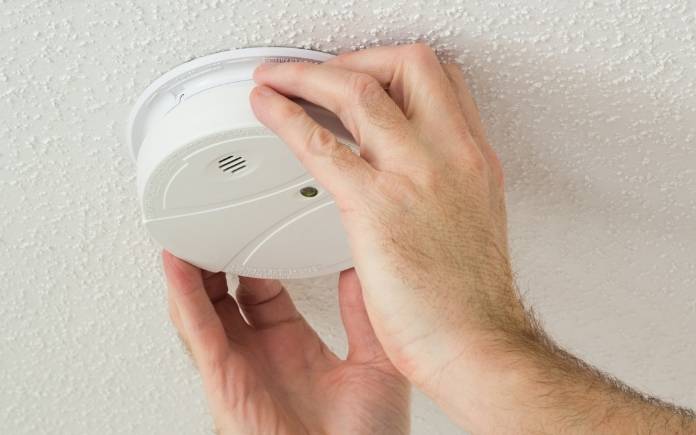
What’s some smoke detector maintenance homeowners should know?
Dwight: You should replace your smoke detector after 10 years. Mobile Fire-Rescue has a program to change out smoke alarms and batteries for citizens, and we’ve seen a lot of smoke alarms that are more than 20 years old that are not working.
Stephen: Test your smoke alarm to make sure it’s still operational. If you hear that chirping sound, don’t ignore it. That means it’s time to change out your smoke alarm batteries.
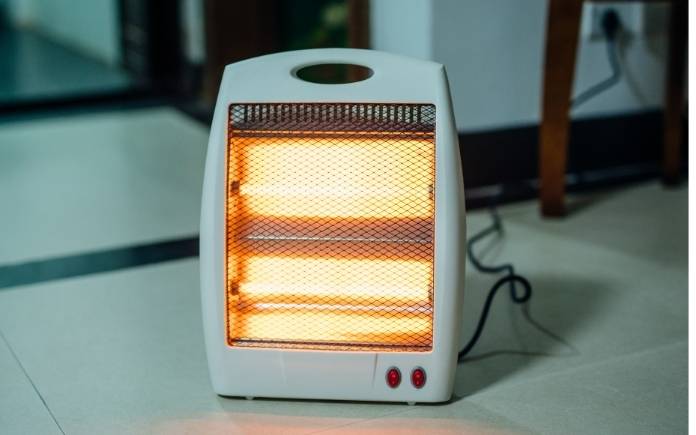
What are some fire safety tips for space heaters?
Stephen: The best thing you can do when using a space heater is follow the manufacturer’s guidelines and give it space.
You can’t operate a space heater if you’re not in that room. It’s supplemental heat for a small area, so it’s not meant to heat an entire room or home.

How often and when should you sweep your chimney?
Stephen: An important part of fire safety is sweeping your chimney at least once a year, especially just before you light it at the start of a new season.
Every season, there are all kinds of things that could be in that chimney — squirrels, birds, leaves, sticks, brush, anything that’s accumulated while you haven’t been using it.
Have it professionally inspected, cleaned and swept before you light it for cold weather months.
Ask a question and we could answer it on the “Today’s Homeowner Podcast!” We also may use it on our nationally syndicated radio broadcast or on todayshomeowner.com.
