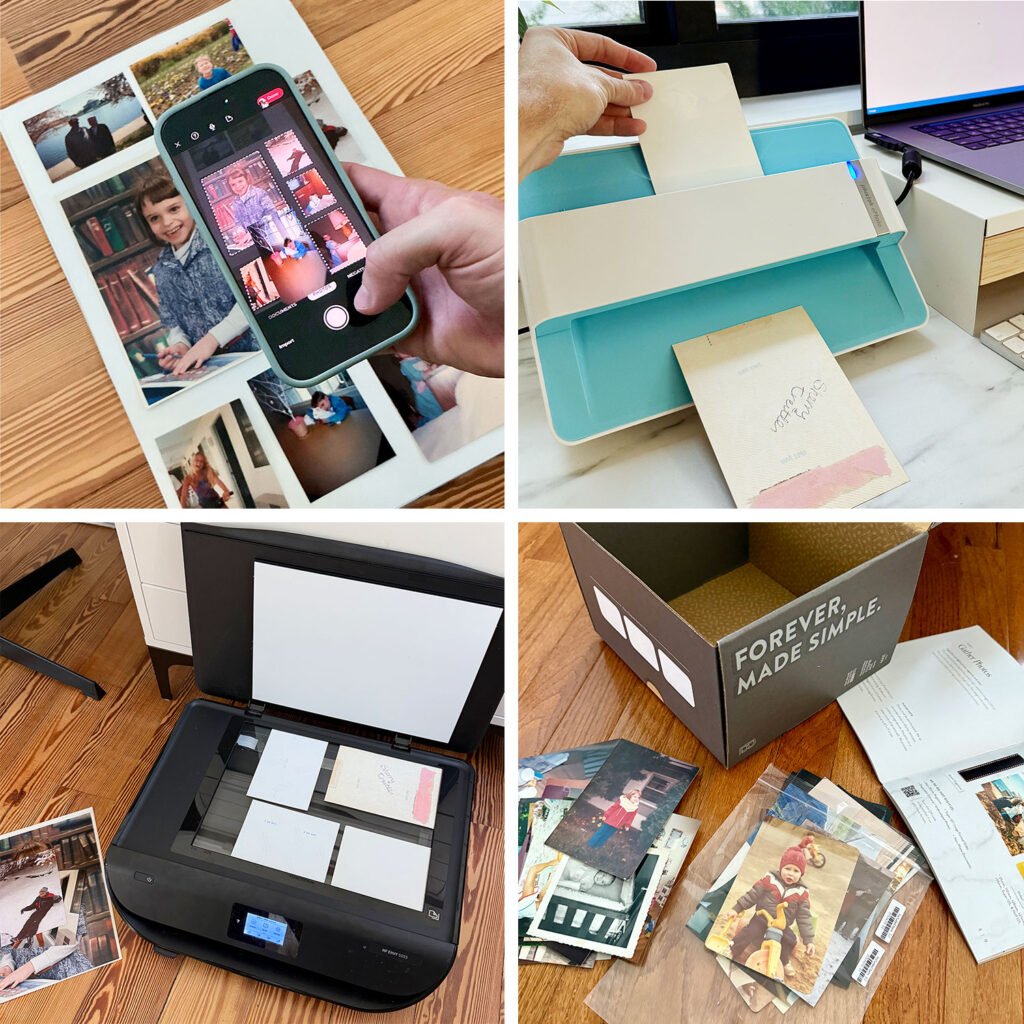
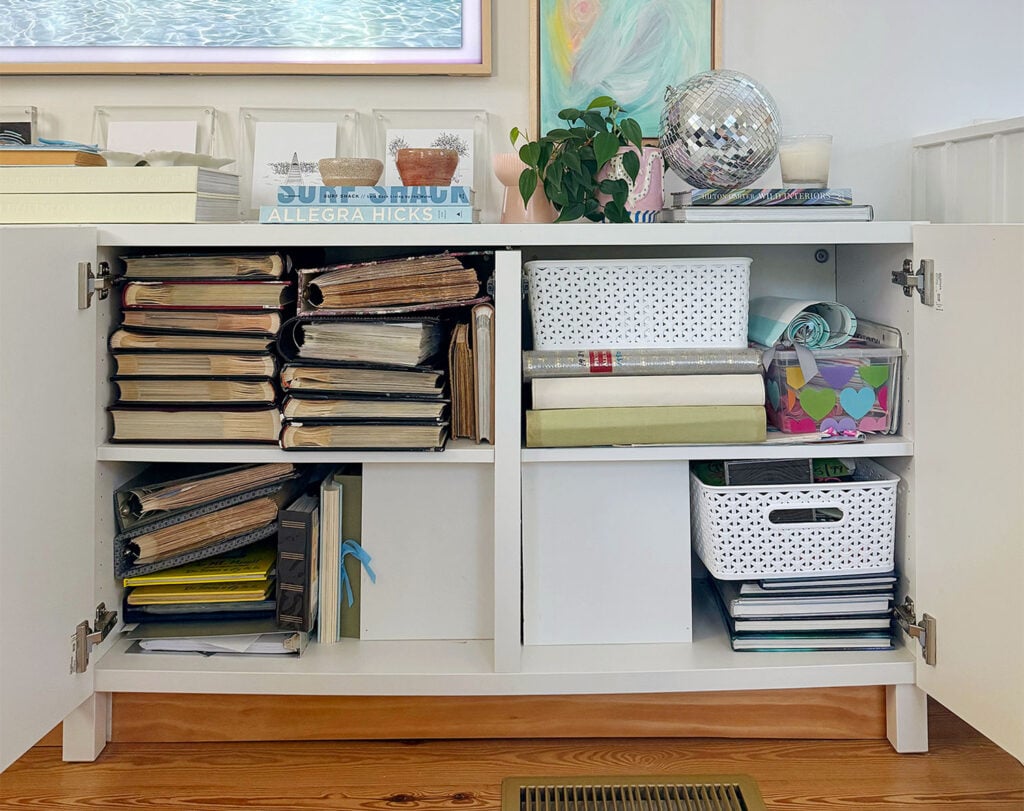
When I hyper-focus on a task, I’m known to go ALL IN. And that’s exactly how I approached the giant job of digitizing all of our old photo albums. We crowdsourced suggestions, took some deep dives into message boards, and Googled the heck out of it. From there, I narrowed our options to 5 photo digitization methods that we tested for quality, price, and speed. There was one clear winner for us, but also lots of other good ways to go about it (even free ones!), depending on your personal priorities. So I’m going to lay out everything we tried, and why we had a clear favorite.
As always, none of the products or methods mentioned have been sponsored or paid for. Everything was bought and tested with our own money, and we’re sharing what we liked best for no other reason than: we really did like it best!
The Photo Digitization Methods We Tested
We tried to pick a range of tools and techniques. Some free, some pricier. Some suspiciously fast, some more intricate. They were:
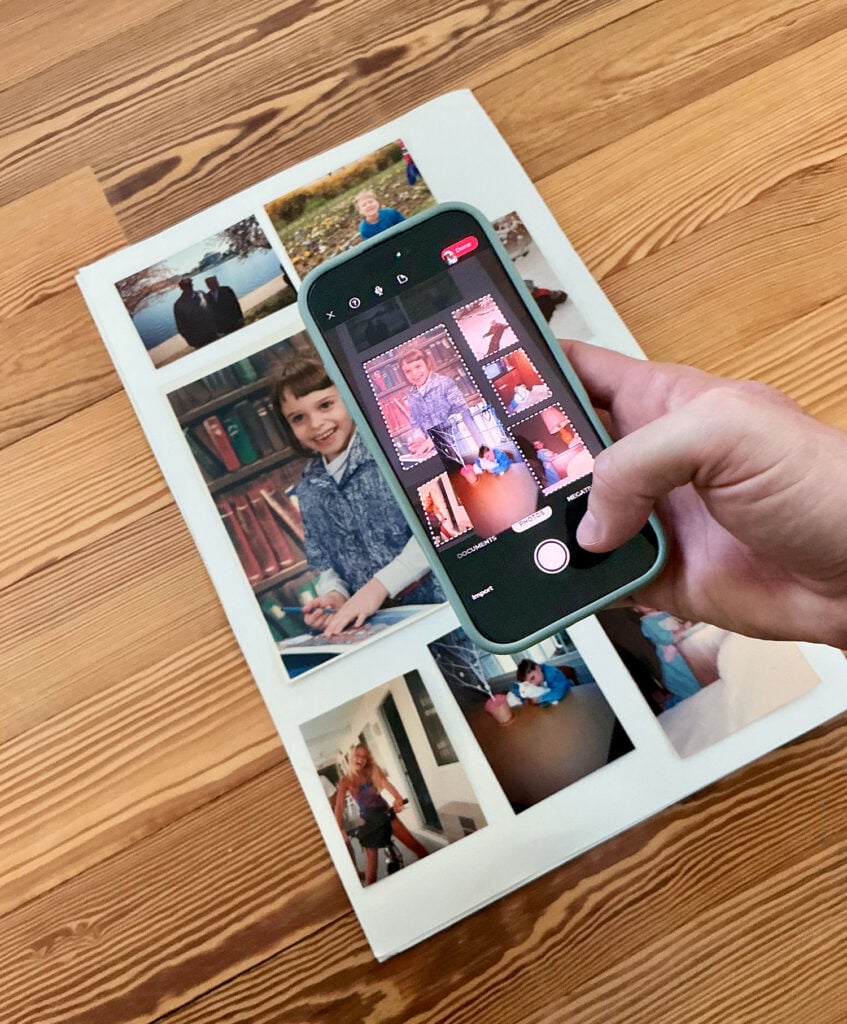
My phone’s camera (simply taking photos of pictures)
*Our printer from 2018 is still going strong, so that link is the closest current model.
I also filmed a quick, 90-second video of how method #2 (the Photomyne app) and #4 (the Plustek scanner) operate, since they’re the more “new-fangled” techniques we tried.
In testing each of these, we paid close attention to the following criteria:
Cost
Quality
Speed
Ease
Overall convenience
That last one is important because, like most people, we have OVER 1,500 old photos to scan. So it’s easy to lose steam if digitizing them feels like a slog. So, for us, that became the deciding factor for the overall best method.
Our Test Photos
Fair warning: you’ll see these pics of young John and little Sherry A LOT in this post. I used them to get apples-to-apples comparisons on quality. I also chose this particular shot of Sherry because it’s a little dark, letting us see how these scanners handle poorly lit photos.
And unless otherwise noted, I’m showing these photos here WITHOUT EDITS or ADJUSTMENTS. This gives you an idea of what you’ll get straight out of the camera or scanner.
Best Price ($0): Your Phone’s Camera
Most of us already own a phone, so it’s hard to beat the $0 price tag for this method. So if cost is your #1 priority, you’ll be glad to know your phone’s camera is a good quality option (I’m using an iPhone 16 Pro). However, this approach takes time, patience, and some setup for the best results.
If you go this route, here’s how to get the highest quality photos of your photos:
Set your camera to its maximum resolution (mine is 48MP)
If possible, use a tripod and your camera’s timer to minimize blur
Arrange your photo(s) on a white background, like a piece of poster board
Shoot in a place with good, indirect lighting, like a sunroom or porch on a cloudy day. This will minimize glare.
Shooting a grouping of prints together (like shown above) can be efficient, but you’ll lose some quality. Notice how the left images are a little blurry? That’s because my camera is pulled back to capture the group. For the best result, photograph your photos one by one so you can be closer to each print.
Overall, this method was way too slow for me. Even though it only took me 4 minutes to photograph 50 photos, I spent nearly 30 mind-numbing minutes cropping each one into an individual file. So, despite its pros (zero dollars! zero special equipment!), this method was way too inefficient.
VERDICT: Best method for digitizing a small number of photos without spending any money, otherwise, skip this.
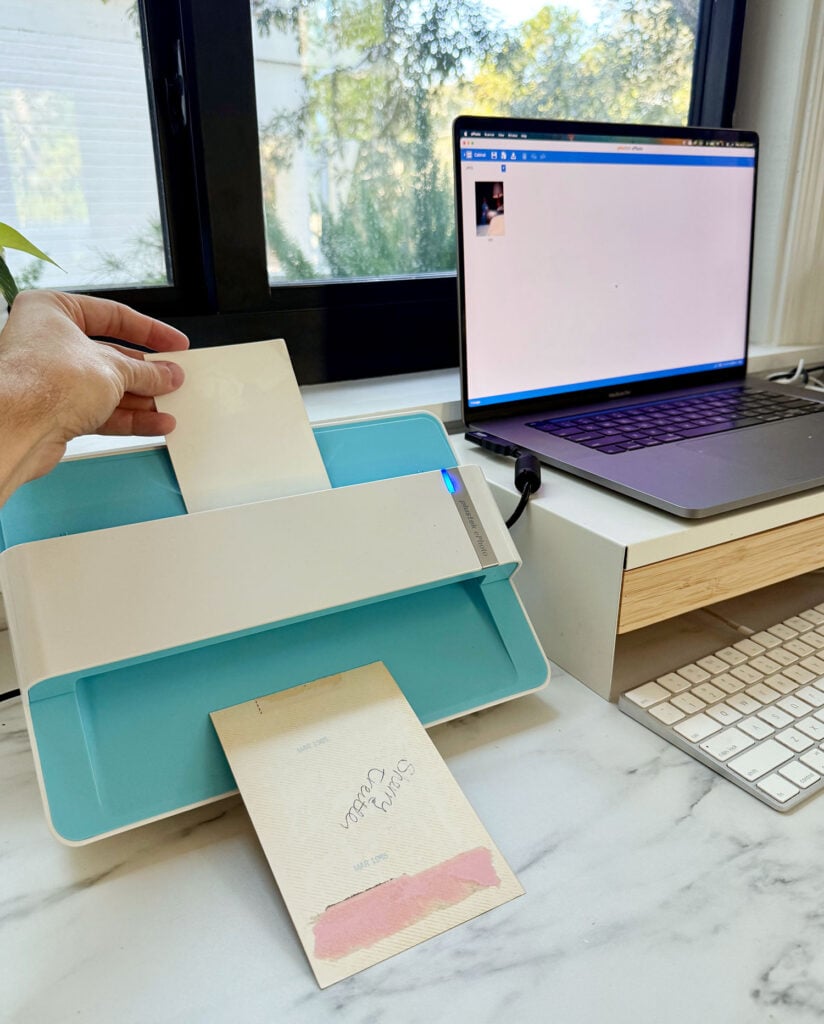
Best Quality: Flatbed Scanner
If quality is your top priority, I was most satisfied with the flatbed scanner in the HP Envy printer we already own… but only just by a hair. This method cost us $0 to try, but a new one sells for about $99. That’s about 1/2 the price of the special photo scanner I’ll discuss in a moment.
When I say “quality,” I mean that the scans were the clearest and most vibrant result without any edits or adjustments (see below). It also handled non-photo scans the best, like the greeting cards and letters I found in one of our albums. So if I were judging on versatility, this would probably win too.
I got similar results on the darker, indoor photo of Sherry. The files from my flatbed scanner were the most “ready to go” straight out of the camera/scanner. Again, the Plustek was a very close second.
Like the iPhone, the big drawback to this method is speed. I wasted a lot of time arranging photos on the glass, waiting for the scan, and then straightening & cropping the scans into individual photo files. This was the slowest method by far, so I wouldn’t recommend it if you have lots of photos.
VERDICT: Best for scanning a small number of photos you want at the highest quality.Likely will drive you crazy and you’ll never finish if you have a large amount of pictures.
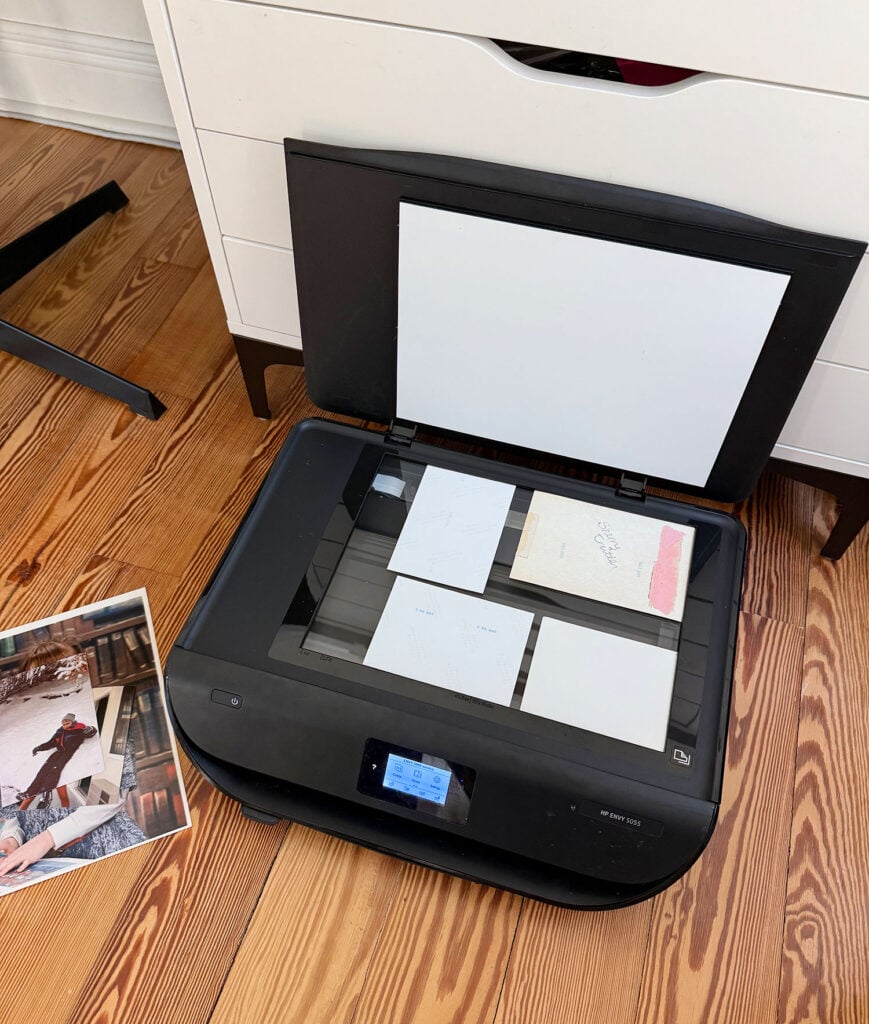
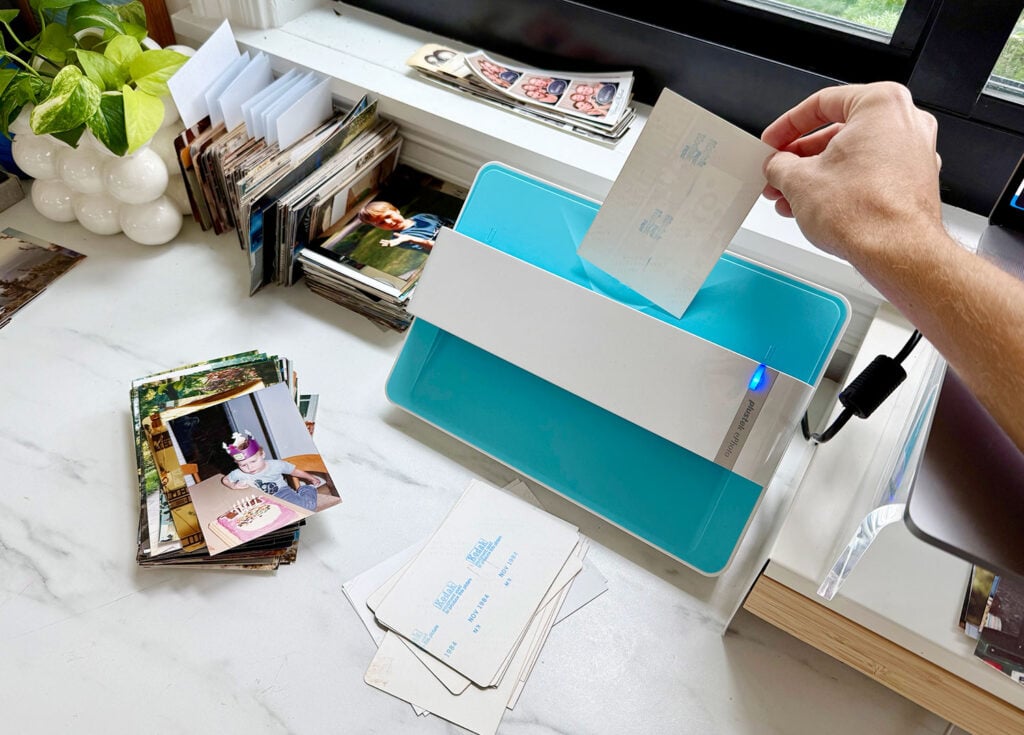
Best For Speed: Plustek ePhoto Scanner
When we asked for photo scanner recommendations on Instagram, the Plustek ePhoto Scanner was the clear favorite – and we can see why! We were a little hesitant to spend $200 when we already owned a flatbed scanner, but over 1,000 people recommended it so we went for it… and I’m so glad we did. The speed and convenience it offers are lifesavers for an undertaking like this.
Just place a photo facedown into the scanner, and it automatically feeds through in seconds. A moment later, an already-cropped file appears in the accompanying software, ready to save. I breezed through 50 photos in less than 5 minutes, making it waaaaay faster than the two methods above. Plus, it was so simple I could’ve done it all day.
VERDICT: Best for fast & easy scanning of large batches of photoswithout sacrificing good, high-quality results.
Getting The Best Quality Out of Plustek
I was actually pretty unhappy with the quality of my first few Plustek scans. They were dark and took a lot of adjusting to look…just okay. But after playing with some settings in the “Preferences” menu, I solved my problem! So before you dive in, do a few test scans and noodle settings until you’re happy.
You can see my preferred settings below – the most important wasturning on the ICC Profile. I liked “Photo Scanner (M21)” the best.
Here’s an example of what my scans looked like at first (left) and after I turned on the ICC profile (right). You can see how much brighter and more vibrant they are on the right.
The ePhoto software that comes with the scanner also includes some built-in photo & color adjustment tools, but I find them to be a little clunky. Luckily, most of my scans come out just fine without extra work.
Best For Speed (Runner Up): Photomyne App
If buying an extra device is a non-starter for you, an app like Photomyne is a good alternative. It supercharges your phone’s camera by auto-cropping your photos (see below), making it much faster than your iPhone alone. It’s not free ($60/year) and some editing features are behind additional paywalls, but there is a 3-day free trial you can use to test drive it.
As I noted above with the iPhone Camera, shooting a big group at once can reduce the quality of the individual photographs – but you’ll also lose some of the “magic” the app offers by shooting pictures one-by-one.
I didn’t splurge for any of the paid editing features, but some of the free ones seemed more gimmicky than actually useful. For instance, an AI facial-sharpening tool tended to make everyone look just a little…. off. You can see what it did to teen Sherry below. Note from Sherry: “those are someone else’s teeth in my mouth.”
Overall, I thought Photomyne did a good, quick job of scanning – even a smidge faster than the Plustek. But the physical process of arranging & photographing things was more cumbersome and prone to error than simply feeding prints through a scanner. I also felt the quality left something to be desired (a little dull & blurry). So some of the efficiency would be lost in having to edit and adjust them all afterwards.
VERDICT: Second best for speed if you don’t want to purchase a scanner.
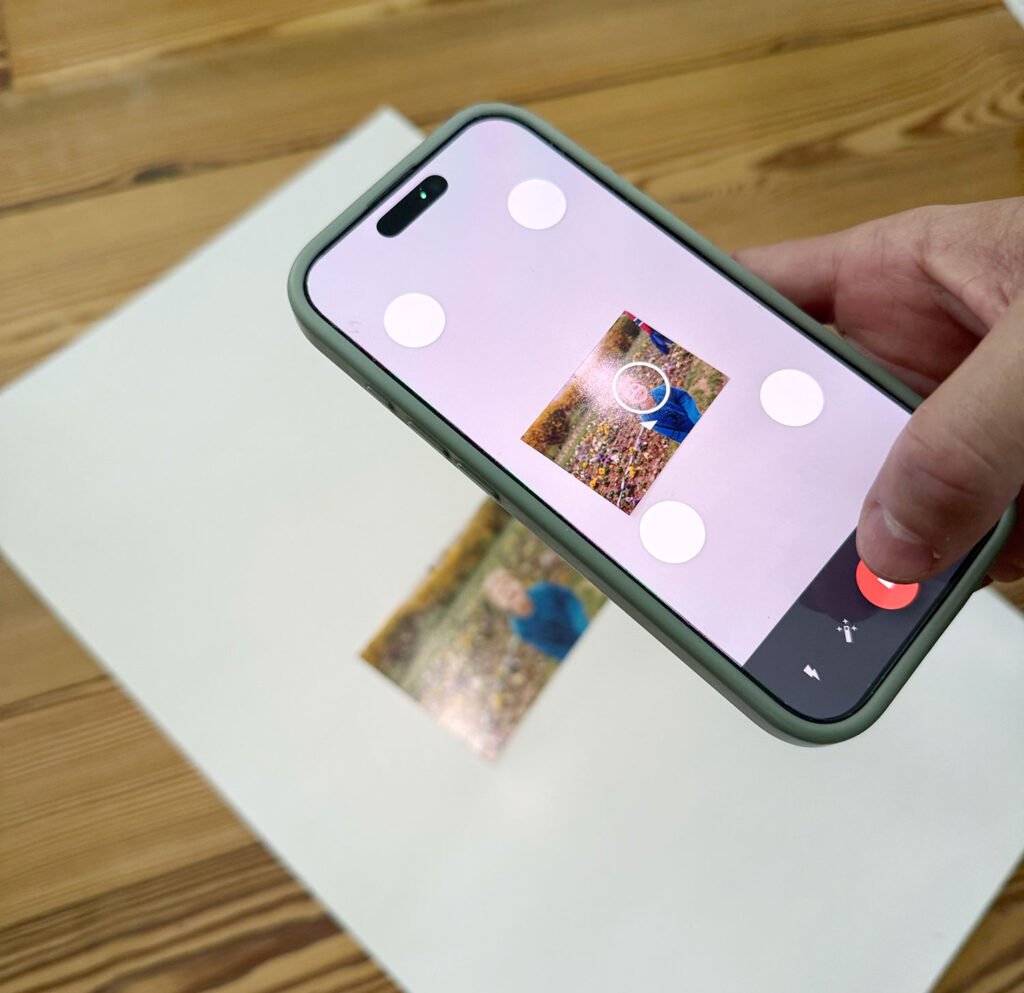
An Alternate Photo Scanning App
I chose to test Photomyne because of its ability to scan and crop multiple photographs at once. However, another popular digitizing app is PhotoScan by Google Photos. It only does 1 photo at a time, but uses an interesting technique to eliminate glare – even with the flash on! The app guides you to position a circle over four white dots on your screen, taking a scan at each corner. Then it stitches the multiple captures together seamlessly.
My results were mixed, however. Some attempts were blurry, and others still had glare. Plus, the process of taking multiple photos to get 1 scan was tedious. So I wouldn’t use this for bulk projects like mine. But it is free to use and links directly to a Google Photos account!
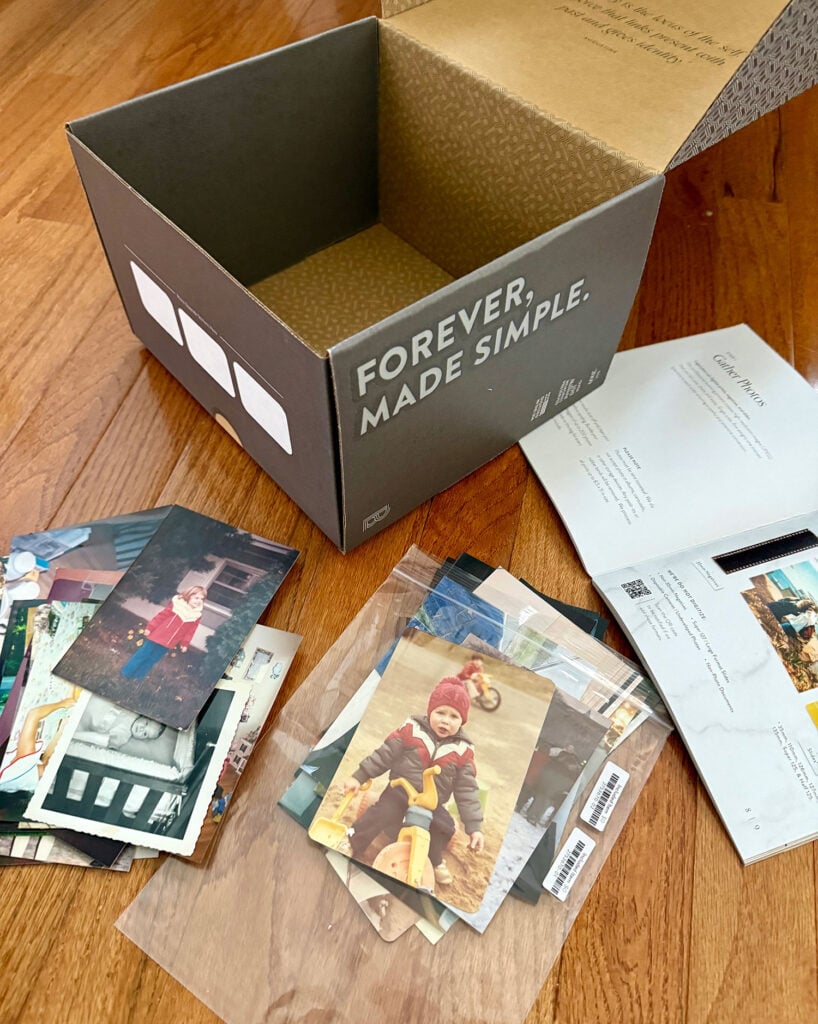
Best For Ease: LegacyBox
LegacyBox is a third-party scan-by-mail service that digitizes both photos and videos in a variety of formats (prints, 35mm negatives, slides, DVD, VHS, etc). They ship you a box, you send it back with photos inside, they digitize everything, and then return the originals to you. You can receive your final files via cloud download, thumb drive, or CD. My order is still processing, but it’s hard to imagine an easier, more hands-off process than this!
I will update this post once I’ve received my final files, so I can’t speak to quality yet. But I’m pretty certain LegacyBox will lose handily on both cost and speed (it’s expensive and takes a while).
I snagged a holiday discount to digitize 50 photos for $25, but after taxes, fees, shipping & handling, and shipping protection, my total was closer to $55. Sure, there would be economies of scale if I sent a bigger batch, but it quickly becomes the priciest option listed here (500 photos will set you back about $350).
As for speed, LegacyBox says standard processing takes 4-6 weeks, which doesn’t include the time to ship the box back and forth. So while it may not require a lot of your personal time, it’s not a great option if you’re in a hurry. And once you get the digital files, remember you still have to put them into a photobook and get that printed, so they don’t make the entire process hands-off.
VERDICT: Best if you have time and want an easy outsourced option to get the job done– especially if money is no object.
Our Final Verdict: The Best Photo Digitization Method
After all my testing, I’ve digitized hundreds of photos – but still have hundreds more to go. And the method I’ll be continuing with (if it wasn’t already obvious) is… the Plustek ePhoto Scanner!
It’s pretty much the ONLY method I can imagine using for such a large collection of photos. There’s no tripod, no shipping, no carefully arranging prints on a white backdrop or scanner pane. The Plustek is easy to set-up, simple to use, and even makes the process somewhat (dare I say?) relaxing. So if you can spare the $200ish to snag this scanner, I think you’ll be very glad that you did. I know we are! And now I know why over 1,000 people recommended it to us when Sherry asked for suggestions on Instagram.
What’s Next For Our Digitization Project?
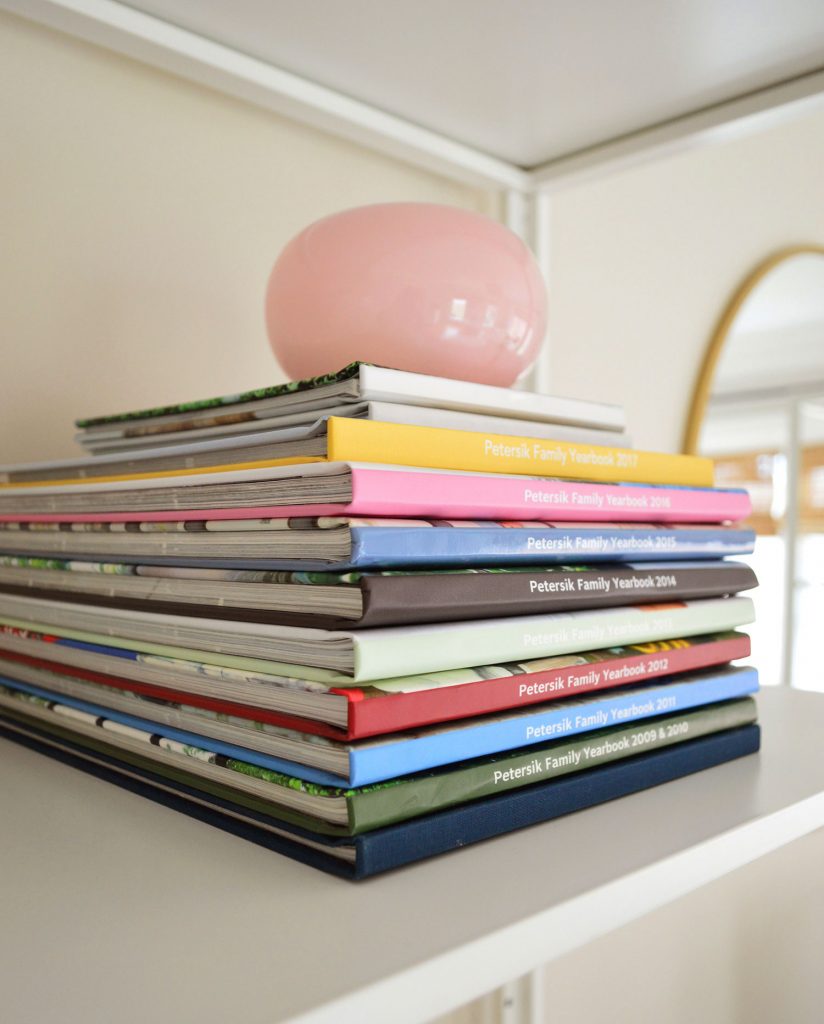
I’m grateful we’ve landed a digitization method, but there’s still plenty of work ahead! In addition to scanning everything, we want to make sure everything is backed up (locally & on the cloud) and then print several photobooks to replace our bulky albums.
You can see below how photobooks can hold hundreds of photos in a MUCH thinner format than the old puffy albums above. Each of the thin books below holds about 450 photos while the puffy ones above hold about 225. To put it another way: that’s ten years of photos (around 4,500!) below in those much thinner books, and fewer than 5 years of photos (around 1,125) in those puffy albums above, which take up about 4X more space.
In summary, we’re thrilled to be reclaiming some extra storage space when we finish this project! And we’ll feel a lot more secure once we have all our photos securely stored in multiple places (many of the photos in our old puffy albums exist only there… so if something happened to our house, they’d be lost forever).
Once we’ve finished this entire photo digitizing journey (what is this, The Bachelor?) I plan to write a final post with all of our tips & lessons learned from this undertaking. And I’ll be sure to address what we’re doing with the old photos we are keeping. Don’t worry, we’re not throwing everything away!
*This post contains affiliate links, so we may earn a small commission when you make a purchase through links on our site at no additional cost to you.
We independently select these products—if you buy from one of our links, we may earn a commission. All prices were accurate at the time of publishing.
When I pore over home decor images online, the most beautiful spaces, no matter their aesthetic, often have a finishing touch in common: an interesting door with great hardware.
My husband and I have put a lot of time and energy into upgrading our beach town apartment. Everything from the kitchen counter to the bathroom mirrors were low-cost builder grade and lacked personality when we first moved in. At this point, we’re finished with all the big renovations (bathroom, kitchen, patio, and laundry room).
And seeing how nice those spaces are now, the cheap builder doors looked out of place and extra-dated. They were hollow core, plain white doors that were painted and repainted many times over. They were pretty thin and would rattle with the slightest breeze, and the noise really bothered me. Having just finished the kitchen renovation, I had some left over budget (and energy, surprisingly) to tackle replacing the interior doors.
I did a fair bit of research on what style I wanted and how it would fit with the laid back vibe of the beach style we created through the rest of the spaces. I narrowed it down to a shaker style with its simple, yet classic design.
Up next was working the replacement of six doors into the leftover budget. To plan this out, I had to decide what kind of replacing I could do. With interior doors, there are a couple options.
There are pros and cons to both, but I ended up going with a slab replacement for budget reasons and because some of our door frames were really thin and cornered up next to each other. It would have ended up being a lot more work to get everything to fit just right in these types of corners. Buying a slab door was much cheaper than the pre-hung door, and I could comfortably fit the six doors in the budget — plus the unlacquered brass door handles I had my eyes on.
Here’s how I upgraded my doors using the pre-existing frames:
First, I made sure I had the right materials.
I had to make sure all of my materials were the right size and came in on time. When researching how to replace doors, I landed on a super helpful YouTube video that took me specifically through replacing slab doors. It involved trimming down the door with a circular saw, routing the spaces for the hinges, and drilling the holes for the handles. I already had a circular saw, a router, and a set of drill bits.
Once everything was installed, it was time to paint. Since the new slab doors came primed already, I didn’t have to do that part, and I just chose the color I painted my walls, Valspar’s Swiss Coffee white in eggshell. I used almost exactly 1 gallon at $75. After two coats of paint, everything was done!
All in all, this project took me about one full weekend and cost $2,114. Although it was a bit of a shock to look at the price tag all together, it came out to about $230 per room and boosted the style of every room. Not to mention, they’re much sturdier than the old doors. The unlacquered brass door knobs tie in with the brass I used in the laundry and kitchen renovations as well.
I’m a fairly skilled DIYer (see: my kitchen renovation, laundry renovation, and back patio), and my project took one day for the total install and one day for painting. But this is also a project that you could outsource.
Personally, I plan on holding onto our townhouse and not selling, so it was easy to make the upgrade choice based on my personal preference, but replacing your doors is also something you might consider if you’re selling.
Doors are so noticeable because it’s the first thing a visitor (or buyer) will see walking down a hallway or up to a room. Solid wood doors are something you can also immediately feel when you open them. It is an upgrade that could make a big impact in the sellability of your home. It sounds so simple, but installing new doors gave a new and fresh look to the whole inside.
Whether you already have them in your home or will be installing them and are preparing for their proper care, this guide on how to clean quartz countertops will cover all your bases.
When it comes to adding an elegant touch to your kitchen or bathroom, nothing quite beats quartz countertops. Made mostly of natural quartz crystals bonded with engineered resin, they’re cut into slabs and often used as kitchen counter surfaces. Compared to granite or marble, quartz is low-maintenance because it’s non-porous, meaning liquids are less likely to seep through and cause staining.
.tasty-pins-banner-container{display:block;margin-bottom:20px;position:relative;width:-moz-fit-content;width:fit-content}.tasty-pins-banner-container a{cursor:pointer;display:flex;font-size:14px;font-weight:700;letter-spacing:1px;line-height:1.8em;text-transform:uppercase}.tasty-pins-banner-container a:hover{opacity:1}.tasty-pins-banner-container .tasty-pins-banner{align-items:center;bottom:0;cursor:pointer;display:flex;justify-content:center;left:0;padding-bottom:1em;padding-top:1em;position:absolute;right:0}.tasty-pins-banner-container .tasty-pins-banner svg{margin-right:4px;width:32px}.tasty-pins-banner-container .tasty-pins-banner span{margin-top:4px}.tasty-pins-banner-container a.tasty-pins-banner{text-decoration:none}.tasty-pins-banner-container a.tasty-pins-banner:hover{opacity:.8}.tasty-pins-banner-container a.tasty-pins-banner-image-link{flex-direction:column}.tasty-pins-banner-container a img{margin-bottom:0}.entry-content .wp-block-image .tasty-pins-banner-container img{margin-bottom:0;padding-bottom:0}#et-boc .et-l div .et_pb_image_wrap .tasty-pins-banner-container .tasty-pins-banner{padding-bottom:1em!important;padding-top:1em;text-decoration:none}#et-boc .et-l div .et_pb_image_wrap .tasty-pins-banner-container a.tasty-pins-banner{cursor:pointer;display:flex;font-size:14px;font-weight:700;line-height:1.8em;text-transform:uppercase}#et-boc .et-l div .et_pb_image_wrap .tasty-pins-banner-container a.tasty-pins-banner span{letter-spacing:2px;margin-top:4px}.et-db #et-boc .et-l .et_pb_module .tasty-pins-banner-container a:not(.wc-forward){padding-bottom:0}
Maybe you’re looking to add a quartz countertop to your home for your next remodel (or this surface is already featured in your space), but you aren’t sure how to maintain its appearance…you’re in luck.
After years of keeping my own quartz surfaces gleaming, I’ve learned what works (and what definitely doesn’t!).
Understanding Your Quartz Countertops
Before diving into cleaning techniques, it’s helpful to understand what makes quartz countertops unique. Unlike natural stone countertops such as granite or marble, quartz is an engineered stone, typically composed of about 90-95% ground natural quartz crystals, polymer resins, and pigments.
This manufacturing process creates a non-porous surface that’s highly stain-resistant and doesn’t require sealing like natural stone does.
The non-porous nature of quartz means bacteria and viruses have nowhere to hide, making these countertops exceptionally hygienic for food preparation.
However, the resin binders that make quartz so durable can be sensitive to certain harsh chemicals and high heat, which is why knowing the right cleaning methods is so important.
Daily Cleaning for a Fresh Start
The secret to keeping quartz countertops looking their best? Consistency. A quick daily wipe-down prevents buildup and keeps your surfaces sparkling with minimal effort. Here’s my go-to routine that takes just a few minutes:
Gather your supplies: a soft cloth or non-abrasive sponge, warm water, and mild dish soap. I keep a designated spray bottle under my sink filled with a gentle cleaning solution, it makes daily maintenance so much easier!
Mix equal parts warm water and soap to create your cleaning solution. If you prefer a spray bottle, use about two tablespoons of mild soap (dish soap works) per 16 ounces of water. This mild mixture is all you need for everyday cleaning and won’t damage the resin in your quartz counters.
Spray or dampen your cloth with the soapy water and wipe down your countertop, paying special attention to high-traffic areas around the sink, stove, and food prep zones. I like to work in sections, especially on larger kitchen islands, to ensure I don’t miss any spots.
Rinse your sponge or cloth with clean water, then wipe the surface again to remove any soap residue. This step is crucial, as soap film can dull the finish over time, so don’t skip it!
Finally, dry the countertop with a clean, dry microfiber cloth. This prevents water spots and streaks while giving you that gorgeous, streak-free shine. I find that microfiber cloths work better than paper towels for achieving that showroom finish.
The Best Cleaning Products for Quartz
While dish soap and water work beautifully for daily cleaning, you might want specialized cleaners for your quartz countertops. Look for pH-balanced, non-abrasive cleaners specifically formulated for quartz or stone surfaces. Many manufacturers recommend their own branded cleaners, but any gentle, stone-safe cleaner will work.
Some of my favorite store-bought options include Weiman Quartz Cleaner, Method Daily Granite Cleaner (which works great on quartz too), and Simple Green Stone Polish. These products are designed to clean effectively while enhancing the natural shine of quartz without leaving residue.
For a natural DIY approach, you can create an effective spray cleaner using water, a small amount of dish soap, and rubbing alcohol. The alcohol helps the solution dry quickly without streaks. Mix one cup of water, one tablespoon of dish soap, and one tablespoon of rubbing alcohol in a spray bottle for an economical cleaning solution.
What to Avoid: Products That Damage Quartz
Just as important as knowing what to use is understanding what to avoid. The resin in quartz countertops can be damaged by harsh chemicals, abrasive materials, and certain acidic substances. Here’s what should never touch your quartz surfaces:
Avoid bleach, ammonia, or any cleaners containing these ingredients. While quartz is stain-resistant, these harsh chemicals can break down the resins binding the quartz crystals together, leading to discoloration and dullness over time. If you accidentally use these products, rinse the area immediately with plenty of water.
Stay away from abrasive scrubbing pads, steel wool, or scouring powders. These can scratch the surface, creating tiny grooves where dirt and bacteria can accumulate. Even “soft scrub” type cleaners often contain mild abrasives that can damage quartz over time.
Skip acidic cleaners like vinegar, lemon juice, or lime-based products for regular cleaning. While quartz is more acid-resistant than natural stone, prolonged or repeated exposure to acidic substances can etch or dull the surface. If acidic foods or drinks spill on your counters, wipe them up promptly.
Avoid oil-based or wax cleaners, furniture polish, and cleaners with dyes. These can leave a film on your quartz that builds up over time, making your countertops look dull rather than shiny. The non-porous surface of quartz doesn’t need these products and won’t absorb them properly.
Never use oven cleaners, drain cleaners, turpentine, or any highly alkaline or highly acidic chemicals near your quartz countertops. If these products accidentally contact your surface, rinse immediately and thoroughly with water.
Tackling Stains and Stubborn Marks
Although quartz countertops are highly stain-resistant, they’re not stain-proof. Knowing how to address different types of stains quickly is key to keeping your surfaces pristine. Here’s how I handle the most common culprits:
Everyday Food and Beverage Stains
For most food and beverage spills, think coffee, tea, wine, or juice, the warm water and mild dish soap mixture works perfectly. The key is addressing these stains quickly. If you catch a spill within a few hours, it typically wipes away effortlessly.
For dried or set-in food stains, let your cleaning solution sit on the stain for a few minutes to break it down before wiping. Use a soft cloth or non-abrasive sponge and gentle circular motions. Rinse thoroughly with clean water and dry with a microfiber cloth.
Grease and Oil Stains
Kitchen oils and greasy splatters can leave stubborn marks on quartz if not cleaned promptly. For these, I use a slightly stronger approach: mix warm water with a bit more dish soap than usual to create a concentrated degreasing solution.
Apply the solution to the greasy area and let it sit for 5-10 minutes. The dish soap will break down the oil, making it easier to remove. Gently scrub with a soft cloth, rinse with clean water, and dry thoroughly. For particularly stubborn grease, you might need to repeat this process.
Dried or Stuck-On Messes
For gum, wax, hardened food, or other stuck-on substances, reach for a plastic putty knife or a credit card rather than a metal scraper. Gently scrape off the material, being careful not to scratch the surface. Work at an angle and use light pressure.
Once you’ve removed the bulk of the material, clean the area with your regular soap and water solution. If any residue remains, a small amount of rubbing alcohol on a cloth can help dissolve sticky remnants.
Tough Stains That Need Extra Help
For stubborn stains that resist regular cleaning, create a gentle paste using baking soda and water. Mix equal parts of each to form a thick paste with a consistency similar to toothpaste. Apply this paste directly to the stain and gently rub in circular motions using a soft cloth.
Let the paste sit for 10-15 minutes, then rinse thoroughly with water and dry. The mild abrasiveness of baking soda is usually safe for quartz, but always use gentle pressure and test in an inconspicuous area first if you’re concerned.
For stains from nail polish, ink, or permanent markers, dampen a cloth with isopropyl rubbing alcohol and gently dab the stained area. Don’t scrub aggressively—let the alcohol do the work. Rinse the area with clean water and dry completely.
Restoring Shine to Dull Quartz Countertops
Over time, even well-maintained quartz countertops can lose some of their luster due to soap buildup, hard water deposits, or general wear. If your once-gleaming counters look dull or hazy, don’t worry—you can restore that showroom shine!
Start by thoroughly cleaning the entire surface with your regular soap and water solution, then rinse extremely well to remove all soap residue. Sometimes dullness is simply caused by soap film buildup.
For a deeper clean, create a solution of equal parts water and rubbing alcohol. Spray or wipe this mixture over the entire countertop, then immediately buff dry with a clean microfiber cloth. The alcohol cuts through any remaining residue and evaporates quickly, leaving behind a brilliant shine.
If you have hard water in your area, mineral deposits might be causing dullness. Mix equal parts water and white vinegar, apply to the affected areas, and let sit for just one minute (no longer!). Rinse immediately and thoroughly with water, then dry completely. While we generally avoid acidic cleaners on quartz, this quick treatment can remove mineral buildup without causing damage.
For ongoing shine maintenance, consider using a quartz-specific polish or cleaner once a week. These products are specially formulated to enhance the natural luster of quartz without leaving harmful residue. Follow the manufacturer’s instructions carefully for best results.
Preventing Damage and Maintaining Beauty
Keeping your quartz countertops shiny and clean goes beyond just cleaning—it’s about protecting them from potential damage in the first place. Here are my essential prevention tips:
Always Use Cutting Boards
While quartz is extremely durable and scratch-resistant, it’s not scratch-proof. Always use cutting boards when preparing food. Cutting directly on quartz countertops can leave marks over time, especially from serrated knives or when applying significant pressure.
Protect from Heat
This is crucial: although quartz is heat-resistant, it’s not heatproof. The resin binders can be damaged by extreme temperatures. Always use trivets, hot pads, or heat-resistant mats under hot pots, pans, and dishes straight from the oven or stove.
I learned this lesson the hard way when I set a hot baking dish directly on my counter—it left a permanent mark that no amount of cleaning could remove. Prolonged exposure to temperatures above 300°F can cause discoloration, scorching, or even cracking. It’s simply not worth the risk!
Clean Spills Immediately
The beauty of quartz is that it’s non-porous, which means most spills won’t absorb if you wipe them up promptly. Make it a habit to address regular daily spills as soon as they happen, especially pigmented liquids like red wine, coffee, beet juice, or tomato sauce.
Even though quartz resists staining better than natural stone, allowing spills to sit for extended periods gives them more opportunity to adhere to the surface or affect the resin. A quick wipe prevents potential problems entirely.
Use Coasters and Placemats
Protect your countertops from potential ring marks and moisture by using coasters under glasses and mugs. While quartz won’t stain from water rings like wood furniture, acidic beverages can potentially affect the surface if left sitting for hours.
Common Mistakes to Avoid
Through my years of maintaining quartz countertops, I’ve learned that certain habits can actually harm rather than help. Here are the most common mistakes to avoid:
Don’t use excessive force when cleaning. Quartz is durable, but aggressive scrubbing with rough materials can cause surface damage. Let your cleaning products do the work—if something won’t come off with gentle pressure, it needs a different cleaning approach, not harder scrubbing.
Avoid letting cleaning products sit on the surface for extended periods. While a few minutes is fine for tough stains, leaving cleaners on quartz for hours can potentially cause discoloration or dull the finish. Always rinse thoroughly after cleaning.
Don’t assume all “stone cleaners” are safe for quartz. Some products designed for natural stone contain sealers or waxes that aren’t appropriate for engineered quartz. Always check that products are specifically labeled as safe for quartz.
Never place extremely cold items directly on quartz countertop surfaces either. While we often think about heat damage, extreme cold can also cause thermal shock. Let frozen items sit for a moment before placing them on counters, or use a trivet or towel.
Creating a Proper Maintenance Schedule
Consistency is the secret to effortlessly maintaining beautiful quartz countertops. Here’s the schedule I follow:
Daily: Quick wipe-down with soap and water, especially after meal prep and cooking. Dry thoroughly to prevent water spots.
Weekly: Deeper clean with a quartz-specific cleaner or polish to maintain shine. Address any spots or marks that regular cleaning might have missed.
Monthly: Inspect your countertops for any developing issues—minor scratches, dull areas, or persistent stains. Address problems early before they become harder to fix.
As Needed: Deep clean with baking soda paste for stubborn stains, or restore shine with alcohol and water solution if surfaces look dull.
This routine keeps my countertops looking pristine without requiring hours of work. The daily maintenance truly takes just minutes, and that consistency prevents bigger problems from developing.
When to Call a Professional
While most quartz countertop care is absolutely DIY-friendly, there are times when professional help is warranted. If you notice deep scratches, chips, cracks, or significant discoloration that doesn’t respond to cleaning, contact a stone restoration professional. They have specialized tools and products that can repair damage without replacing your countertops.
Similarly, if you’re unsure whether a particular stain or issue will respond to home treatment, consult the manufacturer or a professional before attempting potentially risky cleaning methods. It’s always better to ask first than to accidentally cause irreversible damage.
The Joy of Beautiful Countertops
You did it—you now have all the knowledge you need to keep your quartz countertops looking absolutely stunning! By following a regular cleaning routine, using the right products, and taking simple preventative measures, your countertops will maintain their elegance and durability for years to come.
The beauty of quartz is that it doesn’t demand complicated maintenance rituals or expensive specialty products. A little daily attention and some basic precautions are really all it takes to keep these surfaces looking their best. And there’s something so satisfying about that gleaming, clean countertop when you walk into your kitchen each morning—it just makes the whole space feel more welcoming and put-together.
Whether you’re cooking up a storm, hosting friends, or simply enjoying your morning coffee, those sparkling quartz countertops will continue to be a beautiful, functional feature of your home. Let those counters shine on!
Last fall, I got to eat, walk, and gasp my way through Florence, Italy (including a day trip to Venice) with three friends. Literally, it was the stuff of dreams. I already shared how I packed light for this trip, but today I’m recapping everything we did, saw, and ate. So if you’re considering a trip to Florence (and/or Venice), here are my thoughts on what was extremely enjoyable to see/eat/do… and a few things we’d actually skip if we were to do it all over again!
I went to Italy with Elsie & Emma (the sisters behind A Beautiful Mess) and Elise (from Elise Joy). The 4 of us have traveled to each other’s hometowns to hang out and go antiquing & eat delicious things over the last few years – and to celebrate Emma’s 40th birthday, we decided to take an international trip together. After much debate, we landed on Florence, Italy (with a day trip to Venice). The thought process behind it was that none of us had ever been to Italy, and those cities promised to satisfy our mutual interests in art, architecture, outdoor markets, and good pasta.
We relied on a travel agent to help coordinate our trip, book the accommodations & tours, etc. This was my first time using a travel agent (other than the art trip I took to France, which was planned by the gallery that coordinated it), and it definitely took a lot of the stress out of the trip. But there were a couple of activities that didn’t pan out (I’ll explain more below). So reading this might just save you time and money!
We stayed at a beautiful boutique hotel called Hotel Il Guelfo Bianco (the photo above is the view from my room!). I can’t say enough good things about this hotel, which had a lovely lobby, a gorgeous atrium, and little rooftop areas you can sit and unwind (my room was on the 4th floor, and there was a patio right outside of my door!).
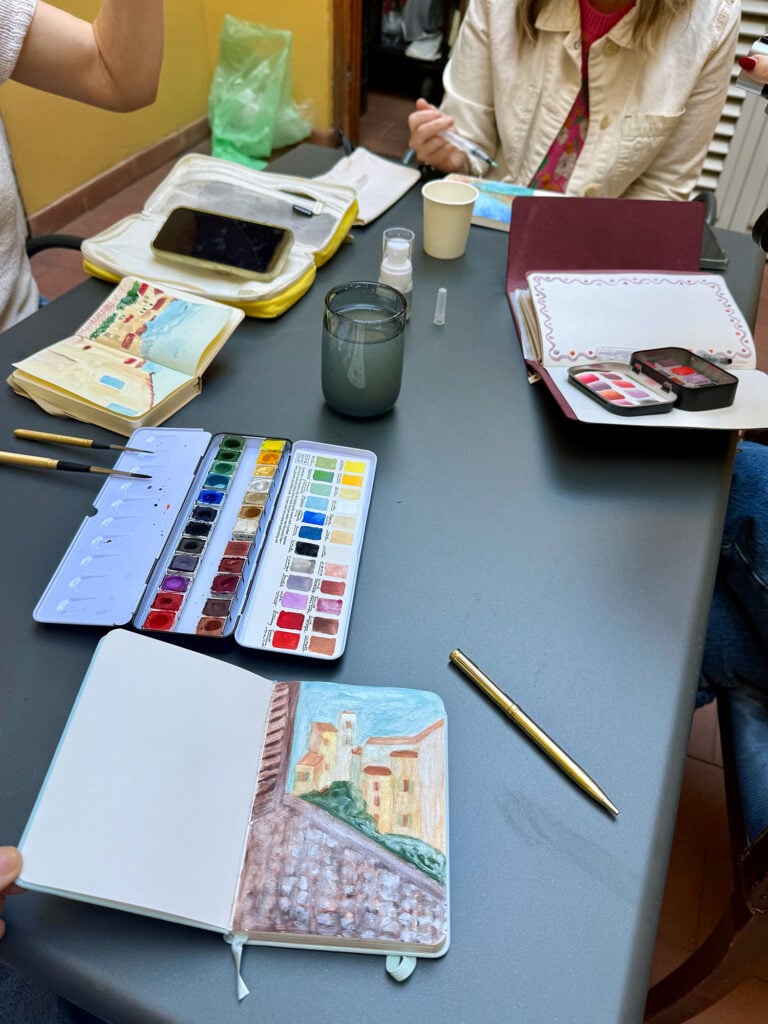
We really liked that there was unscheduled time built into every day of our trip (we typically had one planned activity like a tour or museum each day, and then some free time to explore, hang out, eat, shop, etc). For example, we used one of our free mornings to chat and paint watercolor landscapes on the hotel rooftop and it was one of our favorite activities of the week.
We each flew from our respective cities to Florence. Elsie, Emma, and I were able to connect in Chicago and fly to Munich and then Florence together. We used a taxi service (booked by the travel agent) to take us to our hotel and after that, we accessed everything else on foot for the next 4 days! Florence is very walkable and most of the sites are centrally located. You really can walk all around it to get to everything – especially if the weather is as beautiful as it was when we were there. We went in early November, and it was clear and sunny every day. So as long as you bring comfy shoes, you can pretty much get all around Florence to your heart’s content.
The only transportation other than rides to and from the airport that entire week was a train for our day-trip to Venice. Our travel agent booked those tickets ahead of time, but we were able to change them with no problem on our own (we decided to take an earlier train home since we flew out the next morning and wanted more sleep the night before our early morning flight). You can walk to the train station in both Florence and Venice, so overall it was super easy to get around.
What We Did In Florence
Let’s start with a rundown of the key sites, activities, and tours we booked for this trip. Then I’ll get into the shopping, food, and other highlights.
Women of Florence Walking Tour: We really loved this tour that our travel agent set up for us. We had a female guide who was around our age and had lived in Florence her entire life. She was wonderful. Since this was a private walking tour (just the four of us and our guide) she asked for a lot of input about what we were most interested in seeing.
We said “we’re more into paintings than statues, we love beautiful architecture, and anything involving artistic women would be great- the theme of our trip is basically creativity + girl power.” She was amazing and pivoted randomly after showing us some great paintings and architecture to introduce us to a female artisan who makes Stradivarii violins in a tiny shop with a glass window so people on the street can catch a glimpse of her handiwork. And when we stopped by we learned she was originally from California and had an actual chat with her. Really epic. Our guide also took us through many Florence landmarks and even gave us tips for where to get some good coffee and a nice lunch.
Below is the iconic Duomo, which we also learned a lot about. Absolutely stunning and GIANT in person. This picture cannot capture the true scale.
Since Florence is such an old city, it’s full of gorgeous architecture and heart-stopping craftsmanship. They just don’t make things like they used to. So I highly recommend this tour!
Guinti Odeon: This is a combination cinema/bookstore that was so fun to walk around! Beautiful architecture and so many cool books!
There literally was a movie playing both times we stopped in, and the upper area where you could view the movie was so beautiful – really the entire building was a work of art. And the books were in both English and Italian, so there was a lot to choose from.
Uffizi Gallery: This was universally our favorite art museum in Florence (we also have a fav in Venice that we’ll share) because it was packed with iconic works like The Birth Of Venus by Botticelli (we couldn’t believe how amazing that painting was in person. Literally it took our breath away). These hand-painted ceilings that connected different rooms in the museum were mesmerizing too!
We did another private tour here – so it was just the four of us with our guide – and our guide was the same woman who had taken us on the walking tour a day earlier! We asked how often that happened and she said in 20 years of being a guide, it had never happened before (there are over 40 guides who work at the same company that she does)! We felt so lucky to have her as our guide again.
Gucci Galleria: This was a surprising fav of the entire group. Just a visual delight. Not only does it showcase their iconic clothing designs from many eras, there’s also a room that shows how they design scarves that was completely fascinating. And we all loved the stunning room full of bags with mirrors that you can see below – it creates the illusion that it’s absolutely endless. It’s just a really fun place to walk around like a science museum – and it was very affordable and quick to slip through.
Ikigai Tattoo Studio: Elsie and I traveledto France together a few years ago and got tattoos there, so we decided that getting small tattoos during our trips should be a tradition. When it came to picking out a good spot that we liked enough to get another one (Emma got one with us too) we just googled the tattoo parlors that came up and looked at the client images that came up to see their style. This tattoo salon had lots of women tattoo artist (I personally love the delicate linework that female tattoo artists have accomplished on my arms and wrists) and their photos were extremely crisp and well done. So it really was an easy choice. We showed up without an appointment and within around 1.5 hours we all walked out with new tattoos. Highly recommend. The women there were so welcoming and so talented.
Peggy Guggenheim (Venice): During our day trip to Venice, this was the absolute highlight. Once again we did a private guided tour, but for this location I don’t think it was necessary. It was a much smaller museum and it’s in an actual home, which was gorgeous and so fun to explore. Don’t get me wrong, we learned a lot of insider stuff from the tour guide, but it was much less overwhelming than some of the larger musuems, so I think you’d have fun just walking yourself around too. Don’t forget to check out the garden, where the iconic Peggy Guggenheim herself is buried, along with her pets. She was delightfully eccentric and literally the perfect legend for our creativity + girl power trip. Her musuem and home were amazing and she was a true visionary.
Where We Ate In Florence
Buca San Giovanni: This restaurant was the best! We learned about it from a local that we befriended. It’s a super old building and you walk down these steps to a hidden restaurant that’s in this cove-like room. The food was fantastic and so was the service. The locals all love this place. It’s a good spot that I’m convinced we never would have found on our own. Don’t miss it!
Paszkowski: This is a great bakery and coffee place with little treats. Our tour guide said the locals love it and it for sure had tourists too but the coffee was good and there were nice pastries and stuff. It has a cute outdoor area to sit and people-watch too.
Gilli: This was another cafe our local tour guide said had good coffee, hot chocolate, and lunch. We got some small plates and coffee and loved it. We ate outside and it’s where we met the local who told us about the first restaurant on this list, which was our favorite of the trip.
Cacio E Pepe: We went to this restaurant for lunch and we all got their specialty… cacio e pepe. It was FANTASTIC. I think we all rate it as our very favorite pasta of the entire trip – which is almost impossible to decide – but it was THAT GOOD.
La Bottega Di Via Maggio: This is small restaurant with like two tables and they make it all fresh. We had 3 types of gnocchi and loved it!
Gelato… literally anywhere: We tried so many gelato shops – and each one was great. Our hot tip is that cherry is the best gelato flavor by far – much better than pistachio and caramel or anything heavy. At least that was our consensus. But what do four Americans know? Ha.
Where We Shopped In Florence
Ugo Poggi: This was a gorgeous plate and glass shop. Just unbelievably beautiful plates and cups and mugs and platters. Some of it was extremely expensive but other items felt totally affordable. Elsie got a gorgeous platter that I think she’ll treasure forever. Definitely a fun spot to pop into.
Santo Spirito Vintage Market: This market only happens the 2nd Sunday of each month and we partially planned our arrival so we could attend. It was GREAT!! We actually walked for hours to another market on another day and it was underwhelming by comparison. This one, was very cute! You had to dig through some booths to find treasures, but there were beautiful vintage pins and jewelry, old art and lovely silk scarves. Even some vintage bags and some great paintings. Also Sia from NY Housewives was there the same day we were there, but sadly we missed her.
Officina Profumo-Farmaceutica di Santa Maria Novella: This was a spot Elsie heard we had to go to, because it’s a gorgeous old building that sells perfumes, soaps, candles and other beautiful home items. There was a charming pottery pomegranate that was delightfully scented and all of us pined over it (but worried how it would travel back home without shattering). The perfumes and soaps were gorgeous too – and the most beautiful thing of all was the building itself. Such a lovely shop.
Calzaiuoli Leather Factory: The local we met who told us about some great restaurants was actually the owner of this leather goods shop – and let me tell you, they sold some beautiful things. Both Elise and I left with leather bags from this shop. Who can resist that buttery soft Italian leather?
The Things We Would Skip
The Vasari Corridor: Our travel agent booked this tour directly after our private walking tour of the Uffizi Gallery and it was essentially a big white hallway. We would definitely skip it next time. Apparently, there used to be a ton of amazing portraits in there, which now are located in the Uffizi Gallery (we saw them there and loved them) – so the hallway… was really just a hallway. It had some white busts inside, and a very cool glimpse into a church from above – but it was otherwise just a freshly drywalled hallway without any historical info, or any guide or signage telling you anything. We all universally agreed we would have preferred to spend the 20 Euros it cost each of us in many other ways. The gallery itself was amazing – so we’d just say, skip paying extra to see the corridor (which we affectionately named “the bore-idor / snore-idor”).
Row Venice: This activity actually seems great, but there was a hilarious miscommunication / misunderstanding between us and our travel agent. We thought we were getting a leisurely gondola ride with wine & food (you know, the cliche that you picture in Venice!), so we were dressed nicely (I had little heeled boots on) and showed up with our paint kits ready to look out on the water and chat and paint… but it turns out with Cichetto Row, you actually do the rowing yourself! Literally, like a challenge on the Amazing Race. We showed up, and our tour guide was dressed in athletic clothing and said “so… do you guys row?” and we were like… “um, no…. there has been some sort of mistake.”
It was the last activity of the day and we had so enjoyed the Peggy Gugeinheim museum and were eager to get back to the hotel to pack and sleep before an early flight home, so we told her to keep the money and politely backed out (she honestly seemed very relieved after seeing what we showed up wearing). We really appreciated the extra time to rest and pack before our early flights the next morning anyway, but if you’re up for a physical challenge, adventure-type thing, I bet it would be perfect for you!
More Favorite Trips
Here are some recaps of other international (and domestic) trips we’ve taken – including my last girls’ trip to Sedona and how we took our dog to Mexico!
*This post contains affiliate links, so we may earn a small commission when you make a purchase through links on our site at no additional cost to you.
Moving is expensive, and losing your security deposit makes it worse. Whether it’s one or two months’ rent, that’s hundreds or thousands of dollars you can’t afford to lose. The good news? Most security deposits ARE returned when tenants follow the right steps.
This guide covers everything from protecting your deposit on day one through getting that check in the mail. We’ll show you how to document properly, clean effectively, and dispute unfair charges if needed.
.tasty-pins-banner-container{display:block;margin-bottom:20px;position:relative;width:-moz-fit-content;width:fit-content}.tasty-pins-banner-container a{cursor:pointer;display:flex;font-size:14px;font-weight:700;letter-spacing:1px;line-height:1.8em;text-transform:uppercase}.tasty-pins-banner-container a:hover{opacity:1}.tasty-pins-banner-container .tasty-pins-banner{align-items:center;bottom:0;cursor:pointer;display:flex;justify-content:center;left:0;padding-bottom:1em;padding-top:1em;position:absolute;right:0}.tasty-pins-banner-container .tasty-pins-banner svg{margin-right:4px;width:32px}.tasty-pins-banner-container .tasty-pins-banner span{margin-top:4px}.tasty-pins-banner-container a.tasty-pins-banner{text-decoration:none}.tasty-pins-banner-container a.tasty-pins-banner:hover{opacity:.8}.tasty-pins-banner-container a.tasty-pins-banner-image-link{flex-direction:column}.tasty-pins-banner-container a img{margin-bottom:0}.entry-content .wp-block-image .tasty-pins-banner-container img{margin-bottom:0;padding-bottom:0}#et-boc .et-l div .et_pb_image_wrap .tasty-pins-banner-container .tasty-pins-banner{padding-bottom:1em!important;padding-top:1em;text-decoration:none}#et-boc .et-l div .et_pb_image_wrap .tasty-pins-banner-container a.tasty-pins-banner{cursor:pointer;display:flex;font-size:14px;font-weight:700;line-height:1.8em;text-transform:uppercase}#et-boc .et-l div .et_pb_image_wrap .tasty-pins-banner-container a.tasty-pins-banner span{letter-spacing:2px;margin-top:4px}.et-db #et-boc .et-l .et_pb_module .tasty-pins-banner-container a:not(.wc-forward){padding-bottom:0}
Understanding Your Security Deposit Rights
What Is a Security Deposit?
A security deposit is money renters pay upfront—typically one to two months’ rent—that serves as financial protection for the landlord. However, this is YOUR money held in trust, not a fee.
Deposits can legally cover damage beyond normal wear and tear, unpaid rent or utilities, lease violations, and excessive cleaning costs. They CANNOT be used for normal wear and tear (faded paint, worn carpet from regular use), repairs from landlord neglect, or upgrades the landlord chooses to make.
Return timeline: Most states require 14-30 days (California: 21 days, New York: 14 days)
Interest requirements: Some states mandate interest on deposits held long-term
Itemized deductions: Nearly all states require detailed lists with receipts
Search “[Your State] security deposit laws” to understand your specific rights.
Normal Wear and Tear vs. Damage
“Normal wear and tear” is deterioration from ordinary use over time. “Damage” results from negligence or abuse.
Normal wear and tear (NOT deductible): Faded paint, minor scuff marks, worn carpet in high-traffic areas, loose door handles, small nail holes, dirty windows.
Damage (deductible): Large holes in walls, broken windows or fixtures, pet stains and scratches, cigarette smoke damage, permanent carpet stains, broken appliances from misuse.
The rule: If you caused it through carelessness, it’s damage. If it happened naturally from living there, it’s wear and tear.
Protect Your Deposit from Day One
Document Everything at Move-In
Within 48 hours of moving in, take comprehensive photos and videos of every room from multiple angles.
Get close-ups of any existing damage, stains, or issues. Document all walls, floors, appliances, bathroom fixtures, windows, doors, light fixtures, and inside closets and cabinets.
Complete the move-in checklist in extreme detail. Don’t write “good condition” if there are any issues. Be specific: “small dent in bedroom door,” “light scuff marks on living room wall.” Have your landlord sign and date it, or email it to them for a paper trail.
Review Your Lease Carefully
Note specific requirements about move-out cleaning, notice requirements (typically 30-60 days), repair responsibilities, and any pet policies. Understanding these upfront prevents costly mistakes later.
Build a Good Landlord Relationship
Communicate promptly and professionally in writing (email is perfect). Pay rent on time, follow property rules, and document all interactions. A landlord who views you as a good tenant is more likely to be reasonable about minor issues at move-out.
During Your Tenancy
Clean regularly to prevent dirt and stains from becoming permanent. Address issues promptly—a small leak can become major water damage.
Report problems in writing to create documentation.
Get written approval before making any changes, save receipts for repairs you make, and take photos documenting any incidents or repairs.
Provide your landlord notice when preparing to move out within the timeframe outlined by your lease.
The Move-Out Cleaning Checklist
The property should be as clean as when you moved in. This is where most deposits are lost or secured. Here’s your deep cleaning guide:
Kitchen
Appliances: Remove and wash all refrigerator shelves and drawers. Wipe down interior surfaces and door seals.
Clean the top, sides, and underneath if possible. Use oven cleaner on the interior and scrub away all baked-on grease.
Clean stovetop burners and drip pans thoroughly. Run the dishwasher empty with cleaner and wipe down the door and edges.
Surfaces: Scrub the sink until it shines. Wipe down all countertops, backsplash, and cabinet exteriors. Clean inside all cabinets and drawers, removing any crumbs or spills.
Floors and Details: Sweep and mop thoroughly, paying attention to corners. Wipe down baseboards and clean any light fixtures.
Bathrooms
Fixtures: Scrub the toilet bowl, seat, tank, and base. Remove all soap scum and mildew from the shower and tub. Scrub tiles and grout. Clean shower door tracks thoroughly. Polish all chrome fixtures.
Vanity and Surfaces: Scrub the sink and faucet. Wipe down countertops and clean inside all cabinets. Polish mirrors and medicine cabinets.
Finishing Touches: Clean the exhaust fan cover. Sweep and mop floors, including baseboards.
Living Areas and Bedrooms
Floors: Vacuum carpets thoroughly, including edges and corners. Consider renting a carpet cleaner for deep cleaning, especially if there are stains. Sweep and mop all hard floors.
Walls and Windows: Spot clean any marks or smudges with a damp cloth. Fill small nail holes with spackle if needed. Clean all windows inside and out, along with sills and tracks.
Details: Dust ceiling fans and light fixtures. Replace burnt-out bulbs. Vacuum inside all closets. Wipe down all baseboards. Remove and wash air vent covers.
Often-Missed Areas
Don’t forget: inside closets, top of ceiling fans, behind appliances, window tracks, door frames, inside the dishwasher and microwave, dryer lint trap and vent, and any balcony or patio areas.
Should You Hire Professional Cleaners?
If your lease requires it, you must. Otherwise, consider professionals if you’re short on time, the property is large, or you want documentation. Professional cleaning typically costs $200-$500, but can prevent larger deposit deductions.
Final Walk-Through Strategy
Request a pre-move-out walkthrough inspection with your landlord if possible. This allows you to address any concerns they raise while you still have access to the property, and shows good faith.
After cleaning, take comprehensive photos and videos of every room, matching the angles from your move-in photos when possible.
Be sure to remove all personal items so you can show all rooms empty, clean appliances (open doors to show interiors), spotless bathrooms, and clean floors, walls, and windows.
Return all keys, remotes, parking passes, and any other items. Get a written receipt that you returned everything on a specific date, or send a confirmation email and keep a copy.
After You Move Out
Follow Up on Your Deposit
Provide your forwarding address in writing and know your state’s timeline for deposit returns (typically 14-30 days). Mark this date on your calendar. If you haven’t heard from your landlord a few days before the deadline, send a polite email reminder referencing your state’s law and the due date.
Review the Itemized Statement
When you receive your deposit statement, compare it to your move-in and move-out photos. Check that:
Charges aren’t for normal wear and tear or pre-existing damage
Amounts are reasonable and supported by receipts
The statement includes an itemized list of the damage, costs, and receipts (required in most states)
The math is correct
Disputing Unfair Deductions
If charges are improper, send a formal dispute letter via certified mail including:
Your name, property address, and move-out date
Specific reasons each charge is improper
References to state law and your documentation
The amount you believe you’re owed
A deadline for response (10-14 days)
If the landlord doesn’t respond, consider filing a complaint with your state’s tenant protection agency or pursuing small claims court.
Small claims court is practical when the disputed amount is significant, you have thorough documentation, and the landlord has violated state law. Many states award double or triple damages for willful withholding, and courts tend to favor well-documented tenants.
Common Reasons Tenants Lose Deposits (And How to Avoid Them)
Inadequate cleaning (most common): Follow the detailed cleaning checklist, don’t rush the process, and consider professional cleaners. Take before-and-after photos of the house or apartment.
Damage beyond normal wear and tear: Treat the property carefully, repair minor damage yourself (nail holes, scuffs), and report issues immediately.
Unpaid rent or utilities: Pay all rent through your last day, verify final utility bills are paid, and never use your deposit as “last month’s rent” unless explicitly allowed.
Not giving proper notice: Review notice requirements early (typically 30-60 days), provide notice in writing via email and certified mail, and keep proof of delivery.
Breaking the lease early: Review early termination clauses, attempt to negotiate, find a replacement tenant if allowed, and document reasons for breaking the lease.
Missing items or keys: Make a list of everything that came with the rental, ensure it’s all present at move-out, and get receipts for returned items.
Pet damage: Professionally clean carpets, repair scratches, and eliminate odors completely.
Smoking damage: If you smoked inside, be prepared for significant cleaning costs, including wall washing and carpet cleaning or replacement.
Special Situations
Pet Deposits: Have carpets professionally cleaned and save the receipt. Repair scratches, eliminate all odors, and take extensive photos showing no pet damage.
Roommate Situations: When moving out together, agree in advance on how to split deductions. When one roommate moves early, document the property condition, get written agreements on responsibility, and involve the landlord to clarify liability.
Breaking a Lease: Review early termination clauses, check if your state allows termination for specific reasons (military deployment, unsafe conditions), try finding a replacement tenant, and consider negotiating to forfeit part of your deposit. Document everything if breaking due to landlord violations.
HOW TO GET YOUR DEPOSIT BACK: STEP-BY-STEP CHECKLIST
Never miss a step with this comprehensive guide! Follow these proven steps from move-in to move-out to maximize your chances of getting your full deposit back. Includes cleaning tasks, documentation tips, and post-move-out procedures.
Instructions
AT MOVE-IN (Day 1-2)
Document Everything
☐ Take photos and videos of every room from multiple angles
☐ Get close-ups of any existing damage, stains, or issues
☐ Report all maintenance issues in writing (email)
☐ Get written approval before making any changes
☐ Pay rent on time every month
☐ Keep all correspondence with landlord
30-60 DAYS BEFORE MOVE-OUT
☐ Provide written notice via email and certified mail
☐ Request a pre-move-out inspection with landlord
☐ Create a cleaning plan and schedule
☐ Address any issues landlord identifies
MOVE-OUT CLEANING (1-2 Weeks Before)
Kitchen
☐ Clean refrigerator inside, outside, underneath, and behind
☐ Deep clean oven and stovetop
☐ Clean inside and outside of all cabinets and drawers
☐ Scrub sink and wipe down countertops
☐ Clean dishwasher and all appliances
☐ Sweep and mop floor thoroughly
Bathroom
☐ Scrub toilet bowl, seat, tank, and base
☐ Remove all soap scum from shower/tub
☐ Scrub tiles and grout
☐ Clean sink, faucet, and inside vanity cabinets
☐ Wipe down mirror
☐ Sweep and mop floor
Living Areas & Bedrooms
☐ Vacuum all carpets thoroughly (consider professional cleaning)
☐ Sweep and mop all hard floors
☐ Spot clean any wall marks
☐ Clean all windows (inside and out)
☐ Dust ceiling fans and replace burnt-out bulbs
☐ Clean inside all closets
☐ Wipe down all baseboards
Don’t Forget
☐ Clean air vents
☐ Wipe down door frames and light switches
☐ Clean behind appliances
☐ Remove all personal belongings
FINAL STEPS (Last Day)
Document Final Condition
☐ Take comprehensive photos of every room (empty and clean)
☐ Use same angles as move-in photos when possible
☐ Photograph clean appliances, bathrooms, floors, and windows
Return Everything
☐ Return all keys, remotes, access cards, and parking permits
☐ Get written receipt for what was returned and when
Provide Forwarding Information
☐ Give landlord your new address in writing
☐ Confirm landlord has correct forwarding address
AFTER MOVE-OUT
Follow Up on Deposit
☐ Mark deposit return deadline on your calendar (usually 14-30 days)
☐ Follow up if you haven’t heard from landlord by deadline
Review Deposit Statement
☐ Compare charges to your move-in/move-out photos
☐ Check if charges are for normal wear and tear (improper)
☐ Verify charges are reasonable and supported by receipts
Dispute Unfair Charges
☐ Send formal dispute letter via certified mail if charges are unfair
☐ Include your documentation and references to state laws
☐ Consider small claims court if direct resolution fails
SPECIAL CONSIDERATIONS
If You Have Pets: Have carpets professionally cleaned, repair scratches, eliminate odors
If You Have Roommates: Agree in advance how to split deductions, document property condition
If You’re Breaking Your Lease: Review early termination clause, attempt to find replacement tenant, document reasons
Remember: Your security deposit is YOUR money. With proper documentation and following these steps, you have an excellent chance of getting it all back!
Conclusion
Getting your security deposit back requires attention to detail and proper documentation. The key steps are:
Document everything from move-in to move-out. Photos are your best protection against unfair charges.
Know your rights and understand your state’s security deposit laws. Don’t accept deductions that violate them.
Clean thoroughly using the detailed checklist above. This is where most deposits are lost or secured.
Follow procedures, including proper notice, meeting deadlines, and fulfilling all lease requirements.
Your security deposit is YOUR money. Landlords must prove specific damages or violations to withhold it. With thorough documentation and following these steps, you’re in the strongest position to get every penny back.
After a long day, comfortably resting in your bedroom is like retreating to the perfect oasis. It’s where you recharge and find peace. But if your bedroom doesn’t feel cozy, settling in might not come as easily. There’s a fix for that! With a few tweaks, you can turn your bedroom from simply a place to sleep into a place to relax and rejuvenate.
Start from scratch or opt for a complete refresh. These practical tips will help you create a bedroom that feels like the perfect place to say “ahh” after a long day.
.tasty-pins-banner-container{display:block;margin-bottom:20px;position:relative;width:-moz-fit-content;width:fit-content}.tasty-pins-banner-container a{cursor:pointer;display:flex;font-size:14px;font-weight:700;letter-spacing:1px;line-height:1.8em;text-transform:uppercase}.tasty-pins-banner-container a:hover{opacity:1}.tasty-pins-banner-container .tasty-pins-banner{align-items:center;bottom:0;cursor:pointer;display:flex;justify-content:center;left:0;padding-bottom:1em;padding-top:1em;position:absolute;right:0}.tasty-pins-banner-container .tasty-pins-banner svg{margin-right:4px;width:32px}.tasty-pins-banner-container .tasty-pins-banner span{margin-top:4px}.tasty-pins-banner-container a.tasty-pins-banner{text-decoration:none}.tasty-pins-banner-container a.tasty-pins-banner:hover{opacity:.8}.tasty-pins-banner-container a.tasty-pins-banner-image-link{flex-direction:column}.tasty-pins-banner-container a img{margin-bottom:0}.entry-content .wp-block-image .tasty-pins-banner-container img{margin-bottom:0;padding-bottom:0}#et-boc .et-l div .et_pb_image_wrap .tasty-pins-banner-container .tasty-pins-banner{padding-bottom:1em!important;padding-top:1em;text-decoration:none}#et-boc .et-l div .et_pb_image_wrap .tasty-pins-banner-container a.tasty-pins-banner{cursor:pointer;display:flex;font-size:14px;font-weight:700;line-height:1.8em;text-transform:uppercase}#et-boc .et-l div .et_pb_image_wrap .tasty-pins-banner-container a.tasty-pins-banner span{letter-spacing:2px;margin-top:4px}.et-db #et-boc .et-l .et_pb_module .tasty-pins-banner-container a:not(.wc-forward){padding-bottom:0}Photo by M&W Studios
Frame Your Space with Window Treatments
Windows can set the mood, and the right treatments can completely transform a basic, boring bedroom.
Curtains and Drapes: Heavy drapes in textures like velvet or linen add warmth and luxury. Sheer curtains make the space feel airy and romantic. If you’re looking for the best of both worlds, layer sheer panels under blackout curtains to adjust brightness levels throughout the day.
Shades or Roller Blinds: Floor-length curtains can feel overwhelming in smaller bedrooms. Shades or roller blinds offer a streamlined look, creating a clean, functional aesthetic.
Color Choices: Dark hues like charcoal or navy create intimacy, while lighter shades like cream or blush brighten the space.
Create Comfort with Pillows and Blankets
Imagine walking into your bedroom and seeing layers of plush pillows, soft blankets, and bedding that make you want to curl up and sleep. This isn’t some Pinterest fantasy. You can create this in your bedroom with a few additions.
Decorative Pillows: Go big! Mix sizes and textures (like faux fur and chunky knits). Arrange them in a cascading pattern: two large euro shams at the back, followed by standard pillows, then smaller accent cushions in front.
Blankets and Throws: A little goes a long way. Just draping a chunky knit throw casually over the foot of the bed instantly adds warmth. If you’re looking for more luxury, try a faux fur blanket or a quilt in rich, earthy tones.
Quality Bedding: Investing in good quality bedding can enhance the look of your bed while also improving how you feel when you sleep. Consider buying breathable linen or cotton sheets for comfort and durability. Pair them with a supportive mattress and a plush topper for that cloud-like feel.
Feel Cozy with Every Step
A rug is the unsung hero of a cozy bedroom. It doesn’t just soften hard flooring – it warms up the space and makes it feel like somewhere you want to get comfortable and chill.
Plush Rugs: A thick shag rug under your bed feels luxurious underfoot and muffles sound (win-win!).
Layering Rugs: Combine a large jute rug with a smaller patterned rug for depth and personality.
Color and Pattern: Use rug colors like deep green or burgundy for a moody feel, or ivory or beige for a light, boho-chic oasis. Soft geometric or floral patterns can also add character without overwhelming the space.
Create a Corner of Calm
Reading is a great way to relax your mind before heading to bed. Instead of reading in bed, create a reading nook for a dedicated spot to enjoy a warm cup of tea and your favorite new novel.
Seating Options: A simple cushioned bench under a window, paired with pillows, or a plush armchair in a corner, with a fluffy blanket, is all you need.
Storage Solutions: Floating shelves are a simple way to create a small bookshelf without taking up too much space – plus, they keep your favorite reads within reach. Add a basket for blankets and a side table for your mug.
Lighting: A floor lamp or wall-mounted sconce provides soft lighting (no big light needed).
Use Lighting as Your Secret Sauce
Speaking of lighting, how you choose to illuminate your bedroom can make or break the cozy factor. Harsh overhead lights feel sterile, while layered, soft lighting calms the mind.
Table Lamps: Choose lamps with fabric shades for a soft glow. Place them on nightstands for easy access.
Candles: Nothing beats the warmth of candles. Add scents like vanilla, sandalwood, or lavender for even more relaxation.
Bulbs and Color Temperature: Use warm bulbs (around 2700K) to mimic the golden glow of sunset.
Natural Light: Maximize daylight and use mirrors to your advantage! They help bounce light around the room.
Personalize Your Walls
Use your walls to your advantage. Often neglected, they are actually prime real estate for creating a cozy vibe.
Feature Wall: An accent wall can add character and evoke a sense of calm. Choose patterns with soft florals, muted geometrics, or textured neutrals.
Artwork: Use oversized art placed above your bed with imagery like coastal landscapes or waterfalls for an instant feeling of serenity.
Color Strategy: Use harmonious colors that enhance and complement your bedding and furniture for a harmonious look.
Organize for a Clear Mind
Imagine trying to chill in a room full of chaos – yeah, it doesn’t feel too relaxing. A tidy bedroom instantly offers peace of mind, so even if you have just 5 minutes before bed, try to tidy things up to ease into your night.
Nightstand Smart: Keep essentials out and put everything else away. Use your nightstand drawer to your advantage, or place a wicker basket nearby to toss extra items.
Smart Storage: Use under-bed drawers and floating shelves to keep clutter out of sight.
Dresser Organization: Divide drawers with organizers to easily store linens and clothing.
Breathe Life with Greenery
Plants can add a touch of softness to your bedroom. Placing indoor plants throughout invites peace and, as an added bonus, keeps the air clean.
Low-Maintenance Plants: Snake plants, pothos, and ZZ plants love being left alone for the most part and adapt well to low-light settings.
Placement Matters: Add a small plant to your nightstand, a trailing plant on a shelf, or a taller floor plant in an empty corner.
Try Alternatives: If live plants aren’t your thing, faux plants or even dried plants (like lavender) can still add a natural vibe.
Use Scents to Your Advantage
Your bedroom shouldn’t just feel relaxing, it should also smell relaxing. Scent is a powerful part of creating a cozy space, and the right scents can help you achieve.
Relaxing Fragrances: Lavender, chamomile, sandalwood, vanilla, and cedarwood are perfect for promoting relaxation.
Candles and Oils: Use scented candles or essential oil diffusers to set the tone for the evening.
Fresh Bedding Boost: Lightly mist pillows and sheets with a calming linen spray before bed to signal your brain that it’s time to unwind.
Create Comfort Through Sound
Sound is also just as important as what you see in your bedroom. Calming music or sounds can settle your energy for rest.
Soft Background Noise: If you struggle with insomnia, gentle rainfall sounds, or calming instrumental music can quiet your mind and promote better sleep.
Sound Control: Thick curtains, upholstered headboards, and rugs help absorb sound, making the room feel quieter.
Evening Rituals: Wind down with a consistent bedtime sound (chimes or soundbowl music) to reinforce your relaxation routine.
Colors for Cozy Vibes
As a final bonus tip, we encourage you the think about the color of your walls. Are they currently stark white? That’s great for waking up energy, but if you want to feel ease, consider colors that promote warmth.
Earth Tones: Shades like terracotta, clay, mustard, rust, and taupe naturally evoke comfort and make rooms feel more intimate.
Soft Neutrals: If color isn’t your style, choose warm neutrals like cream, greige, beige, or mushroom that gently reflect light.
Your Retreat Awaits
You deserve a cozy bedroom, and all it requires is a few small additions. A plush rug, velvety curtains, and fluffy pillows, combined with soft lighting, calming artwork, and decor, offer simple touches for relaxation. With these ideas, your bedroom can become the warm, inviting retreat you’ve always dreamed of — sweet dreams!