Some homes make an impression the moment you step inside. Not because they shout for attention, but because they feel quietly confident, and this is one of those spaces.
Walking through the Warm Modern Interior is less about trends and more about how thoughtful design can slow things down. Designed by Anastasia Brandt, the interior balances modern structure with warmth + restraint. It’s modern living, softened in all the right ways.
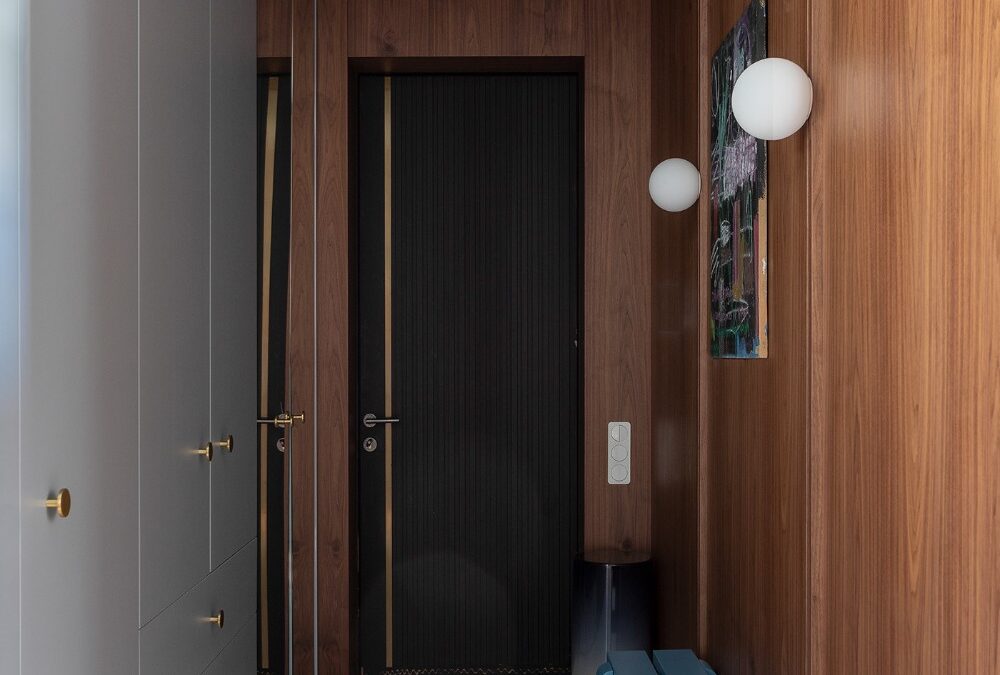
Entryway
First impressions stay lowkey here.
The entryway mirrors the language of the entire home… warm wood paneling, soft neutrals, and clean lines. Plus, there’s additional storage hiding in here: built-in and generous, yet visually restrained.
More than a passage, this space reinforces the rhythm of the home.
Living + Dining Room
The living and dining areas are designed as one continuous, easygoing space. Furniture placement and material choices do the quiet work of defining zones.
The dining area feels truly intentional. A solid wood table anchors the room, paired with a built-in bench that keeps the profile low and the mood informal. Ceramics and simple vessels sit casually on the surface, reinforcing the idea that this is a space meant to be used, not styled.
Just beyond, the living area continues the same language. Soft, neutral seating faces the windows, and the layout is arranged to encourage conversation. Calm textures, clean linens, natural materials.
Kitchen
The kitchen is confident but controlled. A deep green niche frames the workspace, which is enhanced by a terrazzo backsplash and countertops. The island sits quietly at the center- solid & sculptural. Cabinetry, too, stays clean, as most of the storage blends into the walls.
Bedroom
Calm, contained, and free of distractions, the Warm Modern Interior features a totally quiet and inward bedroom. Soft textures lead the experience. A low bed, framed by a textured headboard and wall-mounted sconces, grounds it further.
Storage remains tucked away in a walk-in closet, separated by arched, frosted glass panels. We also see muted green tones appearing softly to reinforce the sense of rest rather than contrast.
Bathroom
Calm settles in immediately as you enter the bathroom.
A freestanding tub is placed directly by the window to create a warm retreat. The big floor-to-ceiling window allows plenty of natural light to wash over the terrazzo floors and surfaces. Warm wood cabinetry, an arched mirror, and black fixtures add to the serene feel.
Cori is a freelance writer who covers interior design, gardening and houseplant care, DIYs, and trending style topics. She writes for publications like Apartment Therapy, The Spruce, and Better Homes & Gardens. When she’s not working on the next story, you’ll find her enjoying a…read more
Moving is expensive, and losing your security deposit makes it worse. Whether it’s one or two months’ rent, that’s hundreds or thousands of dollars you can’t afford to lose. The good news? Most security deposits ARE returned when tenants follow the right steps.
This guide covers everything from protecting your deposit on day one through getting that check in the mail. We’ll show you how to document properly, clean effectively, and dispute unfair charges if needed.
.tasty-pins-banner-container{display:block;margin-bottom:20px;position:relative;width:-moz-fit-content;width:fit-content}.tasty-pins-banner-container a{cursor:pointer;display:flex;font-size:14px;font-weight:700;letter-spacing:1px;line-height:1.8em;text-transform:uppercase}.tasty-pins-banner-container a:hover{opacity:1}.tasty-pins-banner-container .tasty-pins-banner{align-items:center;bottom:0;cursor:pointer;display:flex;justify-content:center;left:0;padding-bottom:1em;padding-top:1em;position:absolute;right:0}.tasty-pins-banner-container .tasty-pins-banner svg{margin-right:4px;width:32px}.tasty-pins-banner-container .tasty-pins-banner span{margin-top:4px}.tasty-pins-banner-container a.tasty-pins-banner{text-decoration:none}.tasty-pins-banner-container a.tasty-pins-banner:hover{opacity:.8}.tasty-pins-banner-container a.tasty-pins-banner-image-link{flex-direction:column}.tasty-pins-banner-container a img{margin-bottom:0}.entry-content .wp-block-image .tasty-pins-banner-container img{margin-bottom:0;padding-bottom:0}#et-boc .et-l div .et_pb_image_wrap .tasty-pins-banner-container .tasty-pins-banner{padding-bottom:1em!important;padding-top:1em;text-decoration:none}#et-boc .et-l div .et_pb_image_wrap .tasty-pins-banner-container a.tasty-pins-banner{cursor:pointer;display:flex;font-size:14px;font-weight:700;line-height:1.8em;text-transform:uppercase}#et-boc .et-l div .et_pb_image_wrap .tasty-pins-banner-container a.tasty-pins-banner span{letter-spacing:2px;margin-top:4px}.et-db #et-boc .et-l .et_pb_module .tasty-pins-banner-container a:not(.wc-forward){padding-bottom:0}
Understanding Your Security Deposit Rights
What Is a Security Deposit?
A security deposit is money renters pay upfront—typically one to two months’ rent—that serves as financial protection for the landlord. However, this is YOUR money held in trust, not a fee.
Deposits can legally cover damage beyond normal wear and tear, unpaid rent or utilities, lease violations, and excessive cleaning costs. They CANNOT be used for normal wear and tear (faded paint, worn carpet from regular use), repairs from landlord neglect, or upgrades the landlord chooses to make.
Return timeline: Most states require 14-30 days (California: 21 days, New York: 14 days)
Interest requirements: Some states mandate interest on deposits held long-term
Itemized deductions: Nearly all states require detailed lists with receipts
Search “[Your State] security deposit laws” to understand your specific rights.
Normal Wear and Tear vs. Damage
“Normal wear and tear” is deterioration from ordinary use over time. “Damage” results from negligence or abuse.
Normal wear and tear (NOT deductible): Faded paint, minor scuff marks, worn carpet in high-traffic areas, loose door handles, small nail holes, dirty windows.
Damage (deductible): Large holes in walls, broken windows or fixtures, pet stains and scratches, cigarette smoke damage, permanent carpet stains, broken appliances from misuse.
The rule: If you caused it through carelessness, it’s damage. If it happened naturally from living there, it’s wear and tear.
Protect Your Deposit from Day One
Document Everything at Move-In
Within 48 hours of moving in, take comprehensive photos and videos of every room from multiple angles.
Get close-ups of any existing damage, stains, or issues. Document all walls, floors, appliances, bathroom fixtures, windows, doors, light fixtures, and inside closets and cabinets.
Complete the move-in checklist in extreme detail. Don’t write “good condition” if there are any issues. Be specific: “small dent in bedroom door,” “light scuff marks on living room wall.” Have your landlord sign and date it, or email it to them for a paper trail.
Review Your Lease Carefully
Note specific requirements about move-out cleaning, notice requirements (typically 30-60 days), repair responsibilities, and any pet policies. Understanding these upfront prevents costly mistakes later.
Build a Good Landlord Relationship
Communicate promptly and professionally in writing (email is perfect). Pay rent on time, follow property rules, and document all interactions. A landlord who views you as a good tenant is more likely to be reasonable about minor issues at move-out.
During Your Tenancy
Clean regularly to prevent dirt and stains from becoming permanent. Address issues promptly—a small leak can become major water damage.
Report problems in writing to create documentation.
Get written approval before making any changes, save receipts for repairs you make, and take photos documenting any incidents or repairs.
Provide your landlord notice when preparing to move out within the timeframe outlined by your lease.
The Move-Out Cleaning Checklist
The property should be as clean as when you moved in. This is where most deposits are lost or secured. Here’s your deep cleaning guide:
Kitchen
Appliances: Remove and wash all refrigerator shelves and drawers. Wipe down interior surfaces and door seals.
Clean the top, sides, and underneath if possible. Use oven cleaner on the interior and scrub away all baked-on grease.
Clean stovetop burners and drip pans thoroughly. Run the dishwasher empty with cleaner and wipe down the door and edges.
Surfaces: Scrub the sink until it shines. Wipe down all countertops, backsplash, and cabinet exteriors. Clean inside all cabinets and drawers, removing any crumbs or spills.
Floors and Details: Sweep and mop thoroughly, paying attention to corners. Wipe down baseboards and clean any light fixtures.
Bathrooms
Fixtures: Scrub the toilet bowl, seat, tank, and base. Remove all soap scum and mildew from the shower and tub. Scrub tiles and grout. Clean shower door tracks thoroughly. Polish all chrome fixtures.
Vanity and Surfaces: Scrub the sink and faucet. Wipe down countertops and clean inside all cabinets. Polish mirrors and medicine cabinets.
Finishing Touches: Clean the exhaust fan cover. Sweep and mop floors, including baseboards.
Living Areas and Bedrooms
Floors: Vacuum carpets thoroughly, including edges and corners. Consider renting a carpet cleaner for deep cleaning, especially if there are stains. Sweep and mop all hard floors.
Walls and Windows: Spot clean any marks or smudges with a damp cloth. Fill small nail holes with spackle if needed. Clean all windows inside and out, along with sills and tracks.
Details: Dust ceiling fans and light fixtures. Replace burnt-out bulbs. Vacuum inside all closets. Wipe down all baseboards. Remove and wash air vent covers.
Often-Missed Areas
Don’t forget: inside closets, top of ceiling fans, behind appliances, window tracks, door frames, inside the dishwasher and microwave, dryer lint trap and vent, and any balcony or patio areas.
Should You Hire Professional Cleaners?
If your lease requires it, you must. Otherwise, consider professionals if you’re short on time, the property is large, or you want documentation. Professional cleaning typically costs $200-$500, but can prevent larger deposit deductions.
Final Walk-Through Strategy
Request a pre-move-out walkthrough inspection with your landlord if possible. This allows you to address any concerns they raise while you still have access to the property, and shows good faith.
After cleaning, take comprehensive photos and videos of every room, matching the angles from your move-in photos when possible.
Be sure to remove all personal items so you can show all rooms empty, clean appliances (open doors to show interiors), spotless bathrooms, and clean floors, walls, and windows.
Return all keys, remotes, parking passes, and any other items. Get a written receipt that you returned everything on a specific date, or send a confirmation email and keep a copy.
After You Move Out
Follow Up on Your Deposit
Provide your forwarding address in writing and know your state’s timeline for deposit returns (typically 14-30 days). Mark this date on your calendar. If you haven’t heard from your landlord a few days before the deadline, send a polite email reminder referencing your state’s law and the due date.
Review the Itemized Statement
When you receive your deposit statement, compare it to your move-in and move-out photos. Check that:
Charges aren’t for normal wear and tear or pre-existing damage
Amounts are reasonable and supported by receipts
The statement includes an itemized list of the damage, costs, and receipts (required in most states)
The math is correct
Disputing Unfair Deductions
If charges are improper, send a formal dispute letter via certified mail including:
Your name, property address, and move-out date
Specific reasons each charge is improper
References to state law and your documentation
The amount you believe you’re owed
A deadline for response (10-14 days)
If the landlord doesn’t respond, consider filing a complaint with your state’s tenant protection agency or pursuing small claims court.
Small claims court is practical when the disputed amount is significant, you have thorough documentation, and the landlord has violated state law. Many states award double or triple damages for willful withholding, and courts tend to favor well-documented tenants.
Common Reasons Tenants Lose Deposits (And How to Avoid Them)
Inadequate cleaning (most common): Follow the detailed cleaning checklist, don’t rush the process, and consider professional cleaners. Take before-and-after photos of the house or apartment.
Damage beyond normal wear and tear: Treat the property carefully, repair minor damage yourself (nail holes, scuffs), and report issues immediately.
Unpaid rent or utilities: Pay all rent through your last day, verify final utility bills are paid, and never use your deposit as “last month’s rent” unless explicitly allowed.
Not giving proper notice: Review notice requirements early (typically 30-60 days), provide notice in writing via email and certified mail, and keep proof of delivery.
Breaking the lease early: Review early termination clauses, attempt to negotiate, find a replacement tenant if allowed, and document reasons for breaking the lease.
Missing items or keys: Make a list of everything that came with the rental, ensure it’s all present at move-out, and get receipts for returned items.
Pet damage: Professionally clean carpets, repair scratches, and eliminate odors completely.
Smoking damage: If you smoked inside, be prepared for significant cleaning costs, including wall washing and carpet cleaning or replacement.
Special Situations
Pet Deposits: Have carpets professionally cleaned and save the receipt. Repair scratches, eliminate all odors, and take extensive photos showing no pet damage.
Roommate Situations: When moving out together, agree in advance on how to split deductions. When one roommate moves early, document the property condition, get written agreements on responsibility, and involve the landlord to clarify liability.
Breaking a Lease: Review early termination clauses, check if your state allows termination for specific reasons (military deployment, unsafe conditions), try finding a replacement tenant, and consider negotiating to forfeit part of your deposit. Document everything if breaking due to landlord violations.
HOW TO GET YOUR DEPOSIT BACK: STEP-BY-STEP CHECKLIST
Never miss a step with this comprehensive guide! Follow these proven steps from move-in to move-out to maximize your chances of getting your full deposit back. Includes cleaning tasks, documentation tips, and post-move-out procedures.
Instructions
AT MOVE-IN (Day 1-2)
Document Everything
☐ Take photos and videos of every room from multiple angles
☐ Get close-ups of any existing damage, stains, or issues
☐ Report all maintenance issues in writing (email)
☐ Get written approval before making any changes
☐ Pay rent on time every month
☐ Keep all correspondence with landlord
30-60 DAYS BEFORE MOVE-OUT
☐ Provide written notice via email and certified mail
☐ Request a pre-move-out inspection with landlord
☐ Create a cleaning plan and schedule
☐ Address any issues landlord identifies
MOVE-OUT CLEANING (1-2 Weeks Before)
Kitchen
☐ Clean refrigerator inside, outside, underneath, and behind
☐ Deep clean oven and stovetop
☐ Clean inside and outside of all cabinets and drawers
☐ Scrub sink and wipe down countertops
☐ Clean dishwasher and all appliances
☐ Sweep and mop floor thoroughly
Bathroom
☐ Scrub toilet bowl, seat, tank, and base
☐ Remove all soap scum from shower/tub
☐ Scrub tiles and grout
☐ Clean sink, faucet, and inside vanity cabinets
☐ Wipe down mirror
☐ Sweep and mop floor
Living Areas & Bedrooms
☐ Vacuum all carpets thoroughly (consider professional cleaning)
☐ Sweep and mop all hard floors
☐ Spot clean any wall marks
☐ Clean all windows (inside and out)
☐ Dust ceiling fans and replace burnt-out bulbs
☐ Clean inside all closets
☐ Wipe down all baseboards
Don’t Forget
☐ Clean air vents
☐ Wipe down door frames and light switches
☐ Clean behind appliances
☐ Remove all personal belongings
FINAL STEPS (Last Day)
Document Final Condition
☐ Take comprehensive photos of every room (empty and clean)
☐ Use same angles as move-in photos when possible
☐ Photograph clean appliances, bathrooms, floors, and windows
Return Everything
☐ Return all keys, remotes, access cards, and parking permits
☐ Get written receipt for what was returned and when
Provide Forwarding Information
☐ Give landlord your new address in writing
☐ Confirm landlord has correct forwarding address
AFTER MOVE-OUT
Follow Up on Deposit
☐ Mark deposit return deadline on your calendar (usually 14-30 days)
☐ Follow up if you haven’t heard from landlord by deadline
Review Deposit Statement
☐ Compare charges to your move-in/move-out photos
☐ Check if charges are for normal wear and tear (improper)
☐ Verify charges are reasonable and supported by receipts
Dispute Unfair Charges
☐ Send formal dispute letter via certified mail if charges are unfair
☐ Include your documentation and references to state laws
☐ Consider small claims court if direct resolution fails
SPECIAL CONSIDERATIONS
If You Have Pets: Have carpets professionally cleaned, repair scratches, eliminate odors
If You Have Roommates: Agree in advance how to split deductions, document property condition
If You’re Breaking Your Lease: Review early termination clause, attempt to find replacement tenant, document reasons
Remember: Your security deposit is YOUR money. With proper documentation and following these steps, you have an excellent chance of getting it all back!
Conclusion
Getting your security deposit back requires attention to detail and proper documentation. The key steps are:
Document everything from move-in to move-out. Photos are your best protection against unfair charges.
Know your rights and understand your state’s security deposit laws. Don’t accept deductions that violate them.
Clean thoroughly using the detailed checklist above. This is where most deposits are lost or secured.
Follow procedures, including proper notice, meeting deadlines, and fulfilling all lease requirements.
Your security deposit is YOUR money. Landlords must prove specific damages or violations to withhold it. With thorough documentation and following these steps, you’re in the strongest position to get every penny back.
Mornings set the tone for the entire day. When they start harsh, everything after feels slightly off. The idea behind a Soft Start bedroom is simple… let the morning unfold gently: light first, sound second, movement last.
This week’s POW focuses on small, intentional pieces that turn waking up into a ritual instead of a shock. Nothing here asks for effort, by the way. Each item works quietly in the background.
A lamp that’s more about atmosphere than brightness. The rotating sunset projection washes the walls in warm gradients that feel closer to golden hour than overhead lighting. Used in the early morning, it creates a soft glow that signals wake-up time without pulling you out of sleep too abruptly.
Traditional alarms rely on sound alone. Sunrise alarms rely on rhythm, a clock that gradually brightens the room, mimicking natural daylight. The body responds instinctively, which makes waking up feel less jarring. The built-in white noise and moonlight features add another layer of calm.
A soft start isn’t complete without stillness, so the routine also includes a gratitude journal designed for short, intentional moments- just a few lines or a few thoughts to set a calm, positive direction for the day. Kept on a nightstand or nearby shelf, it becomes part of the morning flow.
Before coffee, before screens, movement helps the body wake up naturally. A foot roller or textured massage ball works just perfectly under your feet while you sit on the edge of the bed. It improves circulation, releases tension, and signals that it’s time to move. The best part is, you don’t need to change into workout clothes or gather motivation every day.
Modern homes are brighter and more open than ever, which is wonderful for daylight — but not always great for privacy. If you’ve ever caught yourself closing the curtains the moment the lights go on, you already understand the problem. Large panes of glass, overlooked rooms, and street-facing windows can quickly make a home feel exposed.
“Blackening windows” is a broad term people use to describe anything that darkens glass, limits visibility, or blocks views into the home. That might mean full blackout, subtle tinting, frosted finishes, or clever films that look dark from the outside while staying clear from inside.
There isn’t one perfect blackout window treatments solution for every home or window. The best option depends on when you need privacy, how much light you’re willing to lose, and how permanent you want the solution to be. This guide breaks down the most effective ways to blacken windows for privacy — clearly, realistically, and without turning your home into a cave.
What kind of privacy do you actually need?
Before choosing a product for covering windows for privacy, it helps to identify the real issue. Most privacy problems fall into one of these categories:
Night-time privacy The most common problem. Your windows look fine during the day, but once interior lights are on, the room becomes visible from outside.
Daytime privacy Often caused by overlooked properties, street-level windows, or neighbours positioned directly opposite.
Total privacy Required in bedrooms, bathrooms, nurseries, or home offices where visibility at any time feels intrusive.
Privacy without losing daylight You want protection from outside views but still want the room to feel bright and liveable.
A darker exterior look Sometimes privacy overlaps with aesthetics — you want windows to look darker from outside, not just function privately.
Once you know which of these applies, the right solution becomes much easier to choose.
Window film: the fastest way to blacken glass
Window film is one of the most popular privacy solutions because it’s affordable, relatively easy to install, and available in a wide range of finishes — from light diffusion to total blackout. It’s also available in different colours, including white, black, grey or other colours.
It can be applied directly to existing glazing, making it ideal if you want a noticeable privacy upgrade without replacing windows or committing to permanent structural changes. For many homeowners, it’s also a practical way to test different levels of privacy and light control before investing in blinds, curtains, or more expensive solutions. Plus, removable blackout window film can easily be taken off if you change your mind or it’s no longer required.
Frosted or etched window film
Frosted window blackout film blurs visibility while allowing daylight to pass through. It’s one of the most reliable privacy solutions because it works the same way day and night.
Best for: bathrooms, front doors, hallways, a dining room, or overlooked ground-floor windows Pros: excellent privacy, bright rooms, neat appearance Cons: no clear view out
Many homeowners choose to frost only the lower half of a window, which blocks sightlines while keeping sky views and light.
Tinted window film
Tinted film is a thin film that darkens the glass and reduces glare. It’s often chosen for living rooms or sun-facing spaces where light control is as important as privacy.
Best for: it’s a good choice for sunny rooms, street-facing windows, modern interiors Pros: darker exterior look, glare reduction, UV protection (varies by film) Cons: limited night-time privacy, reduced indoor light
Tinted film alone does not guarantee privacy after dark. When interior lights are brighter than outside, silhouettes are often still visible, so in a bedroom you may need to wear an eye mask if you need a fully darkened room for quality sleep.
Reflective or “one-way” privacy film
One way blackout window film is the film many people search for — glass that looks dark or mirrored from outside while staying clear from inside. It works by relying on a light imbalance. When it’s brighter outside than inside, the reflective surface limits visibility into the home.
Best for: cover windows for privacy in the daytime in overlooked areas Pros: strong daytime privacy, clear outward view, modern appearance Cons: the window film blackout privacy reverses at night unless paired with blinds or curtains
Reflective film is best treated as a daytime privacy solution, not a complete one.
Blackout window film
Blackout privacy window film blocks light entirely. It’s the most extreme form of window blackening and is used where light and visibility need to be completely eliminated.
Best for: blackout window film is ideal for bedrooms, nurseries, media rooms, unused windows Pros: total privacy, full light block Cons: no daylight, can feel heavy in living spaces
This is a great option for total blackout window film. However, if you want light during the day, a good compromise is applying blackout film only to part of the window rather than the whole pane.
Getting window film right (and avoiding the common frustrations)
Blackout film for windows can look sleek, subtle, and professionally finished — or it can end up streaky, bubbly, and endlessly annoying. The difference usually isn’t the film itself, but how it’s chosen, installed, and cared for.
Taking a little extra care at this stage makes all the difference between a solution you forget about (in a good way) and one that catches your eye every time the light hits it.
Choose the right film for the window — not just the room
Not all window film is suitable for every type of glass. Some films aren’t recommended for certain double-glazed units, particularly older sealed units or specialist coatings. Always check the manufacturer’s guidance before buying, especially if the window gets strong direct sunlight.
It’s also worth thinking about how the window is used. A film that works beautifully on a fixed pane might be frustrating on a window you open regularly, particularly if the edges catch or peel over time.
Cleanliness is everything
Most installation problems come down to one thing: dust. Even a single speck trapped under the film can create a visible bubble that draws the eye again and again.
Before applying film:
Clean the glass thoroughly with a lint-free cloth
Remove any old adhesive, paint splashes, or residue
Clean the window frame and sill too — dust from these areas often falls onto the glass mid-install
Many people find it helpful to clean the glass, walk away for a short while to let airborne dust settle, then clean again just before installation.
Work with water, not against it
Most window films are designed to be applied to wet glass. This allows you to slide the film into position and push out air bubbles gradually.
A simple spray bottle filled with water and a tiny drop of washing-up liquid is usually enough. The goal isn’t to soak the window, but to create a slippery surface that gives you time to adjust the film before it sets.
Start from the centre and work outwards with a squeegee or soft-edged tool, applying even pressure. Rushing this stage is one of the quickest ways to trap air.
Cut carefully — and use a sharp blade
Neat edges are what make window film look intentional rather than temporary. Always use a sharp, new blade when trimming, and take your time around corners.
Some films recommend leaving a very small gap around the edge of the glass to allow for expansion and prevent peeling. Follow the instructions closely — a film that’s cut too tight can lift over time, especially on windows exposed to heat.
Expect a settling period
It’s normal for freshly applied film to look slightly cloudy or show small water pockets for a few days. This usually clears as the moisture evaporates and the adhesive fully cures.
During this time:
Avoid touching or cleaning the film
Don’t be tempted to lift edges to “fix” minor marks
Keep windows closed if possible
Most films settle completely within a week, though thicker or blackout films may take slightly longer.
[embedded content]
Think about long-term maintenance
Once installed, window film is fairly low maintenance, but it does need gentle care. Avoid abrasive cloths, harsh cleaners, or anything that could scratch or lift the surface.
A soft cloth and mild detergent are usually all that’s needed. If the window is in a high-touch area — such as a kitchen or near a door — be mindful of repeated contact along the edges.
When professional installation is worth it
For small bathroom windows or secondary glazing, DIY installation is often perfectly manageable. But for large front-facing windows, bay windows, or full-height panes, professional fitting can be a worthwhile investment.
A professional installer will:
Ensure compatibility with your glazing
Achieve clean, nearly invisible edges
Reduce the risk of bubbling or peeling
Save you time and frustration
If the window plays a major role in how your home looks from the outside, it’s often worth getting it done once, properly.
Test before committing
If you’re unsure about how dark a film will feel or how it will look from outside, test one window first. Live with it for a few days, at different times of day and in different weather.
This is especially important with tinted or reflective films, where light levels and visibility can change dramatically between bright mornings and gloomy afternoons.
Blackout blinds: privacy when you need it
Total blackout blinds or blackout shades offer flexibility and various benefits. You can enjoy clear glass and natural light during the day and complete privacy at night, which makes them a popular choice in a bedroom window or a living space.
Blackout roller blinds
Roller blinds are simple, affordable, and widely available. True blackout fabrics block light effectively, but an edge gap on a room-darkening roller shade can reduce privacy unless it’s fitted carefully.
Best for: bedrooms, bathrooms, home offices Tip: side channels or cassette systems dramatically improve performance
Cellular (honeycomb) blackout blinds
Cellular shades are structured blackout roller shades trap air, helping with insulation and energy efficiency as well as privacy.
Best for: bedrooms, cold rooms, street-facing windows Pros:insulation benefits, soft modern look Cons: higher cost, slightly harder to clean
Top-down, bottom-up versions are particularly good for balancing light and privacy.
Roman blackout blinds
Blackout Roman shades combine blackout lining with a softer, more decorative finish.
Best for: bedrooms, living rooms Pros: warm, stylish appearance Cons: side gaps can allow light unless layered
Blackout curtains: the softest solution
Blackout curtains remain one of the most effective and forgiving ways to create privacy in your home. When lined properly and hung well, blackout curtains can deliver excellent results, so they’re a good option if you’re looking for complete darkness in a room.
What makes blackout curtains work
Proper blackout lining, not just thick fabric
Generous width for full coverage
Floor-length drop for a finished look
Pole or track mounted wider and higher than the window
Curtains that skim the window opening rarely block light or views properly. Coverage matters as much as fabric.
Pros: excellent night privacy, cosy feel, hides imperfect windows Cons: takes up space, collects dust, cheaper versions can feel stiff
Smart glass: privacy at the touch of a button
Smart glass (also known as switchable glass, privacy glass, a smart window tint or electrochromic glass) is a high-tech alternative to films, blinds, and curtains that provides superior performance. Instead of covering the window, the glass itself changes from clear to opaque when activated, usually via a wall switch, remote, or smart home system. Clever, huh?
In its opaque state, smart glass looks similar to frosted glass, blocking visibility while still allowing light through. When switched off, it becomes fully transparent again.
How smart glass works
Most residential smart windows use an electrical current to control a special layer within the glass. When the current is off, the glass appears frosted. When the current is on, the particles align and the glass becomes clear.
This means privacy can be turned on or off instantly, without any physical window coverings, making it a super clever switchable film.
Where smart glass works best
A genuine smart tint is most commonly used in:
Bathrooms (especially shower screens and windows)
Home offices or meeting rooms
Modern extensions and new builds
Internal glass walls or doors
Street-facing windows where blinds would spoil a clean look
It’s particularly appealing in minimalist interiors where visible blinds or curtains would feel intrusive.
Advantages of smart glass window tinting
Instant privacy with no additional coverings
Clean, uncluttered appearance
Allows daylight even when opaque
Ideal for contemporary designs and open-plan spaces
From a design perspective, it’s an excellent choice, as it offers one of the most seamless privacy solutions available.
Limitations to consider
Despite its appeal, smart glass isn’t always the most practical option for typical homes.
Cost: It’s significantly more expensive than film or blinds
Installation: Usually requires professional fitting and electrical work
Not a blackout solution: Opaque glass still allows light through
Repairs: More complex and costly than replacing a blind or curtain
Because of this, smart glass is often best suited to specific feature windows rather than whole-house use.
Is smart glass worth it?
Smart glass is less about blackening windows and more about controlling privacy. If your goal is total darkness or budget-friendly privacy, traditional blackout solutions are far more effective.
However, if you’re renovating, building from scratch, or designing a very modern space where visible window coverings feel wrong, smart glass can be an elegant, long-term solution — particularly for bathrooms and home offices.
For most homeowners, the advanced technology of smart glass works best as a specialist feature rather than a universal fix.
Best solutions by room
Image: Shutterstock
Bathroom: frosted film (often lower half) with a moisture-resistant blind if needed Bedroom: blackout blind with side channels or blackout curtains — or both Living room: reflective or tinted film for daytime plus curtains for evenings Kitchen: frosted film on lower panes or wipe-clean blinds Home office: frosted film for focus, or reflective film with a night-time blind Glass doors: panel blinds, vertical blinds, or curtains paired with film
Combining solutions for better results
Layering often gives the best balance of privacy, light, and comfort.
Reflective film + curtains
Frosted film (partial) + blind
Blackout blind + sheer curtain
These combinations feel intentional and flexible rather than restrictive.
Common mistakes to avoid when blackening windows for privacy
Blackening windows sounds straightforward, but a few very common missteps can lead to disappointing results — rooms that feel darker than expected, privacy that disappears at night, or finishes that never quite look right. Knowing what not to do is often just as helpful as knowing what to choose.
Assuming one solution will work in every situation
One of the biggest mistakes is applying the same privacy solution throughout the house without considering how each room is used. A film that works perfectly in a bathroom might feel oppressive in a living room. A blind that suits a bedroom might be impractical in a kitchen.
Privacy needs vary by time of day, room function, and window position. Treat each window individually rather than looking for a one-size-fits-all answer.
Relying on reflective film for night-time privacy
Reflective or “one-way” window films are often marketed as a complete privacy solution, but they rely on light levels to work. During the day, when it’s brighter outside than inside, they can be very effective. At night, the situation reverses.
Once interior lights are on, reflective film often allows silhouettes and movement to be seen from outside. If night-time privacy matters, reflective film should always be paired with blinds or curtains rather than used alone.
Choosing blackout options without thinking about daylight
Blackout film, blinds, and curtains are excellent for privacy — but they can also dramatically change how a room feels. In living areas or home offices, fully blacked-out windows can make spaces feel flat, gloomy, or disconnected from the outdoors.
If you don’t actually need total darkness, consider a softer solution such as frosted film, partial coverage, or layered window treatments that can be opened during the day.
Underestimating light gaps around blinds and curtains
Many people assume that “blackout” automatically means no light and complete privacy. In reality, the way blinds and curtains are fitted matters just as much as the fabric itself.
Poorly positioned roller blinds, narrow curtains, or tracks fitted too close to the window frame often leave gaps at the sides, top, or bottom. These gaps allow light to leak through and can make rooms feel exposed in the evening.
Positioning blinds slightly wider than the window and hanging curtains higher and wider than the frame makes a noticeable difference.
Rushing window film installation
Window film is unforgiving if rushed. Dust, fingerprints, uneven pressure, or blunt blades can all leave visible marks that are difficult to ignore once the film has set.
Take your time, clean thoroughly, and don’t attempt installation when the room is dusty, busy, or poorly lit. A calm, patient approach usually leads to a much better finish.
Forgetting about condensation and ventilation
In bathrooms, kitchens, and bedrooms, moisture matters. Some blackout films and tightly fitted blinds can trap condensation against the glass, leading to damp patches or mould over time.
Moisture-resistant materials, regular ventilation, and leaving small gaps for airflow where appropriate can prevent long-term issues.
Choosing style before function
It’s tempting to choose a solution purely because it looks good — especially with tinted or mirrored films. But if it doesn’t meet your privacy needs at the times you use the room most, it will quickly become frustrating.
Always prioritise function first, then choose the finish that fits your style within those practical limits.
Not thinking about future flexibility
Permanent solutions can feel appealing in the moment, but needs change. A home office becomes a nursery, a side window becomes overlooked, or you move house.
If flexibility matters, consider removable films, layered window treatments, or solutions that can be adjusted over time without major cost or effort.
Ignoring how the window looks from outside
Some privacy solutions look very different from the street than they do from inside. Strong mirror films or solid blackout panels can alter the appearance of your home’s exterior more than expected.
If kerb appeal matters to you, test one window first and view it from different angles and at different times of day.
Assuming cheaper always means worse — or better
Expensive doesn’t always mean better, and budget options aren’t automatically poor. The key is choosing the right product for the job. A simple frosted film can outperform an expensive reflective film if your priority is consistent privacy.
Focus on suitability rather than price alone.
How window blackening can save energy in your home
Window blackening isn’t just about privacy — when chosen carefully, it can also reduce energy loss, control heat, and lower heating and cooling costs. Windows are one of the weakest points in a home’s thermal envelope, so anything that improves how they perform can make a noticeable difference to comfort and bills.
Here’s how different window-blackening methods help save energy.
Reducing heat loss in winter
Glass loses heat far more quickly than solid walls. Even modern double glazing can feel cold, especially at night.
Blackout blinds and curtains help by creating an extra insulating layer between the room and the glass. The trapped air acts as a buffer, slowing heat loss.
Thick blackout curtains can noticeably reduce cold draughts
Cellular (honeycomb) blinds are particularly effective because their structure traps air
Floor-length curtains that overlap the window frame perform better than short or narrow ones
This means your heating system doesn’t need to work as hard to maintain a comfortable temperature.
Preventing overheating in summer
In warmer months, large windows can let in excessive solar heat, making rooms uncomfortable and increasing reliance on fans or air conditioning.
Tinted and solar-control window films reduce the amount of infrared heat entering the home while still allowing light through.
Rooms stay cooler during the hottest parts of the day
South- and west-facing windows benefit most
Less need for mechanical cooling
This can be especially valuable in modern homes with large expanses of glass or open-plan layouts.
Stabilising indoor temperatures
Homes feel more comfortable — and use less energy — when temperatures remain stable rather than fluctuating.
Layered window treatments (for example, film plus blinds or curtains) help regulate indoor conditions by:
Reducing sharp temperature swings
Minimising cold spots near windows
Improving overall thermal comfort
A more even temperature often allows you to turn thermostats down slightly without noticing a loss of comfort.
Cutting glare and artificial lighting use
Some blackening options, such as frosted or lightly tinted films, diffuse harsh sunlight rather than blocking it completely.
This reduces glare while still allowing usable daylight into the room, meaning:
You’re less likely to switch on lights during the day
Screens are easier to view without blinds fully closed
Using natural light more effectively can lead to small but consistent energy savings.
Protecting furnishings (indirect energy benefit)
While not an energy saving in the strictest sense, reducing UV exposure helps protect furniture, flooring, and fabrics from fading.
This can:
Extend the life of furnishings
Reduce replacement frequency
Lower the environmental impact associated with manufacturing and disposal
Solar-control and tinted films are particularly effective for this.
Smart glass and energy efficiency
High-end solutions such as electrochromic or smart glass actively adjust how much solar heat enters a building.
Darkening in strong sunlight reduces cooling demand
Clearing in low light maximises passive solar gain
While costly, these systems are designed with energy performance as a core benefit, particularly in highly glazed homes.
What works best for energy savings?
If energy efficiency is a priority, these combinations tend to perform well:
Cellular blackout blinds for insulation
Blackout curtains hung wide and high for winter heat retention
Solar-control or tinted window film for summer overheating
Layered solutions for year-round performance
The biggest gains usually come from addressing night-time heat loss in winter and solar gain in summer, rather than relying on a single solution.
A realistic expectation
Window blackening won’t replace proper insulation or glazing upgrades, but it can make a meaningful difference — particularly in rooms with large or older windows.
Many homeowners notice:
Improved comfort near windows
Reduced reliance on heating or cooling
A home that feels more stable and easier to heat
In other words, privacy upgrades can quietly become comfort and energy upgrades too.
Quick decision guide
Here’s an at-a-glance quick decision guide to help you choose the right window blackening option for your home
Privacy day and night, still bright: frosted window film
Darker windows and glare reduction: tinted film (add curtains at night)
See out clearly during the day: reflective film + evening cover
Total darkness and privacy: blackout film or layered blinds and curtains
Cosy, traditional feel: blackout curtains
Clean, practical finish: blackout roller blind with side channels
Final thoughts
Blackening windows isn’t about shutting out the world — it’s about feeling comfortable in your own home and, in many cases, getting better sleep. The most successful perfect window solutions balance privacy with daylight and flexibility, rather than relying on a single fix.
For many homes, the sweet spot is a layered approach: something subtle that handles daytime exposure, paired with a soft or practical covering for evenings. That way, your home stays bright when you want it to — and private when you need it to be.