A patio is a wonderful addition to any home, providing a space for relaxation, entertaining, and enjoying the outdoors. But weather conditions can cause mildew or algae. Let’s talk about how to clean the mildew and algae off your patio.
.tasty-pins-banner-container{display:block;margin-bottom:20px;position:relative;width:-moz-fit-content;width:fit-content}.tasty-pins-banner-container a{cursor:pointer;display:flex;font-size:14px;font-weight:700;letter-spacing:1px;line-height:1.8em;text-transform:uppercase}.tasty-pins-banner-container a:hover{opacity:1}.tasty-pins-banner-container .tasty-pins-banner{align-items:center;bottom:0;cursor:pointer;display:flex;justify-content:center;left:0;padding-bottom:1em;padding-top:1em;position:absolute;right:0}.tasty-pins-banner-container .tasty-pins-banner svg{margin-right:4px;width:32px}.tasty-pins-banner-container .tasty-pins-banner span{margin-top:4px}.tasty-pins-banner-container a.tasty-pins-banner{text-decoration:none}.tasty-pins-banner-container a.tasty-pins-banner:hover{opacity:.8}.tasty-pins-banner-container a.tasty-pins-banner-image-link{flex-direction:column}.tasty-pins-banner-container a img{margin-bottom:0}.entry-content .wp-block-image .tasty-pins-banner-container img{margin-bottom:0;padding-bottom:0}#et-boc .et-l div .et_pb_image_wrap .tasty-pins-banner-container .tasty-pins-banner{padding-bottom:1em!important;padding-top:1em;text-decoration:none}#et-boc .et-l div .et_pb_image_wrap .tasty-pins-banner-container a.tasty-pins-banner{cursor:pointer;display:flex;font-size:14px;font-weight:700;line-height:1.8em;text-transform:uppercase}#et-boc .et-l div .et_pb_image_wrap .tasty-pins-banner-container a.tasty-pins-banner span{letter-spacing:2px;margin-top:4px}.et-db #et-boc .et-l .et_pb_module .tasty-pins-banner-container a:not(.wc-forward){padding-bottom:0}
However, over time, patio slabs can become plagued with unsightly mildew and algae growth, particularly in shaded or damp areas.
Algae on patio surfaces not only look unpleasant but can also create a slip hazard.
In this blog post, we’ll explore effective methods for removing mildew and algae from your patio, ensuring it remains a safe and inviting space.
Gathering Necessary Supplies
Before starting the cleaning process, it’s important to have all the necessary supplies on hand. Here’s a handy list to get you prepared:
Stiff-bristle brush or scrubbing brush
Garden hose with a spray nozzle or a pressure washer
Protective gloves and eyewear
Broom or leaf blower
Tarp or drop cloths to shield nearby areas
Cleaning agents
Oxygen bleach, which is great for tackling mildew
Algae remover specifically designed for patio surfaces
White vinegar, a natural cleaning alternative
Baking soda for those tough stains
Chlorine bleach for the most stubborn mildew (just be careful with certain materials)
With these supplies, you’ll be ready to tackle any mildew or algae that has taken over your patio.
Preparing the Patio Area
Preparing your patio for cleaning is a straightforward but essential step.
Start by moving all your furniture, potted plants, and decorative items to another spot. This will give you clear access to every inch of your patio and protect your belongings from any potential damage.
Next, grab a broom or a leaf blower to sweep away loose debris, leaves, and dirt.
To protect plants and nearby surfaces from cleaning agents, cover them with a tarp or drop cloth. This is particularly important if your patio is next to wooden decking or porous materials.
Taking these preparatory steps will ensure that your cleaning process goes smoothly and that everything stays in great shape.
Cleaning Methods for Mildew
To get rid of mildew on your patio, start by mixing oxygen bleach with warm water according to the instructions on the package.
Wearing gloves and protective eyewear, apply the solution to the mildew-infested areas using a stiff-bristle brush. Focus on small sections at a time to ensure thorough coverage.
Let the solution sit for about 10-15 minutes so it can break down the mildew effectively. After that, rinse the patio well with a garden hose or pressure washer to remove any residue.
If you prefer a natural approach, a mixture of white vinegar and water works wonders for less severe mildew. Just apply it in the same manner and scrub away.
Dealing with Algae on Your Patio
Algae can make your patio look grimy and can even be slippery.
If you’re dealing with light algae growth, start with a simple solution of water and baking soda.
Sprinkle the baking soda over the algae, then scrub it with a stiff-bristle brush. This should break up the algae and make it easier to wash away.
For more stubborn patches, you’ll want to use an algae remover that’s specifically designed for patio surfaces.
Follow the manufacturer’s instructions for application and let the product sit for the recommended time. Afterward, scrub the area thoroughly with your brush to ensure all the algae is lifted.
Once you’ve scrubbed away the algae, rinse the area well with a garden hose or pressure washer. Make sure to get rid of all the cleaning solution to prevent any residue from affecting the patio’s appearance or feel.
Remember, consistent cleaning can prevent algae from taking over, so make this a regular part of your patio maintenance routine.
Preventive Measures
To keep your patio looking its best and free of mildew and algae, regular upkeep is essential.
Start by sweeping your patio frequently to remove leaves, dirt, and other debris that can hold moisture and encourage growth.
Address any drainage issues promptly—standing water is a major contributor to mildew and algae.
Think about how much shade your patio gets. If it’s heavily shaded by trees or bushes, consider trimming them back to allow more sunlight to reach the area. Sunlight helps to dry out moisture and discourages growth.
If your patio is made from a porous material like concrete or sandstone, applying a sealant can provide an extra layer of protection.
Another tip is to move outdoor furniture and potted plants around occasionally. These items can trap moisture beneath them, creating ideal conditions for mildew and algae. By moving them, particularly out of shady areas, you allow those areas to dry out properly.
Consider setting a schedule for light cleanings using your preferred method. Whether it’s a quick scrub with a vinegar solution or a spray down with a hose, frequent maintenance can stop problems before they start.
If you live in a particularly wet or humid climate, you might need to increase the frequency of these cleanings.
By staying proactive, you can enjoy a beautiful and safe patio year-round.
Removing Mildew and Algae from Your Patio
Cleaning your patio can seem like a big job, but it doesn’t have to be overwhelming.
By gathering the right supplies and taking the time to prepare properly, you’ll be well on your way to a sparkling clean outdoor space.
Regular upkeep will not only keep your patio looking great but also prevent mildew and algae from taking hold in the first place.
Simple steps like sweeping often, addressing drainage issues, and allowing more sunlight to reach your patio can make a huge difference. Moving furniture and potted plants around occasionally will also help keep moisture from building up.
By making these tasks part of your regular routine, you’ll maintain a beautiful, safe patio that enhances your outdoor living experience.
So roll up your sleeves, get scrubbing, and enjoy your refreshed patio!
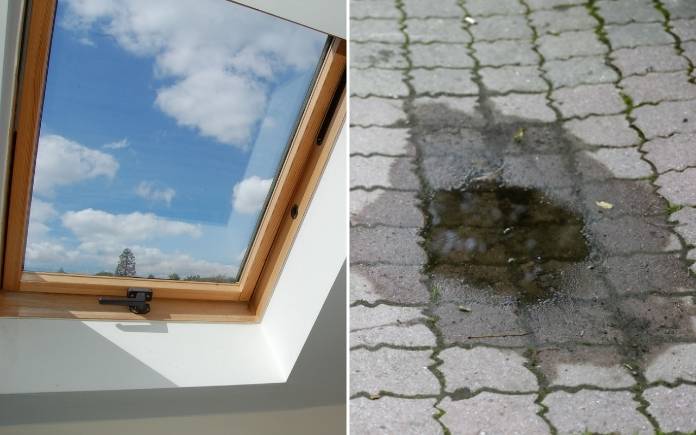
This week, hear our thoughts on the best spot for a skylight, plus how to fix puddling on a concrete patio. (KM6064/temmuzcan, Getty Images Signature)
Hour 1
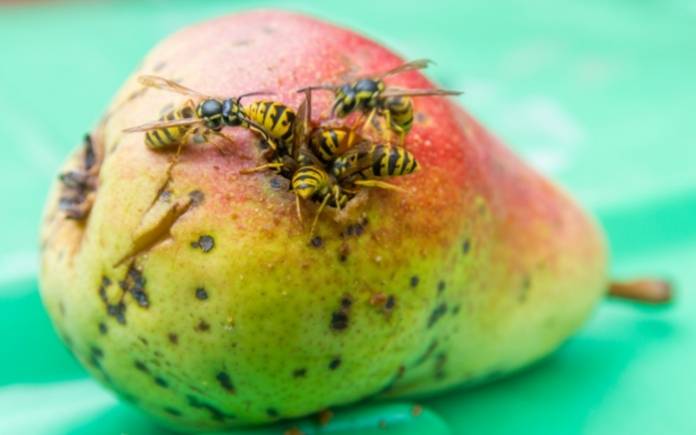
In Hour 1, hear how to prevent wasps from swarming around fruit trees, tips for cooling off a hot attic and more.
Controlling Wasps Around Fruit Trees
Wasps are attracted to the sugar in ripe fruit. (TAs3, Getty Images)
Wasps are swarming around the apple and pear trees in Valerie’s front yard.
“Each fallen fruit attracts about five or more wasps, such that I can’t (well, I don’t WANT to) touch the fruit to move it away to cut my grass,” she says.
Valerie wants to know: “What time of day should I pick up the fruit?”
Wasps, as well as bees, are attracted to the sugar in rotten fruit.
Don’t spray any poison around the trees because it won’t just kill the wasps —it will also kill honey bees, precious pollinators that are dying at an alarming rate.
Unfortunately, there’s not much you can do, other than:
Pick the fruit as soon as it’s ripe.
Don’t let it fall to the ground. We know it’s impossible to prevent every fruit from landing in the dirt but check on the trees frequently.
Rake up the fruit on the ground with a long-handled rake to avoid any stings.
Bees and wasps aren’t as active at night or very early in the morning, so pick up the fallen fruit then.
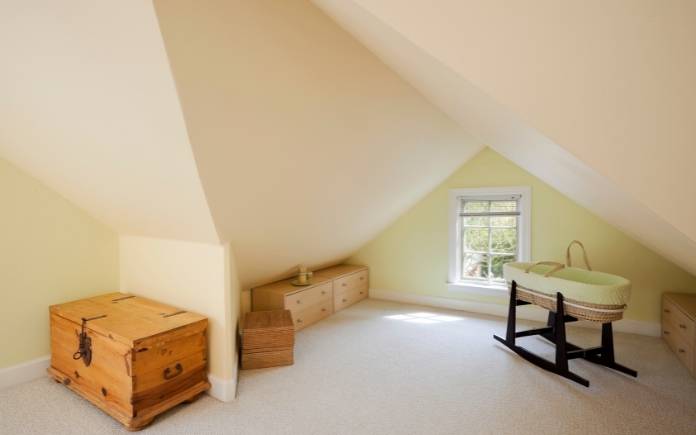
A renovated attic like this one can be hard to insulate because there’s not much space between the walls and the roof. (chuckcollier, Getty Images Signature)
Leslie Trippe’s 1953 home in Huntsville, Ala., has a finished attic space with two bedrooms and a bathroom.
The ceilings are only seven feet tall and angled in the bedrooms, plus there’s no extra space in between the drywall and the roof.
“When the wall or ceiling is touched the heat can be felt coming through the drywall. We currently use portable air conditioners to keep the space cooler. Is there a way to cool off this space?” she asks.
This is a very common problem in attics that have been converted into living spaces. When people are slowly renovating their home, they forget to take into consideration how hot the attic can get.
Most of the time, it’s almost impossible to add insulation without doing some demolition. Any added insulation in the space between the drywall and the roof will help.
See if any contractors in your area do blow-in cellulose insulation. It’s a mix of wood or paper-based products and glue that’s pumped into the cavities behind walls and ceilings. The contractor would need to cut a small area of drywall to pump it into the small space, but this can easily be repaired.
Besides adding insulation, call an HVAC professional and see if they can set up some zoning for your air conditioning system. This allows you to pump more air conditioning into certain areas.
You can also invest in a ductless air conditioner. This has its own separate system that attaches to the wall.
Hour 2
In Hour 2, hear our thoughts on the best spot for a skylight, keeping water from pooling on a patio, and more.
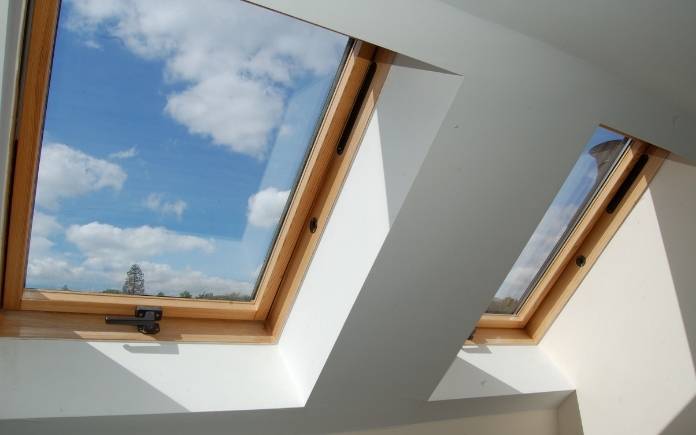
The Best Spot for a Skylight
Consider two things when installing a skylight: What room that you want it in, and how much sun do you want shining through. (KM6064, Getty Images Signature)
A hotline caller wants to use skylights for ventilation more so than sunlight.
He wants to know: What direction should the skylights face: north, south, east or west?
There’s a lot to consider when placing skylights. Start by asking where do you want the light on the inside.
Then run a plumb line up along the ceiling in the attic and see if you run into any valleys or if the light tunnel will be exceptionally long.
In terms of directional exposure, I don’t think that’s a big deal to worry about if you have a quality skylight with shade capabilities. Just make sure it looks good from the inside and doesn’t affect your home’s structure.
In often cases, people don’t put it on the front of the house for aesthetic purposes. They’re often placed on the north-facing roof plane because it provides the most indirect light, so you won’t get a lot of glare or heat build-up.
If you live in a northern climate, you might want to place them on the south-facing side for some extra heating.
Buy a glass skylight, not an acrylic one. Those can lead to water damage and intense heat if they don’t have the proper curving or seamless flashing.
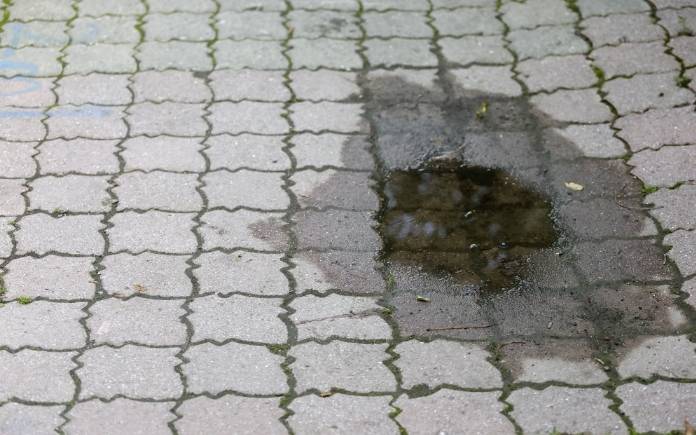
Stopping Pooling Water on a Patio
Pooling water on an uneven patio can weaken the concrete’s structure. (temmuzcan, Getty Images Signature)
Fifteen years ago, Jane Pierce’s husband used a concrete leveler to correct a low spot on her patio that was collecting water.
“It’s held up very well until now. It is cracking and chipping off. How can I fix this?” she asks.
Here’s how to fix this:
Chip away as much from the surface as you possibly can. You don’t have to be too aggressive with it — just get all of the material that’s separated from the original patio.
Next, get some Quikrete ReCap Concrete Resurfacer. Use Quikrete’s Concrete Calculator to determine how many bags you’ll need.
Then, mix it according to the directions on the package and pour it onto your patio.
Use a large rubber squeegee (about a foot to 16 inches wide) to spread the mix. Cover the entire patio to ensure it’s level.
Before it dries, drag a broom across it to add some texture for a slip-resistant surface
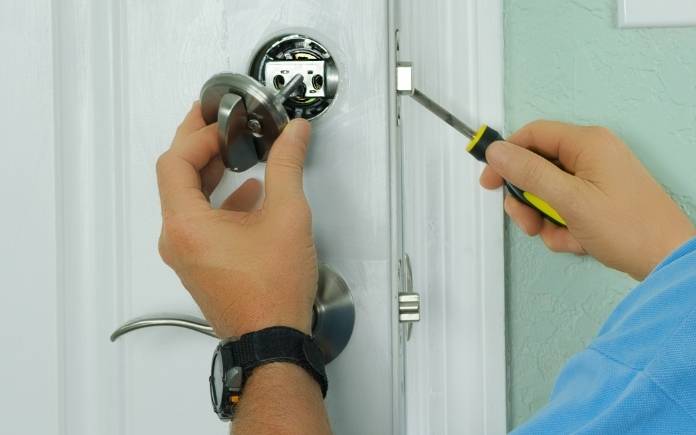
A regular screwdriver can loosen any stuck parts inside a deadbolt. (mokee81, Getty Images)
How do you fix a deadbolt that’s stuck in the locked position? That’s what Marlene Lauer in Neenah, Wisconsin, wants to know.
She says, “We removed the doorknob, but couldn’t move any of the parts to slide the bolt. We tried to take the door off and that did not work. My son wants to saw through the bolt. Is that our only option?”
Usually, a small piece inside the doorknob has broken and is lodged inside, keeping it locked.
Use a hammer to tap a screwdriver or nail punch to the right and left inside the keyhole to loosen the jammed part. Then, try tapping the screwdriver a bit with a hammer to loosen what’s stuck inside.
If this doesn’t fix it, call a locksmith.
Best New Products
Lutron’s Dimmer Switch Starter Kit gives your home lighting a smart upgrade, without competing for a signal with other devices. Learn more >>
Simple Solutions
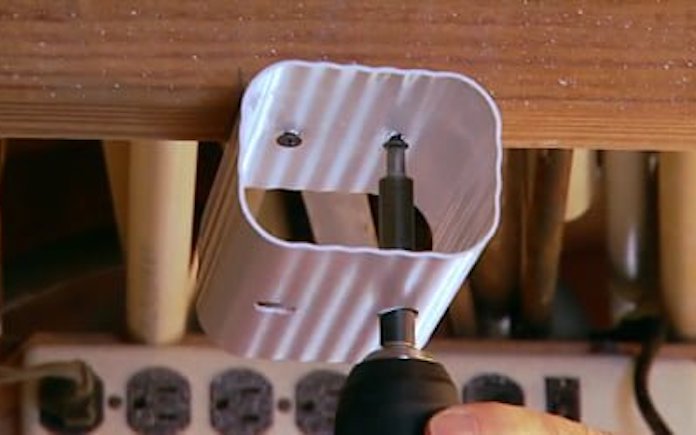
Attaching a section of downspout to a ceiling joist creates easy storage for long and narrow items. (3 Echoes Content Studio)
Easy Overhead Storage — Here’s how to make an overhead rack in your garage workshop, or shed for storing small-diameter pipe, narrow moldings, and even fishing rods.
Cut two 5-in.-long pieces from a length of vinyl downspout.
Then screw the downspout pieces to an overhead ceiling joist, spacing them about 4 feet apart.
Now, simply slide moldings and pipes into the short downspout sections. The parts will be up and out of the way, but easily accessible when you need them.
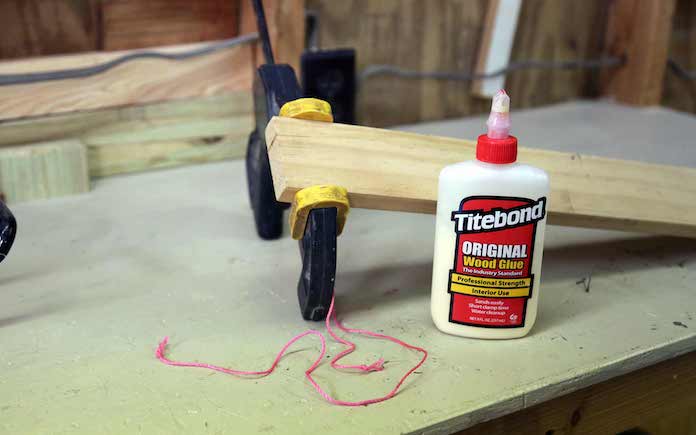
Have a split chair leg or a tabletop? Here’s how to get the wood glue in tight spaces when you fix it, and coat both sides evenly! (3 Echoes Content Studio)
Gluing Tight Cracks — When fixing a split chair rail, cracked baluster, or similar object, it’s difficult to apply glue because the crack is so tight. Try this:
Wedge open the crack with a small flat-blade screwdriver.
Then, squeeze in some glue and use a length of dental floss to work the glue deep into the crack.
Pull out the screwdriver, wipe away the excess glue and clamp the repair.
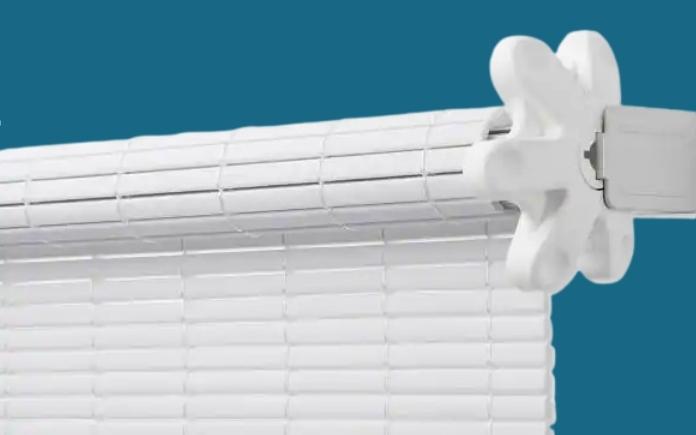
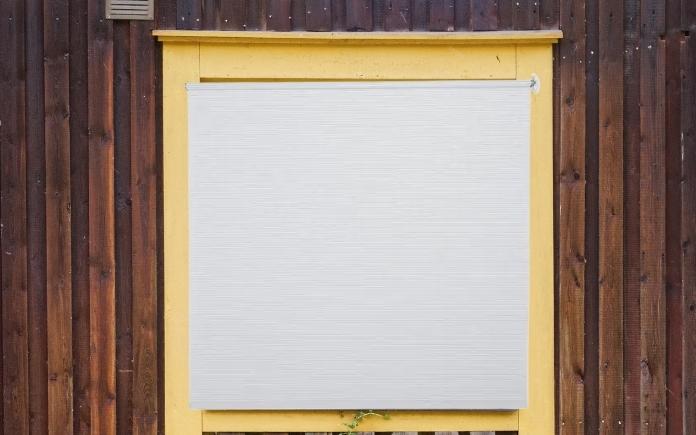
Outdoor roll-up blinds for your patio solve the problem of late afternoon and early-morning sun glare.
No matter where you build your patio (or porch or pergola), the sun is bound to blast that space at some time in the day.
Finding attractive blinds to block or filter the sun has always been a challenge. Some shades block too much of the outside view while others let too much light shine through.
Plus, the cords on blinds can easily become entangled, becoming a danger to children and pets.
Coolaroo’s new outdoor roll-up blinds for your patio are the safe solution for this shade problem.
The unique wheel operation that allows you to easily adjust the height of your shade to control your privacy and comfort. (The Home Depot)
This page contains affiliate links. If you purchase a product from these links, we will earn a small commission at no additional cost to you.
This wheel design eliminates any dangling cords, making these outdoor roll-up blinds for your patio certified “Best for Kids” by the Window Covering Safety Council.
Products that qualify for “Best for Kids” either have no cords, no operating cords, or inner cords that can’t create a potential wrap-around hazard. To be certified, manufacturers must meet the program’s specifications and have their products tested in a third-party laboratory.
Sarah is a staff writer at Apartment Therapy. She completed her MA in journalism at the University of Missouri and has a bachelor’s degree in journalism from Belmont University. Past writing and editing stops include HGTV Magazine, Nashville Arts Magazine, and several outlets local to her hometown, Columbia, Missouri.
Apartment Therapy received compensation for this post, which was written and edited independently by our editorial team.
Shifting into spring and summer brings the urge to do nearly anything outdoors: eating, entertaining, relaxing — you name it. If you’re lucky enough to have a private outdoor sitting area, be it a balcony or a yard, it’s time to start thinking about furnishing it to maximize your outside time — even if your space isn’t exactly roomy. To get you started, we’ve rounded up our favorite outdoor furniture for small spaces so that you can make the most of what you have and spend as much time as possible outside the house.
Nicole Lund and Sarah M. Vazquez also contributed to reporting.