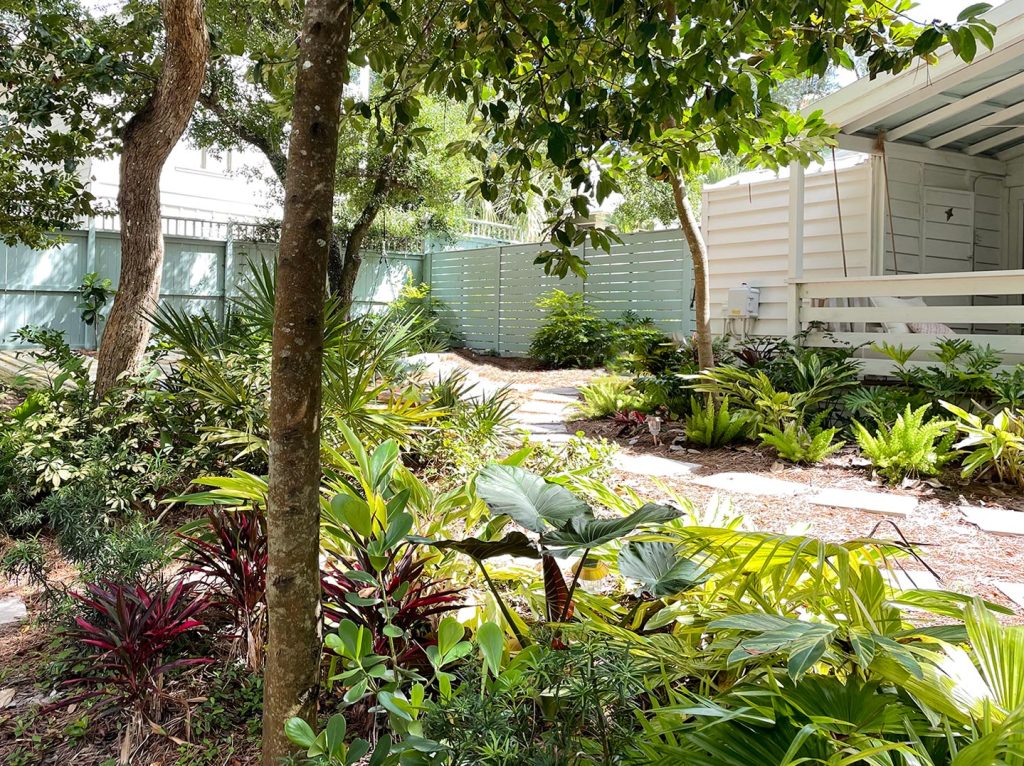
Last month’s arctic blast brought surprisingly frigid temperatures to Florida. We had three consecutive nights with temperatures in the low 20s – and an ultimate low of around 18 degrees! A lot of our outdoor plants aren’t built for that kind of freezing weather (in the 3 winters we’ve spent here we can remember one other low of about 32-degrees, but things went right back up to our more normal lows of around 45 degrees within a few hours). They’re calling our recent deep freeze a “once-in-a-century event” here in Florida. In other words: the ultimate test. So here are the steps we took to protect our plants, including a few things that worked better than others.
It should be said that there are definitely bigger things to worry about during extreme cold weather events – like protecting people, pets, and pipes. But you’ll often see plants as the 4th “P” on that list of things to check on in freezing weather. And since we’ve spent a good amount of time and money on our landscaping, we figured it was worth the effort to protect what we could, especially if some up-front effort could save us the time and money of replanting things that would otherwise die without a little help.
Tip 1: Identify Plants Vulnerable To Freezing
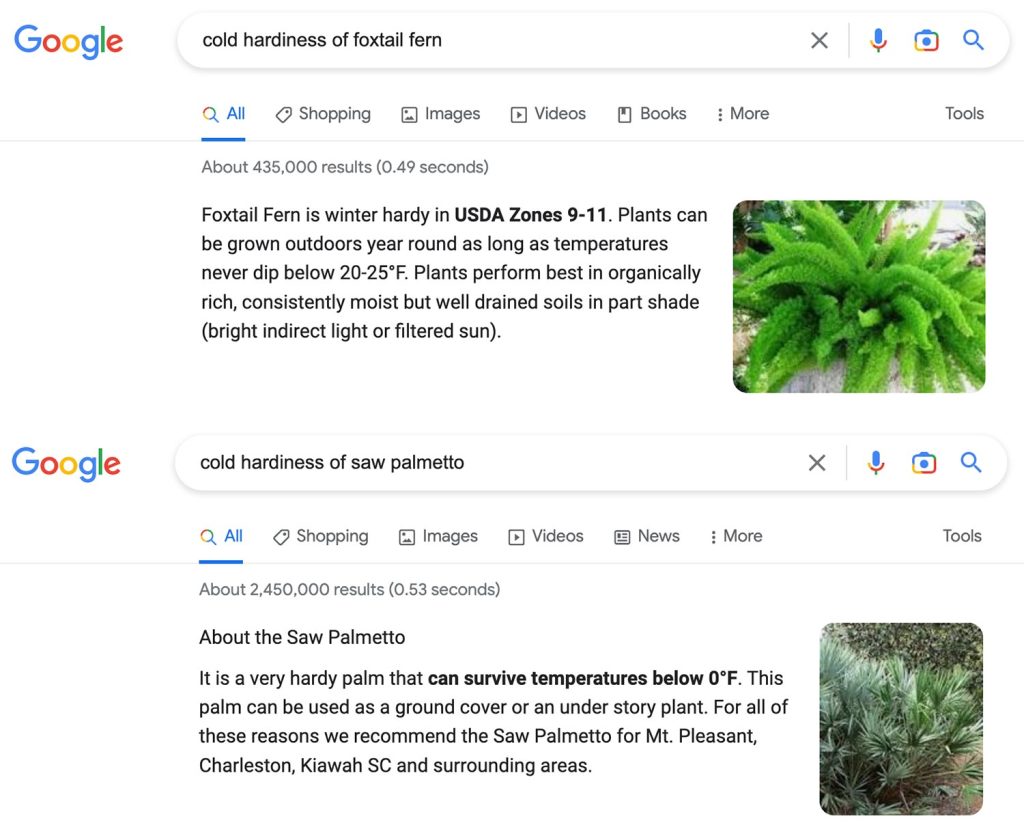
To prioritize your efforts, try to learn which plants are the least capable of surviving in your forecasted temperatures. Presumably, most of them are designed to survive in your growing zone (find your zone here). However, that might not be enough information if the weather is expected to be abnormally cold – especially for 3-4 days in a row. Going into this “hard freeze” we googled “cold tolerance” or “cold hardiness” along with the name of each plant we had outside.* It’s a great starting point for learning which plants we should focus on, and which would hopefully be just fine. For example, we learned that our saw palmettos wouldn’t need our help, but our foxtail ferns might.
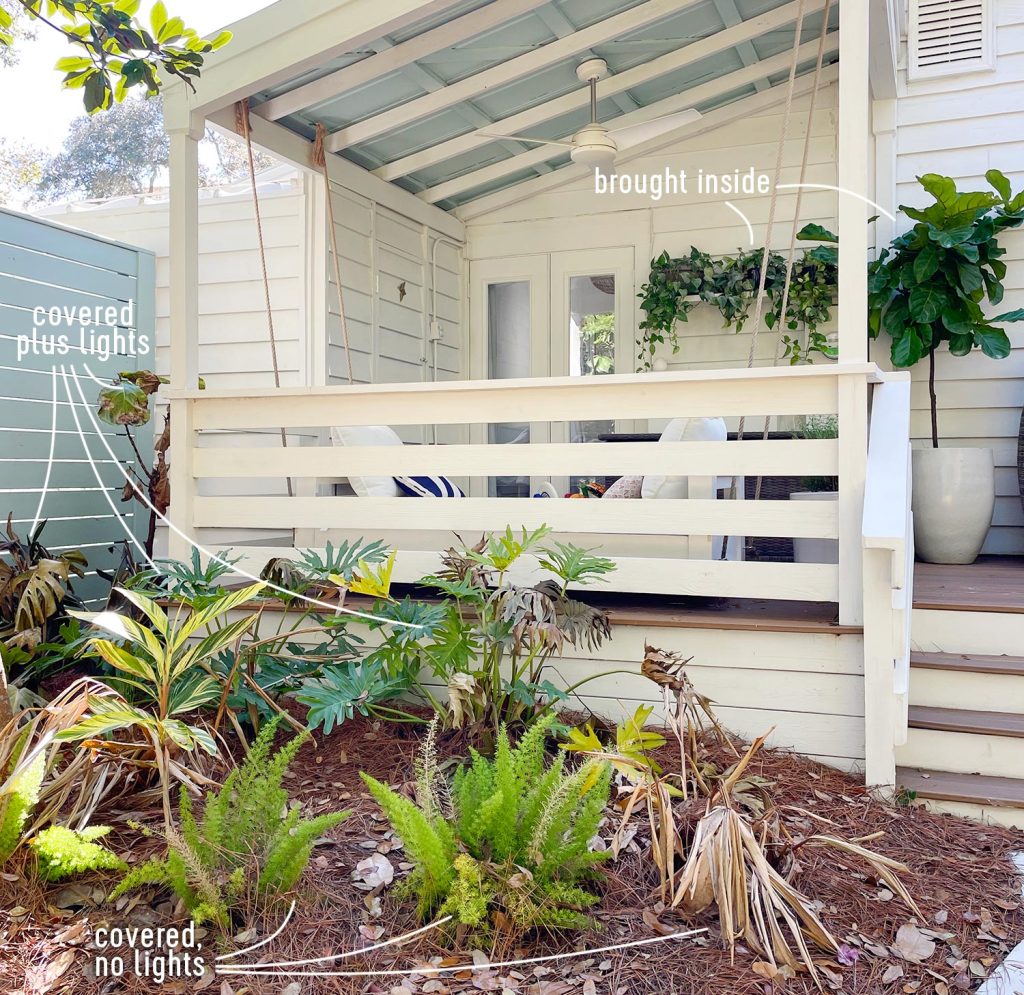
The surest way to keep your plants from getting too cold is to bring them inside where it’s warm. Of course, this is easier said than done. Many plants might be dug in the ground, too heavy to move, and/or too big to fit indoors. But things like small-to-medium pots or hanging planters are good candidates for transporting inside. You’ll have to be the judge of what’s reasonable for your home.
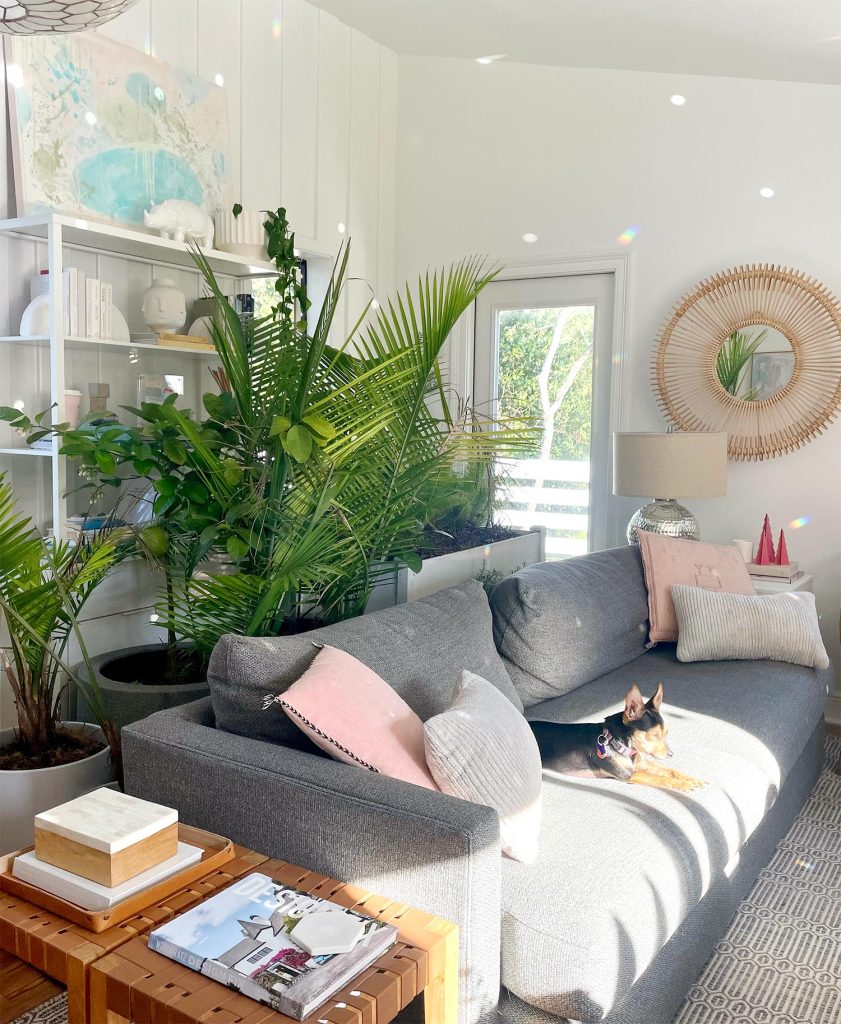
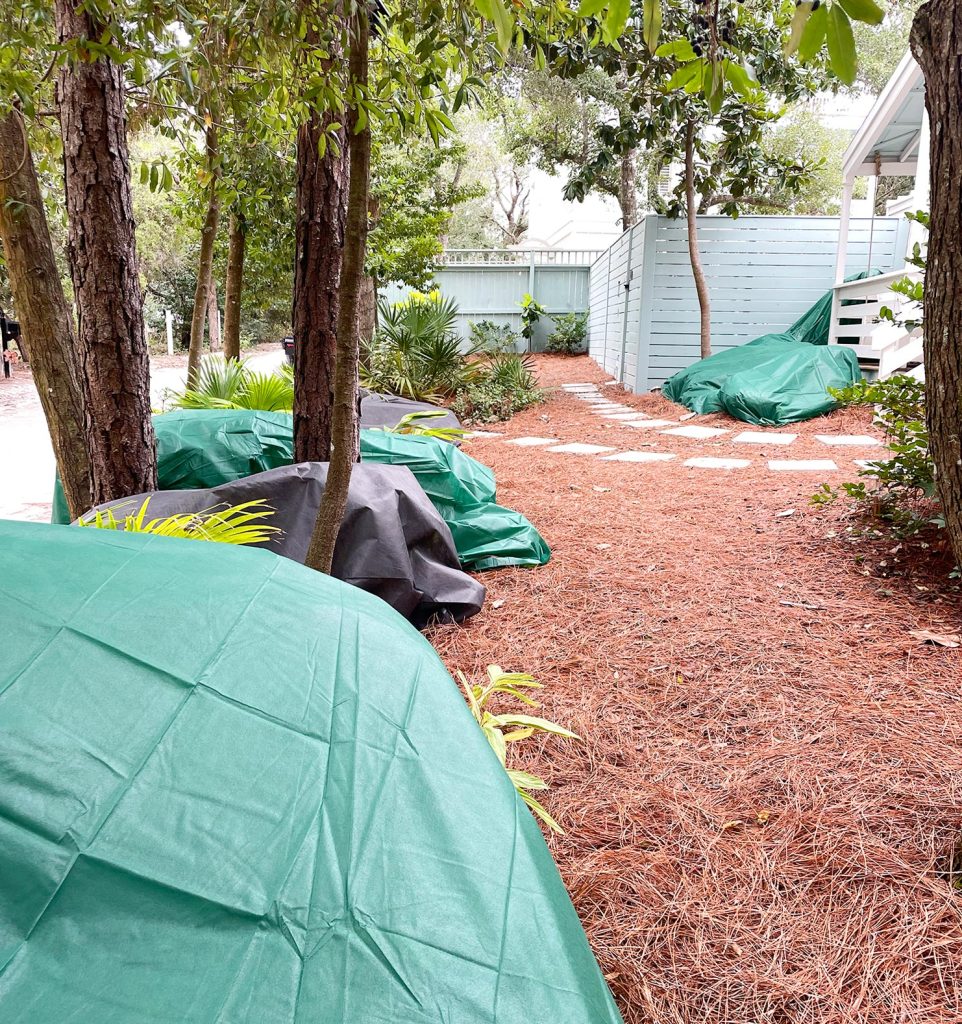
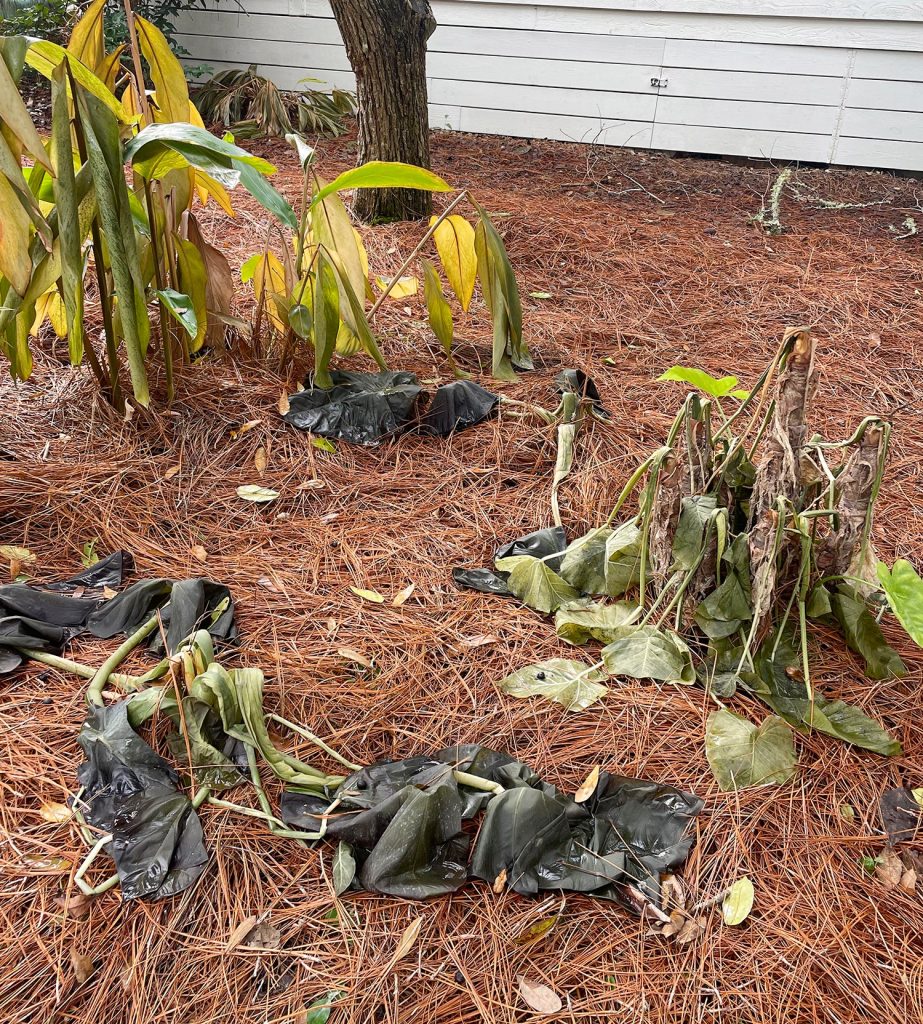
As you’ll see in these pictures, we have A LOT of potted plants outside. Some might call us crazy for bringing so many inside – especially considering we’ve got a small home and this freeze was happening while we were celebrating Christmas. But we laid out some tarps by a couple of lesser-used doorways and crammed as many pots as we could onto them. The tarps protected the floors from dirt and any residual water in the soil (remember that outdoor pots have drainage holes on the bottom). It was slightly inconvenient for a few days, but this turned out to be the only method that had a 100% success rate.
By bringing so many pots inside, we probably saved over $500 in plants that we might’ve had to replace otherwise. It was definitely worth it. Even if it did mean breaking out a dolly to drag our big fiddle leaf fig off the front porch and into the kitchen! It actually doesn’t look half bad in here… except for the fact that it made getting into the laundry closet kinda tight.
If bringing your plants indoors to your heated space isn’t possible, even relocating them into a protected area like a garage, basement, or attic could be enough to keep them alive. Potted plants are especially vulnerable to cold because their soil is less insulated than those dug into the ground. And getting them out of the wind helps to minimize heat loss.
Tip 3: Add Pine Straw Or Mulch
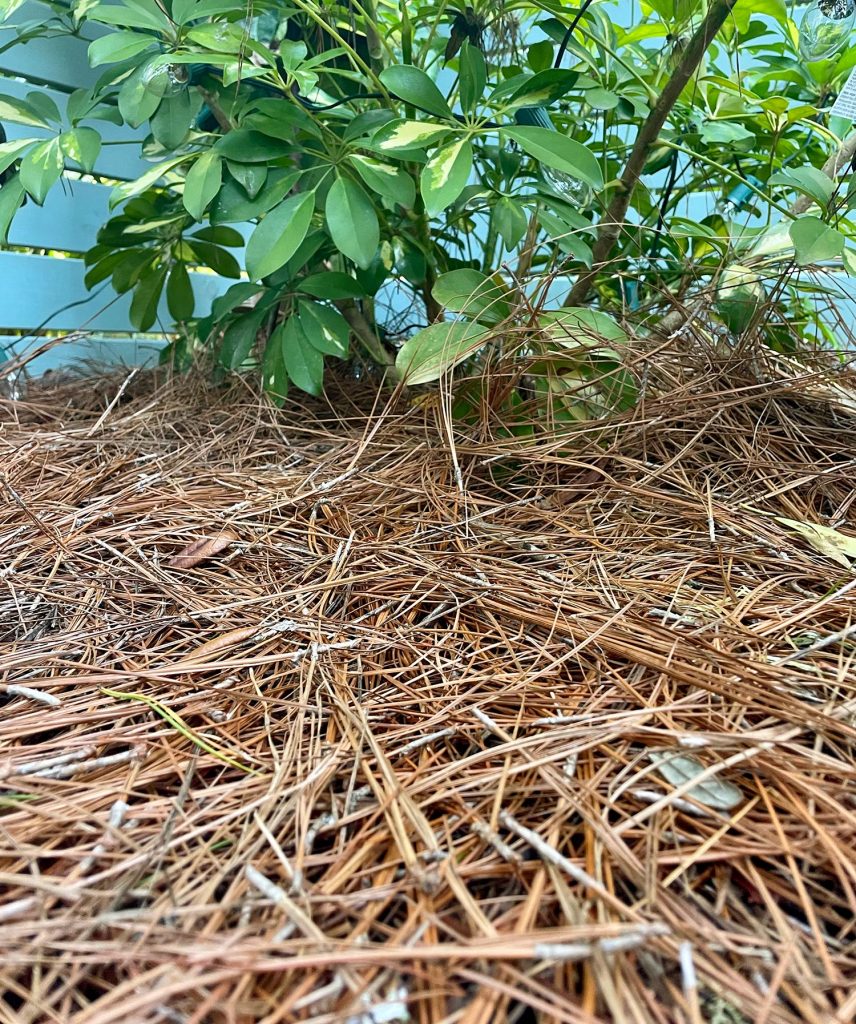
For plants staying outside, your main strategy is helping them stay as warm as possible. One technique is to add a layer of fresh mulch to your plant beds, especially around the bases of your plants. Mulch actually helps trap air around your plants – particularly when using a light material like straw or pine straw – which insulates them against dramatic drops in temperature. It can also help retain moisture and, surprisingly, wet soil actually retains more heat than dry soil.
Mulching does require a bit of time, effort, money, and planning. Luckily, we already had plans to add fresh pine straw to our yard because we had guests visiting for the holidays. We wanted the clean look of freshly mulched beds and the cold protection was a nice bonus! It’s also a great tip to water all of your freshly mulched plants before the cold. As I said above, we were surprised to hear that as a tip from a lot of local garden centers – but wet soil retains more heat than dry soil. So sprinkle away.
Tip 4: Cover Plants With Breathable Fabric
If you’ve ever seen someone throw a blanket, towel, or sheet over their plants, that’s another popular way to try to keep some heat around your plants. The cover traps warm air around the plant in the same way that a blanket keeps us humans warm – but instead of trapping body heat, it retains the heat that’s coming off the plant and soil. We figured it wouldn’t be foolproof with such low forecasted temps, but we knew even if it saved half of what we covered it would be worth it. And we picked up some tips to make it as successful as possible that we’ll share with you below.
Use breathable fabric, not plastic
It may sound counterintuitive but using breathable fabric so air can still flow around the plant was the number one tip from local nurseries and online plant experts alike. We read over and over again that a plastic drop cloth or plastic bag can be worse than no protection in many cases, since it can hold moisture against plant tissues and cause more serious freeze damage. Just think about how you’d feel covered in plastic vs fabric. Not fun, right? That’s why things like spare bedsheets or towels are good solutions that you may already have around.
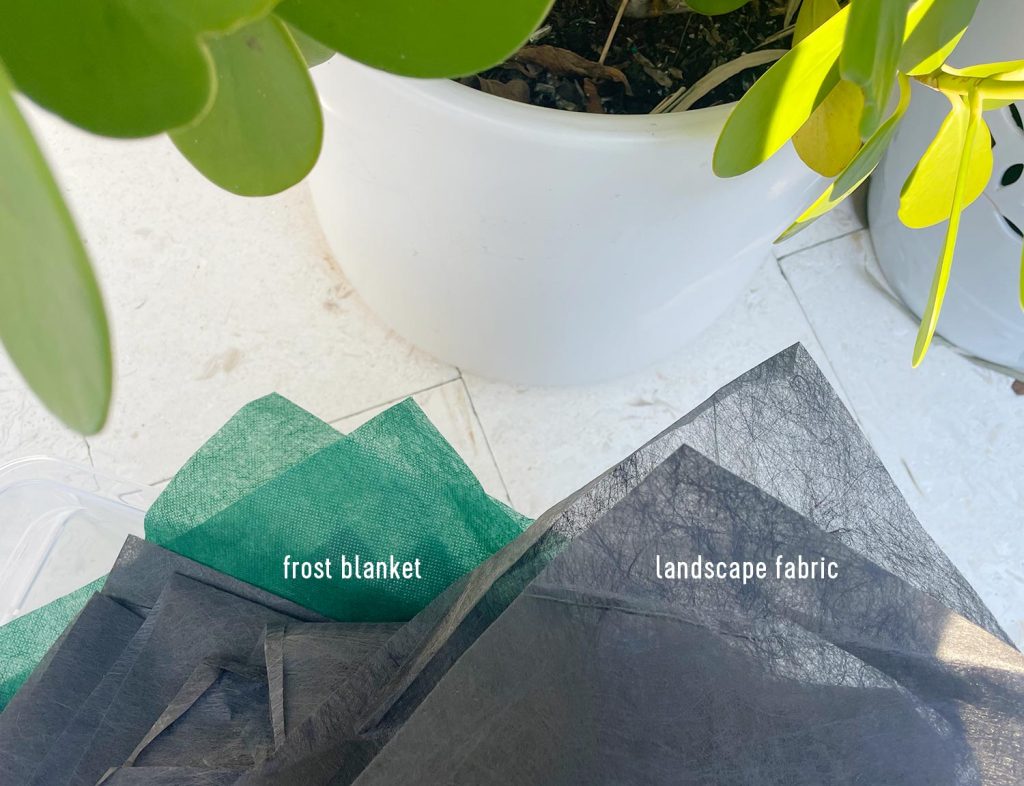
If you can’t find frost blankets, try landscape fabric instead
We don’t have many spare sheets, so we bought several of these Frost Blankets when we first saw the forecast. But a few days later, when we went back to grab a couple more, the store was completely sold out. Thankfully, someone there told us that landscape fabric – the kind meant to block weeds – is a similar material, making it a suitable substitute. We found it to be a little thinner than the Frost Blankets, but it was also less expensive. And in the end, they both seemed to perform about the same.
Don’t “lollipop” your plants
Make sure your blankets go all the way to the ground. Your soil is the main source of the heat that the blanket will be trapping, so just wrapping the leafy top (like a lollipop wrapper) isn’t as effective. When draping bushes or small trees, think more about making “ghosts” where your cover makes contact with the ground on all sides. Also, don’t forget to buy some garden stakes or landscape pins to keep your covers held down – especially if it’s going to be windy!
Tip 5: Add An Ambient Heat Source
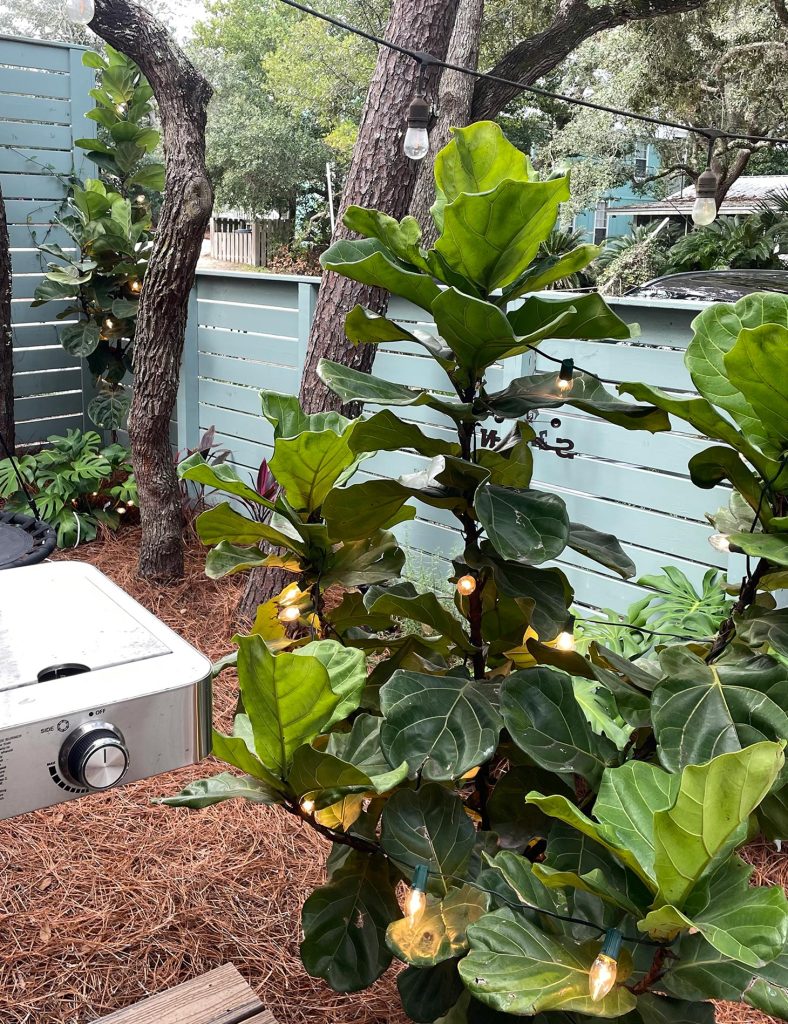
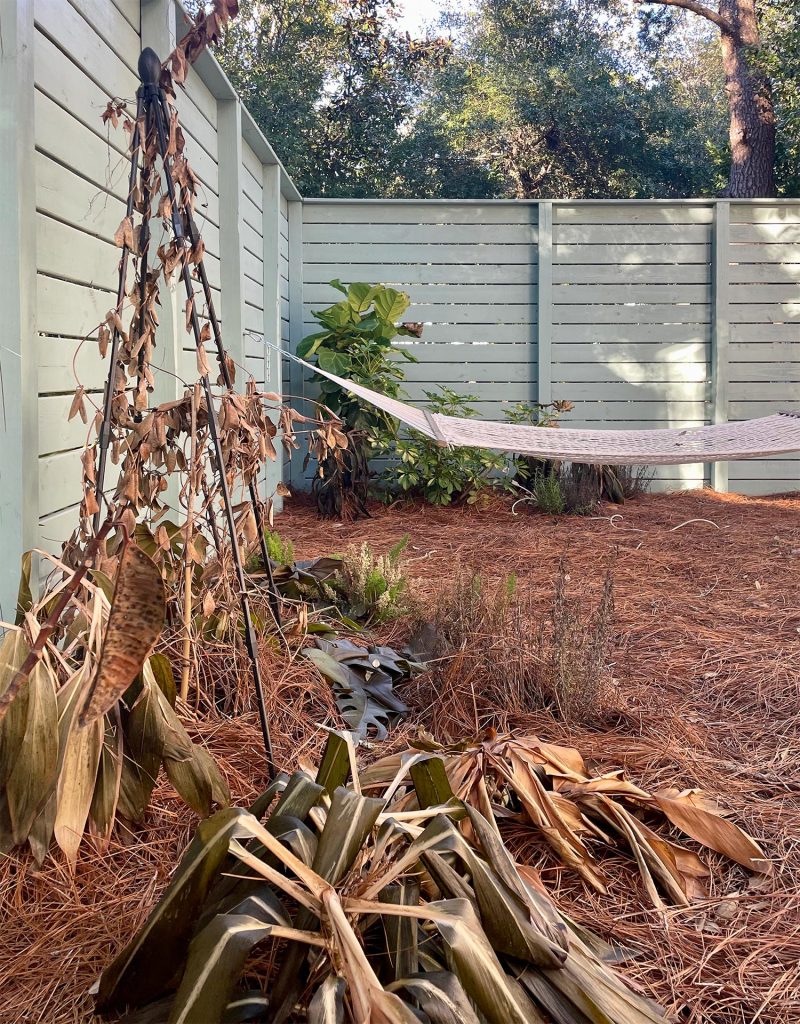
To increase the amount of warm air your blanket will trap, you can also introduce another heat source. Someone tipped us off that wrapping incandescent Christmas lights around your plant or through your plant beds is a great way to do this. LEDs won’t work because they don’t give off heat, but the old-school ones – specifically the larger C9 bulbs – are slightly warm and known to work well. Just be careful not to overload your breakers with too many strands. Here’s what ours looked like before we covered them.
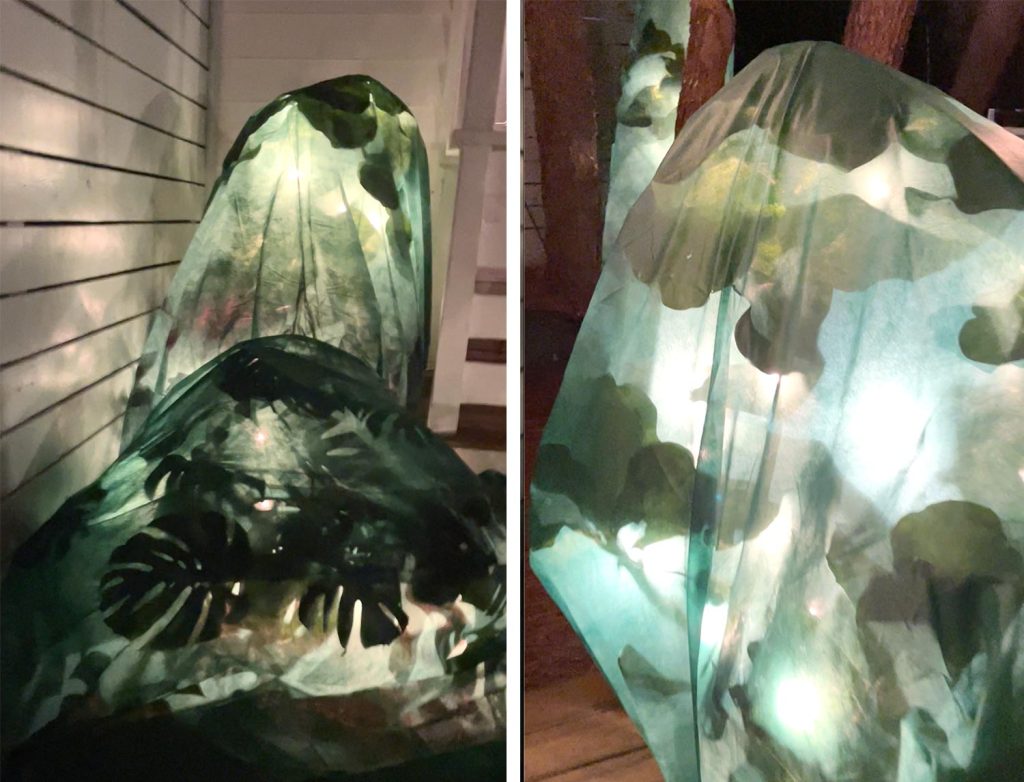
And here’s what they looked like after we put the frost blankets over them. I was kinda pretty, in a spooky sort of way!
We’ve also heard of people filling milk jugs with hot water and placing them near their plants. The same principle is at work, but this sounded like a more labor-intensive technique. Plus, since this was happening on Christmas weekend for us, we had no trouble finding plenty of discounted C9 bulbs at the store. We got 4 boxes for the price of 1!
How Did Our Plants Fare?
After taking all of the above actions, I’d love to say that our landscaping looks as good as it did before the cold snap (see how it looked this fall here). It definitely does not. Despite our efforts, we, unfortunately, have a lot of plants – namely tropicals – that just aren’t built for the extreme sustained “hard freeze” that we experienced for 3 solid days in a row.
I wish there was a clear takeaway like “blankets work” or “C9 bulbs are amazing every time” but our results were too mixed to draw such decisive conclusions. Some covered plants did great (as in, they looked pristine when we uncovered them) and some didn’t. It’s likely that many if not all of our covered plants might come back based on the base/root seeming to be unaffected and only the leaves looking limp (typically leaves can come back if their root/stem is ok) but they don’t all look great right now. We’ll have to update you on how things fare, so stay tuned for that.
But our overview is that while some covered plants had lights and some didn’t, both groups had some plants that looked great upon uncovering them and some really wilted ones (which again might completely come back, but they don’t look great now). Once again: bringing plants inside was the only 100% success rate we had.
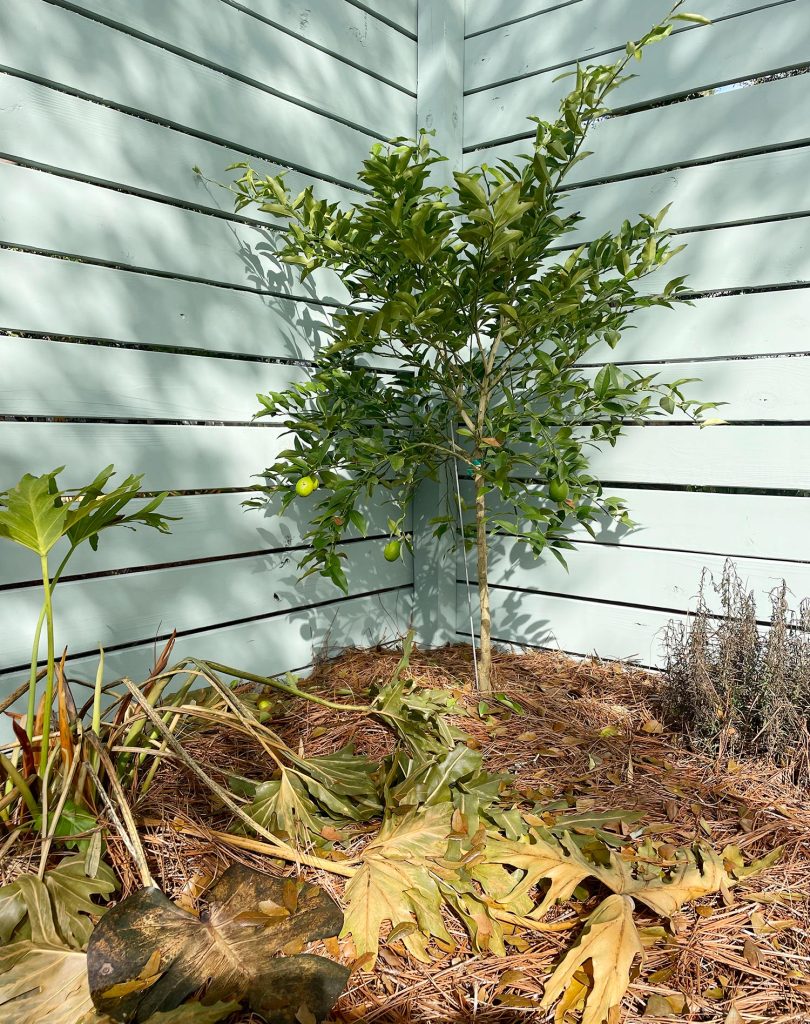
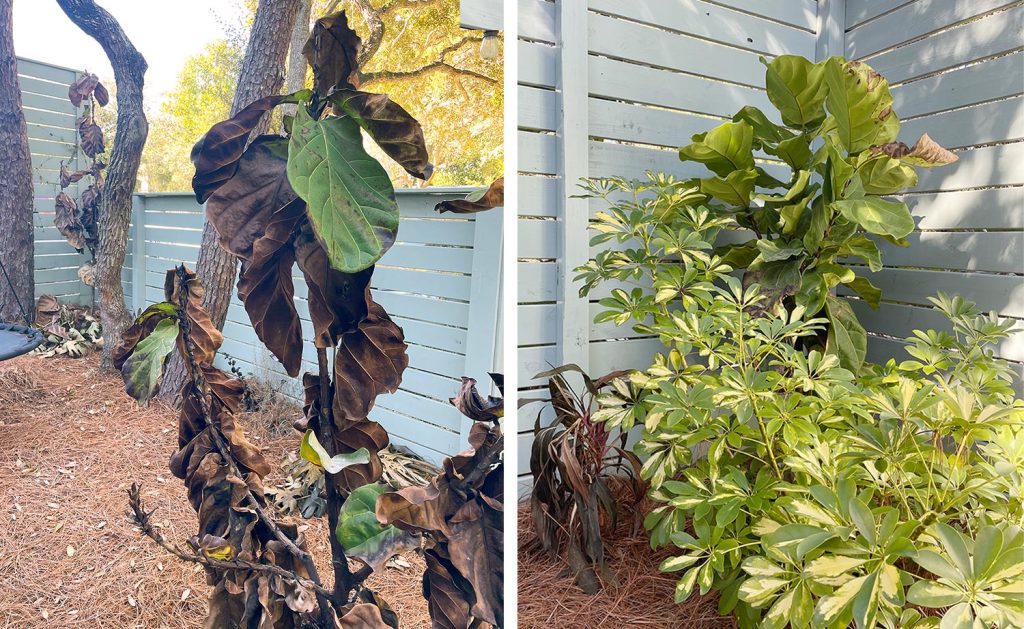
We think a lot of this “varied result” could be related to specific plant species and planting locations. For instance, one of our lime trees looks completely fine (see below) and the other is basically covered in brown leaves and all the fruit dropped off. Both were mulched and covered, but without C9 bulbs. Our best guess is that one was a lot more exposed to the wind than the other one since the happier one (seen below) was in a corner where there were two fence sides as wind breaks. Most of our more tropical plants like monsteras, elephant ears, and gingers got entirely limp, but our philodendrons fared okay with at least a few happy-looking leaves and a base that’s already shooting up new healthy leaves.
We have several fiddle leaf figs planted outside because we’ve had better luck with them outdoors here than inside. Over the past 3 winters they’ve been outside & very happy, so we brought in the potted one that we could, and for the ones that were planted in the ground, we covered, mulched, and wrapped them in Christmas lights. The results? One one came out completely unscathed (below right). And, to our surprise, it was the smallest and most recently planted of the whole bunch. In fact, that whole bed it was in did pretty well. So maybe it was just in a warmer corner of our yard which once again had two fences meeting to form a wind break around it?
The only reason we feel ok about the other figs looking so bleak is that we have seen a fiddle leaf fig completely die inside of our house (dropped all leaves, was a dead-looking stick) and when we put it outside it completely regrew into a super huge and healthy tree. So we are holding out hope that happens again with these. Will keep you posted for sure.
So, again, it’s hard to draw clear conclusions about what of this effort worked… at least not yet… but it feels safe to say that it didn’t hurt to try and we have high hopes for many things coming back this spring. (*crosses all fingers and toes*)
What’s The Good News?
As I’ve mentioned when it comes to limp plants or brown leaves, all hope is not lost. There’s a huge difference between a dead leaf and a dead plant, so just because lots of our leaves are brown and wilted, doesn’t mean the whole plant’s a goner. They may just need time to shed their frozen bits and regrow new ones when the weather heats up again. Which leads us to…
Tip 6: Don’t Prune Right Away
As antsy as we are to clean up all of the dead-looking plants in our yard, many of the experts we googled (and chatted with locally) say that our plants will actually do better if we wait. Recommendations differ slightly from plant to plant, but in general, here are some reasons to put your shears away (for now):
You might cut off healthy branches or dig up healthy plants
You probably won’t know what parts of the plant are truly dead right away. Some damage may not appear immediately, while some rough-looking plants may bounce back in a few days. Still, others won’t sprout again until the spring. You wouldn’t judge the health of a tree based on its empty branches in the winter, right? So by waiting for things to start greening up again, you’ll have a much clearer idea of what plants (or parts of your plants) didn’t survive.
Dead leaves can still protect your plant
Until you’re past your area’s last possible frost (check your frost dates here) there’s always a chance you’ll experience another cold snap this season. That dead material can still offer some insulation to the living parts of the plant, whereas removing them leaves each plant more exposed to cold and wind than before.
You don’t want to stress your plant more
After a freeze event, your plant focuses its resources on keeping its core alive and healthy. That’s what you want it to do. Cutting branches or removing leaves too soon might trigger a growth response, which might unnecessarily “distract” its resources. Plus, if pruning does result in new growth, those new leaves become even more vulnerable to future freezes this season if another cold front rolls around.
Generally, we’ve followed the rule of letting damaged leaves and flowers fall off on their own (even if it means waiting for new growth to push them off in the spring). But for anything that is mushy or gross, which tends to happen on some tropicals (see above), we remove that sooner to prevent rot. This happened to one of our biggest elephant ears last year during our one and only brief frost, but it grew back just as big this year. Fingers crossed it does that again!
So even though our yard doesn’t look quite the way we want it to right now, we’re reserving final judgment on what worked and what didn’t until spring and summer rolls around. We’re hopeful that more things survived than it seems and, if not, we’ll reevaluate if we want to risk replanting the same thing in its place. A neighbor of ours said she likes to look at these moments as an opportunity for things to come back hardier and stronger, so we’re hoping that holds true for our plants.
Additional Freezin Weather Preparation
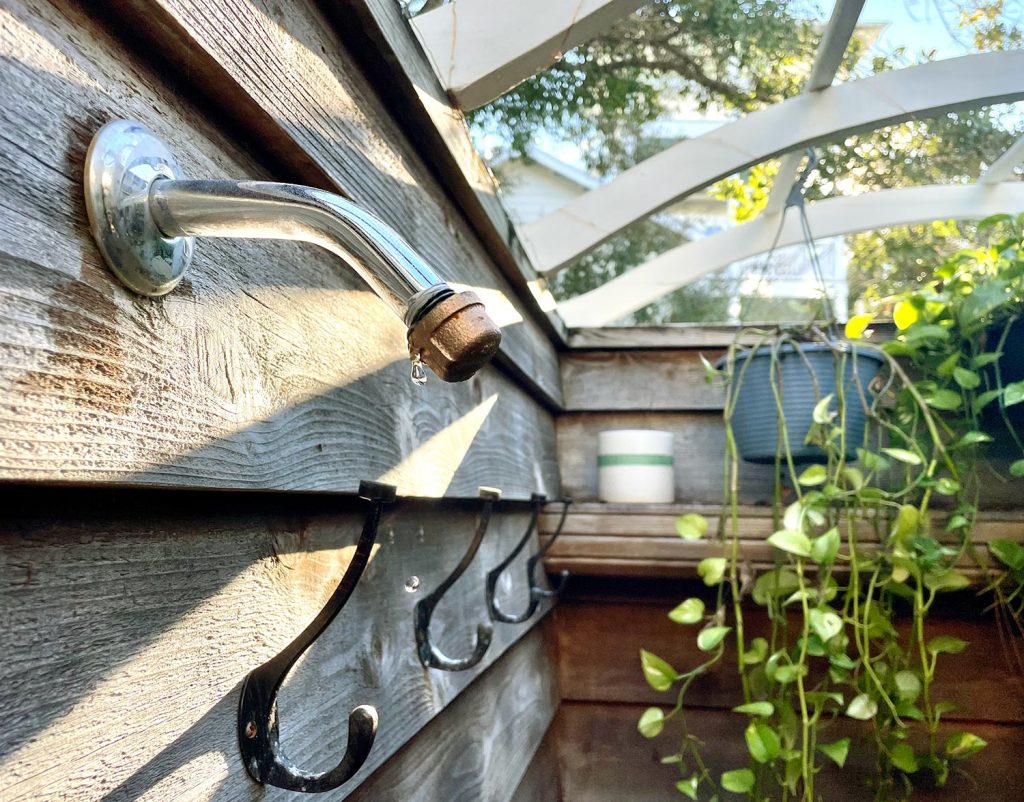
Our plants weren’t the only thing we took steps to protect during this recent cold snap. Since it was our first time having such low temperatures in our Florida house, we protected our pipes from freezing too. Several of our neighbors experienced burst pipes – especially in their outdoor showers. But luckily the steps we took spared us from having the same trouble!
*This post contains affiliate links, so we may earn a small commission when you make a purchase through links on our site at no additional cost to you.
I’ll start this post with a confession: I resented our kitchen porch when we finished it last fall. Resent is a strong and, admittedly, strange word to use for a porch. But I’ll explain it later on in this post. The good news is that I no longer harbor any ill will toward it. In fact, it has become one of the spaces I’m most grateful to have in our smaller home. Especially after some functional additions that we’ve made to it over the last year since you saw it.
I love this space so much, that I’m actually writing this post from it right now. Call it Method Blogging. I’m fully immersed in my character.
A Kitchen Porch Renovation Recap
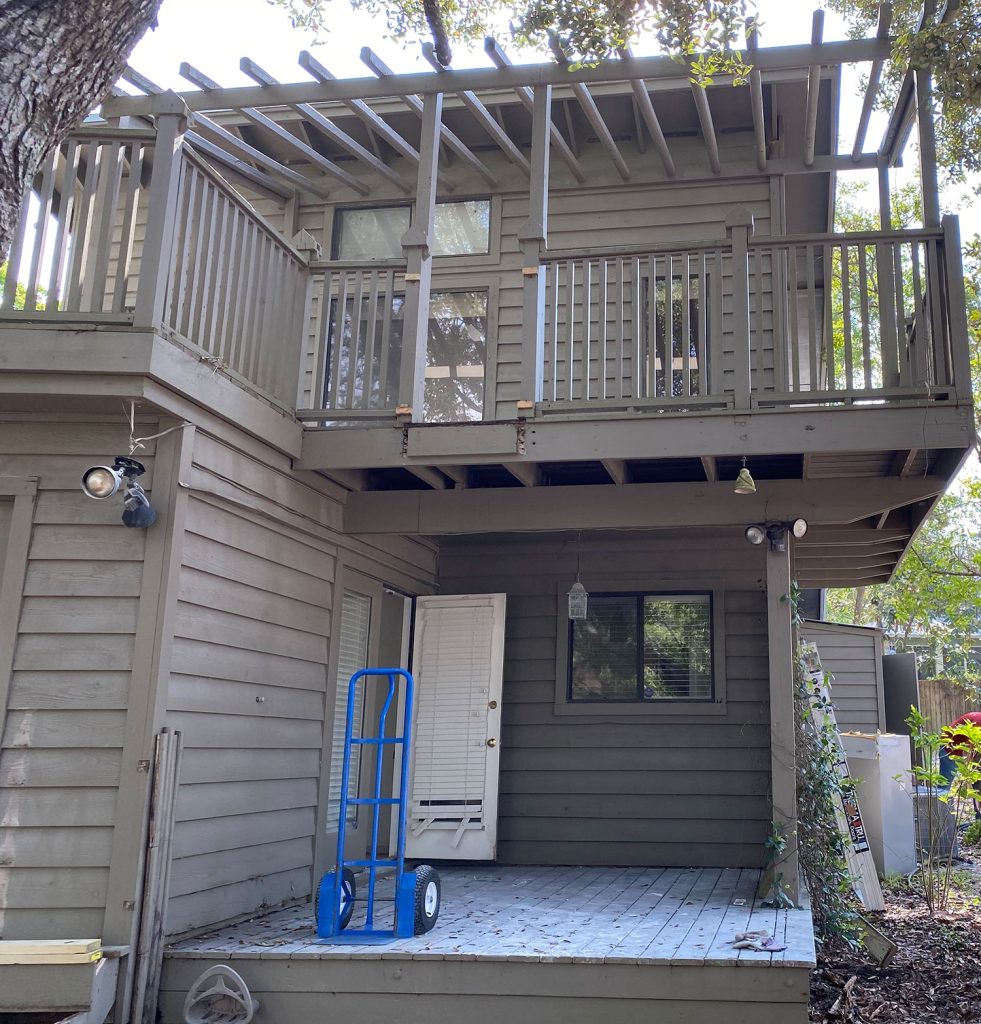
You can read a full post of this porch’s previous updates, but the quick version is: this used to be a porch off of our bedroom, which had 8 glass doors leading outside (yes, eight whole doors in one room). We closed off two of the doors that led to this porch, which you see in the photo below (which also created a wall for our bed). Then we swapped that black window for a door that connects this porch to our kitchen.
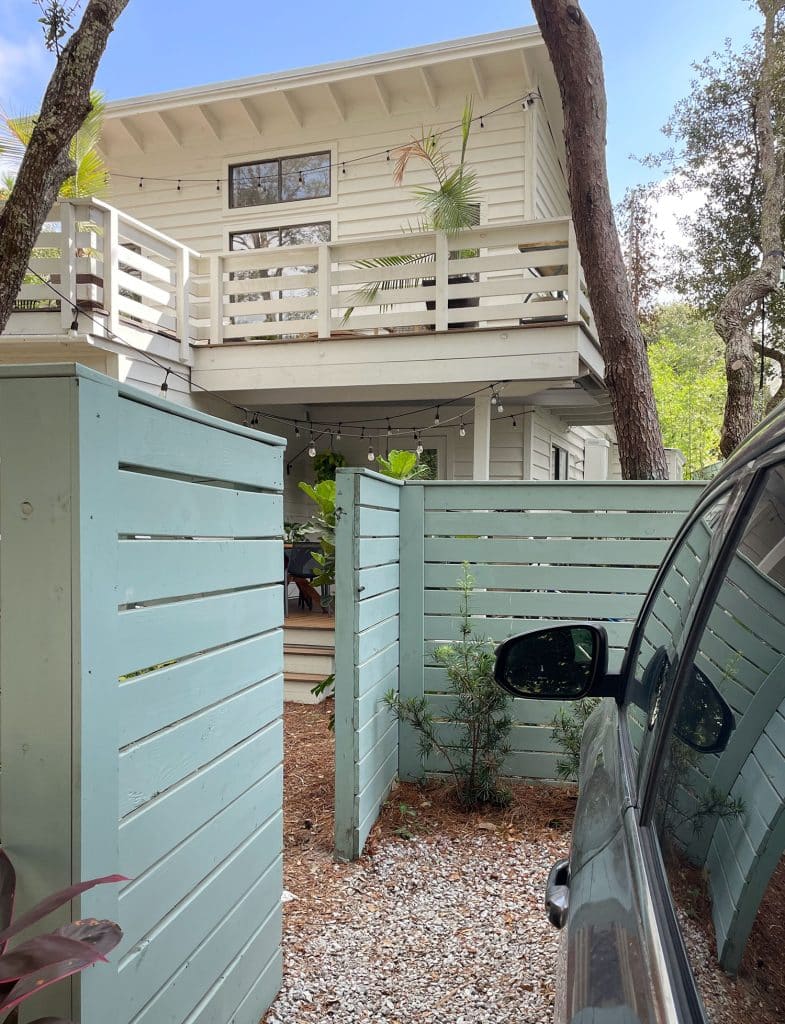
Taking this from “unused bedroom porch to “heavily used kitchen porch” has been a complete game changer. We love that this update created a quick path from our driveway to the kitchen, which makes bringing in groceries a whole lot easier.
You can see below how we park our car just outside the gate beyond this porch. There are still parking spots for guests in the front yard (they get to walk up our pretty front porch and enter into the sitting area, which feels nice for people visiting), but this little side yard parking spot has been so great for us. It’s a much more direct route into the house, and the porch is covered, so it’s a dry spot to run under if we’re coming home in a downpour.
We also love the easy access to our outdoor grill that’s just steps away from our kitchen’s cooking area.
By comparison, this is what we had going on when we bought the house:
It’s hard to articulate how much convenience this setup has added to our lives, but again, game-changer is the word that keeps coming to mind.
So How Did We Improve It?
To see the changes we’ve made over the last year, and to get a sense of how functional this has become for us, you can watch this quick video tour Sherry filmed (keep an eye out for my cameo). It’ll give you a better sense of the flow and you can see some of the added function in action:
As you saw in the video, the biggest improvement we’ve made since you last saw it was the addition of these two cabinets. They’re specifically made to be outdoors and they slip perfectly into the space, in a spot that used to be taken up by a wicker console table that Sherry found on the curb, which was pretty but offered us about 89% less function (zero concealed storage and a woven rickety top).
The #1 thing these outdoor cabinets do is provide convenient outdoor shoe storage. Since we don’t have a mudroom or a foyer, having not one but two places where we can keep our shoes has been really helpful (we have a cube cabinet next to the front door with baskets where we also store shoes).
I know keeping them outside may seem like a recipe for disaster, but it has been several months (some of the hottest/most humid) and we’ve had zero issues with bugs/smells/moisture. Sherry jokes that the bugs would rather be in our lush plant-filled yard, and our shoes get some nice ventilation through the tiny cabinet slivers that are built in for airflow (again, these are made to be outside, so that bit of moving air is likely why they don’t swell/warp/fall apart). You can see more about that if you watch the video tour Sherry made that I shared earlier in the post, which is also where you can see Sherry open the other cabinet to show you what’s in that one.
The nice thing is that this is BONUS shoe space thanks to also having that indoor storage in our cubby by the front door. Plus, keeping our shoes outside helps minimize the amount of sand and dirt that gets tracked in.
The cabinets also create bonus counter space, which has been especially useful as a prep area whenever we’re grilling (you may have noticed my case of grill tools stored above the shoes). And the wood-framed concrete counter has proven to be very durable and weatherproof so far.
Beyond their function, they just fit so nicely in this space and we love that they look like an outdoor extension of the cabinets inside. It’s like our kitchen counter got lengthened by five and a half feet (and since the porch is covered, it’s usable year-round).
Adding A Water Feature
Maybe “water feature” is a bit of an oversell, but we’ve grown to appreciate the running water sound by our pool so much that we wanted to try to incorporate something that sounds nice on this side of the house too.
So we bought this water fountain as a self-contained, all-in-one kit (you literally just put the ball on top, fill it with water, and turn it on). Super easy. We especially like that the green patina ties into our copper rain chains and the sound is really nice (you can hear it in the video).
We’re considering moving it down into the yard at some point, we just have to figure out the electrical situation first. But for now, it’s just plugged into the outlet up here.
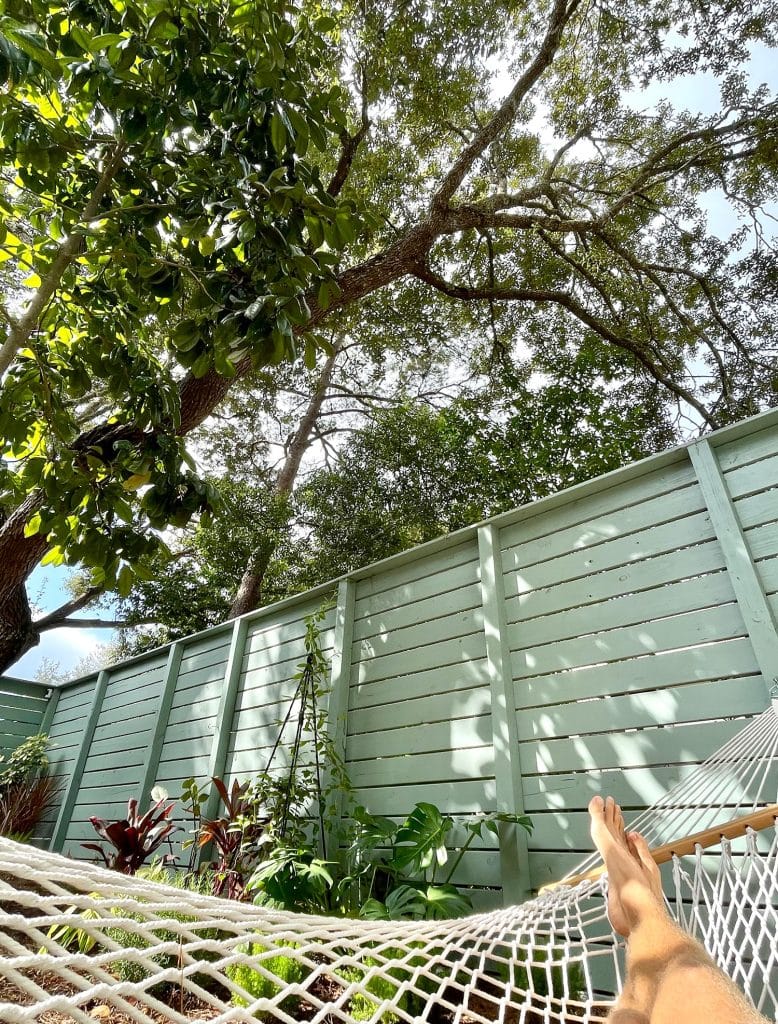
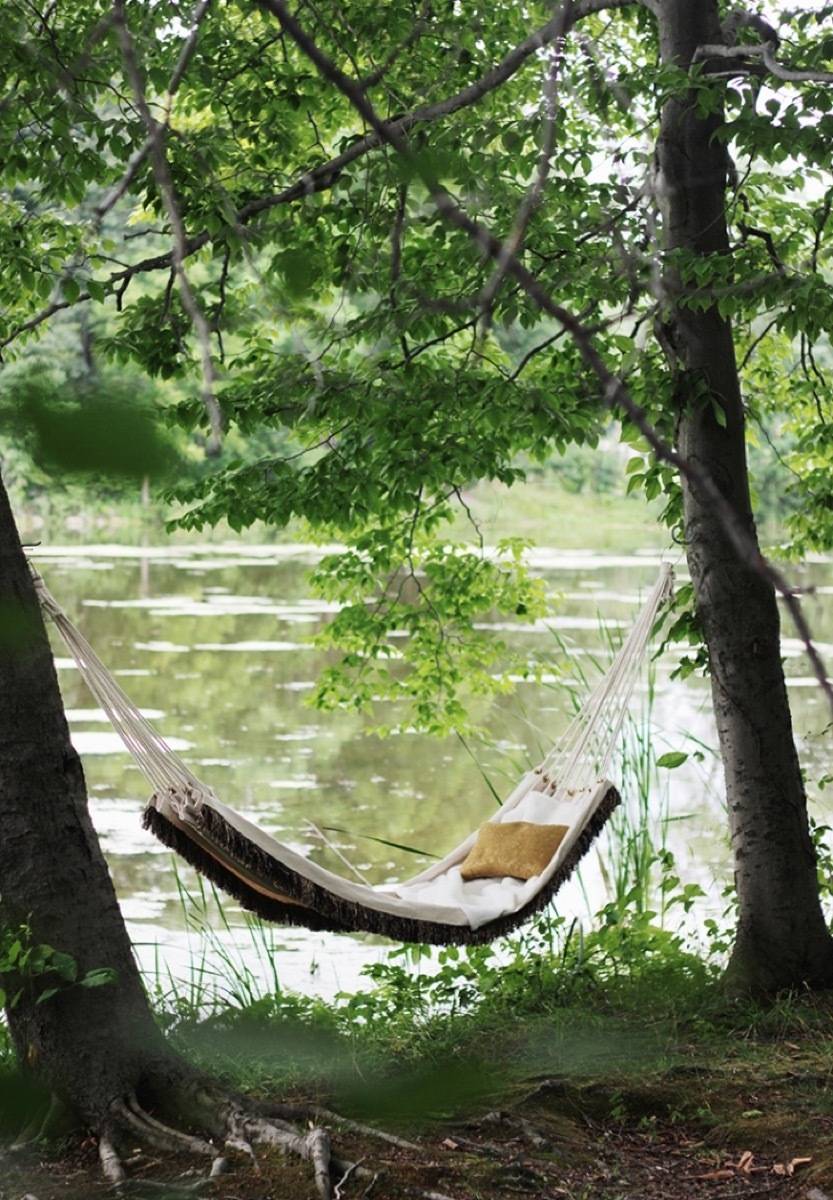
Creating A Hammock Zone
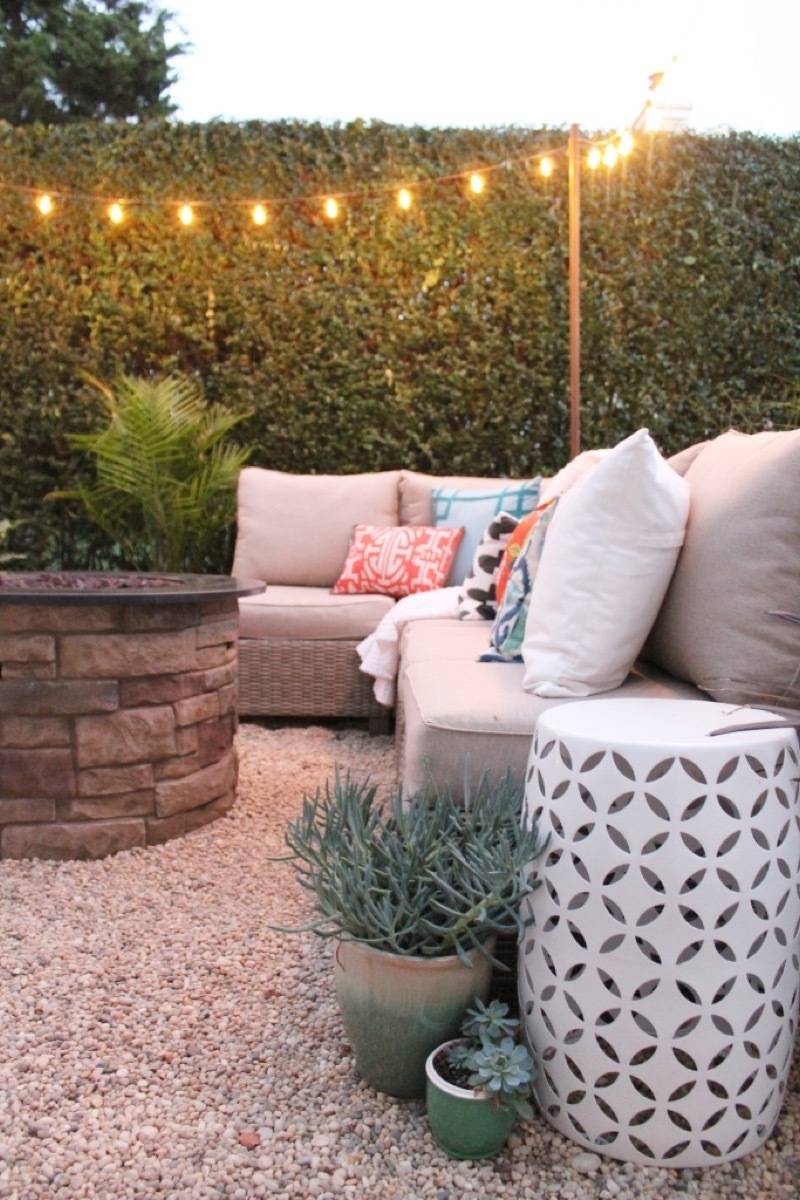
Sherry mentioned on Instagram that we doubled our backyard pool area by shifting the fence back (we’ll write a post about that as soon as it’s more settled). And as soon as we earned that much bigger pool yard, we moved our firepit over there, which means we can do more entertaining all in one spot. Think kids swimming while adults enjoy a fire, which we often do at our friends’ houses so we knew we’d like it.
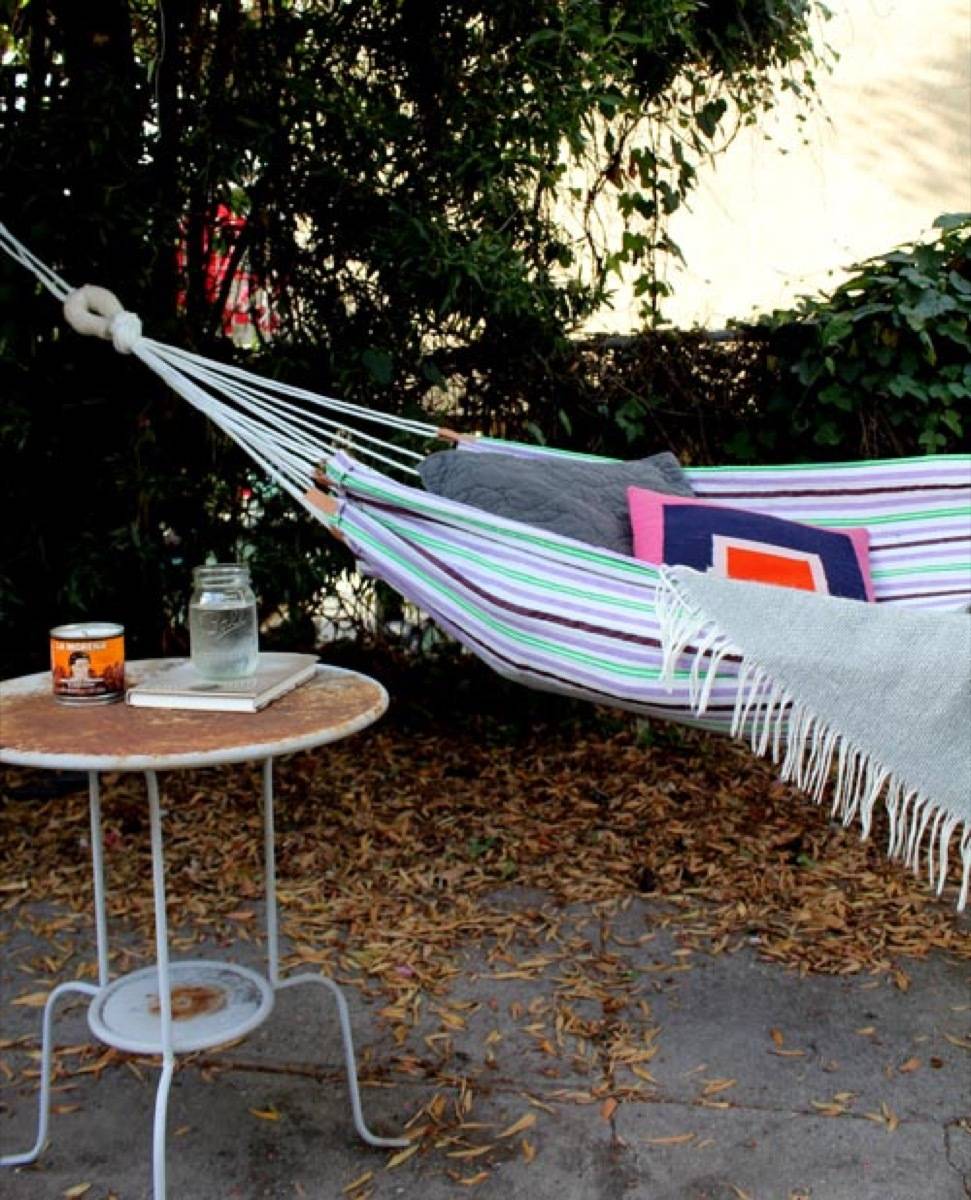
Moving the firepit left an unused zone in our side yard – which is just beyond the kitchen porch. The kids have been excited to have a hammock, so we bought one and it fit perfectly right in the old firepit spot.
Actually, we bought two hammocks. The fabric one we ordered first turned out to be really uncomfortable (IMO, at least – your back can’t arch very much so you feel like you’re splayed out and kind of flat) so we returned it and got a much-cheaper-yet-superior traditional rope hammock instead. It has quickly become a favorite reading spot for all of us (and a stellar napping spot for me). The only downside is that I feel like I’m cheating on our outdoor daybed, which used to be my go-to spot for such leisurely activities.
It has been especially great these last several weeks thanks to the fall weather around here. There’s like no humidity, but it still gets into the 70s and 80s each day. But even when it’s on the hot side, the hammock gets some great shade!
I know it sounds like I’m gushing (bragging?) but again, we’ve just been really happy with how this whole side of the house has come together. Next on our list is to get some more permanent walkways and then just continue to turn it into a plant-filled haven (as you can imagine, Sherry is ON IT every time we go anywhere near a plant store).
So Why Did I Resent This Porch At First?
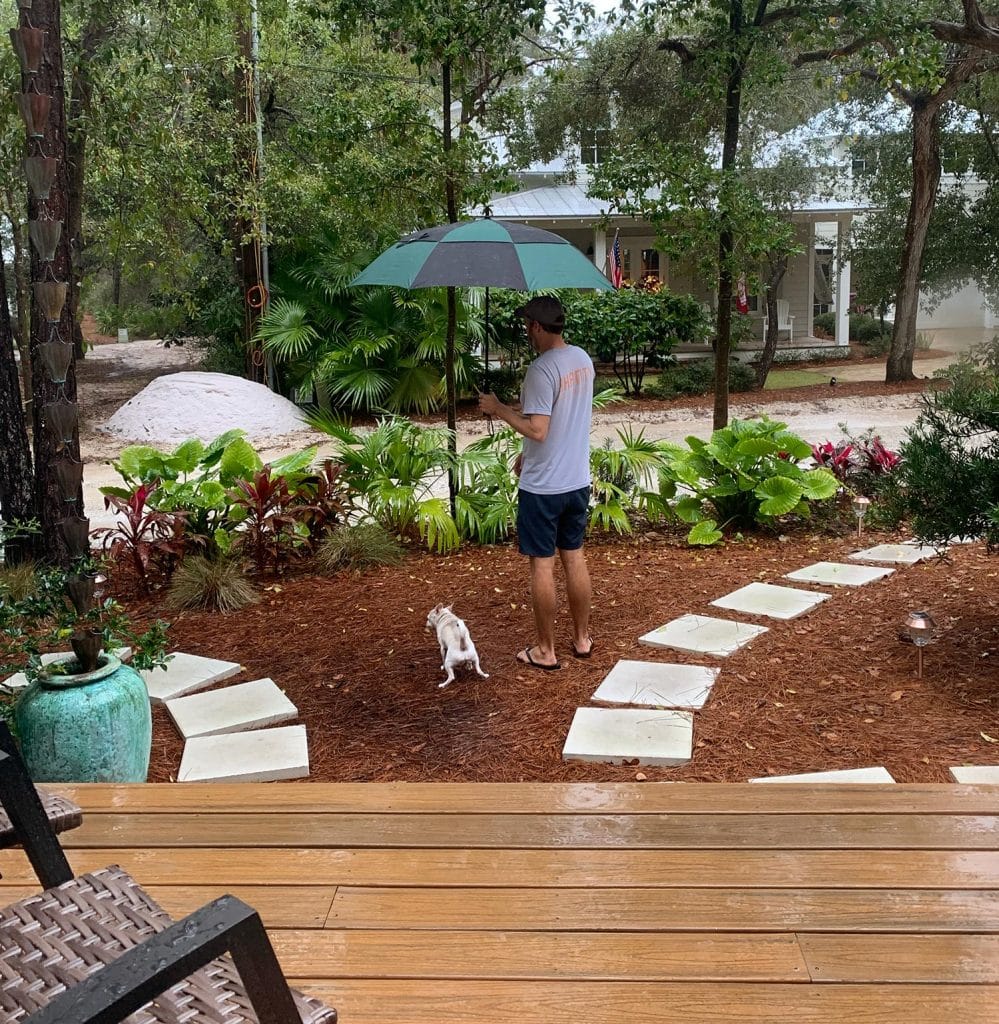
Okay, back to my confession about having mixed feelings about this space at first. It really had nothing to do with the space itself, just the timing of… things. Part of the reason we embarked on updating this zone – fencing the side yard, adding the new door, redoing the porch, etc – was for our 15-year-old dog, Burger. We wanted to create a fenced area where he could easily go to be outside, sleep in the sun, go to the bathroom, etc. Up until then, he’d been using the front door for those “activities” and, since that yard wasn’t fenced and was right by the street – it always required supervision. And, in the case of bad weather, also an umbrella.
Yes, I was the Fonzworth Bentley to Burger’s P Diddy. Or should I say his Pee Diddy?
Anyway, renovating this porch was definitely for us human Petersiks too, but it was also specifically for Burger. Sadly, he died less than a week after we finished it. We’re grateful he got to use it for a few days (look how happy he is in the photo below) but somewhere in the grief of his passing, I felt like I hated this porch sometimes. I don’t know if I was mad at us for not renovating it sooner, or at the universe for the cruel timing of it all. I’m fully aware that the feelings were misdirected, but that’s the best way I can explain how it felt at the time.
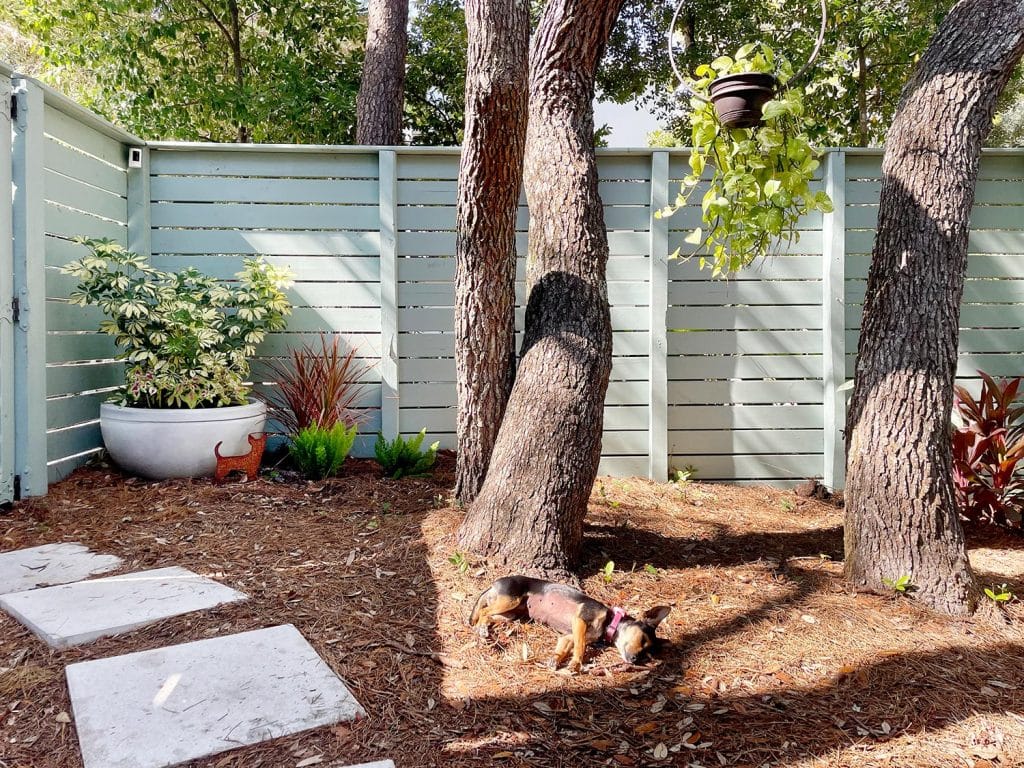
It’s been over a year now and thankfully my feelings have sorted themselves out. We still love and miss Burger every day, but it’s easy to fully appreciate how vital this space has become for our family every time we walk out there – the convenient door, the added storage, the extra counterspace, the grill near the kitchen, the closer path to the car, etc. We also find a lot of comfort in how much our dog Penny enjoys the space. It has been great seeing her use it in all of the ways we had hoped Burger would. Especially when they hang out “together” (note the little metal chihuahua we put in the corner in Burger’s honor).
I hope that’s not a bummer way to end this post (about a simple porch, no less!) but it feels nice to be able to appreciate how hard this area works for our family, and to reflect on how much we all enjoy it now (even if it took me some time). This whole side of our house was pretty useless when we moved in, so we’re proud of how it has come along. Now if you’ll excuse me, I have a nap to finish in the hammock.
*This post contains affiliate links, so we may earn a small commission when you make a purchase through links on our site at no additional cost to you.
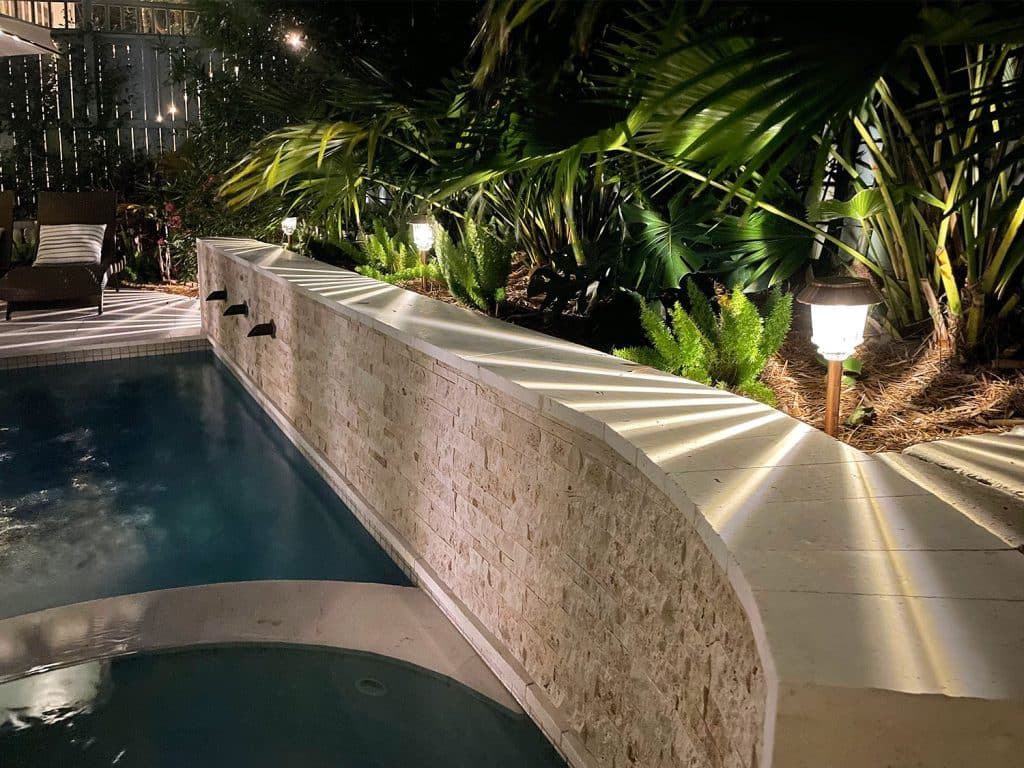
Some people are surprised to hear that we illuminate our entire pool area using nothing but solar LED landscape lights. As in: the sun provides free evening ambiance with zero effort on our part. Nothing has to be plugged in. Our electric bill feels zero impact from softly illuminating this entire area of our house. So today I wanted to share the 3 solar products we use in case you want to give your own outdoor space a literal glow-up.
Technically we have a porch light and in-pool lights too, all of which use traditional electricity, but we almost never turn them on. Honestly, they’re a little blinding and we like a soft glow that doesn’t block out our view of the stars. Instead, day-to-day (or night-to-night?) we just rely on our solar-powered LED lighting for that oh so charming come-hither glow.
I used to think solar-powered landscape lighting was a lackluster substitute for traditional, wired landscape lights (which, btw, we found very easy to install ourselves at our last house). But now we’re huge fans of solar lights, and I’ll tell you why.
Why We Love Using Solar Lights
One common reason for using solar lights is to avoid the wiring necessary for plug-in or electric-powered lights. And honestly, that’s one of the reasons we initially used them here – almost as a placeholder until we had time to install a more permanent lighting plan.
But since adding them, we’ve discovered there are TONS of pros to relying on solar lighting in your yard:
Easy to install: No wiring necessary! Just find a sunny spot for your solar panel.
Placement Flexibility: You’re not constrained by wires or proximity to a plug, put ’em anywhere!
Affordable: They’re not very expensive to buy and they’ll never add to your electric bill.
Set & Forget: They’re dust-to-dawn, so there are no switches or timers to worry about.
Eco-Friendly: Renewable resources FTW!
I even filmed this short little time-lapse video to show you how our pool area automatically transitions from day-to-night, without us having to do a darn thing!
Now, of course, the main drawback to solar lights is that they rely on sunshine, so they don’t glow as long on cloudy days – but generally they have surprised us by shining longer than we’d think they should on especially gloomy days (they might come on at dusk and shine until 11 or 12 instead of 3 or 4 like they do on a normal sunny day. Very occasionally if we’ve had a string of gloomy days they might only glow a tiny bit or not at all, but in those cases we always have that porch light and our in-pool light if we really need them.
Typically whenever we have friends over after dark, we hang around our firepit area or upper deck anyways, both of which are illuminated by plug-in LED outdoor string lights. So that pool ambiance you see in the video is mostly enjoyed by mom & dad in the hot tub, where it easily provides enough light to make sure nobody misses a step getting in, but not like a search-light level blast of light like a UFO is above us trying to beam us up.
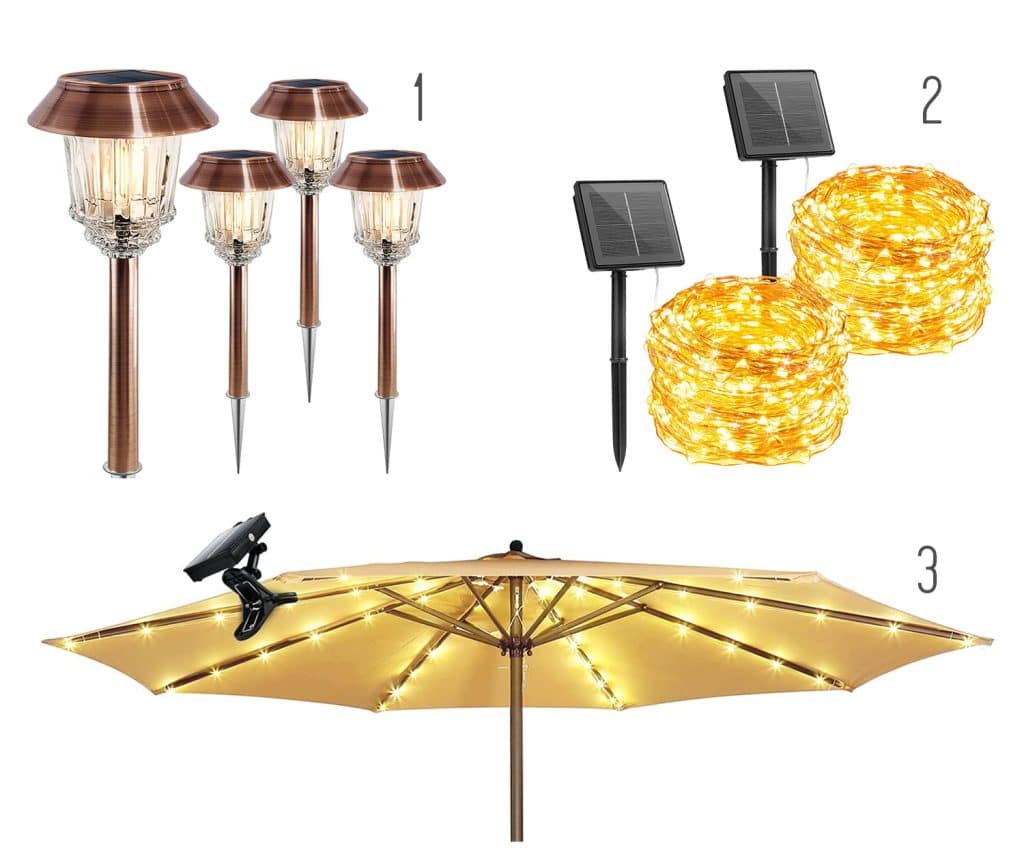
The 3 Outdoor Solar LED Lights We Use
I’ll talk about each of these in a bit more detail, but for a quick rundown, here they are:
They all include the necessary solar panels, so you don’t need to buy any extra equipment. Everything is ready to go right out of the box. They are also all WARM WHITE, which helps them put off a pleasing glow, not a harsh fluorescent-colored light or anything too weirdly blue.
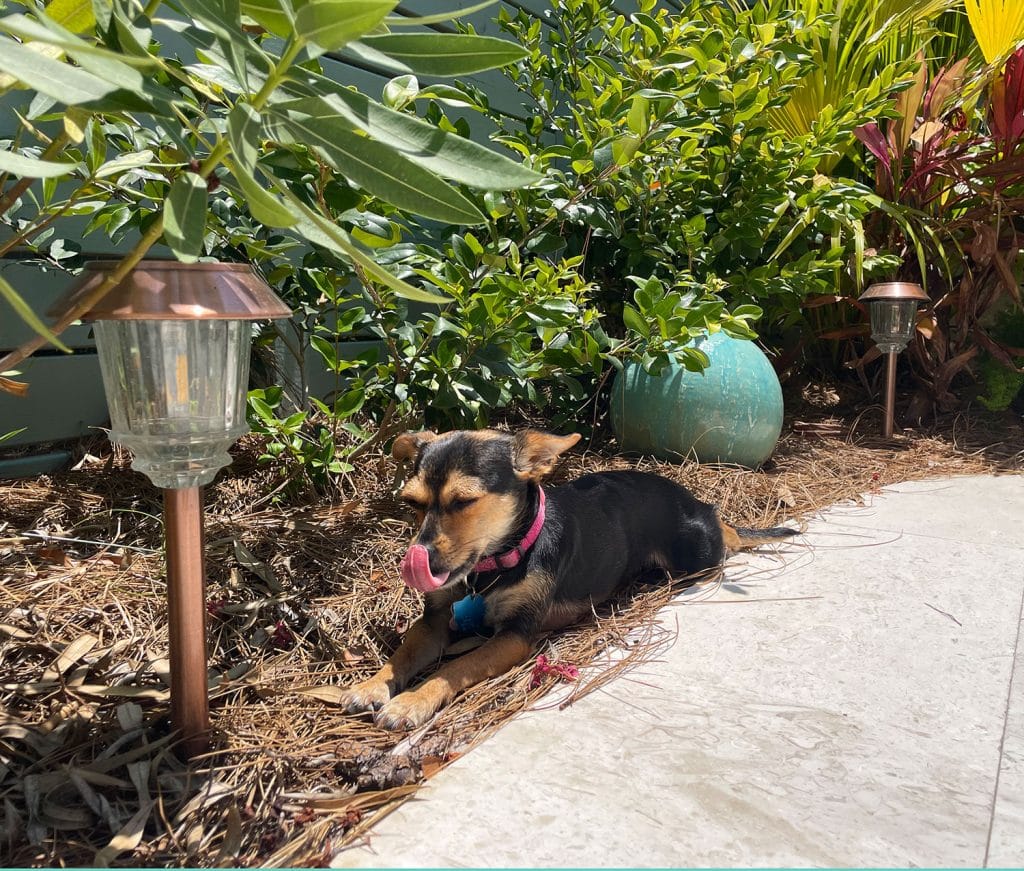
Solar-Powered Pathway Lights
Sherry has mentioned these solar pathway lights a ton on Instagram and I feel like they’re already building up quite a voracious following – and for good reason! So many of you have sent photos of them in your yards, and from seeing them in snow or other tropical places or just lining a front walkway in the suburbs or the city, they always look great. They’re attractive during the daytime and SO easy to install (just turn the switch in the cap on, stake them into the ground, and you’re done). The solar panel is built right onto the top of the light, and those starburst reflections shine down on the ground around them when they glow.
At dusk they automatically come on, casting a surprising amount of light that creates this cool pattern on the ground. Almost like rays of the sunshine beaming out onto your patio, path, driveway, or wherever. We’ve actually got them on all sides of our house – probably about 16 in total! We get asked if they work in the snow and colder climates and have definitely heard from people who have them and love them there – our only advice is don’t put them somewhere that gets zero sun – because, duh, they’re solar. So like under an awning that’s always shaded won’t work nearly as well as out in a garden, along a path leading to the door, etc.
I haven’t created an Excel spreadsheet to see how long they last every night to provide you with the mean, median, and mode (doesn’t that sound like something I’d do?) but the important part is that most of them are still on by the time we go to bed – so they’re functional for the time we need them to be functional. And I say “most” just because one or two of ours behind our pool wall don’t get as much sun thanks to the plants overhead, so they might fade a little faster.
Thankfully they collectively cast more than enough soft light for us to get around out there and soak up that ambient glow until around 11 or 12, we’re usually inside & sound asleep by then. There are definitely nights when Sherry’s randomly up at 3 or 4am for a glass of water or whatever and says she still sees them glowing softly out there after a sunny day.
Note: when you get them, turn them on under the cap. They have two brightness settings there as well, so you can experiment to see which one you like best. We have ours on the brightest setting and it’s still very soft and not harsh or in-your-face at all.
Solar-Powered Fairy Lights
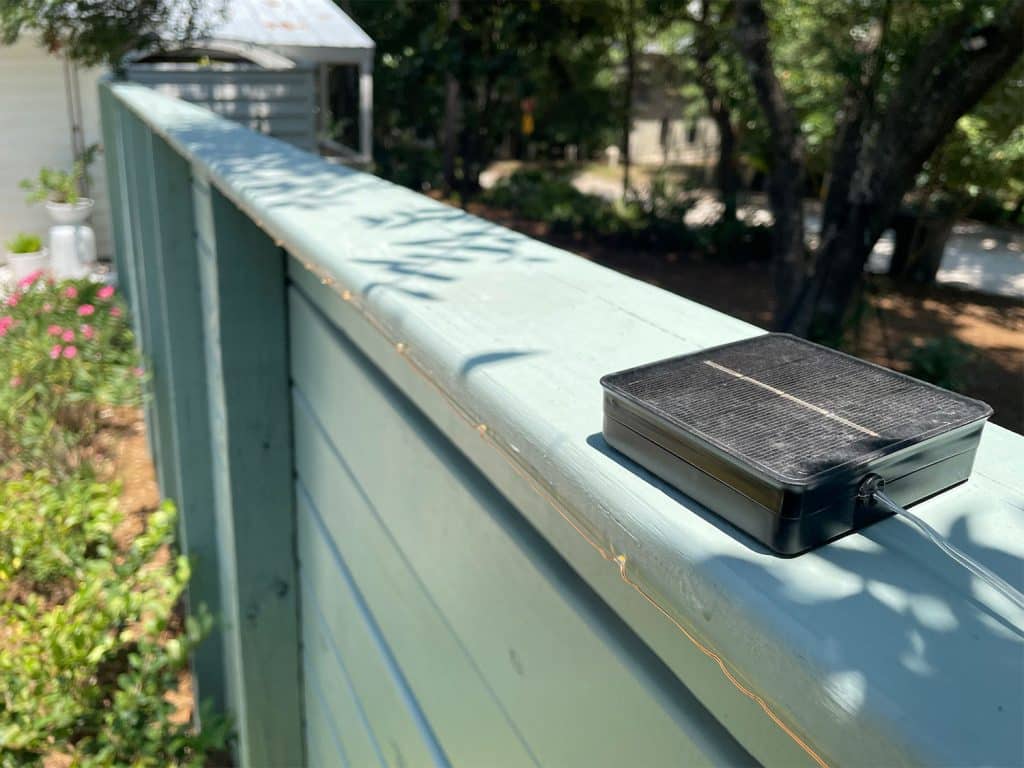
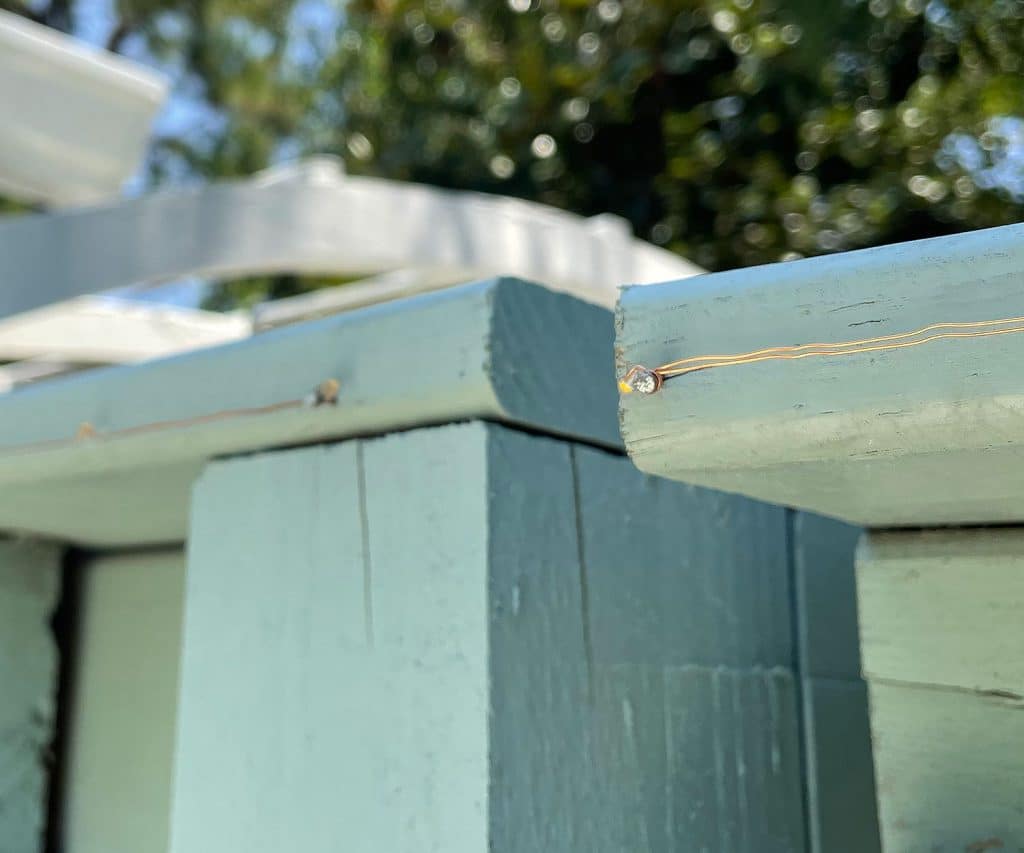
Last summer we decided to give these solar fairy lights a try and I’m so glad we did. We didn’t really have a plan for them at first, but quickly decided to run them under the eave of our house and along our fence.
They too are easy to install. It just tacked in some small nails along the fence and wound the copper wire tightly around each nail. And instead of staking the solar panel into the ground, it literally just sits on top of the fence collecting all that beautiful free electricity from Mr. Sun. Can’t even see it from the ground (I’m standing up on a ladder for this shot).
One strand is 33 feet long, which worked out perfectly for us. We have two, and each strand starts on either side of the gate (which is how we were able to make sure the gate still swings open freely). So the one on the right side of the gate opening runs along the fence, while the one on the left of the gate opening runs the other direction across the house.
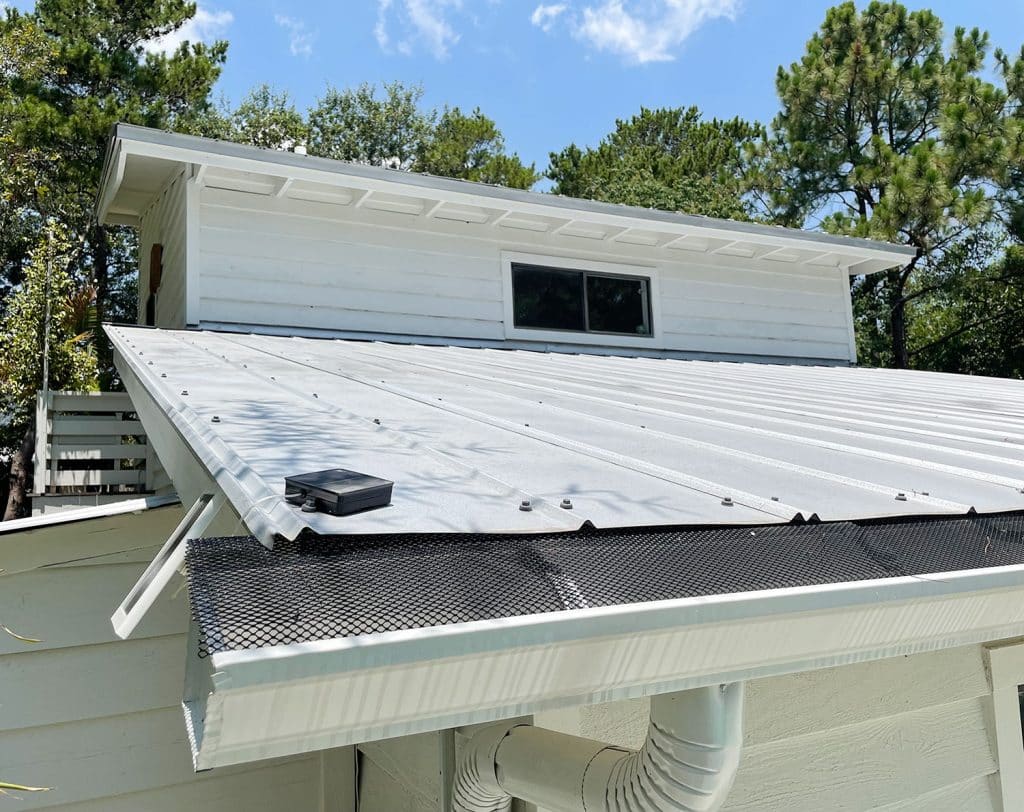
The solar panel on the other end of that strand that runs along the house just sits unceremoniously on the corner of our roof. You can’t really see this one from the ground much either from most angles, thanks to some greenery that obscures that corner and the inherent over-your-head factor (I’m up on a ladder to get this shot too).
You can see what I mean about the greenery in that corner that obscures the view of the solar pad on the roof here (it’s in that far left corner that you can’t see):
The LEDs don’t give off much heat, so a lot of people also use them more “organically” in bushes or other landscaping. They’d also be great for outdoor holiday decorations, like bunched up in a jack-o-lantern or as part of a Christmas display. Oh and if you’re hosting a disco dance party they also have various lighting modes – like flashing, twinkling, or fading in and out. We just use the solid “on” setting.
From certain angles it’s hard to see the ones under the house (thanks to the gutter) so it’s sort of like an under-cabinet glow that washes down the side of the house – and we often catch them in the pool reflection, like in the photo above. Actually, the reflection of these lights are one of my favorite things about them! Speaking of which…
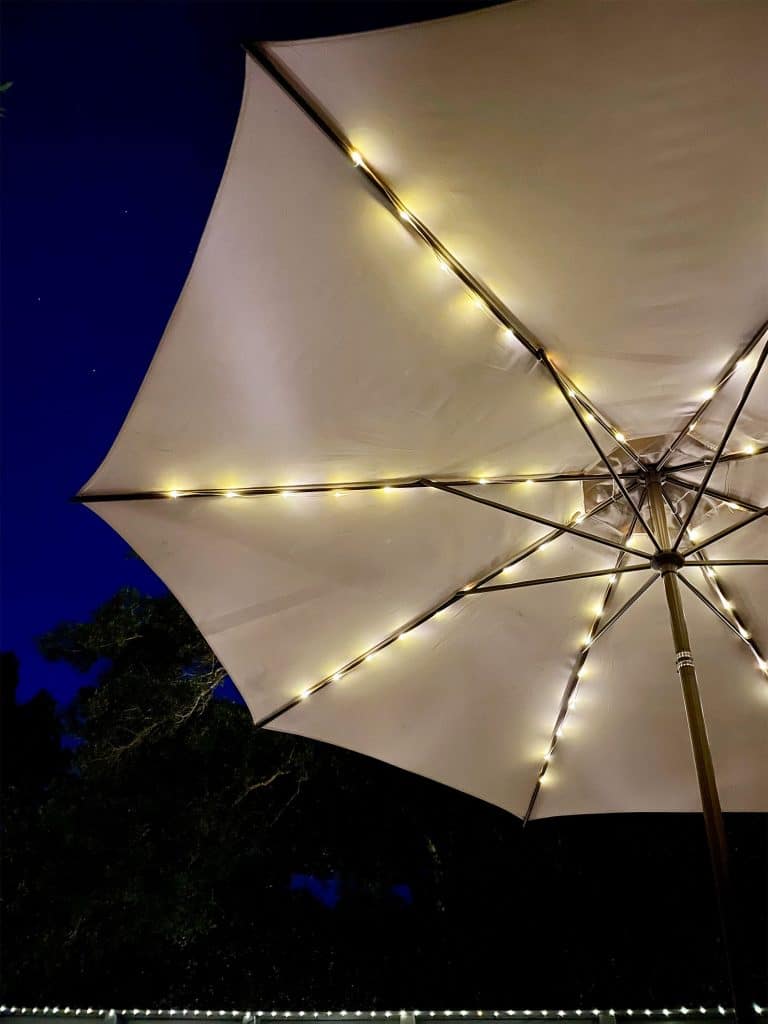
Solar Patio Umbrella Lights
After the success of the fairy lights, I sought out some other places to add them. That’s when I came across these umbrella fairy lights specifically designed to go on the spokes of a patio umbrella.
Instead of a strand of lights that run in a straight line, these fairy lights are laid out almost like an octopus – with 8 shorter lengths of wire spidering off from a center ring. This makes it perfect for any umbrella with an 8-rib design, between 7ft – 10ft in length. We actually have this 11ft umbrella, so the lights don’t technically go to the ends, but you can see when you scroll up or watch the video it still looks really charming.
The kit comes with a bunch of small zip ties to hold the fairy lights in place on your umbrella. We also chose to wrap ours around the spokes too, because I found it required fewer zip ties (we just have one on each end) and holds the wires in place when we put the umbrella down and back up again.
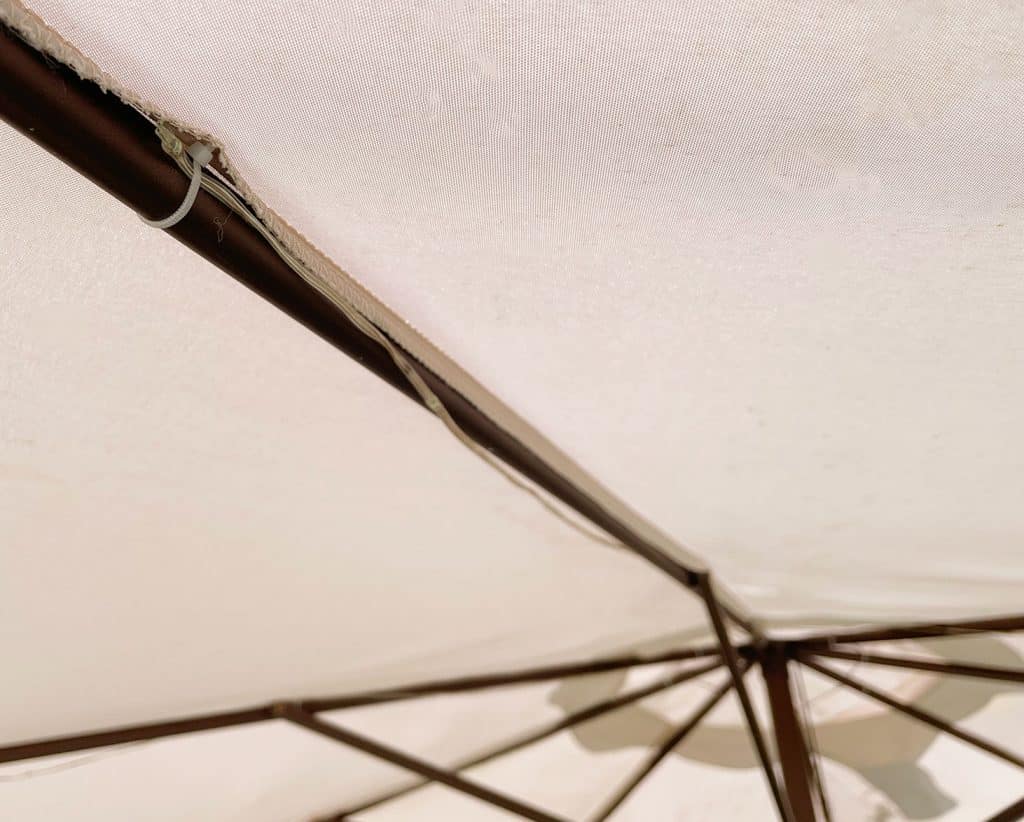
The listing shows the solar panel mounted on the outer edge of the umbrella, but that made the umbrella lean a little to one side. So we just clip ours near the top of our umbrella instead – to that loose fabric around the top vent. The panel is literally like a giant chip clip, so you’ve got a lot of options for where you want to put it.
It doesn’t give off a giant amount of light (I wouldn’t be able to read a book by it, for example), but that’s not our goal here. We generally like enough light not to fall into the pool or hot tub and be able to see if we drop something but there isn’t “evening reading time” under the fairy lights. They just layer more glow into the backyard and reflect beautifully in the water of the pool.
Overall, we have found this assortment of solar-powered outdoor lights to be the perfect mix for us. We take evening hot tub dips a few nights a week (hot tubs are the best at night!), and we love that these lights offer a zero-effort, electricity-free way to make the backyard look cozy and inviting.
Oh, and one more thing, because it’s also solar. But it’s in a totally different area of our house:
BONUS: Solar Motion-Activated Flood Light
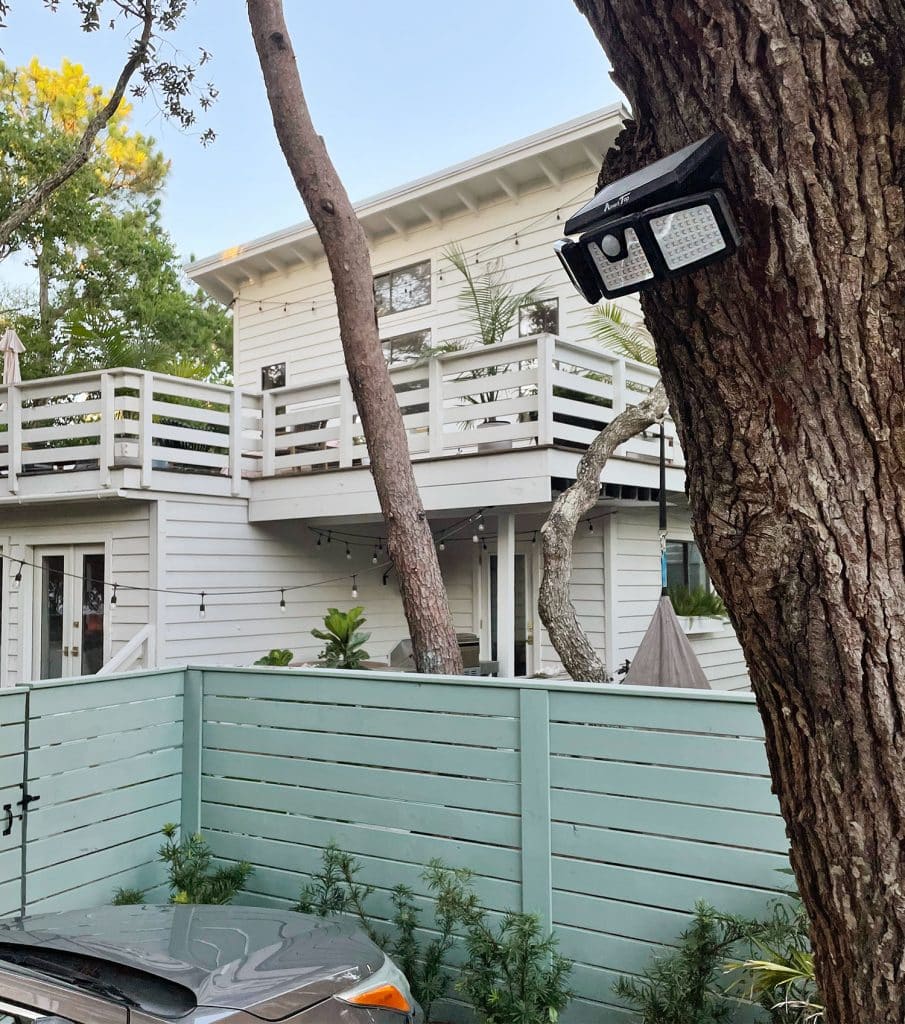
I’m switching gears a bit, I couldn’t tie up this post without mentionig the 4th type of solar light that we love: these motion-activated flood lights (a 2 pack is currently $30). They’re not really going to add any ambiance, but boy are they surprisingly bright for being solar-powered!
We put them in a couple of dark corners of our yard, including near our driveway to give us some extra light after dark if we’re getting out of the car and we’ve been really impressed by them. We’ve got ours mounted on trees and, since every part of the device pivots, you can adjust it to make sure it’s detecting motion where you want AND shining in the right direction. Again, they’re surprisingly bright!
So we hope this post encourages you to give some solar-powered lights a try somewhere in your yard or patio. And if you’re looking for some other outdoor updates you can do yourself, here are a few ideas:
Note: We get a lot of source questions, like “where did you get those lounge chairs by the pool?” or “what’s the link to that porch lamp?” so we created a spot with all that info (and our paint colors!). This page has any and all sources for things that are outside or inside our home.
*This post contains affiliate links, so we may earn a small commission when you make a purchase through links on our site at no additional cost to you.
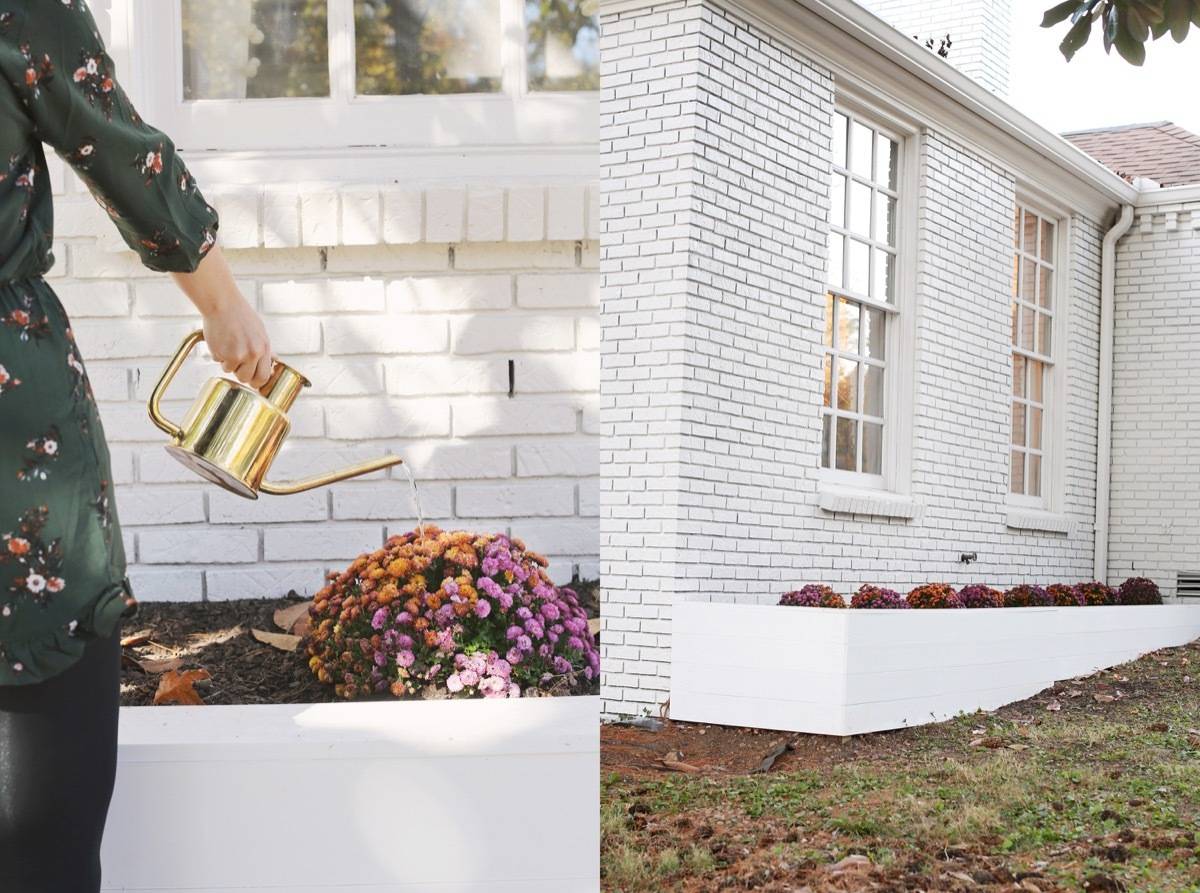
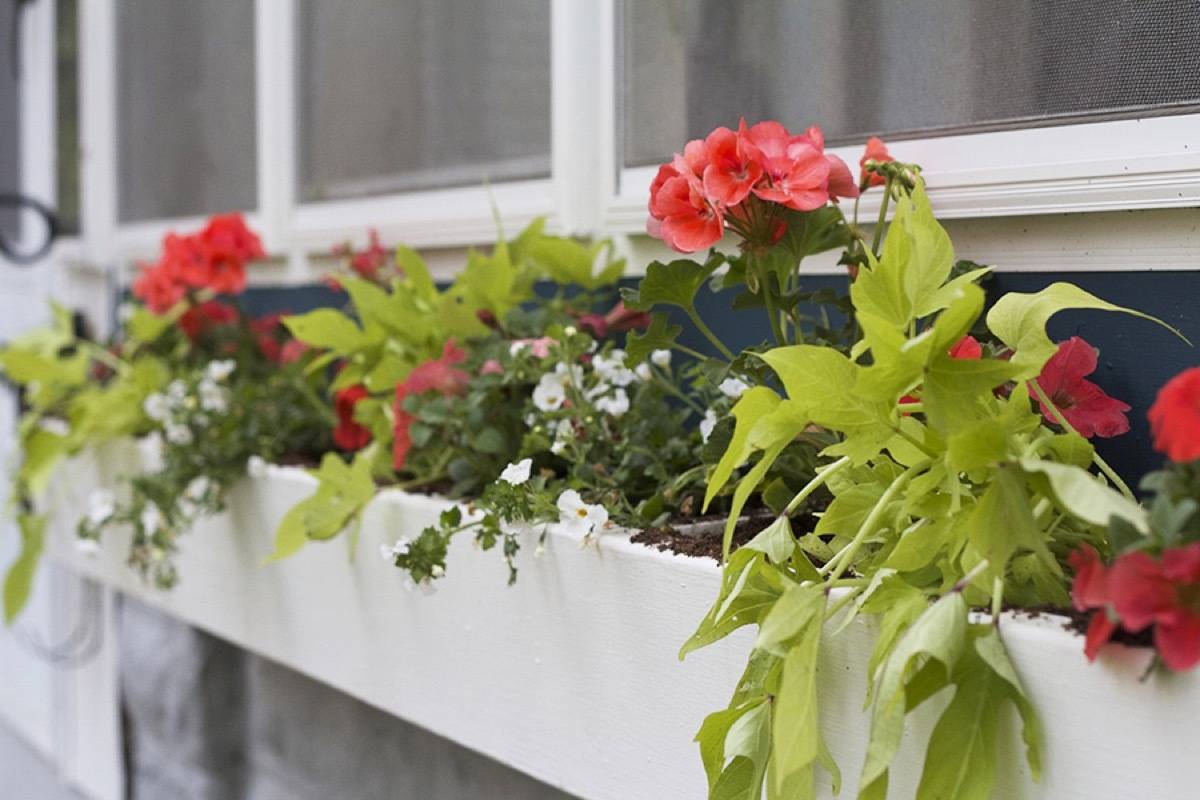
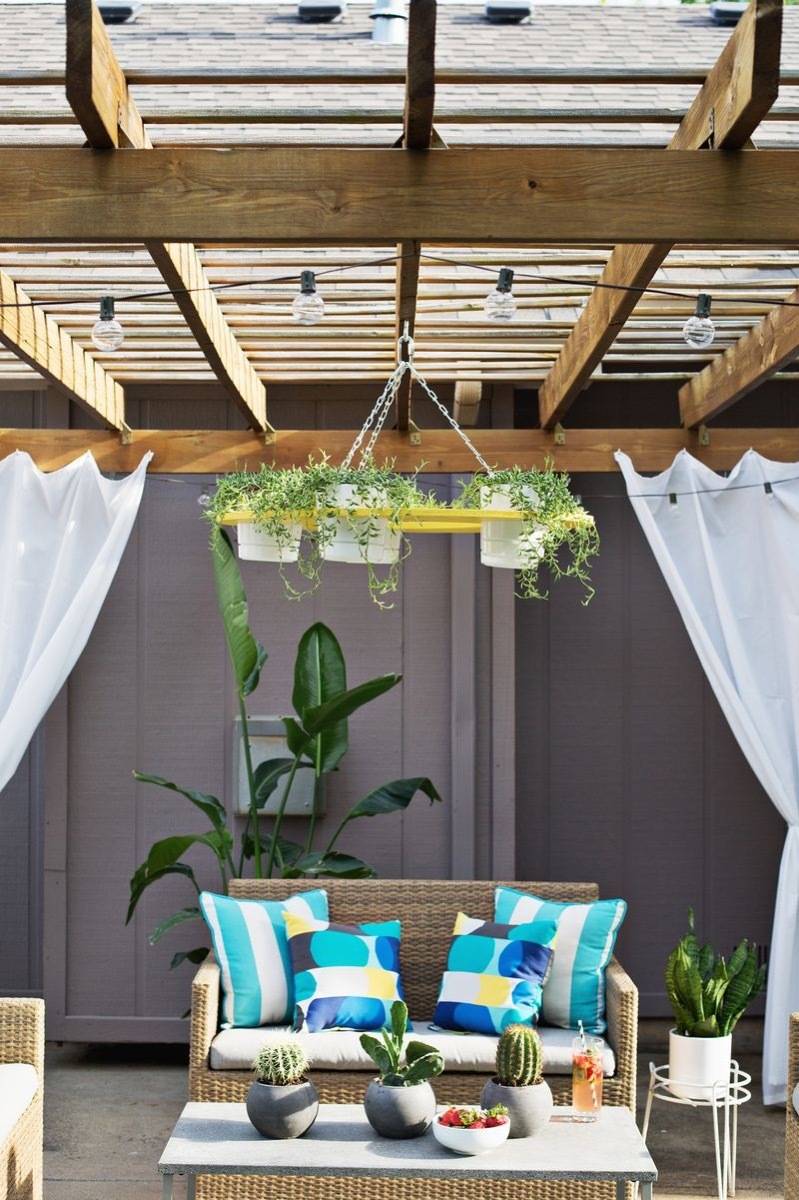
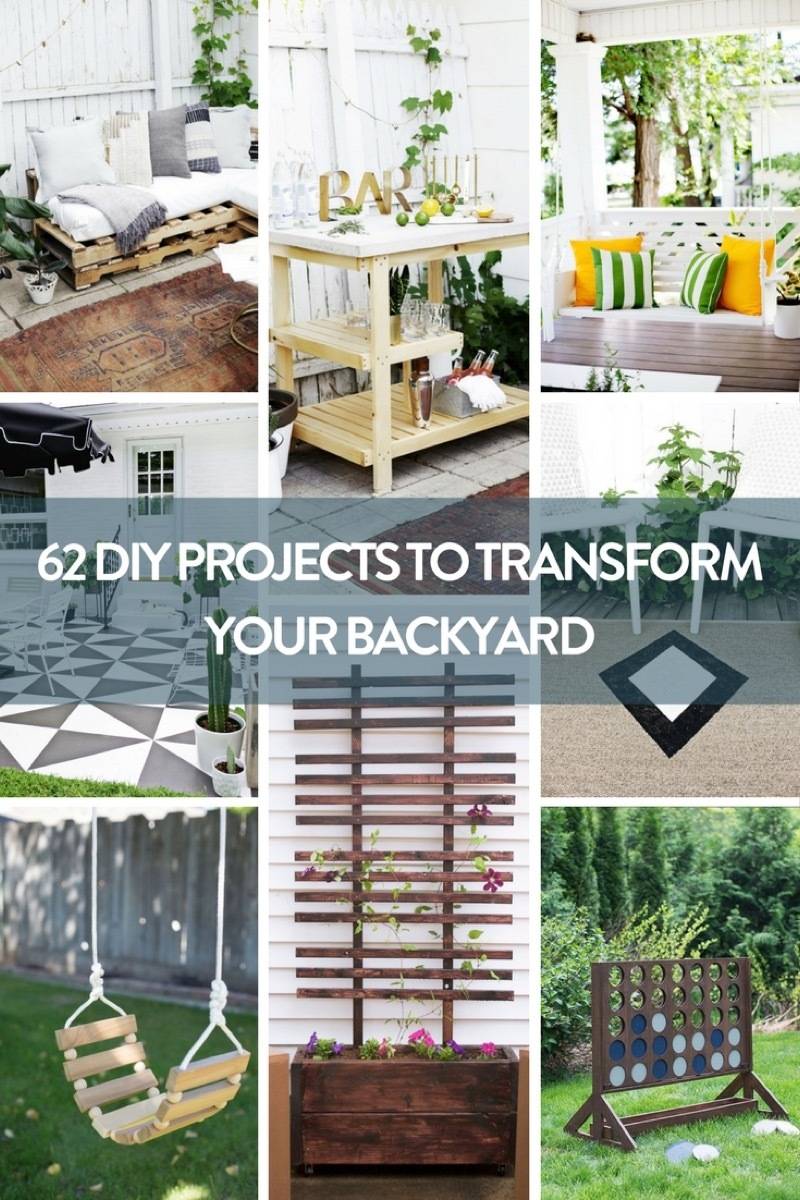
Blooming flowers and fresh rain can only mean one thing: spring has definitely sprung! That means summer will be here before you know it. If getting your backyard in order is on your to-do list but you’re having trouble getting started – don’t fret! You don’t need a total landscaping overhaul for your yard to feel refreshed and inviting. Sometimes it’s just a matter of hanging up some string lights or creating a simple fire pit. We’ve rounded up 62 outdoor DIY projects to get you excited to be outside again as the weather warms up. From plants to playhouses, keep scrolling for more inspiration!
What ways do you want to transform your backyard? Let us know in the comments!
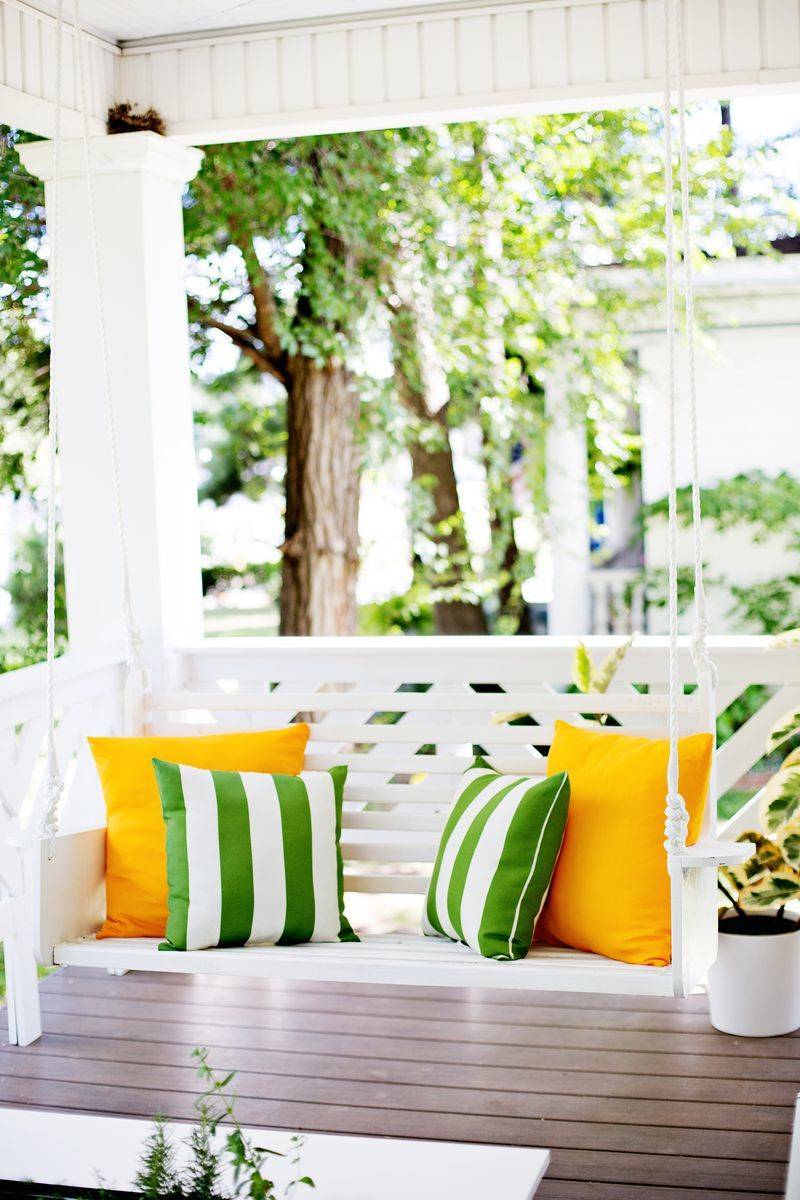
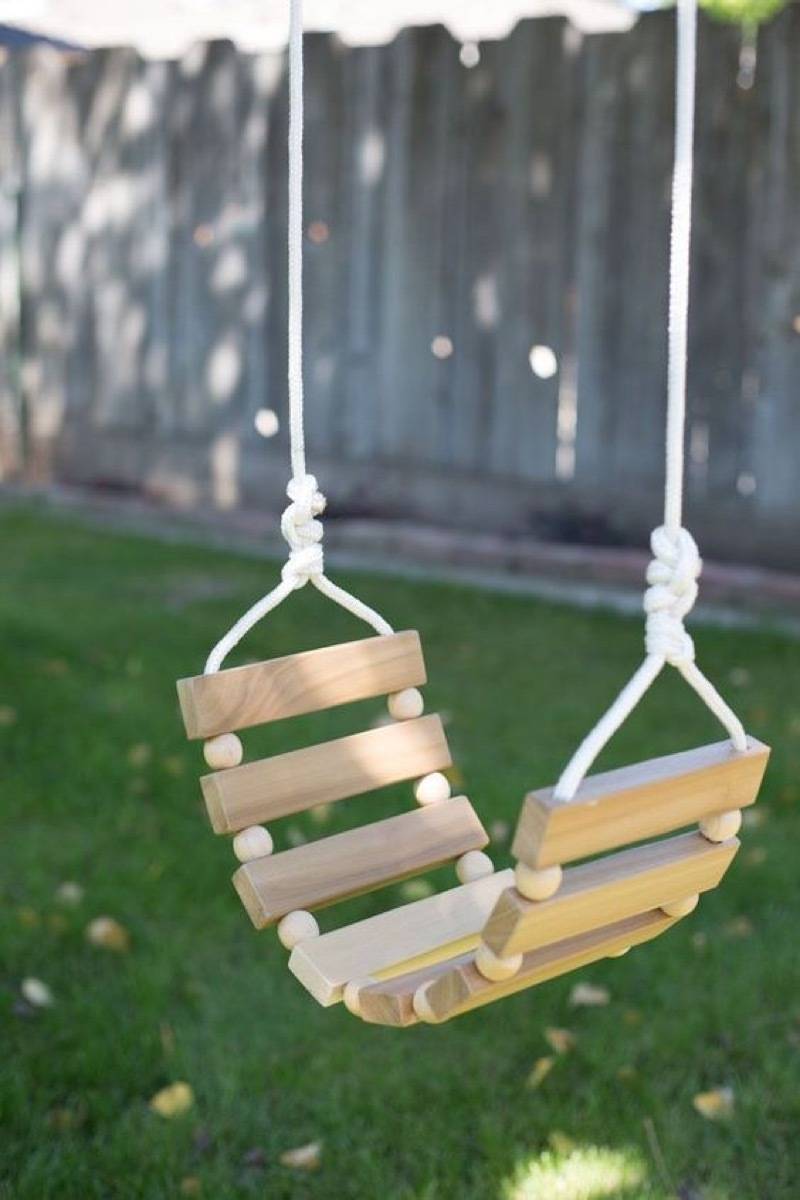
4. DIY Porch Swing: As Liz Lemon says, “I want to go to there!” Swinging in the spring breeze is a total DIY reality with this project from A Beautiful Mess.
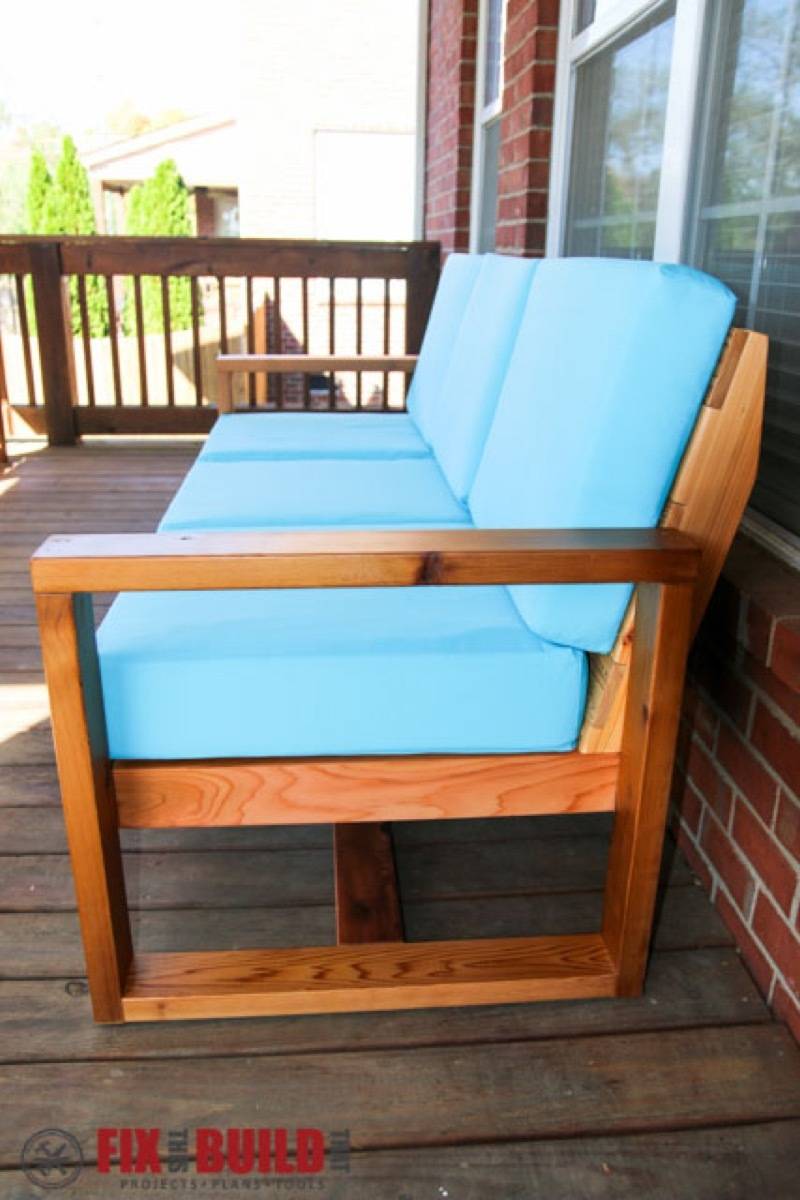
9. Modern Outdoor Sofa: This number is so sleek I might want to bring it inside my house! The good news is it’s built to withstand the elements, which means you can make your back deck super classy.
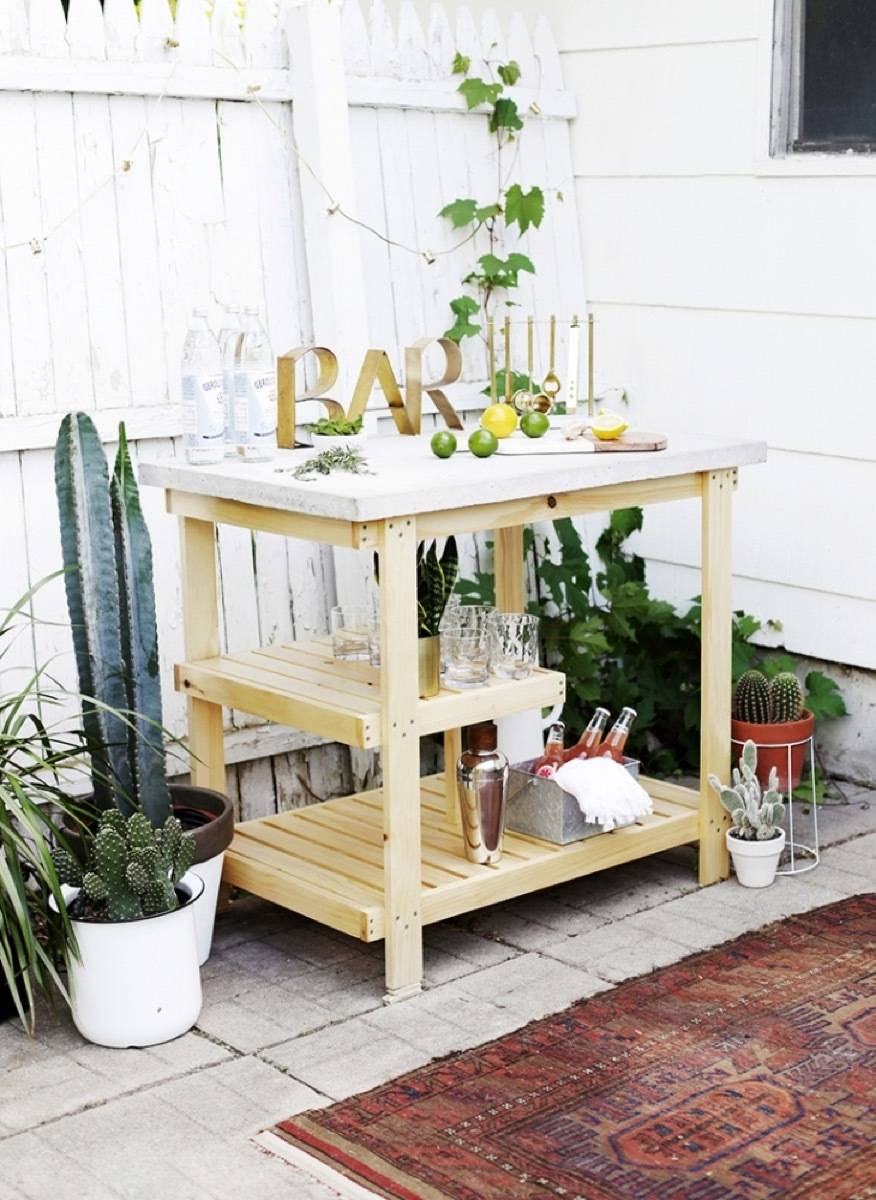
11. Outdoor Bar: If you’re not really the grill master type, but more of a whiskey woman, why not make a drink bar for your backyard?
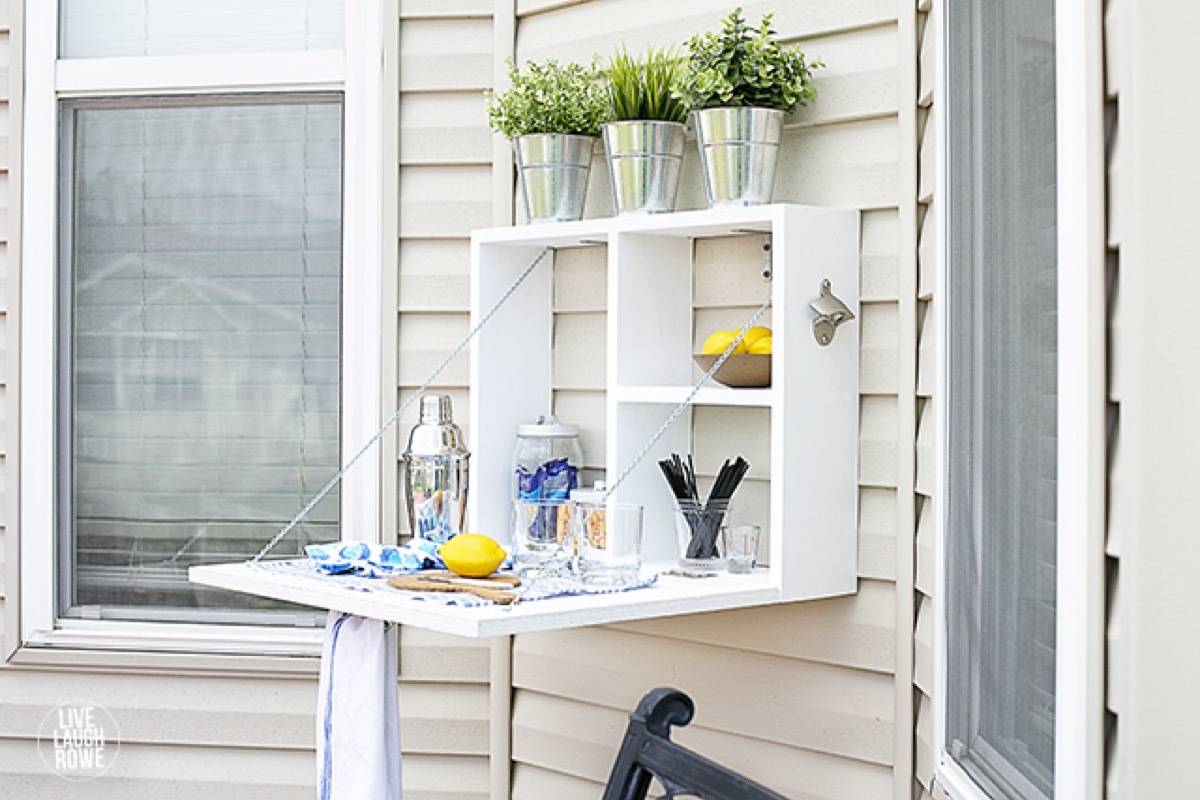
Photo: Live Laugh Rowe
12. Wall-Mounted Serving Station: Want to entertain but don’t have space for a full outdoor kitchen? Go vertical by building this simple serving station with drop-down tabletop!
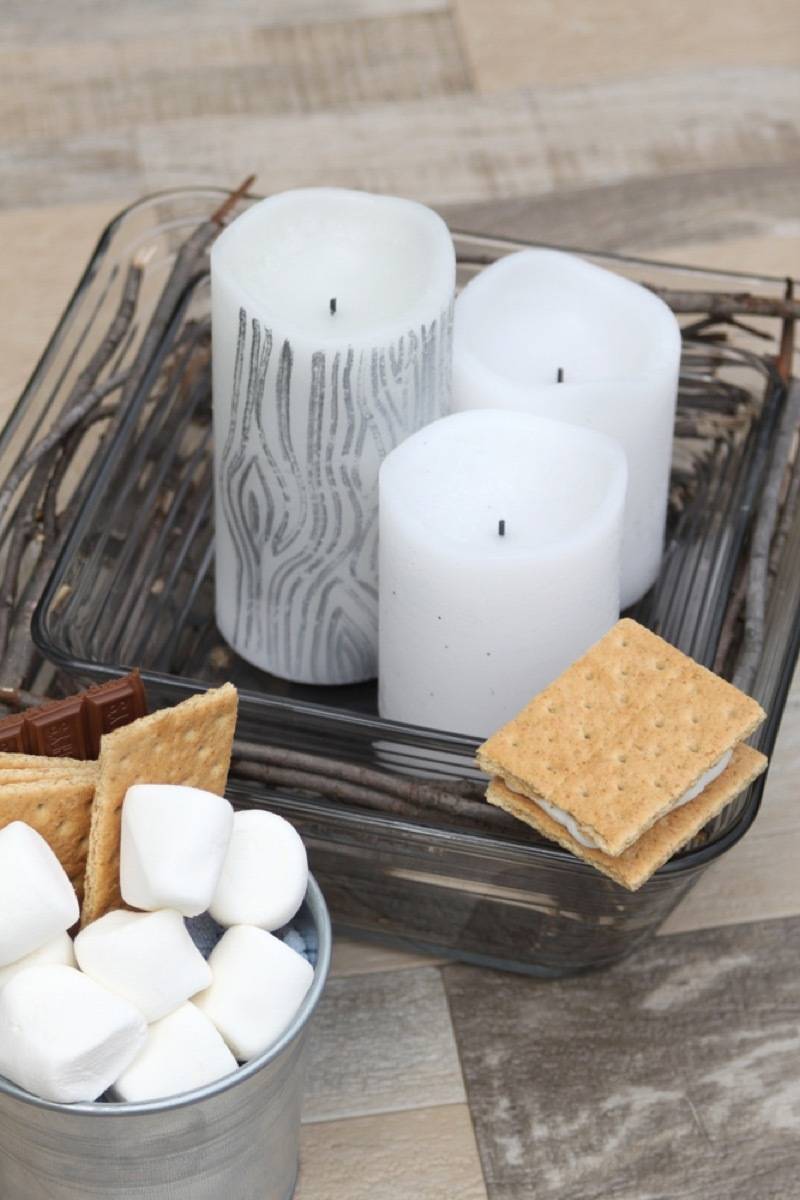
14. S’mores Station Centerpiece: Acting as both a lovely centerpiece and a warming station for marshmallow and chocolate, party guests are sure to be impressed by this s’mores machine (made from glass dishes!).
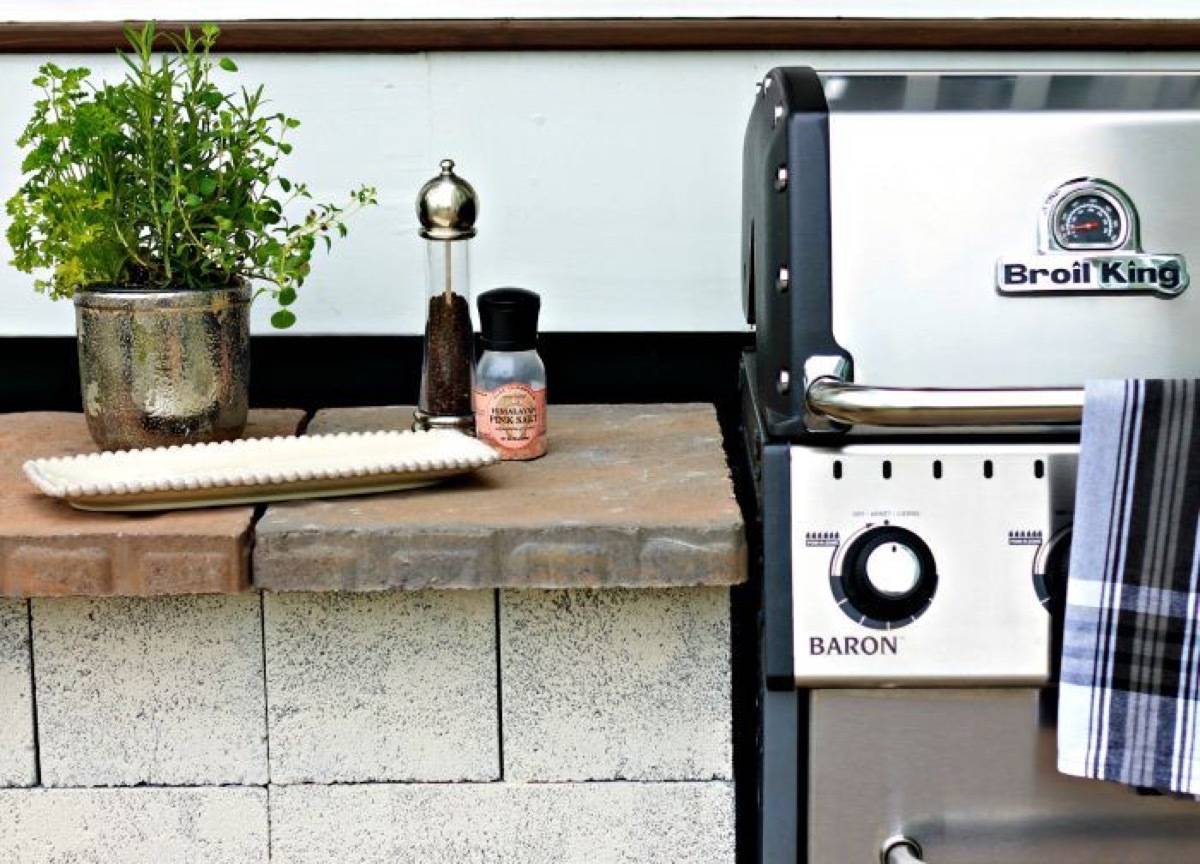
16. DIY Grill Countertop: Basically like having an outdoor kitchen, this brick counter space built around a grill surely makes outdoor entertaining a breeze.
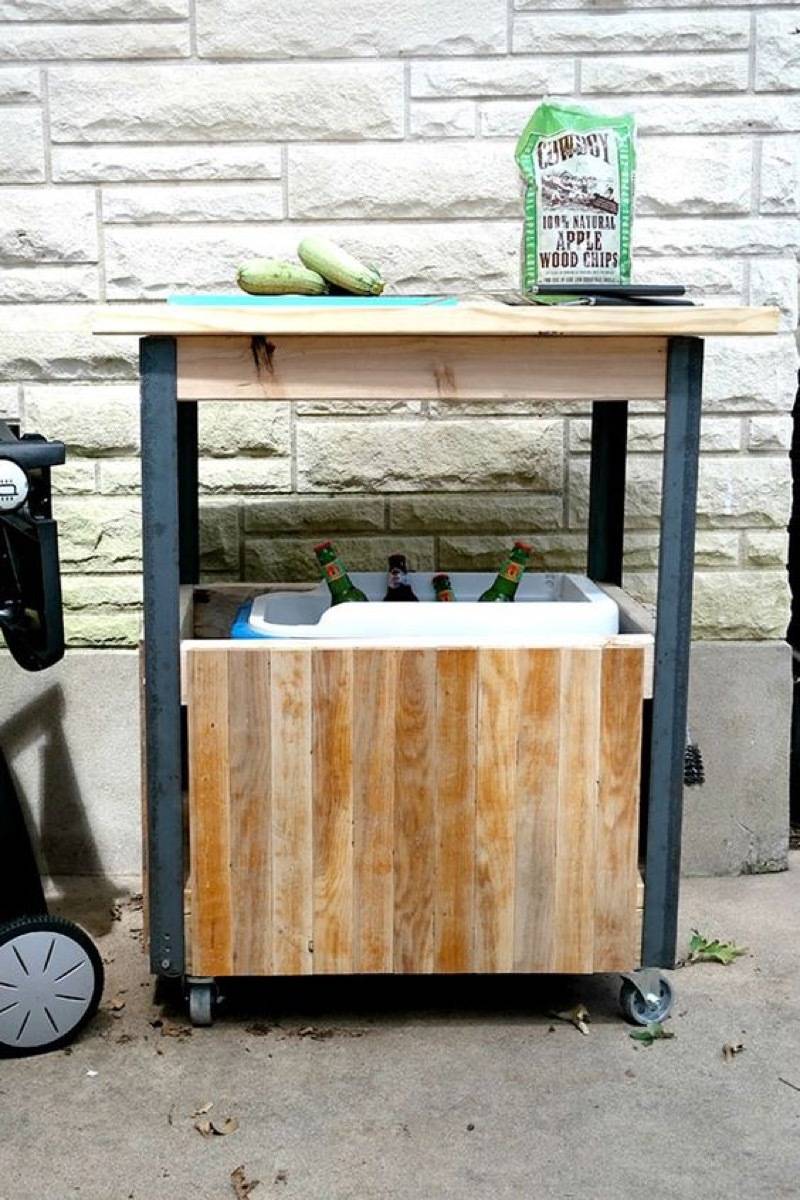
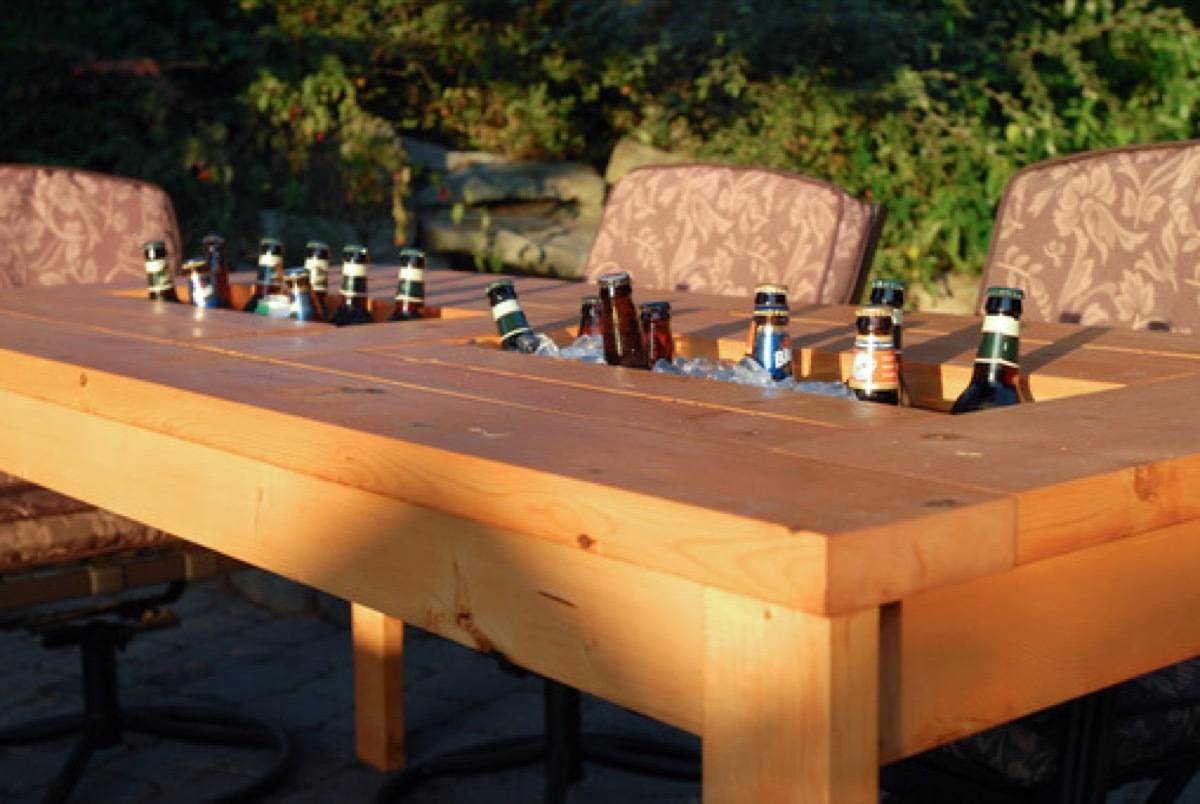
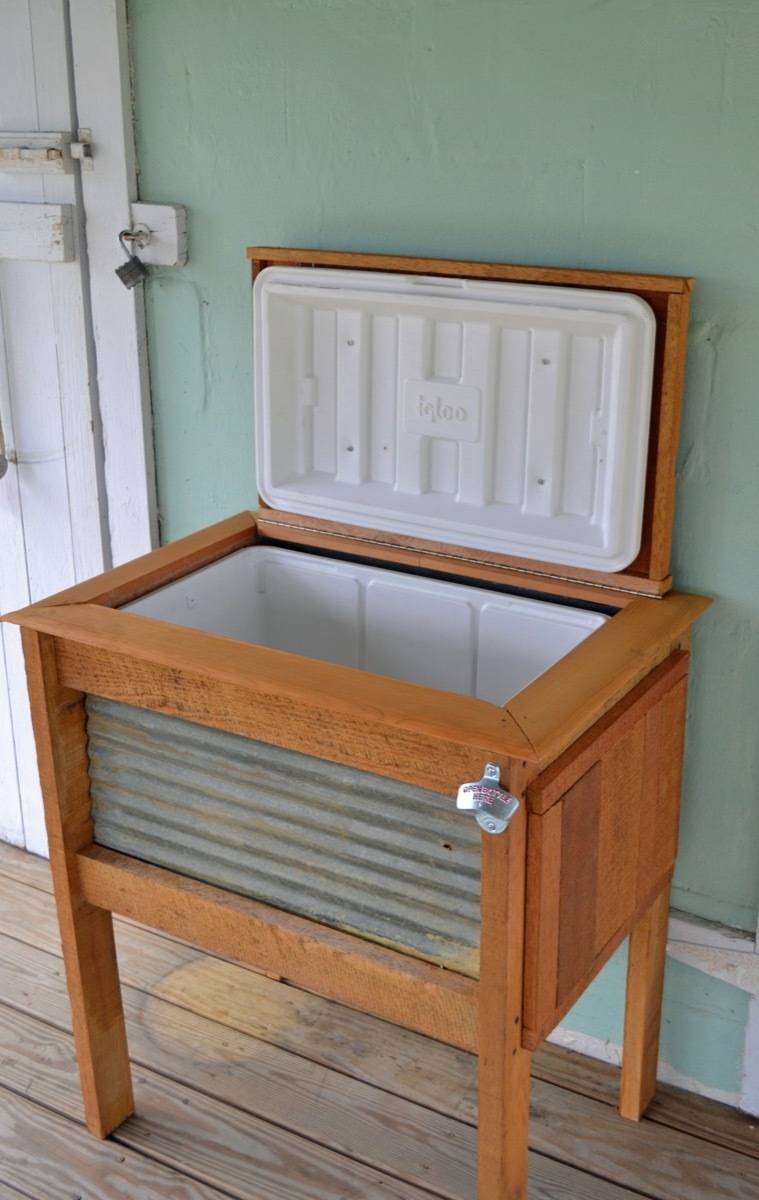
17. Drink Cooler Stand: If you’re constantly entertaining outside, or if you just enjoy having a cold beverage available whenever, this drink stand provides a classy solution to the standard cooler.
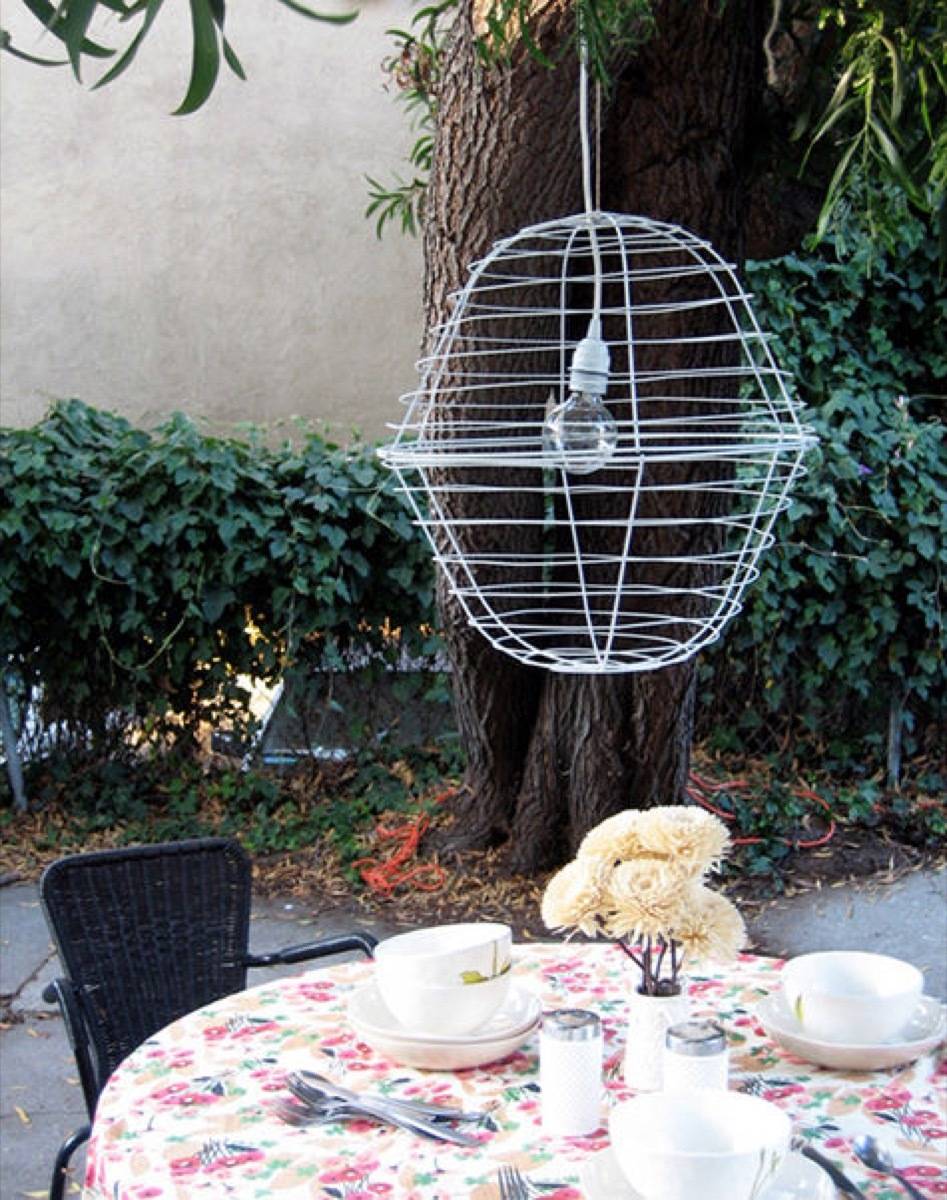
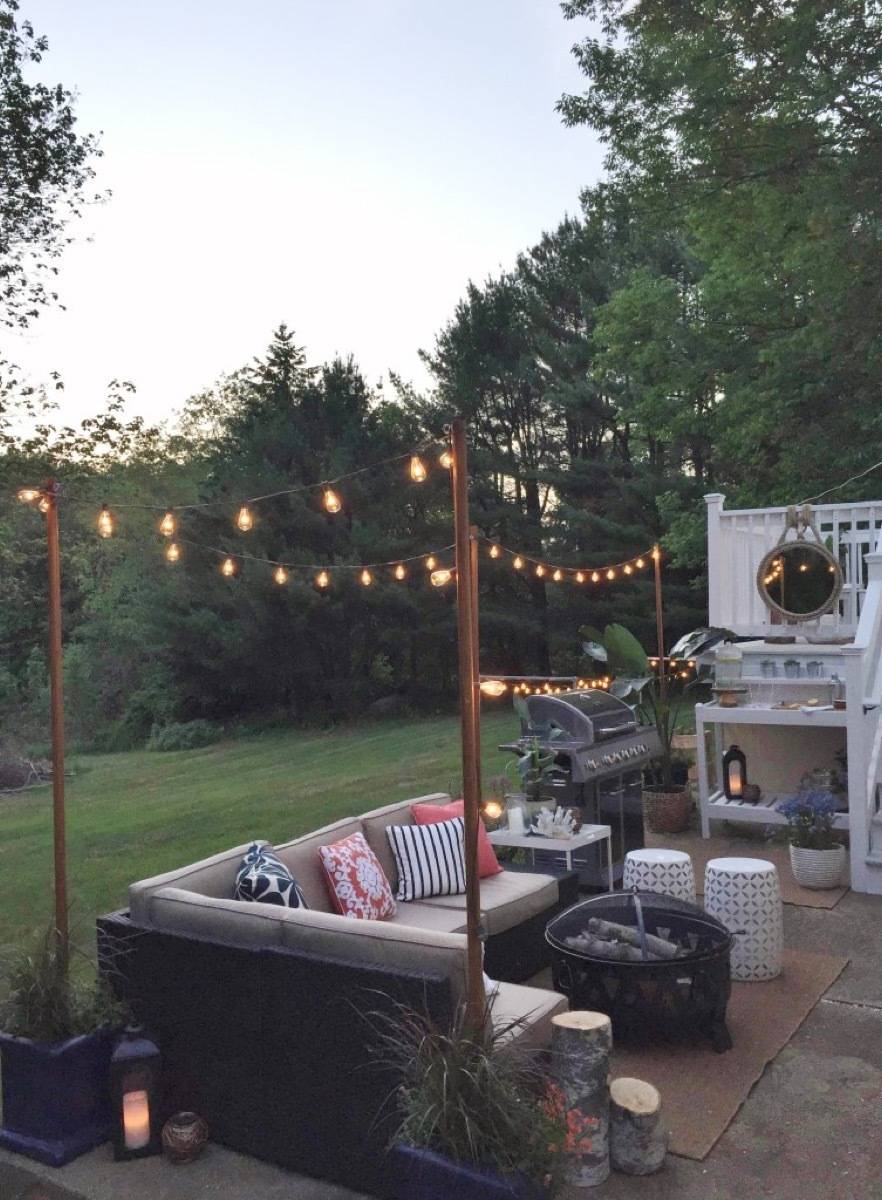
26. String Light Hanging Poles: If you want to hang string lights outside but don’t have anywhere to put them, City Farmhouse has an easy solution that also involves plants!
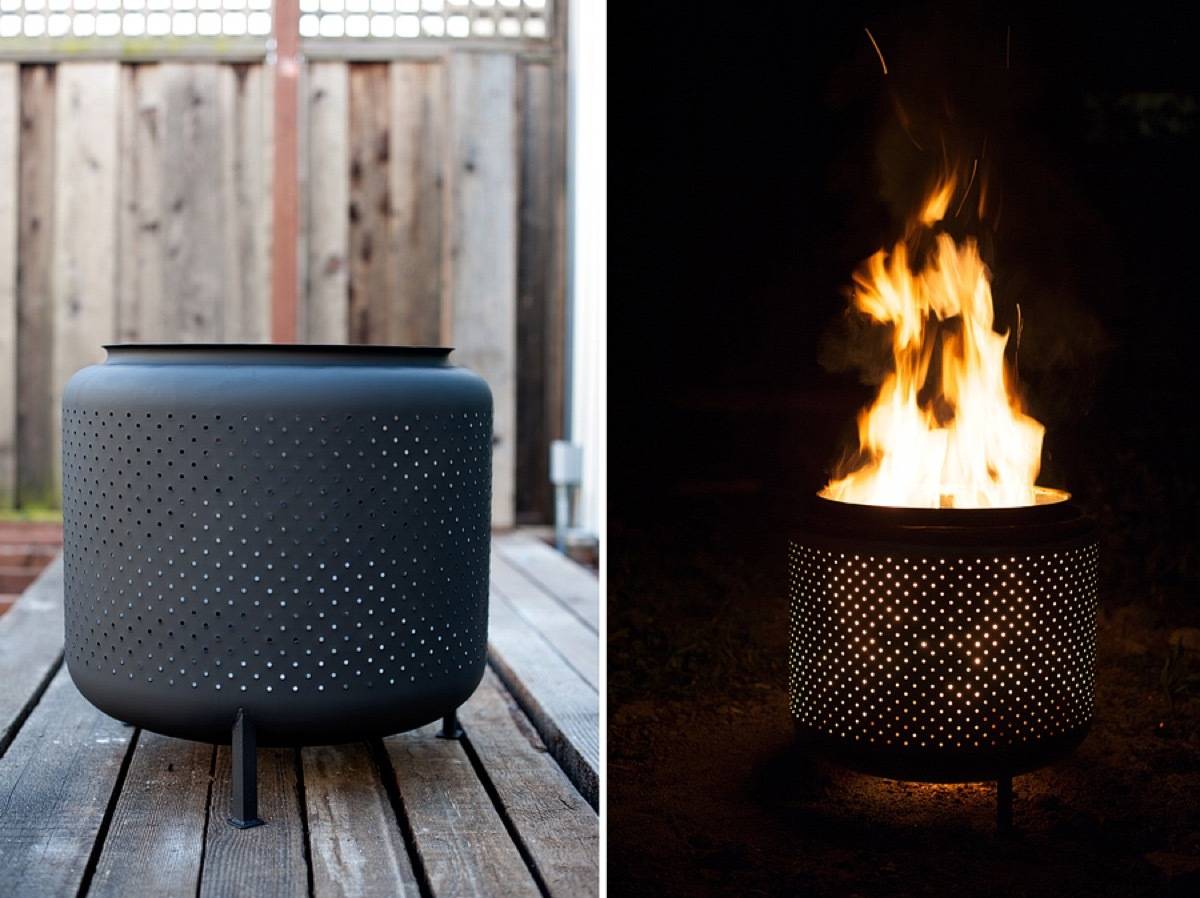
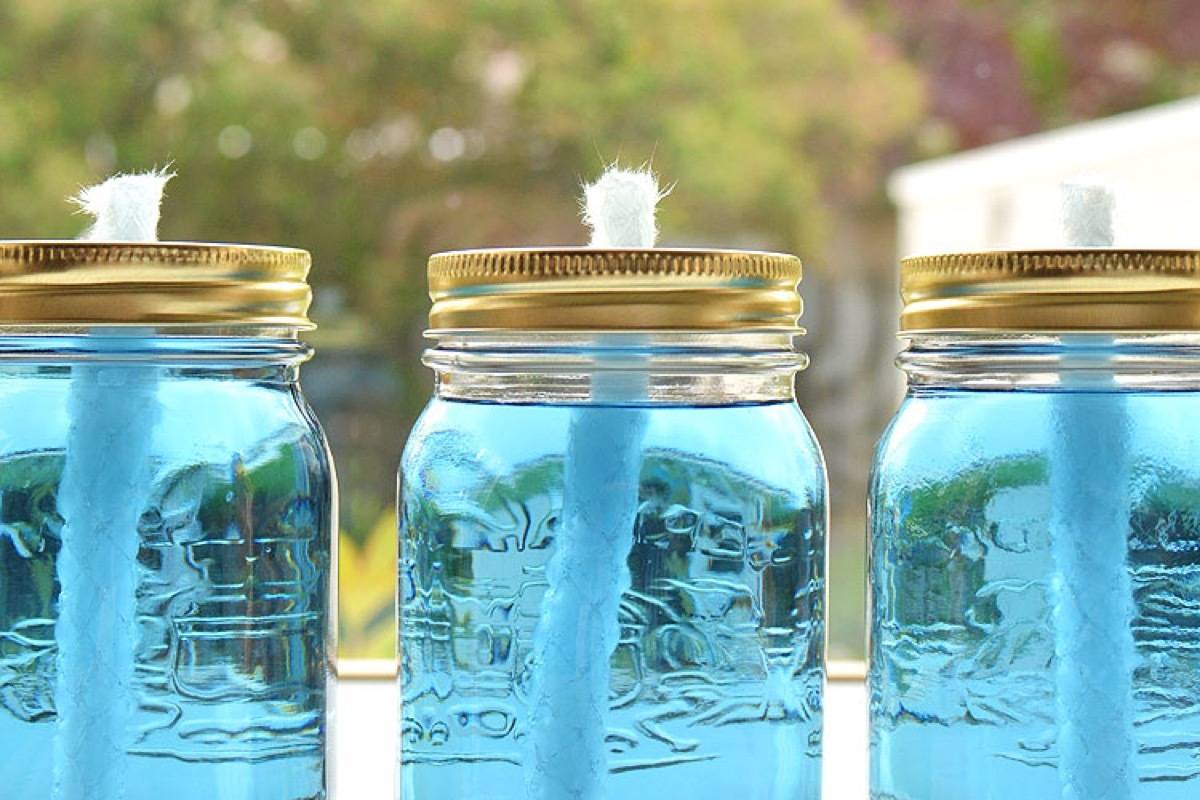
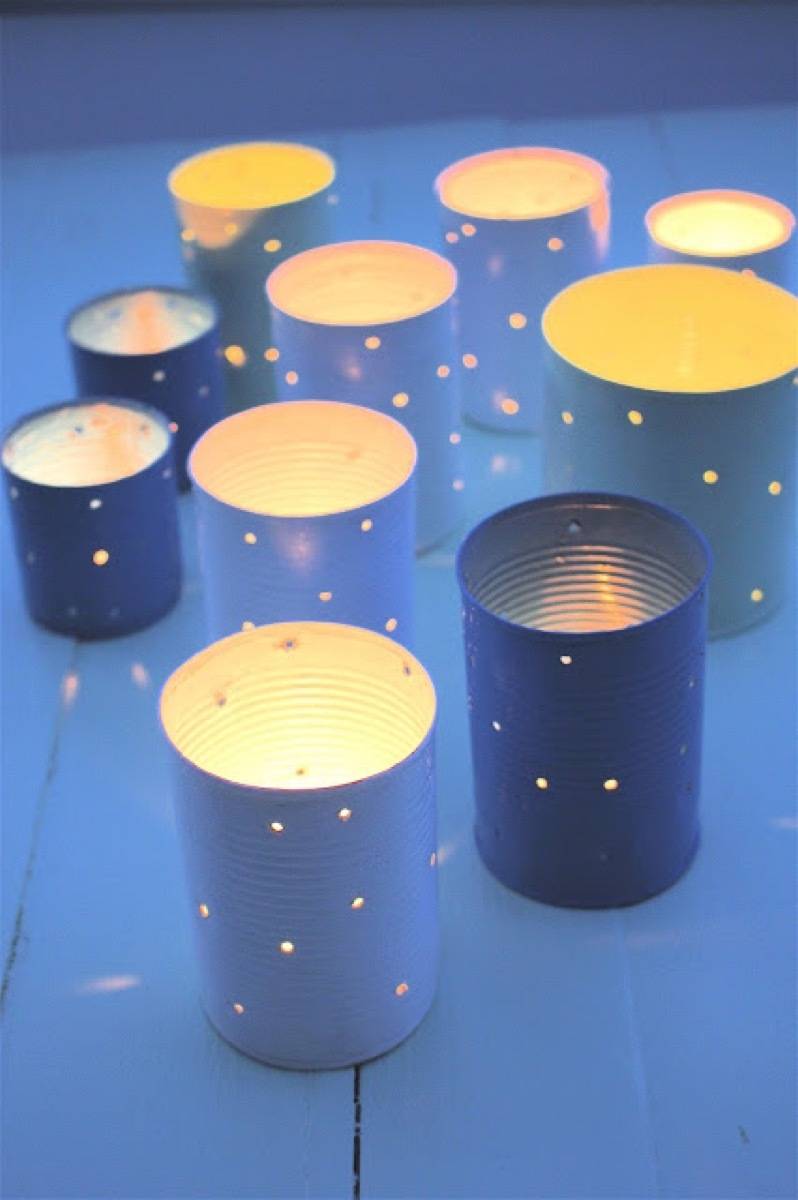
29. Tin Can Lights: This project is a classic, and couldn’t be left off the list! If you need a quick, easy, and cheap solution for your outdoor lighting situation, grab some tin cans, tea lights, a hammer and a large nail, and get to punching!
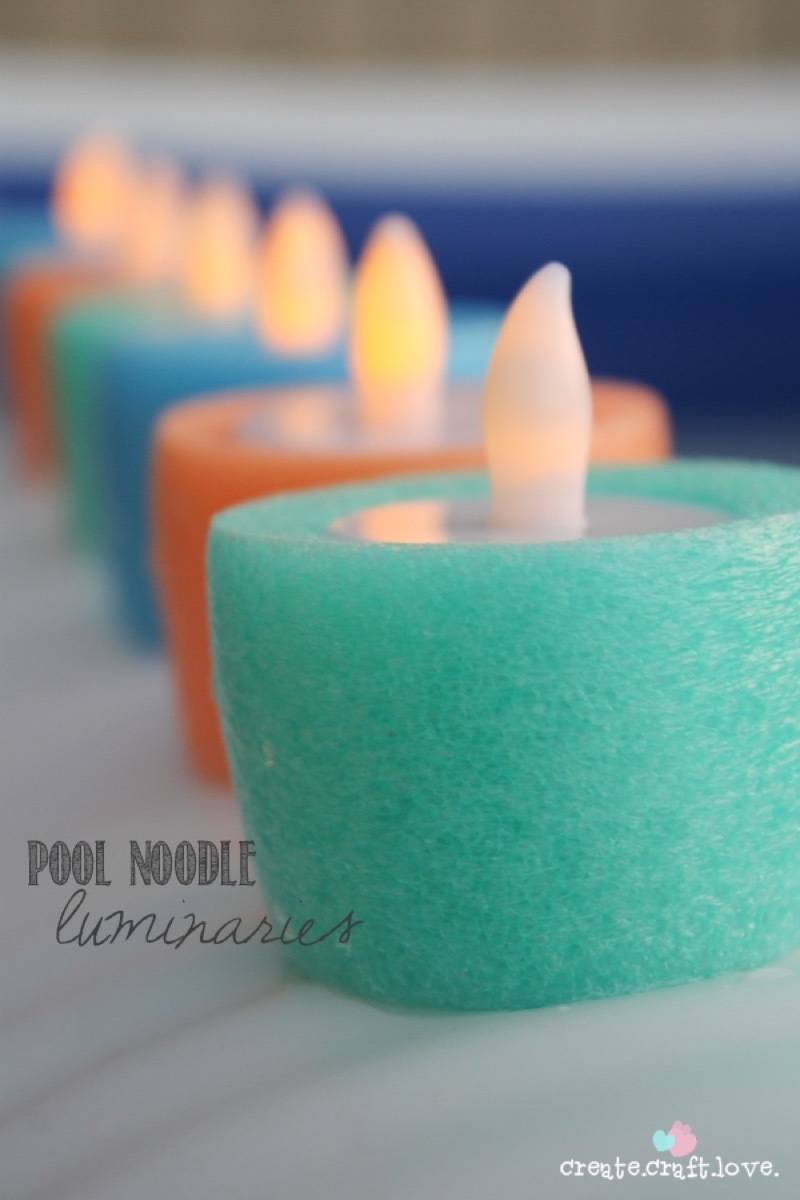
31. Pool Noodle Luminaries: Even if you don’t have a pool, you can set these floatable candles off in a large container of water to add ambiance to any space.
Photo: The Blue Eyed Dove
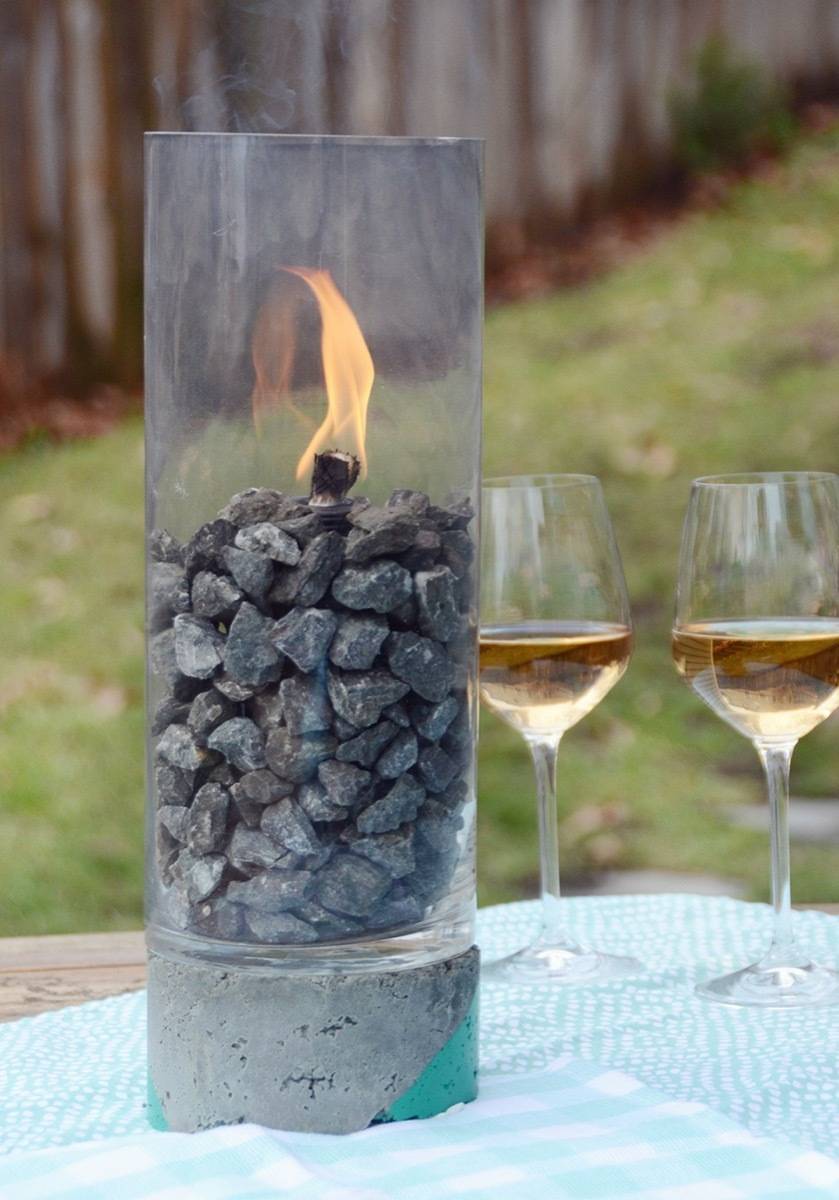
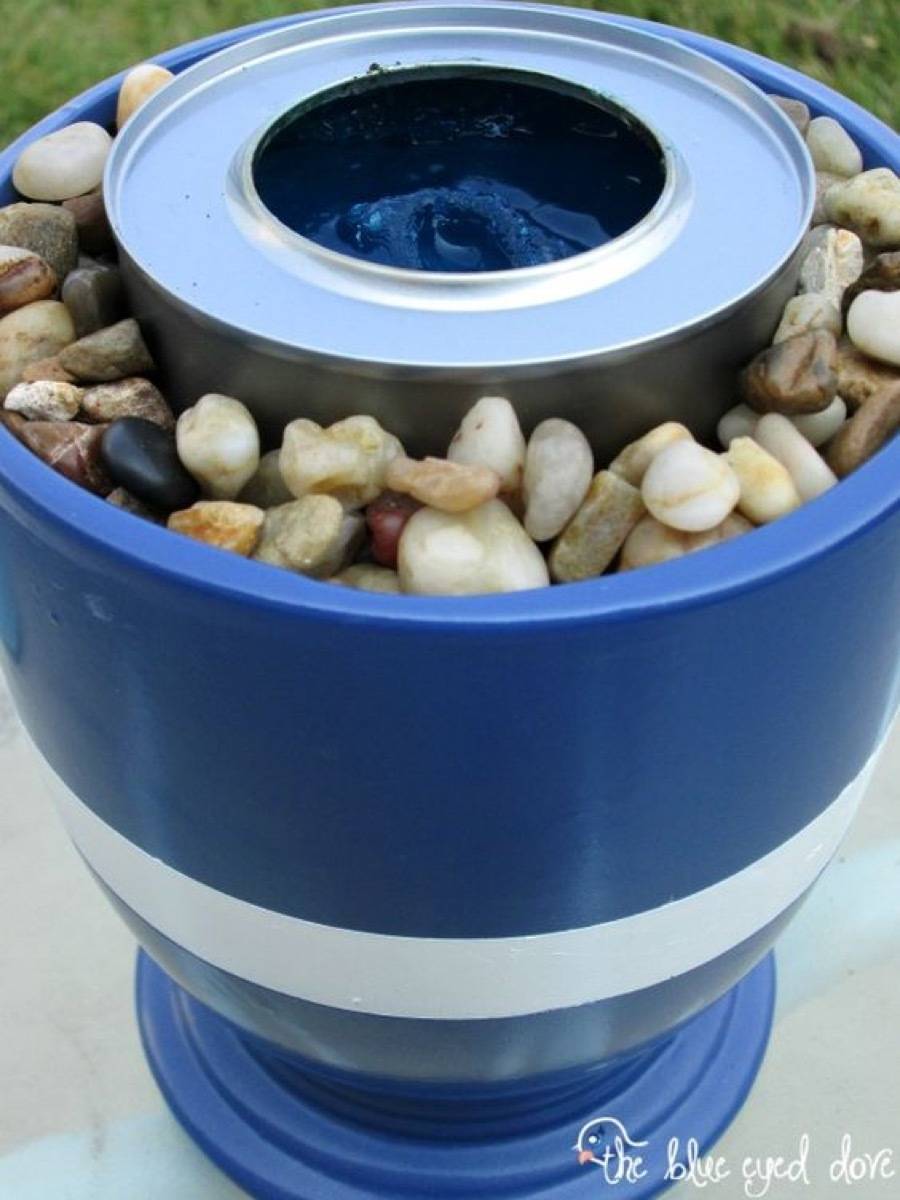
32. Flower Pot Fire Pit: Who says fire pits can’t be cute? Beautiful in blue, this outdoor DIY project only requires a flower pot, stones, and a little flame.
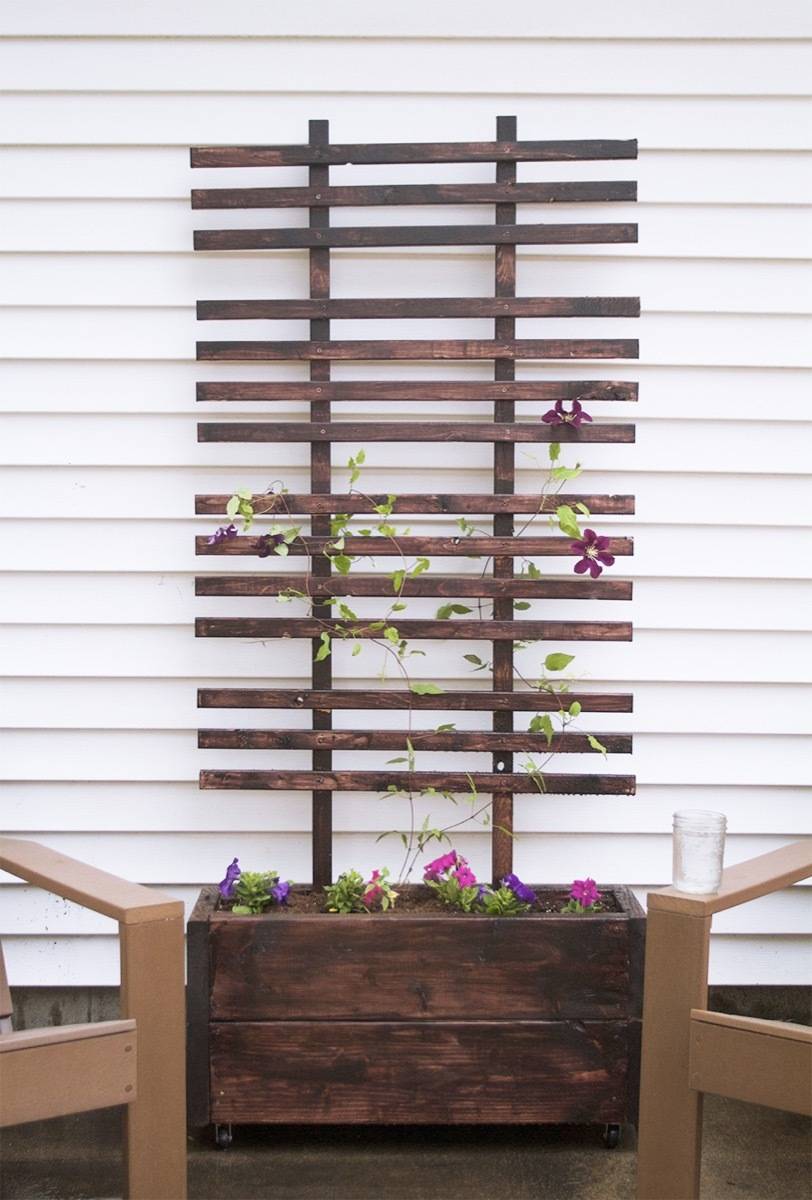
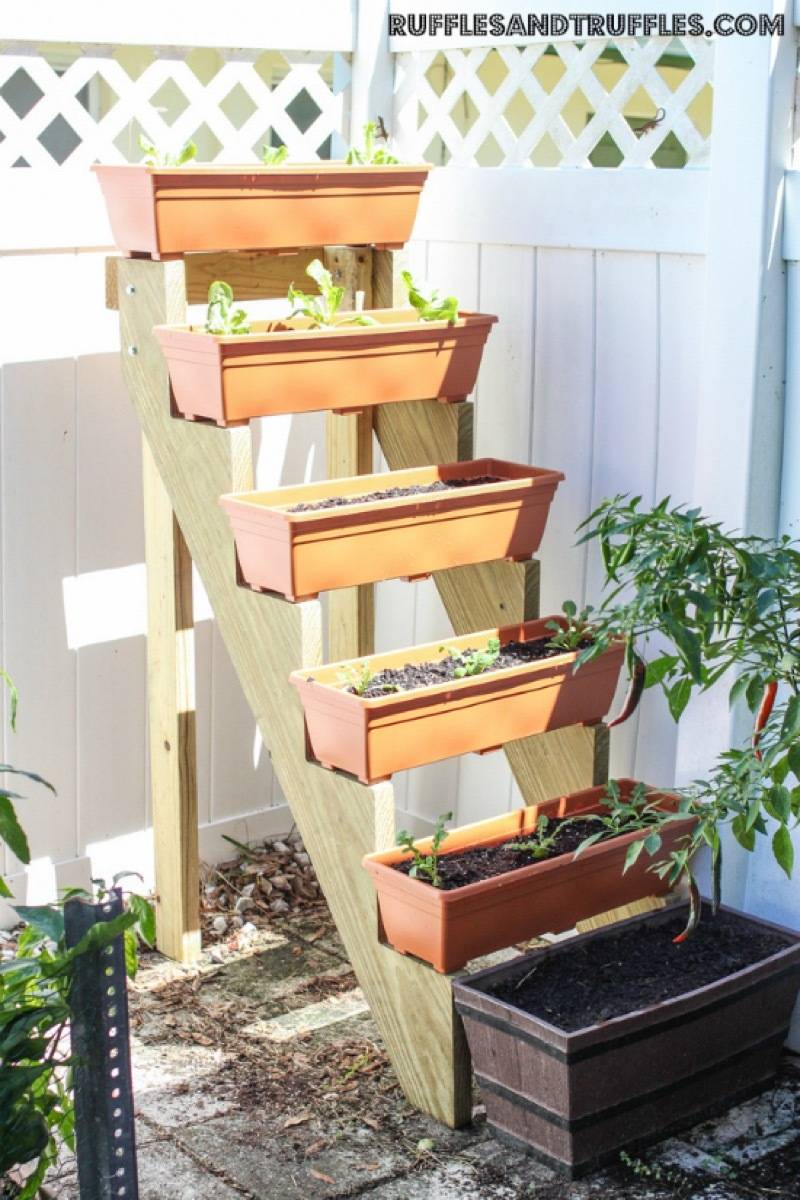
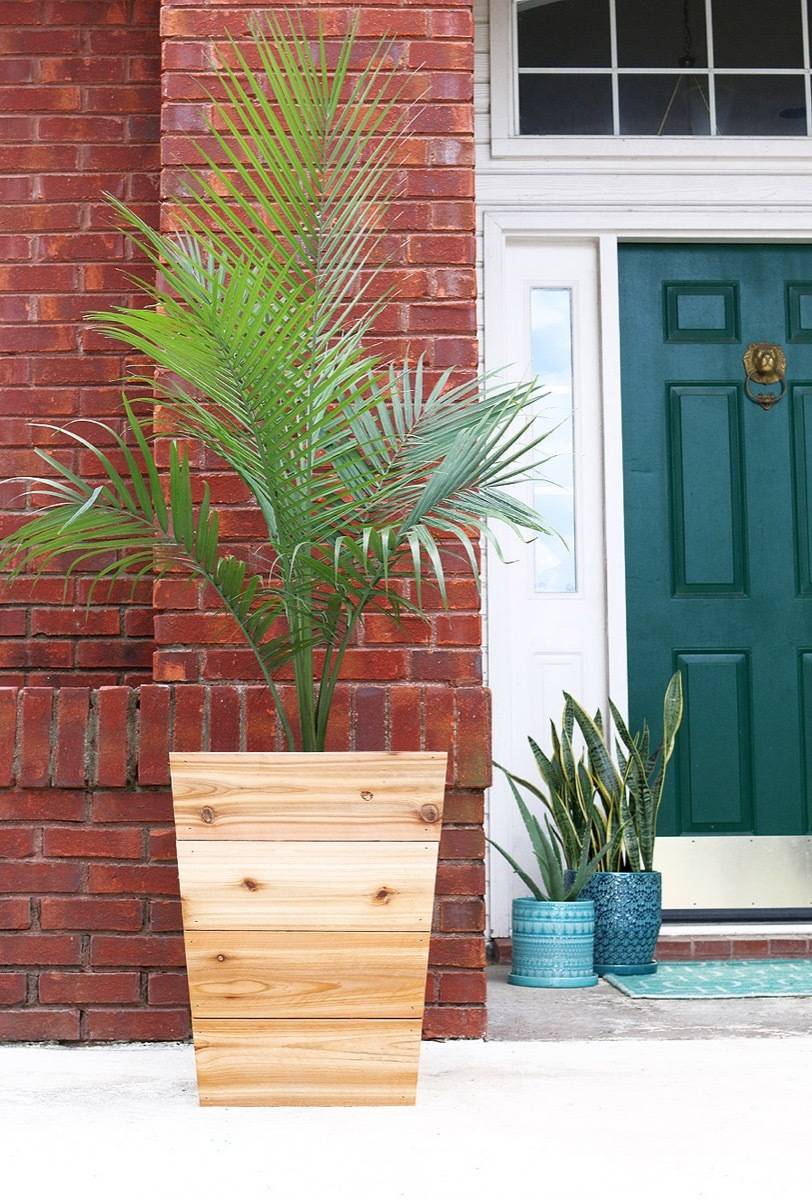
33. DIY Trellis with Planter Box: Give crawling plants somewhere to go by building them a trellis. This project is also great if you’re looking to fill visual space in your patio or deck area!
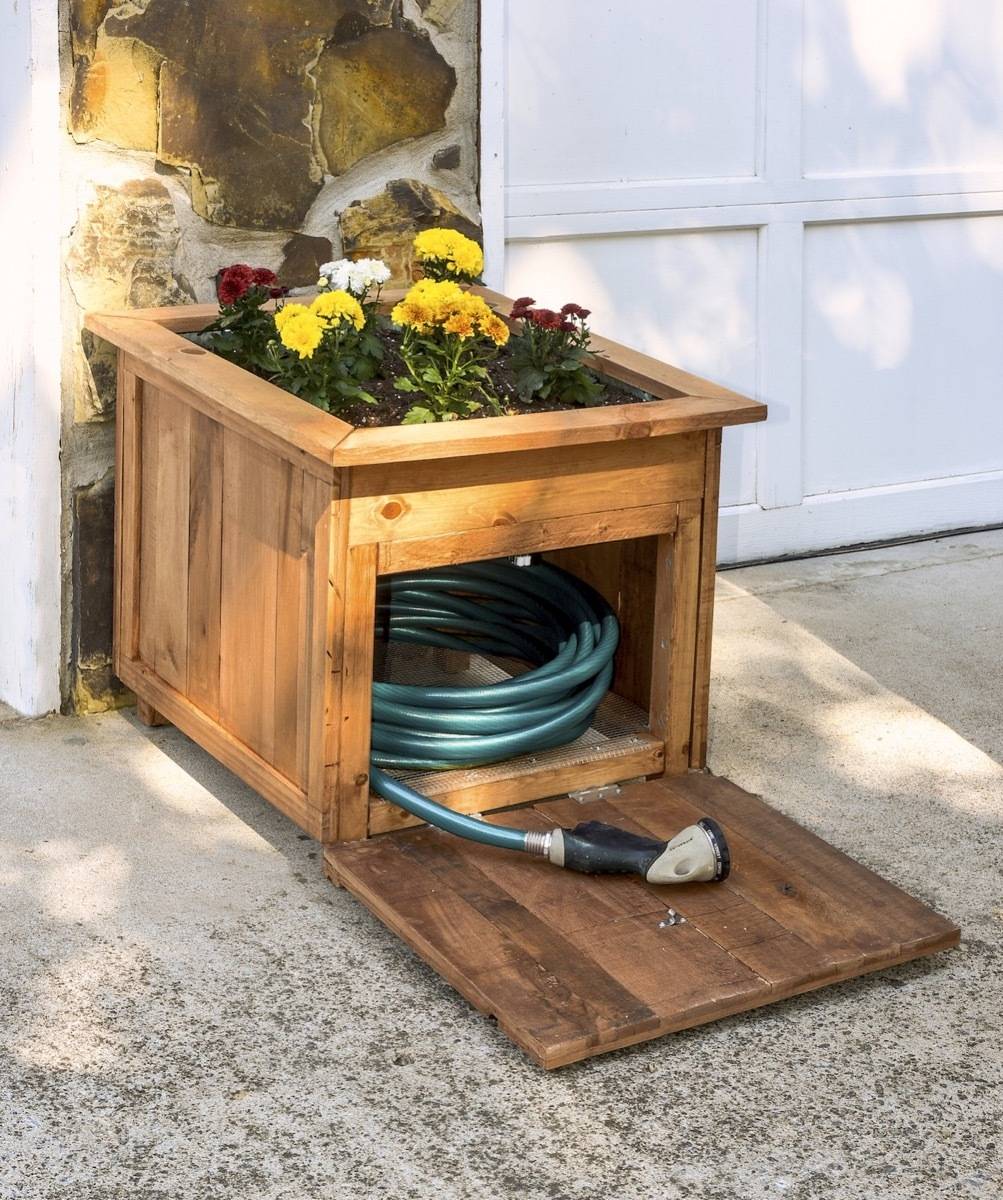
34. Hose Housing Station with Built-In Planter: Gardening hoses are hard to keep neat and pretty. This project solves that solution by keeping the hose hidden! Plus there are flowers involved, which is always a bonus.
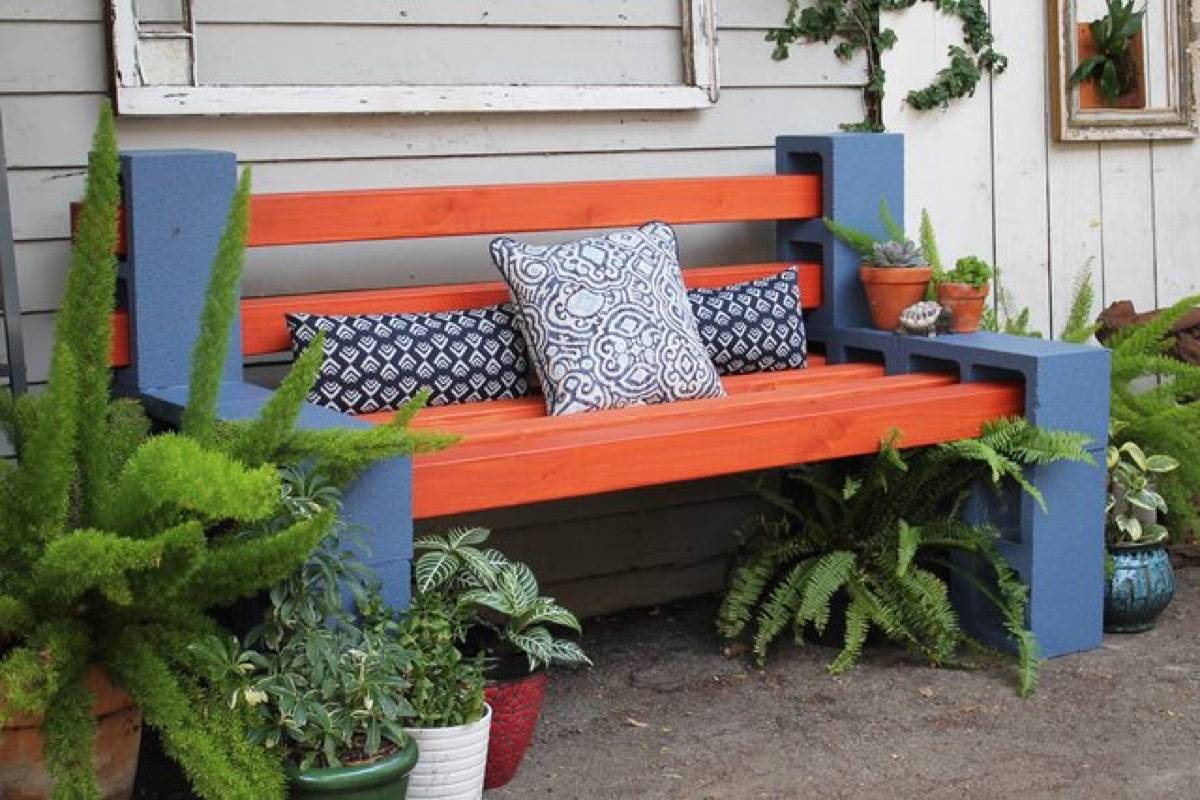
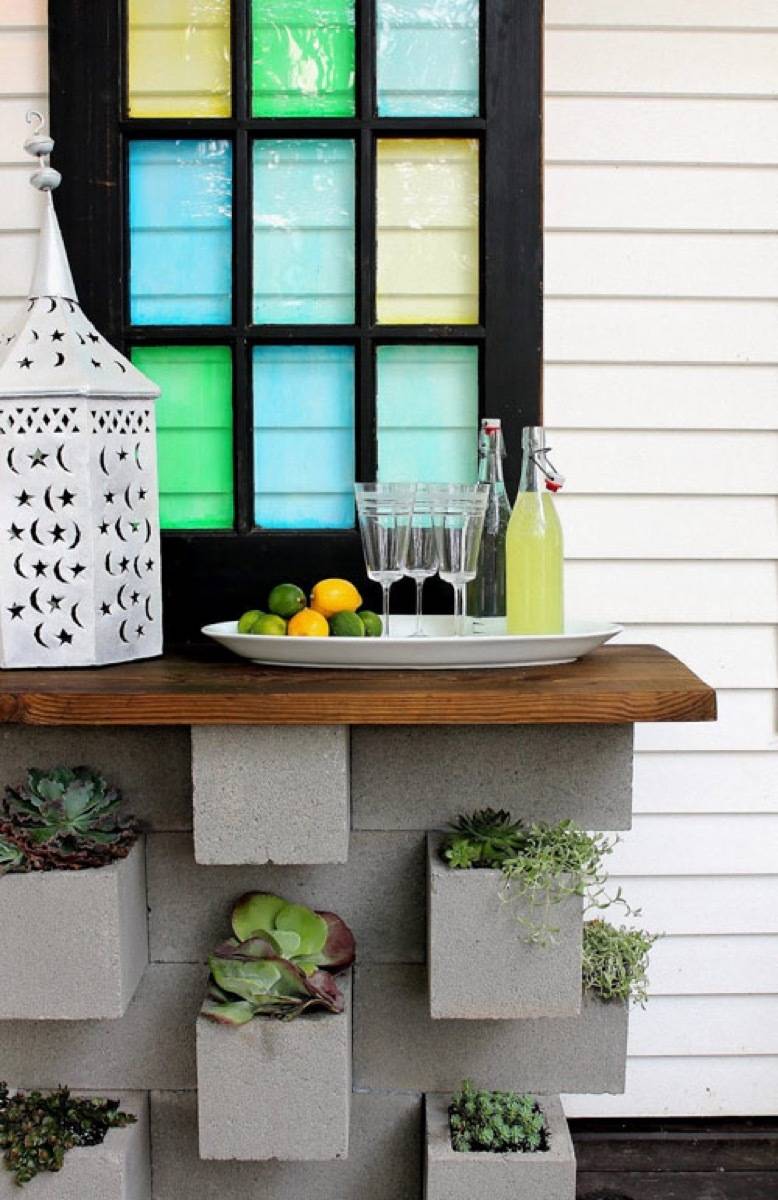
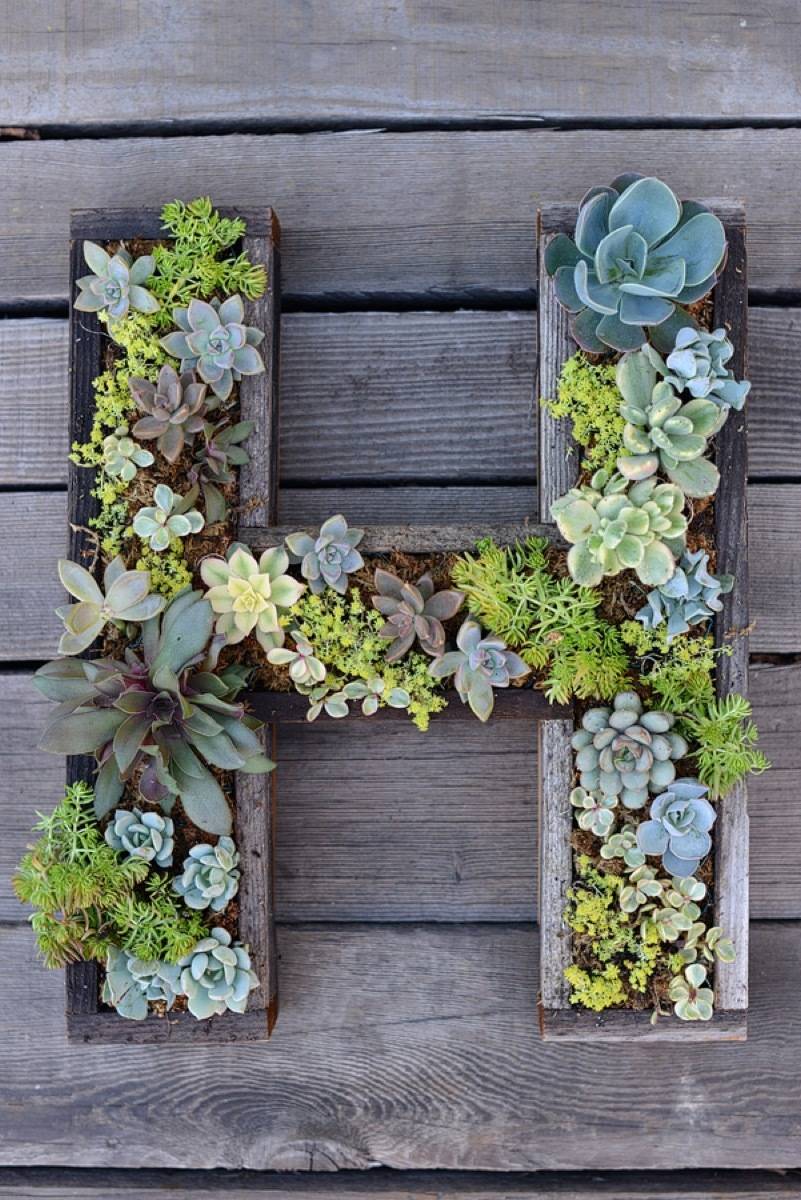
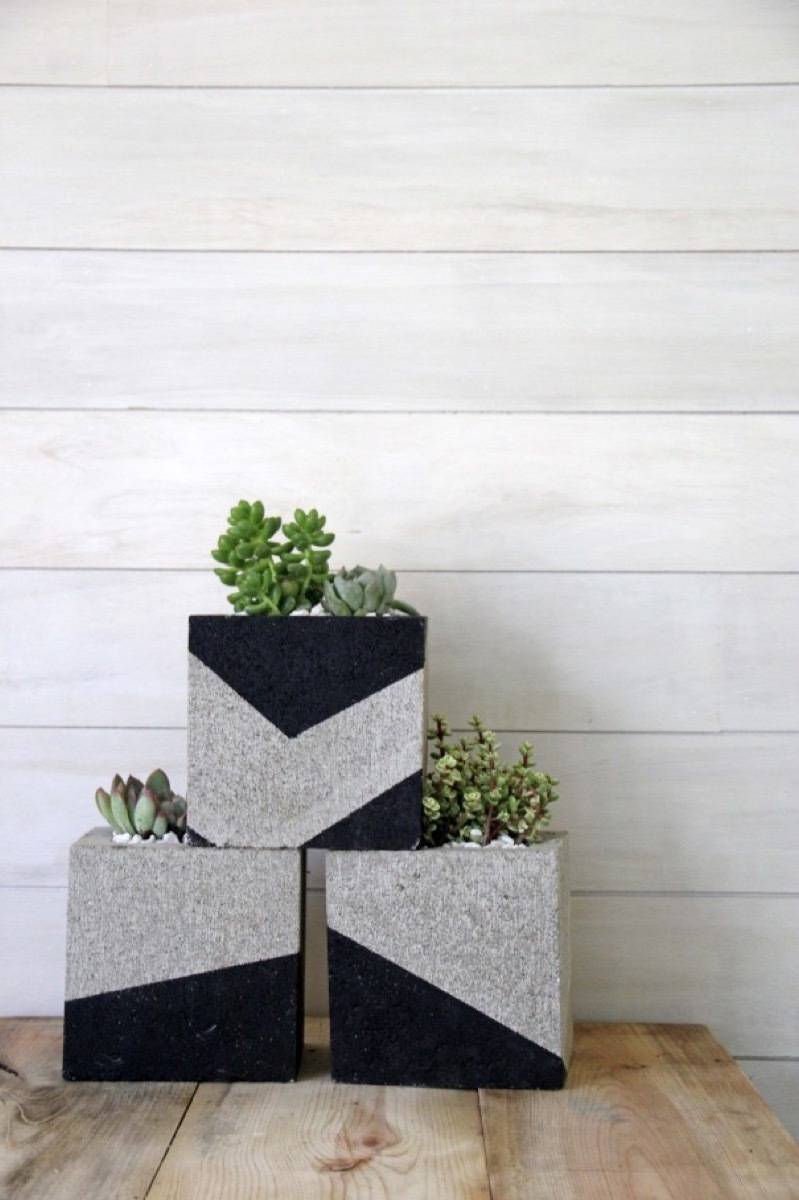
41. Geometric Cinder Block Planters: Cinder blocks are at it again! With a simple paint job, you can create a modern-looking planter to house all kinds of greenery.
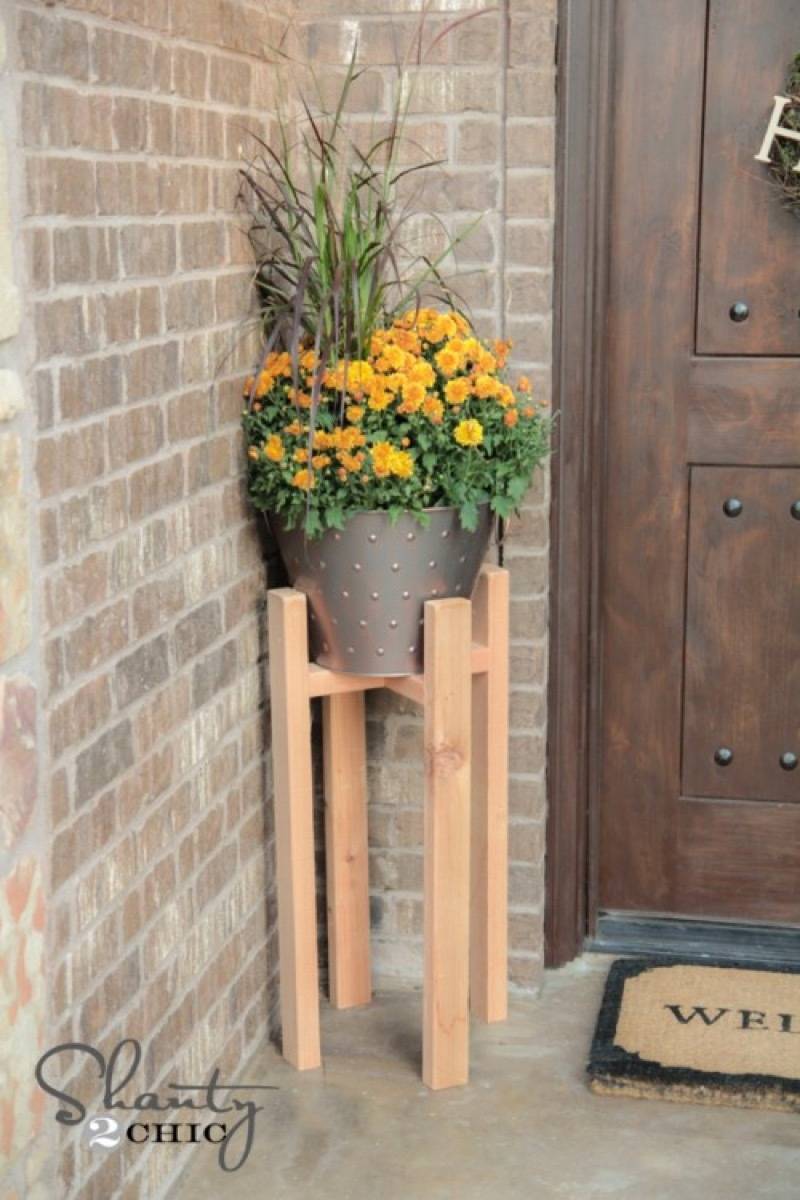
42. Wooden Plant Stand: If you’re looking for ways to add visual height to your plant-scape, Shanty 2 Chic has the plans to build a wooden plant stand.
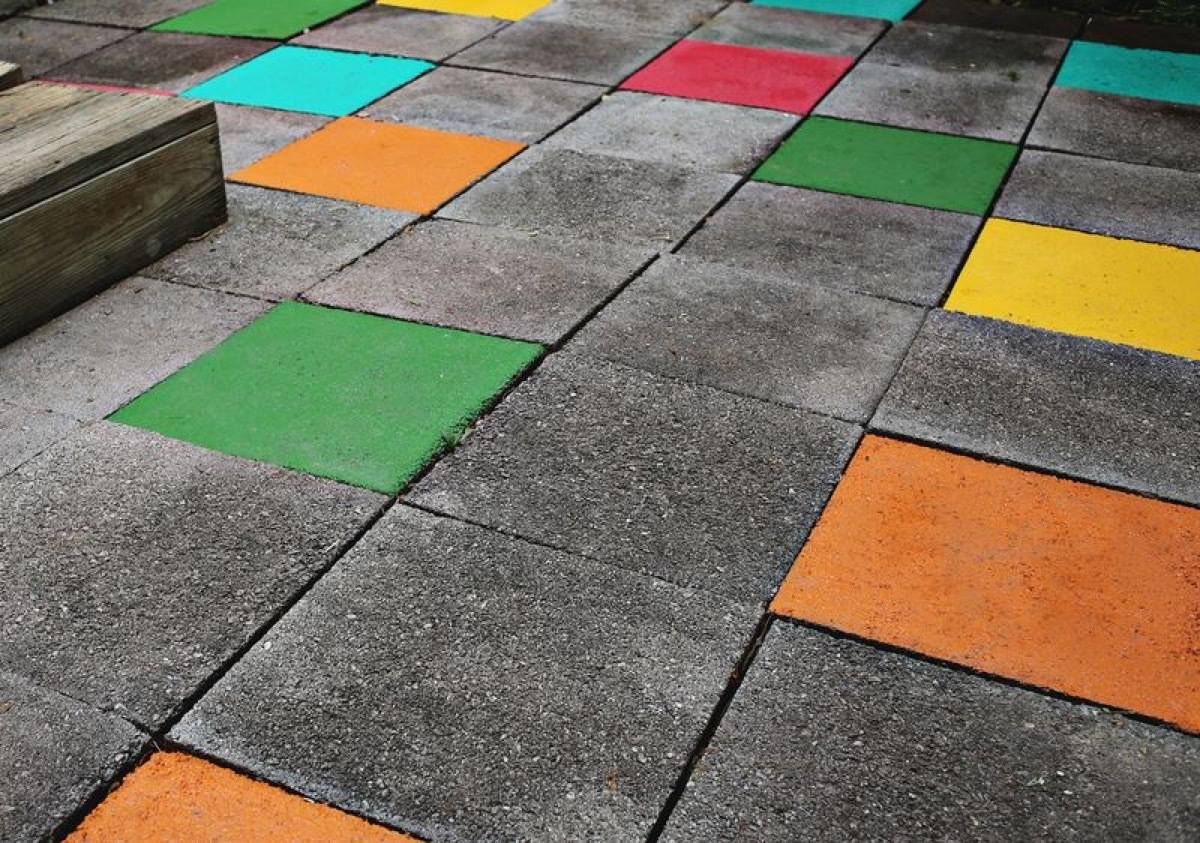
44. Colorful Patio Tiles: I can’t get over what a simple and transformative idea this is! If you can’t commit to painting your patio, try chalk for a temporarily colorful time!
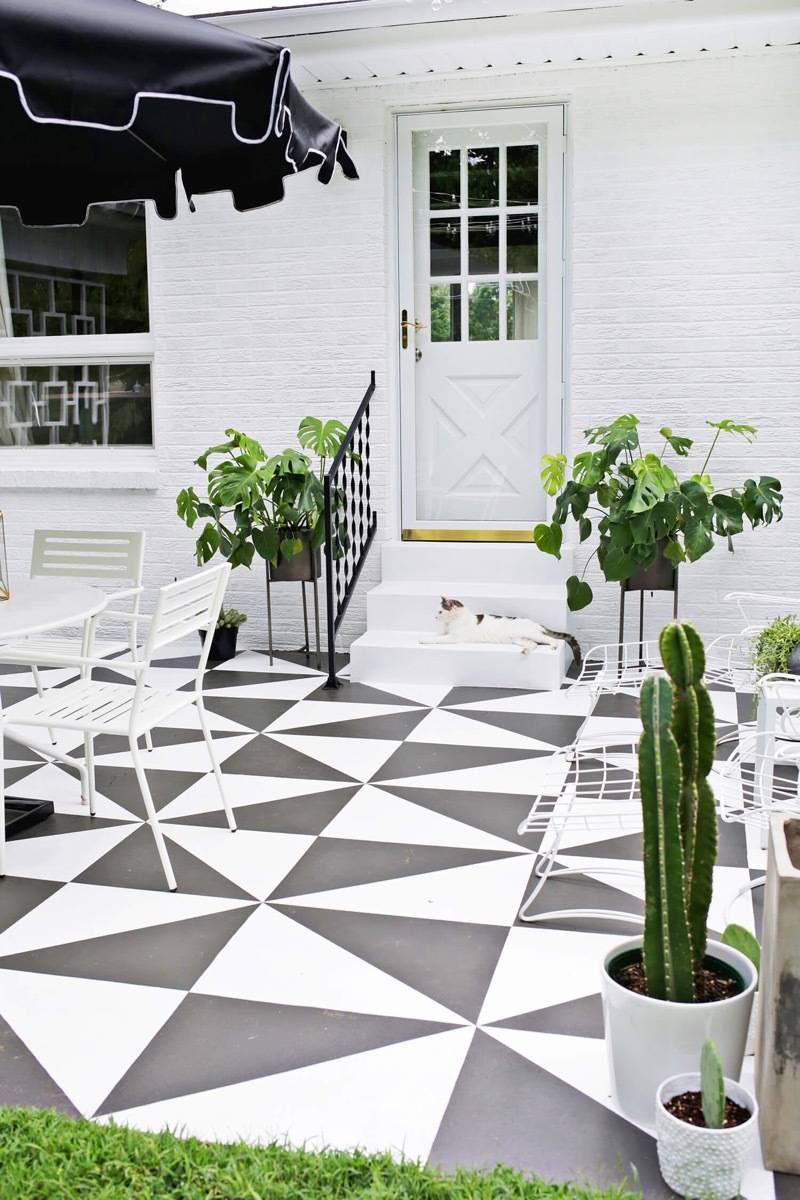
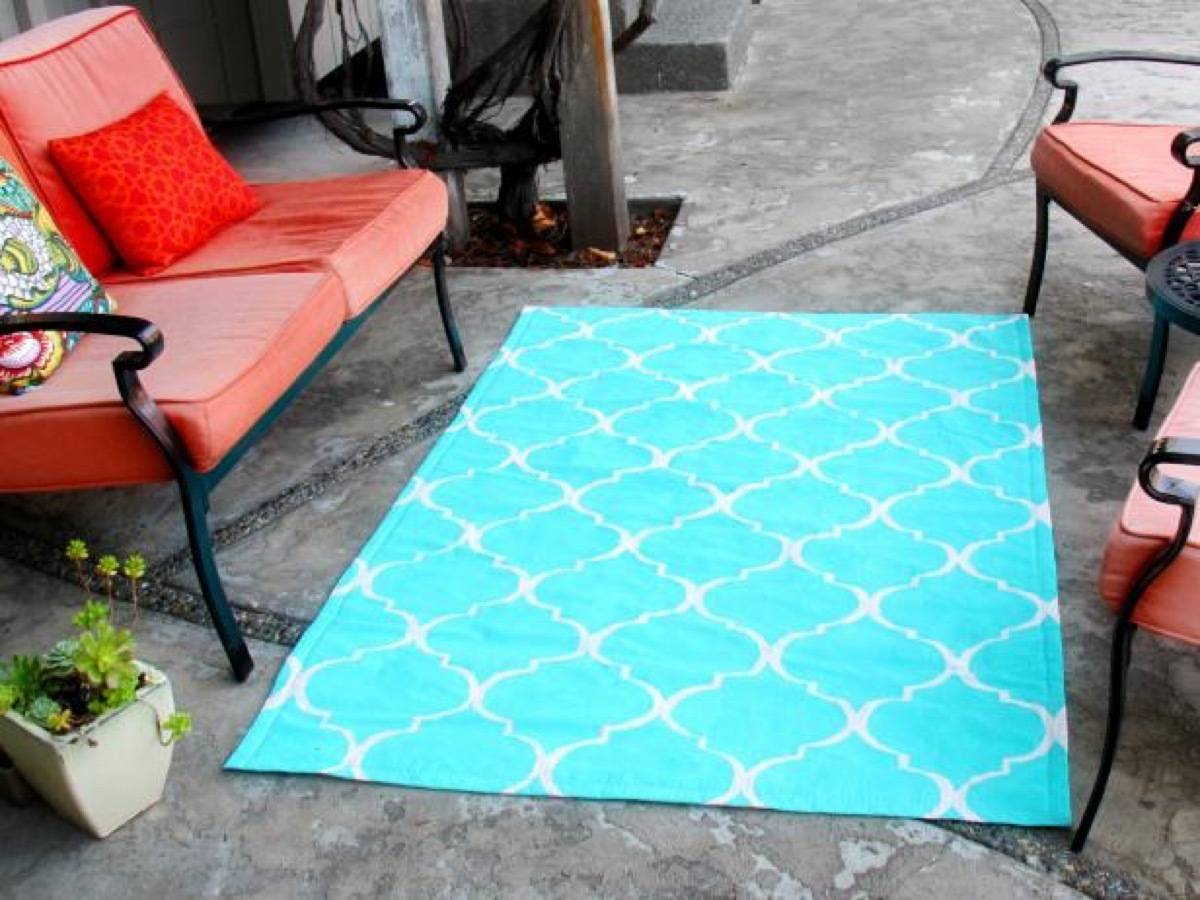
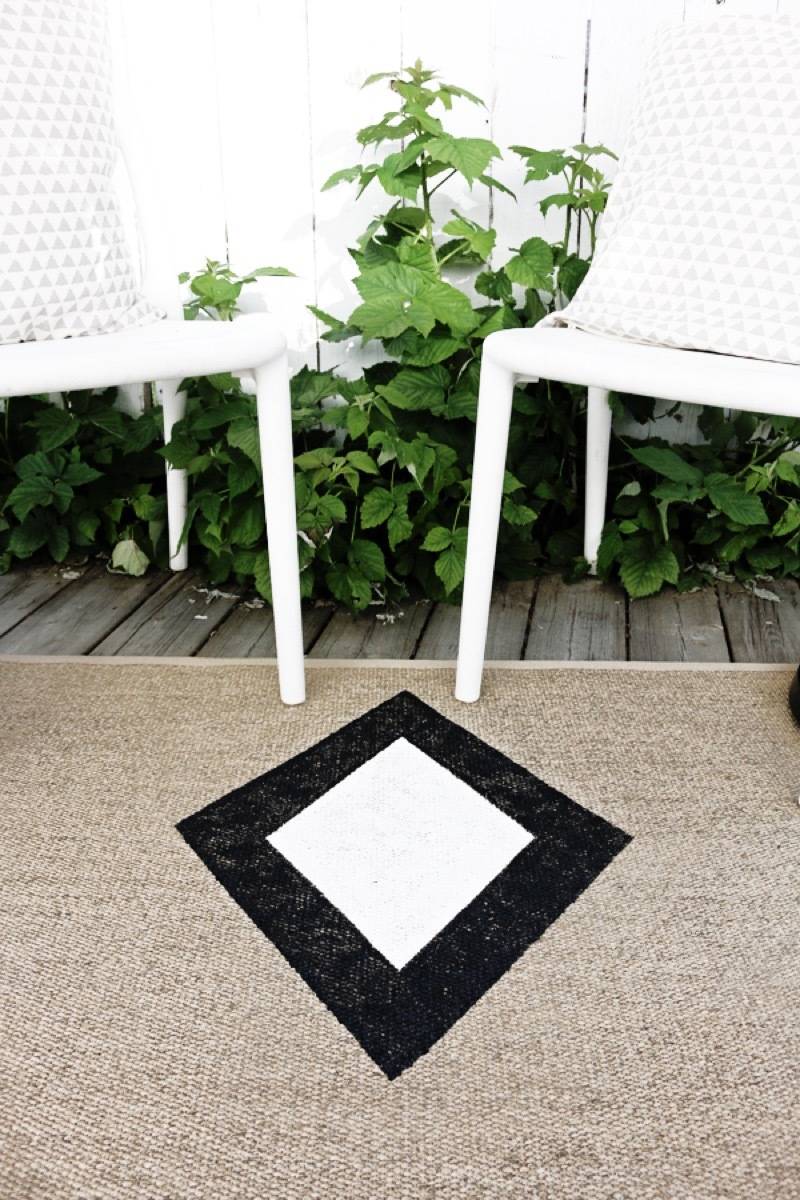
46. Stenciled Concrete: This stencil job mimics the look of a rug with the low-maintenance factor of concrete! Try this look on for size if you’re trying to create a more intimate outdoor living space.
53. Sandbox with Lid: It’s a gross reality, but if you have cats, you have to have a sandbox with a lid. Ana White has the plans for how to build one of your own.
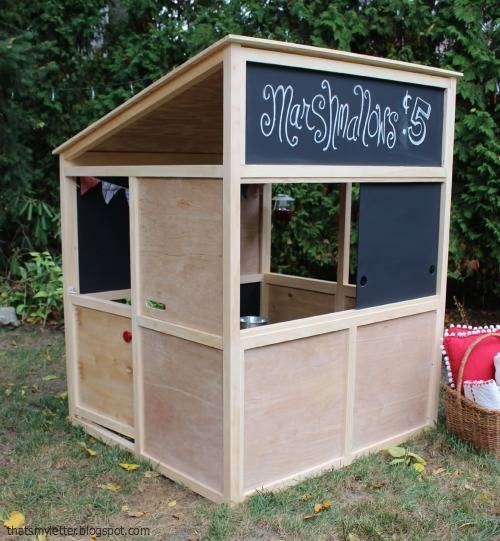
54. Sandbox with Seating and Awning: Keep the kiddos safe from the sun by adding an awning to your sandbox. Plus these plans come with adorable seating!
58. Tire Teeter Totter: Alliteration aside, this teeter totter is adorable. Plus it’s made from recycled materials, so it’s good for the kids and the earth.
Photo: Simply Kierste
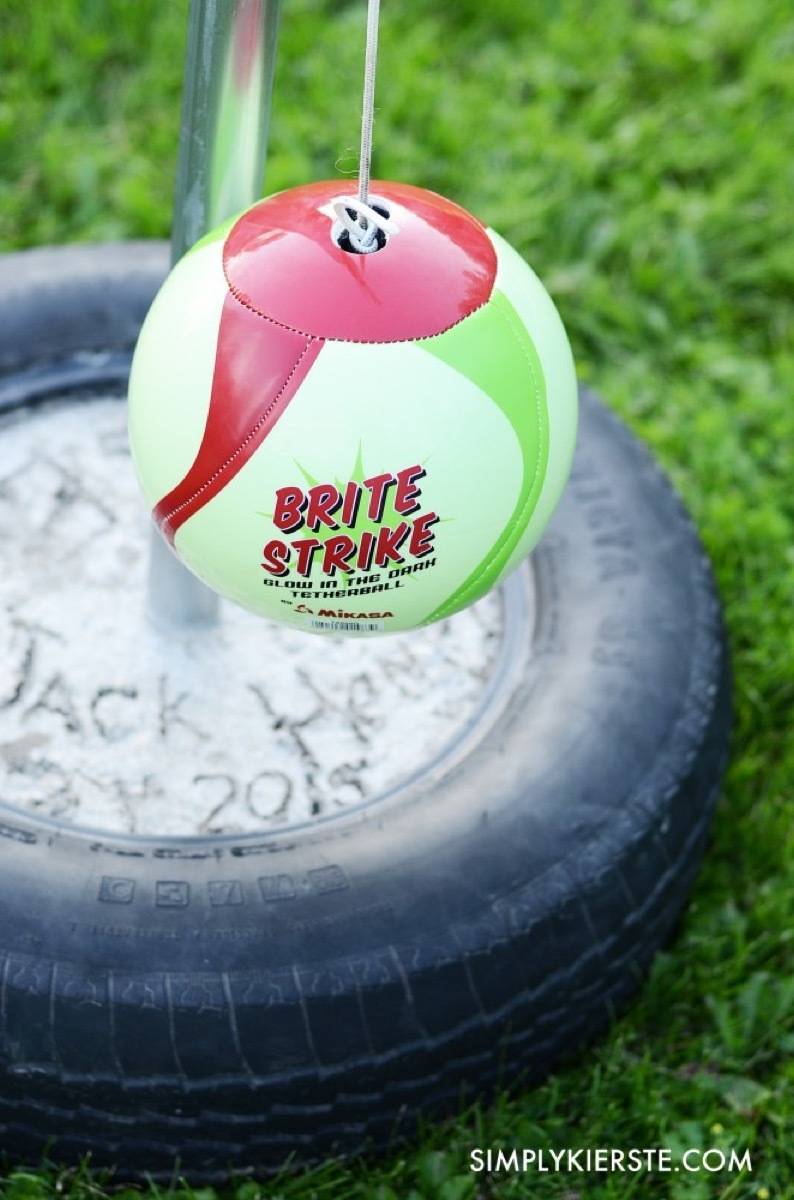
59. DIY Tether Ball: This DIY feels like a throwback! Do you guys remember playing tether ball long into the afternoon? Turns out it’s pretty easy to make one of your own for you or your offspring to enjoy!
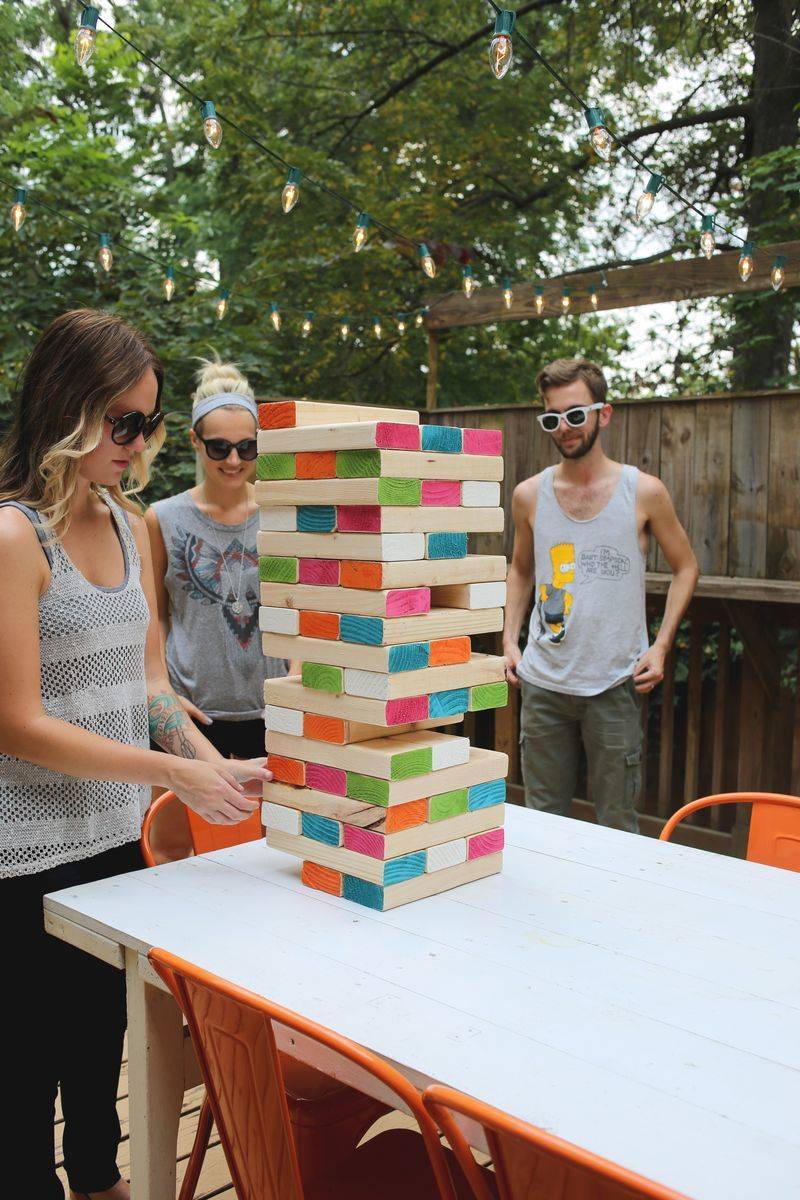
62. Giant Jenga: Last but not least, this thrilling game is the perfect addition to a summertime backyard party.
Bonus! Author Christina Pfeiffer is sharing What to plant for more drought resilient containers
By their nature, containers require more frequent watering than plantings in the ground. Smaller containers in full sun can need watering twice a day during hot spells. Go large when choosing new containers to save on time and water demands.
Choose a group of plants that are compatible in looks and culture. Match up their needs for light and water first, then play with combining colors and texture.
Sedums
These perennials are my first ‘go-to’ s for drought tolerant containers. They come in a variety of sizes, shapes and colors with blooms that benefit pollinator insects and ask for little in terms of water and fertilizer. Most will overwinter and also combine well with other drought tolerant plants.
Herbs for garden and kitchen
Culinary and ornamental herbs are another group happy in well drained soil and sun. Those with variegated foliage are stunning accents planted solo in a container. Among my top favorites are:
Variegated lemon thyme Sages that are edible and ornamental: ‘Berggarten’, ‘Aurea’, ‘Purpurescens’ and ‘Tricolor’ Oregano ‘Kent Beauty’ trails beautifully out of hanging baskets and into the marinara sauce.
Perennial favorites
These garden perennials make a successful leap between garden beds and containers and back again:
Coral bells, Heuchera ‘Green Spice’, ‘Peppermint Spice’ and ‘Moonlight’ Geranium x ‘Johnson’s Blue’ and other hardy geranium Oxalis tetraphylla ‘Iron Cross’ Dusty Miller – Sunrose, Helianthemum ‘Wisley Pink’ and ‘St. Mary’s’ Hardy fuchsia Cape fucshia
Add these grasses and grass-likes for contrasting texture
New Zealand Flax, Phormium and variegated iris both offer tall, strappy, striped leaves. Low growing glack mondo grass has dramatic dark foliage and and small white or purple flowers. Variegated lily turf, Liriope muscari ‘Variegata’, ‘Silver Dragon’ and ‘Sunproof’ all have white edged leaves and purple blooms.
Annuals that can take the heat (and a bit of drought)
Many of the popular annuals used for seasonal color do best with regular water and fertile soil. Be sure to keep these birds-of-a-feather together. Here are some great annuals that don’t like as much water and fertilizer and that combine well with other types of plants listed in this article:
African daisy, Osteospermum Symphony series Sweet allysum, Lobularia maritima Coreopsis tinctoria Dwarf snapdragons, Chinese Lantern series
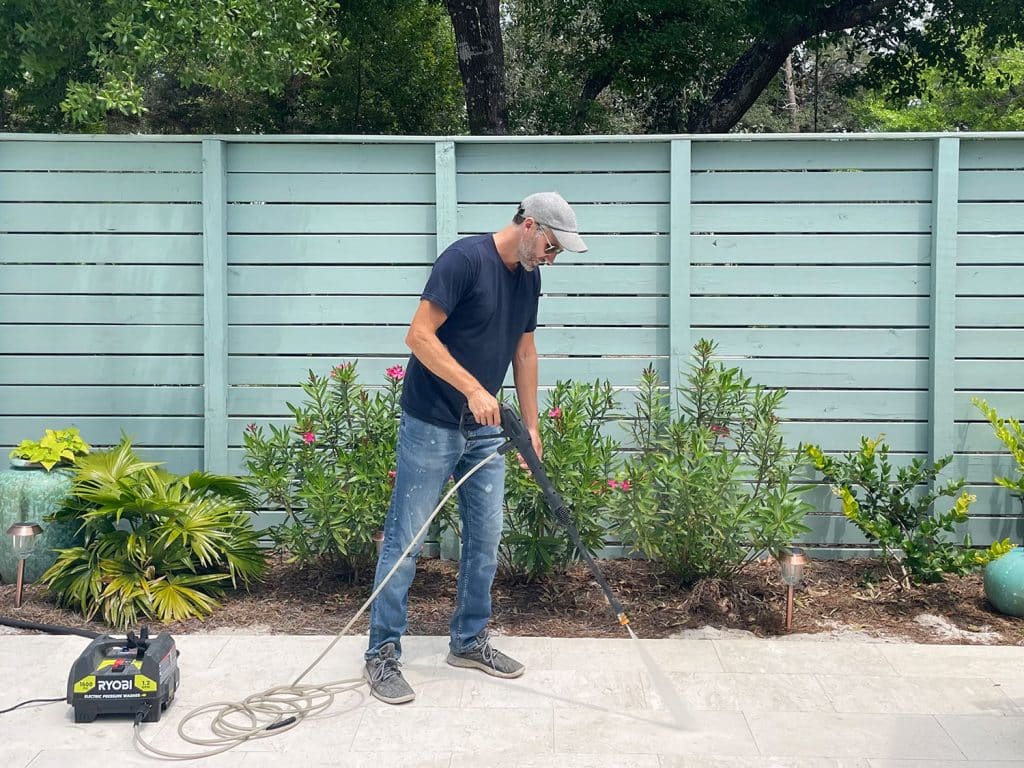
We’ve mentioned how we use our pressure washer to revive various things around the house – like outdoor furniture and even an indoor rug – but we still hear from people who fear that it’s complicated to set up or expensive to buy or hard to control… and the good news is that it’s none of those things. So this post is a comprehensive start-to-finish guide for anyone who’s finally ready to get their pressure washing feet wet (maybe even literally).
Pressure washing is an easy, affordable, and TOTALLY AWESOME way to keep your outdoor spaces looking fresh. So I’m walking you through everything from setting it up and turning it on, to where and how we use ours. It makes such an insane difference every spring, I’d even call it a DIY VIP.
We were a bit intimidated the first time we tried pressure washing nearly 10 years ago. The cumbersome gas-powered machine we rented for a day was so big it didn’t even fit in our car! So I TOTALLY understand anyone with PWH (pressure washing hesitation).
But that all changed when we found a GREAT pressure washer that’s super compact and easy to use – this $99 Electric Pressure Washer from Ryobi. Both Sherry and I use it regularly – and neither of us have any issues controlling it or having enough power to get every single task on our list done. It’ll make a pressure washing convert out of just about anyone. We bought it many years ago with our own money and love it – so nothing about this glowing review is sponsored in any way.
A Beginner’s Video Guide To Pressure Washing
We’ll cover all three of those topics in text & photos below, but if you want to see ALL of it in action and in real-time, the video below is for you. Oh yeah and there’s lots of that sweet sweet pressure washing footage that everyone’s eyeballs can’t help but love. And more importantly, several cameos by our dog Penny.
Again, we currently own this $99 Electric Pressure Washer from Ryobi. We bought it for our beach house in 2018, and when we moved we opted to bring it with us instead of an older/larger version we had before – just because this one is so compact and reliable and (most importantly) GOOD AT CLEANING. There are definitely more powerful (and more expensive) options out there, but this pressure washer has always met our needs. Always. In fact, we don’t even use it on it’s highest setting. That’s how adequately powerful it is. Plus it’s pretty much the most affordable option out there and we especially love that it’s compact and easy to use. So unless you have a special need for something more intense, this is a fantastic option.
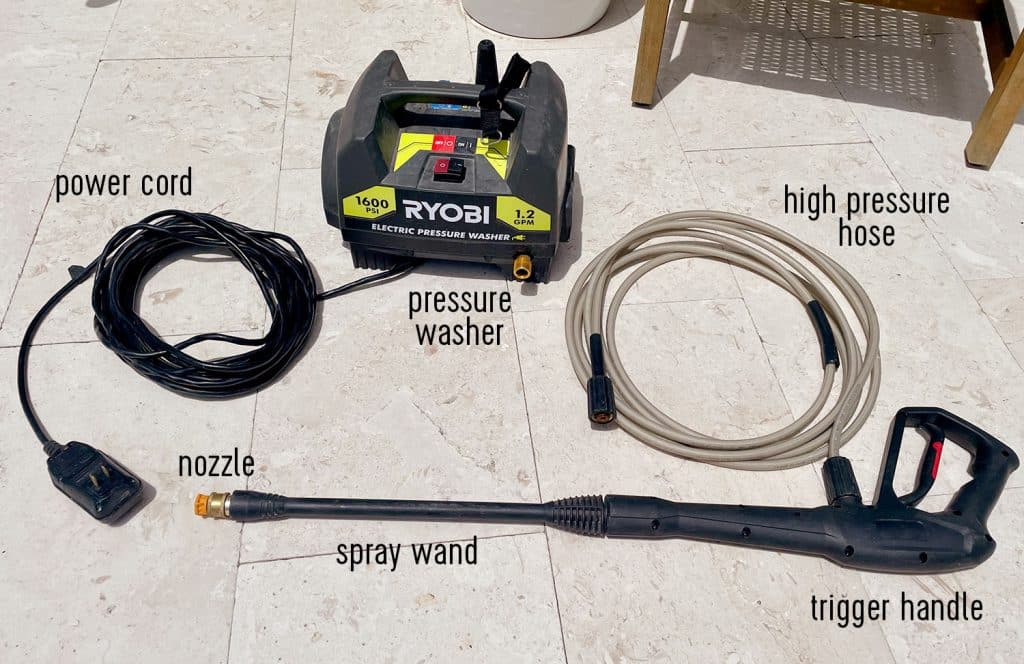
The box includes everything shown above, you just need to supply water (via a garden hose) and power. And, as we show in the video, set-up is pretty much as easy as just connecting those two things!
Step 1: Assemble Your Wand
We typically store our wand and trigger handle assembled, but coming fresh out of the box you’ll need to lock these two pieces together with a simple twist.
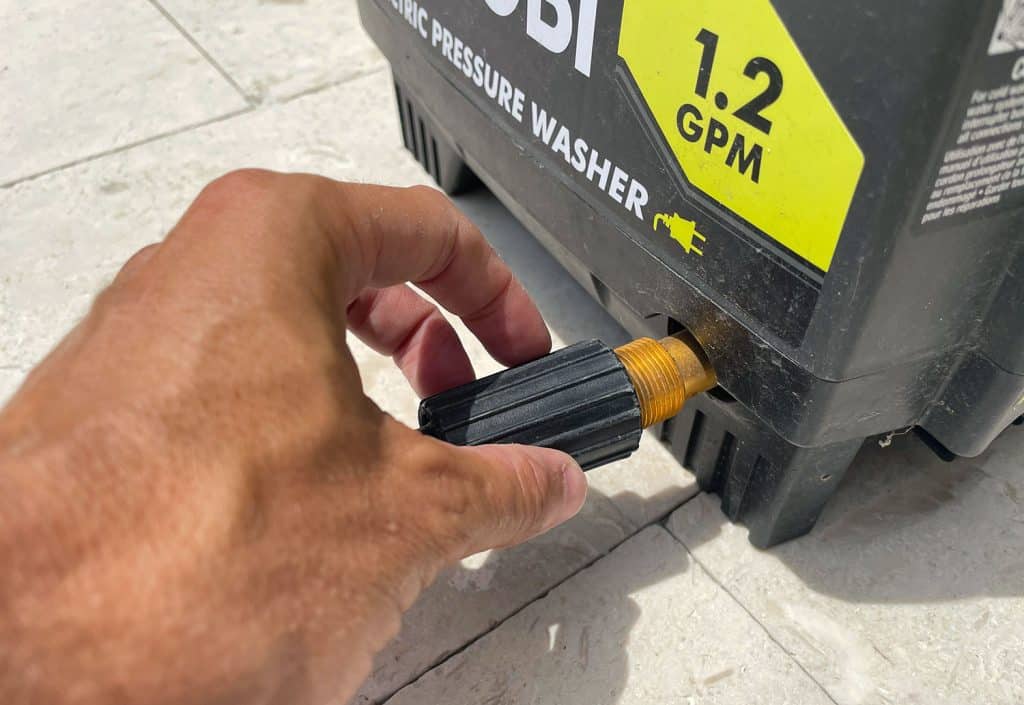
Step 2: Connect Your High-Pressure Hose
The high-pressure hose is what carries the pressurized water from the machine to the spray wand. Each end has an identical black threaded collar. One end connects to your trigger handle, the other to the brass connection on the pressure washer. Just hand tighten until they’re both secure.
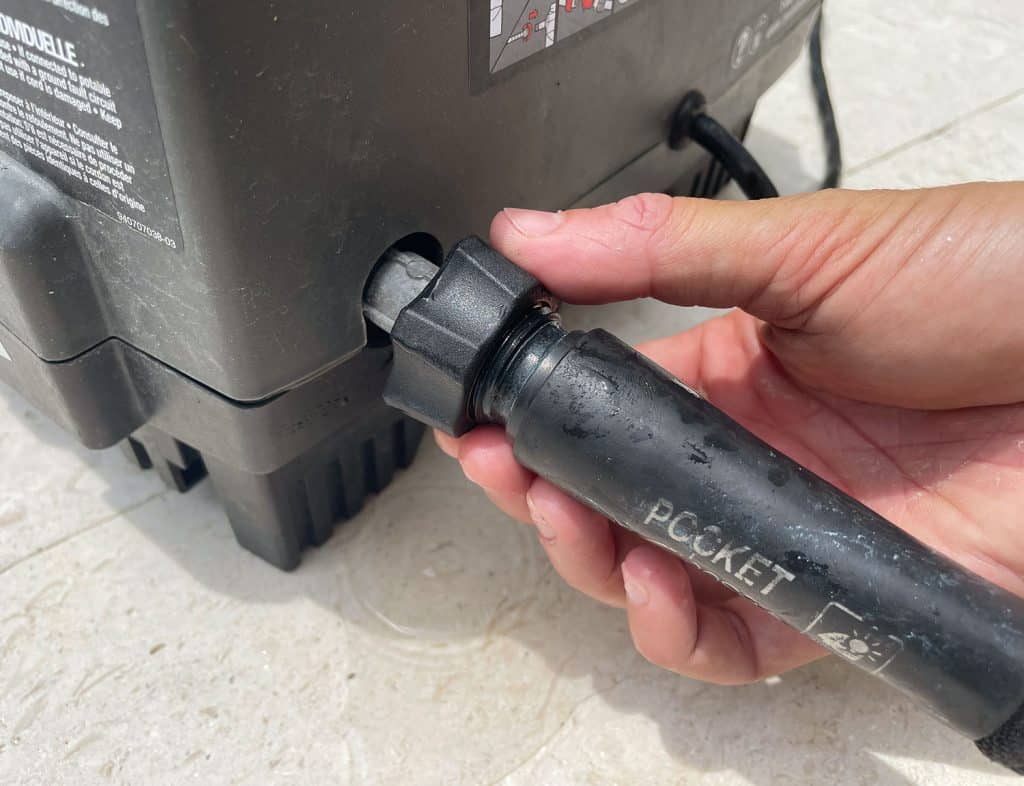
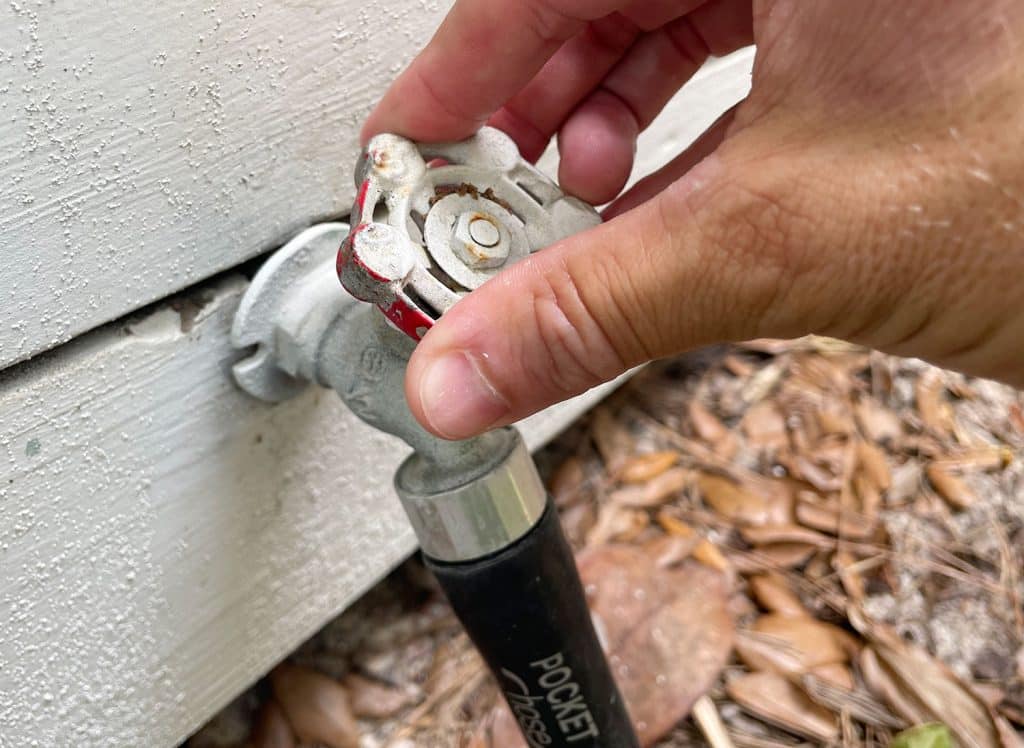
Step 3: Connect Your Garden Hose
On the opposite side of the pressure washer, there’s a black threaded connection that fits a regular garden hose. Attach your hose tightly just like you would screw it onto your home’s hose bib.
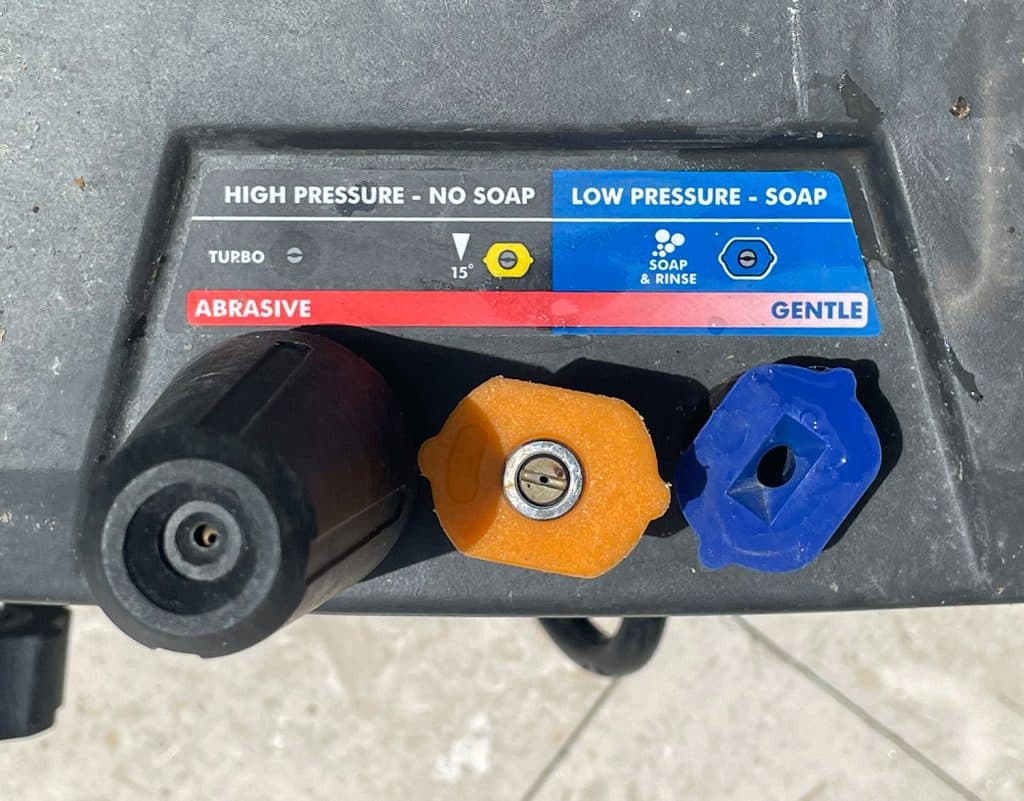
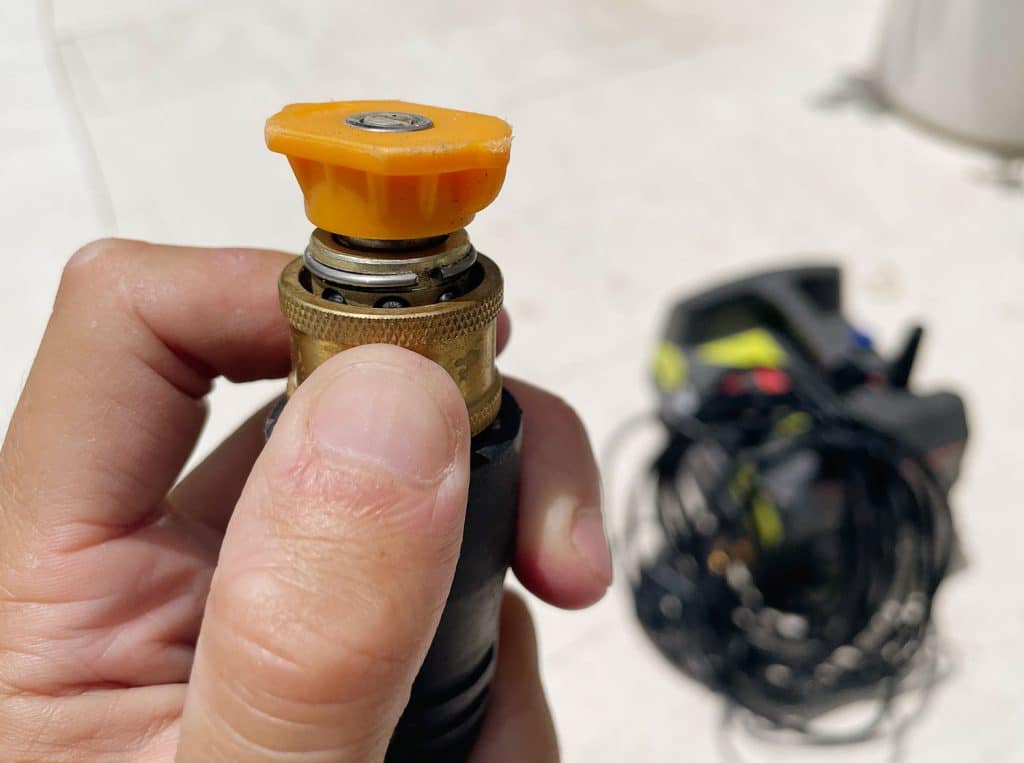
Step 4: Select & Attach Your Nozzle
This pressure washer comes with 3 nozzle options that offer different levels of pressure for different applications (you can also purchase others as needed). There’s a handy guide on the top of the device that explains the differences between the three, along with holes to store them in.
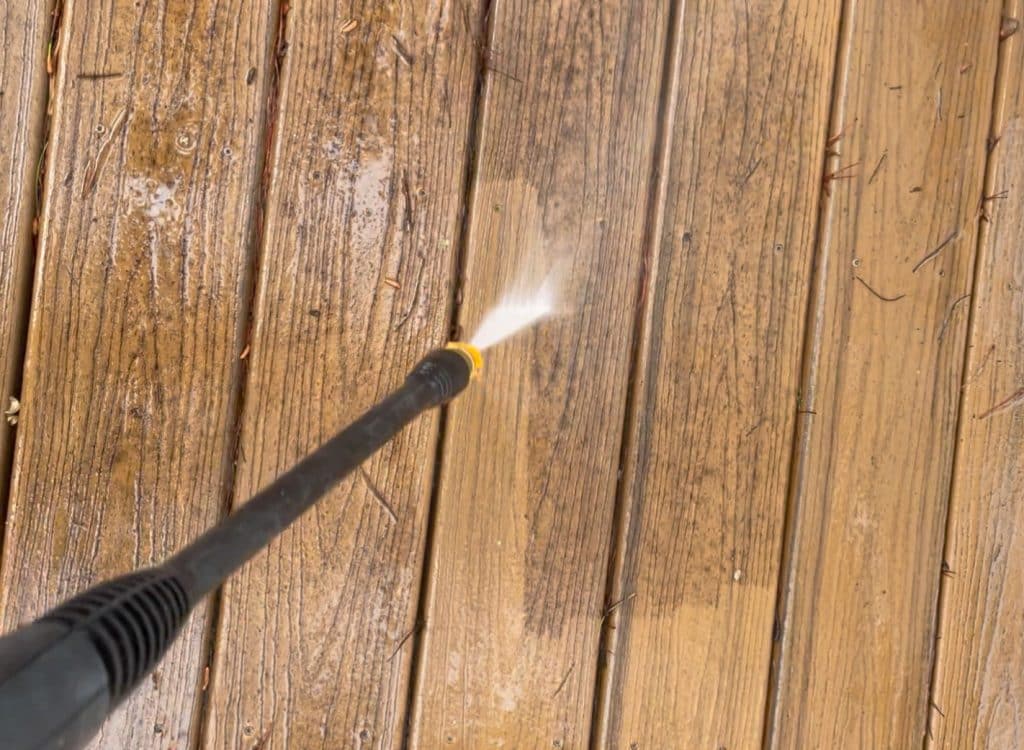
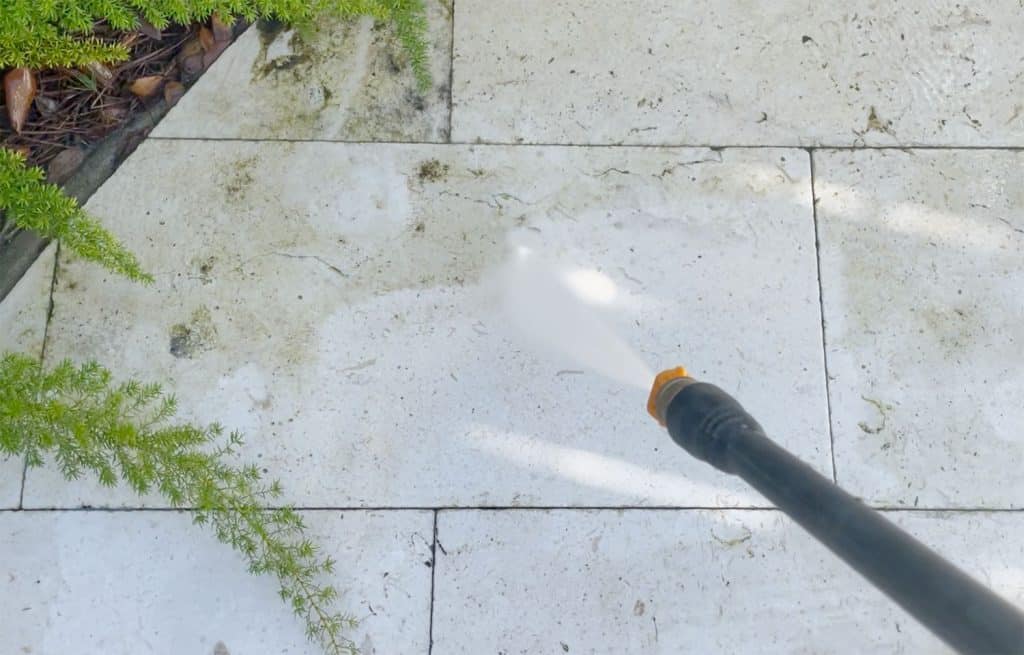
As we describe in the video, we almost EXCLUSIVELY use the middle (medium pressure) orange nozzle. It’s kind of the Goldilocks of options, giving us the “just right” amount of pressure for cleaning patios, decking, outdoor fabrics, and more. Plus, you can always adjust the pressure you’re applying by simply holding your wand closer or farther from the surface you’re cleaning.
The distance matters – so try to watch the video above whenever you can to see more of what we mean. Held too close to something, even the medium pressure nozzle can strip paint or stain off of wood – but spraying with adequate distance can mean zero removal of anything but dirt and grime – which is SO satisfying, and leaves lots of surfaces outside looking like new.
To attach your selected nozzle at the end of the wand, you just pull down on the brass collar and place the nozzle into the opening. Releasing the collar locks it into place.
This completes all of the water connections you need to make, which means you can now…
Step 4: Turn On Your Hose
With your water connections secure, you can now turn on the water at your hose bib. It’s a good idea to open that sucker ALLLLLLLL the way to be sure you’re getting the fullest flow possible from the hose.
You also want to check your hose for any kinks, leaks, or other knots that might prevent the water from flowing freely to your pressure washer. It’s also a good idea to squeeze the trigger on your pressure washer for several seconds to make sure the water is coming out steadily before proceeding.
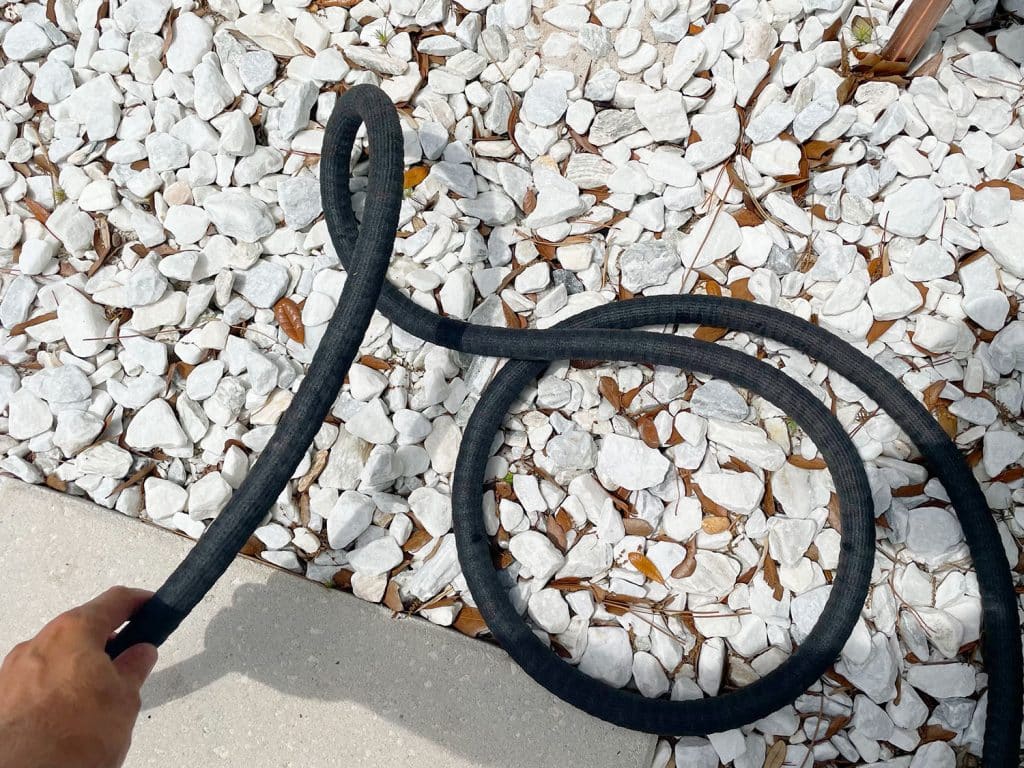
You may notice that we’re using one of those expandable “pocket hoses” that shrink up when it’s not full of water. We love these hoses because they’re less bulky and cumbersome than traditional hoses, but some may dissuade you from using them with certain pressure washers (we’ve personally never had any issue using ours).
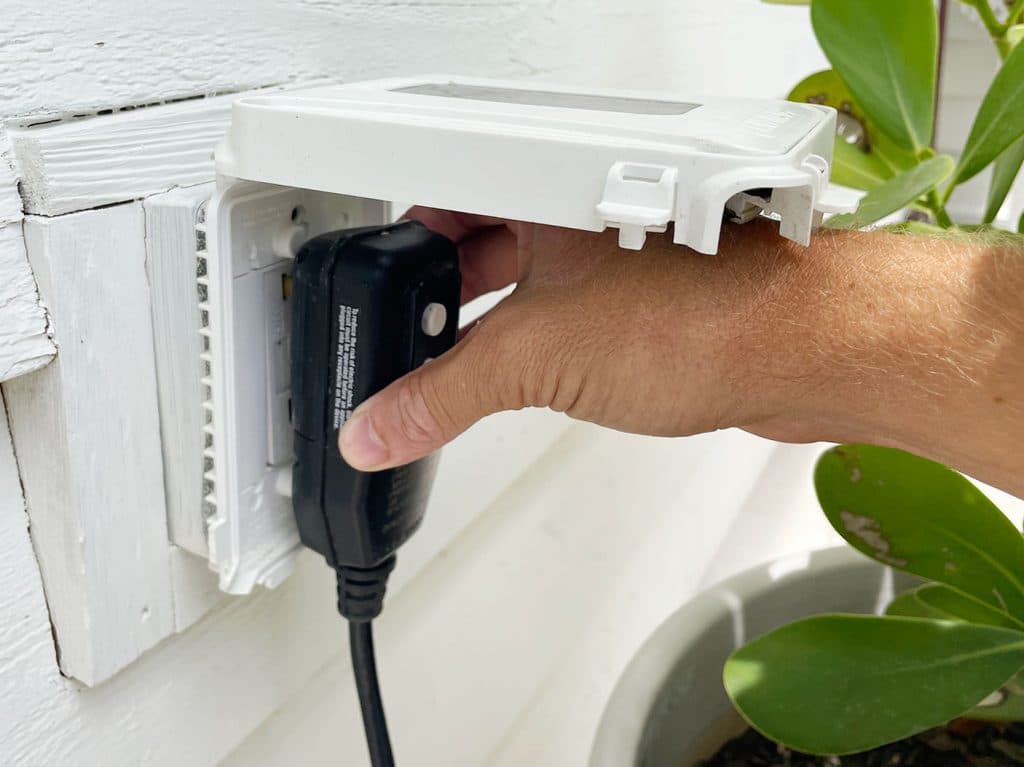
Step 5: Connect Your Power
With your water good to go, now you can plug in your pressure washer. Ours comes with a SUPER long cord, so you probably won’t need an extension cord, but you can always use one if necessary.
If you are connecting an extension cord, just be sure to elevate the connection point of the two plugs (like on a table, chair, or bucket) to prevent water from dripping toward the plugs.
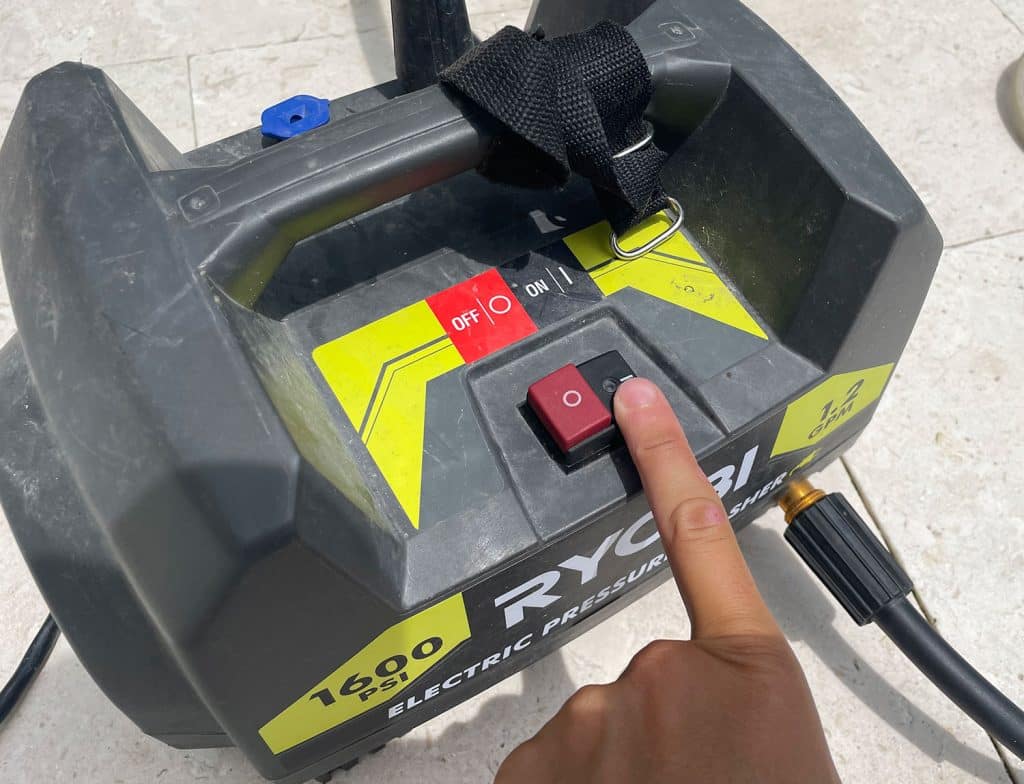
Step 6: Turn On Your Pressure Washer
Turn on the pressure washer using the black button on the top of the machine. You will immediately hear the device engage and you may see your high-pressure hose stiffen as pressurized water fills it up. If this does not happen, try pressing the test & reset buttons on the plug or on your GFI outlet. Those can be common culprits for your power not working.
Now your pressure washer is set up and ready for use!
Before You Start Cleaning With Your Pressure Washer
We cover a lot of tips along the way during the video (watching that is truly the best way to get a full primer on pressure washing), but here are a handful of things to keep in mind before you start your first pressure washing adventure.
Wear close-toed shoes and pants to help protect your feet and lower legs from any accidental pressurized spray. A direct, close-range spray can sting or even break the skin.
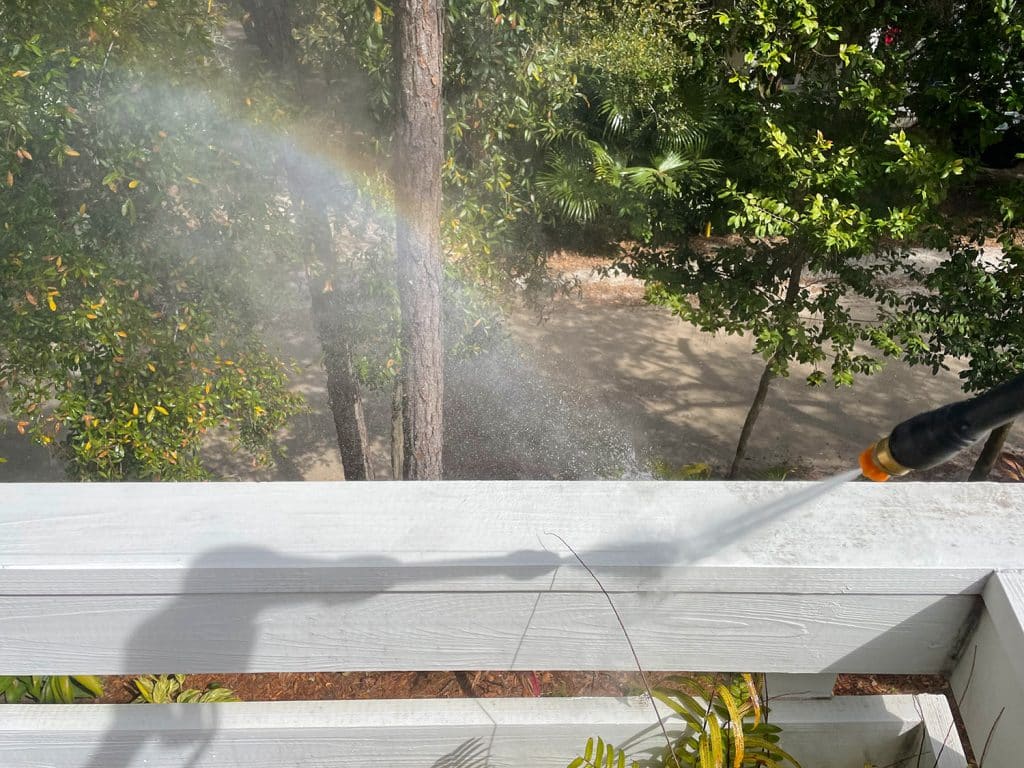
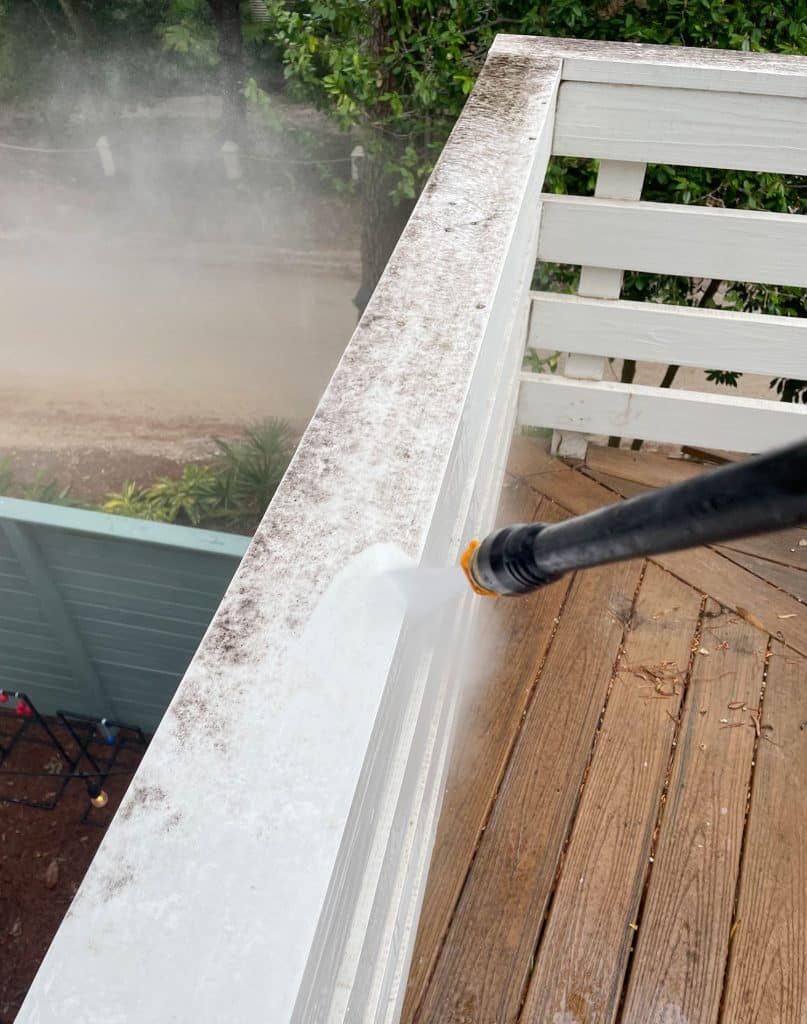
Clean top to bottom. If your to-do list includes multiple surfaces, start with the higher ones (railings, patio umbrellas, etc) and work down to lower ones (decks, patios).
Start slow and test in an inconspicuous spot first. It’s always good to start in a hidden spot (like the back of a pillow or the area of your deck that’s under your outdoor sofa). If it’s your first time pressure washing a particular material or surface, start with low pressure and gradually increase it as needed (by bringing your wand closer or changing nozzles) to make sure you’re not damaging the surface. Don’t start by blasting something with the nozzle mere inches away ever.
Beware of sensitive materials like windows, soft woods, & vinyl siding that can be easily broken or damaged with too much pressure. We generally tend to stick to cleaning concrete, outdoor stone or tile, Trex or wood decking, brick paths or patios, wood or metal railings, and outdoor furniture/pillows as well as outdoor AND indoor rugs (more on that here). You obviously want the nozzle further away from fabric than, say, concrete.
Mind your cords. This pressure washer is super light and portable, but keep an eye on your power cord and water hoses as you move it to make sure you’re not kinking anything or creating tripping hazards.
What We Clean With Our Pressure Washer
We typically break out our pressure washer 2-3 times a year to keep our various outdoor spaces looking fresh and clean. Between all of our trees, our clay/sand road, and the salty beach air, things can get grimy – so we usually do a pretty thorough cleaning in the spring to wash off the dirt, pollen, or mildew that collected on things over the winter. Then we might do some quicker “touch up” cleanings as needed in the summer and fall.
We use it on a variety of surfaces, but here are the primary ones that we’ll cover today:
Composite Decking
Painted Railings
Outdoor Fabrics
Stone Patios
Composite Decking
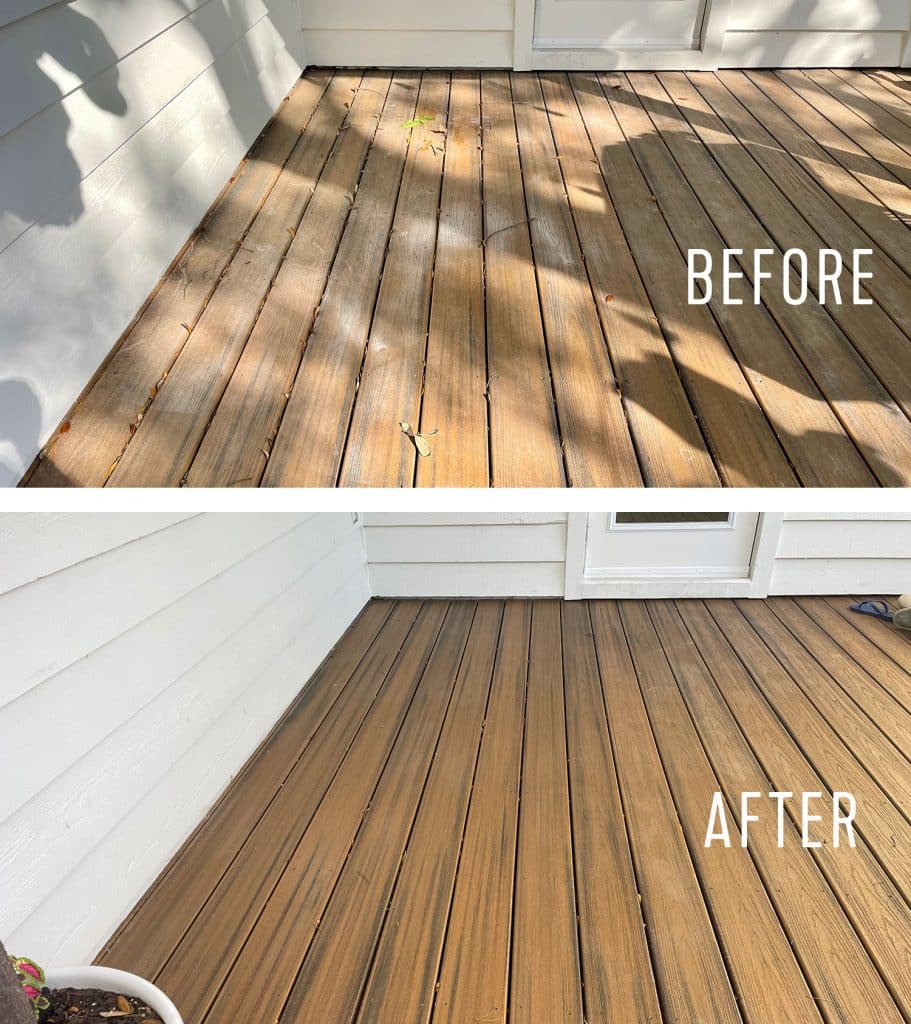
We have Trex decking on our porches and we’ve found the pressure washer to be a great way to get dirt, dust, and sand build-up off of them. The woodgrain texture on the Trex catches a lot of grime and we hadn’t cleaned our upstairs deck in a while, so it had quite the layer of black tree dirt. That made the job super satisfying though…
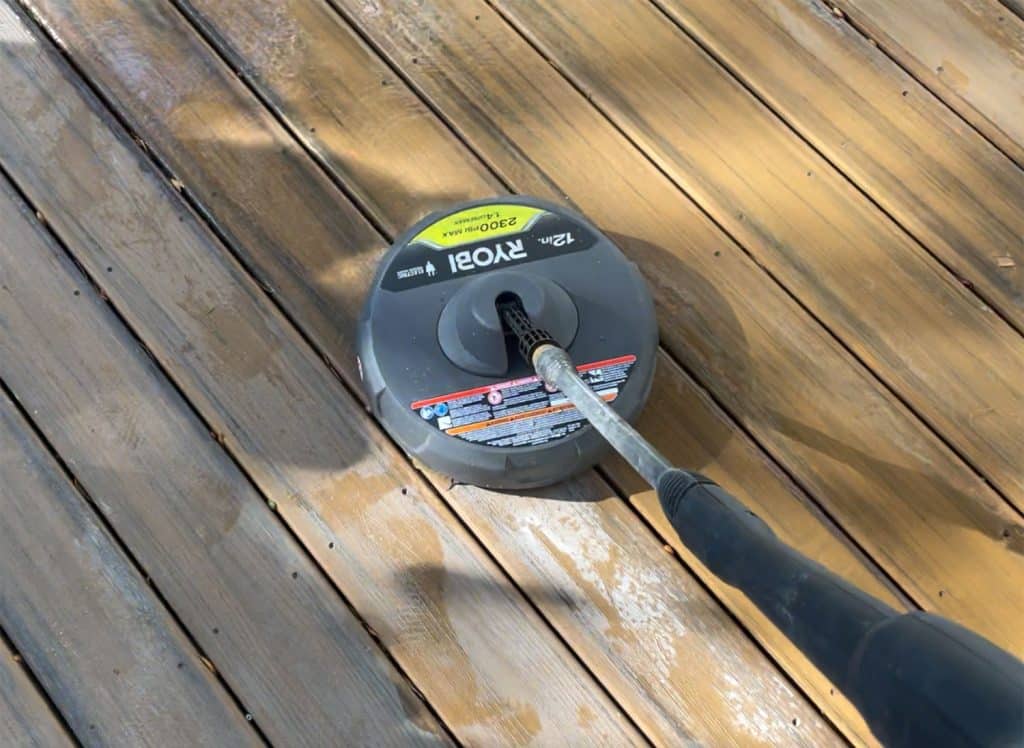
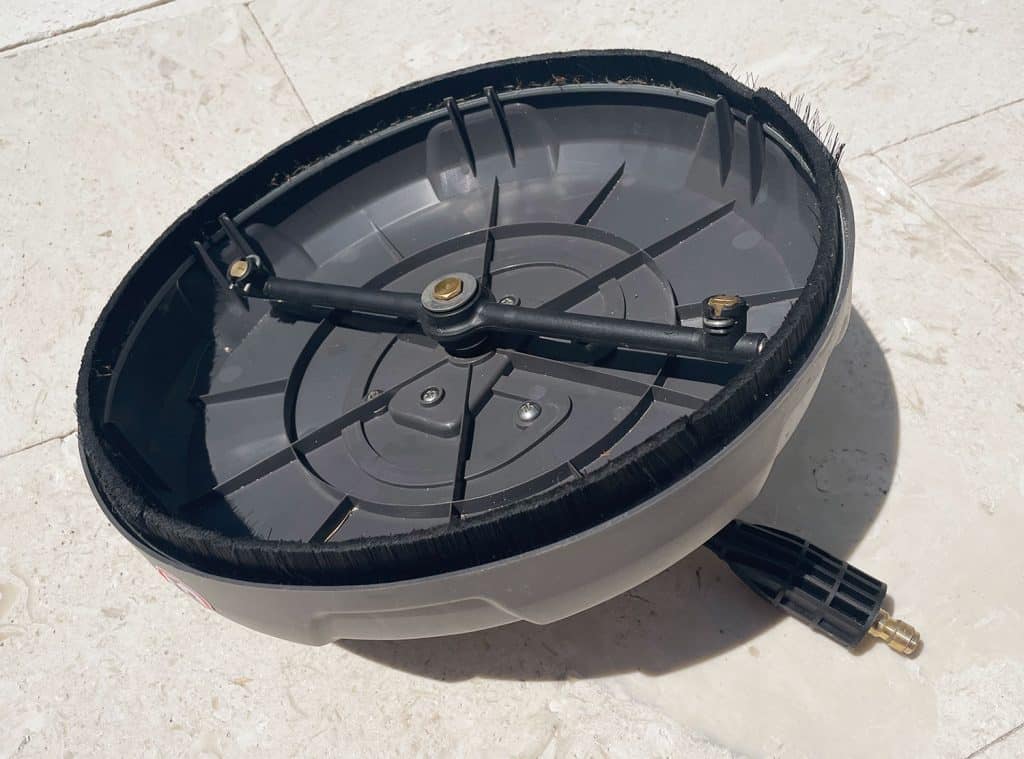
Doing that large upstairs deck was pretty tedious because we had to be slow & systematic so we didn’t miss any boards (sometimes it’s hard to see what’s still dirty once everything has gotten wet). So before doing my downstairs decks I bought this $40 surface cleaning attachment for electric pressure washers that a bunch of you have recommended for doing larger “floor” surfaces faster. Boy was it a game-changer!
It attaches to my spray wand just like any other nozzle does, but provides a much larger 12″ cleaning surface, which made pressure washing my decks SO. MUCH. FASTER.
Not only was it faster, but I didn’t worry as much about leaving “streaks” if I missed a spot or only cleaned part of a particular board. You can see below that our decks can get a lot of sandy footprints and settled sand on them. But they look much fresher now!
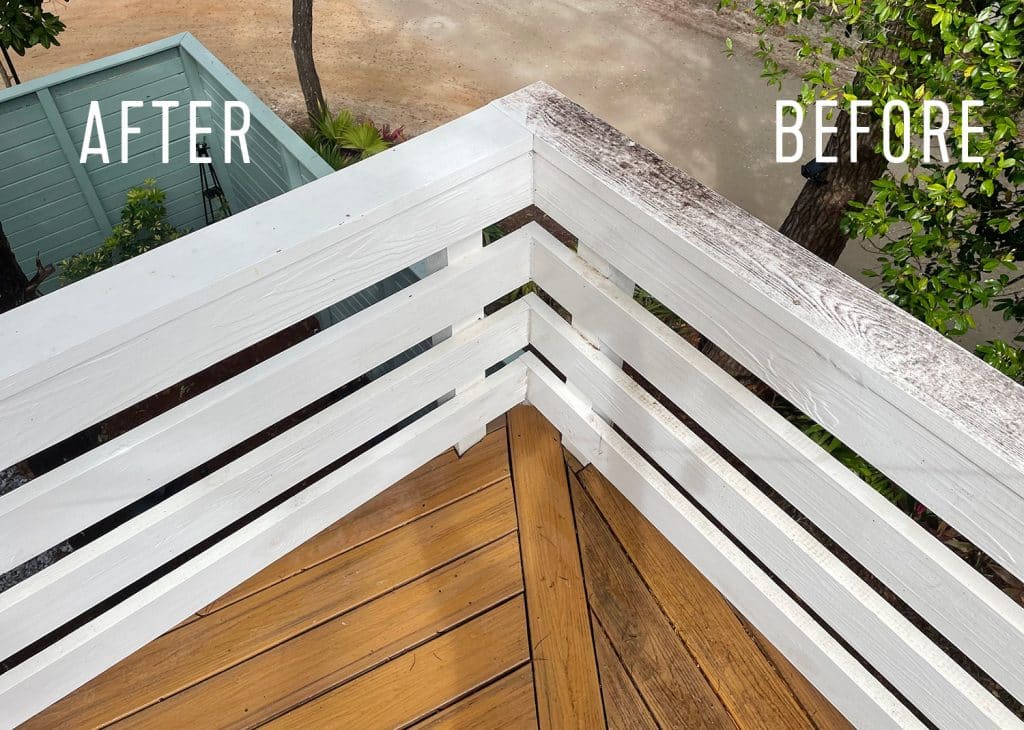
Railings
Another area that we hadn’t cleaned in a while was the upstairs deck railings, which had a build-up of tree dirt on them just like the Trex decking.
These railings are painted wood, and you should always use a bit of caution when pressure washing painted surfaces because the pressure can cause the paint to chip or flake. Also, if any areas have started to rot beneath the paint, the pressure washer can make the situation worse.
We just always keep a close eye on the surface as we clean, and lessen the pressure (step back!) or skip a particular spot if the paint isn’t holding up. If your biggest nightmare is some flaked paint, I’m also here to assure you that a few paint touch-ups aren’t a big deal. We’ve done them and they’re never detectible once it’s dry.
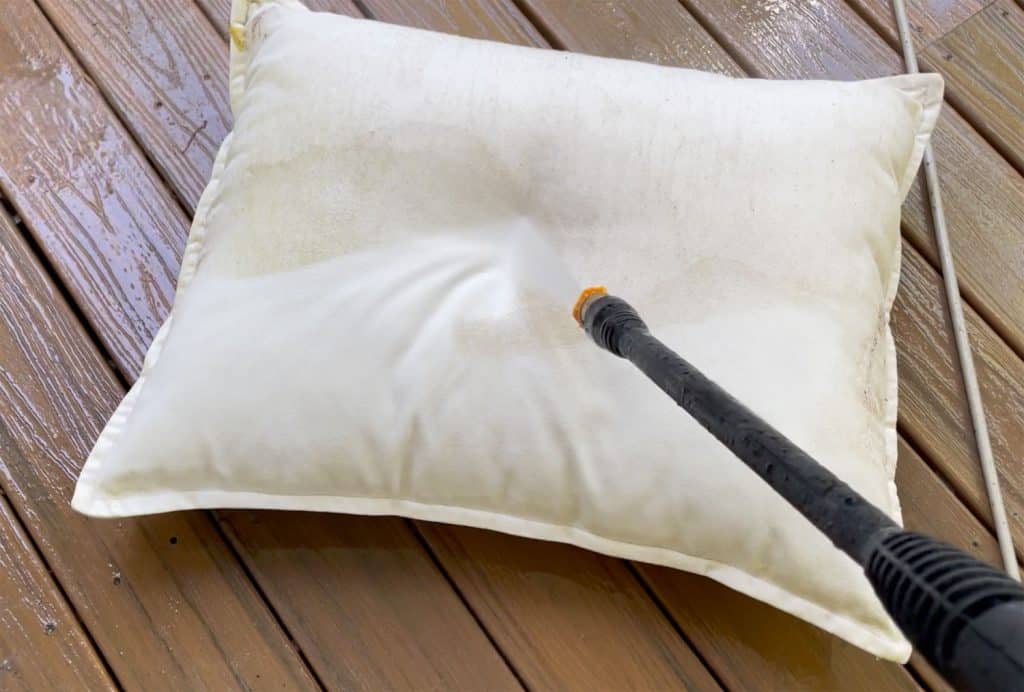
Outdoor Fabrics
We’ve definitely extended the life of more than a few outdoor pillows and cushions thanks to our pressure washer. It’s just especially important with fabrics to take it slow because too much pressure can cause the fabric to tear or fray. So start on the back and with low pressure, especially if it’s the first time you’re cleaning that material.
Also, keep in mind that the process may not be perfect. Some stains may only get lighter, not disappear entirely. So you may need to attack certain spots with an outdoor cleaner or fabric cleaner to finish the job. But for us, we find the pressure washer does the bulk of the work getting our outdoor fabrics ready for spring. Hot tip: put them in the sun to dry. That does a great job of lightly bleaching some more stubborn stains than if you set them out to dry in the shade.
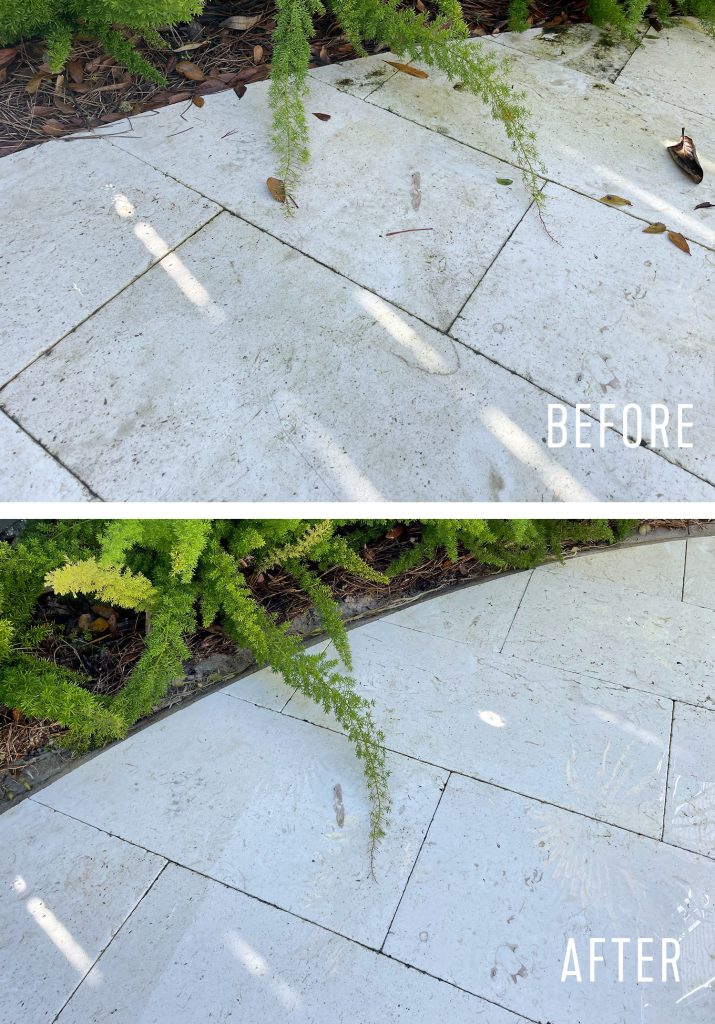
Stone Patio
Pressure washing is a great way to get patios, driveways, sidewalks, and even some decking to look new again. This was the first season we used it to clean the stone patio around our pool, which had collected a lot of green scum in some of the more shaded areas of the yard (under and behind the lounge chairs for example).
The video shows how satisfying this really was, but the before & afters below give you an idea as well. It’s a bit hard to tell because the stone itself has some darker shell “spots” in it (and the surface is wet in the after shot), but this whole area looks totally redeemed.
*Everything except the left corner of the patio was cleaned in the photo above – see that line of darker scum? Such a difference.
When you’re cleaning patios or other stone surfaces, just be mindful of any polymeric sand (or regular sand) that you may have between the cracks. The pressure washer may blow that loose and you’ll need to refill it.
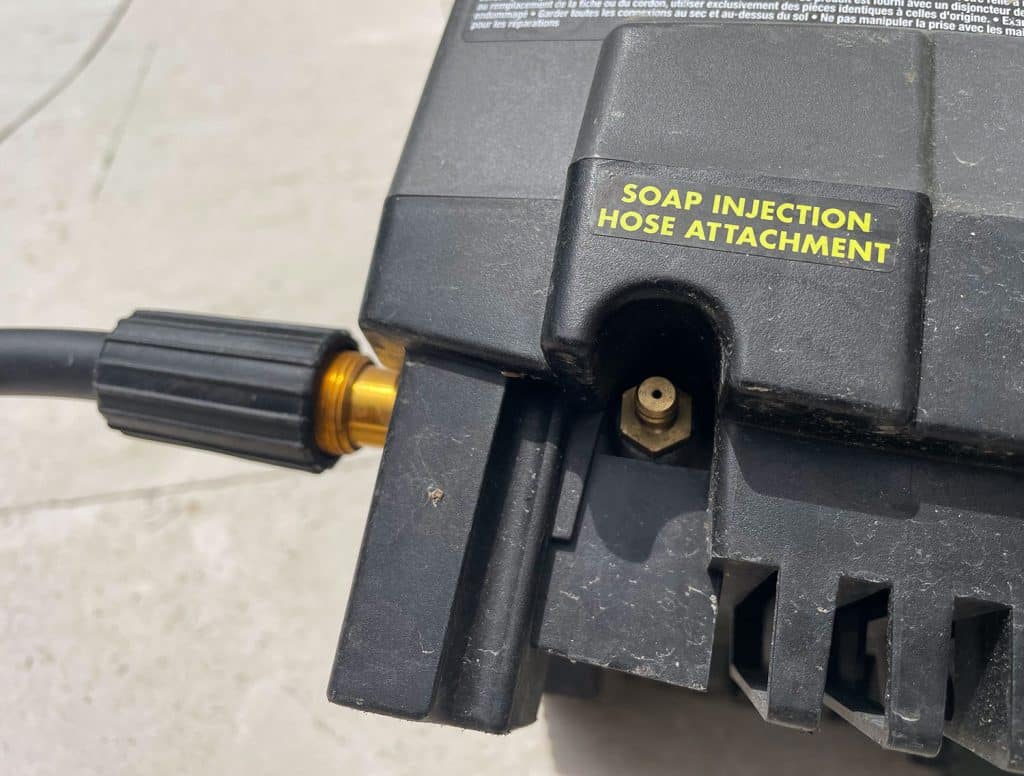
We also get asked very often about whether or not we add some sort of soap or cleaner to our pressure washer. While the machine DOES come with a way to wash with soap (it includes a hose that you can attach and connect to your bottle of soap), honestly, we’ve never used it. We just spray outdoor cleaners on certain items (mainly stubborn fabric stains – for example, we use this fabric cleaner) by hand and then pressure wash them to move those suds all around and rinse them away.
The last thing to keep in mind when cleaning outdoor fabrics is to make sure you have a sunny spot to let them FULLY dry. Otherwise, you may just encourage more mildew build-up.
Other Uses For Your Pressure Washer
While those are the ways that we currently use our pressure washer, there a TONS of other ways they can be useful around the house. Here are some previous posts we’ve written about other pressure washing adventures:
Putting Your Pressure Washer Away
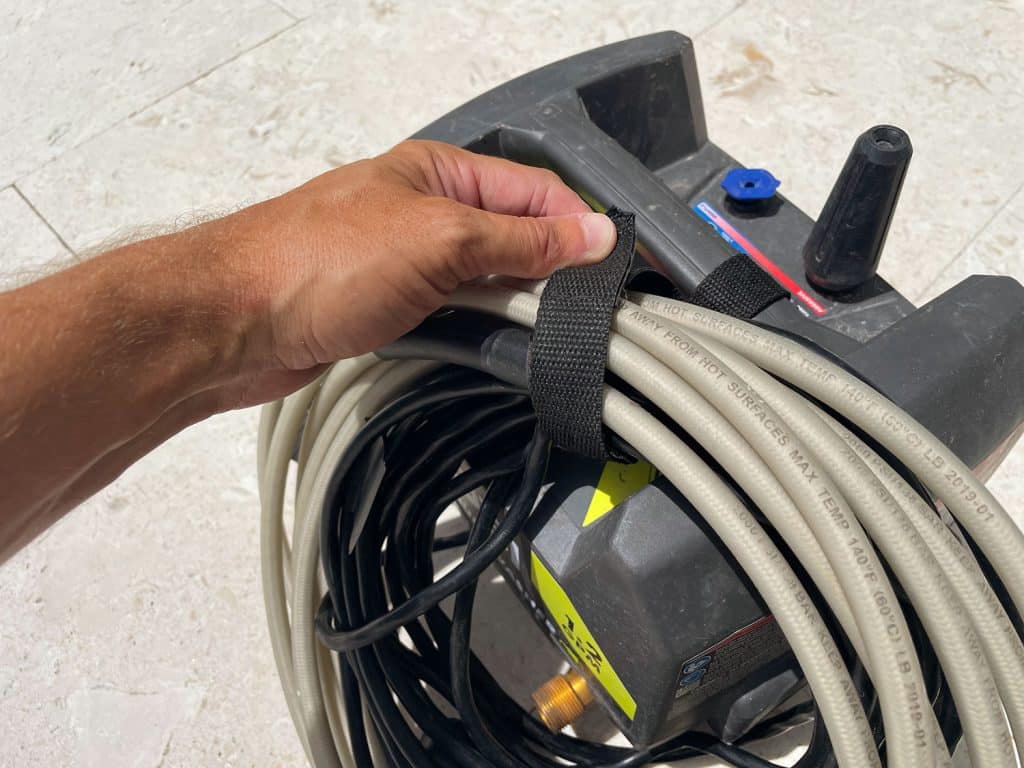
Once you’ve finished your cleaning, disconnecting and storing your pressure washer is even easier than setting it up. You’re basically reversing the steps:
Turn it off and unplug it
Turn off your water
Spray the wand for several seconds to release the water pressure (it will make disconnecting the hoses easier)
Disconnect your garden hose
Disconnect your high-pressure hose from the pressure washer (we leave it attached to our spray wand, but you can disconnect that end too)
Once everything is disconnected, there’s a handy velcro strap on the handle of the machine to help you wrangle all of your cords and hoses. It’s one of our favorite features because it makes storing it so much easier! You can see it in action in the video 😉
So, there you have it. All the info I can possibly think of on the topic of pressure washing. I hope it leaves you feeling confident that you can tackle this project yourself (you can!). I’m ridiculously glad that we tried one out many years ago and have never regretted owning one since!
Sidenote: we finally better-categorized and updated our Amazon shop to include a lot of the more recent things we have been loving – like Sherry’s beloved robot vacuum, some new favorite family board games, our tried and true beach gear, favorite recent reads, etc – so that’s all right here.
*This post contains affiliate links, so we may earn a small commission when you make a purchase through links on our site at no additional cost to you.