.tasty-pins-banner-container{display:block;margin-bottom:20px;position:relative;width:-moz-fit-content;width:fit-content}.tasty-pins-banner-container a{cursor:pointer;display:flex;font-size:14px;font-weight:700;letter-spacing:1px;line-height:1.8em;text-transform:uppercase}.tasty-pins-banner-container a:hover{opacity:1}.tasty-pins-banner-container .tasty-pins-banner{align-items:center;bottom:0;cursor:pointer;display:flex;justify-content:center;left:0;padding-bottom:1em;padding-top:1em;position:absolute;right:0}.tasty-pins-banner-container .tasty-pins-banner svg{margin-right:4px;width:32px}.tasty-pins-banner-container .tasty-pins-banner span{margin-top:4px}.tasty-pins-banner-container a.tasty-pins-banner{text-decoration:none}.tasty-pins-banner-container a.tasty-pins-banner:hover{opacity:.8}.tasty-pins-banner-container a.tasty-pins-banner-image-link{flex-direction:column}.tasty-pins-banner-container a img{margin-bottom:0}.entry-content .wp-block-image .tasty-pins-banner-container img{margin-bottom:0;padding-bottom:0}#et-boc .et-l div .et_pb_image_wrap .tasty-pins-banner-container .tasty-pins-banner{padding-bottom:1em!important;padding-top:1em;text-decoration:none}#et-boc .et-l div .et_pb_image_wrap .tasty-pins-banner-container a.tasty-pins-banner{cursor:pointer;display:flex;font-size:14px;font-weight:700;line-height:1.8em;text-transform:uppercase}#et-boc .et-l div .et_pb_image_wrap .tasty-pins-banner-container a.tasty-pins-banner span{letter-spacing:2px;margin-top:4px}.et-db #et-boc .et-l .et_pb_module .tasty-pins-banner-container a:not(.wc-forward){padding-bottom:0}Photo by Maude Frédérique Lavoie on Unsplash
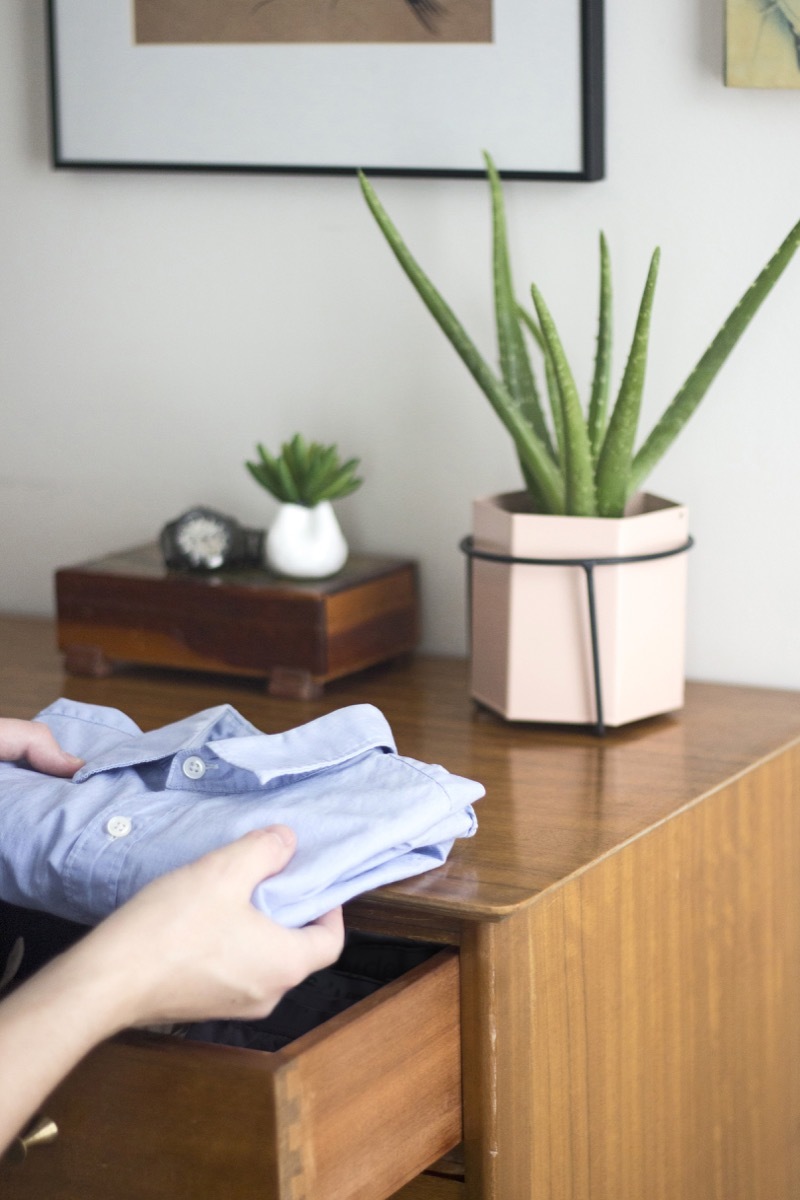
There’s nothing quite like the frustration of trying to find a shirt in a dresser drawer packed full of balled up clothes. There’s no order, and everything is kind of just shoved in there. While it may be tempting to just close up your dresser drawers when they start to get chaotic, being able to have everything nicely folded and visible will make getting ready in the morning a million times easier and maximize your storage space. So, rather than just tossing that tee in the back of the drawer, fold it properly the first time so you can find it when you need it. Keep reading for the best way to fold shirts, pants, socks, even underwear!
Watch this video on how to fold everything in your closet, and keep reading for the full details.
The easiest way to fold laundry is on a clean, flat surface. So clear off your coffee table or dining buffet, and let’s get to folding.
Table of contents
Before we get into how to fold t-shirts, I wanted to mention which kinds of shirts you should be storing in your dresser, versus hanging in the closet. Generally speaking, you want to fold t-shirts, tanks, undershirts, or anything that isn’t heavily affected by wrinkles. We’ll cover how to fold a dress shirt, but personally I prefer to hang dress shirts to prevent creases. You always want to fold a sweater, never hang. Using a hanger will pull on the weave of a sweater, leaving stretch marks at the neck and shoulders.
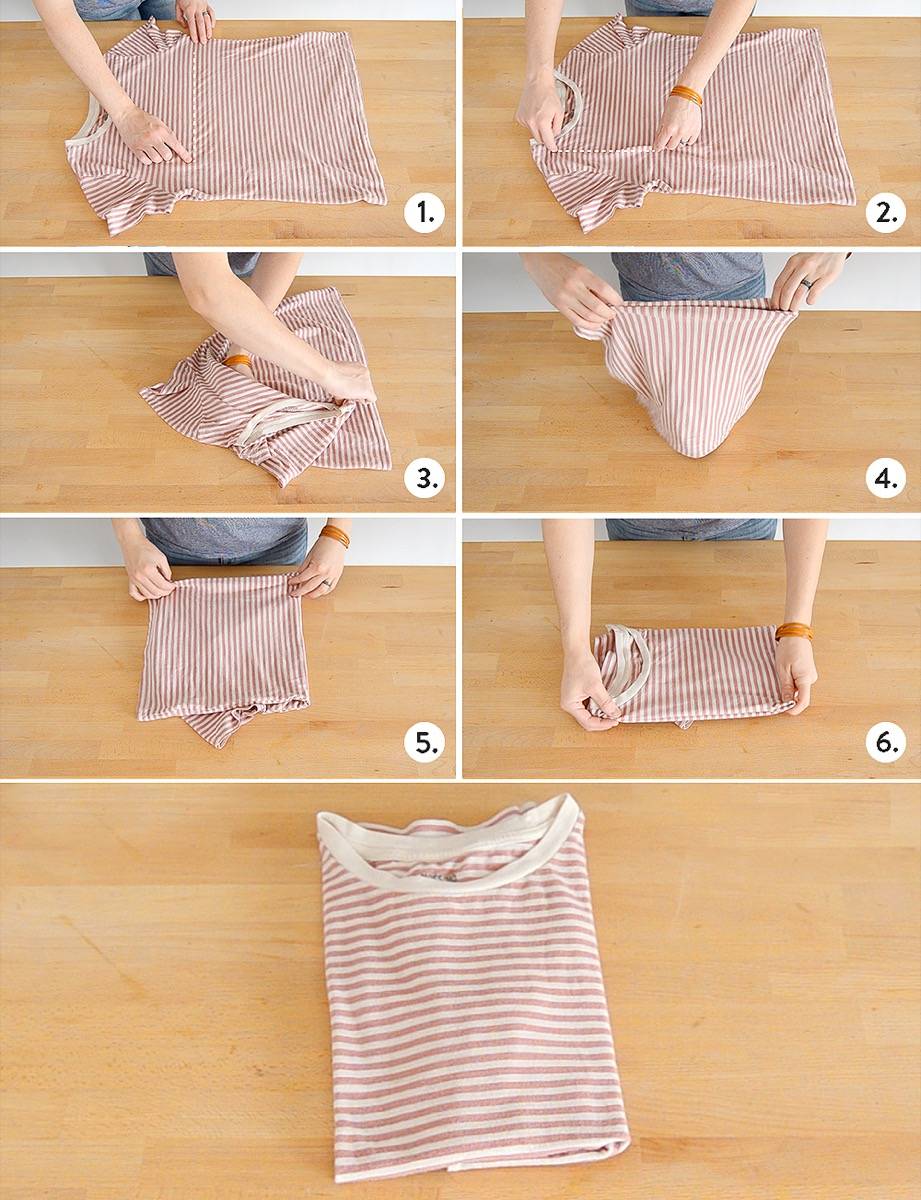
How to fold a t-shirt
This is the famous “two second” folding trick—however, on the first few tries it’ll take you just a little longer. It might seem like magic, but after a bit of practice, you’ll be folding your shirts in a jiffy!
Make an invisible line across the chest of the shirt, stopping just past where the collar ends. Pinch here, making sure to grab both the front and back fabric of the shirt.
Make an invisible line up to the top of the shirt, and pinch here with your second hand.
Still pinching the fabric, move your second hand down to the bottom of the shirt. Pinch the fabric here too, still holding onto the top of the shirt.
Uncross your arms.
Lay the shirt down.
Fold in half.
Fold in half again if you want to save even more space in your dresser.
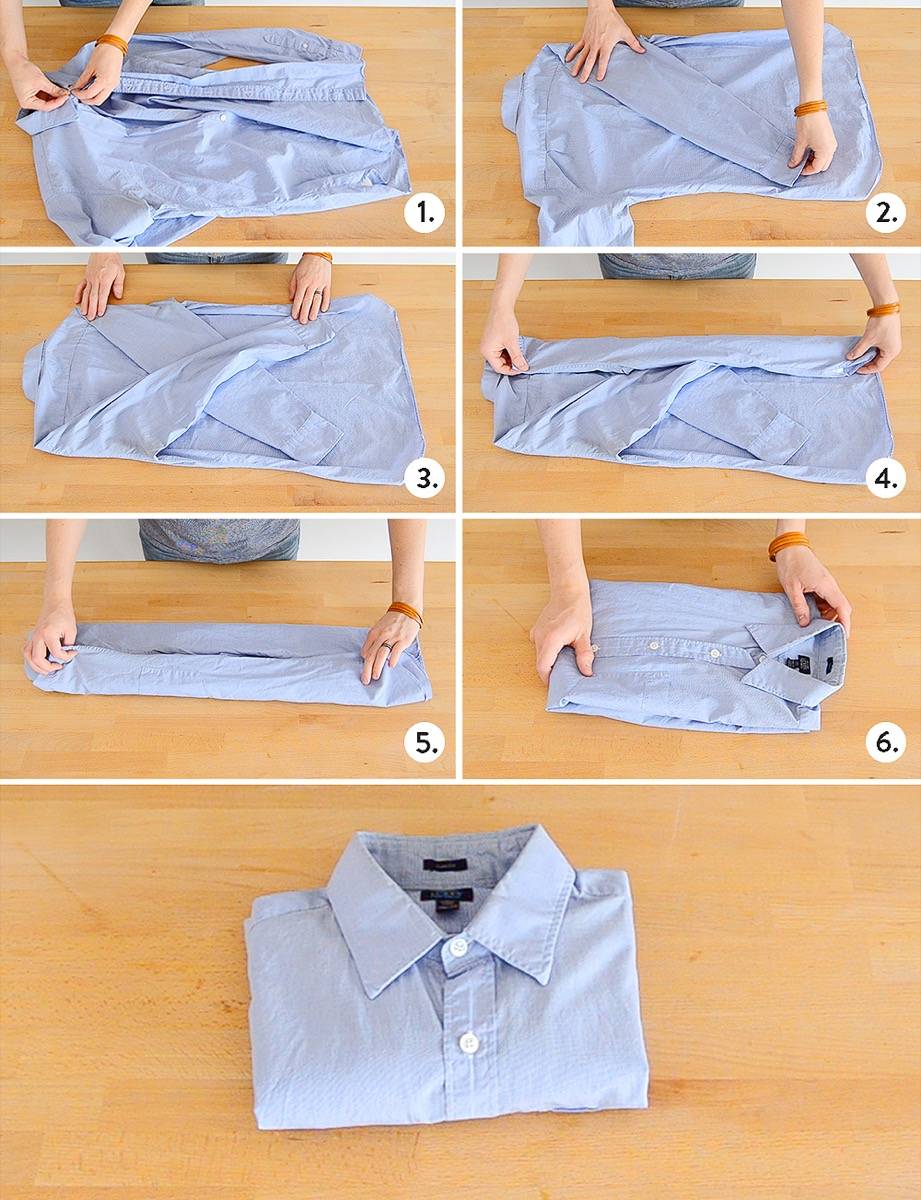
How to fold a dress shirt
Whether you’re packing for a trip or packing your dresser, you want to learn how to fold a dress shirt in a way that minimizes wrinkles, and protects the collar. Here’s how:
Button up the shirt.
Flip the shirt over, and fold the sleeve over so it crosses the back of the shirt.
Fold the second sleeve over the same way.
Fold in the shoulder, so it meets the middle of the shirt.
Fold in the second shoulder in the same way.
Fold the shirt in half.
If you need to save more space, fold in half again.
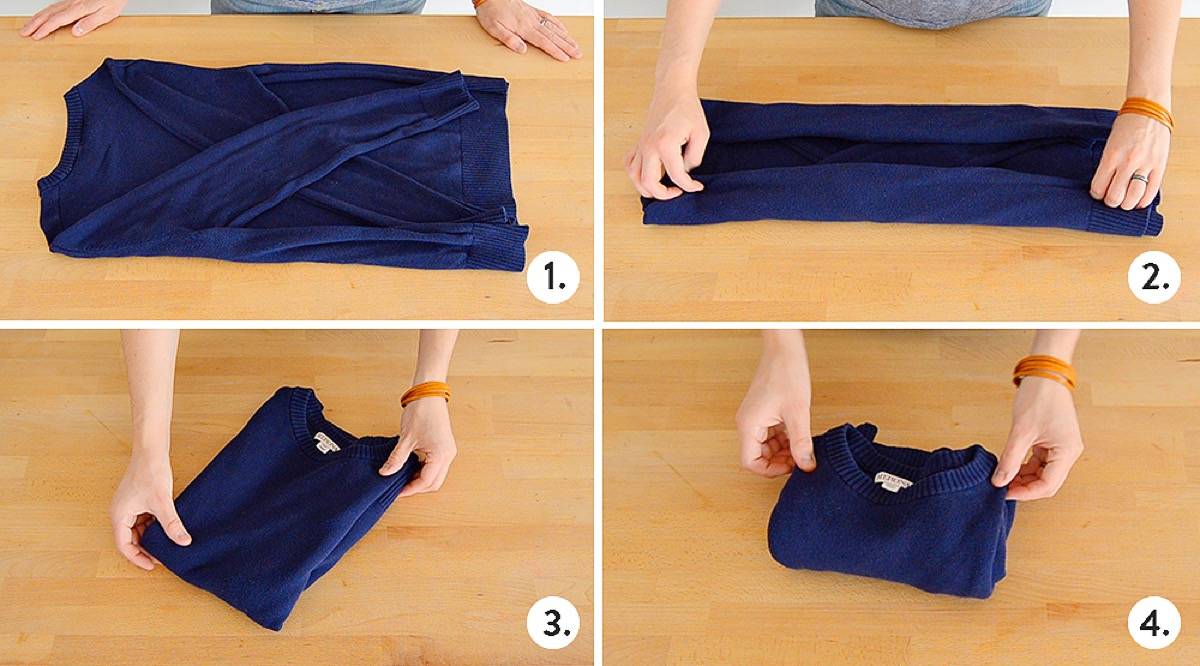
How to fold a sweater
Hey, guess what? Now that you’ve learned how to fold a dress shirt, you can fold any long-sleeved shirt! Simply fold the same way.
Flip the shirt over, and fold in the sleeves.
Fold in the shoulders to the middle of the back of the shirt.
Fold the shirt in half.
Fold in half again if you need to save more room.
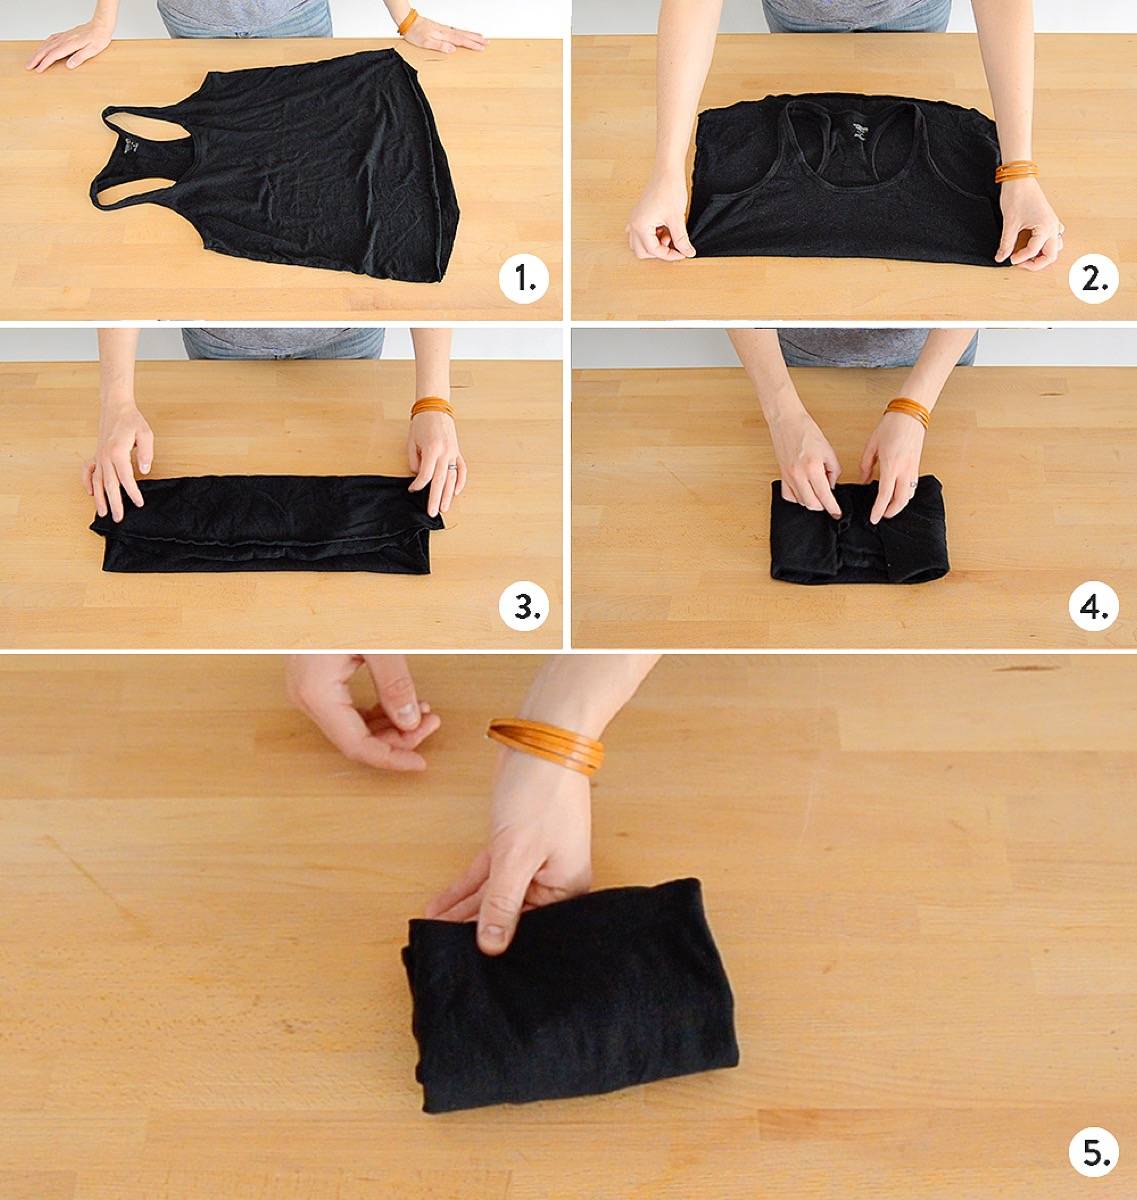
How to fold a shirt with straps
Tank tops and spaghetti strap shirts are a little awkward looking when folded, unless you know the secret (psst – the secret is to hide the straps!).
Lay the shirt face up.
Fold the shirt in half, with the top of the straps meeting the bottom of the shirt.
Fold in half again.
Fold the sides in, meeting in the middle.
Fold in half again.
Now that our tops are folded and put away, let’s talk bottoms. Folding pants in a way that keeps them wrinkle-free is simple.
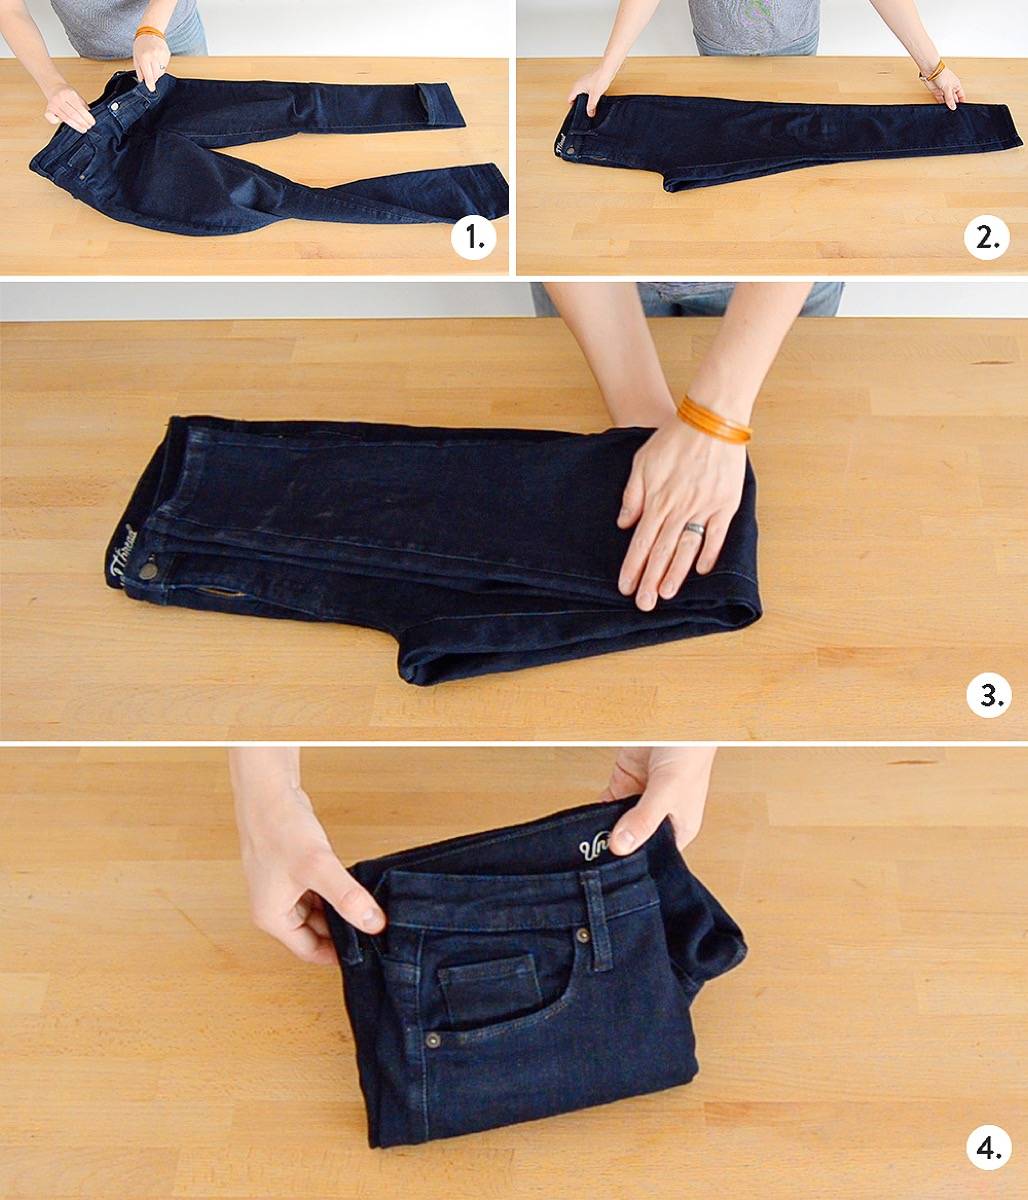
How to fold pants and jeans
Button the waistband.
Fold them in half, front side out.
Fold in half, lengthwise.
Fold then in thirds, lengthwise.
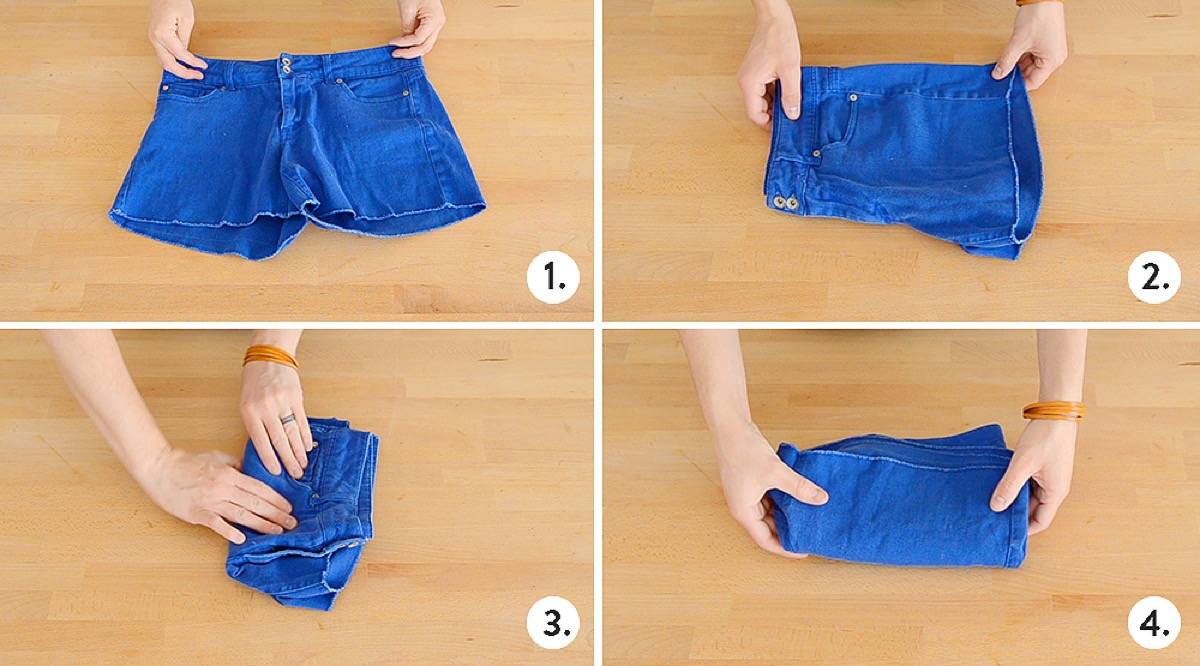
How to fold shorts
Folding shorts is just like folding pants, only… shorter!
Button the waistband.
Fold them in half, front side out.
If your shorts are short, fold them in half, lengthwise.
If your shorts are longer, fold them in thirds, lengthwise.
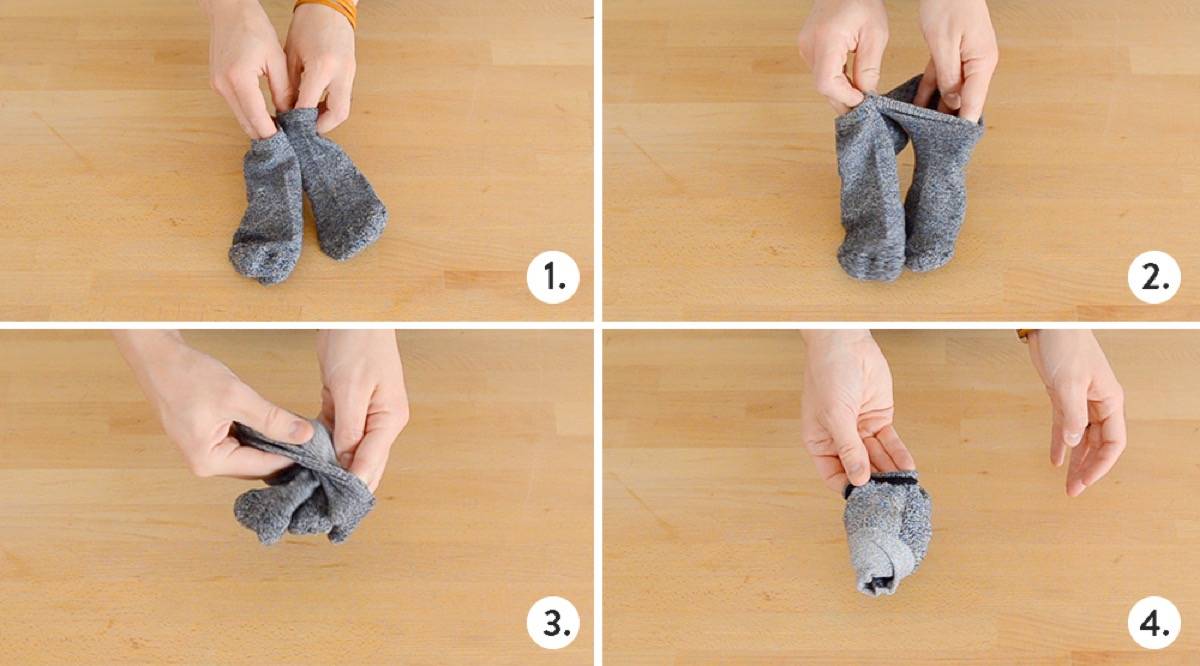
How to fold socks with an ankle (knee-high, crew, quarter-length, etc.)
You probably already know how to fold socks, but let’s go over it again, shall we?
Line the socks up, side by side.
Put your hand inside one of the socks, opening it up.
Grab onto the other sock through the first, and begin to turn the first sock inside out.
Turn the first sock inside out entirely.
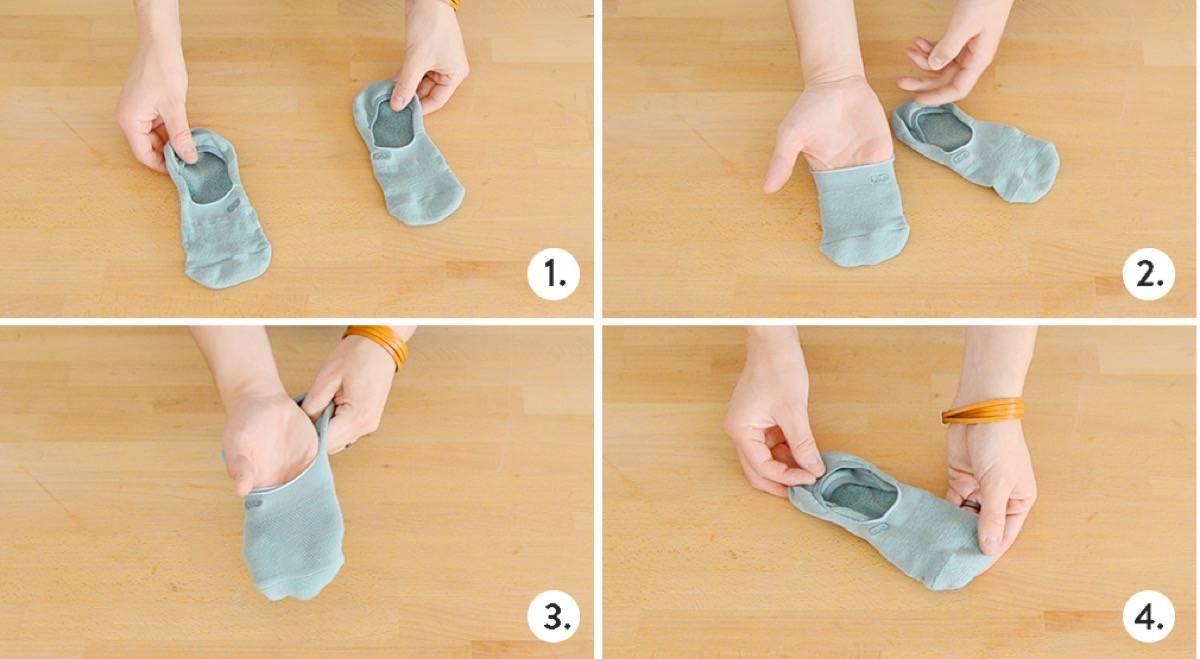
How to fold socks without an ankle, a.k.a. no-show socks or low-cut socks
So, what about socks that are teeny-tiny? We can fold those too!
Lay socks together, pointing in the same direction.
Put your hand inside one of the socks.
Put your socked-hand inside the other sock.
Pull your hand out, leaving one sock inside the other. Done!
How to fold a bra
Bras are like necklaces, they get all tangled up when you’re not looking! Keep them organized by folding them like this:
Open the bra.
Fold in half, with both cups pointing in the same direction, nesting into one another.
Tuck the straps into the cups.
Done!
How to fold underwear
Finally, let’s talk about how to fold underwear. Do you fold your undies? A lot of us don’t, but folding them sure makes it easy to see what you have available in your drawer.
.tasty-pins-banner-container{display:block;margin-bottom:20px;position:relative;width:-moz-fit-content;width:fit-content}.tasty-pins-banner-container a{cursor:pointer;display:flex;font-size:14px;font-weight:700;letter-spacing:1px;line-height:1.8em;text-transform:uppercase}.tasty-pins-banner-container a:hover{opacity:1}.tasty-pins-banner-container .tasty-pins-banner{align-items:center;bottom:0;cursor:pointer;display:flex;justify-content:center;left:0;padding-bottom:1em;padding-top:1em;position:absolute;right:0}.tasty-pins-banner-container .tasty-pins-banner svg{margin-right:4px;width:32px}.tasty-pins-banner-container .tasty-pins-banner span{margin-top:4px}.tasty-pins-banner-container a.tasty-pins-banner{text-decoration:none}.tasty-pins-banner-container a.tasty-pins-banner:hover{opacity:.8}.tasty-pins-banner-container a.tasty-pins-banner-image-link{flex-direction:column}.tasty-pins-banner-container a img{margin-bottom:0}.entry-content .wp-block-image .tasty-pins-banner-container img{margin-bottom:0;padding-bottom:0}#et-boc .et-l div .et_pb_image_wrap .tasty-pins-banner-container .tasty-pins-banner{padding-bottom:1em!important;padding-top:1em;text-decoration:none}#et-boc .et-l div .et_pb_image_wrap .tasty-pins-banner-container a.tasty-pins-banner{cursor:pointer;display:flex;font-size:14px;font-weight:700;line-height:1.8em;text-transform:uppercase}#et-boc .et-l div .et_pb_image_wrap .tasty-pins-banner-container a.tasty-pins-banner span{letter-spacing:2px;margin-top:4px}.et-db #et-boc .et-l .et_pb_module .tasty-pins-banner-container a:not(.wc-forward){padding-bottom:0}
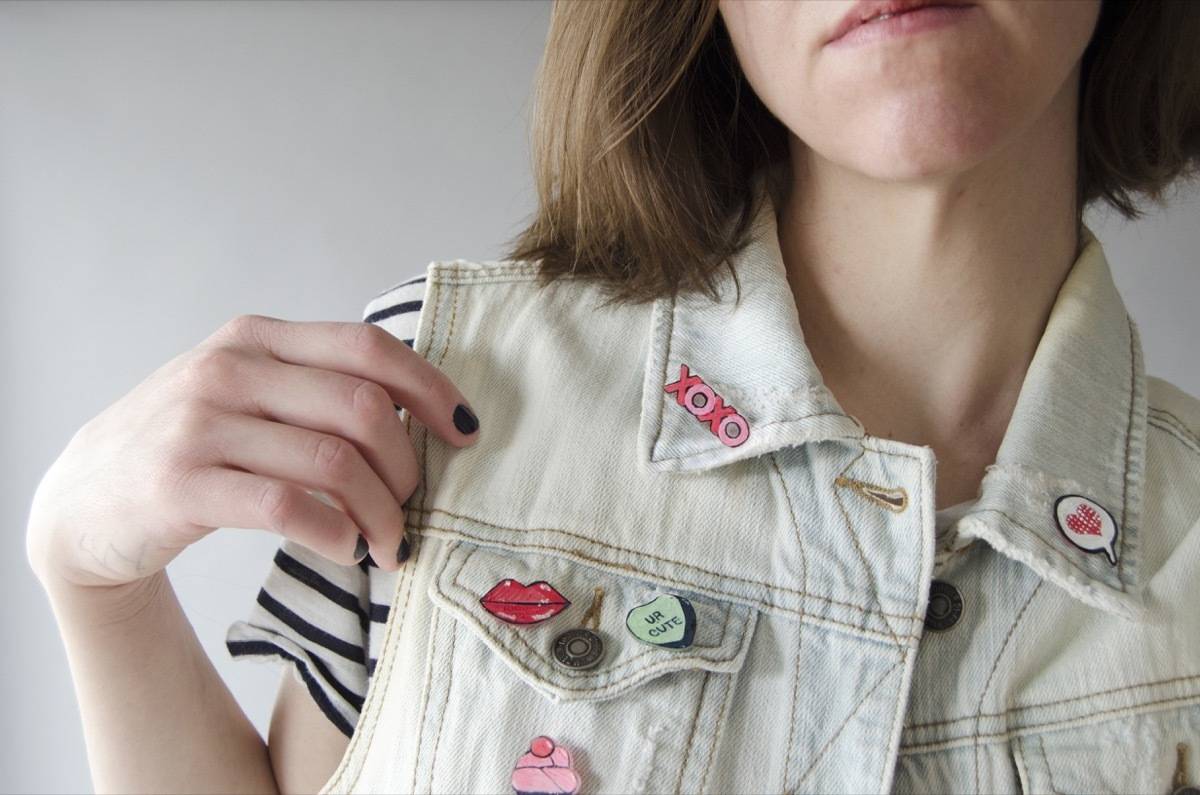
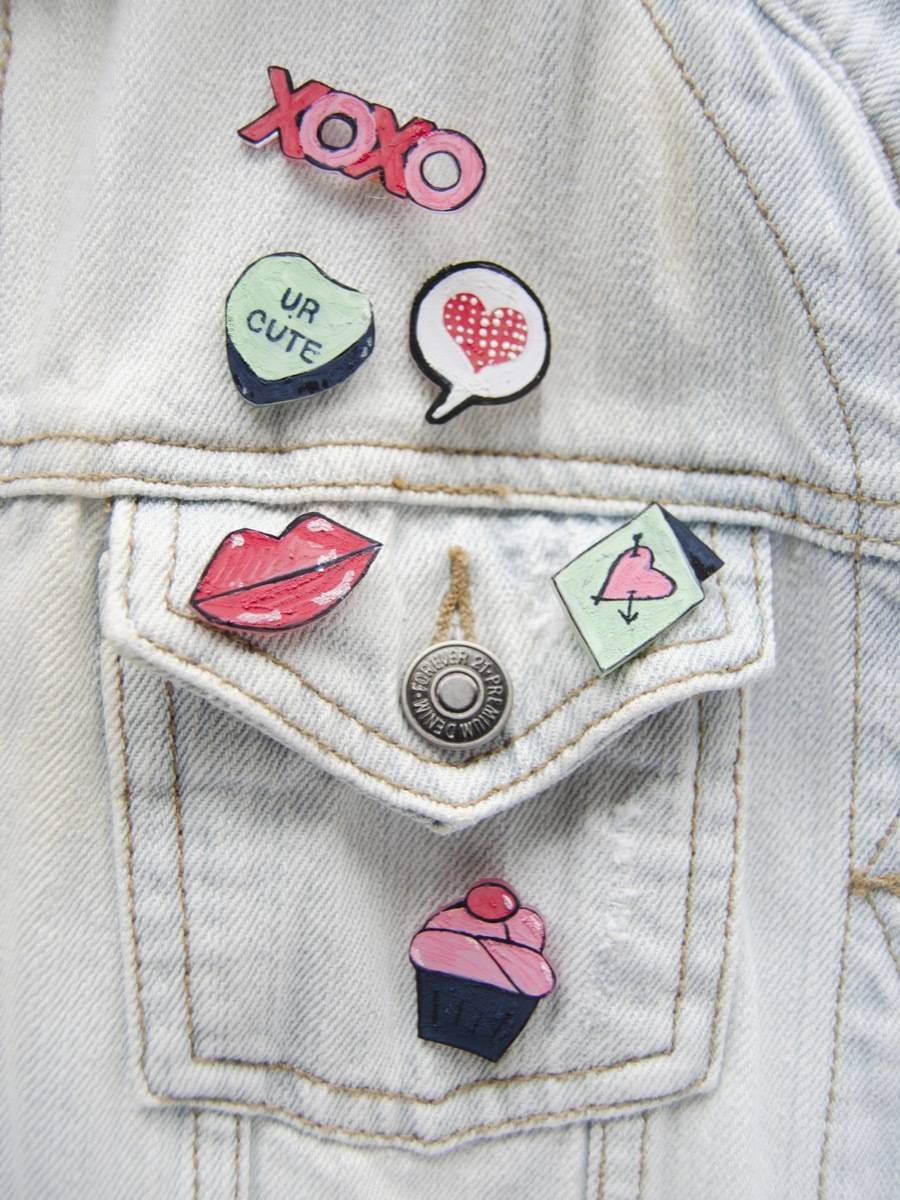
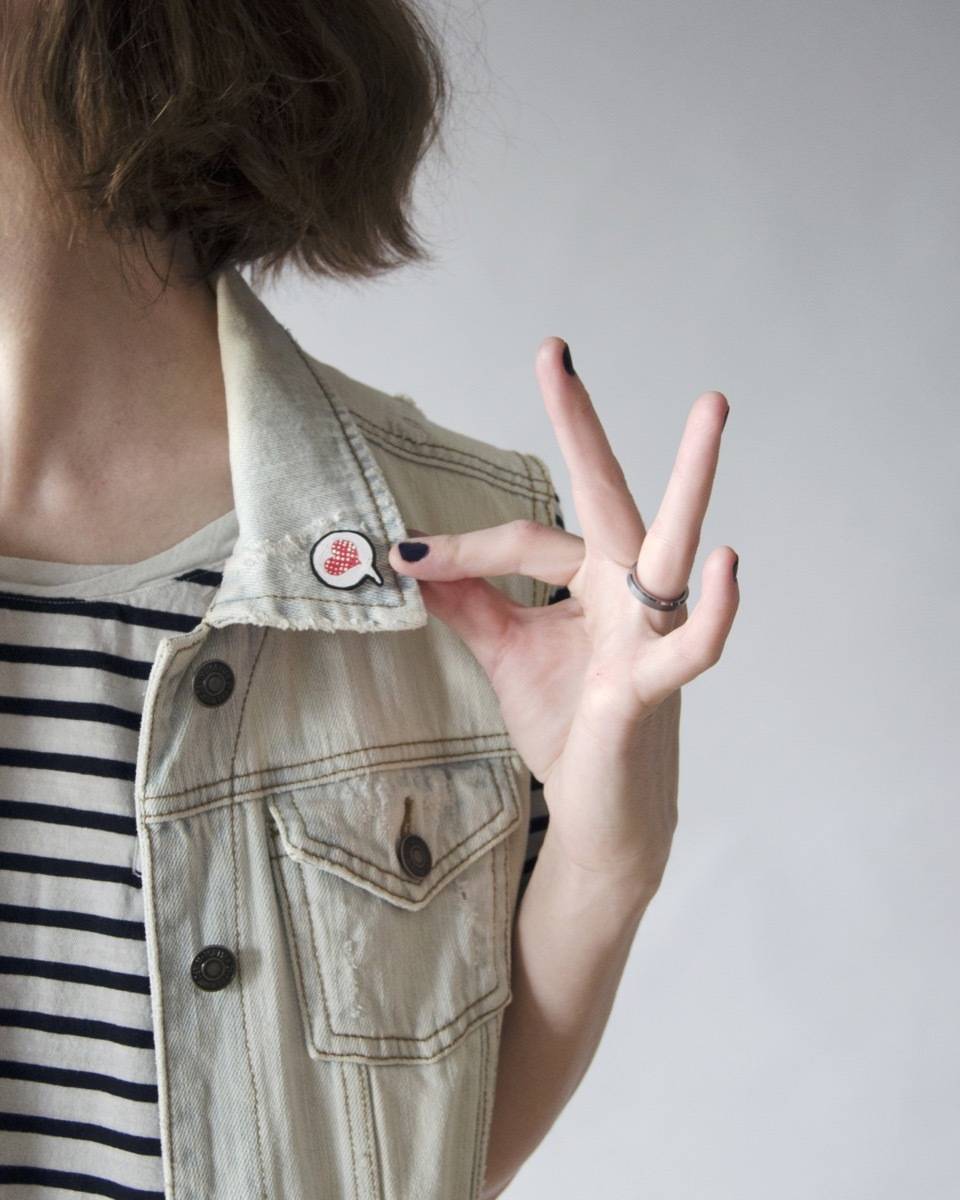
It’s almost Valentine’s Day! I love this holiday because: A. love is a lovely thing, B. exchanging cards or little gifts is always fun, and C. chocolate! What’s not to enjoy? You know what else I’m totally loving right now? Enamel pins (hello 90s fashion – it’s nice to see you again!). If you’re looking for a cute gift to give to your friends, coworkers, or gal-pals, these faux enamel pins are quick and easy to make.
Watch our video tutorial for the walkthrough, or follow the steps below. The fun part about this DIY project is that there is lots of room for creativity. You can personalize these Valentine’s pins any way you want, or you can use the printable template available below!
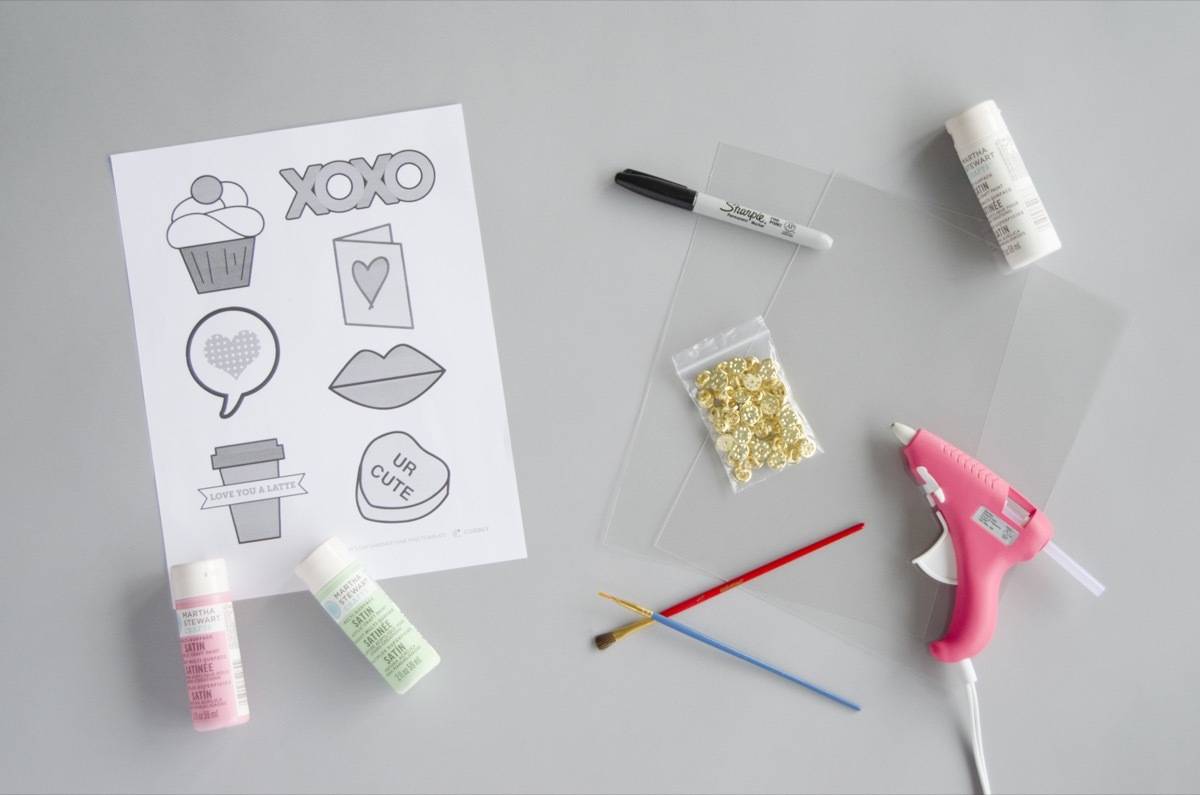
Materials
If you want to make these faux enamel pins in even less time, you can purchase printable shrink filmand print these designs directly onto the shrink paper!
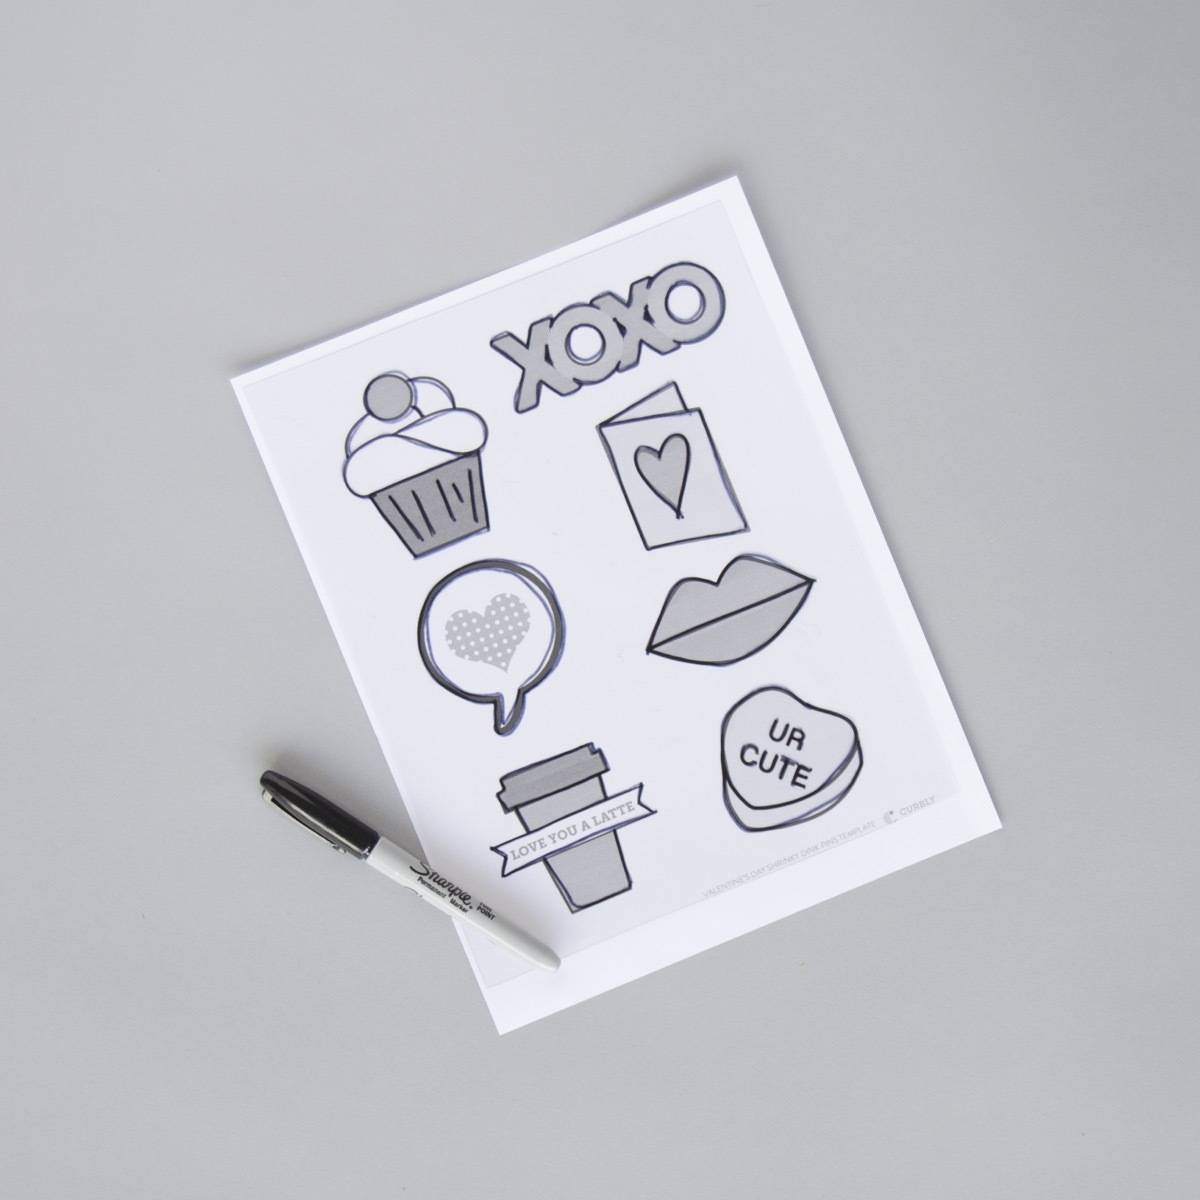
Step 1
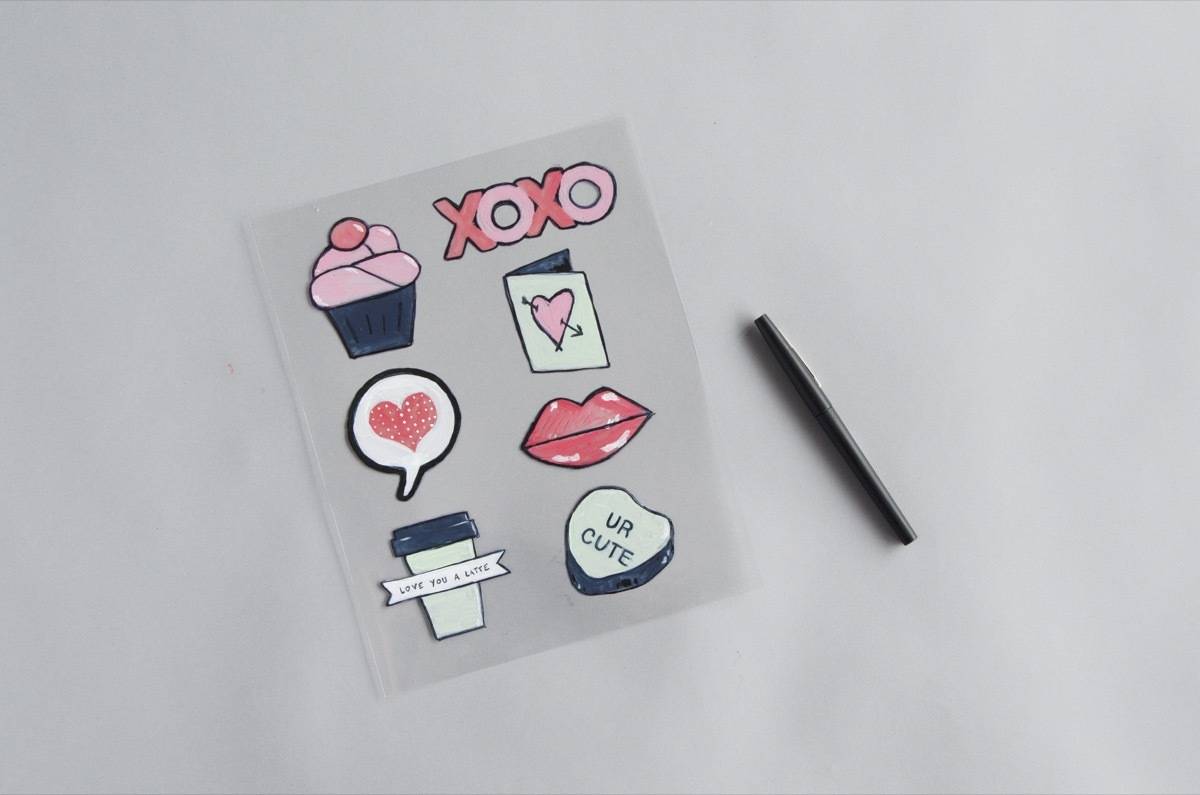
Print out the Valentine’s Day pins template. Lay a piece of shrink paper over the template, and with a marker, trace each shape onto the shrink paper.
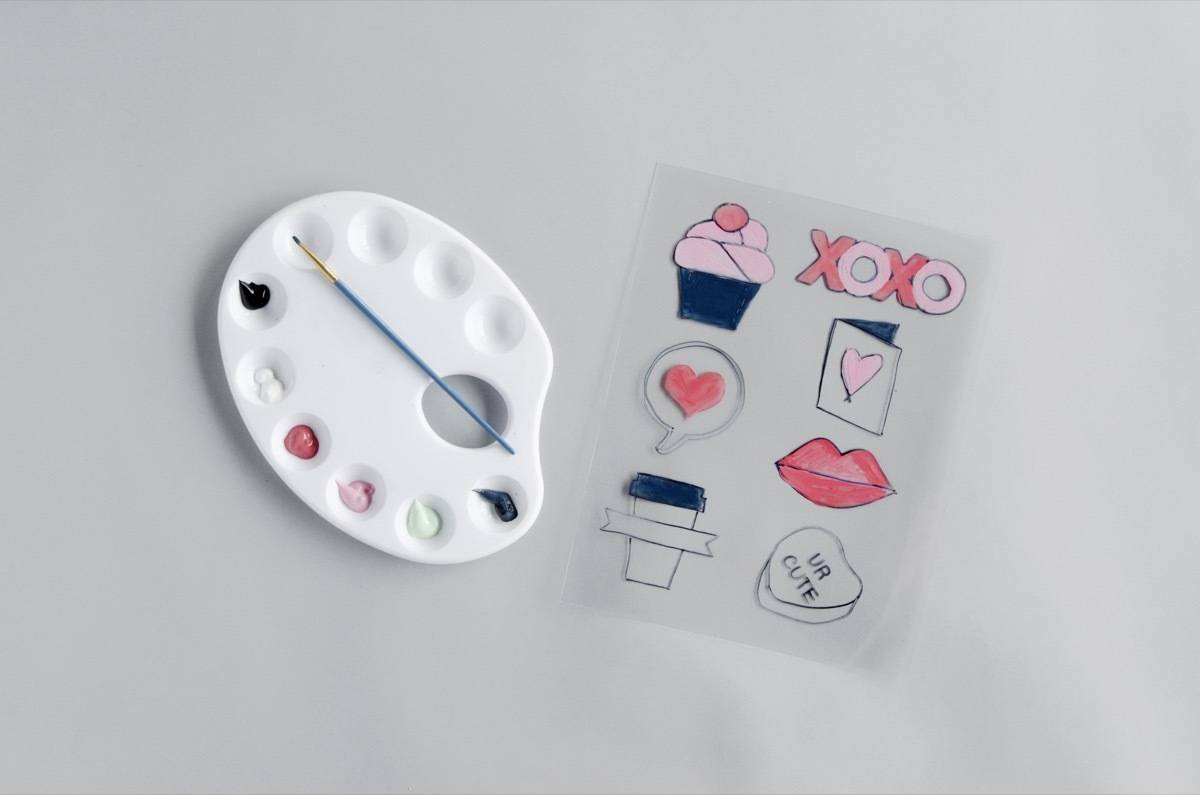
Step 2
Fill in the designs with a thin layer of acrylic paint. The more paint you apply, the “rougher” the pins will look once they shrink, so keep it light. I recommend using high-quality paints, as cheaper paints require multiple layers to get richer color.
Step 3
Once the paint has dried, go over the lines of the designs again to redefine any hard edges. Add any lettering over the paint.
Step 4
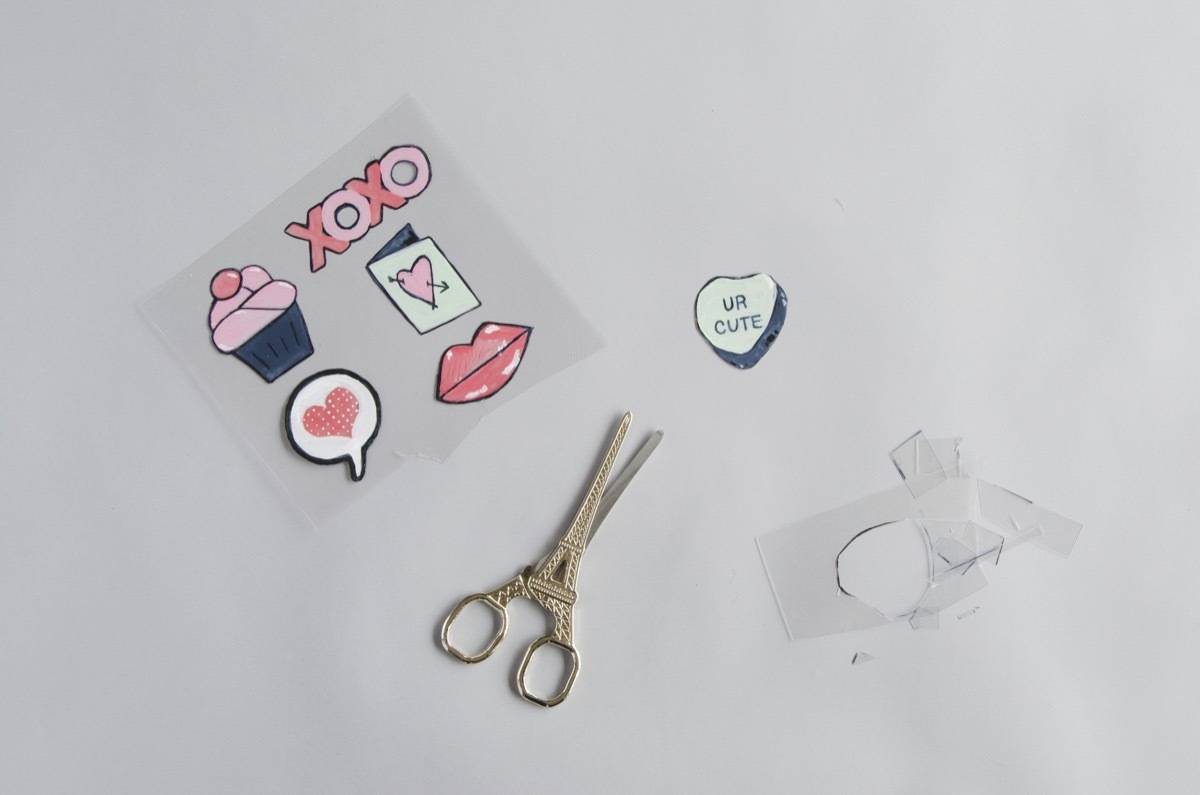
Cut out each design. Take your time with this step, as the shrink paper can rip easily.
Step 5
Preheat the oven to 325º F. Line a cookie sheet with aluminum foil. Lay the designs on the pan so they are not overlapping. Bake for 1-3 minutes. The shrink paper will initially curl while baking – once the paper has curled it will shrink to 1/3 its original size, and become remarkably thicker.
Step 6
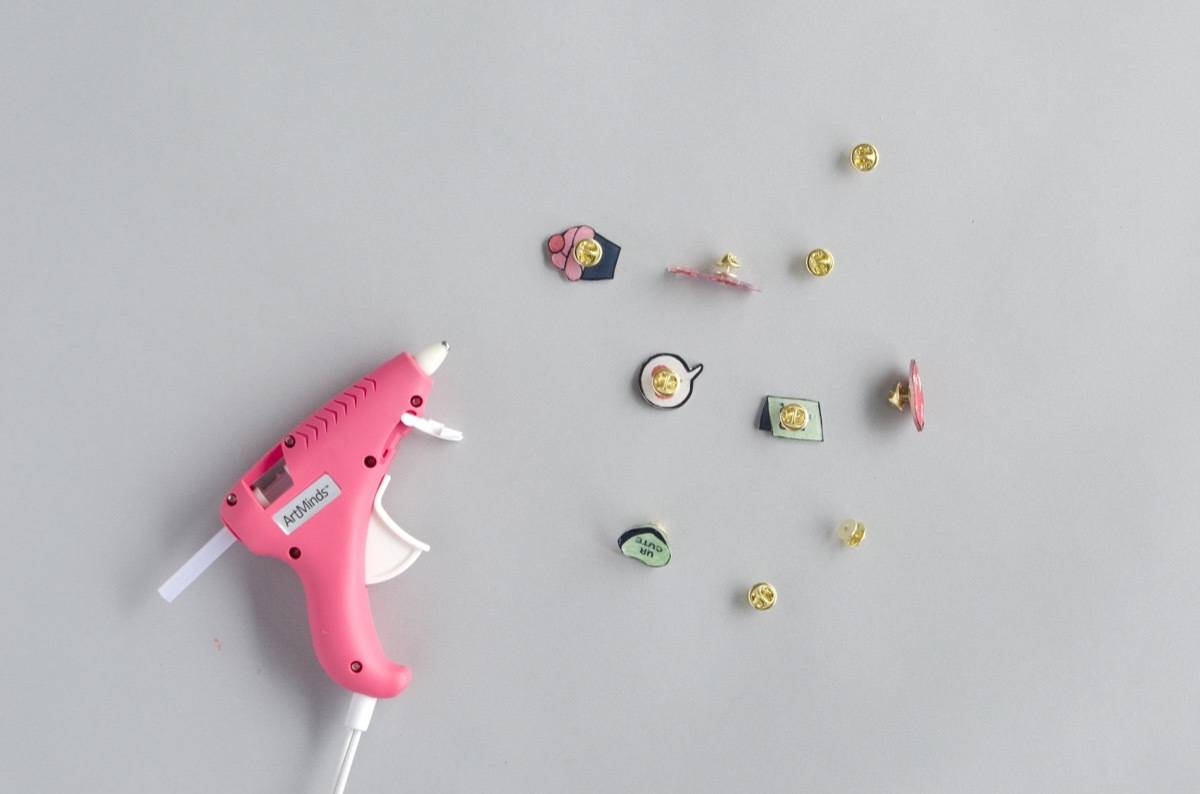
After the designs have cooled, use hot glue to apply the pin backs. If you want to give your pin designs some added protection, you can seal them with a finisher spray. Done!
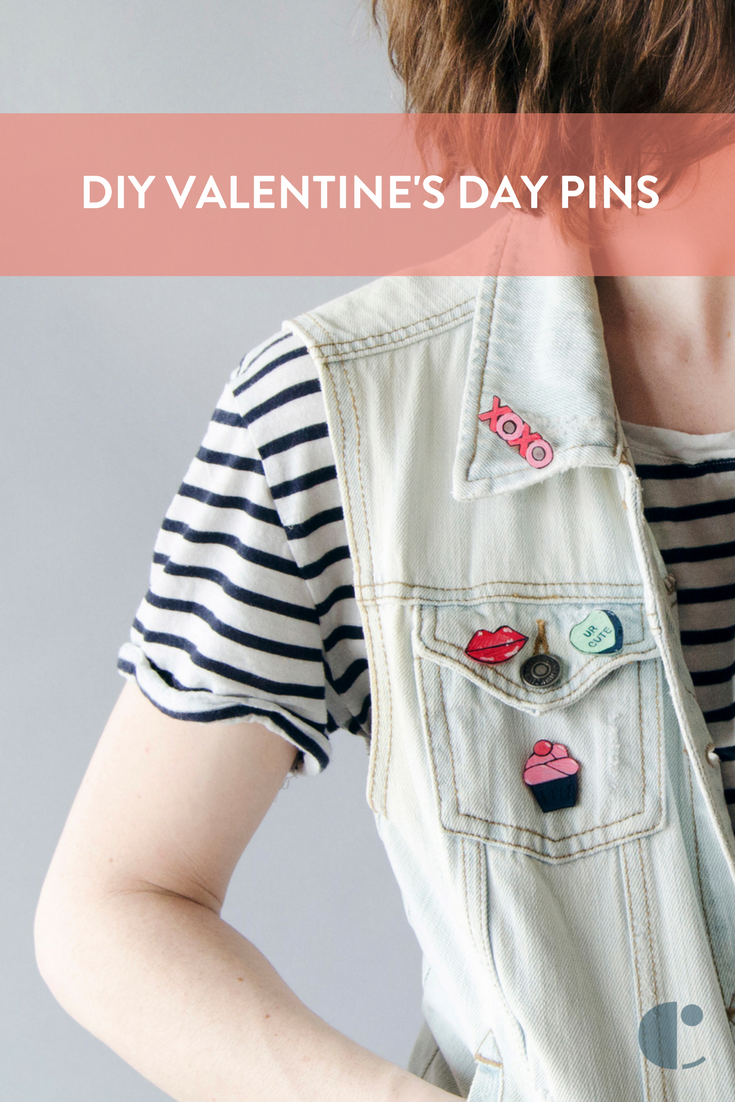
Share this project on Pinterest!
Side note: Like I said earlier, I love enamel pins. That being said, watching fashion come full circle and recognizing the decade this fad came from because I lived through it has me feeling super old! I’ll let it slide though, because 90s fashion really was the best (#DENIM4LIFE).
Clothes and fabric — much like trinkets from travels, pieces of furniture, and cards from birthdays past — can hold a ton of sentimental value. Whether it be a T-shirt from a favorite concert, a scrap of sample fabric from a project long-since completed, or an article of clothing from a loved one, people cling to certain pieces much longer than others. But what do you do when that item no longer fits? Sure, you could tuck it in the back of a drawer or store it high up in the closet. What if I told you there’s a clever, rental-friendly DIY project you can use if for instead, though? That’s right. Two words: fabric wallpaper.
For more content like this follow
“I love using vintage fabric as wallpaper,” says Gretchen Raguse of her Portland, Oregon home, which features this crafty hack in more than one spot. Where’d she get her inspiration? None other than Apartment Therapy! “I came across this idea on Apartment Therapy a few years ago and knew I needed to try it out in my own space,” says Raguse. “I started with an accent wall in my kitchen, meant to visually divide the area for my office. Repurposing a dress my mom made in the ’70s, I cut and pasted the fabric together to form a repeating pattern.”
Raguse only had enough material to cover a small section of wall, so she added trim and beadboard to round out the wall, which created the pretty patterned panel you see above. “Fabric as wallpaper quickly became an obsession of mine and made its way through my apartment,” she adds. “After the accent wall, I added it to my hallway ceiling and bedroom (as shown below). Even my friend’s place got a fabric makeover!”
If you’re ready to try this idea out yourself, I’d recommend checking out this in-depth tutorial, but here’s the gist: You start by positioning your chosen fabric on a freshly-cleaned wall with tape, lining up any edges. Lift up the fabric and roll a nice layer of liquid starch onto the wall, then smooth the fabric out onto the wall, removing any bubbles or wrinkles as you go. Next, add another thick layer of liquid starch on top of the fabric, ensuring it’s totally saturated through to the wall. Finally, cut the excess fabric off with a utility knife. When you’re ready for a change, the fabric will come right off with a soapy sponge bath. Genius, no?
We independently select these products—if you buy from one of our links, we may earn a commission. All prices were accurate at the time of publishing.
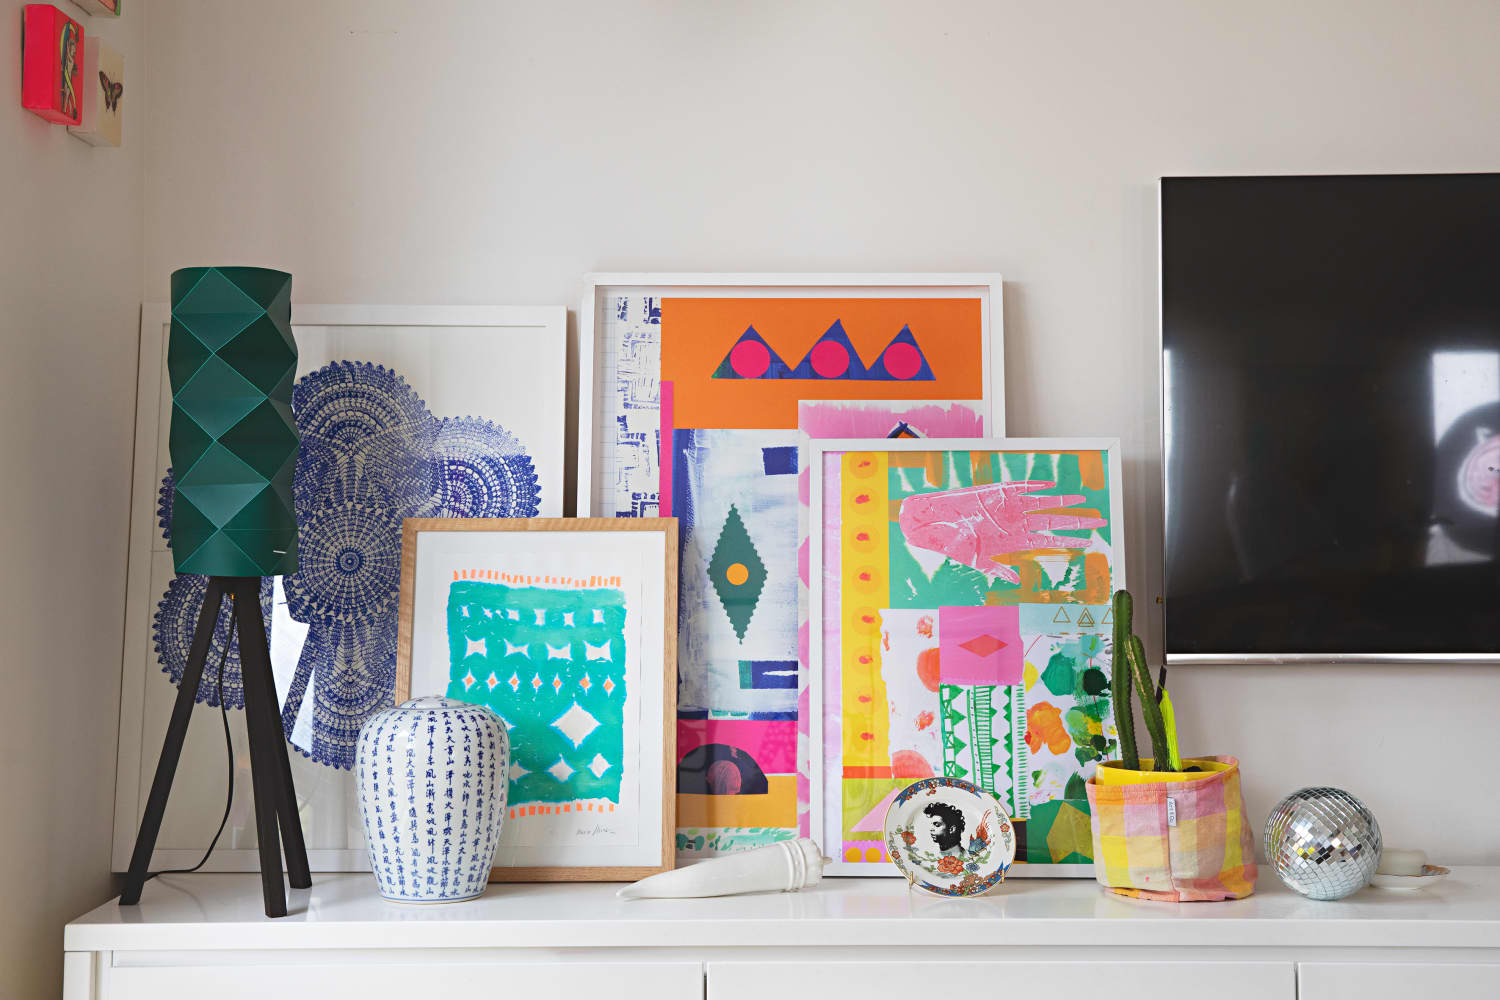
The easiest way to make a home really feel like home, whether you rent or own, is to fill it with art that resonates with you. Maybe that art is a print of a favorite vacation destination, or a great photo of a loved one. Or maybe it’s just something that you like looking at because the colors or the subject matter speaks to you on some level. No matter the reason for your selection, the art you choose helps bring your personality to the forefront of your space.
That said, art can be expensive, especially if you’re looking for a lot of it at once (gallery wall, anyone?). Thankfully, there are plenty of clever and resourceful DIYers who prove that you don’t need to spend a ton to adorn your walls with something beautiful. Here, take a look at eight smart ideas for DIY art that range from high-quality prints of classics to totally custom three-dimensional textured pieces. All come in at under $20 a pop, so you can outfit multiple rooms without breaking the bank.
For more content like this follow
Printable Art with a Luxe Upgrade
You may already know that the National Gallery of Art has free, downloadable images of its permanent collection that you can browse by art type, nation of origin, timeframe, style, or even subject to find the perfect piece for your home. But here’s a DIY that will make a free printable look like a priceless piece. Instead of printing the piece on paper, Erin of Francois et Moi used printable canvas; from there, she attached it to a repurposed frame. The effect looks downright luxurious, all for easily under $20 per piece.
This upcycled sculptural art is perfect if you’re craving tonal texture, and the main material is certainly something you have on hand. Here, Geneva of Collective Gen layered abstract shapes cut from leftover packaging to create her design. Then, she unified the look with a generous layer of joint compound overtop.
Jorge of Casa Refined has a knack for transforming unconventional materials into inspiring art. For this project, he carved a geometric design into a piece of craft foam from the hardware store, before painting it in a classic cream and black palette. The finishing touch: a pine frame around the edges, which pulls the whole piece together. You can use his methods to create your own pattern and customize the palette to your liking.
When it comes to decor, nothing is easier or cheaper than looking around your home to see what could be framed as art among the things you already own. Brittni of Paper & Stitch created the two pieces shown here by simply framing a tea towel and wallpaper sample she had laying around. Some other ideas to consider: pictures cut from an old calendar, an interesting illustration from a greeting card, or a collage of old tickets to museums or shows.
For a more natural vibe, preserve a sensory memory by pressing and displaying flowers, as Studio DIY did here. Choose something that’s tied to a special memory — like the types of flowers that were in the garden of your childhood home, or varieties that were in a favorite bouquet — or just visit the floral aisle of a local grocery store and see what calls to you.
For this simple but impactful piece, Jorge of Casa Refined was inspired by artist James Turrell’s “Light and Space” work. He got the same vibes in his home by using an upcycled tabletop — which he texturized with drywall compound — and an LED light. This DIY looks like it belongs in a museum, but Jorge pulled it off in less than a day.
Hand-Lettered Custom Poster
Pick a phrase, pick a paper, and pick a paint, and you’ve got a display-worthy piece in the making. You can find high-quality, poster-sized paper in almost any color for under $10 at your local art store. For her handmade art, Brittni of Paper & Stitch practiced hand lettering her phrase a few times on scrap paper before committing paint to the final sheet.
Jorge of Casa Refined put his DIY leftovers to work by displaying a splattered drop cloth. Mounting it to a pegboard — another hardware store staple — helps give it a little extra interest and texture. This art definitely makes the case for mining your local hardware store for supplies and inspo!
Olivia Harvey is a freelance writer and award-winning scriptwriter from outside Boston, Massachusetts. She’s a big fan of scented candles, getting dressed up, and the 2005 film adaptation of Pride and Prejudice starring Keira Knightley. You can make sure she’s doing okay via Instagram and/or Twitter.