How to Transform a Common Thrift Store Find into the Cutest Wall Decor (In Just 3 Steps!)
It’s totally customizable. READ MORE…
2-Day Shipping on most products. Shop Now!
It’s totally customizable. READ MORE…


Can’t get away but in need of a getaway? It’s time for a staycation. The best part is you don’t have to travel far. Just a few creative touches will get your home ready to become the cozy oasis of your dreams.
Maybe you’re in the mood for a spa vibe or you want a fun indoor adventure, these simple yet beautiful ideas are the perfect place to start.
Candles are an affordable way to get the vacation feels started. Set the mood with candles that smell like coconut, citrus, or fresh linen so no matter what room you walk into, you are instantly transported into vacation mode.
Bonus: Scents like lavender naturally tell your brain to relax and unwind.
Close your eyes and imagine walking into a spa. What’s the first thing you notice?
The scent!
Similar to lighting a candle, essential oils entice your senses, helping your mind and body ease into a sense of relaxation.
Try essential oils like eucalyptus, peppermint, or lavender.
Rolled towels are a chef’s kiss for simple added luxury.
Make your bathroom feel like a spa by rolling and stacking towels. You can even have rolled towels ready on your bed after a shower.
Spritzing them with lavender or other essential oils can add to the “resort at home” feel.
One of the key features of many vacations is the spa experience. Bring the spa to you by treating yourself to a full spa day at home on one of your staycation days.
Create a spa station to easily access items to make a face mask, body scrub, manicure, and pedicure.
Play some soothing music and sip homemade cucumber water throughout the day.
If there’s a destination you love or have always wanted to try, choose it as a theme for a night of your staycation. Destinations like Italy or Hawaii offer relatively easy-to-find decor.
Dress up, try a themed recipe, and play music from the region.
A cozy nook to read, nap, craft, or create art is perfect for your staycation. If you don’t already have a space like this, set up blankets and throw pillows near a window for natural light and calming energy.
Fairy lights or candles offer an extra magical glow in the evening.
Trying a new recipe, such as Thai curry, French crêpes, or Spanish paella, is a fun staycation activity. Consider decorating your dining area with the theme of the country.
Whether for indoor relaxation or outdoor vibes, a mocktail or cocktail bar makes your favorite drinks easily accessible.
Stock your bar with fresh herbs, fruit, umbrellas, and decorative straws. Infuse drinks with fruits like pineapple, mango, or passionfruit to add a twist.
Use a pop-up canopy or a sheet-draped structure to create a cozy and inviting backyard cabana. This staycation addition makes your backyard feel like a resort.
Add string lights, comfy seating, and a portable speaker to complete the experience.
There are several ways you can make an outdoor movie night a key feature of your staycation. You only need a projector and a blank surface, like a shed wall or a hanging sheet.
Just don’t forget the popcorn, candy, and cozy blankets!
Grab your charcuterie board! This staycation idea involves picnicking right from your home. Have blankets and pillows handy and a wicker basket filled with foodie favorites.
Create the feeling of a luxury wellness retreat right from your backyard (patio or balcony) by rolling out your yoga mat each staycation day.
Just a few moments of mindfulness can balance your mood and really set a calming tone.
Incense, sage, or essential oils are great to use as aromatherapy during your practice.
Hang around and read, journal, or just relax in an indoor hammock. Installation may require some help and prep before your staycation, but once added, you’ll be able to use it to reconnect and give yourself a go-to area during your time.
Remember building forts as a kid? Grabbing a ton of sheets and putting them over the dining room table or covering chairs. Tap into some nostalgia by creating a fort with sheets, blankets, throw pillows, and fairy lights.
If you live in a smaller space and have a balcony, use it for your staycation!
Create a chill ambiance with a few comfy cushions, citronella candles, fairy lights, and summer decor of your choice (and don’t forget a Bluetooth speaker).
Nothing says summer vacation like cold treats, and an ice cream station is an easy way to stay cool. Include toppings like candy, fruit, and yummy syrups (think chocolate or strawberry).
Be sure to feature special flavors to match the theme of your staycation – lavender honey, anyone?
Turn your backyard into the resort beach party of your dreams. Play music, mix your favorite mocktail or cocktail, and bask in the summer night sky.
No matter the size of your pool (even a kiddie pool works), you can spruce it up for your staycation. Lay out a beach towel, wear your swimsuit, and fill the pool with noodles or other fun toys. Add a speaker to play your favorite island music to complete the vibes.
Pull out your camping tent and set it up in the yard for a beautiful space to sleep under the stars. Use sleeping bags, flashlights, or string lights, and keep snacks nearby for the full experience.
Treat yourself to spa-style baths during your staycation by adding essential oils, bath salts, fruit, bath bombs, and candles.
Playing music and turning off the lights during this time will add to the tranquility. Cozy up with a book and let the warm water wash away any stress.
Last on our list is an easy (and free) staycation staple – doing a digital detox. Find a place in your home where you can put your phone away for the day or during different periods throughout the day, like while cooking or enjoying the sunset.
Treat your staycation like a real vacation, because that’s exactly what it is. Turn off your phone notifications, turn on out-of-office replies, and let yourself fully unwind.
Even if it’s just for the weekend, staycations are a great way to recharge without breaking the budget or needing to travel too far. You can turn your home into the perfect retreat with just a few creative touches. Bon voyage!

Hands up if you want to do some easy DIY home projects this weekend that can transform your home without breaking the bank? Right? There’s something incredibly satisfying about ticking off a home project. Especially when it doesn’t require a full-blown renovation, a team of tradespeople, or a massive budget. Often, people, including me (…definitely me), are put off from doing home renovations due to the immense effort and budget that is involved. I want to do so much in my home but when I think about what needs doing it can feel really overwhelming and disruptive. But there are lots of affordable home improvement projects that can be done easily in just a weekend. All that is needed is just a little time, money, a bit of creativity, and a few clever tricks can make a huge difference to how your home looks and feels.
So, if you’ve been itching to give your space a bit of a refresh, these easy DIY home projects are perfect for a weekend makeover. From simple home upgrades to quick style swaps, they’re the kind of improvements that are totally doable when you’re feeling inspired on a Saturday morning.

Arch mirror from Neutypechic
You can transform your home with a statement mirror. Adding a mirror is one of the easiest ways to instantly elevate a room, because mirrors have a way of changing the way a room looks. A mirror not only reflects light and makes the room feel brighter, it can also help to create a sense of space and make a room feel bigger. Try positioning a mirror opposite a window to bounce soft natural light around the room.
And if you choose something with personality—a bold frame, an antique finish, or an organic shape—it can double up as a piece of art. Adding statement mirrors is one of those simple DIY home upgrades that has a big impact with minimal effort and minimal cost.

Neutral Botanicals Removable Wallpaper Mural Available At Wallsauce.com
If you’ve ever stood in front of a paint chart feeling overwhelmed, peel-and-stick wallpaper might be your new best friend. It’s a fun, low-commitment way to experiment with colour, texture, and pattern. And the best part? You can remove it without leaving a trace.
Use it to create a feature wall in a living room or bedroom, line the inside of open shelving, or even add interest to a plain hallway. This is one of the most budget-friendly home improvements you can make—and it’s a great way to explore your personal style without committing to anything permanent.

A beautiful front door entrance. Image c/o Yesterhome
Your front door is one of the first things people notice about your home and it really sets the scene for how you want to feel as you step inside when you return after a hard day. Giving it a fresh coat of paint can completely change the tone and character of your exterior. It really is one of the easiest ways to upgrade your home exterior for maximum impact.
Try painting a few swatches onto card and taping them to your door so you can see how the colour shifts in different light. Whether you go bold with teal or yellow, or keep it classic with black or sage green, it’s an easy DIY home project that delivers an instant boost in curb appeal. And if you’re feeling adventurous, paint the inside of the door too—why not let that cheerful colour greet you on your way out and in?

Digbeth Pull from Armac Martin
You’d be amazed how something as small as a cupboard handle can transform a space. Swapping out tired or mismatched hardware on kitchen cabinets, bathroom drawers, or even internal doors is a simple home upgrade that brings everything together.
Choose hardware that works with the overall mood of your space—brushed brass for warmth, matte black for contrast, concrete door handles for an industrial feel or mix and match for an eclectic look. Don’t forget areas like towel hooks, door hinges, and light switch plates—small details matter.

Quirky furniture and unique homeware from Audenza
If you’re lucky enough to have a fireplace, treat it like the focal point it is. Whether it’s brick, tile, or wood, painting your fireplace can make a huge difference to how the room feels.
Stick to paints that are heat-resistant and suitable for fireplaces, and think about the atmosphere you want to create. A dark, moody shade can feel dramatic and cocooning, while a soft neutral can make the room feel light and modern.
Painting the fireplace is one of those easy DIY ideas for home that feels bold but is surprisingly quick to do.
Light switches are one of the most overlooked elements in interior design—and yet we touch them every single day. They’re like punctuation marks in a room, quietly doing their job, often unnoticed. But what if they could be more than just functional? What if they could be beautiful too?
This is where designer switches come in. Gone are the days of basic plastic toggles—today’s light switches are tactile, stylish, and beautifully engineered. Think matte black dimmers with knurled finishes, brushed brass rockers that feel weighty in the hand, or sleek, sculptural plates that sit like jewellery on the wall.
Swapping out old, discoloured switches for something more intentional is one of those easy DIY home decor projects that makes an unexpectedly big impact. It’s a subtle but powerful detail that instantly elevates a room. Whether you prefer a minimalist vibe or something with bold contrast, there’s a finish and style to suit every interior.
And if you really want to dial up the luxe factor, opt for a coordinated set of switches, sockets, and dimmers throughout your home—it’s like a well-curated outfit for your walls.

Clarke & Clarke Congo Velvet Amber Curtains from Blinds2Go
One of the simplest ways to create the illusion of height and elegance is by adjusting your curtain rods. Instead of hanging them just above the window frame, raise them to just below the ceiling and use full-length curtains to draw the eye upward.
This easy DIY project for the home can make ceilings feel taller and rooms feel more luxurious—without spending a fortune. You might need to let out a hem or invest in longer curtains, but the impact is worth it.
With these easy DIY home projects, you can begin to update your home today. All it takes is a bit of time, effort and budget, and you will have an appealing home to enjoy. Incorporate statement mirrors, paint, and new hardware to add personality and charm one room at a time.


The thought of renovation mistakes brings me out in a cold sweat and this is what has put me off renovating my own home to the extent that it needs it. Mistakes are costly and some can be irreversible and the idea of getting it wrong scares me. Sure, renovating a home is exciting, but it’s also a totally overwhelming process. It’s easy to get caught up in the vision of your dream space, (just check out my Pinterest account if you’re in any doubt just how caught up I am with teh vision!) but without careful planning, small mistakes can quickly turn into expensive problems. And I ain’t got time or energy for expensive problems. From budget miscalculations to structural surprises hiding behind walls, home improvement projects can go off track in an instant. So how do we avoid the common renovation mistakes and save ourselves, time, stress and a whole heap of money? Let’s find out!
There’s a big difference between being budget-conscious and cutting corners. While it’s tempting to save money wherever possible, choosing the cheapest materials is one of the most common renovation mistakes homeowners make.
The reality? Low-quality materials wear out faster, need replacing sooner, and can even compromise the structural integrity or overall finish of your renovation. That bargain kitchen worktop might seem like a win—until it starts chipping after a few months. Cheap laminate flooring? It won’t hold up to heavy foot traffic for long.
Instead of opting for the cheapest option, focus on value and longevity. Prioritise high-traffic areas like flooring, countertops, and fixtures, where durability really matters. If budget is a concern, look for smart swaps—engineered wood instead of solid hardwood, quartz over marble, or a high-quality second-hand kitchen instead of a brand-new budget one.
Nothing derails a successful home renovation faster than discovering major structural problems after you’ve already started the finishing touches. Peeling back layers of an older home often reveals hidden issues—damp, crumbling plaster, faulty wiring, or even load-bearing walls that need reinforcement.
It’s frustrating (and expensive) to have to rip up brand-new flooring because a plumbing leak was ignored. That’s why structural repairs should always come first. Before picking out paint colours and cabinetry, invest in a thorough home inspection. Addressing foundational concerns, electrical updates, and plumbing repairs early on will save you from costly headaches down the line.
If your plans involve renovating a garage—whether as a workshop, utility room, or home gym—it’s essential to assess both the structure and the access points. Replacing an old or damaged door with one from a reputable overhead door company can improve insulation, boost security, and prevent issues like leaks or warping from costly water damage that could compromise your renovation efforts.
It is always worth organising a professional home inspection if you are in any doubt as to the structural integrity of your home.
We all want our homes to look their best, but there’s a fine line between thoughtful improvements and over-renovating. Some of the most charming features in older homes—original beams, slightly uneven wooden floors, or period fireplaces—can get erased in the quest for ‘perfection.’
Over-renovating can also mean making changes that don’t align with the rest of the home’s character or neighbourhood. If you pour thousands into high-end renovations that outprice similar homes in your area, you may struggle to get a return on investment if you ever sell. This is when you need to decide whether it’s a better call to renovate or relocate.
The key? Enhance rather than erase. Preserve period details where possible, focus on timeless updates, and avoid ultra-trendy changes that could date quickly.
It’s easy to focus on what you can see—beautiful tiles, sleek kitchen units, or stylish lighting—but what’s beneath the surface matters just as much. Ignoring essential upgrades to plumbing, wiring, or roofing can lead to expensive and disruptive problems down the road.
If your home has outdated plumbing or faulty electrics, these should be addressed before you start the aesthetic work. Ripping up brand-new flooring to replace faulty pipes or rewiring after plastering is the kind of renovation nightmare that’s best avoided.
Similarly, if your roof is in poor condition, investing in roof repairs now will protect your entire home from leaks, dampness, and heat loss. A good rule of thumb: focus on function before form—it’s much easier to add stylish details later than to redo major structural elements after finishing work is complete.
A DIY approach can be a great way to save money—but only if you know what you’re doing. While easy DIY home decor tasks like painting walls or installing shelving might be manageable, certain renovation tasks should always be left to the experts.
Electrical work, plumbing, and structural changes require specialist knowledge and certification—botching these jobs can be dangerous and, in some cases, illegal. Even seemingly simple jobs like tiling or flooring can cost double if mistakes need professional correction later.
If you’re determined to DIY, be honest about your skill level. Start with small projects and research thoroughly. But for major renovations, hiring experienced tradespeople will save time, money, and stress in the long run.
Avoiding common renovation mistakes isn’t just about knowing what not to do—it’s also about planning smart from the start. Here are some tips for a smooth, successful home renovation:
A well-planned renovation can transform your home without unnecessary stress or costly mistakes. By learning from these renovation mistakes, you can make confident choices that lead to a beautiful and long-lasting result.

Are you ready for a crazy-quick sewing project? I’m calling this the “half hour half apron” because it’s one of the fastest sewing projects I think I’ve ever completed. Honestly, if I busted out a few more of these half aprons, I believe I could get my time down to 15 minutes. No sweat. My point is, this half apron is a breeze to make. This is a perfect project for beginner sewers. Plus, who doesn’t need an adorable handmade apron in their kitchen?
 This half apron is made up entirely of rectangles, all of which are the same width. You only need to be able to single stitch in a straight line, and you don’t need a pattern. You guys – if you’ve ever doubted that you could sew something, this is not that project! I’ve even put together a video so you can watch how to stitch this half apron together. Watch on, or keep reading for the step-by-step guide.
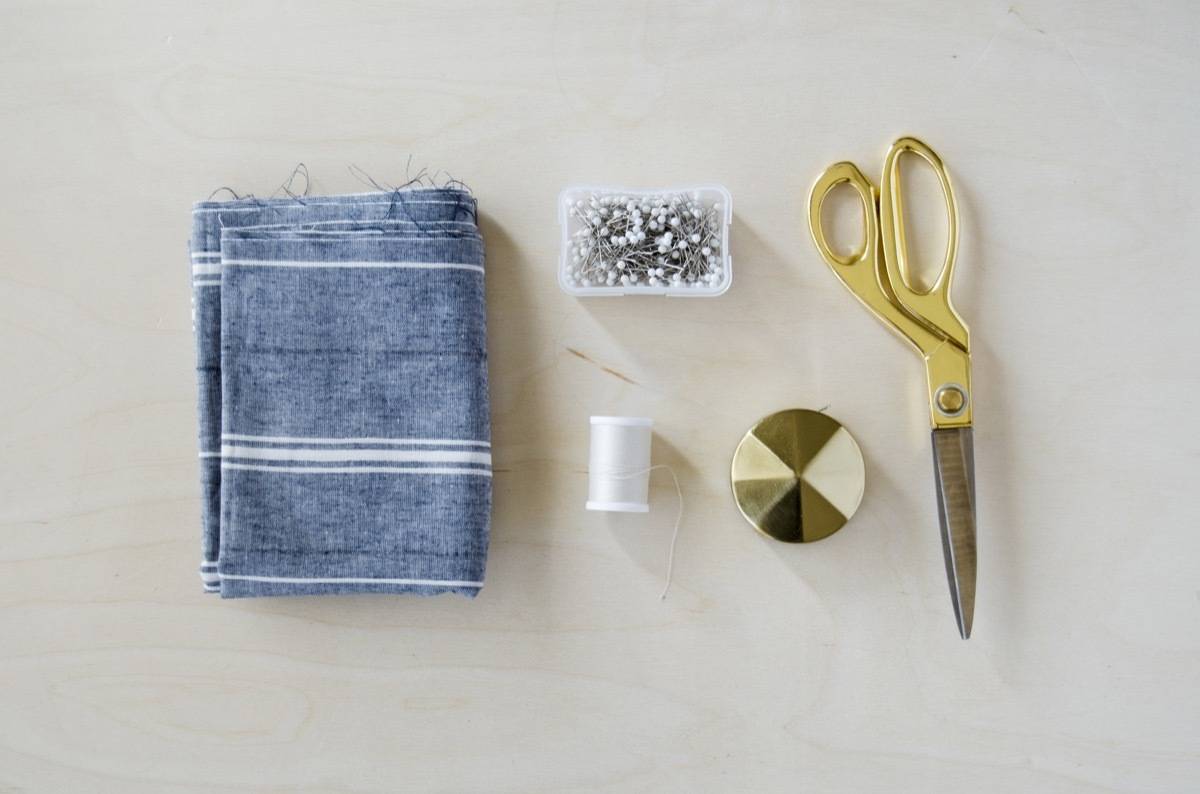
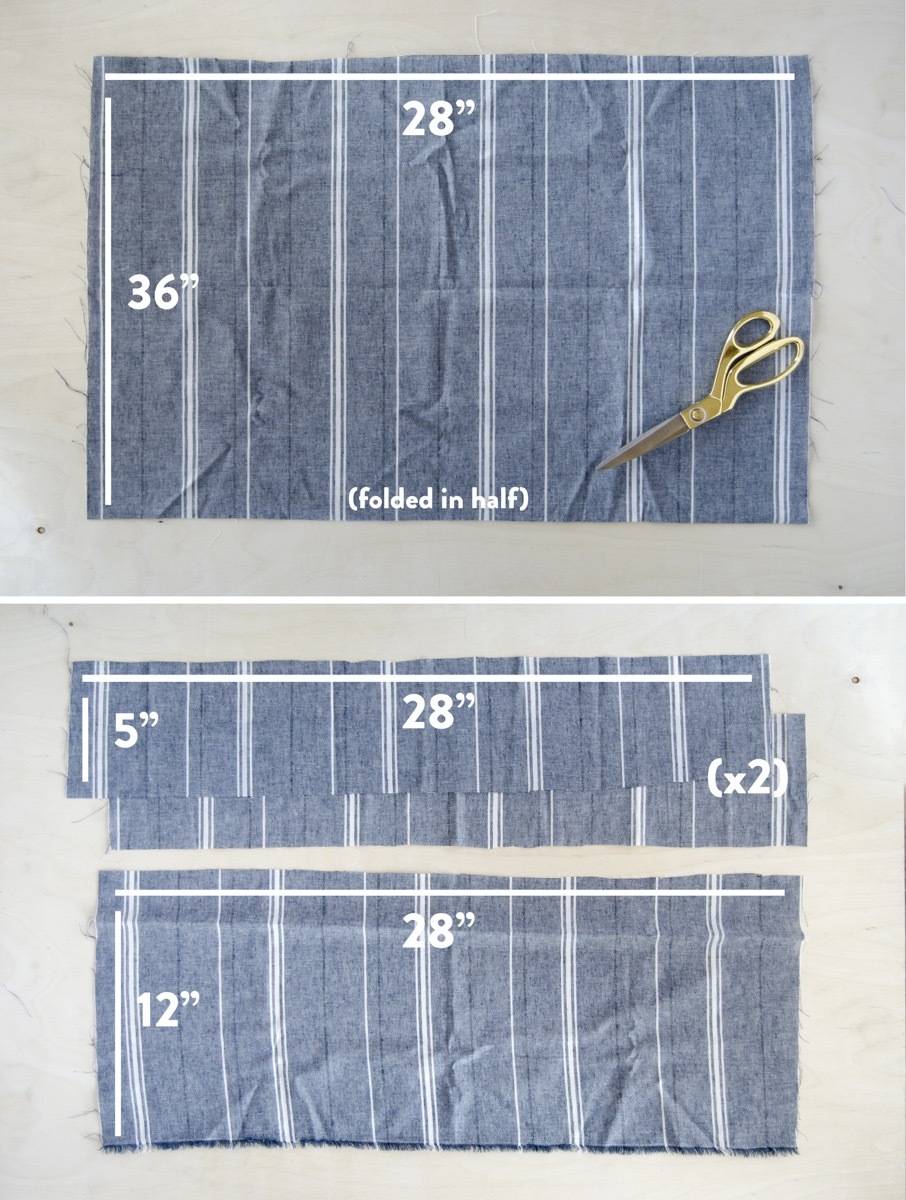
Start by cutting the pieces. There are four pieces total, all cut at a 28″ width.
The first piece is the body of the apron, and is 28″ wide and 36″ tall (in the picture this piece is folded in half lengthwise).
The straps are made up of two identical pieces, both 28″ wide and 5″ tall.
Finally, the pocket is what’s left of your original piece of fabric, being 28″ wide and 12″ tall.
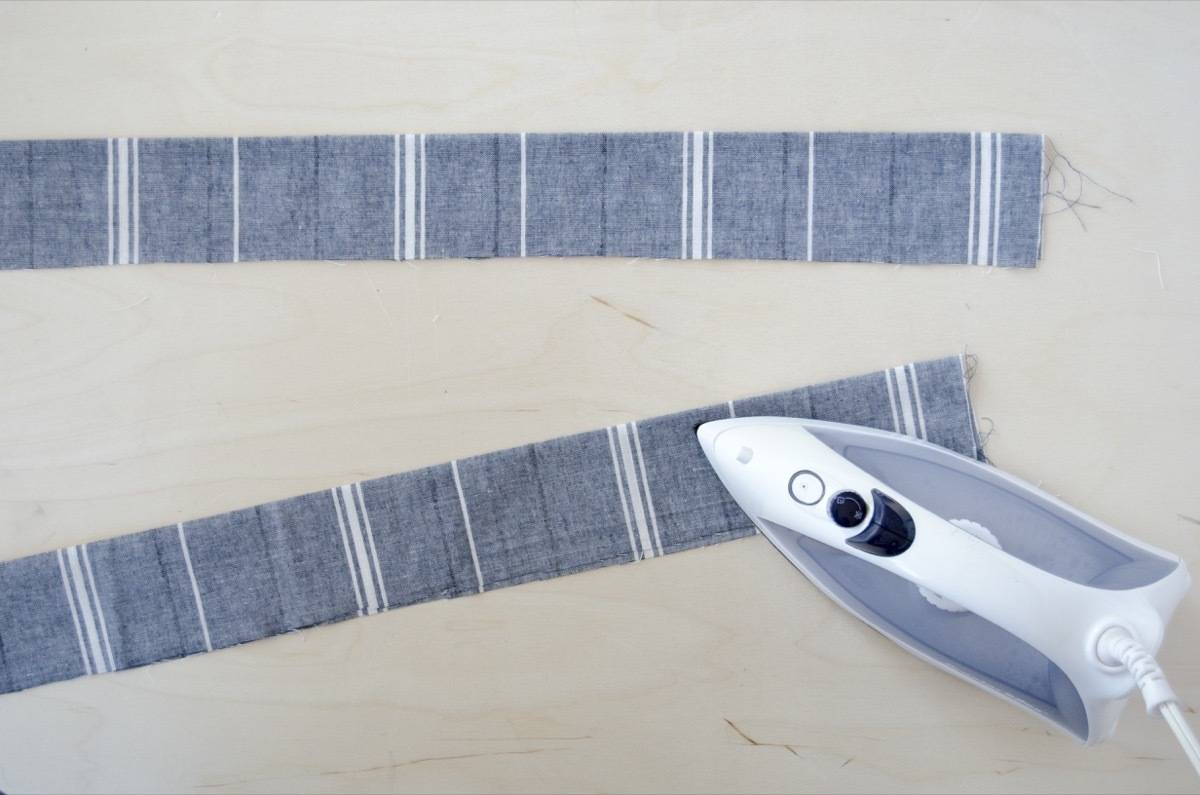
Let’s start with the straps. Fold each strap piece in half, right sides in. Iron the fold flat.
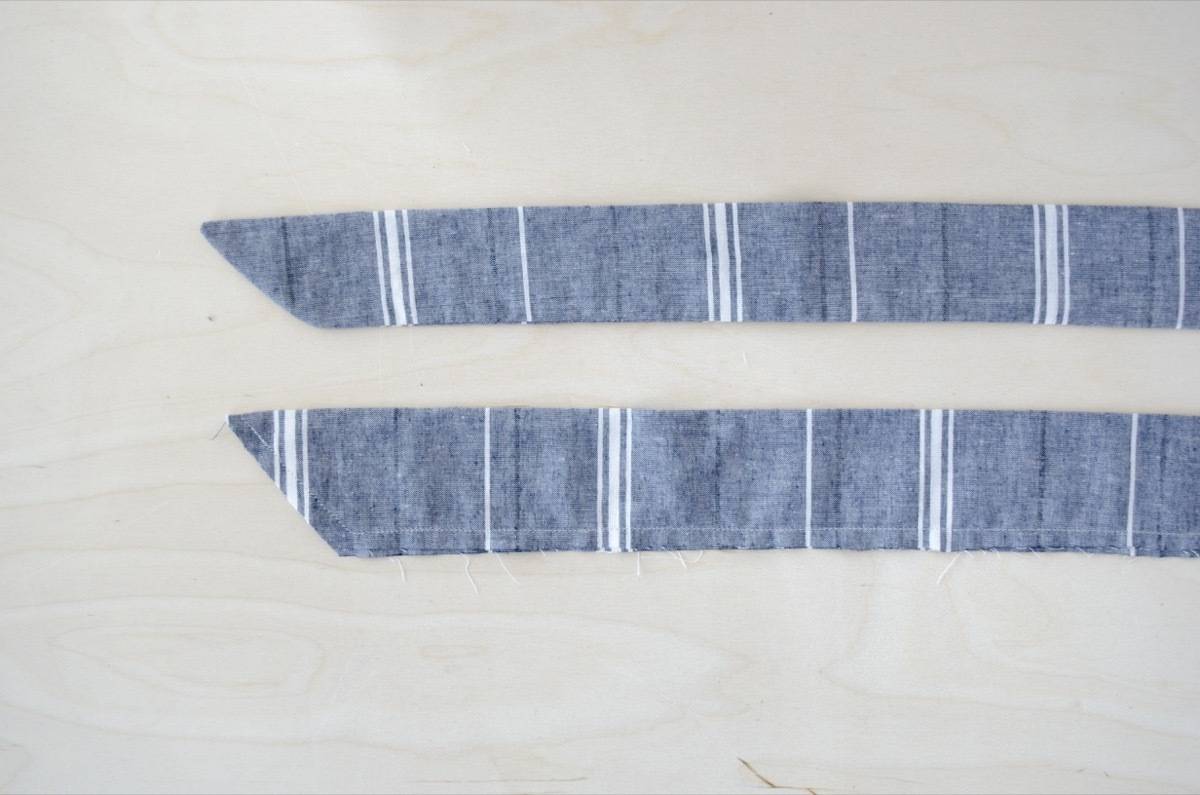
Using a straight stitch, sew down the long side of each strap. At one end, make a 90-degree turn and sew to the opposite corner, creating a right angle.
Turn the straps right-side out, and press.
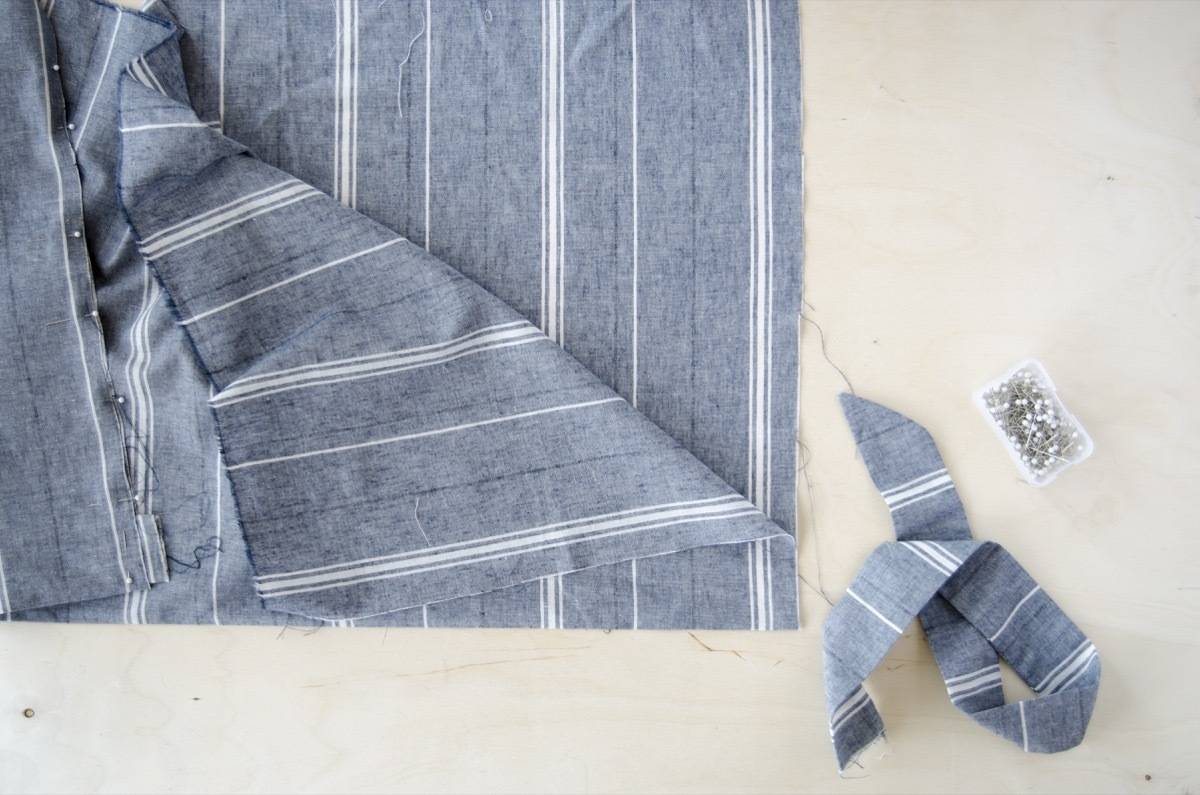
Now to attach the straps to the body of the apron. Take the largest piece of fabric, and fold it in half right side in. It should measure 28″ wide and 18″ tall when folded. Open the fold, and pin the raw end of one strap to the inside of the fold, with the strap leading inside the folded fabric. Repeat with the other strap on the other side of the fold. Both straps should sit inside the folded fabric.
Pin up the sides of the folded fabric. Do the same along the bottom, but leave a 3-4 inch gap in the middle.
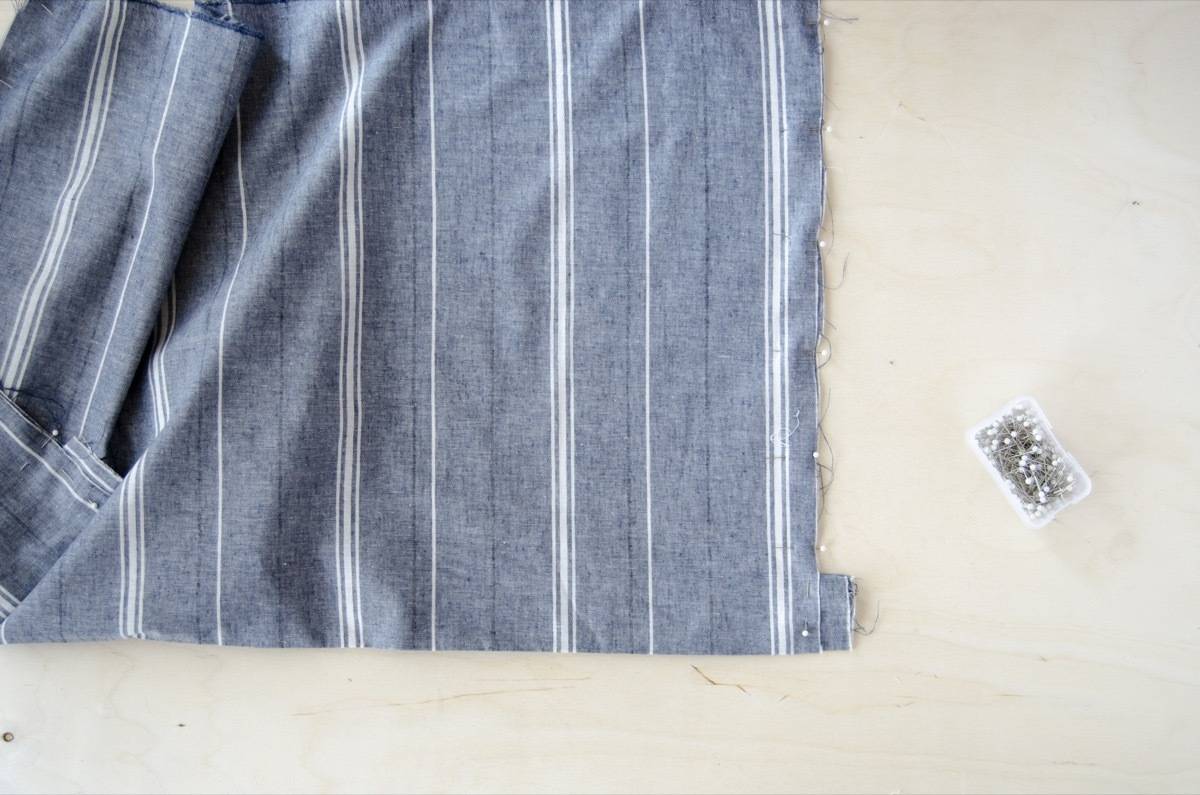
With a straight stitch, stitch along the three sides where you pinned, sewing the straps in place. Do not sew across the gap in the bottom.
Through the gap along the bottom, turn the apron right-side out. Iron flat.

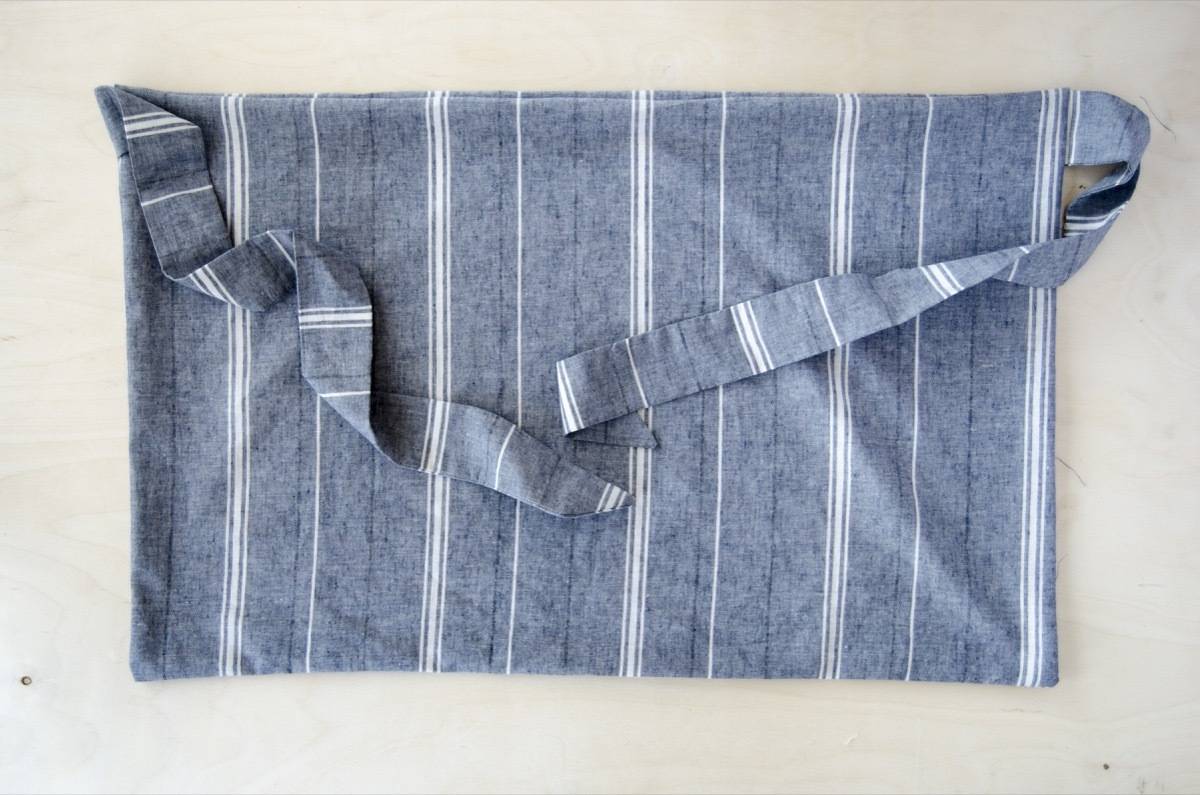
And finally, the pocket! Press and sew a 1/4 inch hem along one long side of pocket fabric.

With the hem-side up, pin the pocket to the apron, lining up the bottom of the apron with the bottom of the pocket. Turn and press the sides and bottom of the pocket in, and pin in place. With a single stitch, sew the pocket in place along the sides and bottom.

Next, mark 6.5″ in from both sides of the pocket. This divides the pocket into three sections – two small pockets on the side and one large pocket in the middle. Starting from the bottom of the pocket, stitch along both pinned marks with a single stitch.

And done!
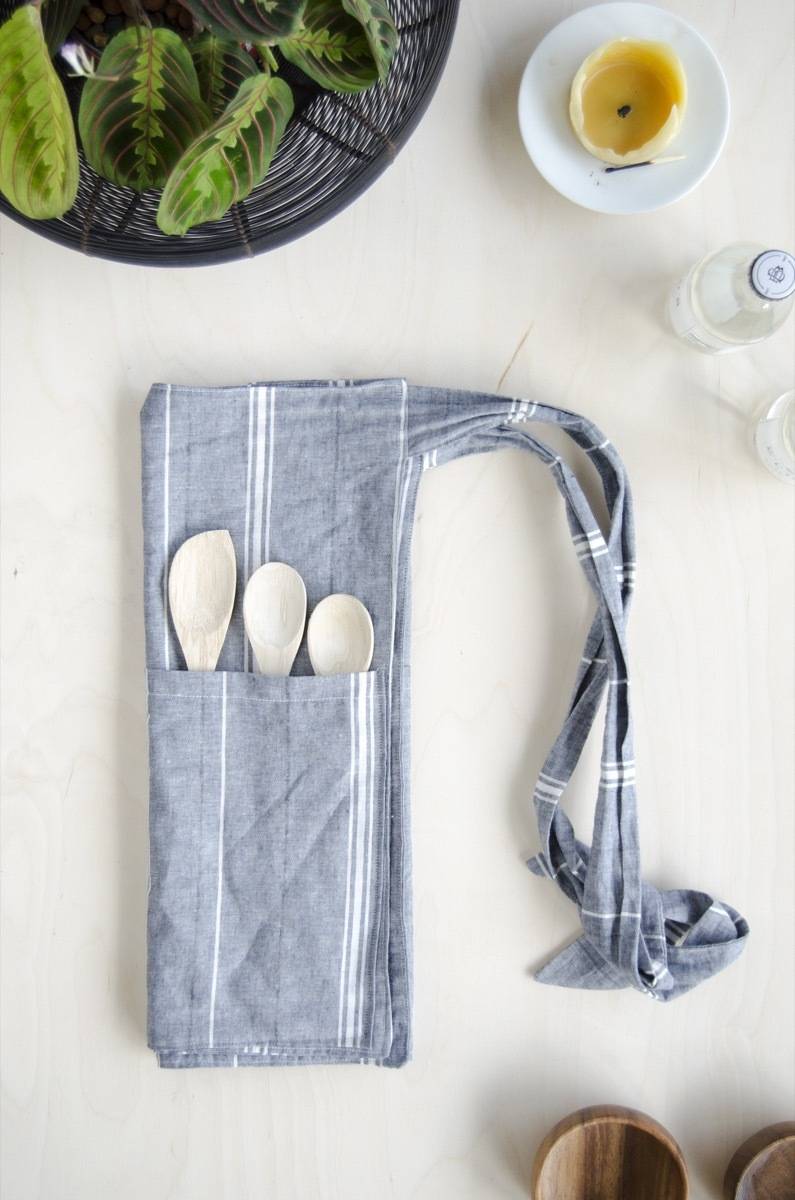


I made my half apron from this sweet and simple linen print that I’m absolutely in love with. I’m already scheming alternative uses for this fabric so I can buy more of it. Anyone else on a major linen kick right now?
Happy sewing!