There are moments in life when you suddenly feel like a real adult. Like when you buy your first car, or take that car for its first oil change. When you open a savings account, or purchase your first washer and dryer. Or like when you finally learn how to fold a fitted sheet properly.
.tasty-pins-banner-container{display:block;margin-bottom:20px;position:relative;width:-moz-fit-content;width:fit-content}.tasty-pins-banner-container a{cursor:pointer;display:flex;font-size:14px;font-weight:700;letter-spacing:1px;line-height:1.8em;text-transform:uppercase}.tasty-pins-banner-container a:hover{opacity:1}.tasty-pins-banner-container .tasty-pins-banner{align-items:center;bottom:0;cursor:pointer;display:flex;justify-content:center;left:0;padding-bottom:1em;padding-top:1em;position:absolute;right:0}.tasty-pins-banner-container .tasty-pins-banner svg{margin-right:4px;width:32px}.tasty-pins-banner-container .tasty-pins-banner span{margin-top:4px}.tasty-pins-banner-container a.tasty-pins-banner{text-decoration:none}.tasty-pins-banner-container a.tasty-pins-banner:hover{opacity:.8}.tasty-pins-banner-container a.tasty-pins-banner-image-link{flex-direction:column}.tasty-pins-banner-container a img{margin-bottom:0}.entry-content .wp-block-image .tasty-pins-banner-container img{margin-bottom:0;padding-bottom:0}#et-boc .et-l div .et_pb_image_wrap .tasty-pins-banner-container .tasty-pins-banner{padding-bottom:1em!important;padding-top:1em;text-decoration:none}#et-boc .et-l div .et_pb_image_wrap .tasty-pins-banner-container a.tasty-pins-banner{cursor:pointer;display:flex;font-size:14px;font-weight:700;line-height:1.8em;text-transform:uppercase}#et-boc .et-l div .et_pb_image_wrap .tasty-pins-banner-container a.tasty-pins-banner span{letter-spacing:2px;margin-top:4px}.et-db #et-boc .et-l .et_pb_module .tasty-pins-banner-container a:not(.wc-forward){padding-bottom:0}Share this life hack on Pinterest!
Once you learn the easiest way to fold a fitted sheet, your linen closets will never be the same.
The best part? This technique becomes second nature after just a few tries and only has a few easy steps. Let me walk you through exactly how to fold fitted sheets so they look as neat as your flat sheets.
Why Folding Fitted Sheets Feels Impossible
If you’ve ever wrestled with a fitted sheet and given up in frustration, you’re not alone. There’s a very real reason why folding fitted sheets feels so much harder than folding regular sheets, those elastic corners.
The stretchy edges and rounded corners that make fitted sheets hug your mattress perfectly are the same features that make traditional folding techniques completely useless.
You can’t simply fold a fitted sheet in half like you would a flat sheet because those elastic edges create bulk and rounded shapes that refuse to cooperate.
Most people resort to balling up their fitted sheets and shoving them in the linen closet and leaving the closet an absolute mess.
It’s not laziness. It’s just that no one ever showed us an actual method that works. The elastic creates resistance, the corners bunch up and creases awkwardly, and before you know it, you’ve got what looks like a fabric burrito instead of a neatly folded sheet.
But here’s the good news: there’s a specific corner-tucking technique that makes folding fitted sheets genuinely easy.
Once you understand how to nest the corners properly, the process takes less than two minutes. The trick is working with the elastic corners instead of fighting against them.
What You Need to Fold a Fitted Sheet
One of the best things about this method is how simple it is. You don’t need any special tools or equipment, just:
A clean, dry fitted sheet
Your hands
A flat surface (optional but helpful for the final folds)
That’s it!
No clips, no fancy folding boards, nothing to buy. You can fold a fitted sheet standing up, sitting on your bed, at a table, or wherever feels most comfortable. The whole process takes just two to three minutes once you know the technique.
I recommend starting on a bed or large table for your first few attempts. Having that flat surface nearby makes it easier to lay the sheet down for the final folds. But honestly, once you’ve practiced a few times, you can do this anywhere.
The Easiest Method: How to Fold Fitted Sheets Step-by-Step
Ready to master this life-changing skill? I’m breaking down the easiest way to fold a fitted sheet into clear, manageable steps. Follow along with the video below, or use these written instructions—whichever works best for you!
Getting Your Starting Position
Start by holding your fitted sheet lengthwise—meaning the longer sides are stretched between your hands. Face toward a bed or table where you’ll eventually lay the sheet flat.
Place your hands inside the two top corners of the sheet with the elasticized edges facing you. The seams should be facing outward. This starting position is crucial because it sets you up for the corner-tucking magic that follows.
The First Corner Tuck
Now comes the key move that makes everything else work. While holding both top corners, bring your right hand over to meet your left hand. Tuck the right corner over and into the left corner. The elastic edges should now sit together neatly.
You’ll now have two corners resting on your left hand. Don’t worry if it feels a bit awkward at first—this is the trickiest part, and it gets easier with practice. Make sure those corners are properly nested together before moving on.
Finding the Bottom Corners
With the top two corners secured on your left hand, use your right hand to reach down and locate the two bottom corners of the sheet. Keep the top corners steady in your left hand as you work.
The fitted sheet will be hanging down, and you’re looking for where the elastic edges meet at the bottom two corners. These are easier to find if you gently shake the sheet to let them fall naturally.
Bringing All Corners Together
This is where it all comes together—literally! Bring the bottom right corner up to meet the top corners in your left hand. Tuck it into the other corners so all three are nested together.
Repeat this with the bottom left corner. Now, all four corners are tucked into one hand, and you should be holding what looks like a roughly rectangular piece of fabric with elastic edges, all nestled on one side.
Smoothing and Shaping
Give the sheet a gentle shake to release any bunched-up fabric. Smooth the material with your free hand, encouraging it to form a rectangular shape. The elastic edges should all be together on one side, and the rest of the sheet should hang fairly straight.
This shake-and-smooth step is more important than it seems. Taking a moment here to work out the wrinkles and get a nice shape makes the final folding much easier.
The Final Folds
Lay your sheet on your flat surface with the elastic edges facing the same direction. Smooth it out into the neatest rectangle you can manage. The elastic corners will create a bit of bulk on one end—that’s totally normal and fine.
Fold the sheet in thirds lengthwise to create a long, narrow rectangle. Then fold it in thirds or in half widthwise, depending on your storage space. You can adjust these final folds based on the size of your linen closet shelves.
The result? A neat, flat rectangle that looks like you actually know what you’re doing with laundry! Sure, it might not be quite as crisp as a flat sheet, but it’s a million times better than the crumpled ball you started with.
Pro Tips for Perfect Fitted Sheet Folding
Once you’ve got the basic technique down, these tips will help you fold fitted sheets even more efficiently and neatly.
Start with the long side. Holding the sheet lengthwise creates better balance and makes it easier to control as you’re tucking corners. If you start with the short side, the sheet feels heavier and more awkward to manipulate.
Use a flat surface for the final folds. While you can do the corner-tucking while standing, having a bed or table to lay the sheet on for those final folds creates much crisper, cleaner results. The difference is noticeable in how your sheets look in the closet.
Practice makes perfect. Your first attempt might feel clumsy, and that’s completely normal. By the third or fourth time, though, your hands will remember the movements and it’ll start feeling natural. I promise it clicks faster than you’d expect!
Smooth as you go. Don’t wait until the end to deal with wrinkles and bunched fabric. A quick smoothing motion after each corner tuck keeps everything neat and makes the final result much better.
The corners are everything. Getting all four corners properly nested together is what creates that neat rectangular shape. If your sheet doesn’t look right at the end, it’s usually because one corner didn’t get fully tucked in with the others. Don’t rush this part!
Match your sheet size to your folding style. King and queen fitted sheets are easier to fold on a bed, while twin sheets work fine folded at a table or even standing up. Adjust your approach based on what you’re working with.
What to Do If It’s Not Perfect
Let’s be real—your first folded fitted sheet probably won’t look Instagram-worthy, and that’s okay! Even an imperfect fold is dramatically better than the ball-of-fabric situation you had before.
The corners might stick out slightly, creating little lumps on one end of your folded sheet. This is normal because that’s where all the elastic is gathered. As long as your sheet is generally rectangular and reasonably flat, you’re doing great.
If your sheet is wrinkled, give it a quick smooth with your hands before the final folds. Or better yet, fold your sheets right out of the dryer when they’re still slightly warm—the heat helps them smooth out naturally.
If your first attempt looks terrible, just unfold it and try again! The beauty of this skill is that there’s no penalty for practice. Each time you do it, you’ll understand the technique a little better.
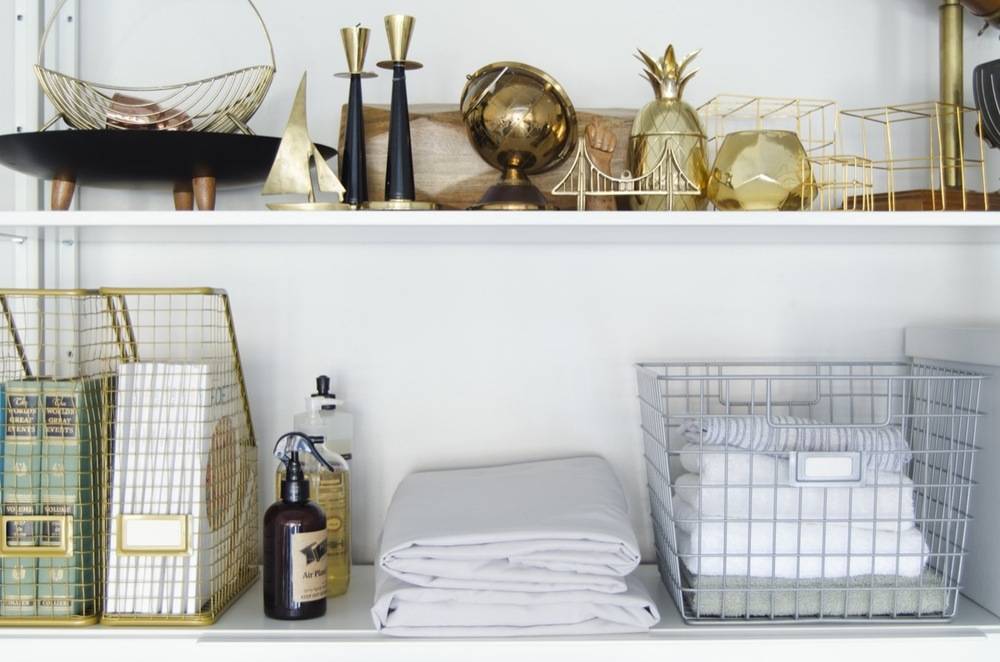
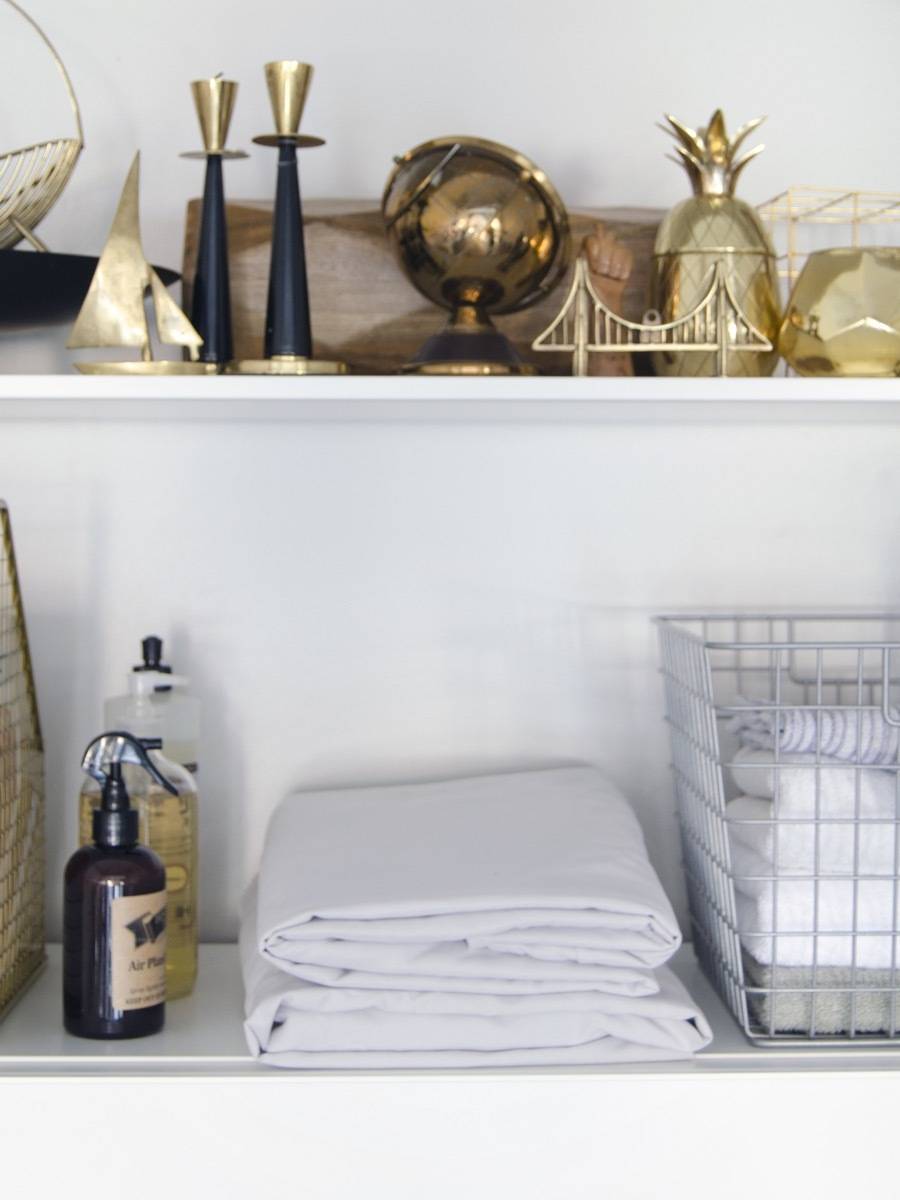
How to Store Your Beautifully Folded Fitted Sheets
Now that you can fold fitted sheets like a pro, let’s talk about how to store them so your linen closet stays organized and your sheets stay neat.
The game-changing trick? Store complete sheet sets together. Fold your fitted sheet, flat sheet, and pillowcases to similar sizes, then tuck everything inside one of the pillowcases. This creates a neat “bundle” that keeps sets together and makes it easy to grab what you need without disturbing other sheets.
Stack sheets by bed size on your linen closet shelves. Keep all your twin sheets together, all your queen sheets together, and so on. If you have multiple sets for each bed, rotate them to distribute wear evenly.
Consider using shelf dividers if you have lots of sheet sets. This prevents stacks from toppling and makes it easy to pull out a set without disturbing others. You can find simple wire dividers at any home store, or even use tension rods installed vertically.
Label your shelves if you have sheets for multiple beds in your home. A simple label like “Master Bed – Queen” or “Guest Room – Full” saves time when you’re making beds and ensures sheets end up back in the right spot.
Vertical storage can work well too, especially if you have deep shelves. Stand your folded sheet bundles on end like books. This makes it easy to see all your options at once and grab what you need without unstacking.
With properly folded fitted sheets, you’ll be amazed at how much more space you have in your linen closet. No more shoving crumpled sheets into overstuffed shelves!
Common Mistakes to Avoid When Folding Fitted Sheets
Even with the best instructions, there are a few common pitfalls that can trip you up. Here’s what to watch out for and how to fix these issues.
Trying to fold it like a flat sheet is the number one mistake. The elastic corners make this impossible, so you have to use the corner-tucking method. If you catch yourself attempting traditional folds, stop and start over with the proper technique.
Not getting all four corners together properly will leave you with a lumpy, misshapen result. Take your time with each corner tuck, making sure they’re fully nested before moving to the next one. This is the foundation of the whole method.
Rushing through the corner-tucking steps leads to corners that aren’t secure and sheets that unfold themselves. Slow down, especially while you’re learning. Speed comes naturally once you’ve mastered the technique.
Folding on a lumpy surface makes it hard to get clean, crisp final folds. Your bed can work, but make sure there aren’t any blankets or pillows creating bumps underneath. A clear table or dresser top is ideal.
Folding sheets when they’re slightly damp creates wrinkles and can even lead to mildew if they’re stored before fully drying. Always make sure your fitted sheets are completely dry before folding and storing them.
You’ve Got This!
Learning how to fold fitted sheets properly is one of those life skills that seems impossible until someone shows you the trick. Then suddenly, it’s so simple you wonder why it ever seemed hard! The corner-tucking method works because it embraces what makes fitted sheets unique—those elastic corners—rather than fighting against them.
After your first few attempts, this technique will become second nature. You won’t have to think through each step; your hands will just know what to do. And the payoff is worth it: an organized linen closet with neat stacks of sheets, more storage space, and the satisfying feeling of having conquered the fitted sheet challenge.
Remember, perfection isn’t the goal—progress is. Even if your folded fitted sheet isn’t magazine-worthy, it’s infinitely better than a crumpled ball shoved in the back of the closet. Give yourself grace during the learning process, and celebrate the fact that you now have this skill in your life-management toolkit.
Have you tried the corner-tucking method? What tips would you add for fellow fitted-sheet folders? Share your experiences in the comments below—we’d love to hear your success stories or any questions you have!
We independently select these products—if you buy from one of our links, we may earn a commission. All prices were accurate at the time of publishing.
Fireplaces, thanks to their dreamy mantels, are one of the most sought-after home features — especially around the holiday season. That area essentially becomes the heart or focal point of your Christmas decor, as it’s where stockings are hung and family gathers. However, if you’re justdecorating the actual mantel and not the space around it, then you’re really missing out on a dramatic decor moment.
Carrie Miller from @acarriedaffairdesigns wanted a Christmas aesthetic that’s “classy with elegance, but nostalgic.” And to Miller, that means going back to basics with garlands, tinsel, and pops of red. In the living room, Miller gave the mantel the Christmas treatment, but also carried the decor to the ceiling, which really transformed the entire room.
“This is hands-down my favorite Christmas look I’ve ever done,” Miller wrote in an Instagram caption. “I thought last year would be impossible to top, but I did it! And we don’t even have the tree yet.”
How to Make Your Mantel Pop This Christmas
Miller’s fireplace is set along a wall of bookshelves, so there’s a perfect alcove to hang garland above the mantel. But you can easily re-create this setup with a bump-out fireplace, or if your fireplace is set into a flat wall.
“I started with adding garland to the top of the bookshelves, and then of course, added some red garland,” Miller said in the video. Miller draped a swag of faux greenery above the mantel and then layered a red ornament garland and a handmade red paper chain garland in front of it. Then, Miller carried the paper chain into the center of the room, where a wreath was hung like a pendant light.
“And then I wanted to do something even more crazy and put a wreath in the center of our living room because we don’t have lighting,” Miller continued. “I added different sizes of red ornaments and used ribbon like streamers and topped it with some poinsettias and red holly stems.”
Of course, Miller’s actual mantel gets the Christmas treatment, too, with some faux pine stems, large red ornaments, and red velvet bows tied to the candlesticks. But it’s really all about what’s happening up above.
Think outside the box when decorating your mantel this Christmas, and you might end up with the most whimsical, nostalgic, and perfectly over-the-top decor ever!
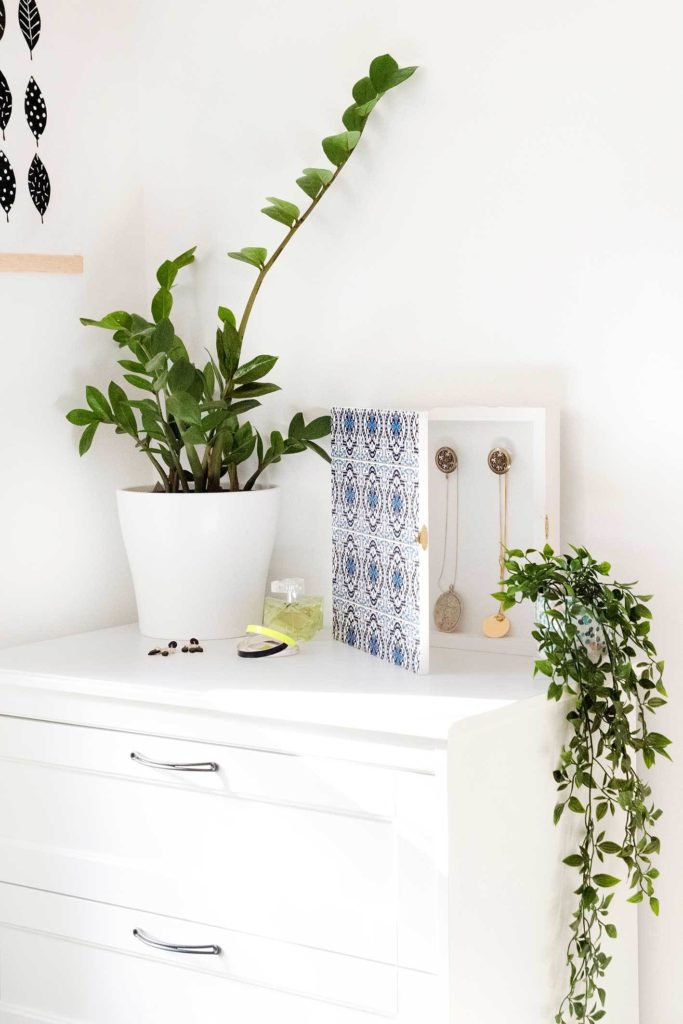
This art wall organizer provides functional storage while adding a beautiful decorative element to your walls. It’s the perfect solution for keeping your bedroom looking polished while keeping all your jewelry organized and accessible.
.tasty-pins-banner-container{display:block;margin-bottom:20px;position:relative;width:-moz-fit-content;width:fit-content}.tasty-pins-banner-container a{cursor:pointer;display:flex;font-size:14px;font-weight:700;letter-spacing:1px;line-height:1.8em;text-transform:uppercase}.tasty-pins-banner-container a:hover{opacity:1}.tasty-pins-banner-container .tasty-pins-banner{align-items:center;bottom:0;cursor:pointer;display:flex;justify-content:center;left:0;padding-bottom:1em;padding-top:1em;position:absolute;right:0}.tasty-pins-banner-container .tasty-pins-banner svg{margin-right:4px;width:32px}.tasty-pins-banner-container .tasty-pins-banner span{margin-top:4px}.tasty-pins-banner-container a.tasty-pins-banner{text-decoration:none}.tasty-pins-banner-container a.tasty-pins-banner:hover{opacity:.8}.tasty-pins-banner-container a.tasty-pins-banner-image-link{flex-direction:column}.tasty-pins-banner-container a img{margin-bottom:0}.entry-content .wp-block-image .tasty-pins-banner-container img{margin-bottom:0;padding-bottom:0}#et-boc .et-l div .et_pb_image_wrap .tasty-pins-banner-container .tasty-pins-banner{padding-bottom:1em!important;padding-top:1em;text-decoration:none}#et-boc .et-l div .et_pb_image_wrap .tasty-pins-banner-container a.tasty-pins-banner{cursor:pointer;display:flex;font-size:14px;font-weight:700;line-height:1.8em;text-transform:uppercase}#et-boc .et-l div .et_pb_image_wrap .tasty-pins-banner-container a.tasty-pins-banner span{letter-spacing:2px;margin-top:4px}.et-db #et-boc .et-l .et_pb_module .tasty-pins-banner-container a:not(.wc-forward){padding-bottom:0}
Those adorable little jewelry holders shaped like cacti and porcelain animals are undeniably cute, but let’s be honest, they don’t always hold much.
If you’ve got more than a handful of necklaces, you probably know the struggle of watching your favorite pieces overflow onto your dresser, getting tangled and covered in dust.
Why This Art Wall Organizer Works
This clever DIY project solves multiple problems at once.
The hidden storage keeps your bedroom looking clean and clutter-free, while the shadow box design protects your jewelry from dust and tangles.
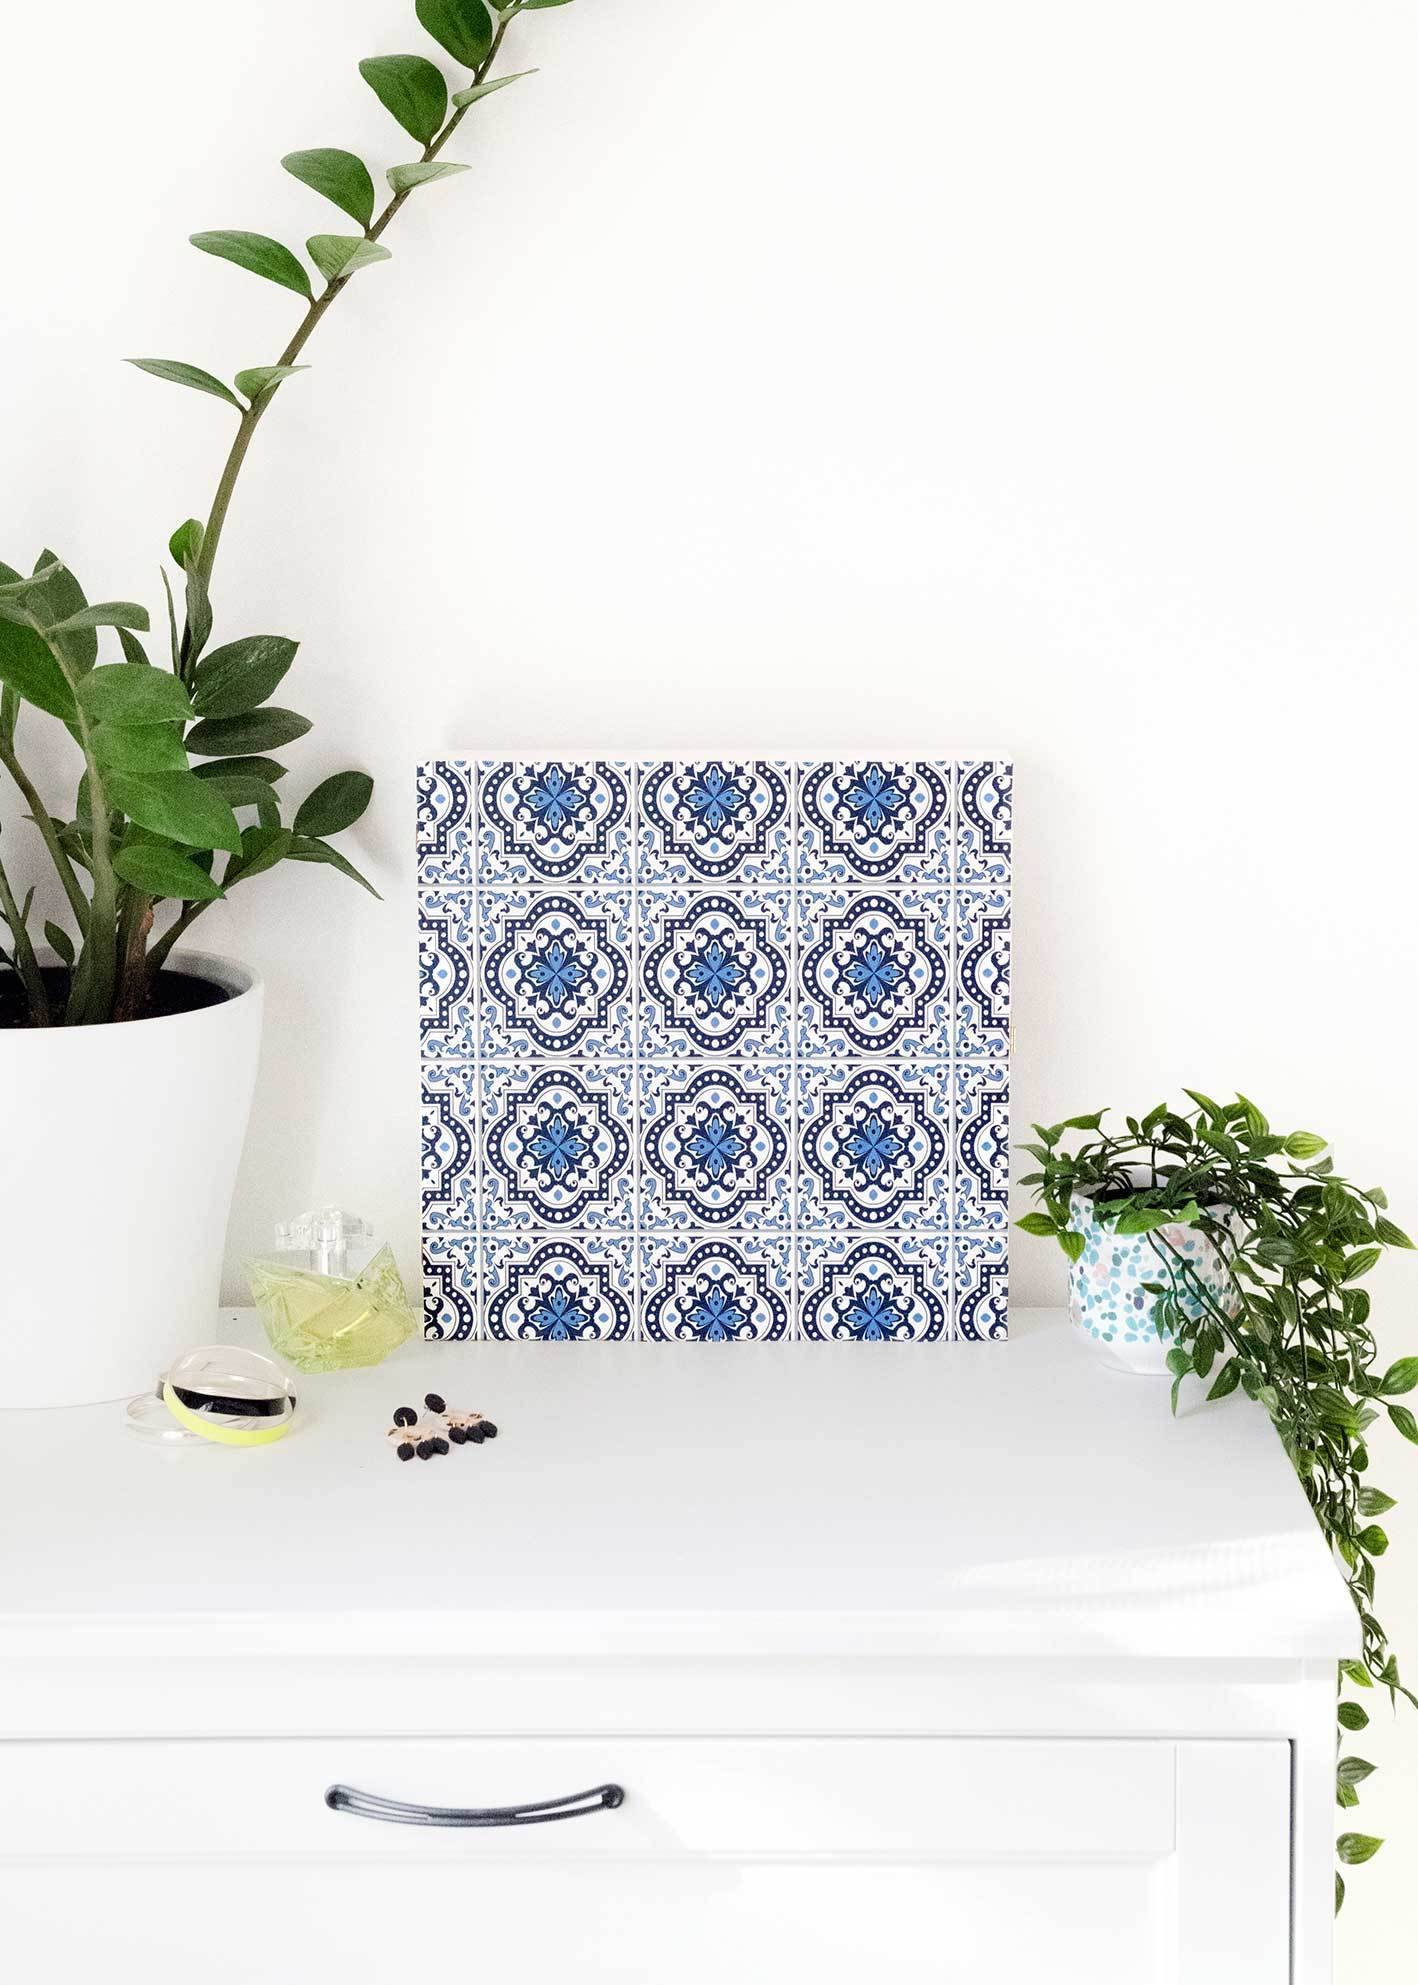
You can customize the front to match any decor style, from modern geometric patterns to vintage florals.
It’s perfect for small spaces where every square inch counts, and it’s a budget-friendly alternative to those expensive jewelry armoires that take up valuable floor space. Best of all, when the door is closed, no one will know it’s anything more than a pretty piece of wall art!
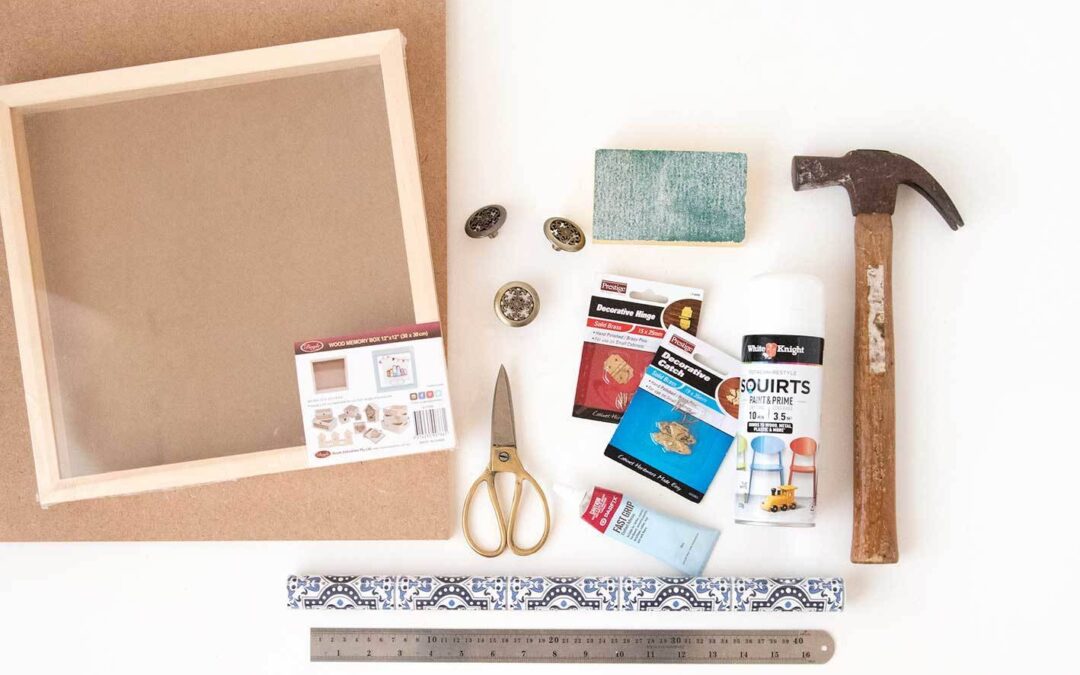
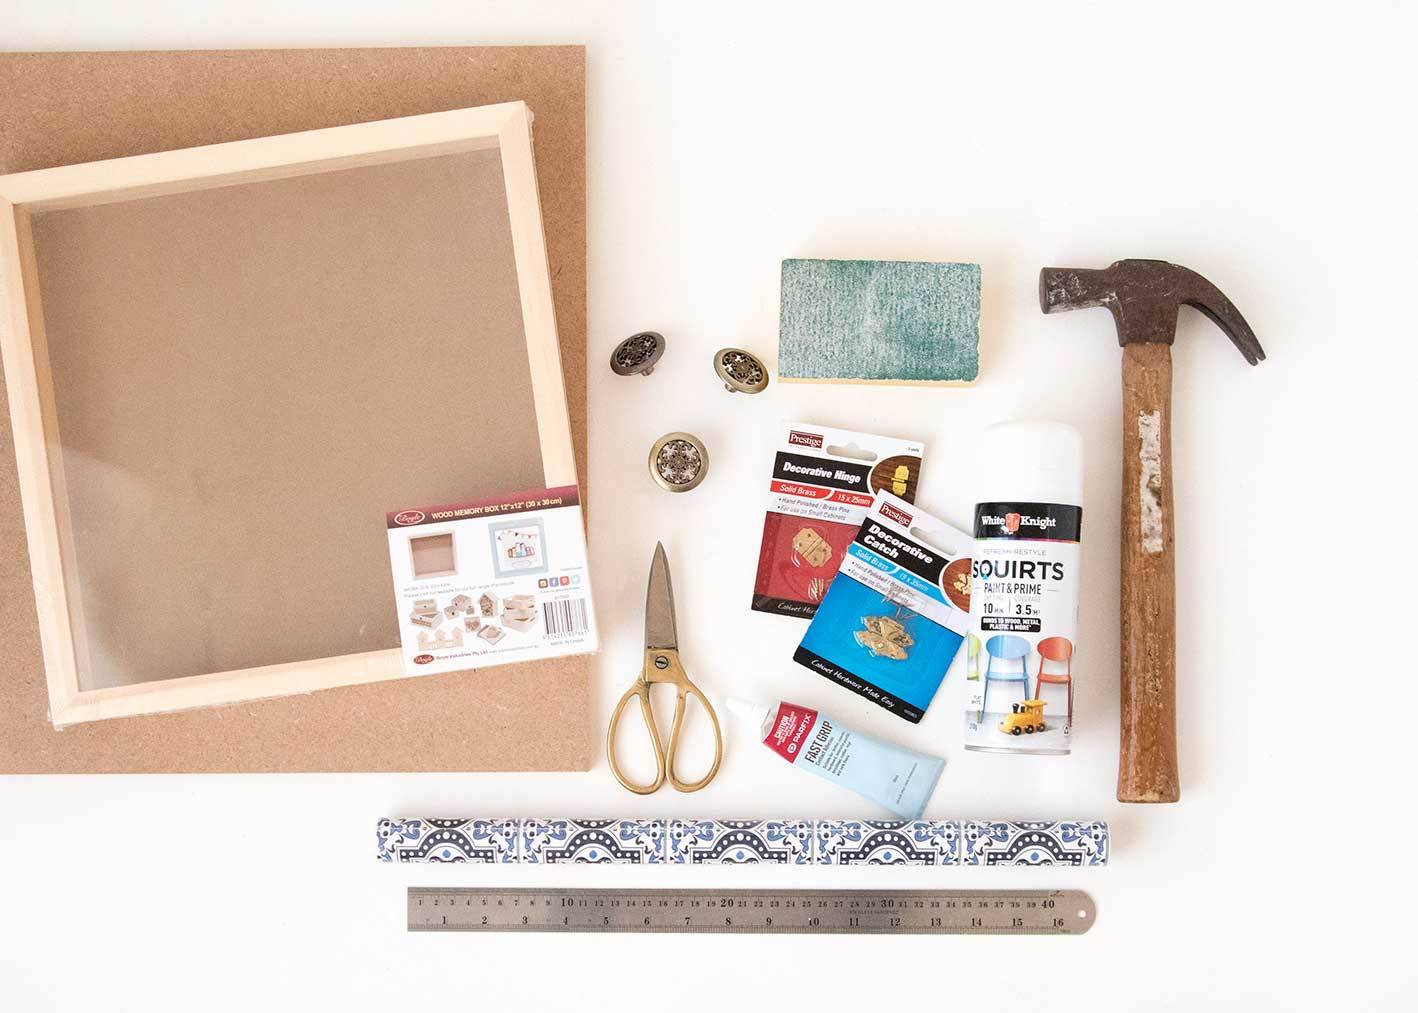
Materials You’ll Need
Wood shadow box frame
MDF board
Decorative contact paper or wallpaper
2 small hinges
Jewelry box clasp
Hooks or small decorative knobs
Primer and white paint
Sandpaper
Saw
Glue or strong adhesive
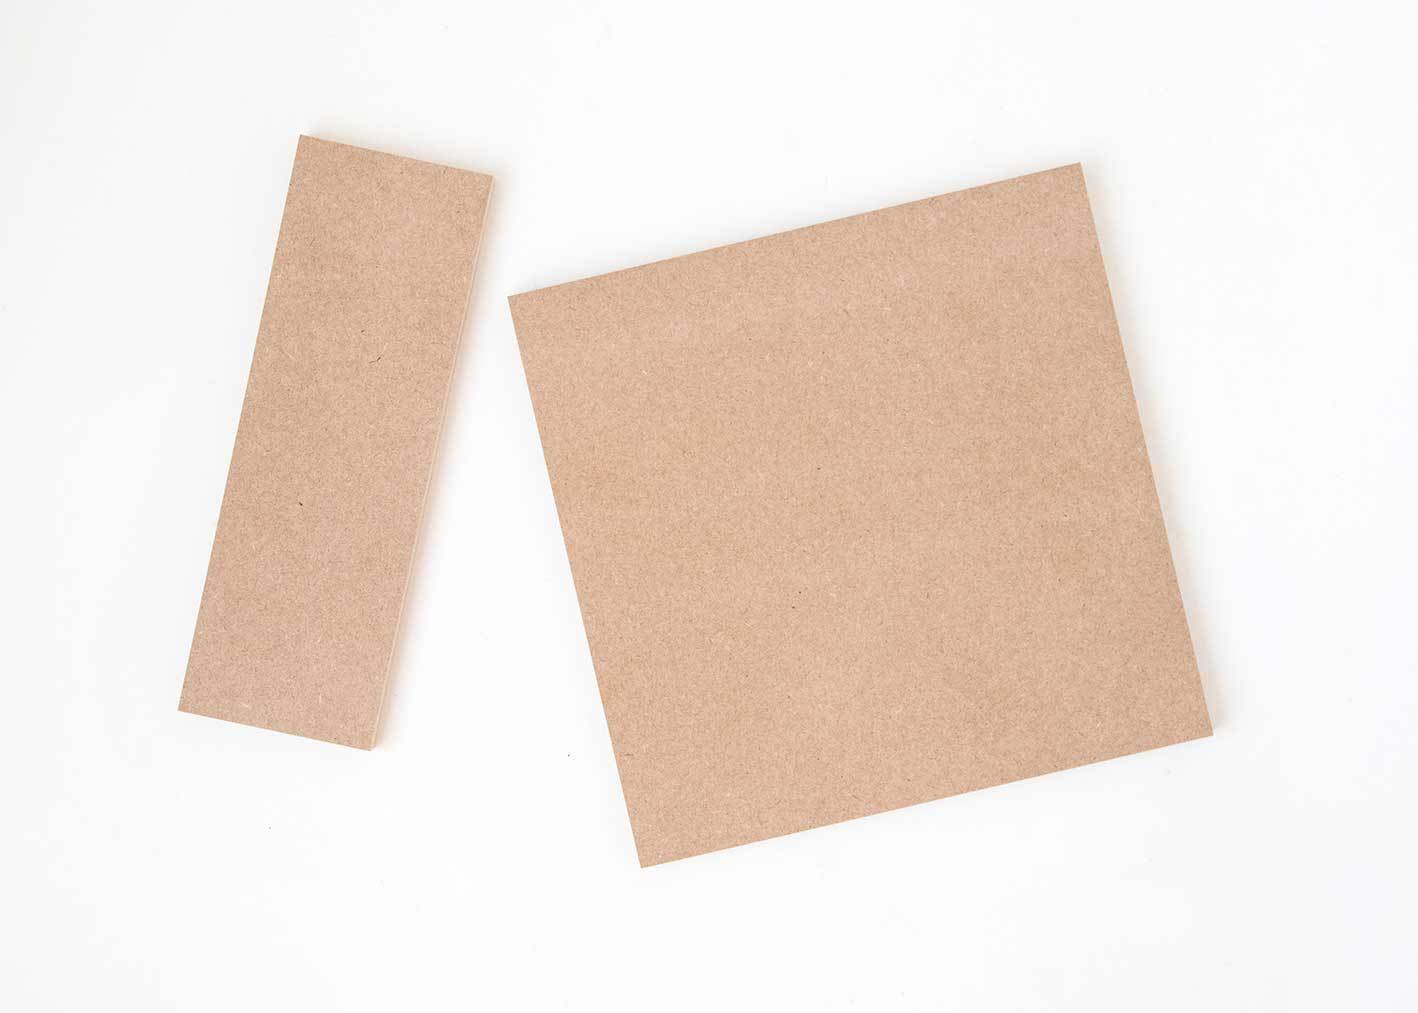
Cut and Prepare the MDF Door
Start by measuring your shadow box frame carefully. Cut the MDF board to match these exact dimensions—this piece will become the door that conceals your jewelry storage.
Remove the glass from the shadow box frame and set it aside (you can save it for another craft project!).
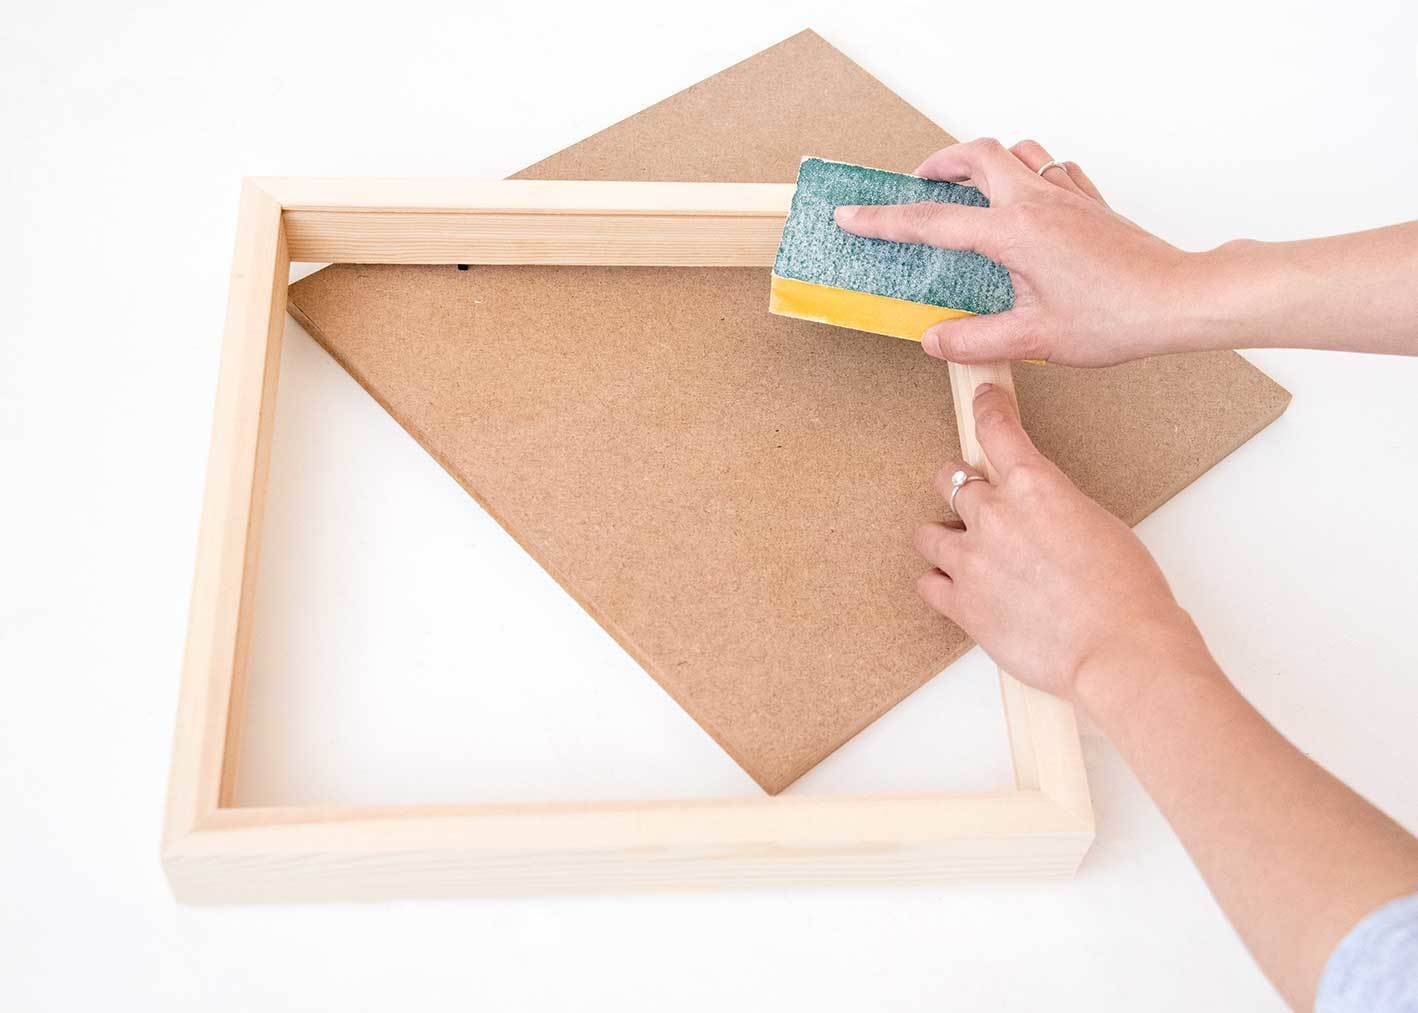
Sand both the frame and the MDF board until they’re smooth. This step is important because it helps the paint adhere better and gives you a professional-looking finish.
If you don’t have woodworking tools at home, don’t worry—most hardware stores offer free cutting services. Just bring your shadow box frame measurements with you, and they’ll cut the MDF to size.
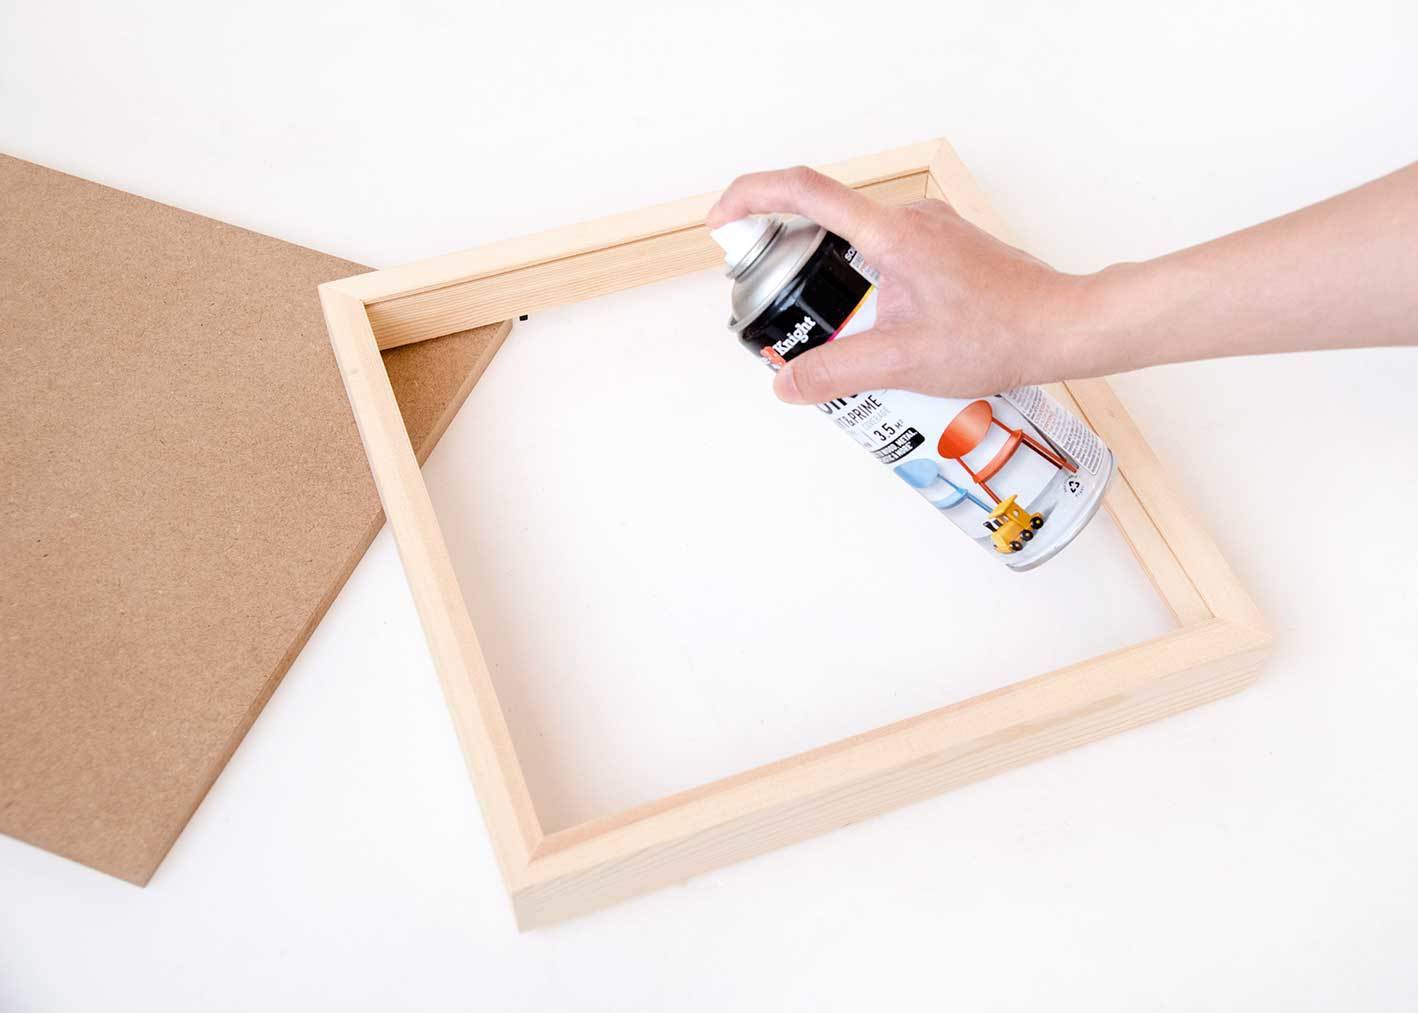
Prime and Paint
Apply a coat of primer to both the shadow box frame and the MDF board. Primer is especially important for MDF because it’s porous and can absorb paint unevenly without it.
Once the primer is dry, paint both pieces with your chosen color. White creates a classic, clean look that works with any decor, but you can absolutely choose any color that matches your room!
Let the paint dry completely between coats. If you want to add a vintage touch, you can lightly distress the edges with sandpaper after the final coat dries.
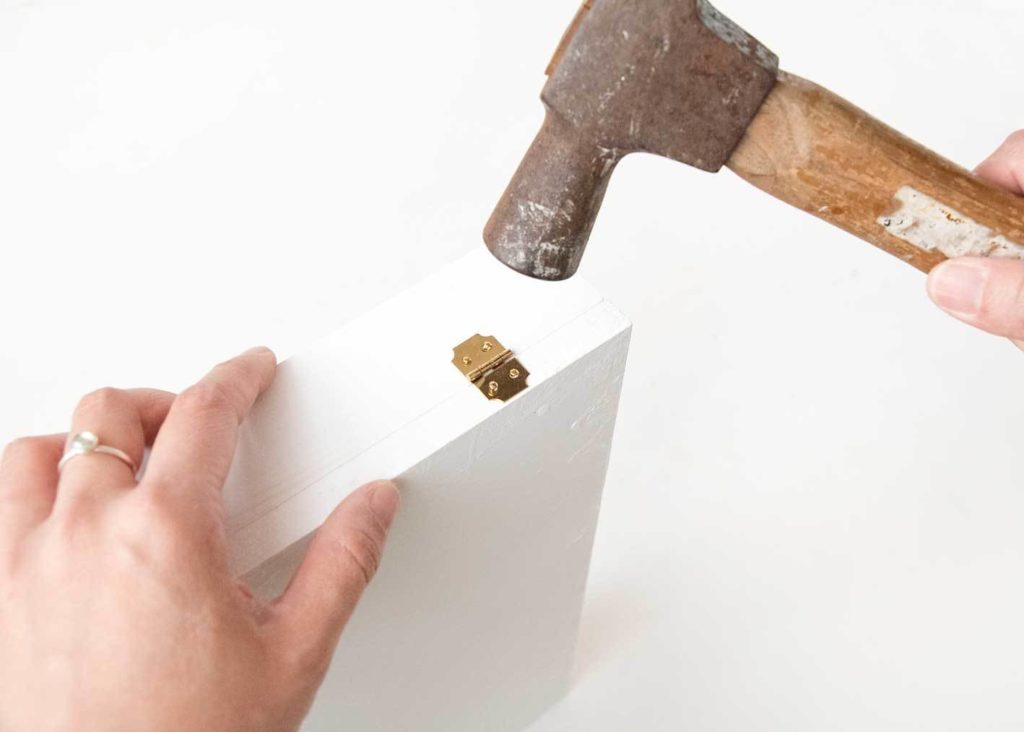
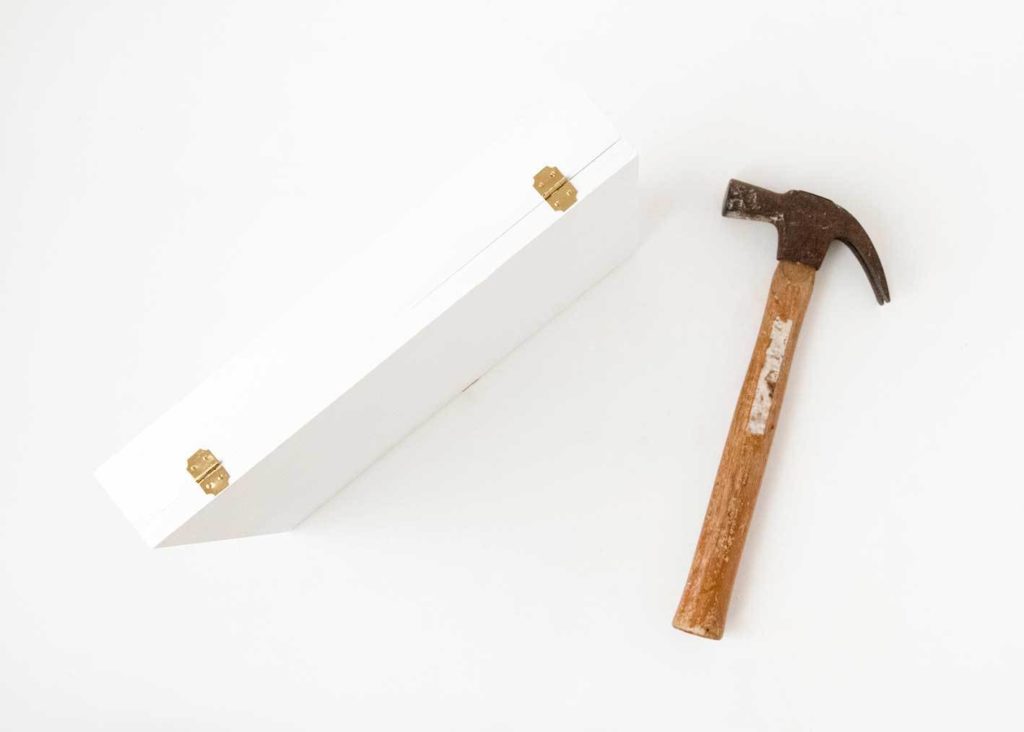
Attach the Hinges
Position two small hinges evenly spaced along one side of your shadow box frame. Before you attach them, it’s a good idea to pre-drill the screw holes to prevent the wood from splitting.
Carefully attach the MDF door to the frame using the hinges, then test that the door swings smoothly.
If your door sticks or doesn’t close evenly, try adjusting the hinge placement slightly. This is one of those steps where taking your time really pays off—you want your art wall organizer to open and close smoothly for years to come.
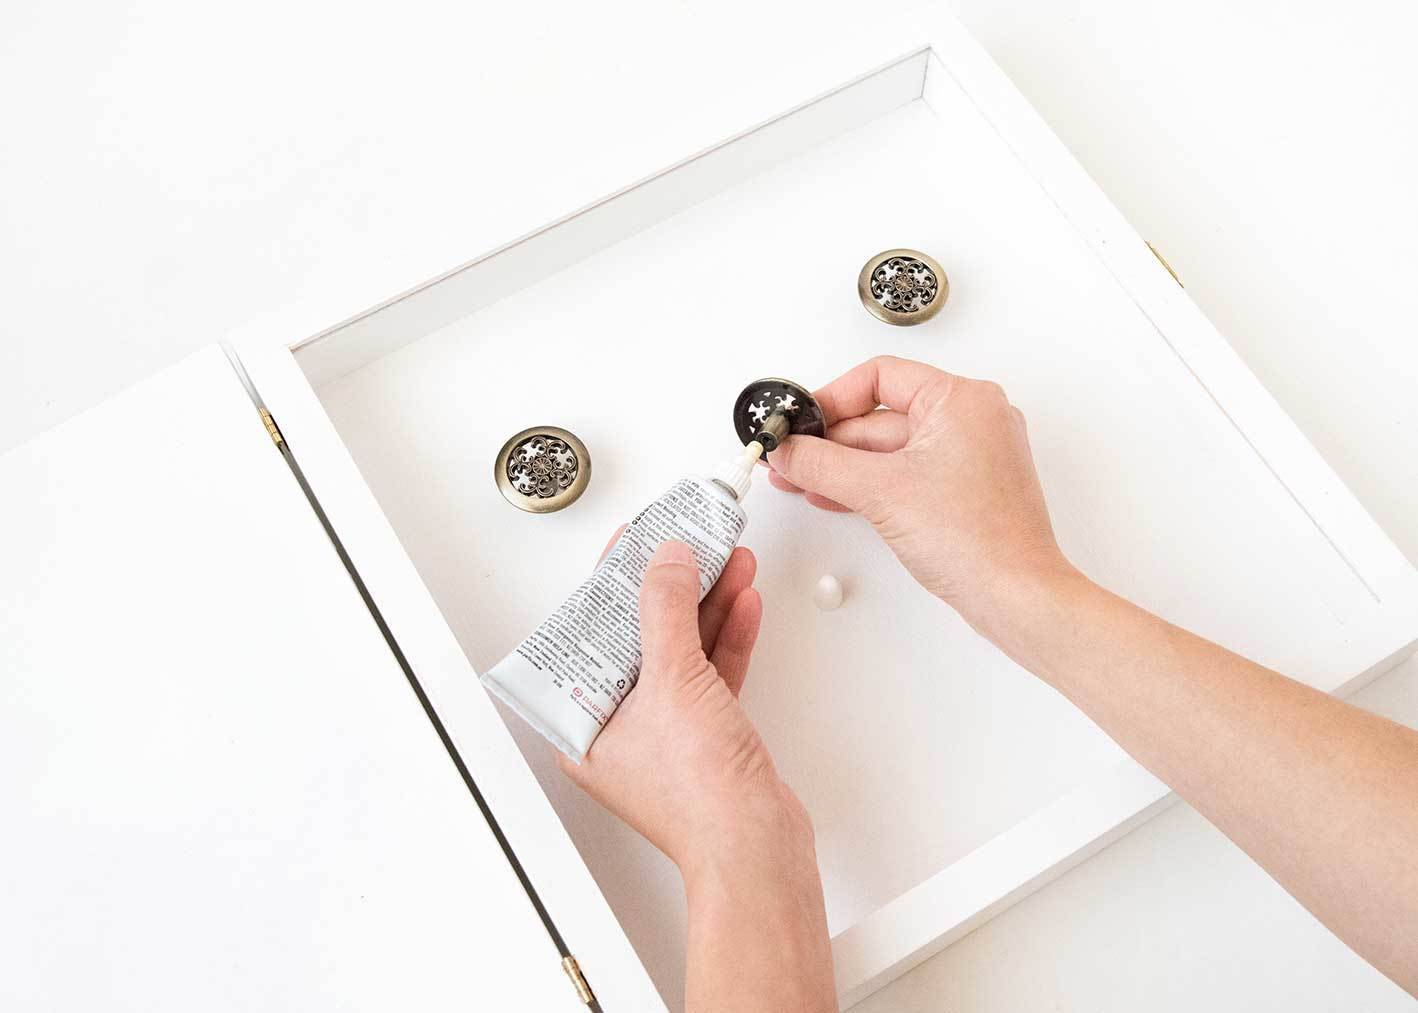
Add the Clasp
Install a jewelry box clasp on the opposite side from the hinges. Center the clasp so the door closes evenly and stays securely shut when filled with jewelry.
Magnetic clasps work great as an alternative if you prefer a cleaner look. Make sure whatever clasp you choose is strong enough to hold the door closed when it’s loaded with your jewelry collection.
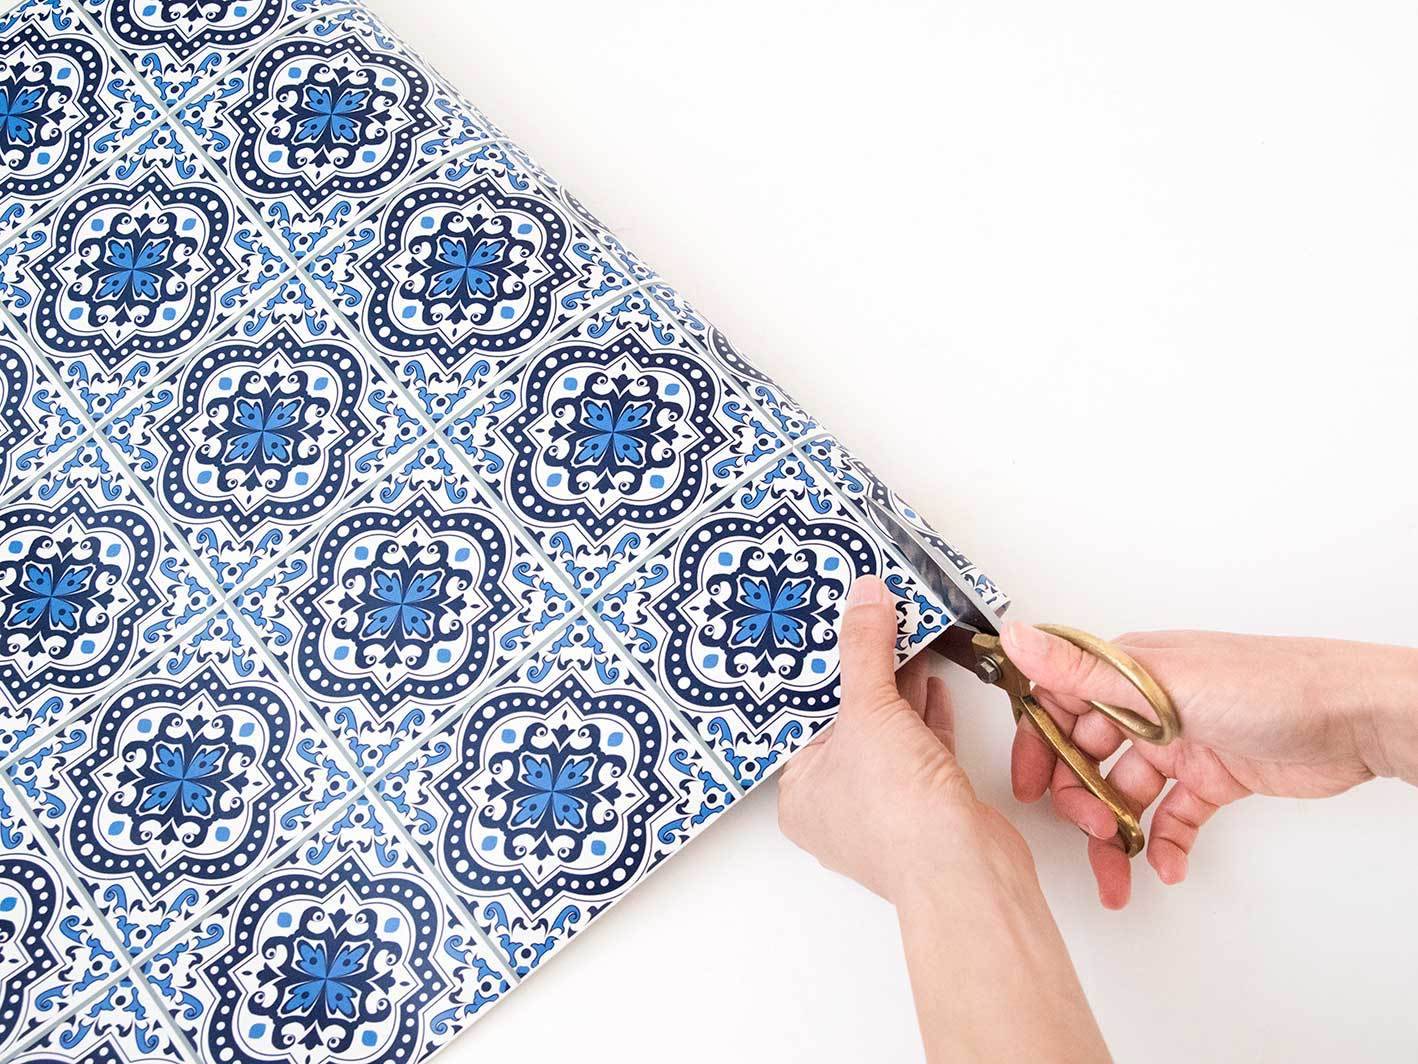
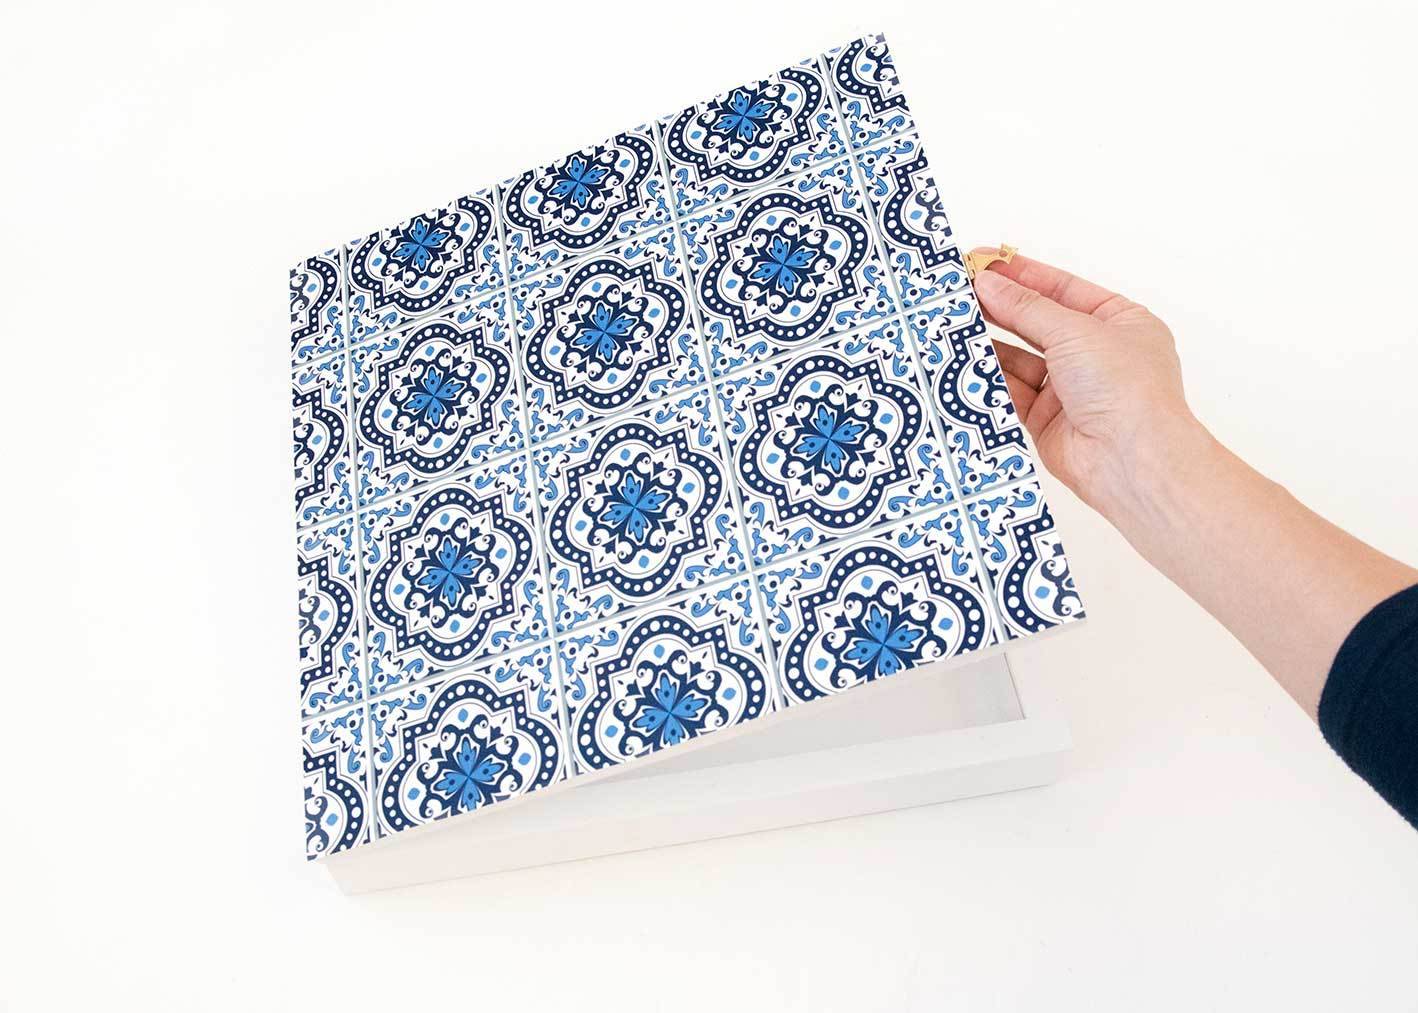
Decorate the Front
This is where your art wall organizer truly becomes a piece of art! Measure the front of your door and cut decorative contact paper or wallpaper to fit.
When you’re ready to apply it, measure twice and cut once—you want this to look perfect.
Apply the contact paper carefully to avoid bubbles. Start from one edge and smooth it down as you go, using a credit card or squeegee to push out any air pockets.
Your options here are endless: geometric patterns for a modern look, floral designs for something softer, or abstract art for a bold statement. Choose something that complements your bedroom’s aesthetic and makes you happy every time you see it.
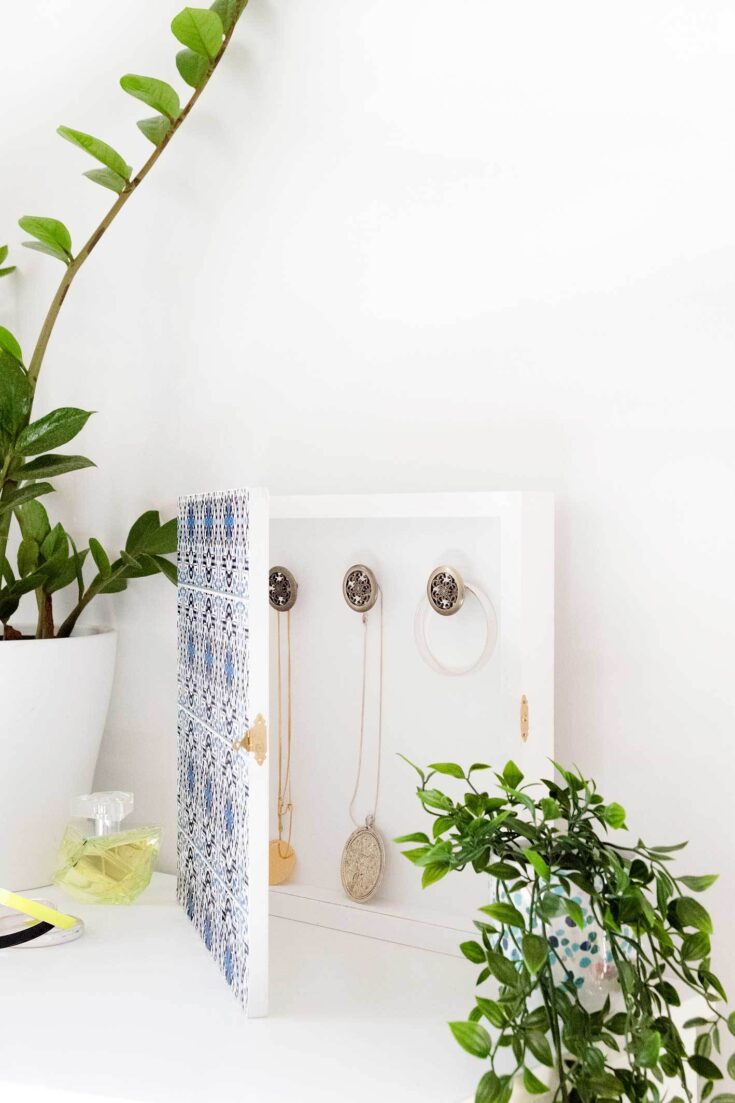
Install Interior Hooks
Now for the functional part! Space your hooks evenly inside the shadow box to accommodate different necklace lengths. Add decorative knobs near the top for shorter pieces like bracelets and chokers. Consider using different hook sizes for various jewelry types—some pieces might need larger, sturdier hooks.
Use strong adhesive or small screws to secure everything in place. Leave enough space at the bottom for longer necklaces to hang without getting tangled. Think about your jewelry collection as you plan the layout—if you have mostly long pendant necklaces, you’ll want to position hooks higher up.
Hang and Organize
Use picture hanging hardware that’s appropriate for the weight of your filled organizer. If you’re hanging it on drywall, wall anchors are essential for keeping everything secure. Hang your art wall organizer at a convenient height—eye level usually works well so you can easily see and access your jewelry.
Organize your jewelry by type or color, whatever makes the most sense for you. Hang your pieces, close the door, and step back to admire your handiwork. You’ve just created a beautiful piece of wall art that happens to be hiding all your jewelry!
Styling and Customization Ideas
Want to take this project even further? Match your contact paper to your bedroom’s color scheme for a cohesive look. You could create a whole gallery wall using multiple art wall organizers in different sizes—one for necklaces, one for bracelets, and another for rings and earrings.
Experiment with different frame styles to match your decor. A sleek modern frame works beautifully in contemporary spaces, while a distressed vintage frame adds charm to cottagecore or farmhouse bedrooms. For even more functionality, consider adding a cork backing where you can pin earrings, or line the interior with fabric to protect delicate pieces. You could even attach a small mirror to the inside of the door for a functional bonus.
The beauty of this project is that you can change the contact paper seasonally or whenever you want to refresh your look. It’s also a wonderful personalized gift for friends who love jewelry but struggle with storage.
Maintenance and Care Tips
Caring for your art wall organizer is simple. Dust the exterior just like you would any other wall art. Every few months, take a few minutes to reorganize the interior and untangle any pieces that might have gotten twisted together.
Over time, the hinges might loosen slightly from regular use, so keep a screwdriver handy to tighten them when needed. Clean the hooks occasionally to prevent any discoloration on your jewelry. If you have particularly delicate pieces, consider adding felt lining to the interior back panel for extra protection.
Frequently Asked Questions
What size shadow box frame works best?
An 8×10 or 11×14 frame works well for most jewelry collections. If you have an extensive necklace collection, go larger—or better yet, create multiple smaller organizers for different jewelry types. There’s no wrong size, as long as it fits your space and your collection.
Can I use this for earrings too?
Absolutely! To store earrings, add a piece of decorative mesh or cork to the interior back panel. You can hang stud earrings on the mesh or pin them to the cork. This works especially well if you create a dedicated earring organizer alongside your necklace storage.
Do I have to paint it white?
Not at all! Paint your art wall organizer any color that matches your decor. Metallics like gold, rose gold, or silver create a glamorous, jewelry-box feel. Deep jewel tones can make a bold statement, while soft pastels work beautifully in feminine spaces. This is your project—make it uniquely yours!
What if I don’t have woodworking tools?
Most hardware stores offer free cutting services for customers. Bring your shadow box frame and its measurements to the store, and they’ll cut the MDF to the perfect size. This makes the project accessible even if you’re working with a minimal tool collection.
How much weight can this hold?
A properly installed shadow box with quality hooks can comfortably hold several necklaces and bracelets. For heavier statement pieces, use stronger hooks and make sure you’ve mounted the organizer to wall studs or used appropriate wall anchors for durability. If you’re concerned about weight, test it before filling it completely.
Can I add a mirror inside?
That’s a brilliant idea! Attach a small mirror to the inside of the door using strong adhesive. This gives you a convenient spot to check how your jewelry looks before heading out. Just make sure the mirror isn’t too heavy for your hinges to support.
How to Make a Jewelry Organizer That’s Cleverly Disguised as Wall Art
Make this jewelry organizer that hides away as wall art! Stow away your necklaces and bracelets with the help of disguise.
Active Time3 hours
Total Time3 hours
DifficultyEasy
Materials
Wood shadow box frame
MDF board
Decorative contact paper or wallpaper
2 small hinges
Jewelry box clasp
Hooks or small decorative knobs
Primer and white paint
Sandpaper
Saw
Glue or strong adhesive
Instructions
Cut and Prepare the MDF Door
Cut MDF to match your shadow box frame dimensions. Remove the glass from the frame, then sand both the frame and MDF board smooth.
Prime and Paint
Apply primer to both the frame and MDF board, then paint with white paint (or your preferred color). Let dry completely.
Attach the Hinges
Connect the MDF board to the shadow box frame using two small hinges on one side to create a door that swings open.
Add the Clasp
Install a jewelry box clasp on the opposite side of the hinges to keep your art wall organizer securely closed.
Decorate the Front
Measure and cut decorative contact paper or wallpaper to fit the door. Apply it to create your “artwork” disguise.
Install Interior Hooks
Attach hooks or decorative knobs inside the shadow box to hold necklaces, bracelets, and other jewelry.
Hang and Organize
Mount your art wall organizer on the wall, fill it with jewelry, close the door, and enjoy your hidden storage!
Making Beautiful Storage Work for You
Creating this art wall organizer gives you the best of both worlds: beautiful art that enhances your space and practical storage that keeps your jewelry organized and protected. Whether you’re a beginner DIYer or someone with plenty of crafting experience, this project is completely customizable to match your style and skill level.
The hidden storage concept works beautifully for keeping your bedroom looking clean while ensuring your favorite pieces are always within reach. You’ve created something functional that also brings beauty to your walls—and that’s what great design is all about.
Ready to create your own hidden jewelry storage that looks straight from one of the great design studios? Gather your materials and give it a try this weekend. Your jewelry (and your bedroom) will thank you!
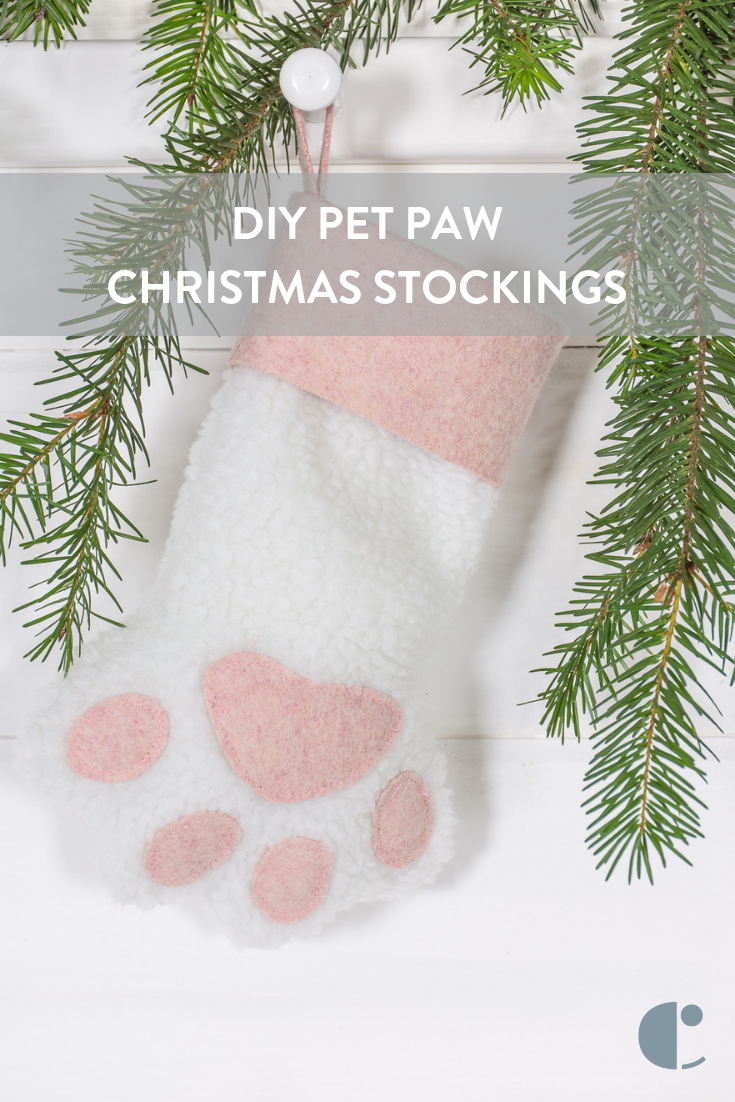
If you’re anything like me, your pets aren’t just animals, they’re full-fledged family members who deserve to be part of every holiday tradition. And what says “you’re part of the family” more than their very own Christmas stocking hanging alongside everyone else’s?
Making animal Christmas stockings is easier than you might think, and the best part is personalizing them to match your furry friend’s unique personality.
.tasty-pins-banner-container{display:block;margin-bottom:20px;position:relative;width:-moz-fit-content;width:fit-content}.tasty-pins-banner-container a{cursor:pointer;display:flex;font-size:14px;font-weight:700;letter-spacing:1px;line-height:1.8em;text-transform:uppercase}.tasty-pins-banner-container a:hover{opacity:1}.tasty-pins-banner-container .tasty-pins-banner{align-items:center;bottom:0;cursor:pointer;display:flex;justify-content:center;left:0;padding-bottom:1em;padding-top:1em;position:absolute;right:0}.tasty-pins-banner-container .tasty-pins-banner svg{margin-right:4px;width:32px}.tasty-pins-banner-container .tasty-pins-banner span{margin-top:4px}.tasty-pins-banner-container a.tasty-pins-banner{text-decoration:none}.tasty-pins-banner-container a.tasty-pins-banner:hover{opacity:.8}.tasty-pins-banner-container a.tasty-pins-banner-image-link{flex-direction:column}.tasty-pins-banner-container a img{margin-bottom:0}.entry-content .wp-block-image .tasty-pins-banner-container img{margin-bottom:0;padding-bottom:0}#et-boc .et-l div .et_pb_image_wrap .tasty-pins-banner-container .tasty-pins-banner{padding-bottom:1em!important;padding-top:1em;text-decoration:none}#et-boc .et-l div .et_pb_image_wrap .tasty-pins-banner-container a.tasty-pins-banner{cursor:pointer;display:flex;font-size:14px;font-weight:700;line-height:1.8em;text-transform:uppercase}#et-boc .et-l div .et_pb_image_wrap .tasty-pins-banner-container a.tasty-pins-banner span{letter-spacing:2px;margin-top:4px}.et-db #et-boc .et-l .et_pb_module .tasty-pins-banner-container a:not(.wc-forward){padding-bottom:0}
Whether you have a playful pup, a curious cat, or another beloved companion, I’m going to show you how to create adorable paw-shaped stockings that’ll make your pet feel extra special this holiday season.
Why Make DIY Animal Christmas Stockings?
Before we dive into the how-to, let’s talk about why handmade animal Christmas stockings are worth your time.
First, there’s the cost factor. Custom pet stockings can run $30-50 or more, while making your own costs just a fraction of that.
You’ll have complete control over the colors, fabrics, and details, so you can match your pet’s coloring or coordinate with your existing holiday decor.
These stockings also make incredibly thoughtful gifts for the pet lovers in your life. Imagine giving your friend a personalized stocking for their new puppy or their beloved senior cat.
It’s the kind of heartfelt present that shows you really get what matters to them.
Plus, let’s be honest, there’s something wonderfully satisfying about creating something with your own hands, especially when it becomes part of your family’s holiday traditions.
Years from now, you’ll smile remembering the afternoon you spent sewing that first stocking for your four-legged family member.
Materials You’ll Need
Gathering your supplies is the first step to success. Here’s everything you’ll need:
Faux fur fabric (½ yard is plenty for one stocking)
Felt in coordinating colors (for paw pads and cuff)
Fabric scissors (sharp ones make all the difference!)
Sewing machine or needle and thread
Sewing pins
Pen or fabric marker
Paw template (download link)
Optional: iron-on letters, embroidery supplies, or fabric paint for personalization
You can find faux fur fabric at most craft stores or online. I love choosing colors that match my pets—brown for my chocolate lab, gray for my tabby cat.
Felt comes in every color imaginable, so you can get creative with the paw pad colors. Some people like realistic black or pink paw pads, while others go bold with red or green for a festive touch.
If you’re working with a tight budget, check the remnant bins at fabric stores. You often need less than half a yard of faux fur, so remnants are perfect and usually discounted!
Step-by-Step Instructions
Now for the fun part—let’s make some stockings! I’ll walk you through each step, and trust me, this is more straightforward than it looks.
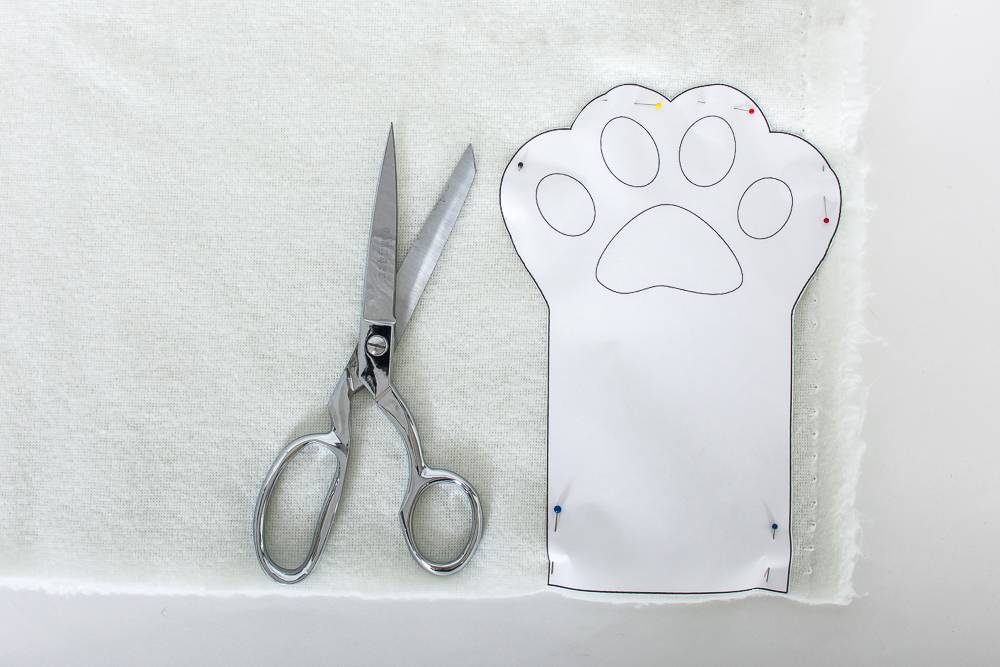
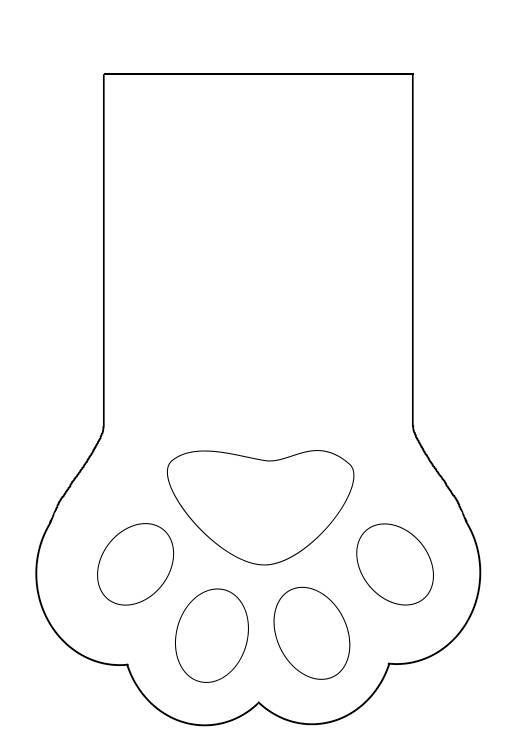
Download and Prepare Your Template
Start by downloading the paw template and printing it at full size. The template should create a stocking that’s approximately 12 inches tall. This is perfect for most dogs and cats.
If you have a smaller pet like a guinea pig or ferret, you can scale down the template when printing (try 75% for a 9-inch stocking). For larger dogs, scale it up to 125% for a 15-inch stocking.
Once printed, carefully cut out the template. You’ll notice it includes the main paw shape and separate paw pad pieces. Keep all the pieces together—I like to put them in a large envelope so nothing gets lost.
Cut Your Fabric Pieces
This is where your fabric scissors come in handy! Fold your faux fur fabric in half with the fuzzy side (the pile) facing inward. Place your paw template on top and pin it securely.
When cutting faux fur, here’s a pro tip: cut through just the backing fabric, not the fur itself. This prevents creating a choppy edge and minimizes shedding.
Pay attention to the direction of the fur pile—you want it running downward on your finished stocking for the most realistic look. Cut out two identical paw shapes.
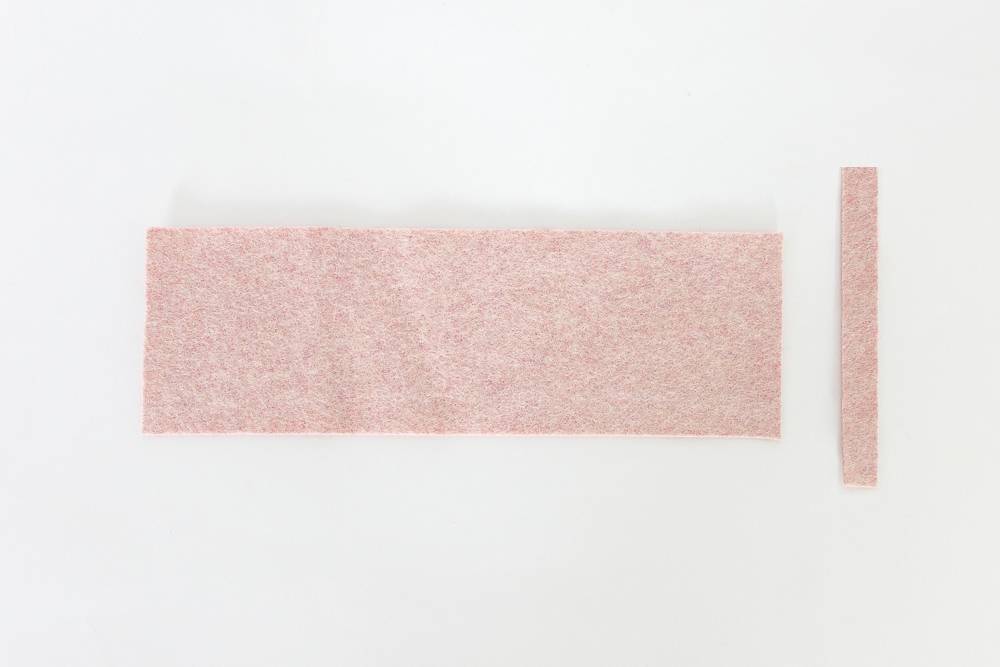
Next, place your paw pad template pieces on your felt and trace them.
You’ll need one large center pad and four smaller toe pads. Cut these out carefully.
Felt is much easier to work with than faux fur!
Finally, measure and cut two rectangles from your felt:
One piece 9½ inches by 3 inches (this becomes your cuff)
One piece 4½ inches by ½ inch (this becomes your hanging loop)
Create the Paw Pad Details
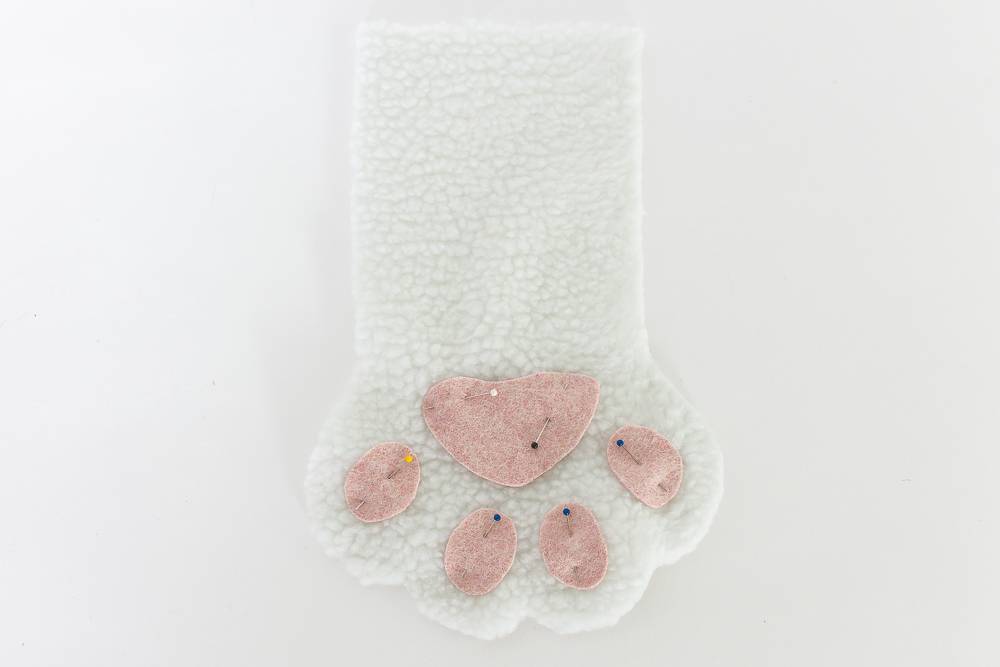
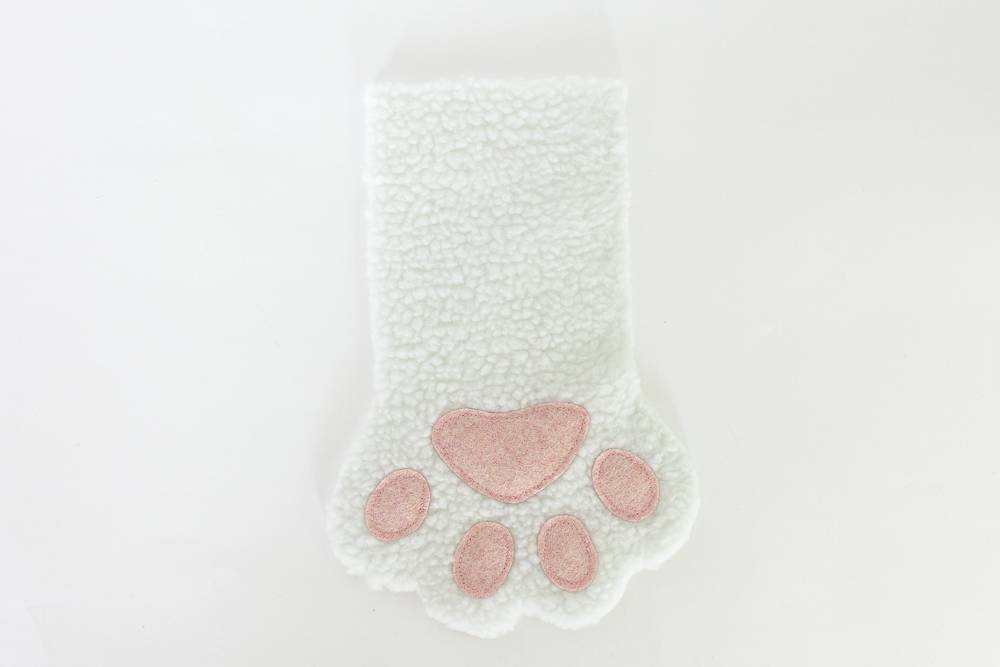
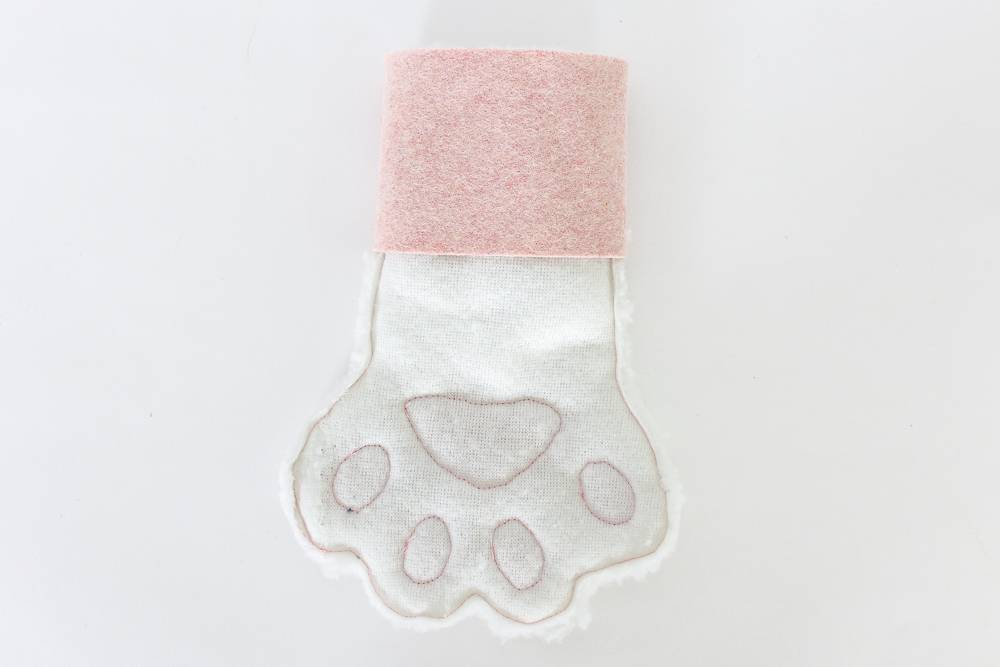
Now we’re adding those adorable paw pads that really make these stockings special! Lay out one of your faux fur paw pieces with the fuzzy side facing up (this will be the outside of your stocking).
Arrange your felt paw pads in position – one large pad at the bottom center and four smaller pads arranged above it like toes.
Take your time getting the placement just right before pinning everything in place. Once you’re happy with how it looks, sew each paw pad down using thread that matches your felt color.
You can do this by hand with a simple running stitch or whipstitch, or use your sewing machine with a straight stitch close to the edge of each pad.
I find that going slowly and pivoting carefully around the curves gives the neatest result. Don’t worry if your stitches aren’t perfect – remember, this is a handmade creation, and those little imperfections add character!
Assemble the Stocking
Here’s where your stocking really starts to take shape. Place your two faux fur paw pieces together with the right sides (fuzzy sides) facing each other.
The paw pads should be on the inside, hidden between the layers. Pin all around the edges, leaving the top straight edge open.
Using a ⅛-inch seam allowance, sew around the entire paw shape. Take your time around the toe curves and the space between the toes—these tight corners can be tricky.
If you’re sewing by hand, use a backstitch for strength. If you’re using a machine, go slowly and pivot with the needle down when turning corners.
Once you’ve sewn all the way around, carefully trim any excess fabric from the curves and corners, being careful not to cut into your stitches. This helps the stocking turn right-side-out more smoothly.
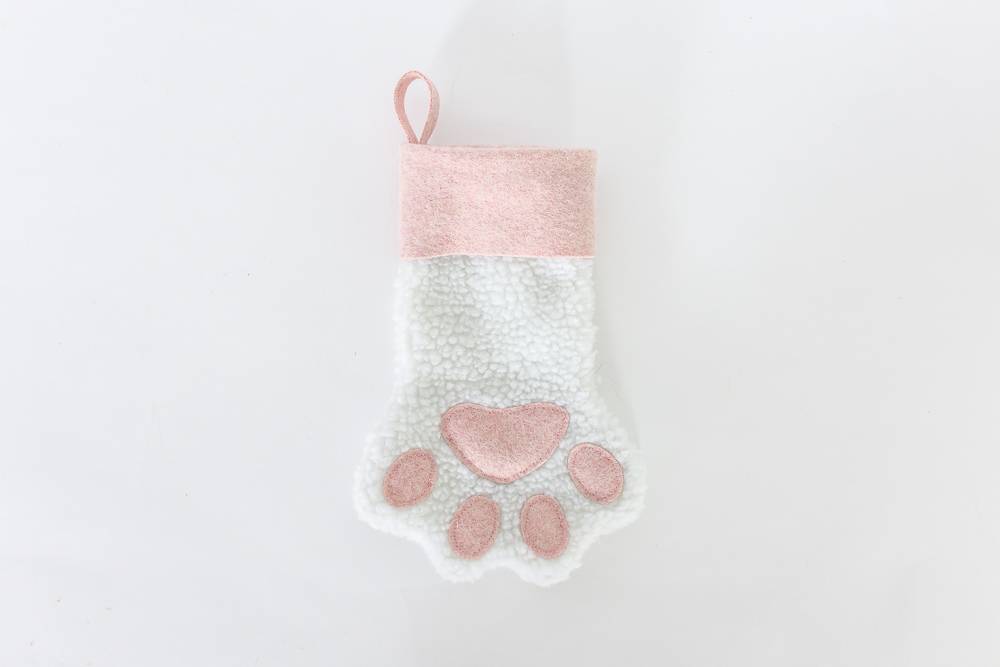
Add the Cuff
Take your 9½-inch by 3-inch felt rectangle and sew the short ends together with a ⅛-inch seam allowance. This creates a tube that will become your cuff. Now turn your stocking inside-out (if it isn’t already) so the paw pads are hidden inside.
Slip this felt tube over the top of your inside-out stocking, with the seam of the tube aligned with the back seam of your stocking. Pin the raw edge of the felt tube to the raw edge at the top of your stocking, making sure everything is even all the way around.
Sew around this top edge to attach the cuff to the stocking. This seam will be hidden when you fold the cuff down, so don’t worry too much about making it perfect.
Create Hanging Loop and Final Touches
Almost done! Turn your stocking right-side-out through the top opening. Give it a good shake to fluff up the fur, and use your fingers or a blunt tool to gently push out the toe shapes so they’re nice and rounded.
Fold the felt cuff down to create that classic stocking look. Now take your 4½-inch by ½-inch felt strip and fold it in half to create a loop. Position this at the top back corner of your stocking (on the cuff) and hand-sew it securely in place.
Make sure to stitch through both layers of the cuff for a strong attachment. You don’t want this falling off when it’s stuffed full of treats!
If you’re adding personalization like your pet’s name, now’s the time to do it. Iron-on letters work great on the felt cuff, or you can embroider names for a truly custom touch.
Personalization Ideas
This is where you can really let your creativity shine! Here are some ideas I love:
Match Your Pet’s Coloring: Use brown faux fur for chocolate labs, gray for tabbies, white for Westies, or spotted fabrics for Dalmatians. Getting that color match makes the stocking feel extra special.
Add Their Name: Iron-on letters are the quickest option and come in tons of fonts and colors. If you’re handy with embroidery, stitching their name adds an elegant touch. Fabric paint works too, but test it on a scrap first to make sure you like how it looks.
Size It Right: The standard 12-inch stocking works for most pets, but don’t be afraid to adjust. I made a tiny 6-inch version for my friend’s hamster, and it was absolutely precious hanging on her mantel!
Festive Embellishments: Consider adding small bells, ribbon bows, or holiday-themed appliques. Just make sure anything you add is securely attached if your pet might try to “help” remove it later.
Coordinate With Your Decor: If your holiday color scheme is gold and white, use cream faux fur with gold felt accents. Love traditional red and green? Go for it! These stockings should fit seamlessly into your existing holiday setup.
Tips for Success
Working with faux fur can be a little tricky if you’ve never done it before, so here are my hard-won tips:
Minimize the Mess: Faux fur sheds during cutting. Work over a trash bag or old sheet you can shake outside afterward. A lint roller is your friend for cleanup!
Cutting Technique: Always cut from the backing side, not the fur side, using just the tips of your scissors. This prevents cutting the actual fur fibers and reduces shedding.
Sewing Through Thick Layers: When sewing the cuff to the stocking, you’re going through several layers of fabric. If you’re using a machine, go slowly and use a heavy-duty needle. Hand-sewing? Use a thimble to save your fingers!
Test First: If you’re trying a new technique like fabric paint or embroidery, practice on felt scraps first. It’s much better to make mistakes on scraps than on your finished stocking.
Keep Pieces Organized: As you cut out your paw pads, keep them arranged in position so you remember which piece goes where. I learned this the hard way when I mixed up all my toe pads!
Common Mistakes to Avoid: Don’t skip the step of pinning everything before sewing—it really does make a difference in your final result. Also, resist the temptation to use a seam allowance larger than ⅛ inch, as this will make your stocking noticeably smaller than intended.
What to Fill Your Animal Christmas Stockings With
Now that you’ve created these adorable stockings, what should go inside them? Here are some ideas that’ll make your pet’s tail wag (or purr with contentment):
For Dogs
Favorite treats or training rewards
New tennis balls or squeaky toys
Dental chews
A new collar or bandana
Puzzle toys filled with peanut butter
For Cats
Catnip toys
Feather wands or crinkle balls
Freeze-dried treats
A new collar with a bell
Small plush mice
For Other Pets
Species-appropriate treats
New hideaways or tunnels
Chew toys
Grooming supplies
Food puzzles
Remember to consider your pet’s size when filling their stocking. You don’t want it so stuffed that it falls off the mantel!
I like to include a mix of treats they can enjoy right away and toys that’ll keep them entertained throughout the holiday season.
Variations and Adaptations
While the paw-shaped design is classic, there’s room for creativity:
Different Paw Prints: Cat paws are smaller and more delicate than dog paws. You can modify the template to create species-specific shapes. Rabbit paws are longer and narrower—perfect for your bunny friend!
Traditional Shape With Animal Details: Not comfortable with the paw shape? Make a traditional stocking pattern and add paw pad appliques to the front, or use animal-print fabric.
No-Sew Options: If sewing isn’t your thing, you can create stockings using fabric glue instead of stitching. It won’t be quite as durable, but it absolutely works for decorative purposes.
Bone-Shaped for Dogs: Instead of a paw, why not make a bone-shaped stocking? Use the same construction technique with a bone-shaped template instead.
Mini Stockings: Create tiny versions (4-6 inches) for small pets like birds, hamsters, or fish. They’re quick to make and absolutely adorable!
Frequently Asked Questions
What fabrics work best for animal Christmas stockings?
Faux fur is my top choice because it’s soft, festive, and comes in colors to match almost any pet. However, fleece, flannel, or even quilting cotton work beautifully, too.
For outdoor dogs who might actually interact with their stocking, machine-washable fabrics like fleece are practical.
Can I make this without a sewing machine?
Absolutely! Hand-sewing takes longer, but it’s completely doable. Use a backstitch for strength along the seams, and a whipstitch or running stitch for attaching the paw pads.
Plan for about 2-3 hours of sewing time, rather than 30-45 minutes by machine.
How do I adjust the size for different pets?
The easiest way is to scale the template when printing. Print at 75% for a 9-inch stocking (perfect for cats and small dogs), 100% for a 12-inch stocking (most dogs), or 125% for a 15-inch stocking (large dogs). Remember to adjust your felt cuff measurements proportionally, too.
What’s the best way to add my pet’s name?
Iron-on letters are quickest and look clean and professional. You can find them at any craft store in multiple fonts and colors.
For a more personal touch, hand-embroidery using backstitch or chain stitch creates beautiful results. Fabric paint or markers work too. Just be sure to let them dry completely and heat-set them if required.
How do I wash handmade pet stockings?
Spot-clean when possible using a damp cloth and mild soap. If you need to fully wash it, turn it inside-out, place it in a mesh laundry bag, and use cold water on a gentle cycle.
Air dry completely. Never put faux fur in the dryer, as heat can damage its fibers. If you made yours from fleece or cotton instead, machine washing and drying is usually fine.
Yield: One 12 inch stocking
DIY Pet Christmas Stockings
Learn to sew adorable paw-shaped Christmas stockings for your furry family members! This beginner-friendly tutorial shows you how to create personalized animal christmas stockings using faux fur and felt. Perfect for dogs, cats, and other pets, these handmade stockings add a special touch to your holiday traditions. Customize with your pet’s name and favorite colors for a one-of-a-kind decoration they’ll love seeing filled with treats each year.
I organize the Before & After series and cover DIY and design. I joined AT in October 2020 as a production assistant. I have an MA in Journalism from the University of Missouri and a BA in Journalism from Belmont University. Past editorial stops include HGTV Magazine, Nashville Arts Magazine, and local magazines in my hometown, Columbia, Missouri.


