This week, we’re helping a family “flip” their family room to improve the space’s function and feel.
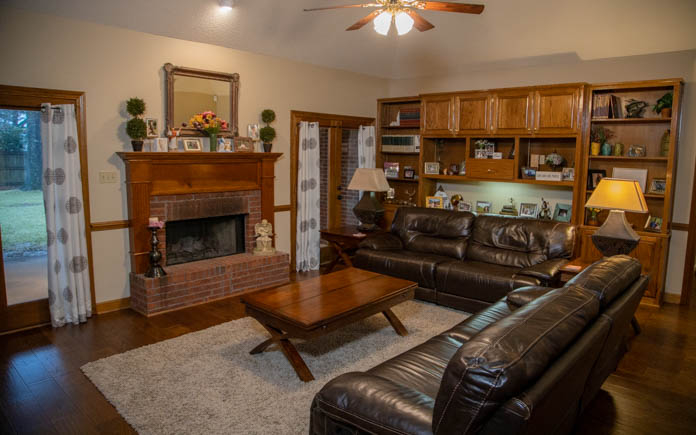
Faith and Roberto’s family room feels cramped with the custom-built desk no one uses and dated bookshelves.
Roberto and Faith have lived in their home for 16 years. It was built in 1993 and came with a custom bookshelf-desk combo that the couple hasn’t used much.
Further, the outdated stain and shiny finish leave the room feeling dated.
And with no other space for their TV besides the wall on the other side of the room, the couch is butted up against the desk, making the room feel small.
But we’ve got some solutions!
The Projects
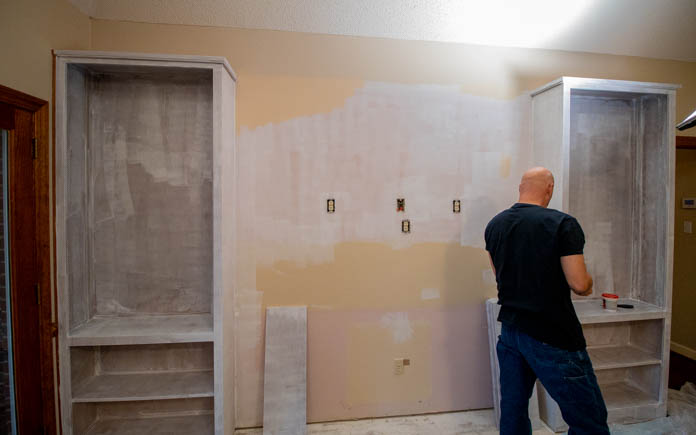
Removing the custom-built desk creates space for a TV between the bookshelves.
Deconstruct the Desk and Cabinets
First, we deconstruct the built-in desk and cabinets we’re removing. But we’re throwing nothing away. These cabinets can be repurposed for storage in the garage.
We save every bit of trim from the desk to use along the floor edge of the bookshelves. Because many of those pieces are made by the manufacturer, we can’t easily replace them.
After removing the cabinets, we found a pop of pink on the wall behind. Roberto and Faith had leftover paint from when they painted the family room years ago, but the color changed and doesn’t quite match what’s on the walls.
Drastic temperature changes can cause paint to change color, so it’s important to store it in a temperature-controlled space to prevent this.
To get the right shade, we do a color match. Simply take a boxcutter and carve out a square of paint from an inconspicuous spot on the wall. We chose to take a sample from next to the electrical outlet that will be behind the TV dresser.
After deconstructing the desk, we realize that new laminate flooring needs to be installed.
Replace Flooring
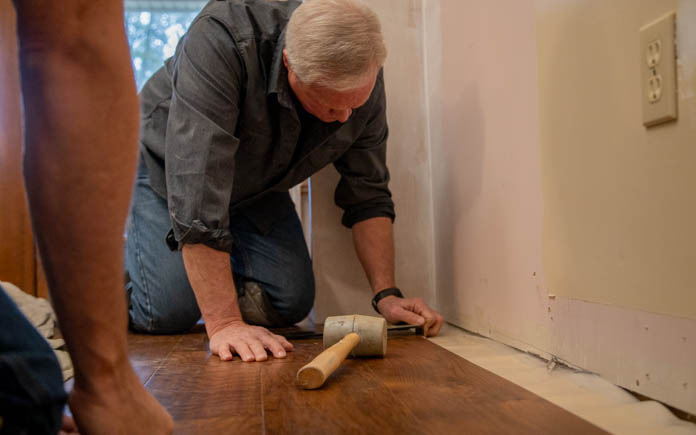
While removing the desk, we find that it’s tightly glued to the floor, so we use a pry bar to get it loose. In doing so, some of the flooring underneath it between the bookshelves gets damaged.
Fortunately, Faith and Roberto just replaced their wood laminate flooring two years ago, so they still had the manufacturer’s information.
Whenever you replace your flooring, always keep that information and purchase some extra flooring in case you need to make repairs in the future. That flooring could be discontinued, and then you’ll be stuck trying to match the flooring if you need to replace a section in the future.
One thing you don’t want on the floor is a “clickity-clack” noise. When you walk across a floating laminate floor, it will make all kinds of noise without an underlay pad.
Once we lay the pad, we stagger the flooring to match the rest of the room.
This faux board and batten above the fireplace makes the room feel as big as it really is.
Freshen Up the Mantel and Fireplace
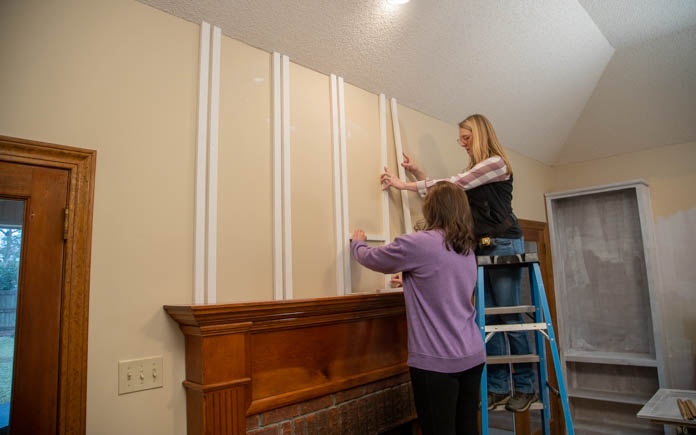
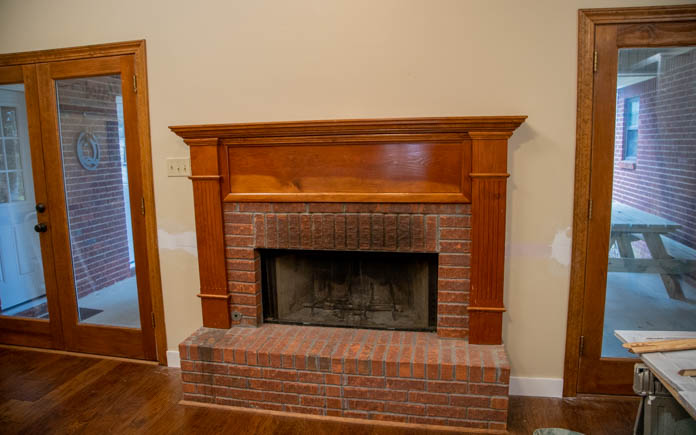
The low placement of the fireplace mantel against the tall ceiling makes the room feel short. To change that, we add batten boards above the mantel.
We’re building a faux board and double batten wall treatment above the mantel. To nail the look, we match the angle of the 1-by-2 boards to the angle of the ceiling using a bevel gauge. Then we cut the boards with a miter saw.
Since there’s no guarantee there are studs behind each batten, we caulk each board with construction adhesive after we nail them.
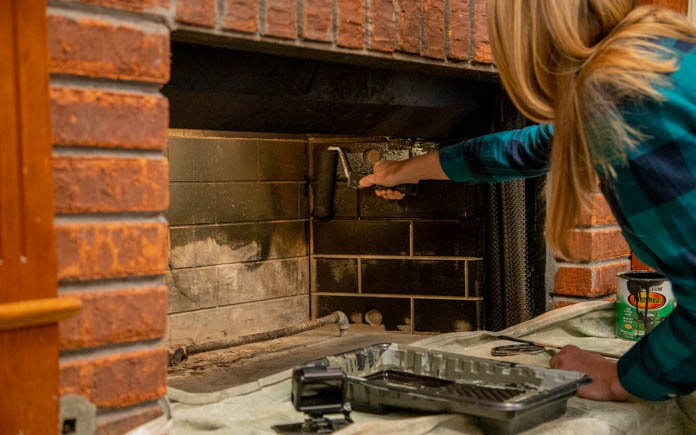
Putting a coat of high-heat black paint in the firebox makes it look brand new.
Next, we focus on the fireplace. The first step is cleaning the fireplace. We use a solution of trisodium phosphate on the bricks, which will remove the soot stains. Once the fireplace is clean, we paint the inside of the firebox with high-heat black paint.
After that, we whitewash the fireplace. We use 50 percent water and 50 percent flat-white paint. First, we wet the bricks with water so our whitewash paint can soak in evenly. The key to whitewashing is to be “consistently inconsistent” with your brush strokes.
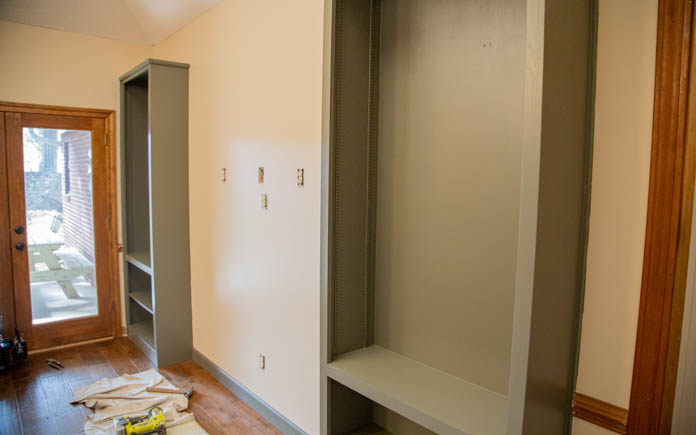
Newly painted bookshelves create a perfect frame for the TV dresser.
Repurpose the Bookshelves
Before we can repurpose the bookshelves, we have to clear them. Next, we sand, prime, and paint the bookshelves to match the TV dresser.
Next, we move the TV dresser from the other side of the room to the space between the bookshelves. This will create a nice entertainment center along the wall and allow the furniture to flow nicely in the family room.
Faith and Roberto’s family room is now the perfect place for entertaining their grandchildren.
Post-Production Thoughts
Roberto and Faith have a beautiful home and they take care of it remarkably. But the family room was giving away the age of the house.
For starters, the room’s layout was inefficient. The massive wall of dark-wood built-ins with a high-gloss finish had the 1990s written all over it.
For a large room, the space somehow felt small. And the fireplace, which should have been a focal point, also seemed small and out of proportion to the room.
But now, that same fireplace grabs your attention from the front door onward, thanks to the whitewashed bricks and the new board and batten wall treatment.
Removing the built-in desk has brightened up the room and allowed us to relocate the TV, which, in turn, allowed us to open up the room with a better layout.
Plus, changing the color palette of the bookshelves has helped bring the room out of the ’90s and into the 21st century.
And we did it all for less than $600 in materials.
Other Tips From This Episode
Products Featured in This Episode
This page contains affiliate links. If you purchase a product from these links, we will earn a small commission at no additional cost to you.
The sheerness of the whitewash paint lets some of the original brick colors show through and gives the fireplace a unique look that many people love.
Whitewashing is basically diluting white latex paint with water and lightly coating the surface of a wall or fireplace. It’s an easy project and can be done in just a weekend.
Materials Needed
It’s important to start with a clean brick surface, or else soot stains will show through the whitewash.
Clean The Bricks
Before you begin, you need to clean the bricks. Mix a little TSP, or Trisodium Phosphate, with water and use it on a scrub brush to clean the brick surface and mortar joints between.
This is important to remove soot stains and create a clean surface so the whitewash will adhere well.
Diluting the white paint will allow the brick’s color to show through the whitewash.
Create Your Whitewash Mix
When the bricks are completely dry, mix up your whitewash. We’re using ordinary flat white latex paint mixed with water at a one-to-one ratio.
Dampening the bricks with water on a paintbrush before you begin will help them absorb the stain more evenly.
The key technique when whitewashing a fireplace is to be “consistently inconsistent.”
Apply Whitewash
Begin applying the whitewash lightly until you get a feel for the bricks’ texture. In this case, they have a rough surface, so dragging the brush over them lightly leaves lots of nooks and crannies with the natural brick color.
If you apply too heavily in one area, some can be dabbed off with a rag. When it’s complete, the surface should vary from light to dark, creating interest in what was a bland brick wall.
Watch the video above for more information!
Cost
Transform your fireplace for less than $40! Here’s the breakdown of costs:
It has been almost 4 years since we last detailed the ways we use smart home technology to make our household more efficient. Since then we’ve changed homes, states, and even our smart home systems. So today I thought I’d break down what we’ve added, what we’ve gotten rid of, and what still has a stranglehold on my nerdy tech-loving heart (and even one that was Sherry’s idea!).
As usual, none of the products mentioned in this post are sponsored or gifted. It’s just stuff that we have bought and loved – or (in some cases) don’t love so much anymore. So let’s get into it.
STILL LOVE: Alexa Voice Assistant
Call us basic, but our Alexa voice-assistant devices are basically the couldn’t-live-without matriarch of our little smart home family. The Abuela to our Encanto. And, despite having downsized to a smaller home, we actually upsized the number of devices: going from 1 Amazon Echo and 2 Echo Dots in our last house to 2 Echos (for the upstairs and downstairs common areas) and 3 Dots (one for each bedroom).
Technically these weren’t new purchases (the extras had been in our beach house, which is why none of ours are the newer globe-shaped devices). But since Alexa is how we voice control many of our smart devices it’s been useful to have her available in more places around the home, particularly so the kids can use her in their rooms now too.
We also use them every single day to play music, set timers, ask for the weather forecast, create shopping lists, call the kids down for dinner, etc (it’s a lesser-known fact that Alexas are essentially a wireless whole-house intercom). Our kids also love asking Alexa for the temperature when they get dressed in the morningand requesting jokes or a story (or to play the Akinator game).
DITCHED: Alexa Auto
Since I’m fascinated with this stuff, I’m always intrigued by the random new Alexa-enabled products that Amazon announces. Eyeglasses!Rings!Analog clocks?! Well, I managed to resist those. But a couple of years ago I got on a half-price, early release list for the Echo Auto, a device that’s designed to work in your car through your phone. I even shared my excitement about it in this podcast episode.
But after a while, we got tired of how glitchy it was. Mostly it seemed to have difficulty hearing or understanding over any music playing, and responses were often slow and unhelpful. Maybe it has since improved or we just had a bad experience (it has 4 out of 5 stars on Amazon) but after about a year we decided it wasn’t worth having the bulky device and extra wires clogging our dashboard anymore, so we gave it away.
ADDED: Smart Blinds
Motorized roller shades are a new smart technology we tried in this house and they’re BY FAR our favorite new smart device. We love being able to control the blackout blinds that we added to each of our bedrooms with our voices (or use our phones to schedule regular routines). Since installing them nearly two years ago, Sherry has gotten so many questions about them that I’m planning to write a Smart Blind FAQ post that dives into them in much more detail – including how much they cost. Hoping to get that up in the next week or so.
The short version is that we ended up with these Bali Blackout Roller Shades with the smart motorization feature, in the Acadia Vintage Veil fabric. Sherry was skeptical about splurging for them, but since we only needed five of them total, she indulged me. And well, now she’s a loud and proud convert. It’s so nice to have the whole house go into night mode or morning mode with a simple command instead of walking into every room and flipping on or off lights and lowering or raising blinds. We’ve impressed more than a few friends by saying “Alexa, It’s bedtime,” and watching their eyes get wide as all of our lights lower and the bedroom shades all go down in unison.
STILL LOVE: Kasa Smart Light Switches, Bulbs, & Plugs
As smitten as I am with our smart blinds, my most trusted sidekicks will always be my collection of smart light bulbs, light switches, and plugs. We’ve been using theKasa system for years and still have no complaints. We primarily use them to control various lights (for example: smart switches for overhead lights, smart bulbs for lamps, and smart outlets for things like table fans, salt lamps, and Christmas decor). We even use an outdoor smart plug to control our string lights.
I find all of the devices easy to set up, except for maybe the switches since they require some electrical skill to hardwire. But even those are pretty basic if you follow the step-by-step instructions. We also like that through Alexa we can control them with our voices (individually, in groups, or as part of routines – like that “Alexa, it’s bedtime” command mentioned above). We can also set fixed schedules, like our front porch light that turns on, off, and even dims according to that day’s sunrise and sunset. I could go on, but I won’t. They’re just the best.
How To Install A Smart Plug
Want to see a step-by-step rundown of how to connect a smart plug? We filmed this video a few years ago but the process has stayed the same. It really is a super simple thing to add to make your house more auto-pilot.
I’m not sure we’ve ever talked about our experience with the Flo by Moen devices we had at our beach house and duplex. We had them professionally installed on all three main water lines because they’re designed to detect unusual water usage (aka: leaks) and to shut off your house’s water to minimize flood damage if they detect a sudden gush. It wasn’t a cheap endeavor – the three devices alone cost nearly $1400 at the time – but seemed worth it to have peace of mind since we lived 2.5 hours away from these houses. They also allowed us to easily turn off the water from our phones if the homes were going to be unoccupied for an extended time or the area had a freeze warning.
However in our experience they caused more headaches than they prevented. It was partly due to the poor internet service there, which made controlling our Flo systems from the app very unreliable. We also received a faulty device at first that caused a brief but frustrating leak in our crawl space.
Most of all, we found the smart monitoring features incompatible with vacation homes that were occupied inconsistently and therefore never had “routine” water usage. You see, during our summer rental season, the app frequently sent us urgent alerts about “extended water use” (which were just families showering off after a day at the beach) and threatened to turn off the water if we didn’t clear the alert within a few minutes. Had I not been near my phone on these occasions, this could’ve left our renters waterless, sandy, and upset.
The only reason those alarms were triggered were because it was “more water usage than a few months before” – but you can see how winter months in a seasonal place would equate to fewer people using the house/water, so it just wasn’t a good method. After consulting their support we were never able to find a way to solve these false alarms and eventually had the devices completely deactivated. Perhaps their technology or interface has improved since 2019, but I can’t say we miss having them.
ADDED: “The Frame” Smart TV
Even though I don’t really think of our Samsung Frame TV as “smart home” technology (although it does have a built-in Alexa, I guess) I couldn’t leave it off this list. It’s been nearly 6 years since we cut the cable cord so using smart TVs for streaming isn’t new to us. But we jumped on The Frame TV bandwagon when we moved here two years ago because we loved the promise of a smart TV that might look more like framed art nearly (it wasn’t cheap – but we just needed one). Here’s what we love about it:
It’s super low-profile and hugs tightly to the wall, just like a picture frame.
It has only one small wire, which connects to a control box (our box is hidden on the floor) where you can plug in your power and other components. Note: you can hide the wire in the wall using this method, we just haven’t yet.
The custom bezels (we have the beige version) that snap magnetically to the edges really give the TV a picture frame appearance. Beige is a weird name, but it looks just like a blonde wood frame.
As we mentioned in our original take on it, we mostly have beef with the process to upload your own photo (it’s much more complicated than it would be if they supplied more clear instructions). We love that we can display a photo or artwork on the screen when it’s dormant – they have a library to choose from or you can upload your own like we did. You can also adjust the brightness and the warmth to make it look more convincing. Just don’t expect it to fool everyone into thinking it’s not a digital screen. It still looks way better than a big black box though. And honestly, we’d do it all over again just for the features bulleted above alone.
TIP: If you’re uploading your own photos to the Frame TV, first resize them to 3814 pixels wide by 2145 pixels tall. This will match the aspect ratio of the TV, which will make any mats you choose look even on all sides for the most art-like result.
STILL LOVE: Nest Learning Thermostat
I realized recently that this home marks the NINTH Nest thermostat we’ve installed (after 2 in our last home, 2 in our beach house, and 4 in the duplex). Clearly, we’re fans. While we do appreciate the ability to control it with our voices (“Alexa, turn downstairs up one degree”) our favorite features are its auto-away & auto-scheduling.
Auto-away uses motion detection to determine when no one’s home and automatically sets itself to eco-mode, meaning it conserves use whether we’re gone for an hour or a whole week.
Its learning capabilities use a variety of factors – seasons, motion detection, manual adjustments, etc – to automatically create a schedule for you. So it figures out when you typically wake up or head off to work and adjusts accordingly (you can always manually edit it too).
We chose the Learning Thermostat with the white outer band, but it also comes in black, brass, copper, and stainless steel. There’s also a more affordable non-learning version for $99. It can still be voice-controlled, it just doesn’t have the smart auto-schedule feature mentioned above. Just be sure to use this online compatibility test to ensure that your system works with either version before purchasing.
DITCHED: Racchio Smart Sprinkler Controller
This particular device got ditched NOT being we didn’t like it, we just don’t have an irrigation system in our new house so there was no need for it. Actually, we’re still big fans of the Racchio Smart Sprinkler Controller and I’ve even encouraged a few friends who have grass here to switch their system to it because it saves money and water. What’s not to love?
It allows you to control your sprinklers with your voice, but we never used it for that. Our favorite features were:
The ability to use a phone app to easily control and schedule our sprinkler system
The fact that the app uses local weather forecasts to determine if it should skip a scheduled watering, meaning there’s no need to install a separate rain sensor.
I can’t be the only person who finds it maddening to see a sprinkler system running furiously during a rainstorm. With the Smart Controller, you don’t have to be that person anymore.
ADDED: Pura Smart Fragrance
Here it is: the smart device that Sherry initiated purchasing! It’s the Pura Smart Diffuser. It’s like the techy, non-toxic version of those old-school Glade Plug-Ins (or does anyone else remember Febreeze Scentstories?? My roommate and I actually owned one after college). The whole natural and pet/kid safe slant was what sucked Sherry in, and you just plug the Pura into an outlet and insert two scent vials of your choosing. Then, using their app, you can toggle between the two scents, control their intensity, set schedules, and more.
I would say we’re both “fragrance sensitive” and find a lot of perfumes, cleaners, and essential oils way too overpowering. So it was nice to be able to crank our Pura down to a level 1 (out of 10, ha!) for just the right amount of fragrance for our delicate little noses.
I think the main reason these work so well is how much control you have over their intensity and the ability to set an auto-schedule so we are never overwhelmed by scent and it just subtly works in the background on its own.
Right now Sherry just has two schedules running back to back, so our Pura switches between the scent of Sherry’s favorite Anthropologie candle, which runs at a super low intensity from 8am to 1pm. Then from 1pm to 9pm it clicks over to this Signature Citrus scent, also running at a 1 out of 10 intensity. They’ve got TONS of scents to choose from, including many recognizable brands like Kenneth Cole, Thymes, Votivo, and more.
Truly the best features are that you can: 1) turn off the light on it (which we did immediately), 2) turn the scent up or down (so it’s never too much), and 3) set as many schedules as you’d like. Feels very very controllable and never too strong or bright thanks to those customizations.
STILL LOVE: HP Smart Printer
I know it’s weird to see the words “love” and “printer” so close to each other, but I still have no complaints about our HP Envy wireless printer and our HP Instant Ink subscription (our current printer model is no longer sold, but I linked the closest version available now). The printer itself has worked great for us and I’ve never had an easier time printing from multiple devices – including my phone! – than I have working through the HP Smart app. I waxed poetic on our podcast about how often I use the app’s ability to scan documents using my iPhone’s camera, and I even made a video of the process!
The HP Instant Ink subscription program was a lifesaver during all of those months of virtual learning at home. Basically, the printer automatically detects when you’re getting low on ink and ships you new cartridges. The monthly fee covers everything – the ink cartridges, the shipping, and the magic sensor in the printer that sends a signal to HP to send your new ink before it runs out. The amount you spend each month depends on how many pages you’re printing (anywhere from $1/month for 10 pages up to $25/month for 700 pages) so you can really customize it to your printing needs.
The fee we pay seems cheaper than it was just to buy ink on our own, and it even covers shipping the empty cartridges back for them to recycle. We’ve had it for a few years now and we’ve never been caught without ink on hand. And we love that it’s one less thing we have to worry about and one less errand we have to run.
ADDED: Smart Outdoor Cameras
The home security system we added to this house is the first time we’ve incorporated exterior cameras, primarily to keep a better eye on our pool and our front porch. These days, most video doorbells and outdoor cameras from the major security providers – like SimpliSafe, Ring, Nest, etc – offer pretty sophisticated motion detection customization. When they detect motion. Where they detect it. They can even distinguish human motion from, say, some random wildlife running across your yard or a palm leaf flapping in the wind.
Having outdoor cameras has given us lots of peace of mind, and they were easy to set up (no wiring required). They connect via Wifi and are powered by rechargeable batteries. We even updated ours with solar panels so they recharge automatically, for free from the sun.
We don’t share our exact alarm system brand & products just because we’ve heard it’s smarter not to broadcast that to the internet (in case someone wants to target you for a specific attack), but most major security providers like SimpliSafe, Ring, Nest, etc have pretty good reviews and choices for you to look into with everything from motion detection and phone alerts to higher tech things like glass-break sensing alarms (which set off the system instantly at the sound of glass shattering, like if someone breaks a window or a glass door panel).
So to recap, here’s a list of all the devices we’re currently using in our home:
I know it looks like a lot, but as much as I geek out on this stuff, we do try to be pretty discerning about what actually improves our life at home, and what is unnecessary or more trouble than it’s worth. I may have had Febreeze ScentStories in my past, but I don’t see some fancy Alexa-enabled sunglasses in my future. I least, not yet…
This week, we’re helping a family organize and dress up their laundry room to give them a clean entrance into their home.
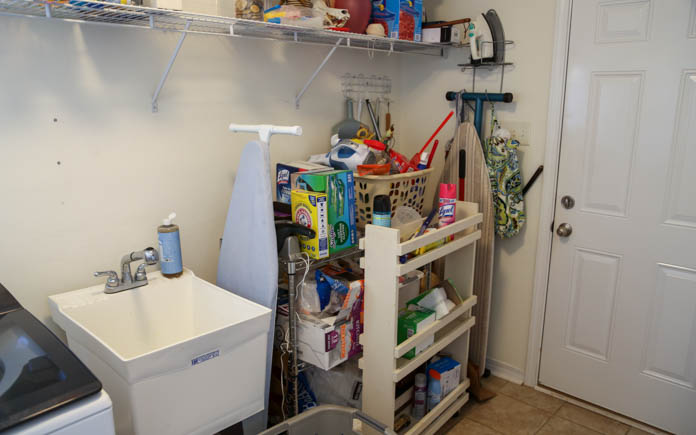
Ed and Sarah have their hands full with their three children, so organization in their laundry room has gone by the wayside. Their laundry room off the garage is the main entrance into their home. We’re here to help them make their space functional and appealing for their house guests.
The Projects
Eliminate what you don’t need when starting any organizational project.
Clear out the clutter
First, we clear out all of the cleaning supplies. Next, we remove the wire shelves on the wall above the sink and washer and dryer. We use putty to fill the holes left behind from the shelf’s screws.
The dryer door kept hitting the door to the kitchen, so we switch the placement of the washer and dryer to keep the doors from bumping into each other. We use a special dryer vent attachment that lays flat so we could reduce the space between the wall and the washer and dryer. We were able to push back the washer and dryer more than half a foot and create more space for the walkway to the kitchen!
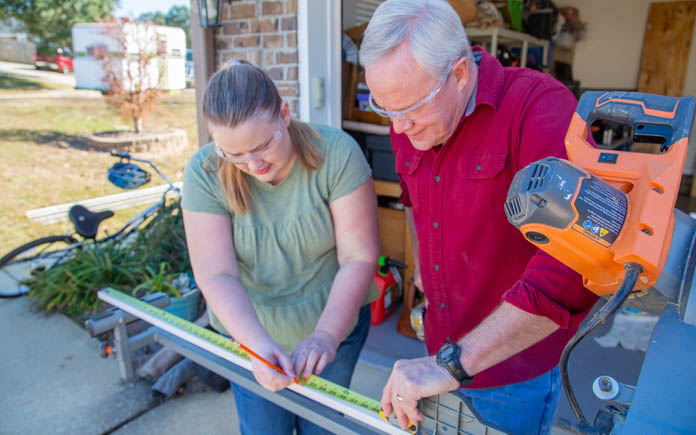
Measure, measure, measure! You want to make sure all pieces are even when building shelves.
Adding shelves and cabinets
To create more storage, we install cabinets and shelves. The kitchen doesn’t have a pantry, so we want to make sure we added some space for extra snack storage.
Sarah can now add “carpenter’s helper” to her resume.
Sarah is our carpenter’s helper in building the shelves. We show her how to use a miter saw to cut the pieces for the bookshelf.
When we start to layout the shelf, Sarah has a really great idea. She uses a box of snacks that she purchases frequently for her kids as a guide for how much space to leave between the shelves.
Once all of our pieces are cut and spaced out, we nail the shelves and use Titebond Original Wood Glue to attach the trim.
A paint sprayer gives you a smooth finish when painting large items.
To add some color to the cabinets and shelves, we used Woodcraft General Finishes Milk Paint in Westminister Green and applied it with an Earlex Super Finish Max HVLP Sprayer. When using a paint sprayer, evenly apply using a steady sweeping motion and always start with light coats. Spray beyond the edge of your surface so you don’t get any buildup on the outer corners.
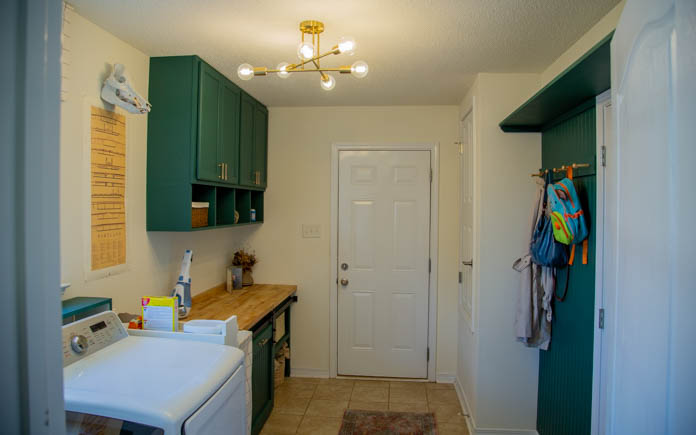
The green cabinets give the laundry room an inviting feel while also concealing cleaning products.
We install a shelf above the guest bathroom door to make use of the vertical space. On the right side of the door, we add a bookshelf for pantry items. On the left, we put a beadboard drop-down space with storage hooks for the kids’ bags.
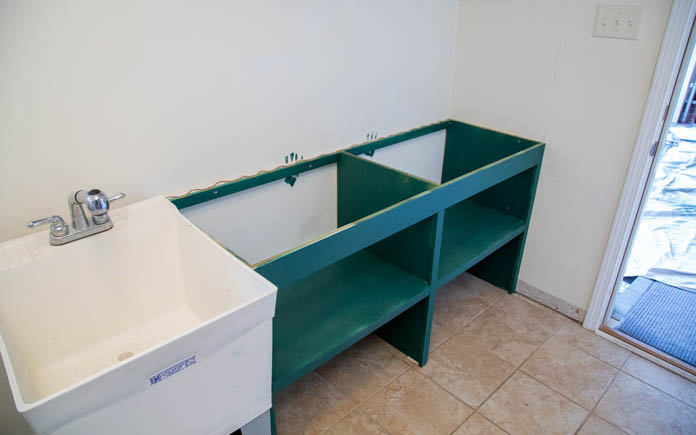
Next to the washer and dryer, we install store-bought cabinets and a butcher block countertop for folding laundry.
The wall cabinets are up at the ceiling to make the room feel taller and larger, but it’s not practical for daily use. So, we add some cubbies under the wall cabinet to give some easy-to-reach storage space.
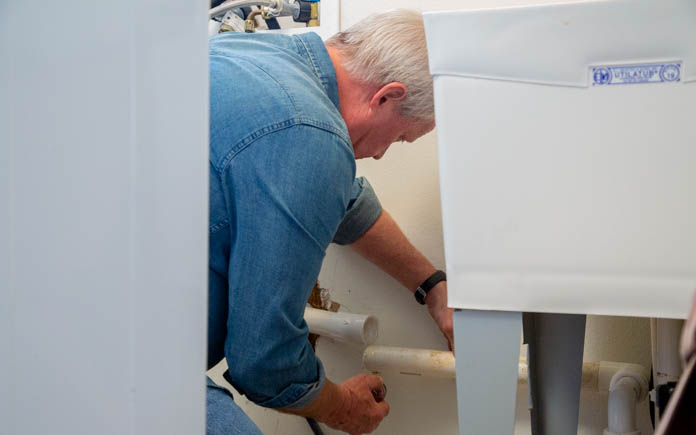
Rerouting the PVC pipe behind the dryer will free up space to push the dryer closer to the wall.
Fix the sink plumbing
The plumbing leading to the sink protrudes far out from the wall, taking up way too much space and forcing the dryer out into the walkway. To fix this, we cut the PVC pipe and place a 45-degree PVC fitting on the pipe closest to the wall. We run the pipe along the back of the wall and place a 90-degree PVC fitting to reroute it to the sink plumbing. This saves about 5-6 inches, and every inch of a space backs a big difference in a small laundry room.
We also:
Installed a butcher block countertop
Placed a sink curtain to cover plumbing
Made wall art using the kids’ handprints
Ed and Sarah now have a laundry room they are proud to show off when guests visit.
Post-Production Thoughts
Ed and Sarah’s laundry room has plenty of space but most of it was not well utilized. The location of the washer and dryer was awkward, and the vent hose and the afterthought plumbing forced them out further into the room. All of the items stored here were in full view making the whole room feel like the inside of a kitchen sink cabinet. And because everything was white, the space lacked any personality at all
Now, the room feels like it has a purpose and a lot of personality. The green cabinets and shelves create contrast and interest while they provide plenty of useful storage that’s out of sight. The butcher block countertop adds warmth and as well as much-needed countertop space. The beadboard drop zone makes the room feel more like a library than a laundry room. In fact, with the washer and dryer now tucked away further, you might even forget it is a laundry room and assume it’s just a cozy little entryway.
We did all this for about $1,200.
Other Tips From This Episode
Products Featured in This Episode
This page contains affiliate links. If you purchase a product from these links, we will earn a small commission at no additional cost to you.
If you need a countertop that can stand up to heavy use, a butcher block countertop is just the surface for you.
These wooden surfaces can withstand heavy daily use and food preparation. They’re the perfect surface for your kitchen or laundry room.
Butcher block countertops come in a variety of sizes and designs, so you can find the perfect fit for your space. Here’s how to install one.
Materials Needed
This page contains affiliate links. If you purchase a product from these links, we will earn a small commission at no additional cost to you.
Cut the wood to fit your space.
Trim the Butcher Block to Fit Your Space
This butcher block countertop is six feet long and twenty-five inches wide. It needs to be cut down for a five-foot cabinet that is twenty-two inches deep. Start by trimming two and a half inches off along the length of the piece. Use a table saw to make this cut so it is perfectly consistent from end to end. The two-and-a-half-inch piece will serve as a backsplash.
Next, mark the panel at the five-foot mark with a framing square before making the cross-grain cut with a circular saw. Cut the narrow backsplash piece to five feet on the miter saw.
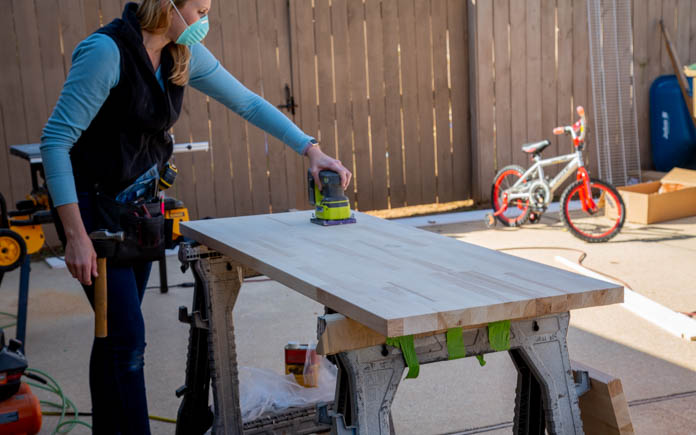
Extra sanding will help smooth out the surface perfectly.
Sand the Wood
The butcher block is pretty smooth right out of the package, but before it’s installed and finished, sand it once more with a fine-grit sandpaper.
Using construction adhesive will eliminate the need for nailing.
Apply Adhesive
Applying a heavy-duty construction adhesive allows you to simply set the countertop in place without the need for any fasteners to secure it. While the adhesive is still wet, double-check the overhang margins before we glue the backsplash in place.
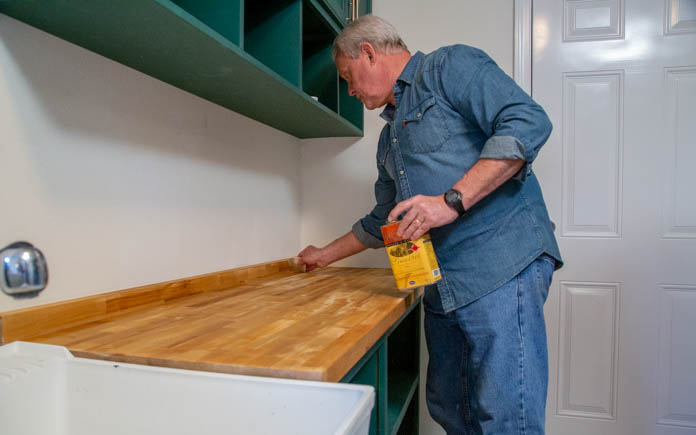
Sealing your countertop will make the wood grain pattern pop!
Seal the Butcher Block
Use a tung oil-based wood sealer and finish that penetrates the wood to seal and protect it from moisture. Applying it with a stain pad allows you to rub the formula into the grain of the wood. After two or three coats of this, the countertop is complete.
Watch the video above for more information!
Cost
This project is on the pricier side, but it’s far less expensive than hiring a professional.
Here’s what you can expect to pay for this project:
If you need a countertop that can stand up to heavy use, a butcher block countertop is just the surface for you.
These wooden surfaces can withstand heavy daily use and food preparation. They’re the perfect surface for your kitchen or laundry room.
Butcher block countertops come in a variety of sizes and designs, so you can find the perfect fit for your space. Here’s how to install one.
Materials Needed
This page contains affiliate links. If you purchase a product from these links, we will earn a small commission at no additional cost to you.
Cut the wood to fit your space.
Trim the Butcher Block to Fit Your Space
This butcher block countertop is six feet long and twenty-five inches wide. It needs to be cut down for a five-foot cabinet that is twenty-two inches deep. Start by trimming two and a half inches off along the length of the piece. Use a table saw to make this cut so it is perfectly consistent from end to end. The two-and-a-half-inch piece will serve as a backsplash.
Next, mark the panel at the five-foot mark with a framing square before making the cross-grain cut with a circular saw. Cut the narrow backsplash piece to five feet on the miter saw.
Extra sanding will help smooth out the surface perfectly.
Sand the Wood
The butcher block is pretty smooth right out of the package, but before it’s installed and finished, sand it once more with a fine-grit sandpaper.
Using construction adhesive will eliminate the need for nailing.
Apply Adhesive
Applying a heavy-duty construction adhesive allows you to simply set the countertop in place without the need for any fasteners to secure it. While the adhesive is still wet, double-check the overhang margins before we glue the backsplash in place.
Sealing your countertop will make the wood grain pattern pop!
Seal the Butcher Block
Use a tung oil-based wood sealer and finish that penetrates the wood to seal and protect it from moisture. Applying it with a stain pad allows you to rub the formula into the grain of the wood. After two or three coats of this, the countertop is complete.
Watch the video above for more information!
Cost
This project is on the pricier side, but it’s far less expensive than hiring a professional.
Here’s what you can expect to pay for this project: