Anyone who knows me is typically shocked when they learn that I now have – and sleep next to! – an actual real-life cat. Even I can’t believe it. Because I definitely have had a lifelong cat allergy that is not mild. I’d actually describe it as “pretty severe” (once, while pregnant, it almost sent me to the emergency room). But if you follow me on Instagram, you know that we now have an indoor cat. And due to trying a whole slew of natural remedies and thanks to some cutting edge science, I no longer have any allergy symptoms at all!
So today I’ll share my personal experience about managing and essentially eliminating my cat allergy – including the products that have (and haven’t) helped. I’m not a doctor or a scientist, but I definitely tried a ton of solutions and I’m sharing exactly what worked, and what didn’t.
How Bad Is My Cat Allergy?
Just walking into a house with a cat would trigger extremely itchy eyes, full congestion, incessant sneezing, and sometimes even actual hives on my skin. Literally within minutes, I’d often become a puffy sniffly mess. It’s such an annoying allergy to have because it feels like allergens are everywhere (cats can reach so many surfaces! their microscopic dander is everywhere!) and I always felt like the weakest link. I’ve even had allergic reactions to hugging someone who has a cat while being out to dinner with them, or being in the car of someone who has a cat when the cat hasn’t ever been in that car.
But now, thanks to implementing a few changes (for me, the cat, and our house), I don’t have any discernible symptoms to living with a cat who sleeps on my head or neck every night. Wild, right? Let me be clear: my allergy is not cured. It is not gone. In fact, I’ve recently been in a house with other cats and still had mildly itchy eyes and a bit of congestion (you’ll see why I have allergies to other cats and not my own anymore a but further into this post).
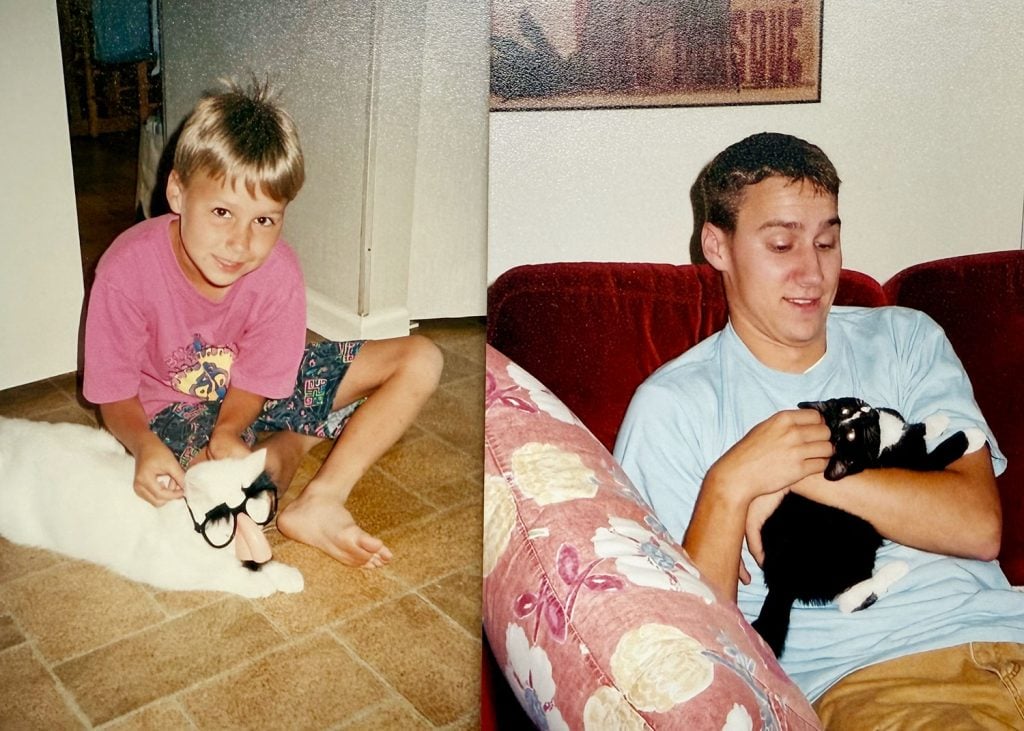
John grew up with a cat and when we met, his parents and older sister still had one each. I wouldn’t touch the cats at all, but with cats, it’s often the house itself that I’d react to. So we have several stories from our courtship when I was trying to fend off a drippy congested nose with bloodshot itchy eyes AND the drowsiness of a Benadryl while trying to make a good impression on my future in-laws.
For years, I’ve just tried to avoid homes with cats when I can. And if I can’t, I usually don’t bother with allergy medications because they tend to make me weirdly drowsy. Instead, I wash my hands frequently while there, avoid touching my face, and call it a night if I’m getting too uncomfortable. I can’t recall a time I didn’t leave a house where a cat lived with very itchy eyes and congestion – except at one friend’s house, which I’ll get to in a second.
Mostly, I was just happily living my life as a dog person. Until recently…
Why Tempt Fate Now?
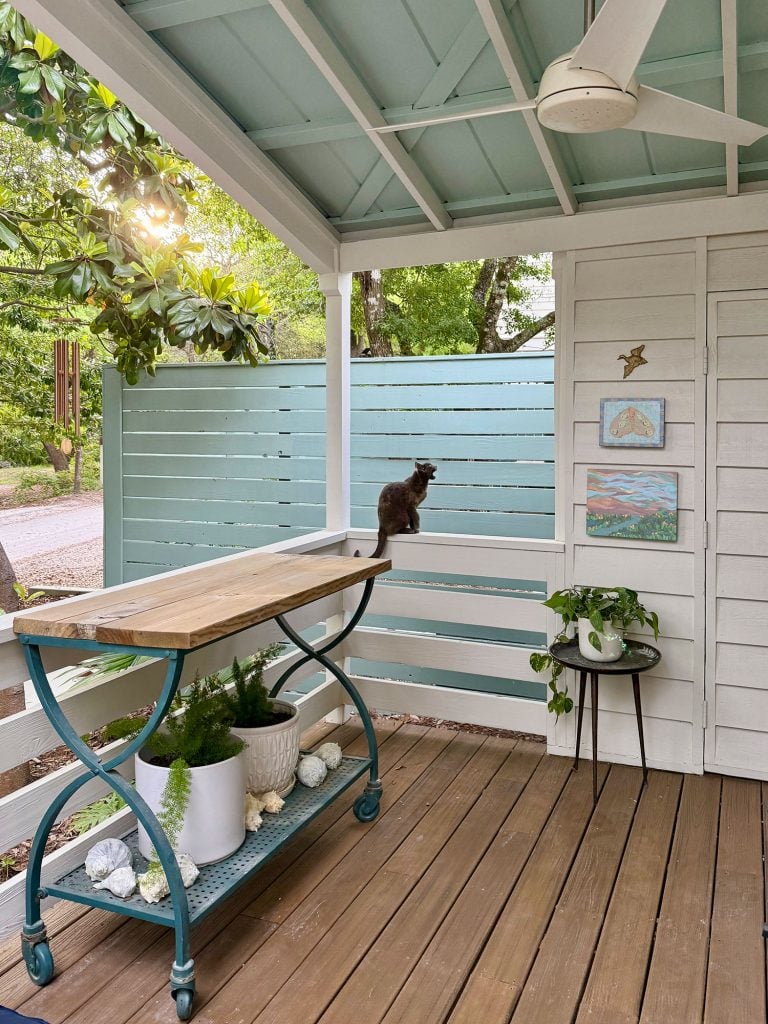
Cats have grown on me in recent years. Partly because of the stray kittens that found their way into our yard a few summers ago (who remembers Nickel and Dime?). Partly because of two charming outdoor cats that greet me at the same spot on my daily neighborhood walks (and literally walk with me – someone once asked if I had them on an invisible leash). And partly – no, mostly – thanks to the stray cat that decided to call our porch home a few months ago. Spoiler: it was Jennifur (aka Jenny from the Block).
On top of that, our daughter has had a couple of neighborhood cat-sitting jobs and is shaping up to be a cat person like her father. So when Jennifur seemed to “pick us” earlier this year (she slept on the egg chair on our front porch every night and sat by our glass door every morning, just waiting to be let in), it felt like a natural opportunity to have an actual pet cat. And as our family’s affection for Jenny grew, so did our desire to have her indoors.
How Do Cat Allergies Work?
Again, I’m no scientist, but I’ve learned that most cat allergies are triggered not by cat hair, but by a protein found in their saliva & skin called Fel d 1. This protein is transferred to fur during grooming, which can then become airborne eventually sticking to fabrics, walls, and even just lingering in the air.
That’s why preventing allergies isn’t as simple as “just vacuum up the cat hair” or “get one of those creepy-but-cute hairless cats.” So this is not a post where I tell you to clean your house more. Nope. That’s not going to do it.
5 Things That Helped My Cat Allergy
Before I dive into the five things that helped me go to virtually zero allergy symptoms with our cat, let me preface it by saying:
I don’t think everything on this list will work for everyone
I think it’s the combination of these tips that got me to my complete result
This doesn’t eliminate your allergy for all cats. It helps you to live with one specific cat… who just might change your life and turn you into a crazy cat lady
1. Pacagen Powder (For The Cat)
My top tip comes from that one friend whose house I could go into with two cats and not have a giant reaction. HOW? WHY? WHAT?!? So I probed… were her cats special allergenic breeds? Nope, her husband had a cat allergy, so she added this chicken flavored powder food topper and it made him a lot less reactive. What?! I was even able to sit on her sofa – in a house with TWO CATS for hours! – and only got slightly itchy eyes.
The powder is called Pacagen Cat Food Topper (this isn’t sponsored or gifted, I just ordered it as soon as my friend recommended it). The idea behind this food topper is that it reduces the cat’s production of that Fel d 1 protein that causes your allergies. And it’s safe and vet recommended with tons of five star reviews from other people who used to be allergic to their cats.
This is the same concept behind allergen-reducing food like Purina LiveClear. The only reason we picked the topper over the food was that it was specifically what my friend used and loved. I also like that it can be added to any food – wet or dry – so it is nice and flexible without requiring a diet change for your cat.
2. Quercetin Supplements (For Me)
I first heard of quercetin (I use this exact one) as a treatment for regular congestion allergies a few years ago, but had never tried it until a few months ago when Jenny moved inside. Quercetin comes from natural pigments found in plants and vegetables and is supposed to boost immunity and alleviate congestion. I was skeptical, but I’m convinced it’s the one-two punch of this & Jenny’s food powder that’s reducing my allergies the most. In fact I’m unwilling to stop one or the other to “test which one is working more” because my allergies alleviated fully when I started using them in combination.
Again, I’m not a doctor, so consult with one before you take anything new. I just take 2 quercetin supplements every morning with the rest of my vitamins and it helped resolve the last of my lingering allergy symptoms. For instance, I no longer get hives when Jennifur “bunts” me with her face (which still occurred a bit after starting the Pacagen). And some lingering occasional slightly itchy eyes dissipated too.
3. A Quality Air Purifier
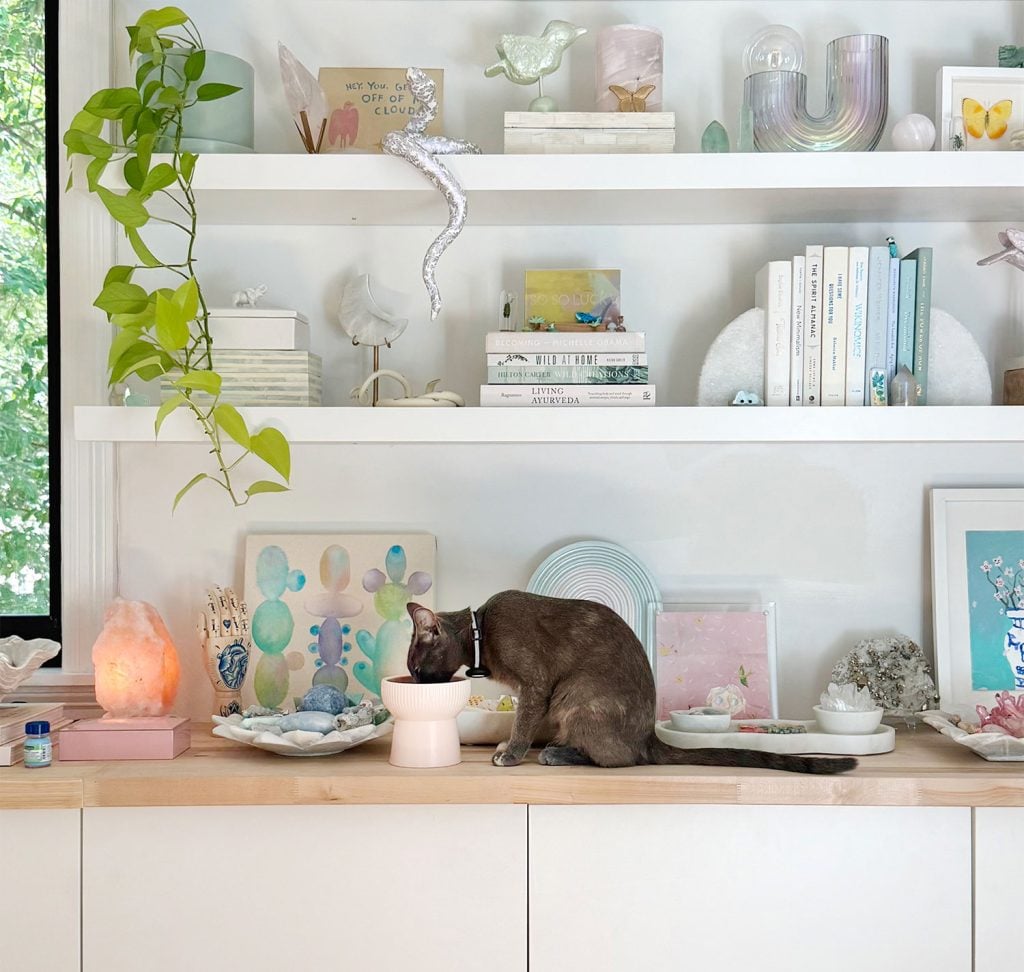
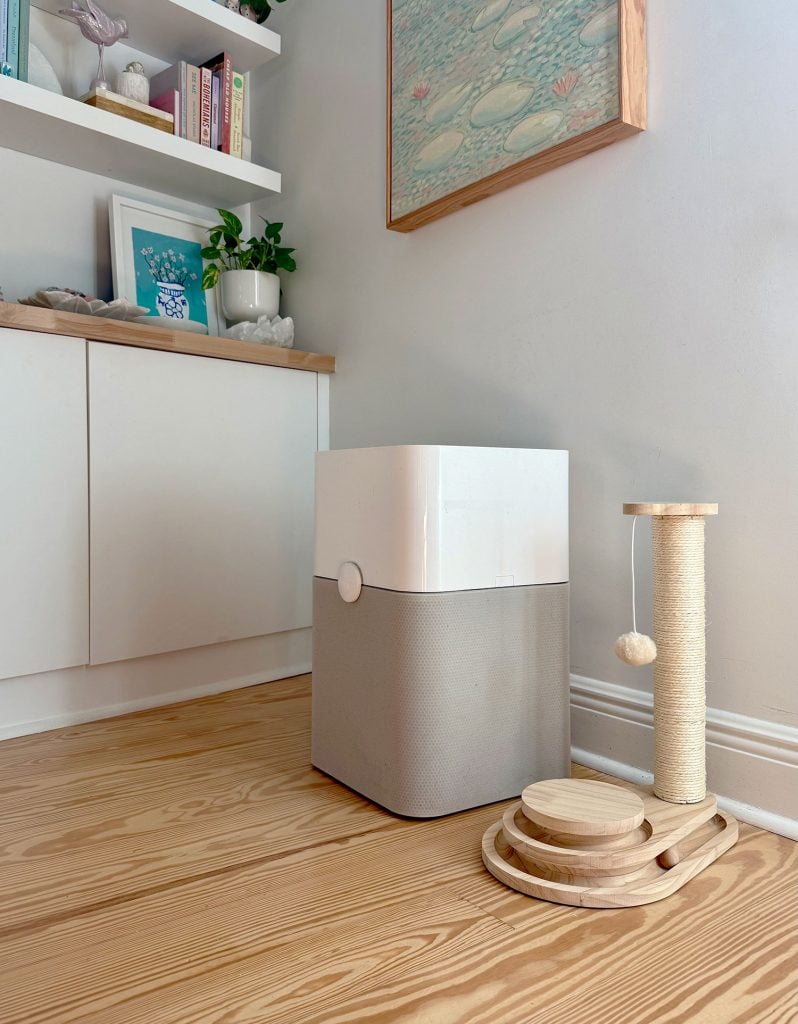
I’m also sure our air purifiers help A LOT. I’ve heard from so many other cat owners who say they significantly help with their pet allergies. We got ours many years ago to help with my seasonal allergies, and they were a game-changer for that – so I shouldn’t be surprised that they also help filter pet allergies out of the air too.
We have a whole post about why we love them and how to use them. We currently have 4 in our house – 1 large one in our upstairs living room, 1 large one in our bedroom, and 2 smaller ones in each of our kids’ rooms.
4. Regular Vacuuming
Now, I said above that preventing an allergy isn’t as simple as “vacuum up the cat hair.” But I still think it can’t hurt that we run our favorite robot vacuum every single morning for a few hours on our first floor, which is where Jenny spends most of her time. I think that, in combination with our air purifiers, are existing routines in our house that help minimize my reaction for sure. But that being said, I was highly allergic to Jenny even with those two things going strong (the purifiers and the Eufy). It wasn’t until the Pacagen and the Quercetin that things began to shift to “zero symptom” territory.
5. Gradual Exposure
I have also heard that sometimes people can reduce their reaction to a specific cat by increasing contact gradullay over a long span of time. Our family did this with Jennifur – not just for allergy reasons – but also to give her time to get comfortable with us. It certainly could have also helped me acclimate to her and find the line of how much my allergy could handle, which typically can build up over time, just like being exposed to anything else very gradually over time.
Broadly, my slow exposure over many months looked like this:
Spending time outdoors (on our porch) with the cat nearby, no contact
Other family members make contact, washing hands immediately after
Letting Jennifur rub against my clothing, changing clothes right after
Making skin contact myself, washing hands immediately after
Letting Jennifur inside for brief exploratory visits
Inviting Jennifur inside for longer periods
Jennifur inside overnight, not in our bedroom
Jenny inside overnight, in our bedroom
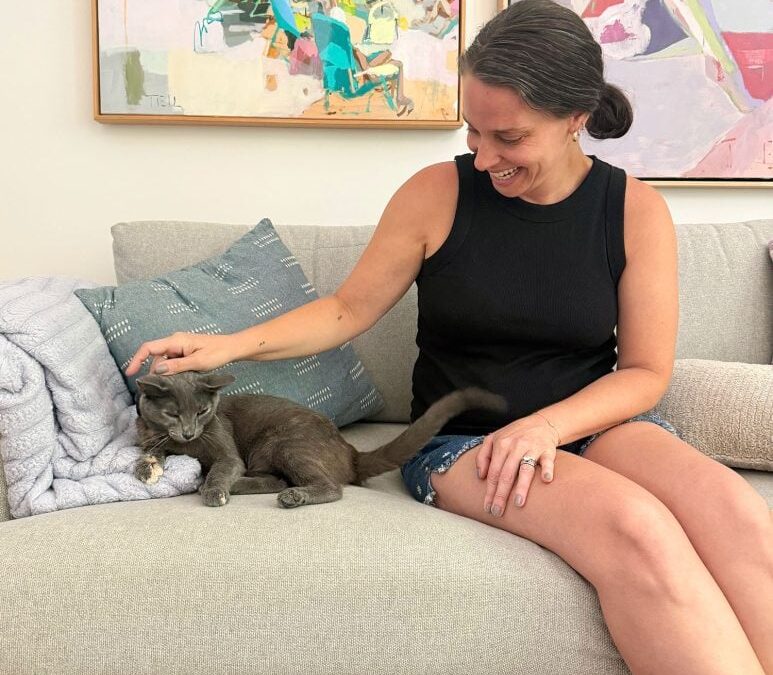
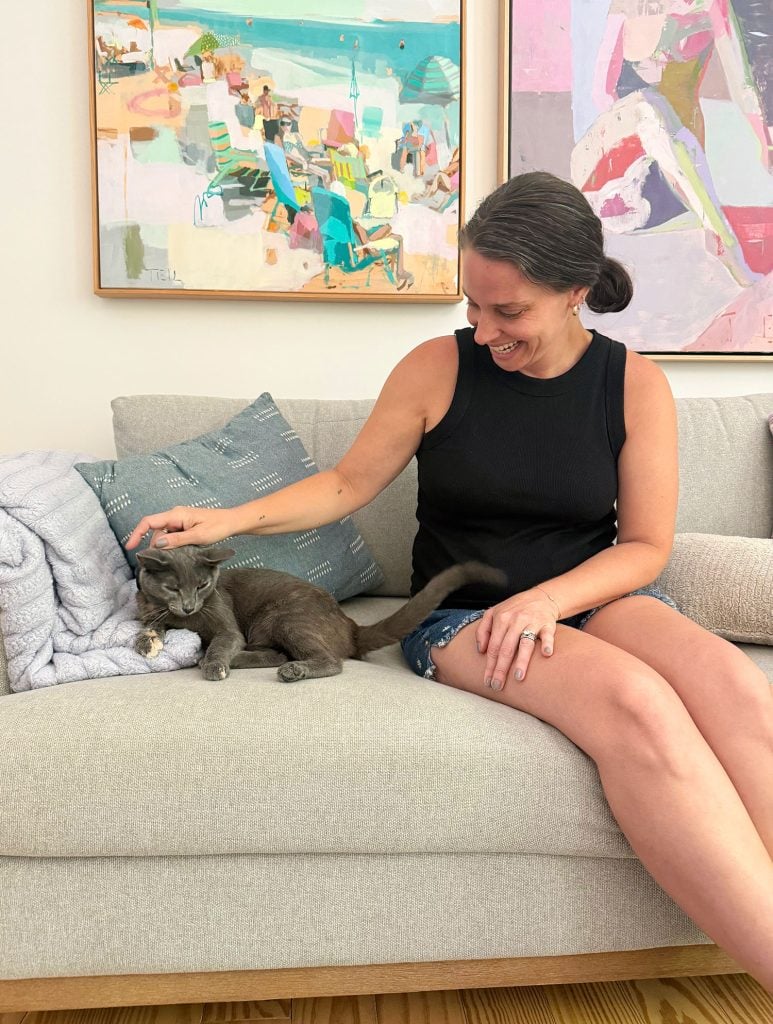
Living inside full time, sleeping in our bed at my feet
Living inside full time, sleeping on my neck or head
John took the photo above a few months ago, before Jenny was brave enough to sleep on my head or neck like she does now. But even her first instincts of sleeping on a chair near our bed, which gradually led to her sleeping by my feet, and now has her sleeping on my head or neck = gradual exposure.
This slow and steady process was as good for Jenny’s comfort as it was for mine (she had run the streets for at least a year prior to adopting us and was pretty skittish around humans). I’d like to think it helped my body grow accustomed to her over time, almost like I was building up an immunity. It also created time for things like her food supplement to take effect.
Like I said upfront, I didn’t eliminate my allergy, I just have zero symptoms to this specific cat. I’m honestly pretty shocked that I no longer have any trouble with surfaces like upholstery or bedding that she lays on or grooms herself on. Even 3 months ago that would have led to a giant reaction that would last at least a full day.
What Didn’t Help My Cat Allergy
I also tried a few things to reduce my cat allergy that didn’t work for me at all… and two that even made it worse! I’m mentioning them below in case it’s helpful, although I fully acknowledge that something that didn’t work for me might work well for someone else. These are the three things I gave up on:
1. Dander Drops (For Me)
Someone had recommended these allergen drops to me. The reviews are very compelling (“it got rid of my cat allergy!“) and they just go under your tongue. They’re supposed to include mircrodoses of the allergen so that your body can acclimate to them. For me, unfortunately, they were counterproductive. After starting the drops, I started having bigger allergic reactions – even on days I had no contact with Jenny (she was still outside at this point). So like… to have a full cat allergy reaction without touching the cat who was outside… that felt bad. So I stopped. Maybe I needed to acclimate to them longer? Maybe they just didn’t work for me personally? Either way, I switched to the Pacagen and the quercetin and never looked back.
2. Dander Remover Wipes (For The Cat)
We also bought a pack of these dander remover wipes that are kind of like a wet wipe you use on your pet’s coat. These did help – especially when I was getting hives after face-to-face contact with Jennifur. But she didn’t always take kindly to being wiped down (especially on her face) and it wasn’t easy to make a routine of it. So we stopped using these mostly because they were too much trouble and other things I had added in were working well.
3. Dander Neutralizing Spray (For The House)
Pacagen also sells a companion spray that can be spritzed into the air or onto surfaces like furniture every 2-3 days. We bought it and the food topper as part of a “starter bundle” on their website, assuming it was a 2-part “system” that had to be used together. But since she was outdoors only for a while, we started her on the topper and saved the spray for the eventual day she’d come inside. Well, the topper worked so well… and when I eventually used the spray… I had a reaction to it. Stuffy nose, congestion. For sure it was the spray and not the cat. I tried it a few more times and it happened every time I used it. So it may work perfectly fine for others (who knows what I’m allergic to in the spray – it could just be a fragrance that irritates my nose), but for me the food powder is perfect and the spray is a no go.
Do I Still Have Allergic Reactions?
It feels insane to say no, because my greatest hope at the start of this process of trying to address my cat allergy was to “lessen it by maybe 50%” – but I can truly tell you that I’m very in tune with my allergy, and I’d definitely notice if I still had itchy eyes, hives, congestion, etc. There are 8 hour spans of sleeping with this cat basically on my face and… it’s wild: no symptoms at all. For sure I expect I’d have big and noticeable reactions to petting other cats though. Or even to being in houses with cats who aren’t on Pacagen powder, don’t have air purifiers, etc – even without touching them.
As a funny aside, throughout this process John has realized that he may have a small cat allergy as well. He noticed his eyes were itchy a couple of times after petting Jenny and then touching his face before her Pacagen powder kicked in. But now he has zero symptoms as well.
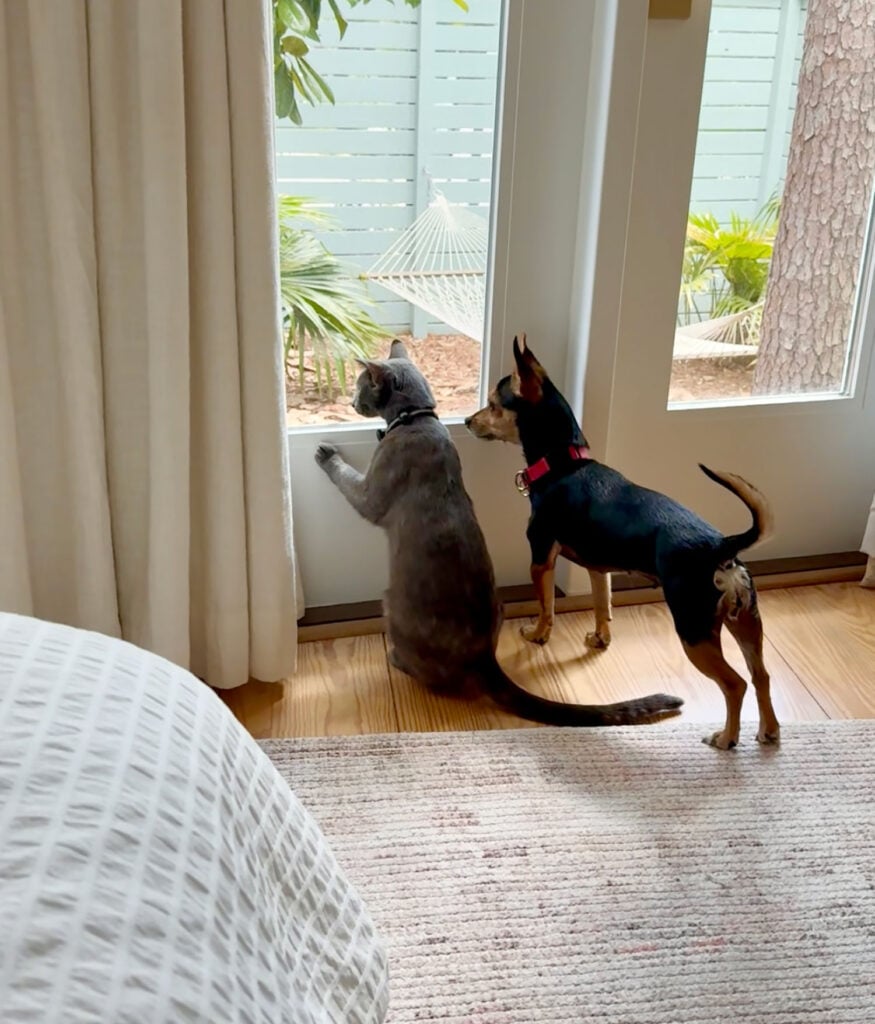
Bonus: How Has The Dog Adapted?
This isn’t an allergy question, but I know some of you are curious about how our chihuahua mix Penny has adapted to having a cat in the house. We describe their relationship so far as “awkward roommates.” Penny is definitely much more interested in trying to touch Jenny, but Jenny remains unconvinced. They love to keep an eye on each other, so they’re often in the same room or following each other around – but so far, there is definitely no snuggling.
We’re hoping someday we’ll get those cute pics of them curled up together, but for now we’re thrilled with their relationship. Penny has always expressed, let’s say, energetic curiosity towards the stray cats outside on walks. So we wouldn’t have been surprised if she chased Jenny or got in the cat’s face with more enthusiasm than the cat wanted. Obviously, we didn’t want Jenny spooked or Penny scratched, so we took things slow.
Luckily, their “courtship” went smoothly. They had several “supervised visitations” (Penny being held) both inside and out where they had a chance to sniff and just exist together. They ate near each other a few times (again, with Penny being held to make sure her enthusiasm didn’t get her in trouble) because we heard that’s a good way to introduce new pets to each other.
And now they happily hop up onto the couch or the bed on either side of me to hang out nearby (they do this to John and the kids too).
More Pet Posts
Our pets have always been a big part of our blog, so if you want you dive into some more dog-related (and now cat-related) posts, check out some of the links below:
*This post contains affiliate links, so we may earn a small commission when you make a purchase through links on our site at no additional cost to you.
I organize the Before & After series and cover DIY and design. I joined AT in October 2020 as a production assistant. I have an MA in Journalism from the University of Missouri and a BA in Journalism from Belmont University. Past editorial stops include HGTV Magazine, Nashville Arts Magazine, and local magazines in my hometown, Columbia, Missouri.
We independently select these products—if you buy from one of our links, we may earn a commission. All prices were accurate at the time of publishing.
As a professional designer, I love to transform spaces — both my own and my clients’ — but I am determined to do it without spending a fortune. It’s a learned skill: I started out with limited resources and had to get creative, and my clients don’t have sky-high budgets, either. (Before I was a professional designer and an antiques dealer, I worked in theater as a prop man and set dresser, so I have 35 years of experience in hunting for bargain-priced gems.)
Over time, I developed what has become my signature rule for creating beautiful spaces: the TGIF Rule, which stands for thrifted, gifted, invented, and found. This rule helps me skip buying things straight from retail stores and instead get more creative with my shopping. Here’s how I use the TGIF rule to create spaces that are super homey (and very affordable).
My TGIF rule started as a shorthand I used to keep myself from impulse buying during the early days of my design business. To help myself use items that were budget-friendly, I used the adage thrifted, gifted, invented, and found.
Over time, the TGIF rule evolved from a budgeting trick into a full-blown design philosophy. I realized these four categories were the building blocks of my favorite spaces — not just because they saved money, but because they helped me fill spaces with unique items that told a story.
In my work, I start every design process by taking stock of what a client already has, what can be obtained on the secondhand market, and what we can invent together — and I do the same thing in my own home (most recently, when transformed my bare patio into my own cheap slice of paradise). Here’s how I use each piece of the TGIF rule.
Thrifted: To get thrifted items, I might hunt for pieces at a local vintage shop, flea market, estate sale, or online listings.
If you’re thrifting, focus on pieces with good bones that just need some love or a fresh idea to transform them. While some thrifted items will be ready to use immediately, most are diamonds in the rough.
Gifted: “Gifted” items are things like family heirlooms or secondhand pieces from friends. Not everyone has gifted items on hand, but when possible, I like to showcase these things! For example, I pulled out a quilt a client’s grandmother made that had been tucked away in a closet so it could be put on display at the foot of their bed.
Found: To get my found items, I keep an eye out for natural or unexpected treasures like branches, stones, sea glass, driftwood, or even old bricks. And I’m always cruising swanky neighborhoods to see what the well-to-dos have put out on their curbs. It’s honestly incredible what people throw away!
What I Love About the TGIF Rule
What sets TGIF apart from most design advice I’ve learned over the years is that it’s super adaptable to any style and any project. It’s not about trends — it’s about following curiosity and experimenting with new ways to decorate.
I’ve used the TGIF rule in my own home, I’ve used it for clients I’ve worked with, I’ve taught it to design students, and I’m even writing a book about the philosophy. No matter where you use it, TGIF gives people permission to be creative with what they have and do more with less. And personally, it keeps me inspired, and always on the lookout for the next beautiful surprise.
We love having friends over to our backyard fire pit, which means we eat A LOT of s’mores. It also means we have A LOT of opportunities to try unique twists on the traditional recipe. There’s nothing wrong with a tried-and-true s’more, but test-testing new ingredients and combos keeps things fun – and we’ve definitely hit on some combos that we think are even more delicious than the original! So here are 5 of our favorite “upgraded” s’more ideas for your next backyard fire pit gathering (or beach bonfire!).
All of these are simple to execute and still involve the fun “roasting over an open flame” part. So don’t feel like you need to do a lot of extra work or be a fancy home chef to pull them off (we definitely aren’t!).
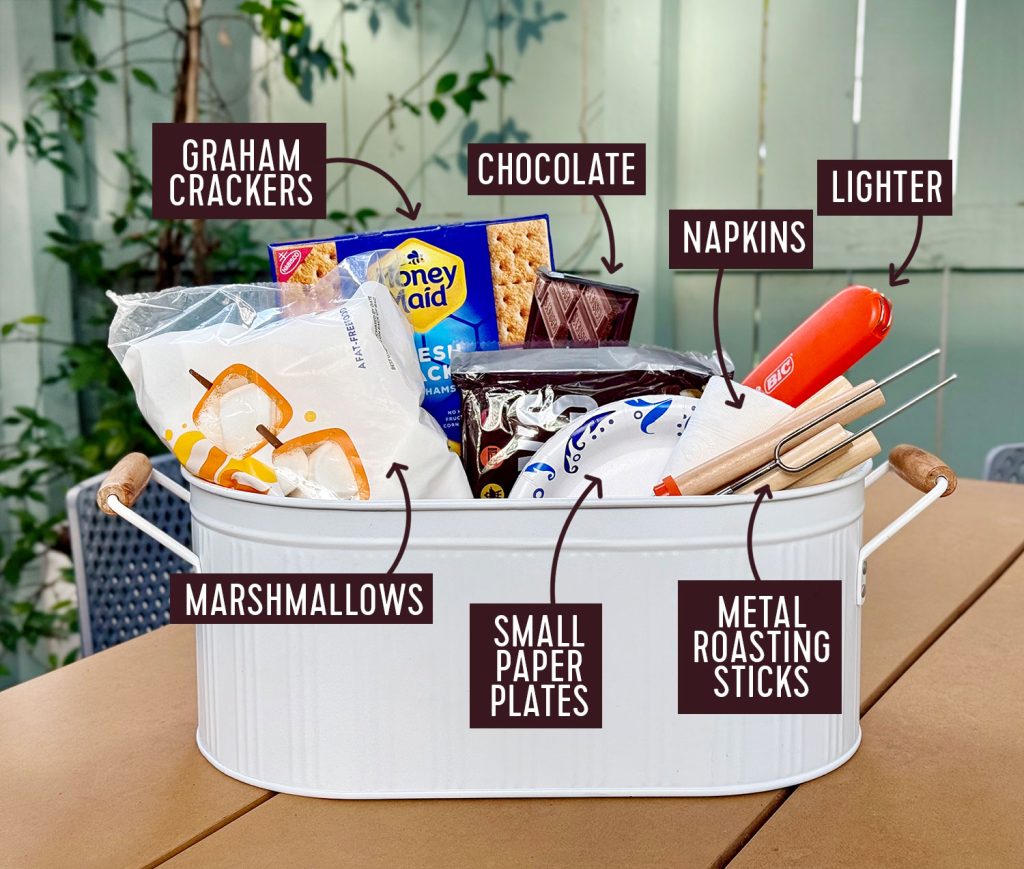
S’more Night Firepit Supplies
Before we dive into the “recipes,” let’s cover some basics about our backyard fire pit set-up. Here are the exact items we have & love (nothing sponsored, all purchased with our own money).
We also have a metal storage caddy (we linked a similar one since ours is 5+ years old) with basic s’mores supplies in the cabinet above our fridge. This makes it MUCH EASIER to bring everything out to the fire in one trip. Here’s what’s in ours:
Standard s’mores ingredients: graham crackers, chocolate bars, & marshmallows
Quick tip for the metal roasting sticks: They often have crispy burnt marshmallow bits left on them at the end of the night. Soak that end in water overnight to make cleaning much easier in the morning!
Five S’more Upgrades
Ok, we’ve made it to the fun part. Here are the 5 “fancy” s’mores we’ll cover today:
Savory s’mores
Chocolate swaps
Cracker swaps
Adding fruits or spreads
Fluff dips
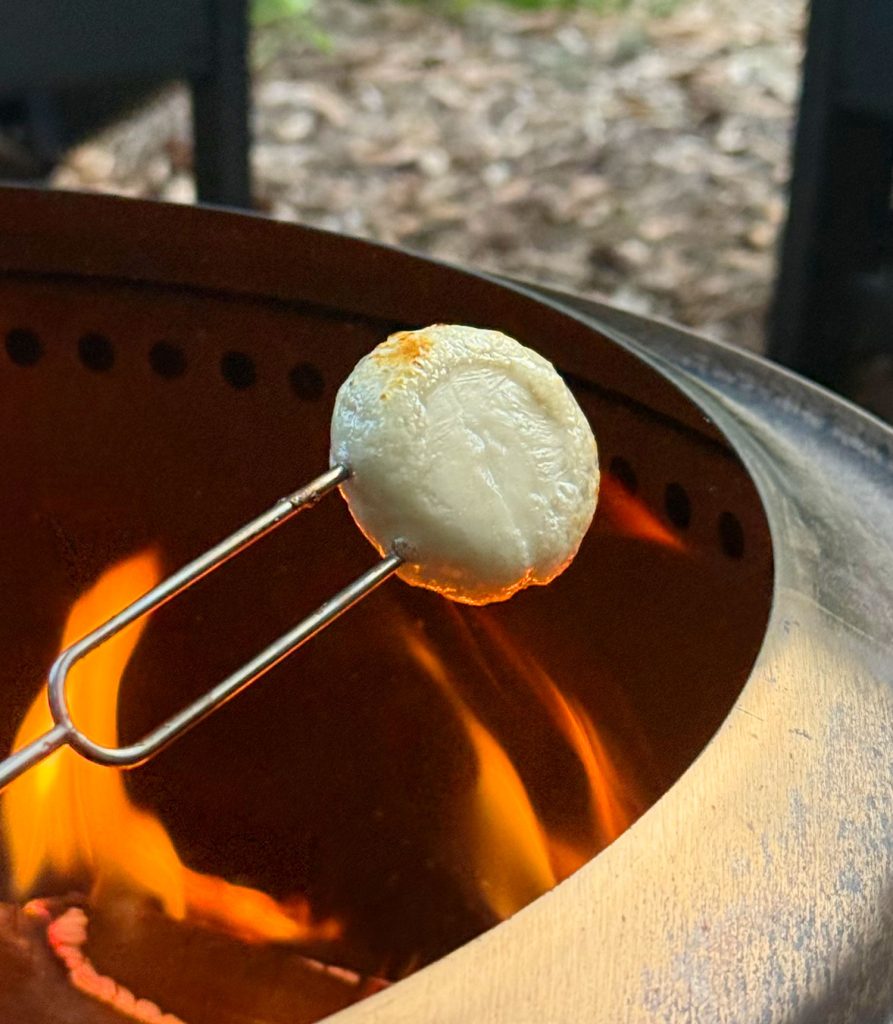
1. Savory S’mores
What if s’mores had a baby with a charcuterie board? That’s the idea here (which made the rounds on TikTok about a year ago and inspired us to give it a try). The gist is: instead of a marshmallow, you’re roasting bite-size cheeses over an open a flame. And then you swap the chocolate for something like salami, add some fancy jam, and any other savory ingredients you’d like (we LOVE hot honey on them).
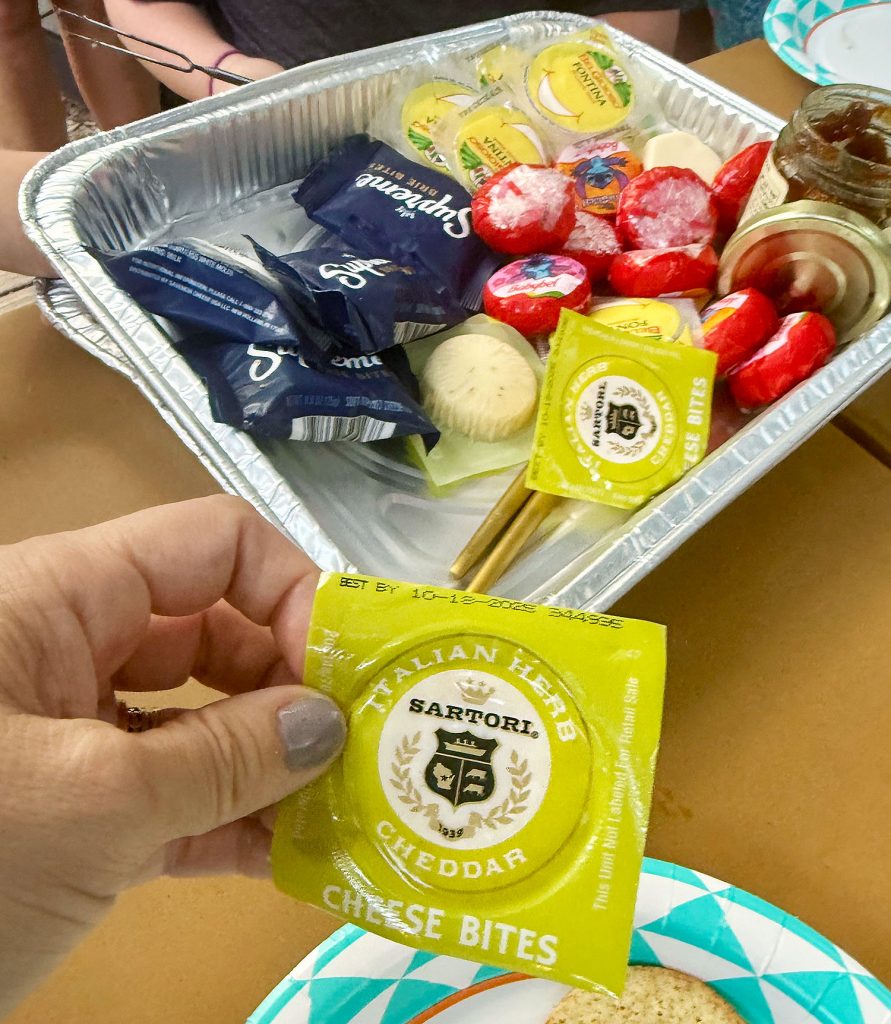
Like any meat & cheese platter, it’s fun to have a spread of options for guests to try. Just be sure to have 3 basic categories covered – cheeses, crackers, and toppings. Here are some of our favorites:
Snacking Cheeses:
Savory Crackers:
Toppings:
As much as we love the look of the fancy cheeses like brie, we’ve found the Babybel to be a crowd favorite!
We’re still working on our “presentation” of savory s’mores because, unlike a fancy cheese platter, we like to keep the snack cheeses wrapped & chilled until they’re ready. We have had luck keeping them cold while they sit outside with us near the fire by freezing a layer of ice in a dispoable baking pan and then nesting another pan on top to corral our ingredients.
The absolute best part? You can have savory s’mores for dinner and then follow up with dessert s’mores later the same evening! Nobody has to be back in the kitchen preparing food while others hang outside. Zero dishes to wash. Absolutely a fun DIY dinner for everyone involved.
2. Chocolate Swaps
The easiest way to mix-up your classic s’more recipe is to sub out the standard Hershey’s bar for other chocolate candies. Just like the savory s’more spread above, it’s a simple & fun way to let your kids or guests experiment. Just pick up a few bars or bags of other chocolate-based treats. Here are our favorites:
You can use just about any snack or mini size chocolate bar (Snickers, Mr. Goodbar, etc). In our experience, the thinnner the better. But it’s all personal preference, so we suggest experimenting! Sherry and I both agree the Andes mint version is underappreciated in the s’mores world and like them better than the original Hershey’s bar.
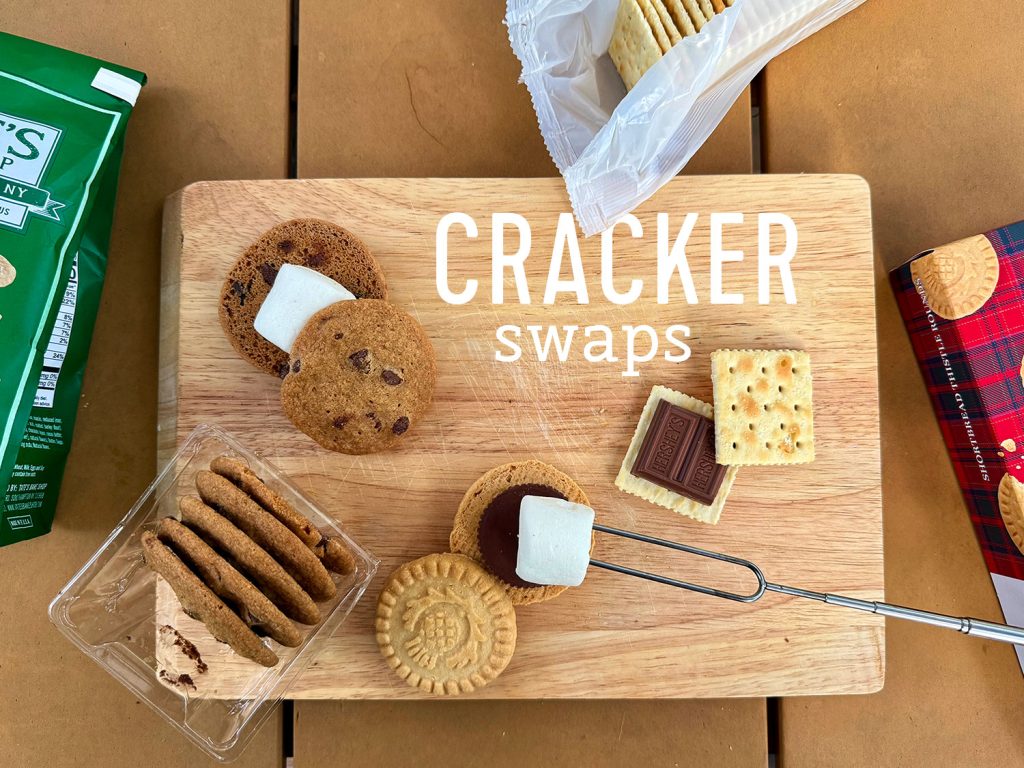
3. Cracker Swaps
Similarly, you can also trade out your classic graham cracker base for a new twist on a s’more. Just be careful whatever you’re using it large & sturdy enough to support your other ingredients. Here are some cracker alternatives to try:
You might be surprised by how much these alterations can change the whole flavor of your s’more. And shockingly, the Saltine is one of our favorite swaps. That little hint of salt is *chef’s kiss*. Truly, try it with a toasty marshmallow and Andes mints instead of Hershey’s chocolate. We are awaiting our Michelin Star, it’s that good.
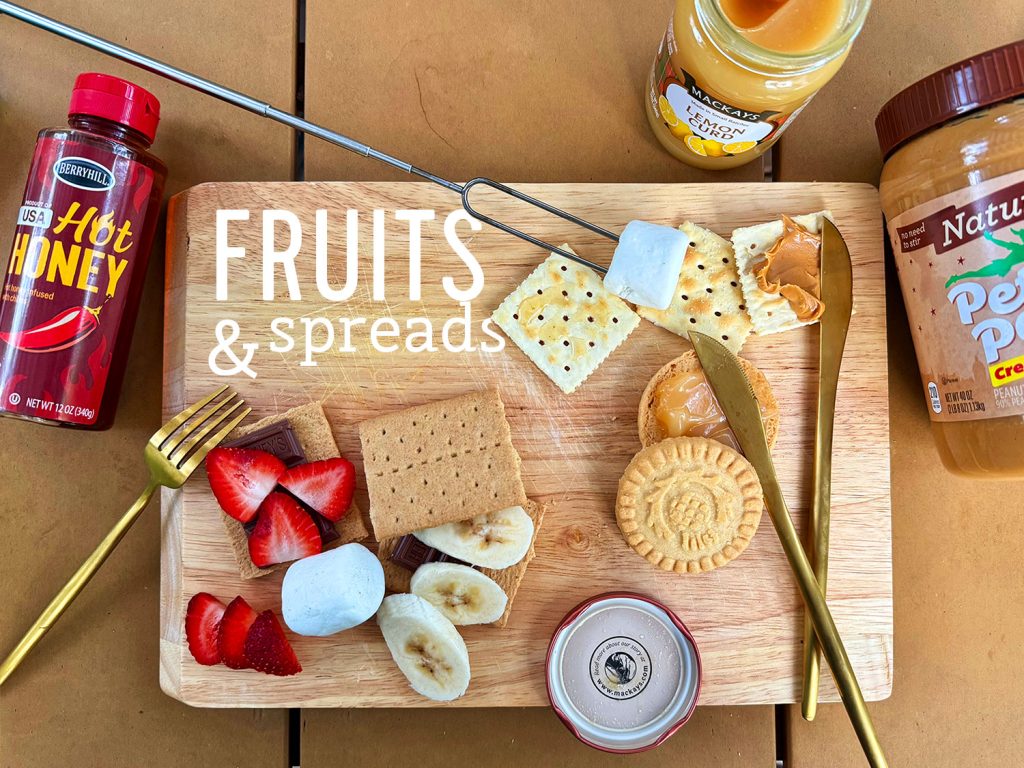
4. Add Fresh Fruit or Spreads
One of our favorite recent discoveries is adding a hit of fresh fruit to our s’mores. It does take a smidge more prep, but regular s’mores now seem almost boring by comparison. These ingredients can be used in addition to OR in place of chocolate:
Strawberries, sliced thin
Bananas, sliced thin
Green applies, sliced thin
Peach wedges
Nectarine wedges
Pear wedges
Whole blackberries or raspberries
Another way to get that fruit flavor but with less prep is using a fruit spread or jam, which we do OFTEN! It tastes so good, and makes it really fun and customizable for your family and guests. Just spread one (or two!) of these on your base cracker first:
Be creative with your combinations of these various categories to create a truly custom s’more. For instance, a shortbread cookie + fresh strawberries + toasted marshmallow can give you an almost strawberry shortcake-like flavor.
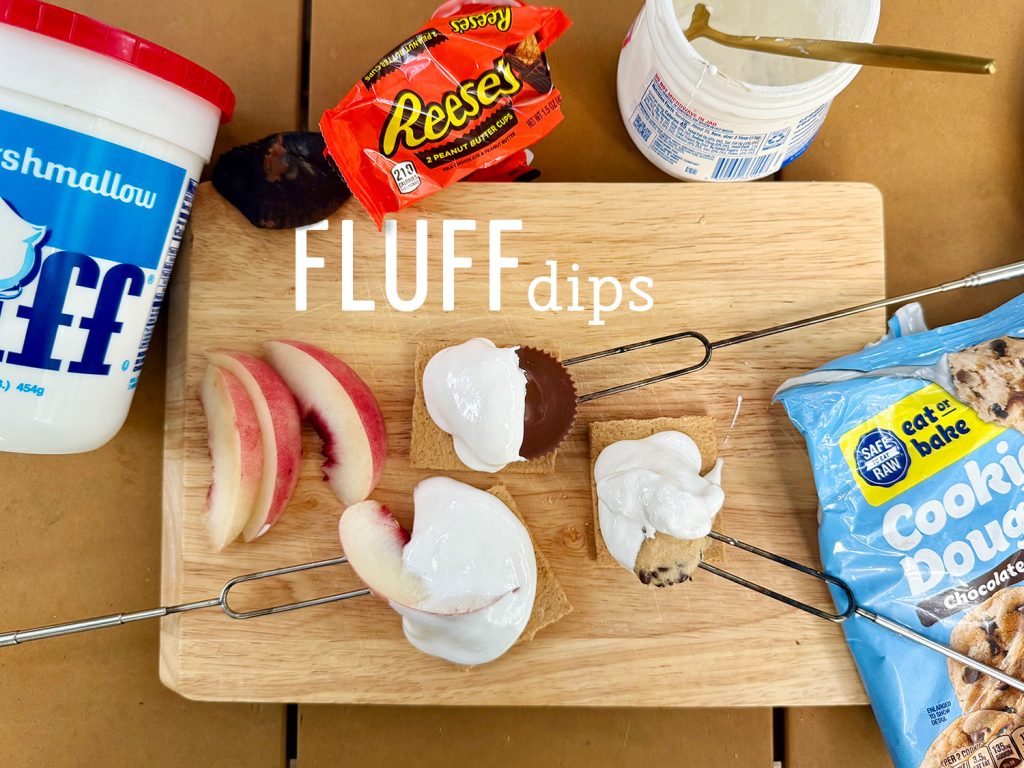
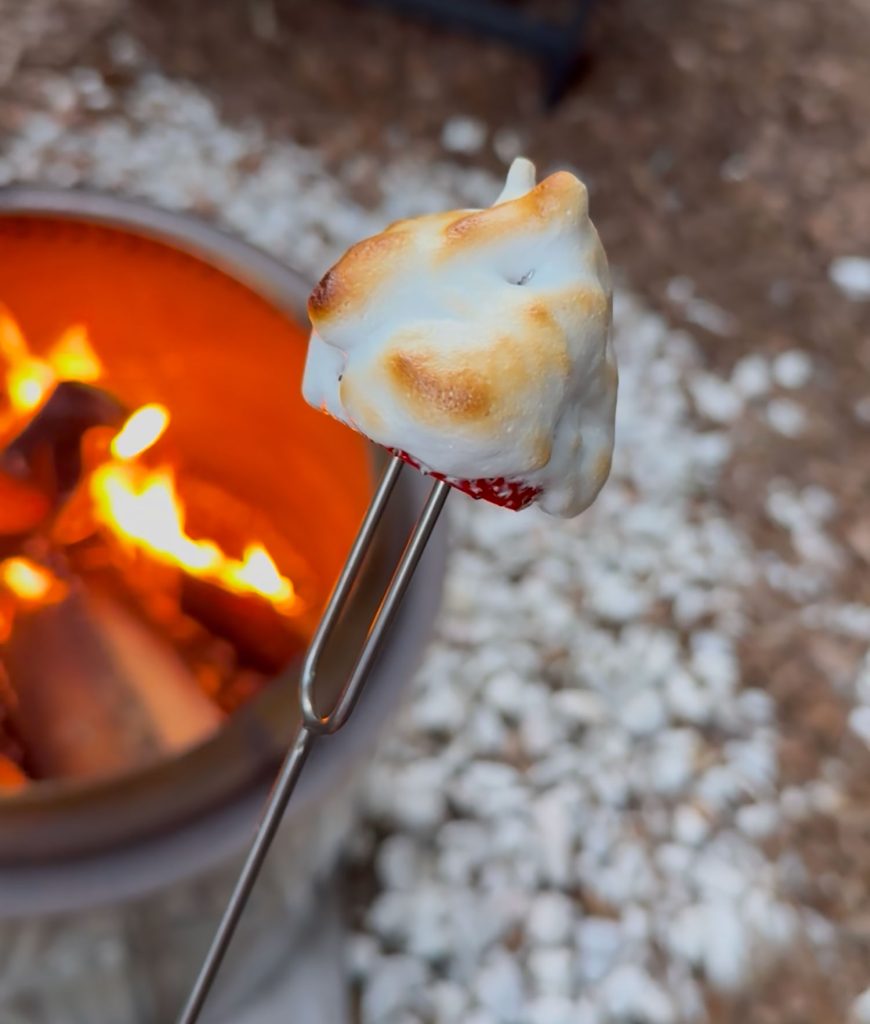
5. Fluff Dips
Skip traditional marshmallow and grab a container of marshmallow fluff instead. Just put one of the base ingredients below onto your roasting stick and dip it directly into the fluff. You may need a spoon to help apply the fluff evenly. Then toast the whole thing over your flame.
After you’re done toasting, you can eat it off a plate with your fingers or a fork – or squish it between two crackers for a traditional sandwich-style s’more. Also consider adding a drizzle of melted chocolate or honey on top! Don’t sleep on a whole strawberry + marshmallow fluff (seen in the photo above). We recently tried them with friends and couldn’t get enough. The fluff gets this toasty crunchy char on the outside and the inside of the strawberry is warm and goey like pie.
Our Favorite Combos
I know we just threw a lot of options your way, so we’ll leave you with our top 3 combinations:
John’s Top 3 S’mores
Traditional s’more + sliced strawberries on graham crackers
Savory s’more with fig jam, proscuitto, and fontina cheese on rosemary cracker
Saltine + lemon curd + marshmallow (no chocolate) on shortbread cookies
Sherry’s Top 3 S’mores
Traditional s’more, sub Hershey’s chocolate for Andes mint on saltines
Savory s’more with hot honey, salami, and Babybel on saltines
Whole strawberry dipped in marshmallow fluff (no cracker)
Happy s’mores-ing everyone! And we solemnly vow to keep trying new s’more combinations. It’s a tough job, but someone’s gotta do it.
Other Posts You Might Enjoy
If you’d like more information about how we transformed our backyard, check out some of these posts below:
*This post contains affiliate links, so we may earn a small commission when you make a purchase through links on our site at no additional cost to you.
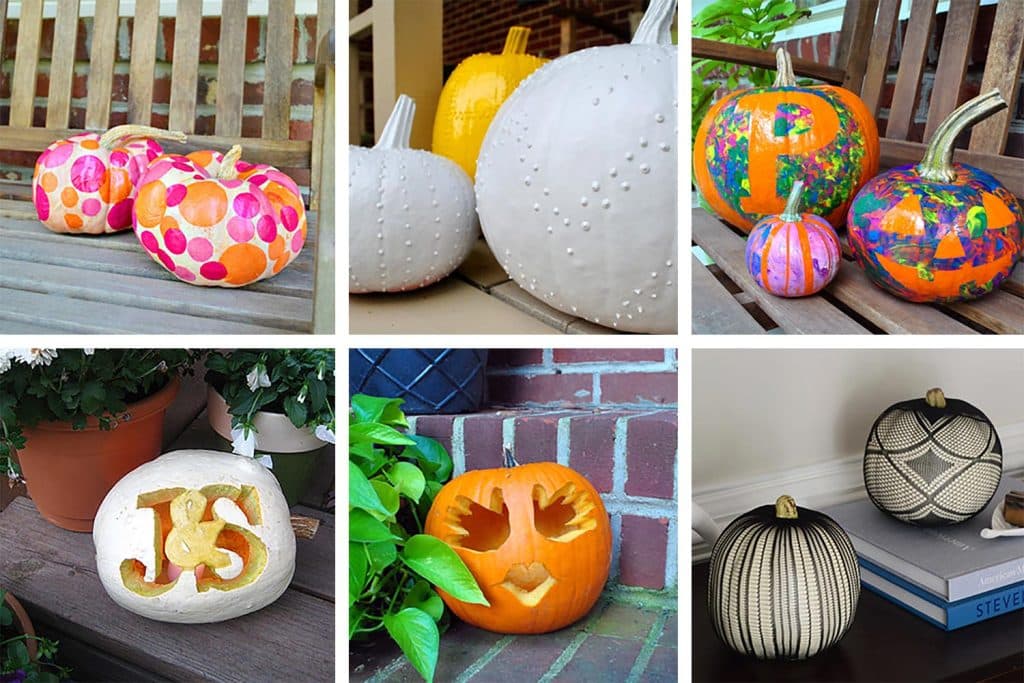
Our kids are very much into the traditional Jack-O-Lantern-style pumpkin carving, often trying to make a scarier, grosser, or goofier face than last Halloween. But we still remember a time when toddler-friendly (even baby-friendly!) pumpkin “carving” was the name of the game over here. So we wanted to highlight six simple, fun, but unconventional pumpkin decorating ideas for kids that we’ve used in the past. Including a “romantic” one we made pre-kids (yes, I’ll pause while you ponder what exactly can be romantic about a pumpkin…).
We’ve included a brief description of each below, but you can also follow the link to the original posts for more photos and details about each pumpkin-carving project.
“Baby’s First” Handprint Pumpkin
Materials Needed:
Paper or cardstock
Pencil or pen (for tracing on hand)
Sharpie or marker (for tracing onto pumpkin)
Scissors
Pumpkin carving tools
Our daughter was only 5 months old by the time her first Halloween rolled around, meaning there wasn’t much she could do to lend a hand in the pumpkin decorating process. But she still participated in that year’s carving by doing literally just that: lending a hand. We traced both of her little hands and used them as homemade stencils on our pumpkin. In our project, they became the eyes of our Jane-O-Lantern (Jacqueline-O-Lantern?) but that part is up to you. They could be butterfly wings, funny ears, or even just hands! Check out the full handprint pumpkin tutorial here.
Finger Painted Stencil Pumpkins
Materials Needed:
Painters tape
Sharpie or marker
Craft knife
Finger paints
The following year, we used a slightly more hands-on approach to involve our daughter in the pumpkin decorating process. She was already into finger-painting on paper, so we just adapted the activity to a new surface. Before unleashing the paint, however, we used painter’s tape, a marker, and a small craft knife to apply some designs to each pumpkin so that once the paint had dried, we could reveal some distinct designs or patterns on each pumpkin. And in retrospect, had we used faux pumpkins we could’ve kept these to break out again the following year. See the full finger-painted pumpkin project here.
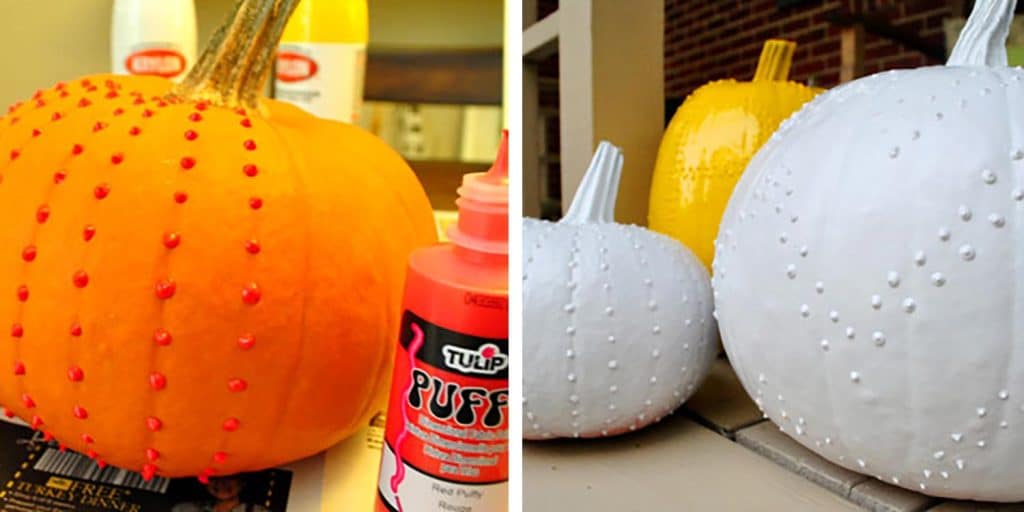
Puffy Painted “Studded” Pumpkins
Materials Needed:
Puffy paint
Craft or latex paint (even leftover house paint works)
This is a craft we completed pre-children, but it would still be a great one to get young kids involved in. Simply use puffy paint to add a design, texture, or pattern to the outside of your pumpkin. We chose to do rows of dots on ours – making stripes, chevrons, and a monogram (we were very into monogrammed pumpkins at the time, apparently) – but you could do the same with solid lines of puffy paint. Once it has dried, paint the entire pumpkin with a solid color to create a sophisticated, textured look. See the full puffy painted pumpkin step-by-step here.
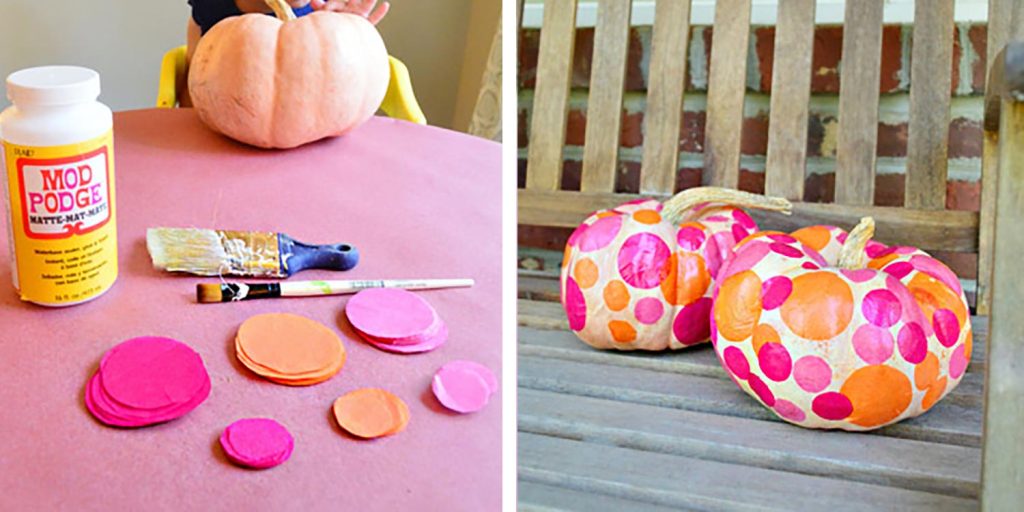
Tissue Paper Mod Podge Pumpkins
Materials Needed:
Colorful tissue paper
Mod podge
Scissors
Paint brushes
We decided to repurpose some leftover tissue paper for this project. We cut three colors of tissue paper into circles, some big and some small. Then we (the adults) coated the pumpkin in a thin layer of Mod Podge to make it sticky enough that our daughter (who was 2 at the time) could place the tissue paper dots wherever she liked. Once she was done, we coated the whole thing again to “seal” the paper to the pumpkin. This project has so many possibilities – colors, shapes, patterns, etc – and if your child is old enough, they can partake in the cutting of the tissue paper! See the full tissue paper pumpkin tutorial here.
Gothic Panty Hose Pumpkins
Materials:
Black fishnet panty hose
Scissors
This is a weird one, but it stick with me. It’s also ridiculously fast! We stumbled upon some black fishnet pantyhose on clearance at the store, and thought it would be fun to try for a Halloween craft – especially since lace-looking pumpkins were all the rage that year. All we did was shove the pumpkin in one leg, stretching the design over the surface and revealing the pattern. Then we cut off the excess and they naturally shrunk tightly around the top and bottom of the pumpkin. Obviously, these are best to dislpay indoors – and we think they look especially great on white pumpkins. See the complete pantyhose pumpkin project here.
Homemade Stencil Monogram Pumpkin
Materials Needed:
Computer
Printer
Paper
Pencil
Marker
Pumpkin carving tools
Like I said, we apparently were very into monograms back in the day? But this particular project shows how you can easily make your own homemade stencil. We just printed out a design, covered the backside of the paper in pencil, pressed it against our pumpkin, and traced over our design with pressure. This transferred the design lightly onto the pumpkin’s surface, which we then carved as usual. This technique can be used with any homemade or DIY pattern – we even used it for a more intricate design in the post! Click here for the full monogram pumpkin stencil tutorial.
So there you have it! Maybe I’ll share these with our (now much older) kids this year to see if they spark any new pumpkin decorating ideas of their own. Either way, I’m sure we also have some zany hand-carved Jack-O-Lanterns in our future again!
Beautiful, charming, whimsical: a cottage garden offers it all. Originating from rural England, this gardening style features a blend of flowers, herbs, and vegetables in small, informal plots around their cottages.
What sets them apart from traditional gardens? They aren’t as tied to symmetry or structure, but more free-flowing in design with dense plantings that feel romantic, wild, and intentional.
Cottage gardens celebrate the art and beauty of gardening with a more relaxed approach.
Typically, you’ll see plants spilling over borders, reaching trellises and pathways that flow through a sea of colorful blooming florals.
This style is not about perfection – it’s all about letting the space feel abundant and flowy.
.tasty-pins-banner-container{display:block;margin-bottom:20px;position:relative;width:-moz-fit-content;width:fit-content}.tasty-pins-banner-container a{cursor:pointer;display:flex;font-size:14px;font-weight:700;letter-spacing:1px;line-height:1.8em;text-transform:uppercase}.tasty-pins-banner-container a:hover{opacity:1}.tasty-pins-banner-container .tasty-pins-banner{align-items:center;bottom:0;cursor:pointer;display:flex;justify-content:center;left:0;padding-bottom:1em;padding-top:1em;position:absolute;right:0}.tasty-pins-banner-container .tasty-pins-banner svg{margin-right:4px;width:32px}.tasty-pins-banner-container .tasty-pins-banner span{margin-top:4px}.tasty-pins-banner-container a.tasty-pins-banner{text-decoration:none}.tasty-pins-banner-container a.tasty-pins-banner:hover{opacity:.8}.tasty-pins-banner-container a.tasty-pins-banner-image-link{flex-direction:column}.tasty-pins-banner-container a img{margin-bottom:0}.entry-content .wp-block-image .tasty-pins-banner-container img{margin-bottom:0;padding-bottom:0}#et-boc .et-l div .et_pb_image_wrap .tasty-pins-banner-container .tasty-pins-banner{padding-bottom:1em!important;padding-top:1em;text-decoration:none}#et-boc .et-l div .et_pb_image_wrap .tasty-pins-banner-container a.tasty-pins-banner{cursor:pointer;display:flex;font-size:14px;font-weight:700;line-height:1.8em;text-transform:uppercase}#et-boc .et-l div .et_pb_image_wrap .tasty-pins-banner-container a.tasty-pins-banner span{letter-spacing:2px;margin-top:4px}.et-db #et-boc .et-l .et_pb_module .tasty-pins-banner-container a:not(.wc-forward){padding-bottom:0}Photo by @clark.cottage.gardens
The key features of a cottage garden include:
A beautiful mix of florals and plants like annuals, perennials, herbs, and vegetables
Climbing plants for vertical appeal, like clematis and wisteria
The use of natural materials like gravel and wood
Pollinator-friendly plants to attract bees, butterflies, and birds
The beauty of cottage gardens is that they can work in a variety of spaces, whether you have a large sprawling backyard or a small urban plot. They are also perfect for gardeners who love diversity and beauty, and who don’t mind a little disarray.
Navigate This Post
Why Choose a Garden Cottage?
If you’re a dreamy, non-traditional garden lover, the winding paths and overflow of a cottage garden are probably perfect for you. With this type of garden, you can embrace your wild and free side as you opt for growing a large variety of flowers, herbs, and vegetables.
Another plus? You get to turn your garden into the perfect escape. Whether you’re starting from scratch or sprucing up a corner of your yard, cottage gardens offer a space to let your garden fantasies run wild. All you need is the right mix of plants, materials, and some design magic to get started.
Designing Your Cottage Garden
Cottage gardens typically shy away from being really structured – this is where your plants and imagination can run free. Start planning for a layered look, where you allow plants to spill over borders.
Here are some key elements to consider:
1. Layout & Pathways
Gravel, brick, or mulch can be used to create charming winding paths
Arches, trellises, and picket fences are great for defining spaces and supporting climbing plants
Bird baths, benches, or vintage flowerpots add beautiful points of interest
2. Soil & Mulch
Test your soil first to understand what your garden needs
Improve soil quality by utilizing organic matter like compost, leaf mold, or bark
Organic mulch or wood chips can help retain moisture (and suppress annoying weeds)
3. Vertical Interest
Climbers like wisteria, sweet peas, and clematis add a beautiful touch to trellises and archways
Get “just a little” structured – for instance, using garden cloches or obelisks adds and supports height without looking too exact.
Cottage Garden Plants and More
Cottage gardens are all about displaying a unique and rich variety of plants. So instead of sticking to one type or style, this is where you can let several of your favorites shine from different colors, heights, to textures. Diversifying plant species can actually help your plants grow, attract pollinators, and keep pests and disease in check.
Here are a few of our top recommendations:
Annuals
Annuals complete their life cycle in one growing season, meaning they sprout, bloom, and die all within a year. Since they flower pretty often, they can offer vibrancy and color to your garden.
Why add them? To fill gaps and enhance seasonal variety.
We think you’ll love: Sweet peas, zinnias, cosmos, nasturtiums, marigolds
Perennials
Perennials return year after year, often growing stronger and fuller with time. Some perennials live a couple of years, while others can have a lifespan lasting decades. We consider these the backbone of a cottage garden, giving it structure and consistency.
Why add them? They’re low-maintenance and long-lasting.
We think you’ll love: Peonies, daisies, lavender, foxgloves, coneflowers
Herbs
Herbs are easy to grow, beautiful, fragrant, and add a different texture to your garden. Many herbs are also pollinator-friendly and repel pests. Herbs can be used in a variety of ways, like cooking, teas, or natural remedies.
Why add them? They smell great and are often drought-tolerant.
We think you’ll love: Rosemary, thyme, sage, mint, chives
Vegetables
Use your garden cottage to create your own abundance. Vegetables bring a functional element to your garden (visually and as a food source) – also, many vegetables like tomatoes and beans can be trained to climb.
Why add them? Fresh food (need we say more?).
We think you’ll love: Lettuce, kale, tomatoes, pole beans, squash
By combining these plant types, your charming cottage garden will not only look beautiful but will also be resilient and bountiful. Plant diversity helps prevent pests, attracts helpful insects, and gives your garden everything it needs to thrive throughout the changing seasons.
Pollinators and Birds
Cottage gardens are perfect for attracting pollinator insects. To get them buzzing their way into your garden, be sure to add nectar-rich plants like lavender and coneflowers. The goal is to create a safe environment for these helpful friends to thrive, so be sure to avoid using pesticides.
For birds, try adding a shallow bird bath so they can clean, swim, and gather. Water features create an inviting space for feathered friends and add to the overall ambiance. In addition, consider adding nesting boxes tucked among climbing roses or ivy-covered trellises to give them a cozy home when visiting.
Styling Tips and Tricks
Styling your cottage garden is all about letting your blooms run wild. Natural materials, flowing plants, and a little free-spiritness will go a long way.
Use natural materials like wood, stone, and terracotta
Let plants do their thing – specifically, allowing them to spill over paths freely.
Add whimsy with vintage garden tools or painted signs
Low-Maintenance Tips
There are a few ways you can make maintaining your cottage garden an easeful experience, like choosing resilient plants and maintaining soil with natural solutions.
Drought-tolerant plants are great for reducing watering (and saving money)
Group plants! Arrange them by soil moisture levels and sunlight needs
Compost is your friend – use compost and organic soil to feed plants naturally
Use dense planting and mulch to keep the weeds away
Cut Flowers for Celebrations
Whether you’re celebrating a birthday or a major holiday, your cottage garden will save you a trip to the local florist. Just head right to your yard and pick out your favorite florals to create your unique arrangement. Also, as you learn more about your plants’ growing patterns, you’ll know which flowers are in season for special celebrations.
With a little planning, you can have blooms throughout the growing season for DIY bouquets (or starting a local flower delivery).
It doesn’t matter if you’re a seasoned gardener or just starting out, a cottage garden is all about creating a space that brings you joy. So don’t worry about being perfect! With the right plants, layout, and a touch of free flowy creativity, your cottage garden can become the perfect sanctury for wildlife, and you.