We independently select these products—if you buy from one of our links, we may earn a commission.
September is Transformation Month at Apartment Therapy! That means we’re sharing stories about home transformations — from big renovations to tiny tweaks — all month. Head over here to see them all!
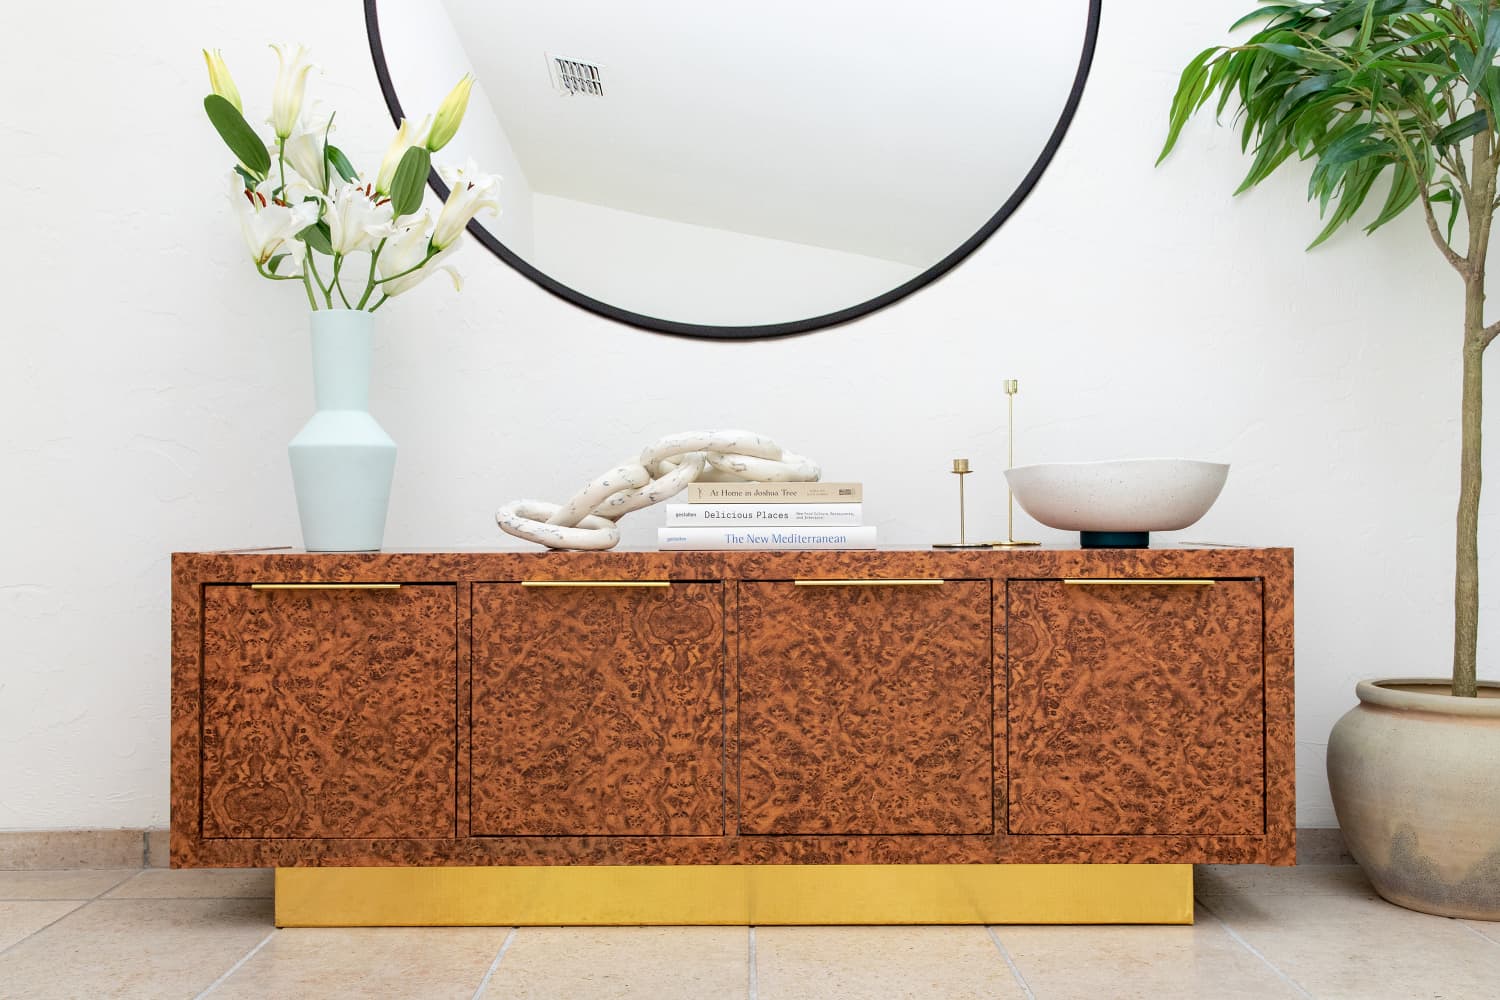
If you’ve ever been in a thrift store or antique shop, you’ve likely seen burl wood. This mottled-looking wood style started getting production attention in the 1960s, hit peak popularity in the 1970s, and is making its way back into the trend zeitgeist. Burl wood is not actually its own type of tree, but actually a grain pattern that results from growths on trees that put stress on the trunk or branches. The result is a cool spotted effect with tons of depth, pattern, and texture. Today, most burl wood furniture on the market is burl wood veneer as the actual sizes of burls make it difficult to produce large, solid pieces.
Because of its uniqueness and rarity, real burl wood veneer pieces can cost a pretty penny. But you can bring the groovy 1970s look to a basic IKEA KALLAX with a little clever DIY and just a few tools. Here’s how.
Supplies you’ll need to create a burl wood cabinet:
How to create a burl wood cabinet:
1. Assemble Your KALLAX unit.
Build your KALLAX according to the included instructions. This 1×4 unit can be approximately built by one person in 10 minutes. Fill in any visible holes with spackle. Let dry and sand smooth. This will prevent bubbles underneath the contact paper later.
For this hack, go ahead and attach the KALLAX door inserts into the cubbies with the interior hinge hardware, but don’t attach the doors yet. This will help you plan where to wrap the inside of the KALLAX.
Lay out the wood pieces, using clamps to keep the joints square. Drill pilot holes and secure together with wood screws. Fill gaps/holes, let dry, and sand.
I’ll be using ours for board game storage, but if you’re planning on using this for heavier items, add two more 2”x 4” x 8.5” interior pieces for support.
3. Apply the contact paper.
Wipe the KALLAX down to remove any dust. Peel back about one inch of the contact paper backing and align the edge of the contact paper to your first surface. Press firmly, starting from the middle and moving outwards; smooth with a plastic card, like a credit card or gift card. Slowly alternate between peeling back more of the backing and smoothing. Let the contact paper “roll” into place instead of pulling. Don’t worry about small bubbles — you can pop these with a utility knife later.
Once you get to the end, cut away from the rest of the roll and leave a little bit of tail to go in later for a more precise trim (I like to trim at the end instead of precutting to exact measurement for more allowance). For the finishing trim, hold your Exacto blade perpendicular to the edge of your surface. Support the blade with your middle finger and guide the blade like a pencil through the contact paper while pulling the excess away. Smooth down the edges one more time.
One thing to be careful around is the small edges of the KALLAX. You’ll notice that the exterior sides are not flush. If your contact paper is on the thinner side like the one I used, I found it easier to not wrap around the small edges to prevent ripping, but instead apply strips individually. Below is the order I found most helpful to prevent difficult cutouts and wrapping:
The great thing about burl wood is that the pattern disguises small mistakes. If you do make a tiny rip, you can easily patch it with matching paint.
Repeat the process to wrap your wood base with the brushed gold contact paper.
Center the KALLAX over the base. Add a few heavy objects on top of the KALLAX to prevent it from moving. Measure and mark inside the KALLAX where the base is directly underneath. Drill pilot holes. Attach with wood screws.
Time for the finishing jewelry! Center your handles to the door faces, making sure they’re as flush as possible to the top edge, and mark the drill holes. Drill pilot holes for the screws; you can use painter’s tape on the drill bit to mark depth so you don’t drill through the front of the door. Screw the handles on.
Then, step back and admire your new ’70s-style centerpiece.