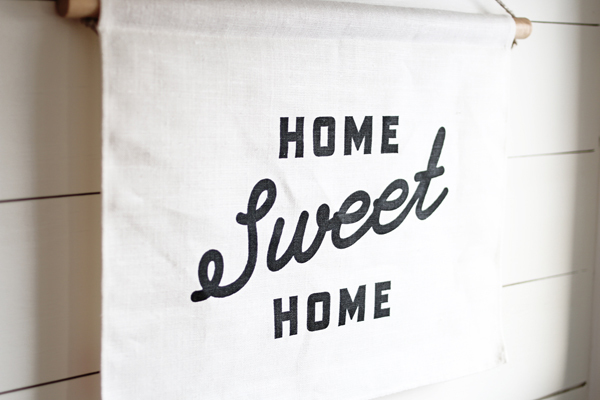
When I think of “home,” I always start with a visual picture: the layout, the colors, and all the “stuff” that makes it so unique. But, of course, my real concept of home doesn’t have anything to do with the physical structure or the things that sit inside it. Home is a sense of peace and rest I experience by myself and with my family. And it’s the place where I nurture relationships, and build community. And if I’m doing things right, it’s the place that helps me stay sane. So this year, I’m giving my home a new commitment, and all my 2017 commitments are actually New Year’s resolutions for the home.
1. Deal with procrastination: Procrastination can really take the joy out most things in life. But in our homes, it can create an unthankful mindset for where we live. We all have projects we put off for days, weeks and sometimes even years. And the effect of that can be feeling behind, but also a lack of gratitude.
When we first moved into our home, we just hauled all our stuff from one country to the other, dumped it into the basement bedrooms that were out of sight, closed the doors and never looked back. Two years later, I still feel anxious when I see all the unpacked boxes and piles everywhere. No more procrastinating! We really want to focus on working on those specific spaces that bring us extra stress that we just don’t need in our life.
If you are in the same boat, you know what we mean. So, come up with a game plan! Working on one room at a time, we are slowly going to clean and organize the basement bedrooms. An easy way to motivate yourself to breath new life into unused spaces is giving them a little facelift! We have plans to give three different rooms their own complete makeover this year: a new home office, an organized laundry room and a spare bedroom/playroom for the kids. We know that hitting these problem areas in the home head-on will definitely make us feel a whole lot less stressed in the long run and give us a little more gratitude for where we live.
2. Narrow down to the necessities: When you live surrounded by a lot of clutter, it’s easy to overlook the details that make your house a home. It’s high time we take a long look around to see what items we have that are necessary and items that have no meaning whatsoever. I really do want to live out the whole “less is more” motto and scale back…big time.
I do love to thrift and hunt for unique treasures. Though we have collected a lot of really “cool” stuff over the years, it all can feel a little overwhelming. It’s time to really ditch the extra baggage around the home and do a little purging. One easy way to do this is figuring out if the object or thing has special meaning or memory. If it doesn’t and you just have it because it simply looks pretty or was on sale, give it away! Having less stuff will easily put your mind at ease.
3. Out with the old, in with the new: Christmas usually means a plethora of new toys and clothes for everyone. Before taking all the new stuff out of the packages and ripping the tags off of new clothes, go around the house with a few boxes to collect old toys and clothes that haven’t been touched in months. It’s like the old switch-a-roo! And to help keep a little order and sanity of course.
4. Invest in people, not things: We try our best, but we are all guilty of getting sucked into this world of consumerism. All the newest decor trends, fashion trends and endless stuff to be had….just walk around your favorite local shops and boutiques and you know the feeling exactly. It’s enough to make you go crazy. This year, I really want to invest in relationships rather than things. It’s about being intentional with our time (and money) and investing it on loved ones and experiences, not goods.
5. A cleaning routine: Am I the only one that finds this one totally daunting? In a fast paced world, there seems to be very little time or energy left to care for the home. Which is why we probably avoid having some sort of cleaning routine or schedule, because it’s just one more thing we have to do! For me, it’s really about an attitude change. I’m a stay-at-home-mom and I sometimes resent that looking after the home is essentially my “job.” But honestly, we are so blessed to have this beautiful home and I should show a little more gratitude by taking better care of it! So you see, it’s about doing a littler inner cleaning of the heart too, if you know what I mean.
How about you? What commitments are you making for your home this year? Please share your thoughts in the comments below.
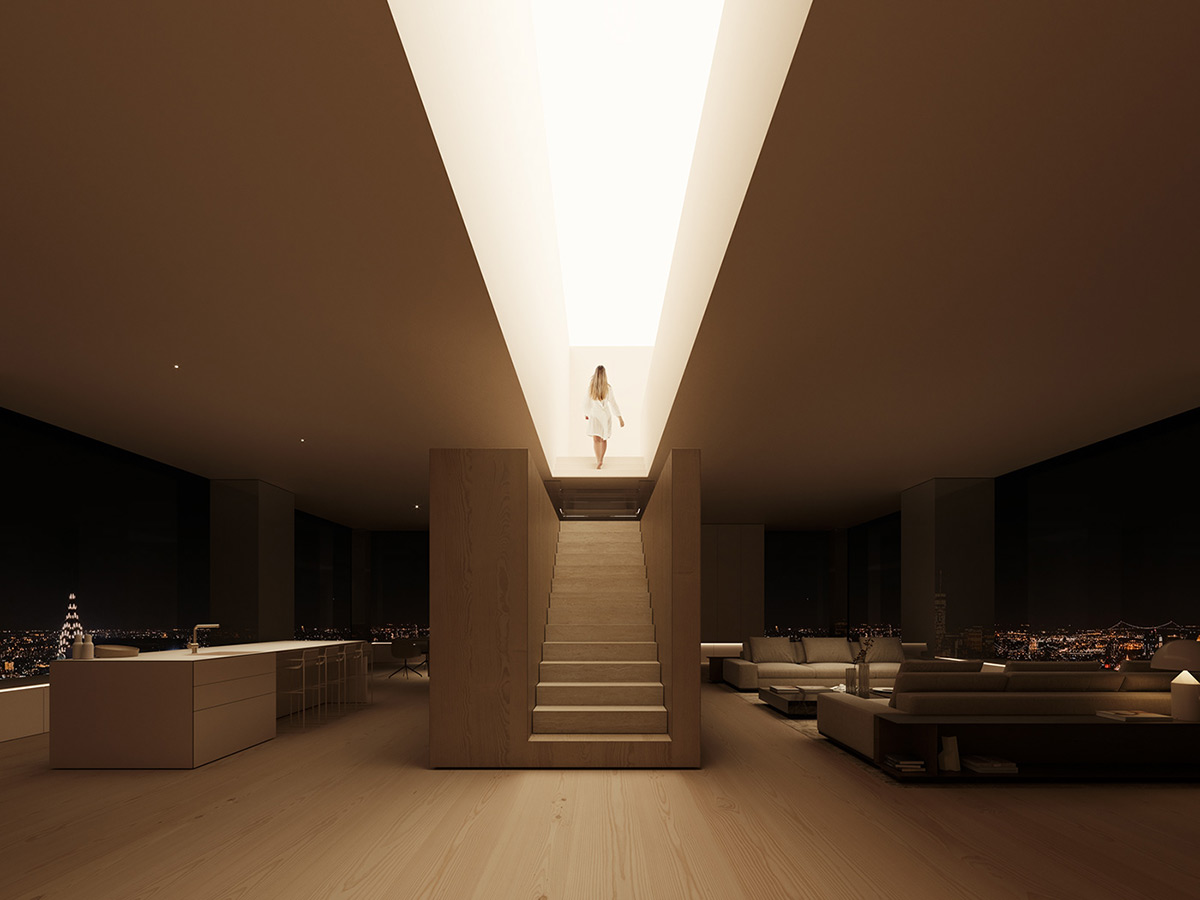
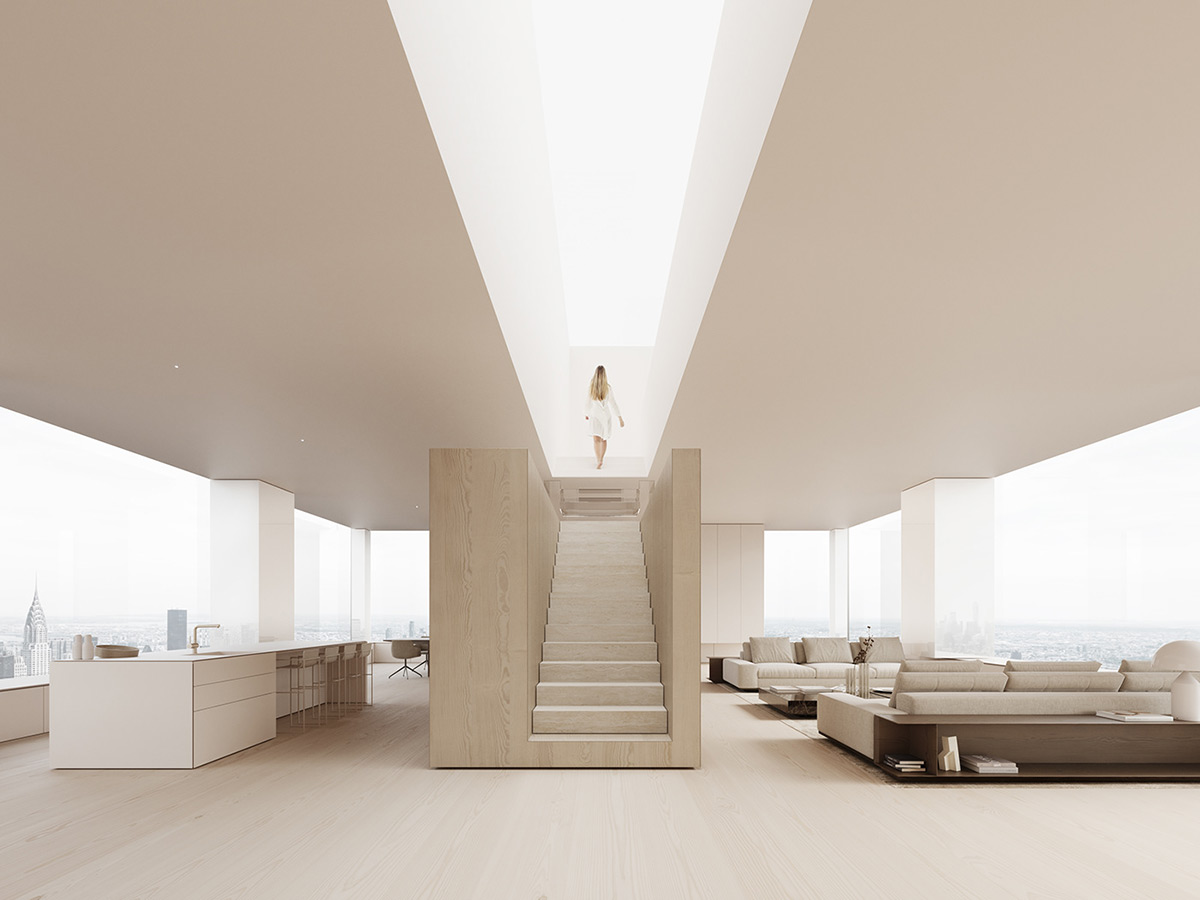
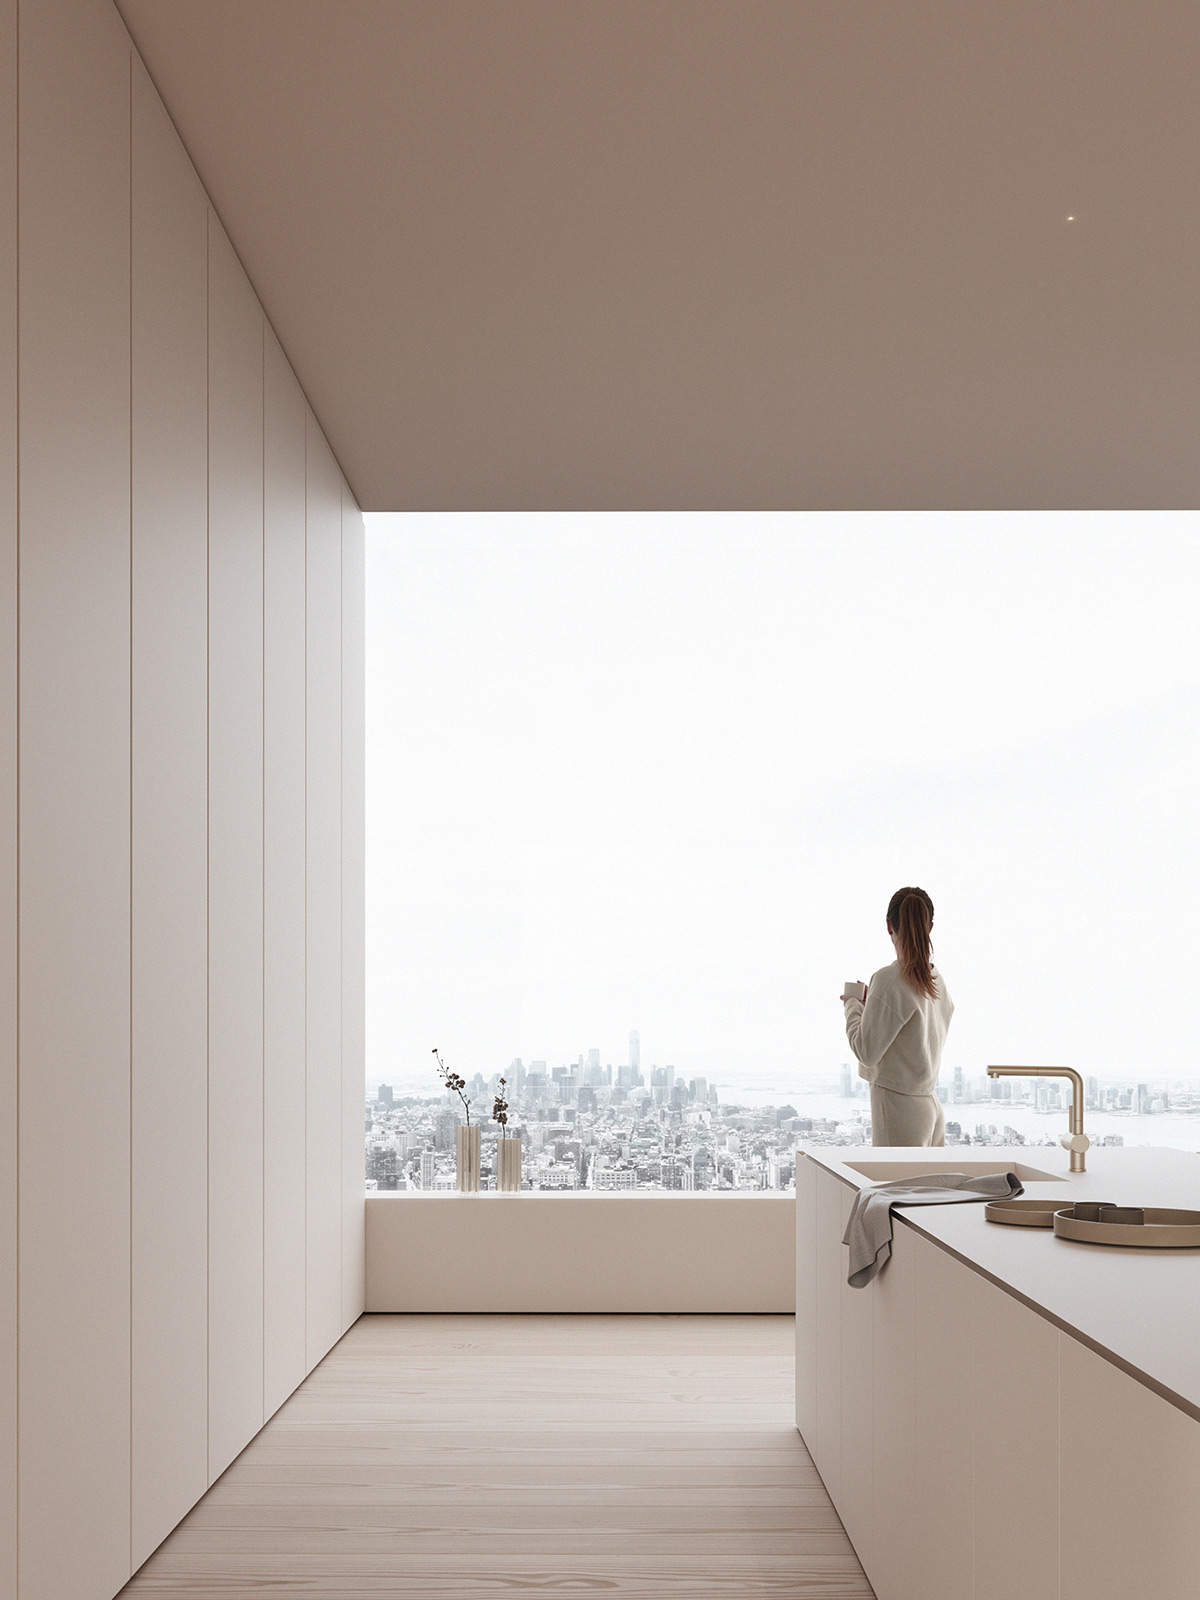
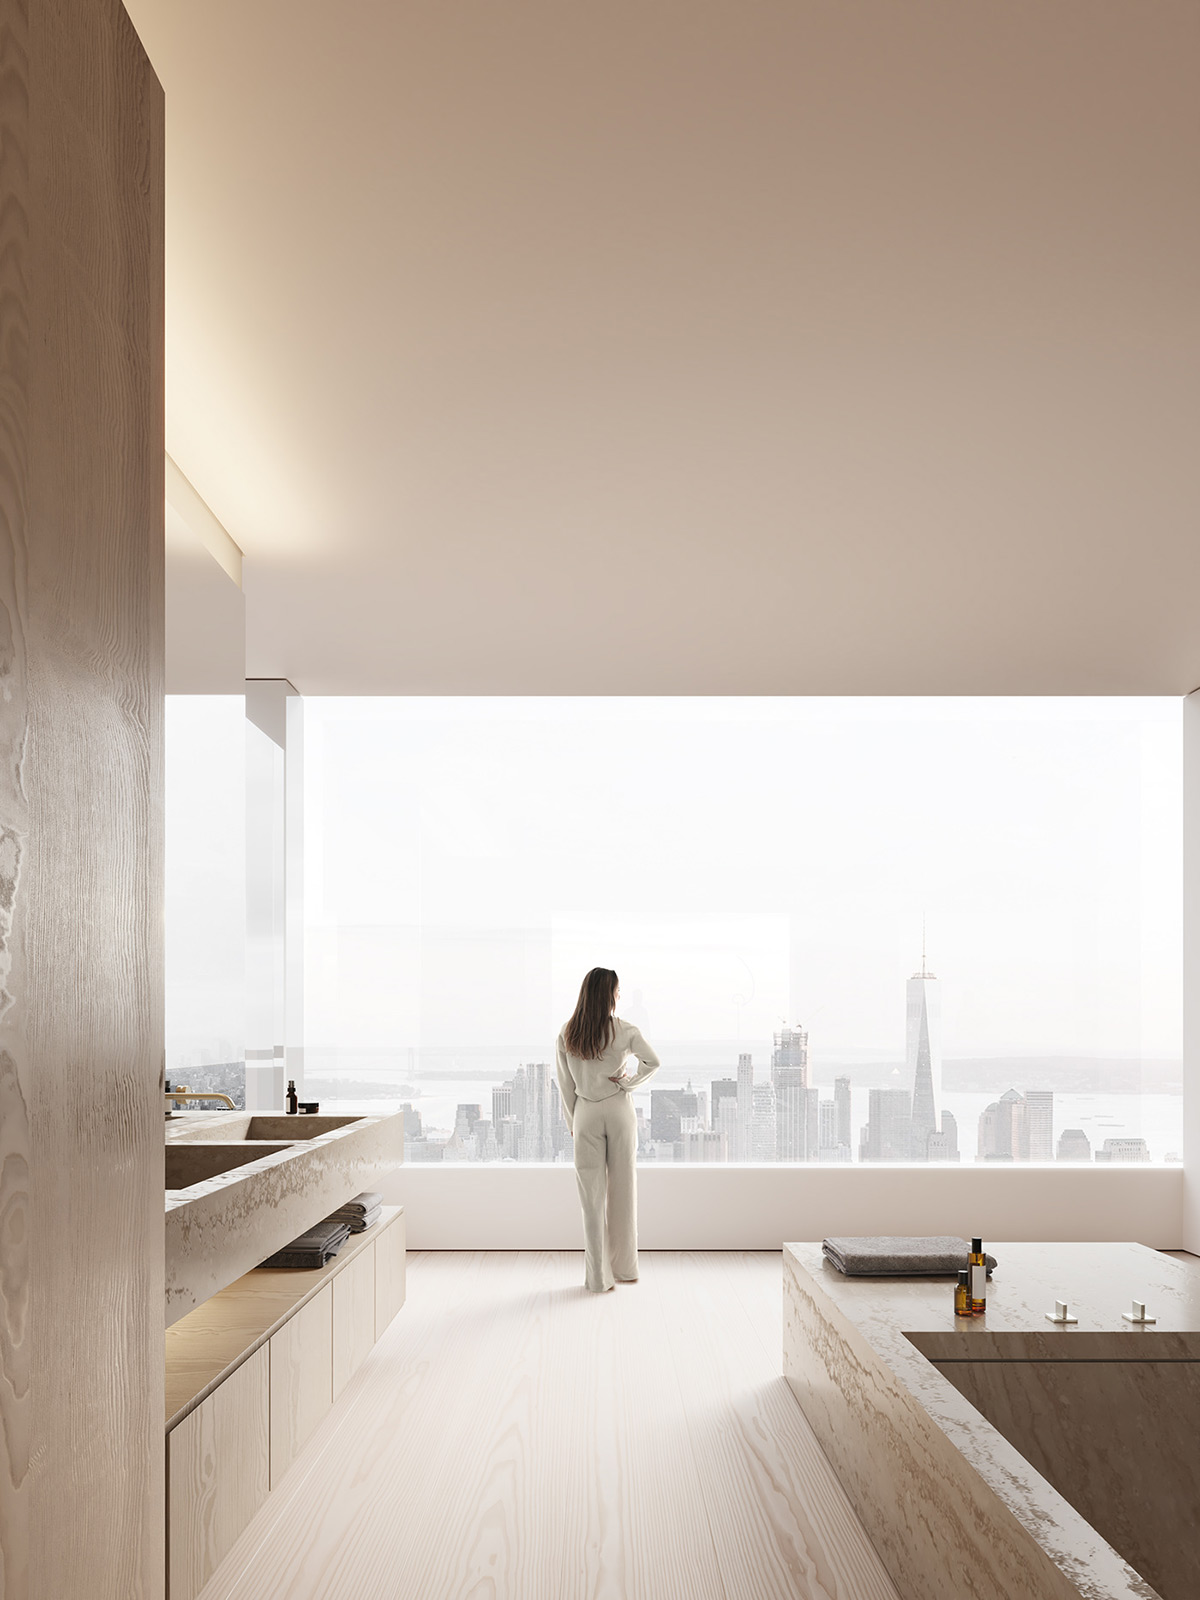
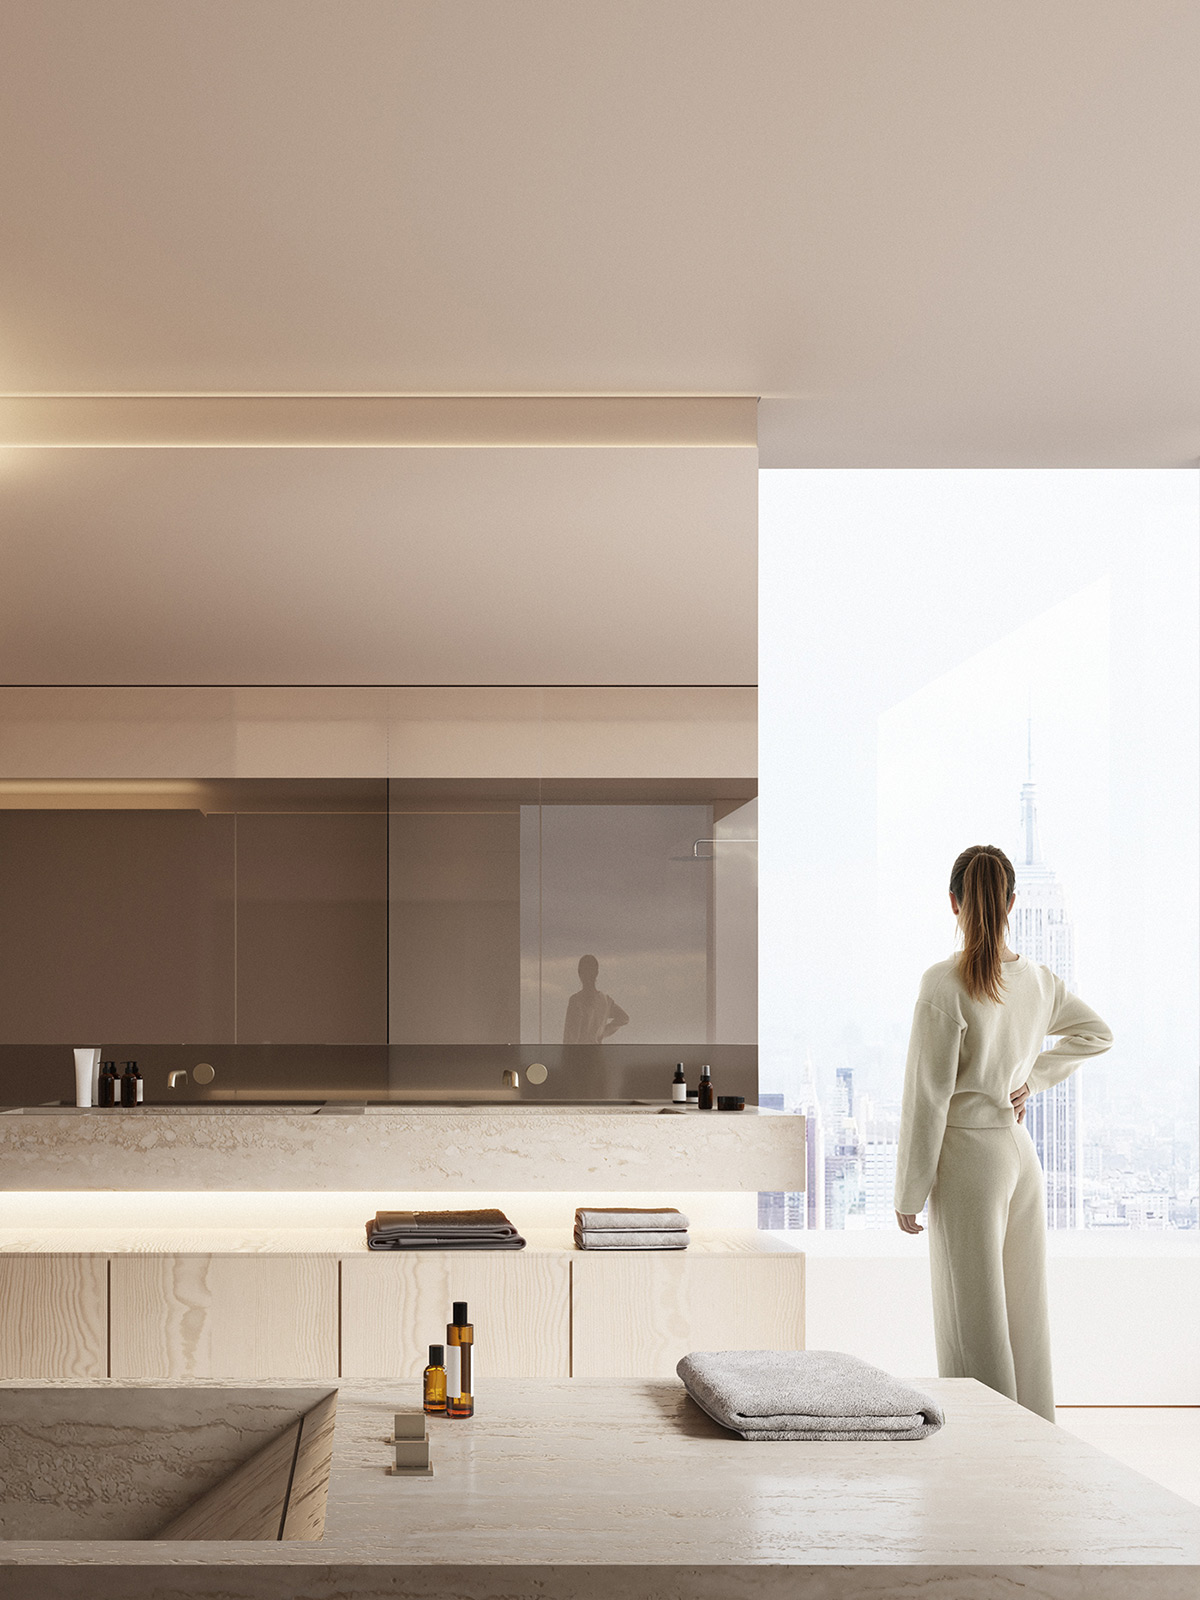
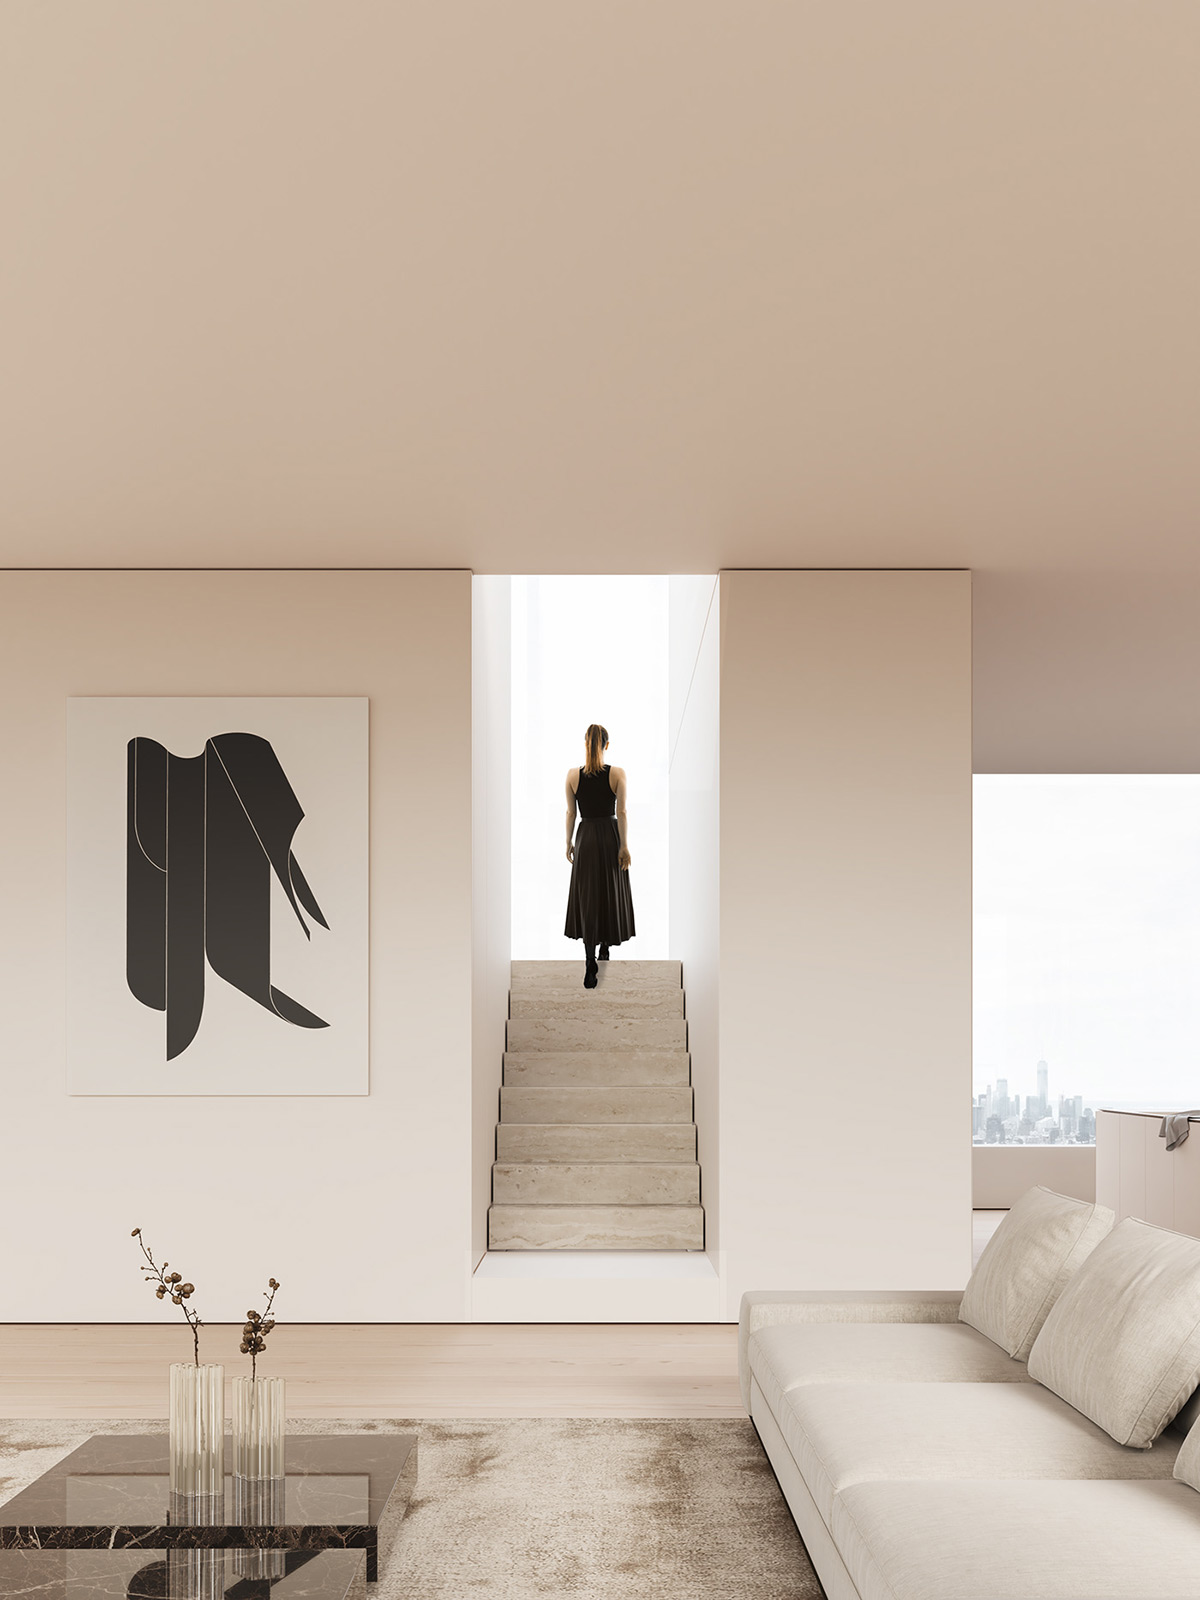
A refined minimalist layout and super smooth limestone elements make this interior a scene of laconic luxury. Visualised by Fran Silvestre Arquitectos, this tasteful home design receives high-end furniture with understated silhouettes. Bleached wood flooring planks lay down a pale base. The interior simplicity allows a magnificent panorama of the city to unfold as the focal point. Huge windows drink in the view and natural sunlight, free from drapes and distractions. A limestone staircase climbs to a large mezzanine bedroom design, where LED perimeter lights paint an inviting glow. Other luxurious bedroom suites offer expansive spaces with ensuite limestone bathrooms, dressing rooms, home workspaces, and of course, the spectacular cityscape.
A full wraparound panorama of twinkling city views pierce this large and laconic home design. At night, interior lights dim to let the city lights shine.
By day, huge windows and an extensive skylight fill the minimalist home with sunlight. A pale palette of white and beige reflects the natural illumination. A central staircase splits the massive living space. At one side of the stairwell, a spacious kitchen diner and a formal dining room unfold. The opposite side of the room is dedicated to a comfortable sitting space where friends and family can gather on ample seating.
Advertisement
The luxuriously minimalist lounge area is furnished with understated linear beige sofas. The two couches form a channel toward the breathtaking view.
A set of two square coffee tables run down the centre of the lounge layout. A pair of decorative glass vases and a collection of coffee table books adorn the glossy marble tabletops.
A sofa table is positioned behind each modern couch. The main body of each low table dips just out of view behind the backrest but forms a sleek side table around the arm of the sofa. A small collection of books are stored in the base.
There is also a dedicated reading nook just behind one of the couches. An inviting wingback chair with a matching footstool and a comfortable lounge chair offer a choice of seating. Two round coffee tables are on hand to hold a hot beverage or some snacks. A slimline floor lamp provides focused light.
A designer table lamp perches on top of the sofa table to provide reading light over the couch. This is the Atollo lamp by Vico Magistretti for Oluce.
Bold modern artwork makes a punchy monochrome accent against the pale wall treatment.
Advertisement
A line of built-in storage units runs the full length of the living room. The cabinets are tucked neatly below the windows to leave the view entirely unobstructed. The top of the units serves as a window seat where the homeowner and their guests can soak up the view from every angle.
Wood wall cladding adds light texture to the laconic decor scheme.
A limestone staircase climbs to a mezzanine bedroom. LED perimeter lights line the ceiling to create an atmospheric glow.
Bud vases and lamps lightly decorate the window sill.
The formal dining area slots into a minimalist kitchen design, where cabinets close around all appliances to hide them from view.
A white kitchen island threads through the space.
Upholstered dining chairs seat up to eight people around the modern wooden dining table.
The minimalist white kitchen island doubles as a breakfast bar at one end. The other half is utilised for storage and the kitchen sink.
Floor-to-ceiling kitchen units achieve a smooth, streamlined appearance. Flat-fronted, handle-free doors keep visual clutter at bay.
A butler kitchen follows the same laconic design with a smaller kitchen island at its centre. White units are suspended clear of the floor on one side to increase the perception of space.
A snug reading room features a pair of matching lounge chairs and glossy black nesting coffee tables. A soft beige rug provides cosy texture under foot. Built-in cabinets construct a wall of generous storage space.
Inside the first spacious bedroom suite, we discover a restful beige decor scheme and more rolling city views.
An upholstered bench is situated underneath the window, where it makes a bright reading area.
Behind the headboard, a wide walkway passes by a wall of fitted wardrobes. An ensuite bathroom waits at the end.
Up on the mezzanine bedroom, a home workspace is fashioned into the deep balustrade. The built-in desk area overlooks the luxurious living room below, and the city beyond.
Another beautiful bedroom design houses a similar decor scheme to the first. Another greige upholstered bed and channel-tufted end of bed bench smartly furnish the space.
A spacious luxury bathroom layout makes the most of the spectacular panorama. A travertine bathtub is positioned to soak up the scene.
Opposite the bathtub, a limestone vanity unit is crisply underlined with wooden storage units.
In the final luxury bedroom, a bedside shelf morphs into a home office desk. A reading area is fashioned in the opposite corner, where it benefits from the influx of natural light.
Stylish Atollo lamps provide bedside light. Modern artwork adds a bold focal point above the bed.
The same decor colours and materials palette is employed throughout the whole home interior to achieve one smooth flowing cohesive aesthetic.
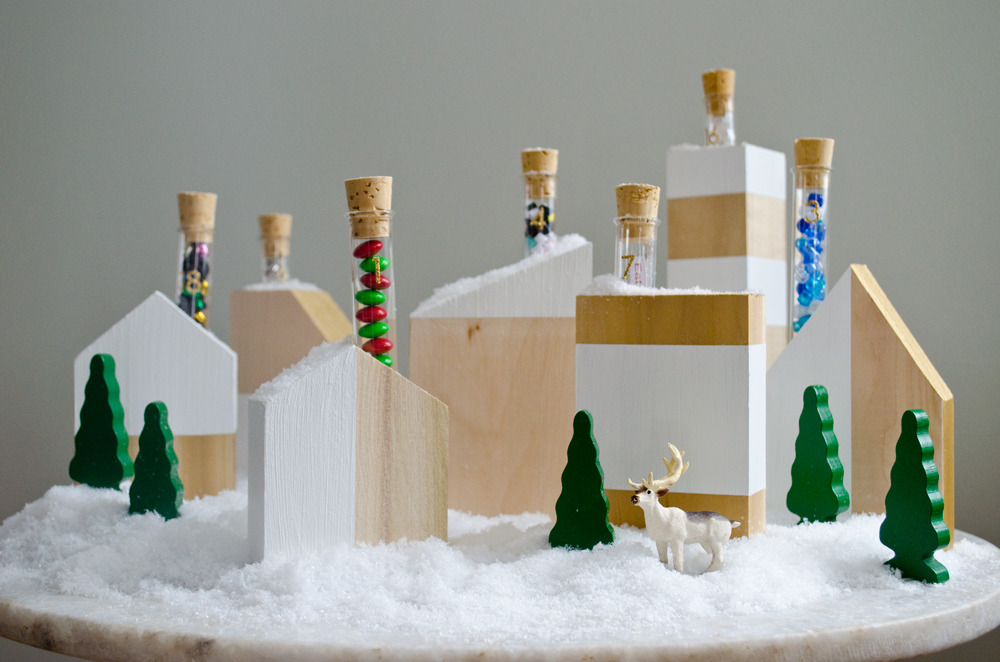
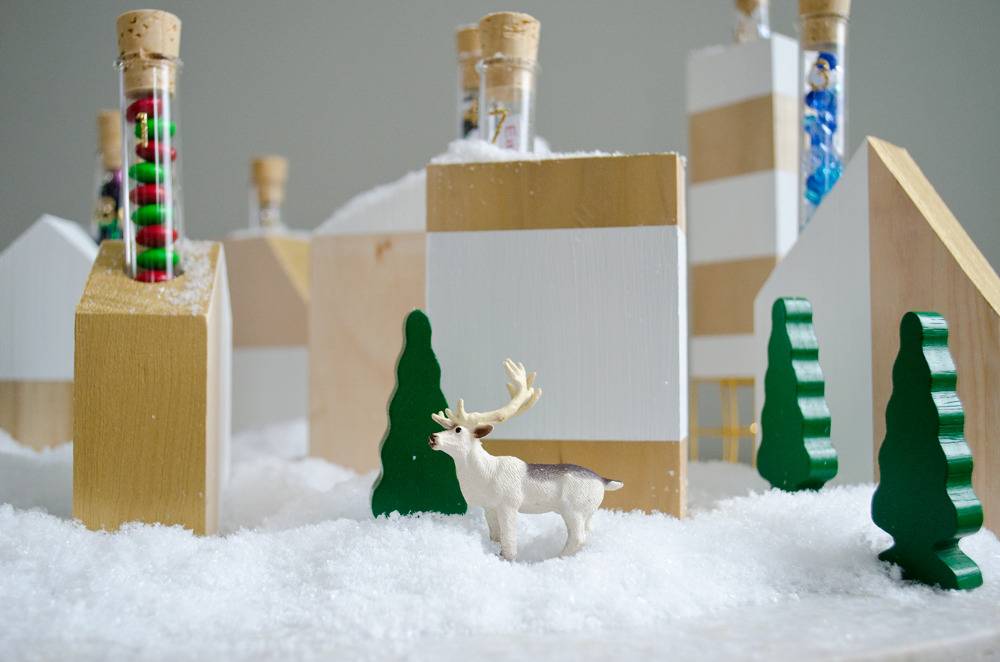
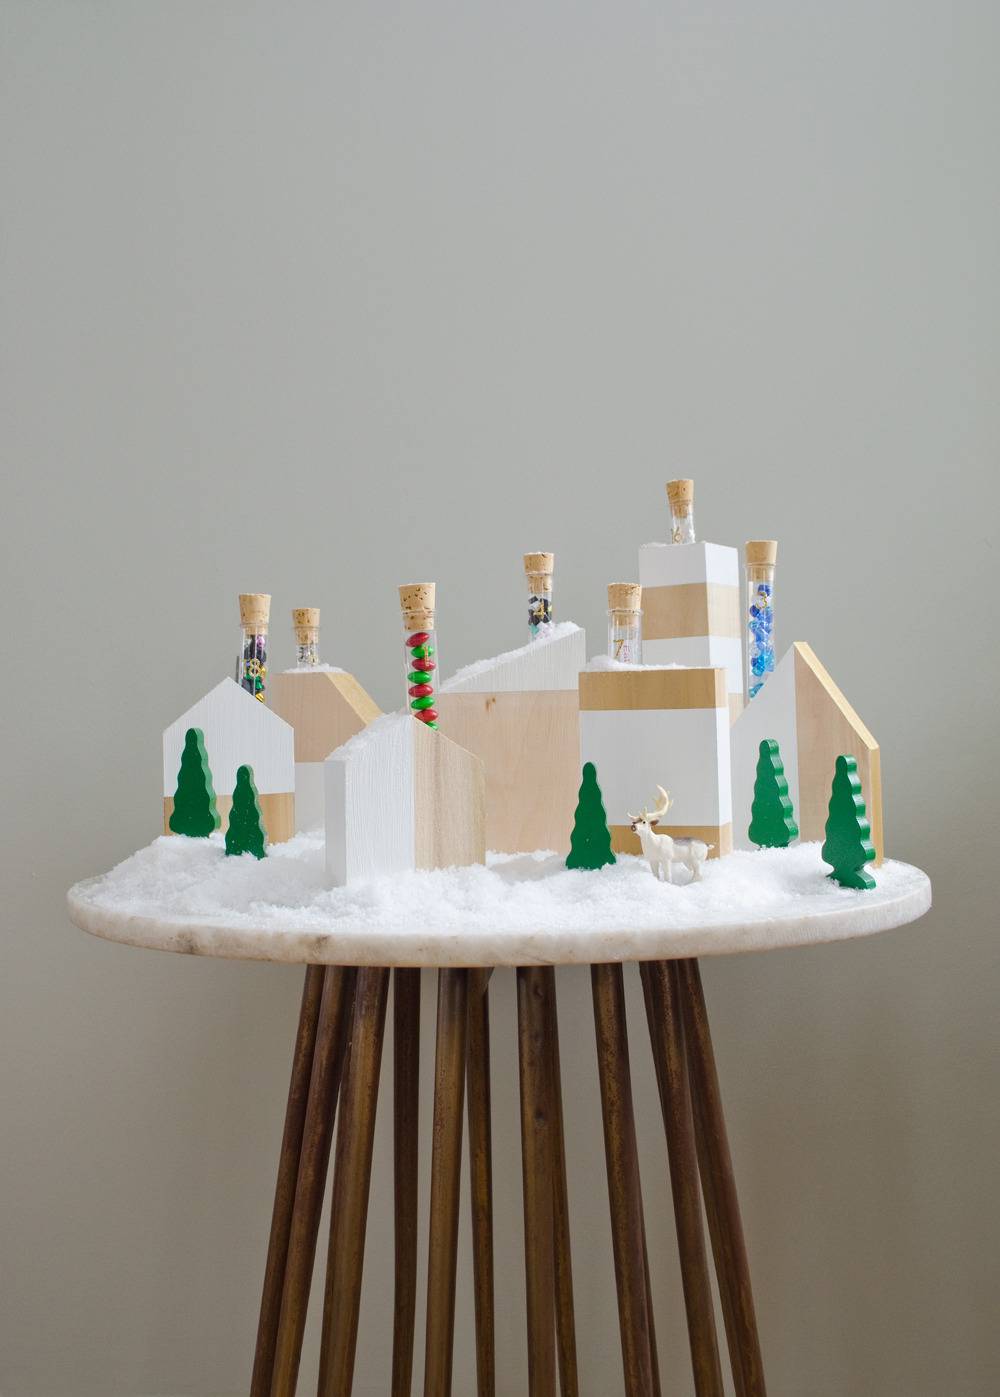
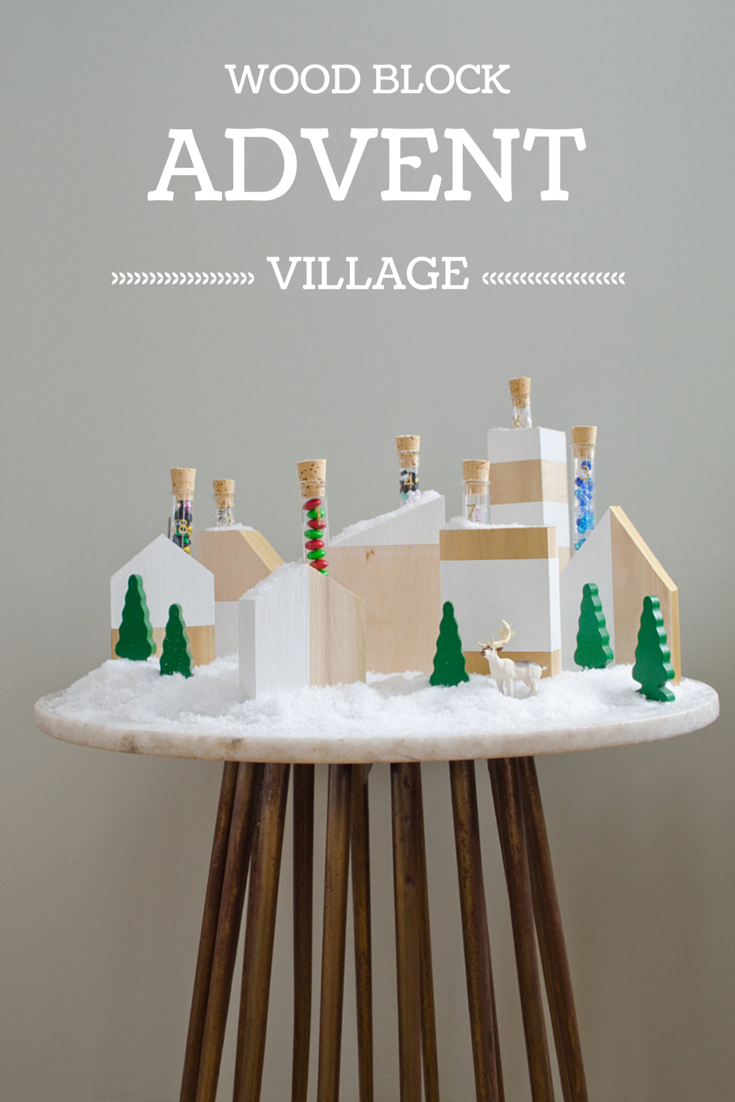
It’s advent calendar time! As I write this post, the Midwest is being walloped by a snow storm. Nothing inspires holiday decorating like many inches of snow, and to stave off decking all the halls, I created a little diy advent calendar village for our children. Read on for the full tutorial.
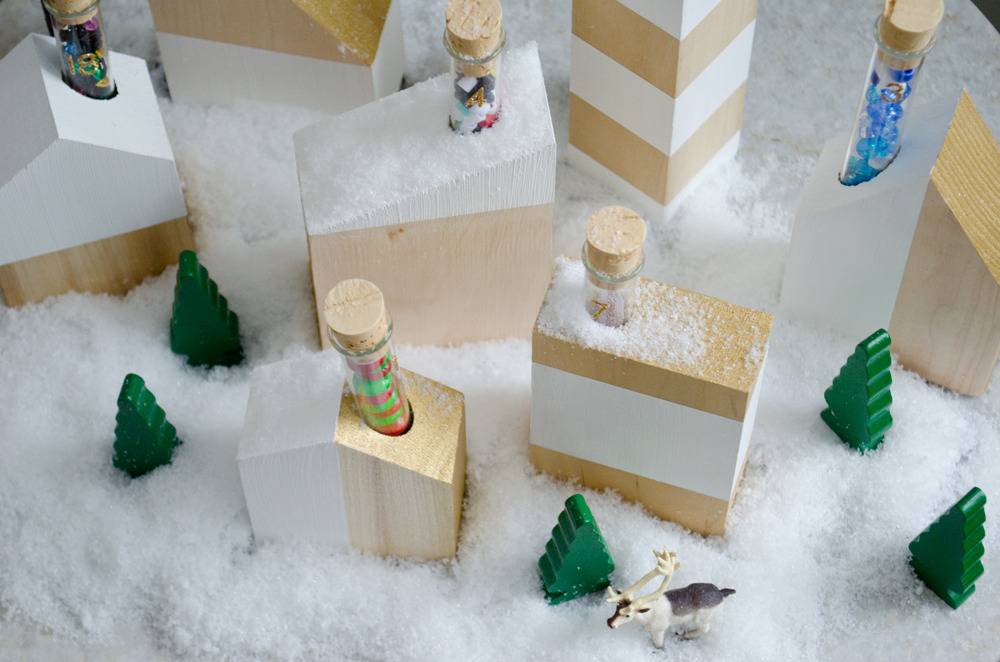
Using blocks of wood and test tubes, I assembled a village full of tiny treasures to help our family celebrate the season. The great thing about using test tubes is that it ensures each day’s surprise is small.
Creating your own diy advent calendar village is simple. We originally created 24 houses for this project, but the result was overwhelming, so we scaled back to a set of seven houses (to represent each week leading up to Christmas).
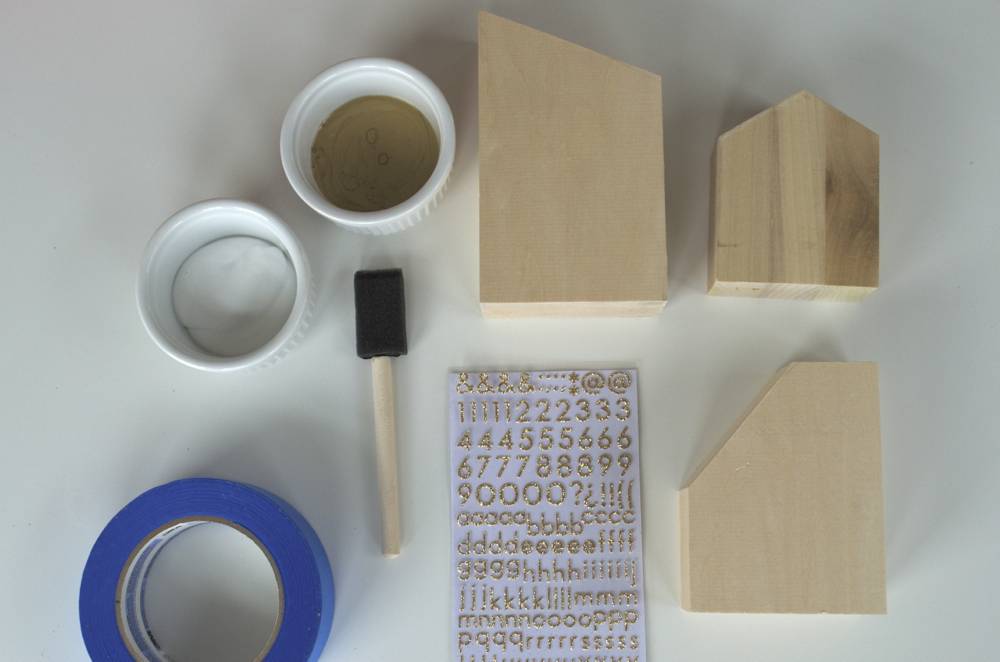
Cut your wood to size. Our houses ranged in size from 3.5″ to 6″ tall, and were about 2″ thick.
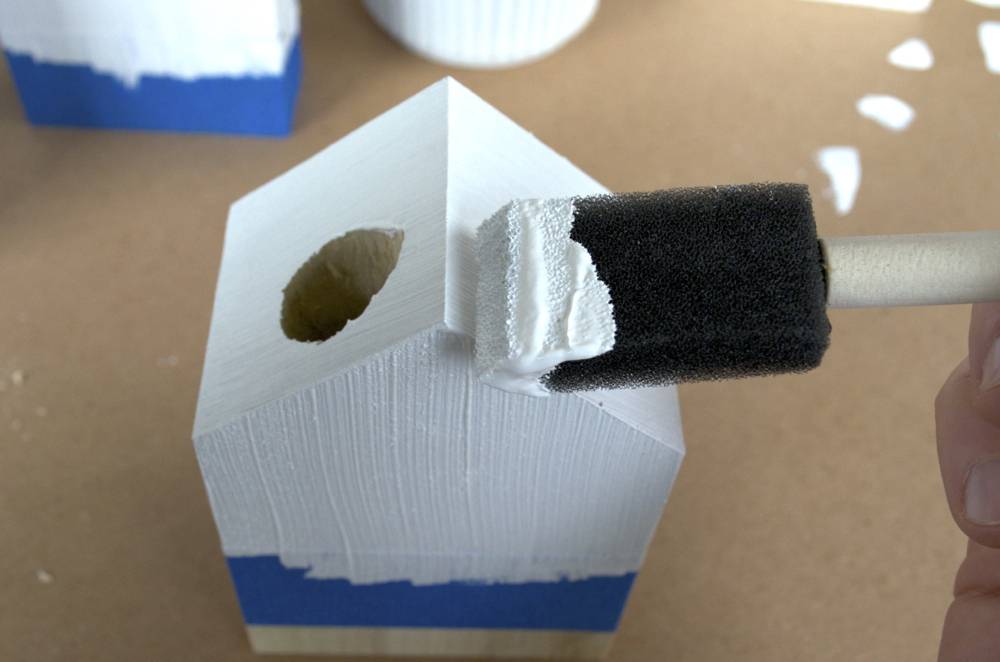
Drill your holes into the blocks of wood. We used a 3/4″ bit. It’s important to drill the holes before you create your angled roofs because it’s much easier to keep your holes plumb this way.
Cut angled roofs on your houses. I think it works best to create a variety of peaks, slants, angles. Because, you know, houses come in all shapes and sizes.
Lightly sand your houses.
Using painter’s tape, mark off the areas you’d like to paint on each house.
Paint your houses. We used white paint on the faces of the houses and gold paint on the rooftops.
Fill your test tubes and place them in their homes!
I used a variety of small treats to fill my tubes, and I’ll share some of my favorites with you because it was a challenge to find goodies small enough to fit inside a standard test tube.
What to put in your DIY advent calendar?
Edible Treats: Candy like M&Ms work well. Hot cocoa with marshmallows is another winner.
Crafts: I filled many tubes with beads and ribbons that came in $1 craft store sets. Some of these sets were too big to fit the test tube, so I placed only a part of them in the test tube (e.g. mini colored pencils).
Notes: In a few tubes, I placed a note indicating a special thing we’d do together as a family (e.g. “Bake cookies.”, “Wrap presents.”, “Take an evening drive to look at holiday lights.”). Notes are also a great way to incorporate a service component into your calendar (e.g. “Shop for gifts for children and donate them to Toys for Tots”). I filled the tubes containing notes with confetti to make them more festive.
The final result is a sweet village to help us count down the days until Christmas.
If you like this how-to, do us a favor and share it on Pinterest:
Thanks for helping us share this project on Pinterest!
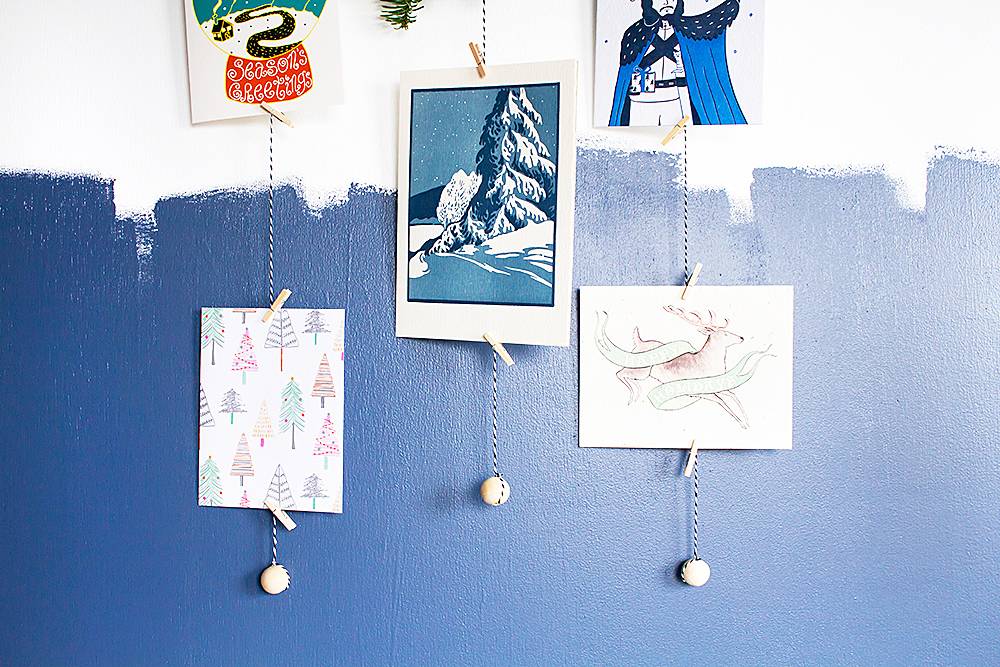
Every winter, it’s the same story. I get a handful of thoughtfully selected, lovingly written cards for the holidays…and, I have nowhere to put them.
Tacked on the fridge with the grocery lists and unpaid parking tickets? Jammed on a shelf between the dusty knick-knacks and piles of unopened mail? Ok, my house isn’t THAT disorganized (most of the time), but I’m sure you feel the pain of receiving beautiful mail and having nowhere to display it.
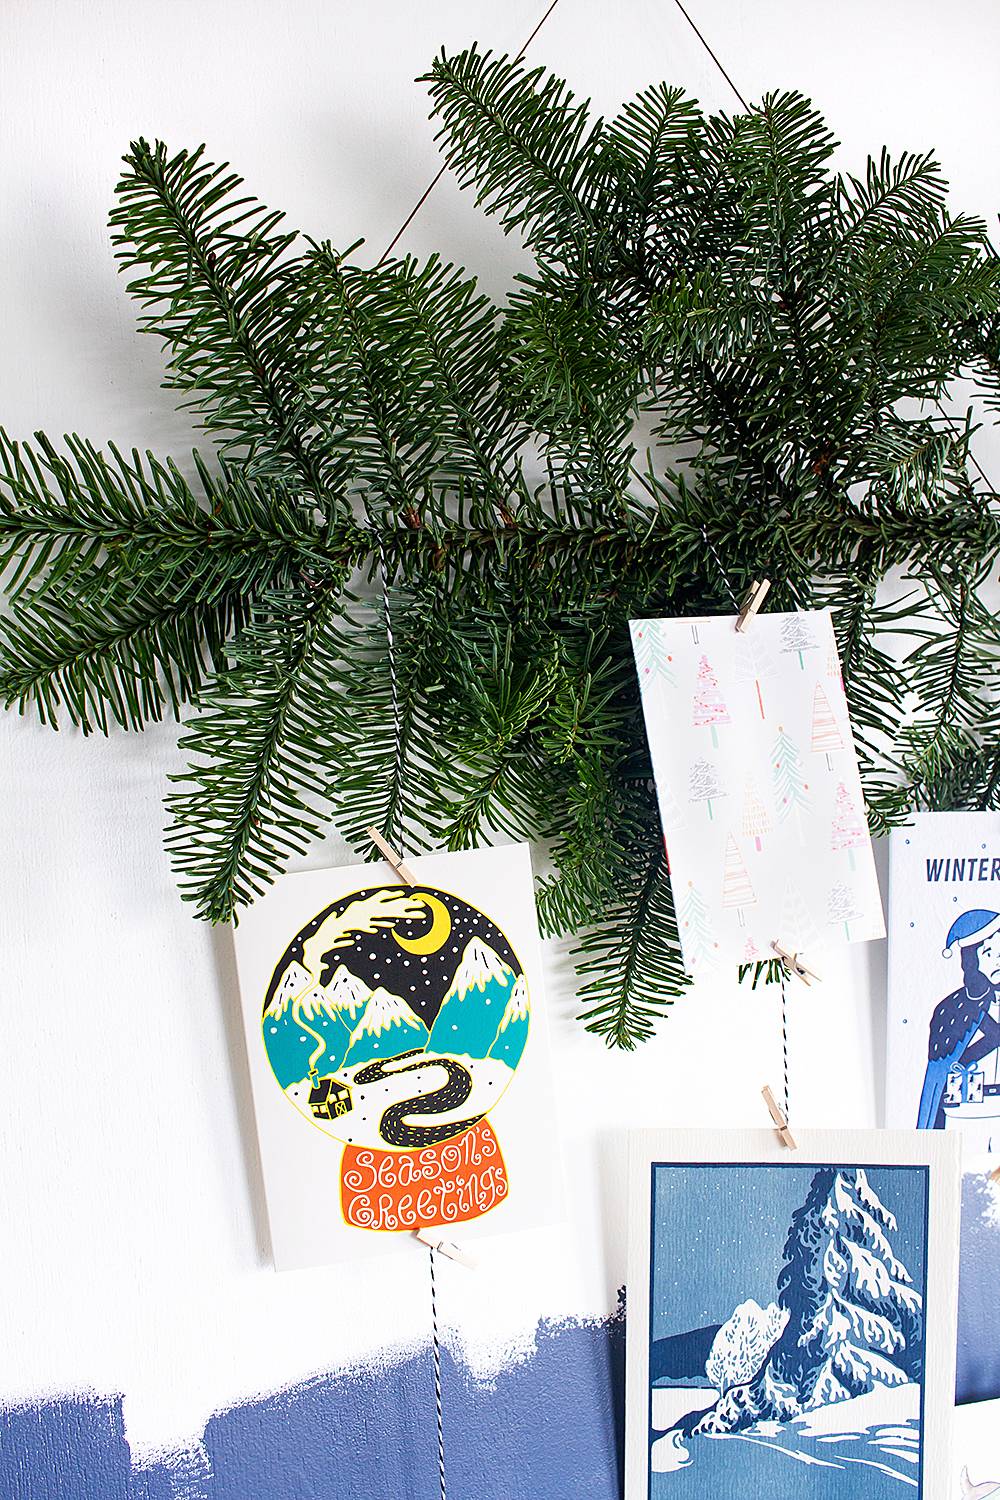
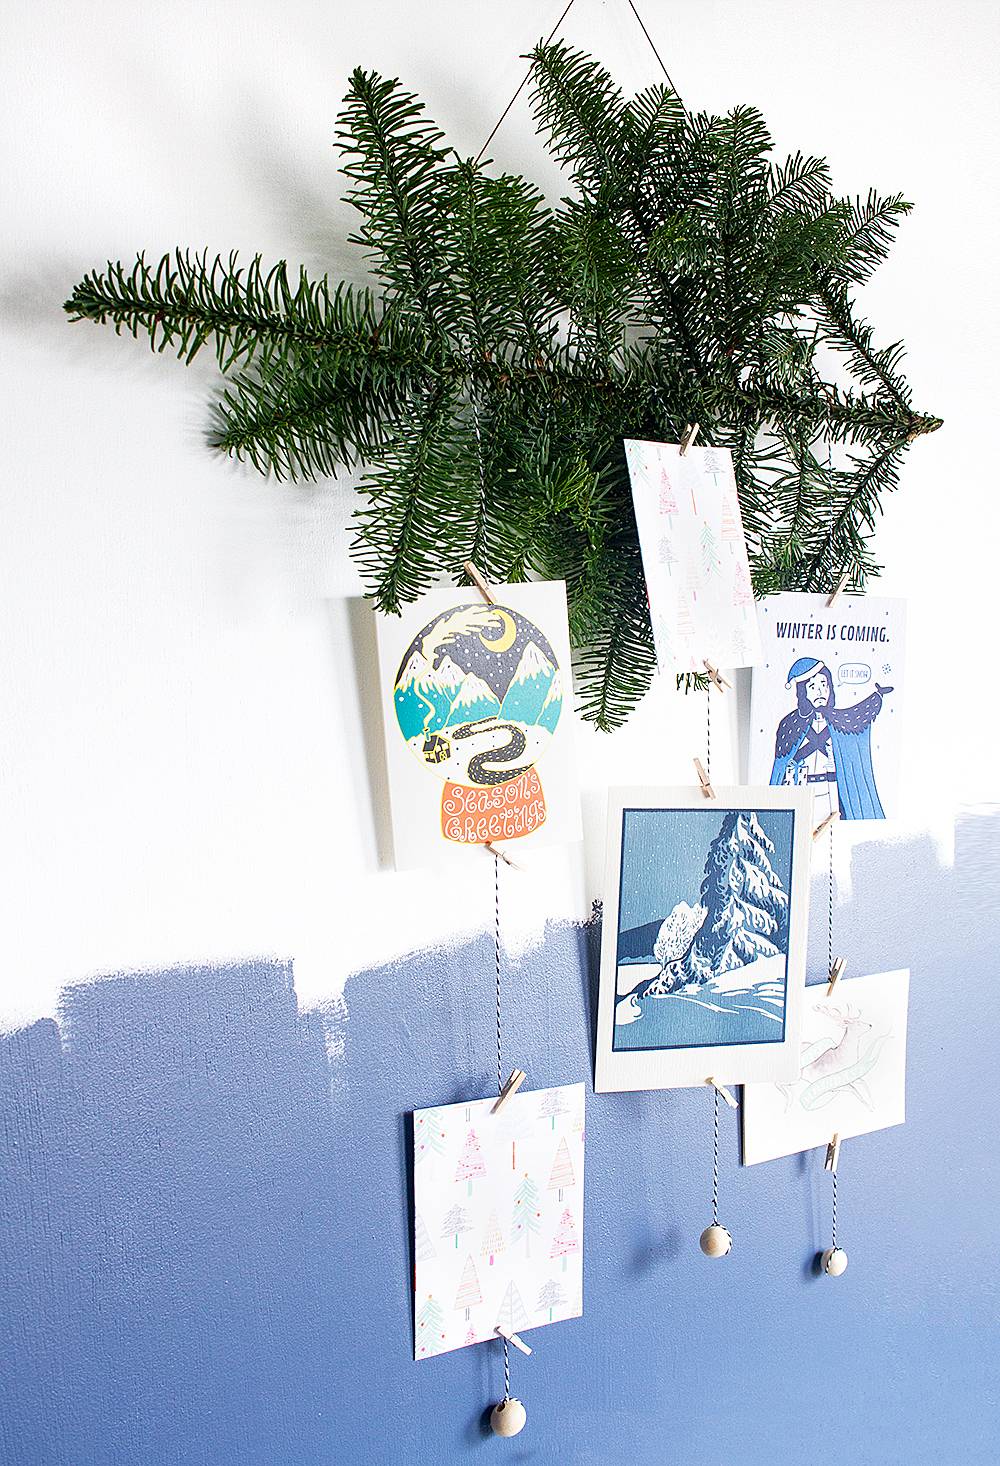
This year, I decided to take matters into my craft-loving hands and make a simple, pretty DIY branch holiday card display. It only requires a few basic supplies to make, can be made as small or as large as you want, and will make your home smell like a pine tree, which is obviously the best reason to make your own. Keep reading to see how to make a DIY branch holiday card display!
Materials
Step
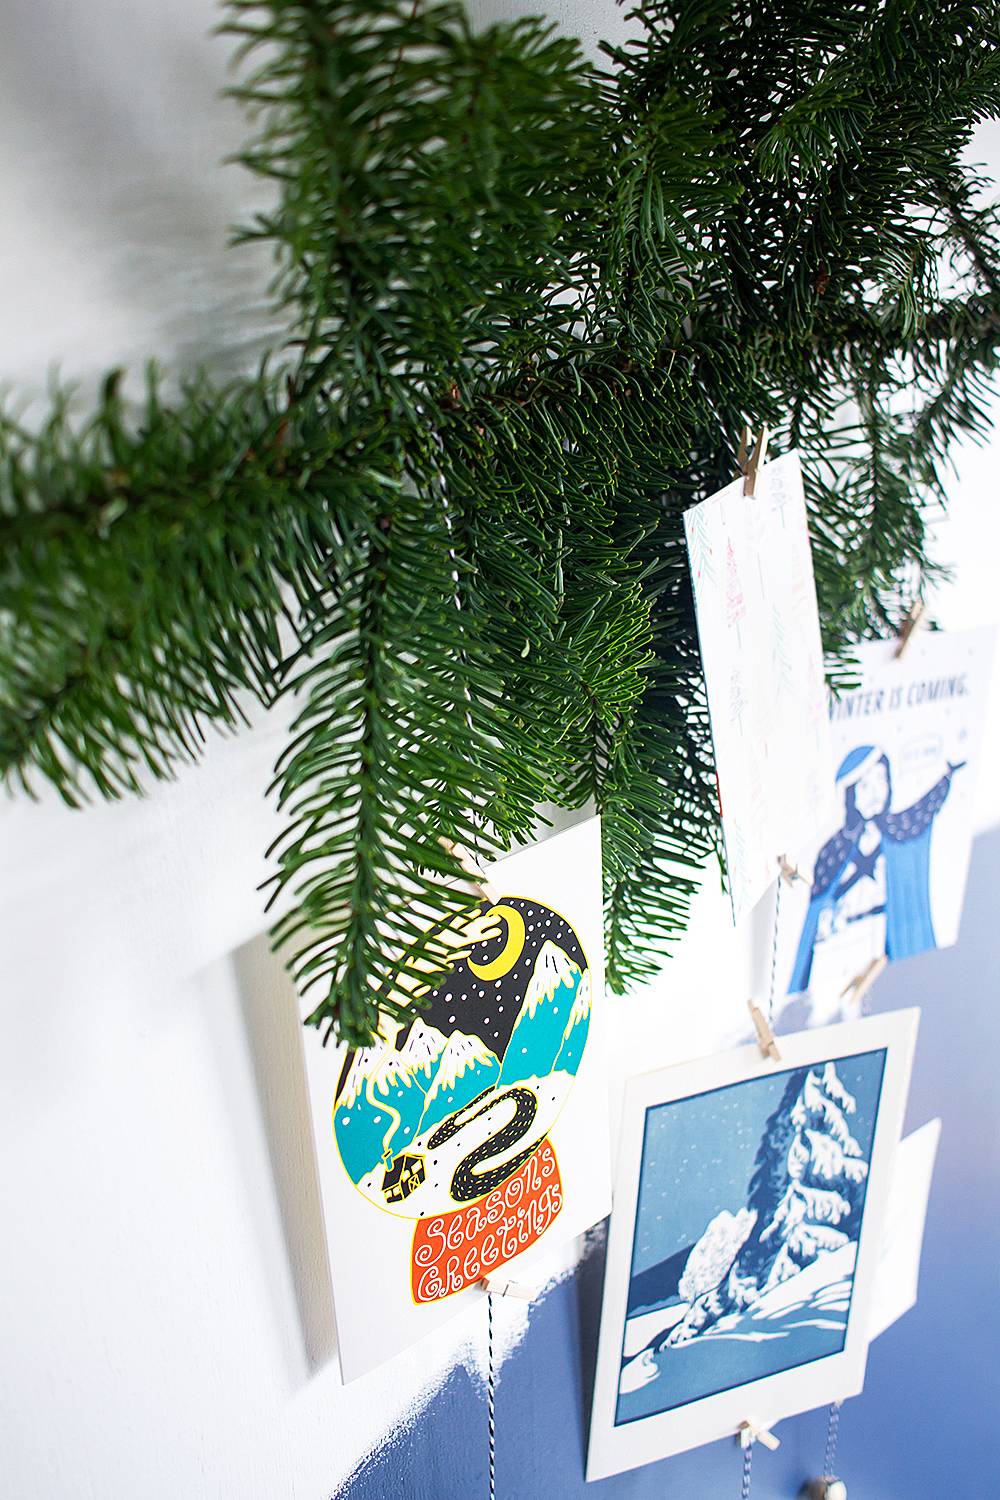
Cut a piece of cord to hang your branch, and tie the cord to the branch at two points.
Step
Attach string to the branch to hang the cards.
If you receive lots of cards for the holidays, simply scale this project up with a larger branch and more string!
Step
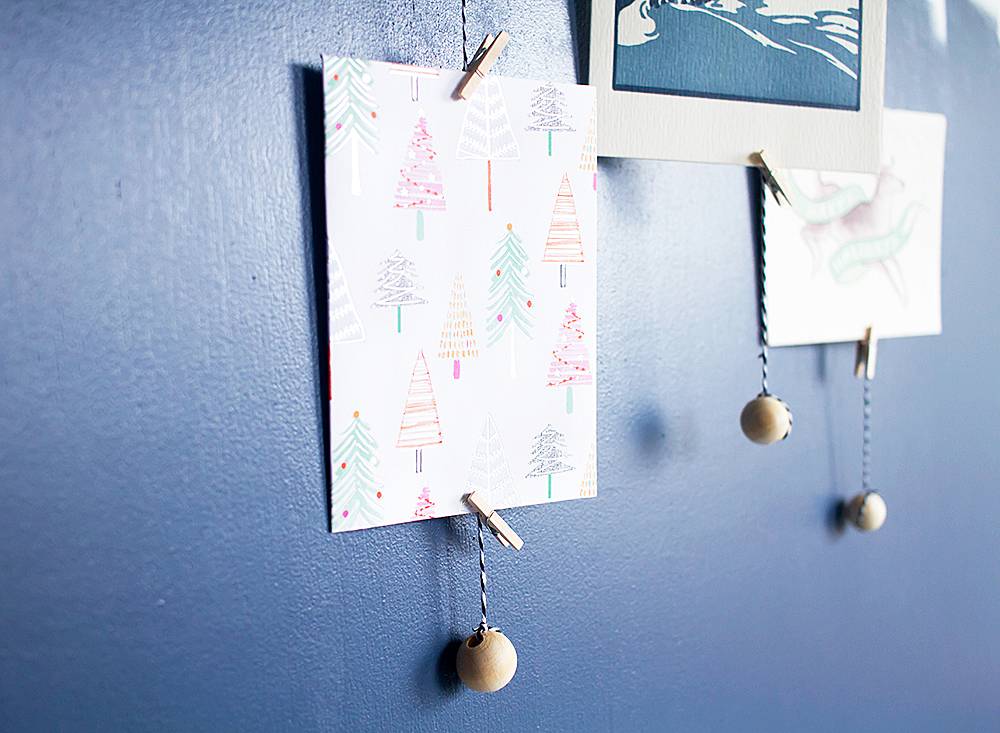
Trim all the string ends, then hang the branch (Command hooks are great for temporary projects like this!). Attach the cards to the string with mini clothespins.
Finally, tie beads to the ends of the strings so they hang straight.
And that’s it! Now you can see and enjoy all that lovely holiday mail for the season.
Don’t forget to pin this project to Pinterest!
Where would you hang your branch holiday card display? Do you have other ideas for showing off your holiday cards? Let us know in the comments!
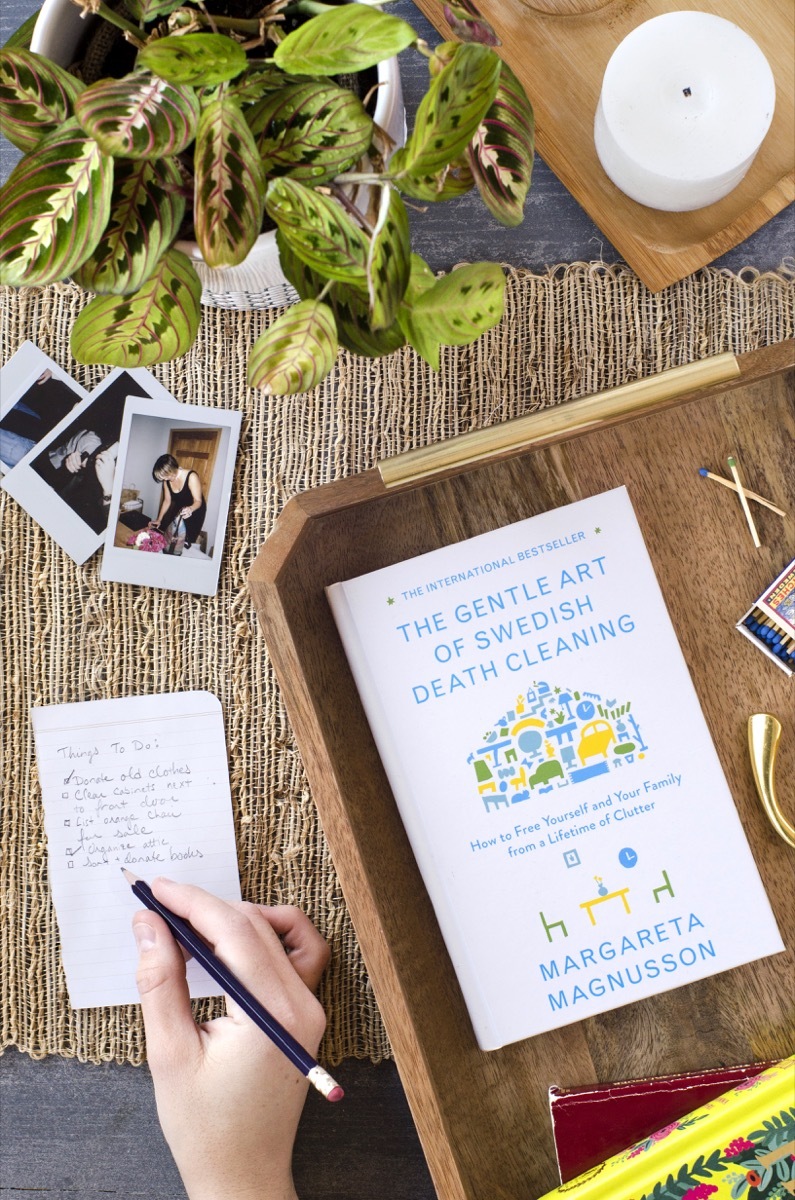
I got a text the other day from my mom. She was asking me if I wanted a collection of magazines that she had held onto from my childhood (if you’re curious, it was a collection of Cricket magazines from the late 70s). Then I got another text — my mom had found an old photo that she wanted to share with me. Then four more texts came my way, each containing a picture or memory of something from the past. It was clear that she was doing some deep cleaning.
When I asked her what she was up to, she replied, “Have you heard of Swedish Death Cleaning?” Um, excuse me??
When I read the words Swedish Death Cleaning, my first thought was, “How morbid!” If you’re found this article, you might be thinking along the same lines as me. No, Swedish Death Cleaning has nothing to do with zombies who enjoy dusting, and no, this trending topic has nothing to do with the similarly-sounding genre of music, Swedish death metal. In spite of its name, this Nordic tradition is actually more happy and wholesome than it is hardcore.
What is Swedish Death Cleaning?
In Sweden, it’s called Döstädning.Dö meaning “death,” and städning meaning “cleaning.” It’s the process of sorting and preparing your belongings in a way that those who come after you will appreciate. This can include everything from shrinking down your wardrobe and cleaning out the attic, to making plans for who gets the dining table and writing up a will.
Swedish Death Cleaning is the process of paring down what you own, so that at the end of your life, your children, spouse, or caregiver is not burdened with an overabundance of stuff and junk to sort through and deal with. This process also benefits the now. Consequently, by thinning out your personal possessions, you have more time to focus on the parts of your life that your really care about, and you spend less time minding all your stuff.
This gentle minimalism also means embracing and cherishing those of your physical possessions that you actually love. And you don’t have to wait until the end of your life to adopt the practice. In fact, it’s better if you get to it sooner rather than later.
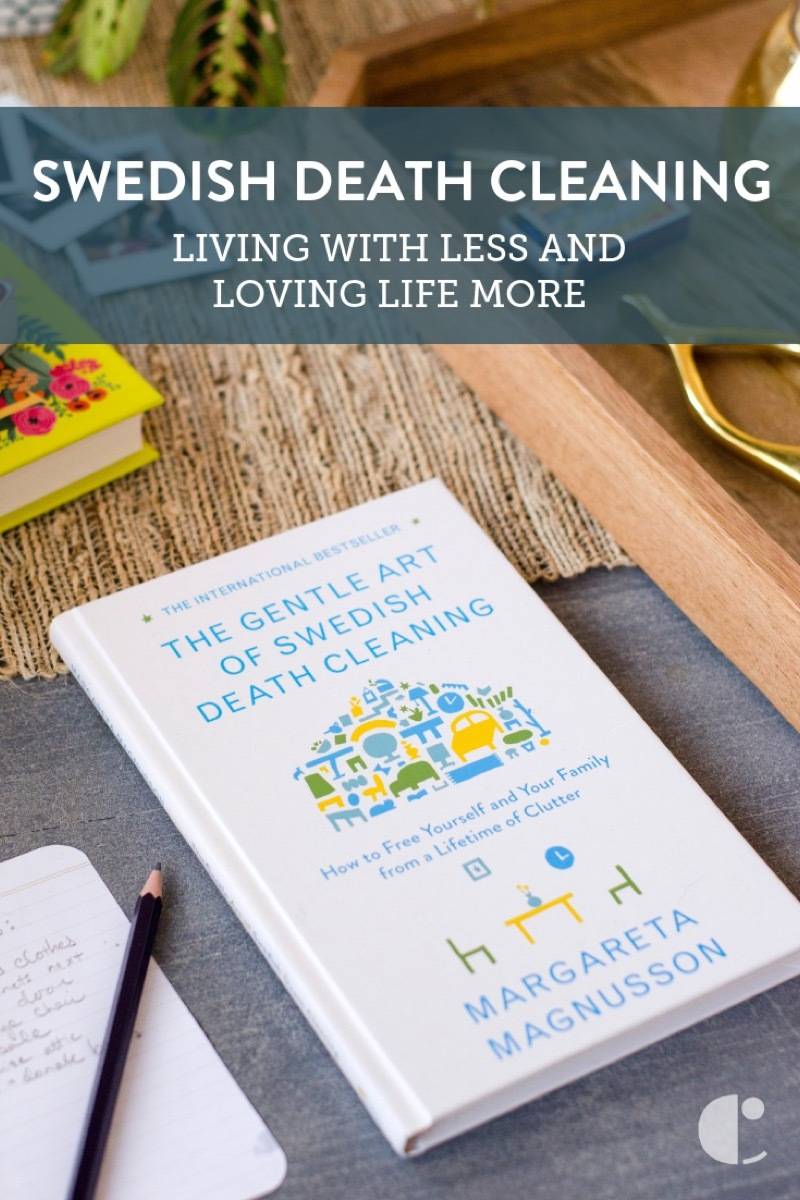
The Gentle Art of Swedish Death Cleaning
After my mom piqued my curiosity about the Swedish death cleanse practice, I decided to do a little reading myself. I picked up a copy of The Gentle Art of Swedish Death Cleaning by Margareta Magnusson. It’s currently the only book on the topic, as far as I could find. It’s a lovely little read that explores the concept of döstädning, and how to apply it to the different areas of your home and life.
I’m pretty lucky that my mom reached out to me first about Swedish Death Cleaning, and that she is already a fairly organized person. Often, the topic of what-to-do-with-all-the-stuff is a hard one to bring up with parents, especially those who have a tendency to be pack-rats. Maybe you’re in a similar situation with parents or in-laws. If so, there are sections in this book that specifically speak to how to approach this delicate topic, from someone who has had to deal with the topic of death more than once.
The Author: Margareta Magnusson
Margareta Magnusson, döstädning expert, ages herself somewhere between eighty and one hundred years old (adorable). Born in Sweden, Magnusson studied design in Stockholm, and later went on be an artist; her work was exhibited in museums in Hong Kong, Singapore, and Gothenburg, just to name a few. Mother to five and having done several rounds of death cleaning for loved ones she has already lost, Magnusson is quite familiar with the need to pare down and stay organized in order to fully enjoy life.
Who is Döstädning for?
Swedish Death Cleaning is for everyone.
Because, everyone dies.
But that fact is not meant to get you down. First of all, coming to terms with the notion that you can’t take your belongings to the grave with you is a good thing! In her book, Magnusson says that those who are too attached to their belongings (also known as pack-rats) are the ones who probably do not a strong grasp on the reality of mortality. They have difficulty with the notion that one day their life will end. So, if the reverse is – if you are open and willing to part with the physical things in your – you open yourself up more to accepting the future, and enjoying the present.
A Swedish Death Cleanse does not mean immediately tossing everything in sight. It’s the slow process that makes this method less painful. Rather than toss everything in the trash, Magnusson suggests saying good-bye to your belongings, and appreciating them on their way out. Likewise, it doesn’t mean living with nothing. It means living with just enough.
Magnusson recommends that if you are nearing retirement, to start the cleaning process earlier, rather than later, as you are more able-bodied now than ever. But you don’t have to wait until you’re in your 60s to adopt some of the practices of Swedish Death Cleaning. Everyone can benefit from thinning out their personal possessions, opening up their lives to enjoying activities and relationships over stuff and collections.
The Process
In Magnusson’s book, she lays out a loose and approachable framework for those who want to start the Swedish Death Cleaning process. Even if you are not at the end of your life, this framework works functions for people who feel overwhelmed by or too attached to their stuff, and need to purge.
Where to Start
It starts with the attic, basement, or storage near the entryway. Essentially, this purge process begins with things that don’t hold sentimental value. If you can start strong, you’re much more likely to stay in momentum throughout the process.
Margareta Magnusson suggests that you tell your friends and family that you’re death cleaning – they might be willing to lend a hand, and they might be interested in taking some of your stuff off your hands! Or, maybe your cleaning will inspire them to do a little purging of their own, and you can encourage each other throughout the process. However, Magnusson warns against friends or family members who may encourage you to hold onto too much. She says that if you can’t make a decision about an item, try reaching out to a third-party. An unbiased source can look at the situation and weigh the facts without getting hung up on the sentimentality.
Start with large items first, and finish with the small. Smaller items tend to have a higher emotional value, and will be more time-consuming to sort. Save those old letters and photos until the very end of the process!
To get a complete look at the process, I highly recommend picking up a copy of The Gentle Art of Swedish Death Cleaning. It’s a short, sweet read that cuts right to the subject of passing from the viewpoint of someone who has dealt with death many times. If you are the child of a mom or dad who is holding onto too much stuff, get a copy for your parent as well.
In Summary
Death cleaning is as much for you as it is for your loved ones. For those in your life, it means that their final memory of you isn’t one of burdensome sorting, organizing, and dealing with your junk.
Thinning and limiting your personal possessions can lead to a happier life, too. With less clutter to distract your time and efforts, you can enjoy the things in life that really matter: relationships and experiences.
Swedish Death Cleaning means living with less. It means embracing reality, and most importantly, it means enjoying the now.