Imagine if every time you walked across a carpet, you felt like 1,000 ants were tickling your toes, or whenever you entered a room with white lights, you felt like the high beams of a car were blinding you. If this is your reality, you are most likely in a constant state of despair and naturally will respond.
These examples may seem exaggerated to some, but for people with autism spectrum disorder (ASD), these experiences are very real. Overstimulation by otherwise safe and nontoxic stimuli is a major trigger for the behaviors associated with autism and is commonly known as sensory sensitivity.
Because no two autism diagnoses are the same and each person has different sensitivities and symptoms, designing an autism-friendly home can be challenging. “There is no one-size-fits-all approach,” reports Dr. Kristi Gaines, a professor at Texas Tech University and the co-author of “Designing for Autism Spectrum Disorders.” A design that is helpful to one person may be harmful to another, so it is important to view each case as unique.
There are some interior design considerations that any family can make to create a safe, comfortable space for their loved one with autism. Designing spaces to limit sensory overload does not always require a complete renovation. A few minor changes — like increasing the amount of natural light and reducing noise levels in the home — can make a big difference.
Why is Autism-Friendly Design Important?
Children and adults with autism experience the world differently than people who are neurotypical. Those with autism may be hypersensitive (over-responsive) or hypo-sensitive (under-responsive) to stimuli in their daily environment and react to things that you may not always — or ever — notice.
Since much of autism therapy focuses on behavior management, therapists, caregivers and families alike constantly look for ways to make the home environment more comfortable for their loved one with autism. Ultimately, these design solutions should provide a safe space that promotes growth, development and a better quality of life.
A growing body of research also suggests that minor changes or adjustments to sensory inputs in the home can reinforce positive behaviors and create a safe oasis for people with autism. A person’s physical environment can so profoundly impact their functional and social performance that autism-friendly modifications have become integral to autism educational and treatment centers.
Why not do the same for your home?
First Steps: Understand Sensory Stimulation Needs
Before you start replacing the lights and painting the walls, it’s important to understand the needs of your child or loved one by having a professional assessment done.
Each person with autism has different needs, and many people have at least one or more other disabilities, impairments or diagnoses in addition to autism. To clarify:
Once you know what kind of sensory stimulation is needed, you can start making changes in your home. If you do not decide to redesign your home completely, you can consider other design solutions including:
Home layout
Paint and finishes
Lighting
Acoustics
Sensory rooms
Safety
Home Layout
Much of the research on interior design for children with autism has focused on learners in an educational setting, but you can easily apply this information to your home environment. Predictability is the most important factor to consider when thinking about home design.
A well-designed floor plan makes it easier for children and adults with autism to navigate their homes. When designing a home for people with autism, one of the main focuses in the report Advancing Full Spectrum Housing is clearly separating rooms and spaces.
There should be clear transitions into each room, and all rooms should be designed according to their function and purpose. “High predictability and routines are essential for children with autism. The higher the predictability, the lower the resistance and behavioral rigidity,” says Victoria Isaac-Jordan, Ed.S, NCSP.
When a room’s layout is functionally predictable, individuals with autism can better focus on emotional and behavioral regulation.
Because paying attention can be challenging for some people with ASD, it can be helpful to place visual cues throughout the home. Written signs or pictures can help children and adults understand the function of a room and where the bathroom, bedrooms, kitchen and sensory rooms are. You can also use color coding, but be sure to use pastels instead of bright colors.
To improve the spatial layout of your home and enable independent living, make the most of your space by doing the following:
Increase visibility in rooms as much as possible
Use clean lines and minimalist-designed furniture to avoid clutter and excessive furnishings
Use a specific color, flooring, type of material or rugs to indicate a change in space
Provide ample storage in both shared and individual spaces
Always provide a quiet place for personal or alone time
Provide enough space between furniture to move around easily
Ensure a balance between shared space for social interaction and personal space
Paint and Finishes
From olfactory to auditory, each person with autism has unique sensory processing. Visual stimuli, especially colors, can have an impact. For example, a neutral color palette is a typical recommendation for people with ASD, but some children may seek sensation and prefer bright colors and glitter. It really depends on the individual, so always consider this before making a design decision.
When choosing colors for your walls and décor, stick to soft, pastel and neutral paint colors — such as tan, beige, pink, blue and green — instead of bright shades. The same goes for flashy, distracting patterns and cluttered décor. If processing sensory input is challenging for someone, it can be hard to concentrate if the walls are full of colorful patterns.
Comfort should always be the goal when creating a calm atmosphere for children and adults with autism. When choosing materials for your design, stick to options that create a warm environment — such as wood grains, green tones and natural elements — rather than busier materials that create an institutional or noisy atmosphere.
Additional considerations for paint and finishes include the following:
Minimize clutter to avoid sensory overload
Choose materials that contain fewer harmful chemicals, like no or low Volatile Organic Compounds (VOC) paints
Rely on tone — how dark or light something appears — rather than bright colors to indicate the location of light switches, outlets and other features
Use fragrance-free paints and materials
Lighting
Bright light is a common sensory sensitivity in children and adults with autism, and fortunately, lighting is one of the easiest updates you can make. When lighting your home, install a range of options that include natural light, non-flickering bulbs and warmer hues.
Natural light is the preferred option. If you have large windows, you just need to install blinds that you can easily control. If you do not have easy access to natural light, you can create your own calming light source by installing recessed and indirect lighting such as lamps, backlit mirrors or under-cabinet lighting.
Because it’s often too bright and stimulating, do not use fluorescent lighting. Instead, opt for warmer light, energy-efficient LEDs and fixtures that you can dim. If you are tech-savvy, you can set up a timer to slowly dim the lights, similar to how natural light changes throughout the day.
In addition to the lighting suggestions above, you should also consider the following:
Avoid flickering light as it can be unsettling
Make sure all your lights are hum-free
Avoid surfaces that might reflect light, such as metal
Reduce glare by using indirect lighting
Always install lights in closets
Hallways, stairways and landings should have adequate lighting
Bathrooms should have bright lighting that does not cast shadows
Acoustics
Noise is a common sensory sensation in any home that may require more intensive renovation to fully address. For example, if you live near an airport, railroad track or busy road, there’s little you can do to limit the noise. However, there are ways you can remodel your home to reduce ambient noise, which is the everyday sound generated by our homes and appliances.
Ambient noise may not be something you notice, but it can be incredibly overstimulating to a person with autism. It may be that your HVAC system makes noise as it pushes air into your home, your refrigerator occasionally hums every or the water softener hisses as it improves your water. To combat ambient noise, you can invest in quiet home systems and appliances that limit excessive sounds.
If you can soundproof your walls, this update alone will decrease noise. However, some homes have such thin walls that there is little you can do to prevent noise from spreading from room to room.
There are several other ways to improve both the acoustics and the comfort of your loved ones, including:
Cover windows with heavy curtains to reduce outside noise
Place large pieces of furniture against the wall to block out ambient noise
Muffle sounds with rugs and carpets
Insulate your walls with acoustic panels or acoustic insulation
Install ductless HVAC systems
Isolate HVAC systems with acoustic duct panels
Install quiet fans
Mount washers, dryers and dishwashers on flat surfaces to reduce bouncing
Use refrigerators, dishwashers and stoves designed to be quiet
Turn off the alarm that indicates the refrigerator has been open too long
Sensory Rooms
A sensory room, also known as a multisensory environment or multisensory room, is a special area that engages all five senses and helps people with autism relax and relieve stress. Because some people with autism are sensory seekers rather than easily overstimulated, you should tailor each sensory room should to the specific needs of the person.
Credit: Weekend Images Inc. / Getty Images
Since this room is designed to be a place where people with autism can spend time regulating their senses, it should not be too sensory or too stimulating. In fact, this space does not have to be elaborate at all, and sometimes less is more. As long as the sensory room is in its own place and away from stimulating environments, this safe space can be an oasis for your child or loved one with autism.
The guidelines below can help you create the perfect sensory room in your home.
Use neutral and white tones to create a calming environment
Add textures to the walls, floor or furniture to stimulate the senses
Make sure the room is enclosed to make it feel safer and more secure
Limit noise in the room, but provide headphones with preferred sounds and music if desired
Provide comfortable furniture with designated seating
Add favorite toys, activities and fidget spinners
Weighted blankets and other compression jackets may be useful
Set up swings, mats, trampolines and playground equipment for sensory-impaired children
Safety
An autism-friendly design should be a comfortable and calming environment that promotes independent living, but it should also be safe. As you create an oasis for your child or loved one with autism, always keep the following in mind:
Create clear pathways without furniture obstructions
Make sure floors are level and smooth
Use non-toxic paints, cleaners and other materials
Use hypoallergenic products
Avoid the use of pesticides and insecticides
Ensure that everyday items are easily accessible
Use only non-slip rugs in the kitchen, bathroom and laundry room
If possible, install smoke and carbon monoxide detectors that talk instead of beeping to minimize stress in a dangerous situation
In this special New Year’s Eve episode, we’re playing back some of our favorite segments from the past year. (3 Echoes Content Studio)
In this special New Year’s Eve episode, we’re playing back some of our favorite segments from the past year. We wish you a happy new year and hope you look at 2023 as an opportunity for you to get things done around your home.
Cutting crown molding is easy when you use our Simple Solution. (DepositPhotos)
Cutting Crown Molding: To make miter cuts in crown molding, turn a panel upside down on the miter saw table. This allows the angled back edges to rest against the fence and the table during cutting.
Holding the molding in the right position while you make a cut is the difficult part.
The solution is to hot glue a piece of 1-by-2 wood to the saw table so it acts as a cleat to hold the molding in the proper position.
Use plastic liners in your apron to easily switch between nails and screws. (3 Echoes Content Studio)
Easy Nail Apron Liners: Make interchangeable liners for your nail apron or tool pouch out of one-quart plastic motor oil bottles.
Cut off the spout, wipe the bottle clean, fill it with nails or screws, and slip the liner into the apron pouch.
Fill up several bottles with various types and sizes of fasteners, so you can quickly and easily switch them in and out without having to dump out the apron.
2022 has been a year of incredible makeovers here at Today’s Homeowner. Here are our favorite before-and-after transformations from the past year.
This front porch now invites you to pull up a chair and enjoy the view. (3 Echoes Content Studio)
5. Front Porch Makeover
Mike and Leigh Ann have a beautiful piece of property that they share with their horses. But they felt like the front of their house lacked the visual appeal that the land it sits on deserved.
The walkway to it was incomplete and unattractive, while the front porch was a sea of dingy paint, stuck on the front of a white house. There was nothing to draw you in or make you feel welcome.
But now, the front porch is freshly painted, and even though we only added a little gray to the mix, there’s enough contrast to give the space some personality.
The rotten wood and peeling paint are gone, and so is the poorly poured sidewalk. In its place is a symmetrically arranged walkway of 12 stepping stones — made from Quikrete’s Walkmaker molds — that create a graceful transition to the porch steps.
The porch now invites you to pull up a chair and enjoy the view.
Large-format pavers make the patio seem larger than it actually is and the new fire pit is the ideal spot for entertaining. (3 Echoes Content Studio)
4. Two Patios are Better Than One
Jerry and Shay have a beautiful backyard with great shade trees and a lush lawn. But their old fire pit had seen better days and the existing patio offered few opportunities to enjoy the outdoor space. It was too small for entertaining and the monotone color palette lacked any real interest.
Now, the whole backyard has come alive with the addition of a big new patio that complements the shape of the trees while it enjoys its shade.
Large-format Pavestone pavers make the patio seem larger than it actually is and the new fire pit is the ideal spot for entertaining.
There are two large steps that create a graceful transition to the old patio, which has been revived with a new shade of stain and a bold color on the doors.
That same color on the storage shed plus some simple landscaping has transformed this yard into a spot you just can’t wait to enjoy.
Chelsea and Brandon’s bathroom is 65 years old. At that age, there’s some baggage — like the pink tub and the lack of ventilation.
The vanity was newer than that, but it really didn’t fit the style of the room and it lacked character.
But now, the bathroom is overflowing with character and grandmillennial style. The wraparound wallpaper not only creates the jewelry box feel that Chelsea was after; it also makes the pink tub look intentional.
The vent fan makes the space more functional, and the larger vanity makes it easier to use. Plus, its black finish complements the room style, and the new Fluidmaster bidet toilet seat elevates the whole room to a spa-like experience.
This bedroom has a clear purpose, which is to make guests feel right at home. (3 Echoes Content Studio)
2. Guest Bedroom Update
Corey and Grace’s extra bedroom was just that — it lacked any real identity. The hardware and paint color lifted by the previous homeowners didn’t make the welcoming statement they wanted for their guests.
But now, the guest bedroom has a clear purpose and that’s to make visitors feel right at home. The board and batten accent wall draws you into the space and the custom trim around the windows tells you they were intentional about making this room nice for you.
The floating shelves and nightstand are functional for short-term guests without taking up as much space as larger pieces of furniture. And the warm wood tones complement the cool green accent wall, just as the gold wall sconces do.
This breezeway has taken on the feel of a courtyard in a fancy hotel. (3 Echoes Content Studio)
1. A More Inviting Entrance
Delane’s breezeway is the main entrance to her home, but before, it had a very tired and haphazard feel to it. The random collection of different slabs on the floor left visitors with questions about what the space was supposed to be.
The sad empty planting bed made the house feel a lot older than it actually was. And the chain link fence made it feel more like a cage than a relaxing space.
But now, the whole space has taken on the feel of a courtyard in a fancy hotel. The consistency of the stencil floor ties everything together from the wrought iron gates to the lush green planting beds.
The door adds a pop of color while the fountain adds a cool visual element and a peaceful soundtrack for the space.
The simple curtain rod and the curtains frame the backyard and somehow make it all feel like a resort.
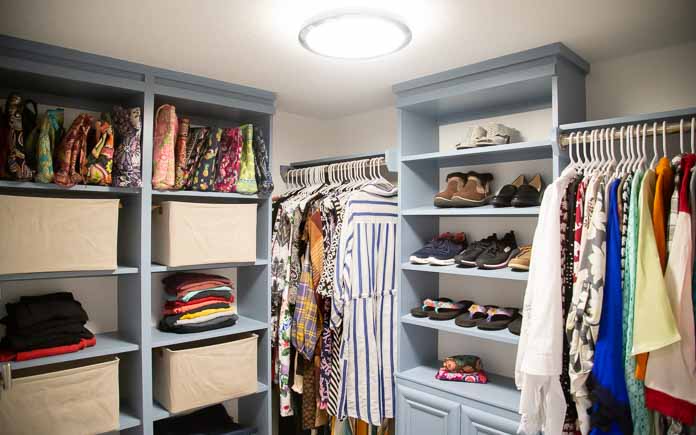
Kelly and Jennifer Foster love improving their home, but their closet has them stumped — what’s good for him isn’t necessarily good for her. So, we’re creating a custom closet system to maximize storage space in a couple’s divided closet.
The Projects
The shelves on Jennifer’s side of the closet create space for purses, shoes and folded clothes. (3 Echoes Content Studio)
Build new shelving
The first step in creating a custom closet system is to remove the old wire shelving. These builder-grade wire shelves are common in newer homes, but they’re not very user-friendly. The slats are the right size for hangers, but it’s impossible to slide them to create more space.
After the shelves are out, we patch the holes left behind and set up Kelly to paint the closet walls and Jennifer to pre-paint the shelf boards we’ll be using for the new storage systems.
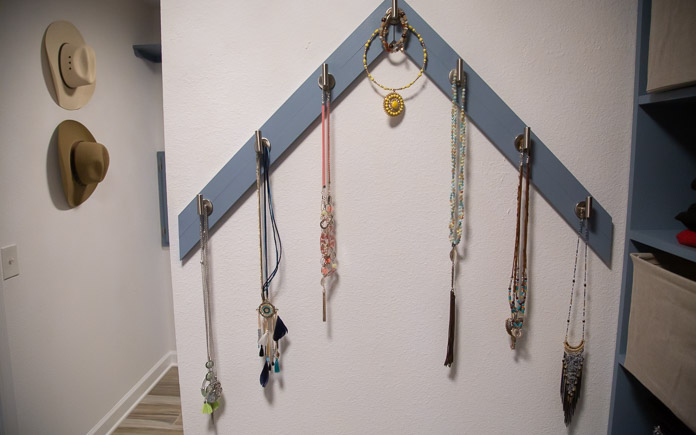
And on the dividing wall, we install wall hooks to hang necklaces on.(3 Echoes Content Studio)
The shelving unit on Jennifer’s side of the closet is too large to assemble outside, so we put it together inside the closet. It includes space for purses, folded clothes, and cubbies for bins.
To create space for shoe storage, we remove the hanging towel cabinet and use it as a base for more shelves.
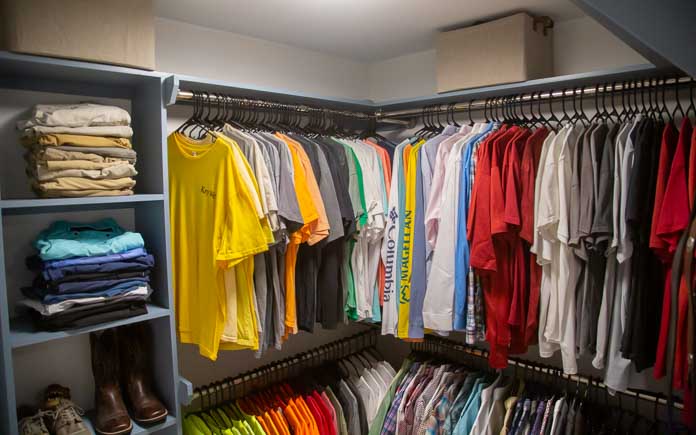
The double horizontal rods maximize the number of shirts that can hang in the closet. (3 Echoes Content Studio)
For Kelly’s side of the closet, we install double horizontal rods to get double the amount of hanging space.
For his shoe rack, we build a smaller version of the shelf unit Chelsea built earlier. But because of its size, we can assemble this one entirely in the garage.
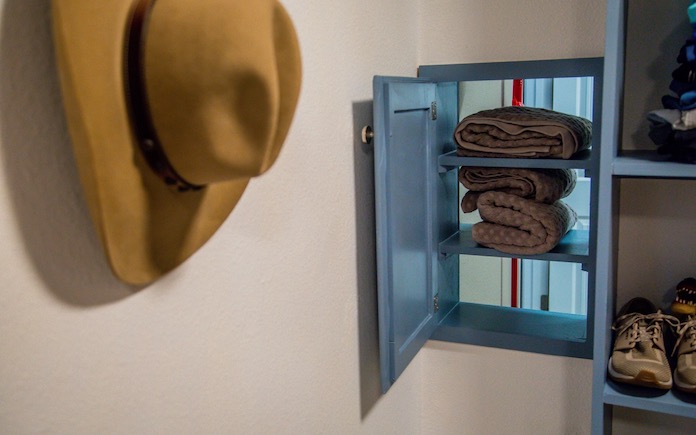
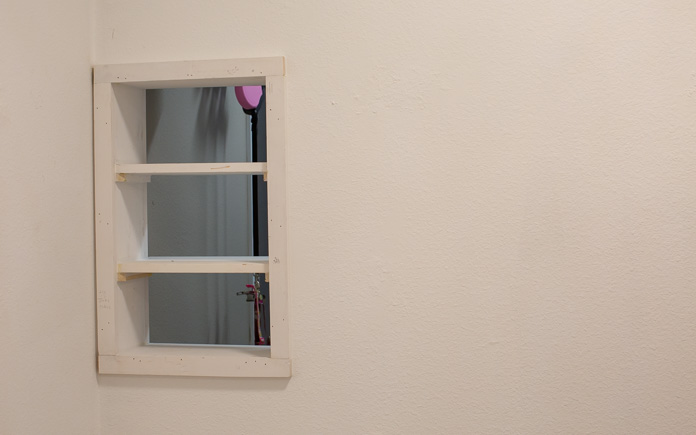
This laundry chute/linen cabinet combo provides space for storing towels. (3 Echoes Content Studio)
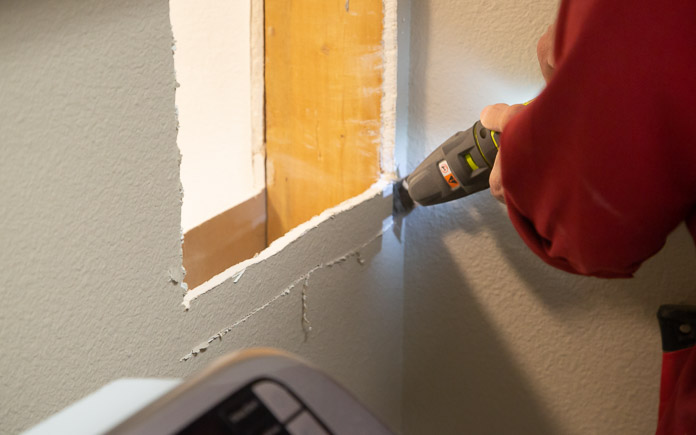
Install laundry chute
Every time Kelly and Jennifer walk into their closet, their eyes are immediately drawn to their dirty clothes hamper.
Since their laundry room is on the other side of the wall on Kelly’s side, we install a laundry chute so the dirty clothes can go straight to where they need to be.
To finish the opening, we build a box that exactly fits the space and adds trim on one side so we can slip into position and add trim on the other side.
Then, we add shelves to stock clean towels. This one opening serves as both a linen cabinet and laundry chute.
Kelly and Jennifer have a spacious closet but there was very little about it that was efficient or convenient. The wire shelves only offered the bare minimum to utilize the space available not to mention the fact that there was nothing “pretty” about them.
But now, the space feels even larger thanks to a custom closet system that features shelving that organizes and displays the contents of the closet for both ease of use and visual appeal. And the addition of all those horizontal surfaces hasn’t reduced the hanging space at all because the double rods we installed have made up the difference.
Plus, the new laundry chute/linen cabinet combo is the definition of efficiency.
Other Tips From This Episode
Products Featured in This Episode
This page contains affiliate links. If you purchase a product from these links, we will earn a small commission at no additional cost to you.
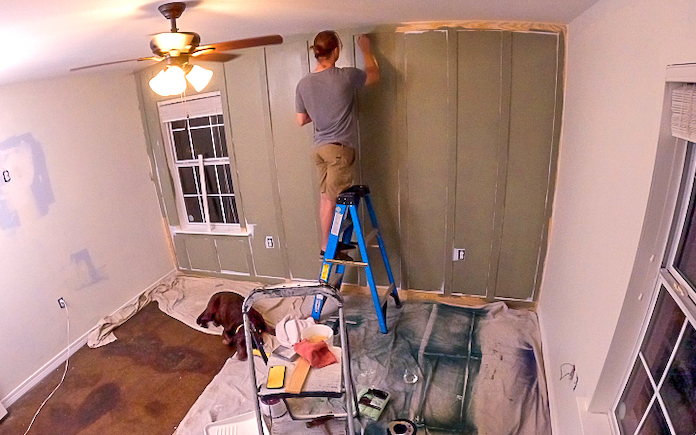
Board and batten adds a geometric, layered look to both interior and exterior walls.
This siding and paneling style uses thin strips of wood — or battens — placed over the seams of wide boards.
You can mimic the look of board and batten on an accent wall without installing wide wood boards. Here’s how:
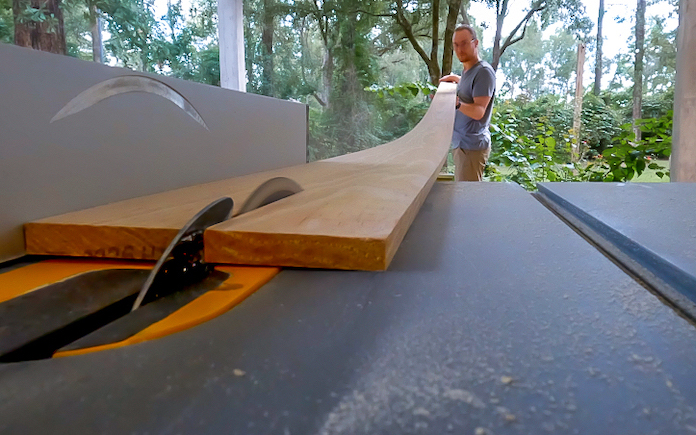
Because we wanted custom-sized battens, we had to cut them down from larger boards. (3 Echoes Content Studio)
For the battens, rip half-inch by 6-inch pine siding along its length to create battens that are about 2¾-inch wide.
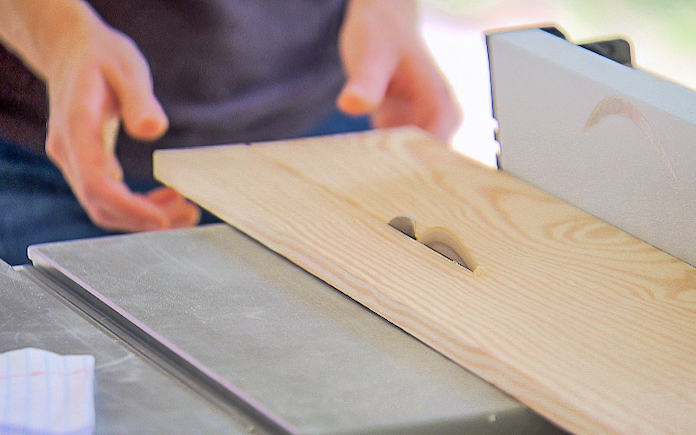
We use the same wood for the baseboard but cut it slightly wider to match the existing baseboards. (3 Echoes Content Studio)
Use the same pine siding to frame the top and bottom of the wall. Cut the bottom piece slightly wider — at 3¼ inch — to match the height of the existing baseboards.
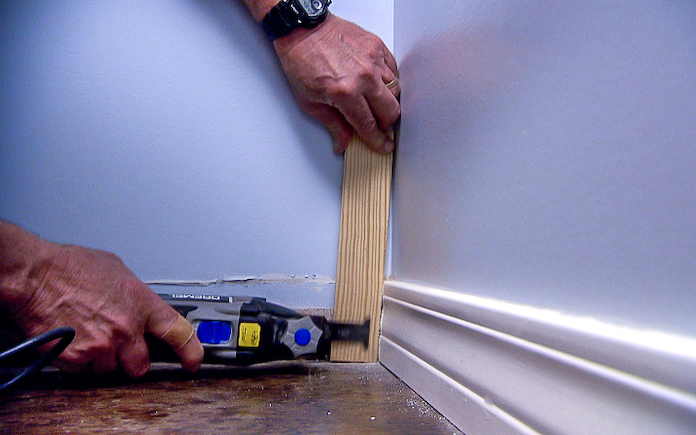
By using an oscillating saw, we don’t have to remove the baseboard to cut it. (3 Echoes Content Studio)
Use an oscillating saw to cut the baseboards on the adjacent walls back a half inch so the pine siding can slide in. Then, attach battens in each corner.
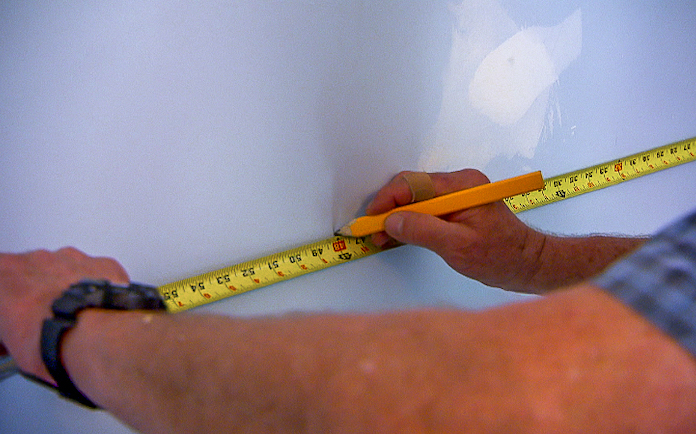
We’re spacing the battens 16 inches apart because that’s the typical spacing of wall studs. (3 Echoes Content Studio)
The remaining battens should be spaced on 16-inch centers. Before installing them, mark those dimensions on the wall with a pencil to be sure the spacing works before installing them.
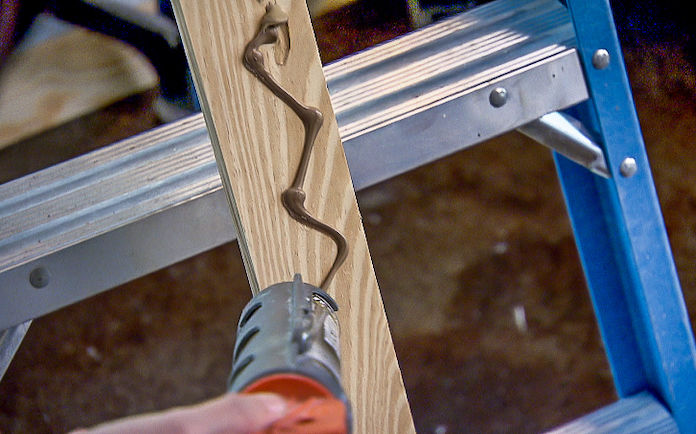
Applying construction adhesive ensures the board will stay put in case the finishing nails don’t penetrate a stud. (3 Echoes Content Studio)
Since we can’t be sure we’ll hit studs with every batten, coat the back of each batten with construction adhesive before tacking them in place with 2-inch finish nails.