We independently select these products—if you buy from one of our links, we may earn a commission. All prices were accurate at the time of publishing.
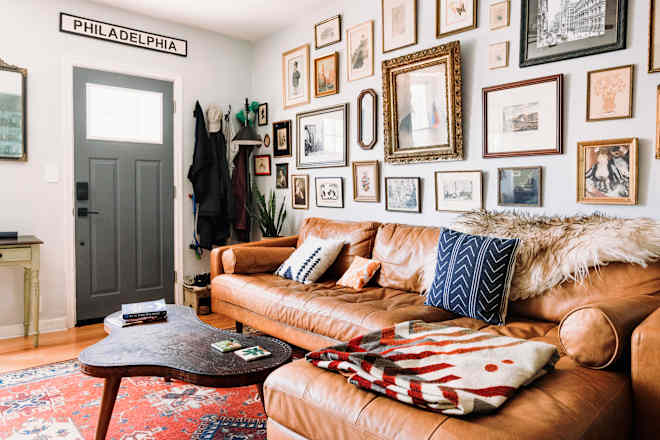
Even though temperatures might not be crisp near you yet, you might be feeling the urge to spruce up your space with a few festive fall or Halloween-inspired finds. Whether you want to go all-out on spooky decor this year or you’re tempted to just light up a pumpkin spice candle and call it a day, this fun DIY provides a nice middle ground — festive, but still easy to pull together in less than 10 minutes.
In a recent TikTok video, user Ashley (@ashleymariesavage_) shares a tutorial on how to create the most adorable “sherpa ghosts” to decorate a tabletop or shelf. Not only are these ghosts easy to assemble, but they’re also just big enough to stand out in your room without taking up too much space. Plus, the soft sherpa fabric adds the coziest touch to a classic Halloween decoration.
How to Make Halloween Sherpa Ghosts at Home
To make these ghosts at home, you’ll need the following:
As Ashley demonstrates in the video, the first step of this DIY is to hot-glue the foam ball to the top of your cone. When it’s dry, loosely drape a piece of the white sherpa fabric on top of each cone to give it a ghostly shape. Then, cut your felt sheet into small ovals to be used as eyes, and attach them onto the sherpa fabric with hot glue. The final step: Apply hot glue to your pumpkins, and set them in between the folds of the sherpa fabric, so that it looks like your ghosts are each holding one up.
Some commenters chimed in with suggestions to further personalize their ghosts. One user writes that she’d put a little Dr. Pepper can in the place of the pumpkin, to show off her affinity for the soda. Another person says that adding LED lights underneath the cloth could allow your ghosts to light up as well.
Shop for Cute Halloween Ghosts
If DIYs aren’t your cup of tea, these cute pre-made options will give you the same vibe with a little less effort.
We independently select these products—if you buy from one of our links, we may earn a commission. All prices were accurate at the time of publishing.
Finding aesthetically pleasing storage is no easy feat. Even cute trinket holders and bowls can jumble your stuff, making it hard to dig out your keys when you actually need them. Luckily, the TikTok DIY pros are here with a storage solution that’s not only useful, but ideal for creating the coastal cowgirl home of your dreams.
In a new TikTok video, Kaia Rae (@kaiaraes) gives an in-depth, step-by-step tutorial on how to create a framed, denim key holder. The best part of this DIY? It involves upcycling, making it a great, eco-friendly way to get more use out of those jeans you know won’t make it to next summer.
How to Make Your Own Denim Key Holder
The coastal cowgirl aesthetic is all about combining Western themes with beach vibes, and this DIY definitely delivers.
The first thing you need to do is grab an old pair of shorts or pants, and a frame of your liking. With fabric scissors, cut the shorts so that one side fits inside of the frame’s panel, with the back pocket centered and facing out. Then, fold the excess fabric behind the panel, and attach your shorts to your frame (the creator doesn’t detail how this was done, but your glue gun should do the trick). All that’s left to do afterward is hang it up, and fill it with your knickknacks.
This pocket can easily hold onto sunglasses, keys, sunscreen, and other small items. It’s a great piece to hang right beside your door, so you can quickly pull items out of the pocket before heading out.
Find a Premade Denim Key Holder
If you’re interested in a premade item like this, Etsy has a few slightly different options that deliver the coastal cowgirl vibes you’re looking for while still being cute and super functional.
Emma is originally from Grand Rapids, Michigan, but moved to Missouri to pursue her dreams of writing. She studies journalism with an emphasis in reporting and writing at the Missouri School of Journalism. Outside of school, she practices floral arranging, crochets blankets and…read more
We independently select these products—if you buy from one of our links, we may earn a commission.
Plants totally liven up a home, and hanging them (whether in a DIY hanging planter or one you pick up from a store) takes them to a whole other level, literally.
The tutorials below will help you transform rope, wood slices and even recyclables into stunning hanging planters for a fraction of the cost of store bought. And if you want to put together a planter to enhance your floor as well as your ceiling, we’ve got instructions for that, too.
1. Brass Ring Planter DIY
These mid-century modern-inspired brass ring planters by A Beautiful Mess only take about 10 minutes to make. They’re perfect for air plants or succulents.
This coral hanging planter was finger knitted and accessorized with wooden beads by Anne of Flax & Twine. You can follow her instructions to get the look.
3. Hanging Plant Shelf DIY
(Image credit: Bobbi Lin for Food52)
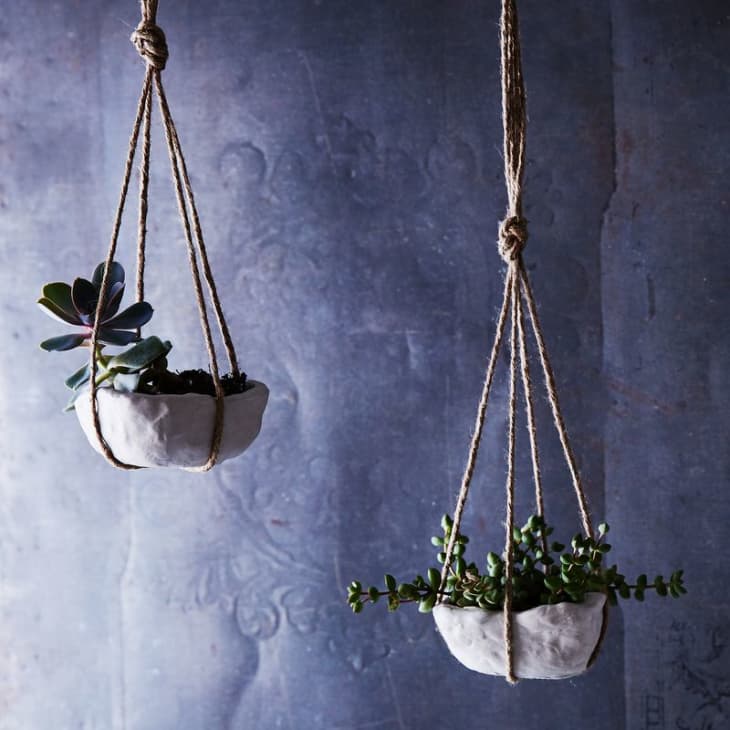
4. DIY Air-Drying Hanging Planters
Charming clay pinch pots like these from Food52 provide a sweet home for plants that don’t require a lot of water or drainage.
5. Anthropologie-Inspired
Cara of Never Skip Brunch was inspired by a $198 Anthropogolie hanging planter when creating this DIY. It has a pretty terrazzo pot and gold hoop.
6. DIY Hanging Plant Holders
8. DIY Hanging Wire Planter
9. $5 Hanging Planter Hack
These Target Dollar Spot pots are upgraded with bits of leftover paint and twine by Paper & Stitch for a super affordable option.
10. DIY Hanging Planter Upgrade
This is the exact same project as above, taken a step further with gold leaf by DIY in PDX.