I also included a few more interesting pieces in my suitcase – like a red tank top and a blue sleeveless top, along with a floral shirt, and a bolder leopard skirt and jacket. They added a little something extra to the other more neutral items I packed. From afar the collage of all my outfits might look somewhat drab, but up close a lot of items had more interest – like my plaid blazer that has brown, black, and bright blue streaks in it. Plus maroon! Literally every color of everything I packed basically.
While I went for some more interesting accent pieces, I aimed for “basic” when it came to my bags (like this oneand this one) and shoes (these are my exact black boots and my exact brown ones). Choosing something classic and not too wild for those two categories made them all interchangeable for the most part – which just made things super easy for me.
Oh and for a dose of the unexpected (in a very low stakes way, which also took up like zero packing room), I added in some green sunglasses (these are similar). They were a neutral enough tone that they worked with everything I had – and sometimes it’s nice to choose one accessory that doesn’t match anything else for a little bit of whimsy or surprise. (*She whispered “live a little” as she tucked her green glasses into her purse*).
If you want to test if your one little unexpected item works with everything else, just lay that item on the bed when you’re packing and you can pretty quickly see if it works or absolutely does not. I was pleasantly surprised to see that my green glasses looked good in the mix, so into my bag they went.
I also packed two different sets of gold earrings (the smaller chunky gold hoops that you see above and the larger gold hoops that you see below) just to give myself a few more options along the way.
Those earrings were both in my toiletry bag in a little pouch (I love using theseto stay organized). Otherwise, I had my default everyday earrings in my ears (for travel days and some days of the trip where I didn’t opt for my bigger gold earrings). This blurry cropped photo below shows you what my normal earring situation is when I don’t swap out the first hole for something that makes more of a statement:
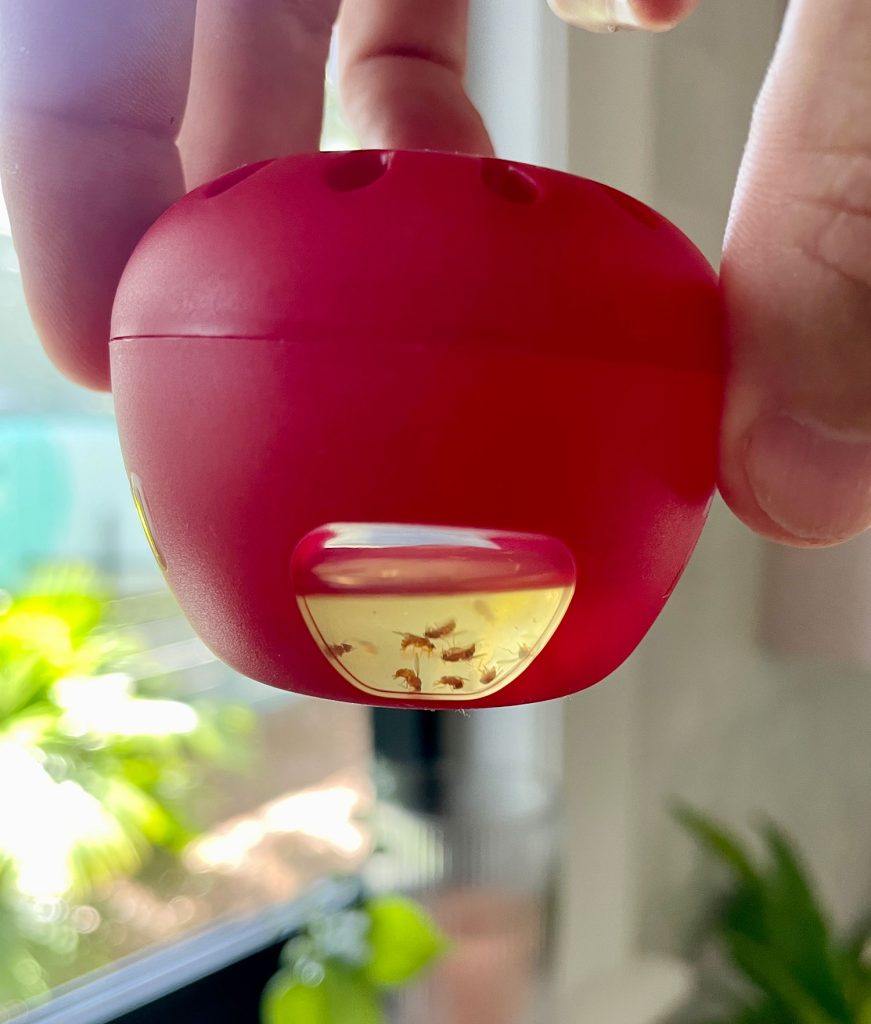
Got little bugs buzzing around your kitchen? Congrats, you may have fruit flies! Don’t fret – these annoying pests are pretty common. And luckily, it doesn’t take a lot of money, supplies, or effort to get rid of them. In fact, you can probably find everything you need in your cabinets! We recently had a fruit fly problem in our home and I seized the opportunity to test 7 different methods of eliminating them. So today I’m sharing the best fruit fly traps and how to make them.
Each homemade trap is easy to make and uses natural ingredients that we already had around the house. So let’s just call this extremely D.I.Y friendly and chemical free. We’ll also share some tips for preventing a fruit fly infestation in the first place.
What Are Fruit Flies?
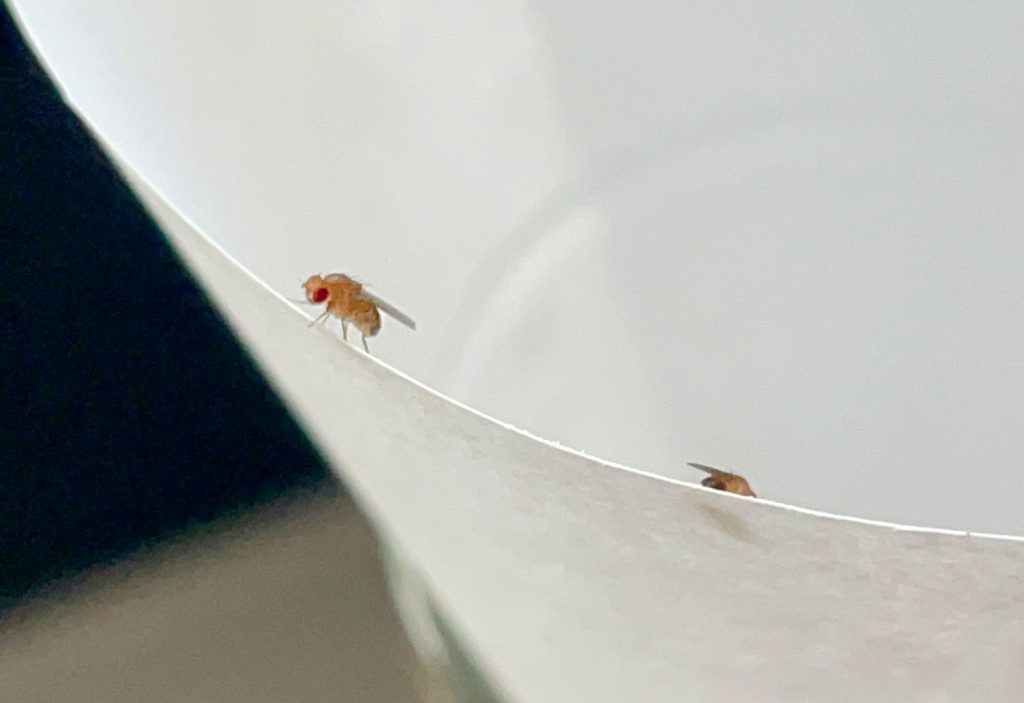
Fruit flies are small flying pests that are attracted to sweet fruits and some vegetables. They’re also drawn to sugary or fermented beverages like beer, wine, or juice. You may spot them swarming around fruit bowls, garbage cans, and even kitchen drains. They’re about the size of a grain of rice and look like small, tan, or brownish houseflies with red eyes. They tend to show up in the summer or late fall when many fruits are in season.
Your problem may begin when a few fruit flies hitch a ride home on a piece of storebought fruit. But females can lay hundreds of eggs in their short lives, each hatching within as little as 12 hours. Since they reach adulthood in just a few days, a few pests can quickly turn into a swarm. That’s why it’s important to get rid of fruit flies as quickly as possible.
Fruit Flies Vs. Fungus Gnats Vs. Drain Flies
Fruit flies are easy to confuse with other common household pests, especially fungus gnats and drain flies. All are small flying insects but correctly identifying them will ensure you pick the right way to get rid of them. We’ve found the easiest way to distinguish them is by where you spot them and what larger insect they resemble.
Fruit flies look like small flies. They’re found near fruit bowls, trash, or other smelly food sources.
Drain flieslook like small fuzzy moths. They’re typically found near sinks and drains.
Fungus gnats look like small mosquitos. They’re typically found near houseplants, since they breed in damp soil.
If you’re unsure, you can try one of the traps below and if it attracts the pests in your home, you’ve got fruit flies!
4 DIY Fruit Fly Traps
Getting rid of fruit flies isn’t complicated or expensive. All you need are some household supplies and a little bit of patience. Each trap follows the same basic formula: attract the fruit fly + keep it from escaping. We tried the following 4 DIY methods and definitely had a clear winner in the end. Here are the first 4 methods I tested out:
Funnel Trap
Plastic Wrap Trap
Dish Soap Trap
Rotting Fruit Trap
I’ll share more details about each method below, along with our verdict at the bottom. Just be prepared that some traps work faster than others, and all techniques may take several days to fully eradicate your issue.
#1: Funnel Fruit Fly Trap
This trap attracts fruit flies into a container through a small hole in the bottom of a homemade paper funnel. The flies find their way in but have difficulty getting back out through the small hole.
Supplies needed:
Small clear jar, cup, or container, preferably with a small or narrow opening
Piece of paper or cardstock
Tape
Scissors
Apple cider vinegar (ACV)
Instructions
Choose your container. Find a small (preferably clear) container like an old food jar or plastic soda bottle. For this method, it’s easier if it has a small or narrow opening.
Add apple cider vinegar. Pour a little bit of apple cider vinegar (ACV), old beer, or wine into the bottom of the container. The smell will attract the fruit flies.
Make your funnel. Wrap a small piece of paper or cardstock into a cone shape with a very small opening at the tip. Secure the shape with tape. You can also cut this opening at the end if that’s easier. It only needs to be about the size of a grain of rice.
Set your funnel. Place your paper cone into the opening of your container. You may need to reshape your funnel so it’s wide enough to rest on top of the opening of your container without touching the ACV. Make sure it rests firmly against all edges of the opening, so flies can’t escape through any gaps.
Wait & release outside. After you’ve trapped several flies, carefully bring the trap outside, remove the funnel, and let them fly away. Be careful not to shift or knock over the funnel inside before you’re ready to release the flies.
You can also try this method with a storebought funnel, however you may find that the opening at the bottom of storebought funnels is too large and lets too many fruit flies out of your trap.
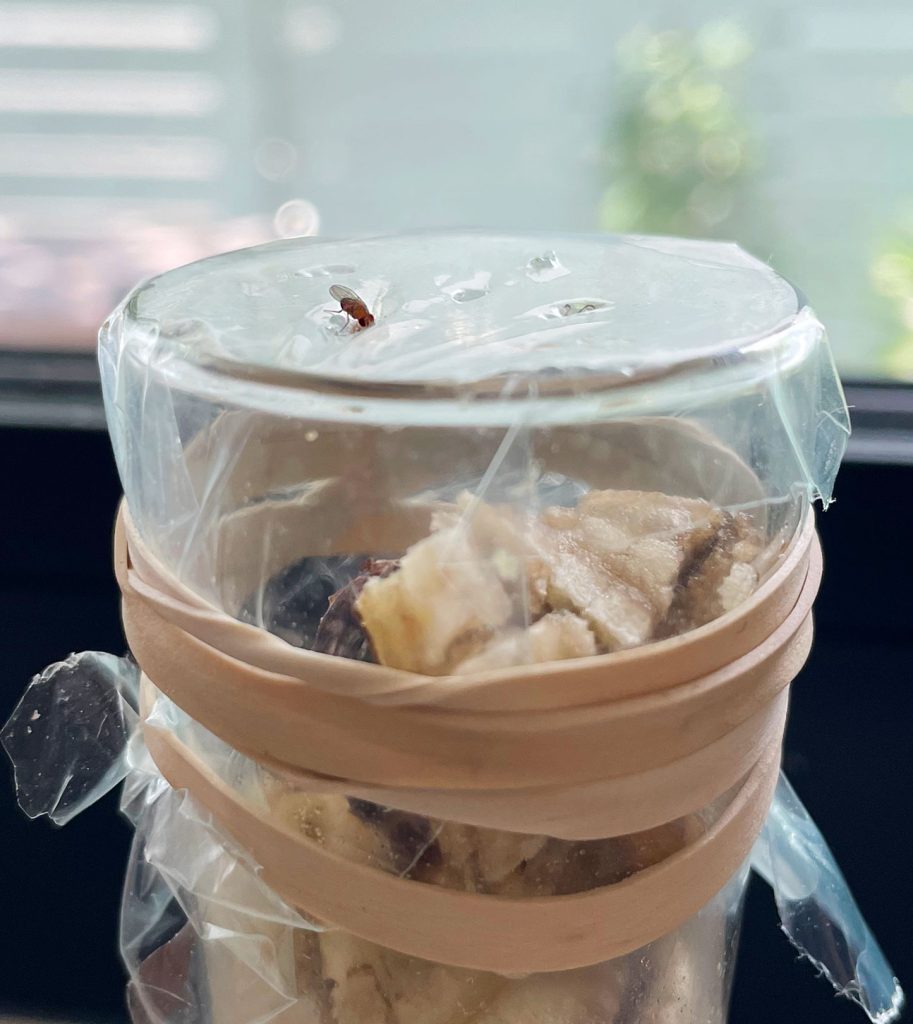
#2: Plastic Wrap Fruit Fly Trap
This trap works by attracting fruit flies with the smell of apple cider vinegar. They enter the trap through small holes in the plastic-wrapped top, but then have trouble finding their way back out, just like the trap above.
Supplies needed:
Small clear jar, cup, or container
Rubber band
Plastic wrap or plastic bag
Toothpick
Apple cider vinegar (ACV)
Instructions
The steps to creating this plastic wrap trap are very similar to the funnel trap described above. Here are the steps:
Choose your container. Find a small clear, jar, cup, or other glass container. Just about anything works and it doesn’t need to be large. Using something clear makes it easier to see the flies your trapping, but an old soda or beer can works too.
Add apple cider vinegar. Pour apple cider vinegar into your container. The scent will attract the flies. Old beer or wine also works too, but not regular white vinegar.
Cover with plastic. Wrap the opening tightly with plastic wrap and secure it with a rubber band. Saran wrap works, but you can also cut scraps from a plastic bag.
Poke small holes. Use a toothpick to poke a few small holes in the top of the plastic. You don’t need a lot, but make sure they are big enough for a fly to fit through.
Optional outdoor ending. Bring the entire contraption outside carefully without removing the plastic wrap cover (or they’ll all escape before you make it out the door) and then remove that and let them fly away.
This technique can also be done by poking a hole in the lid of a metal jar lid. You can use a mason jar or old food jar for this. Use a hammer and nail to puncture the top.
#3: Dish Soap Fruit Fly Trap
Unlike the previous two methods, this fruit fly trap doesn’t require making any covers. Instead, it relies on a soapy surface to keep these pets from flying away. Note: this one doesn’t allow you to set them free outside, as they get coated in the soap.
Supplies needed:
Small container, bowl, or dish
Dish soap
Apple cider vinegar (ACV)
Instructions
Put out some apple cider vinegar. Like the other traps, fill the bottom of a small container, bowl, or dish with apple cider vinegar. This scent will attract the fruit flies.
Add dish soap & mix. Squirt several drops of dish soap into the ACV and mix to create a soapy solution. Flies will land on the mixture but then find it difficult to fly away.
This technique can also be combined with the plastic wrap and funnel method. Just add some dish soap to the apple cider vinegar before you cover the top. This introduces another way the flies can get stuck in your contraption.
#4: Rotting Fruit Trap
We also tested out some of these traps where we swapping out apple cider vinegar for what fruit flies love most: actual fruit!
Supplies needed:
Small glass jar, cup, or container
Plastic wrap or paper funnel, depending on your chosen trap mechanism
A small fruit scrap like a banana peel or apple slice
Instructions
To create a rotting fruit trap, just substitute apple cider vinegar for a piece of banana peel, apple slice, or peach in either the Plastic Wrap Trap or Funnel Trap. You can also add this fruit scrap to your ACV as well. Just be prepared to swap out your fruit scrap every day or two so you don’t introduce unwanted smells to your kitchen.
The Best Fruit Fly Trap
As you can see in these photos, we set out 4 different DIY traps to see which performed the best. The four homemade traps we tested were a combination of techniques. They were:
Plastic Wrap Trap with banana peel
Funnel Trap with ACV + banana peel
Plastic Wrap Trap with ACV + soap
Dish Soap Trap with ACV
For us, the clear winner was less about what type of trap we used and more about the lure. Anything with banana peel performed MUCH better than apple cider vinegar. Our two Plastic Wrap Traps were nearly identical, but the one with the banana peel dramatically outperformed the one with the ACV + soap. Maybe ACV is less enticing when there’s real fruit nearby?
So our suggestion would be – no matter what trap you set up – add a fruit scrap to it! We had a slight preference for the plastic wrap trap because it was easier to make and less prone to disruption. I accidentally knocked over our funnel once and released half of the flies back into the kitchen. Oops!
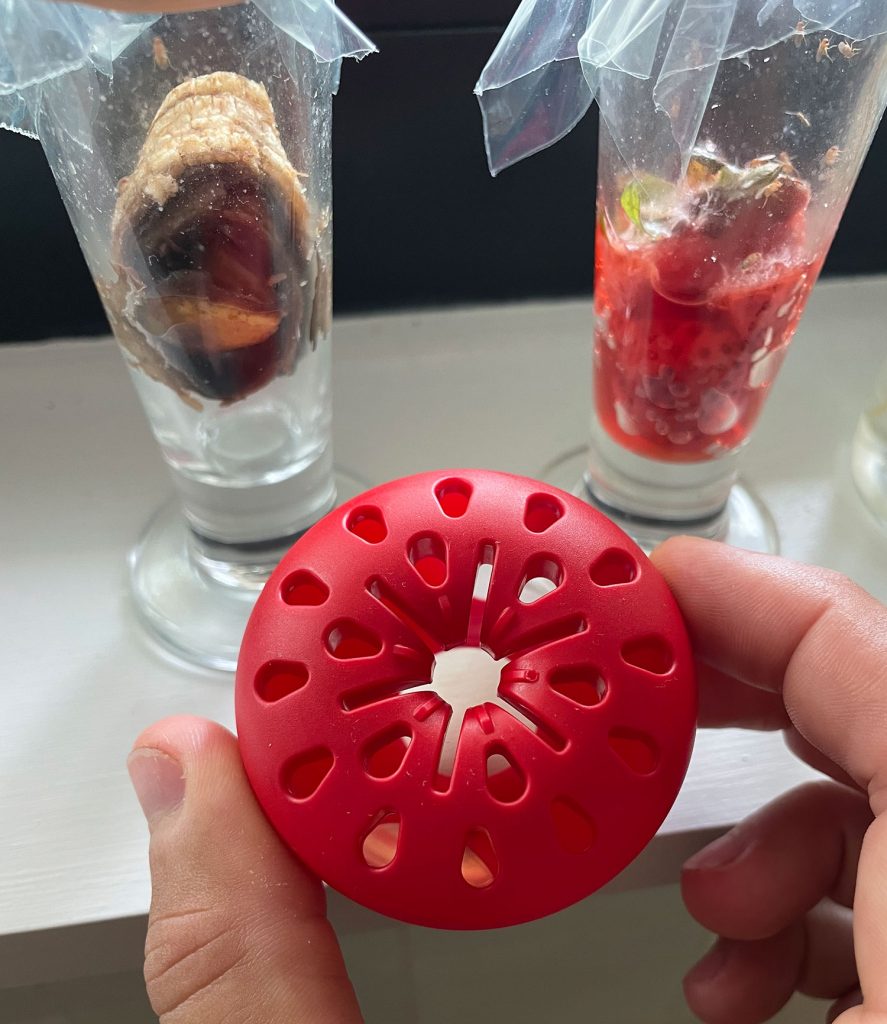
What Attracts Fruit Flies Best?
Here’s where I jumped at the chance to continue this weird little experiment. Since we had such good luck using fruit scraps, we wanted to test which kind of fruit was the best bait. We used three fruits we already had on hand: a banana peel, apple slices, and a strawberry. We put each in a Plastic Wrap Trap side-by-side on our countertop for 24 hours.
Although the banana peel started off strong (it was the most rotten at the beginning), the fruit flies ended up being the most attracted to the strawberry. The banana peel still snagged several flies, but the longer the strawberry rotted, the more flies it caught. The apple slices didn’t catch a single one!
Storebought Fruit Fly Traps
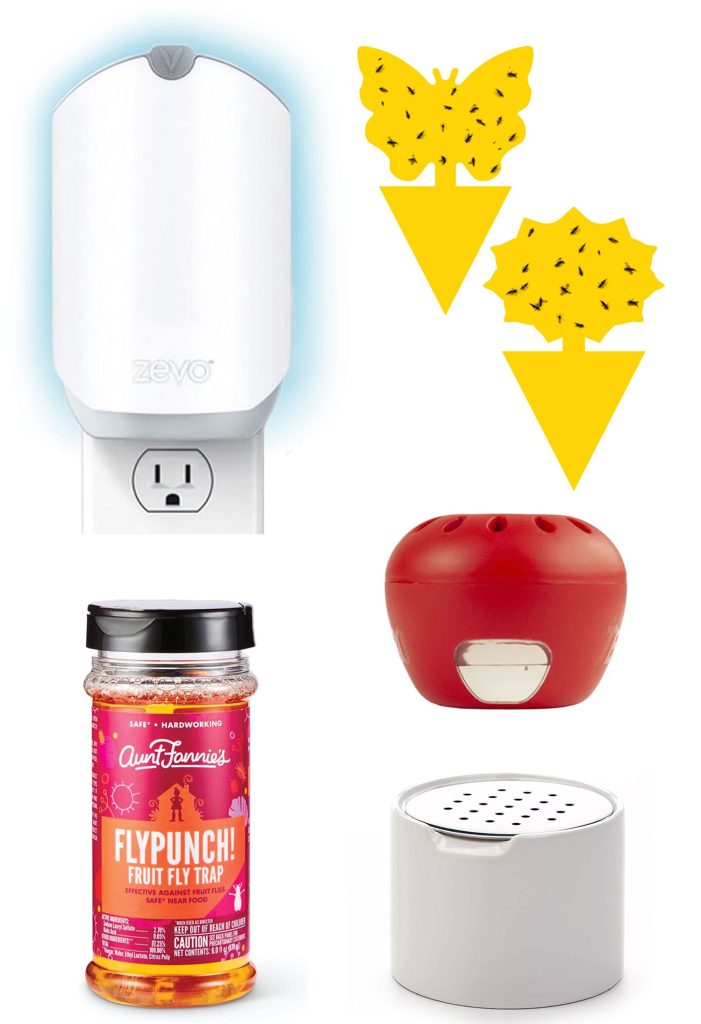
If you’re not having any luck with these DIY solutions or don’t have the time or materials to make them, there are premade traps you can buy instead. All have thousands of positive reviews and cost less than $20. They might be worth considering if you want something that catches other types of flying insects, or if you want something more discreet than than a DIY trap.
Zevo Flying Insect Trap ($19): This trap plugs into an outlet and uses UV light to capture fruit flies, fungus gnats, houseflies, and more.
Landisun Sticky Traps ($12): These small sticky traps can be staked close to the source of the problem, whether they’re fruit flies on your countertop, mosquitos outside, or fungus gnats near your plants.
Terro Fruit Fly Traps ($15): Apple-shaped traps that lure fruit flies in with liquid bait and prevent them from escaping. This works only for fruit flies.
Aunt Fannie’s FlyPunch ($8): This plant-based liquid bait trap looks like a stylish spice jar filled with a pungent punch that fruit flies are drawn to.
Sur La Table Fly Trap ($15): This stylish trap disguises its less-than-pretty function, but doesn’t come with any lure (you need to add your own ACV or fruit).
During our little experiment, I picked up a pack of Terro Traps to see if they performed better than my homemade methods. I left one out for 24 hours next to our banana & strawberry traps to see which of the three performed best.
Once again, our homemade strawberry trap did best, followed closely by the homemade banana peel trap. The storebought trap caught only one. HOWEVER…
Just to be sure, we discarded both of our DIY traps and left the storebought trap out for another 24 hours. That’s when it caught the collection you see above. So it definitely worked, just not as well or as fast as our homemade traps did. Our verdict? Use storebought traps if you want something more discreet looking, especially if you plan to leave it out indefinitely… but there is nothing bad about the homemade ones, in fact we found them to be the best way to get the fruit flies right away!
How To Prevent Fruit Flies
Getting rid of fruit flies is pretty simple, but the best-case scenario is to stop them from invading in the first place. Here are some simple ways you can prevent fruit flies from taking up residence in your home.
Clean kitchen surfaces. Wipe down kitchen counters, stovetops, tables, and any other surfaces that may collect food residue or spilled liquids. Fruit flies are especially attracted to fruit, sweet juices, and alcohol so don’t let those sit!
Take out your trash. Leaving food scraps in your garbage overnight can quickly turn your trash can into a fruit fly breeding ground.
Dispose of overripe fruit. Monitor your fruit bowl for browning or rotting apples, bananas, etc so you can get rid of them before they become a problem.
Wash your fruit as soon as you get it home. You can eliminate eggs or larvae that might come home from the store by washing produce right away (except for berries, which could rot faster from the moisture).
Store produce in the fridge when possible. Fruit flies won’t flourish in the cold, so when in doubt, try storing your fruit and vegetables in the refrigerator.
Clean your sink drain. Food scraps left in your drain can also attract fruit flies, so make sure you run your garbage disposal and/or flush the drain regularly.
Lastly, don’t panic when you spot fruit flies in your home. Yes, you want to take action quickly to prevent the problem from getting worse. But the solutions in this post are easy, effective, and fast-acting. You might even have some fun becoming a fruit fly scientist like I did.
*This post contains affiliate links, so we may earn a small commission when you make a purchase through links on our site at no additional cost to you.
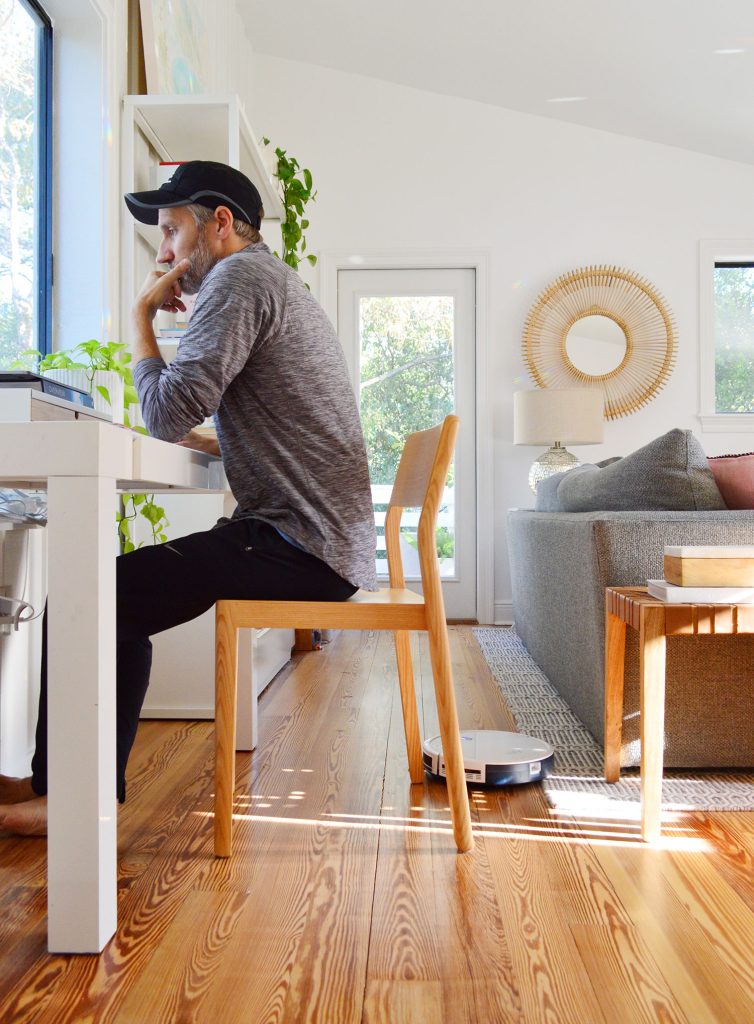
We owned a Roomba robot vacuum almost a decade ago because it sounded so good in theory. Something that does the vacuuming for you while you sit on the couch? Sign me up. But in reality, we had SO MANY ISSUES with it. It was extremely loud, frequently got stuck, and didn’t cover many areas before the battery died. Did I mention it always got stuck? It felt like babysitting someone who was poorly vacuuming to the point that our time was better spent actually doing the vacuuming. We finally ended up selling it on Craigslist.
So imagine our surprise to now be declaring that we actually LOVE having a robot vacuum and the technology has come SO FAR. It feels lightyears ahead of the one we owned before – and it was much less expensive! In fact, we’ve owned our new robot vacuum for 8 glorious months, and it’s probably our favorite purchase of the year.
NOTE: We’re saying this as two people who bought it with our own money and love it. This isn’t a sponsored post & Eufy doesn’t know us from Adam.
So today we’re breaking down a ton of information for you, like:
What exact robot vacuum do we own?
How much does it cost?
How it works & what features we love most
Helpful tips for getting the most out of it
What other people love about it
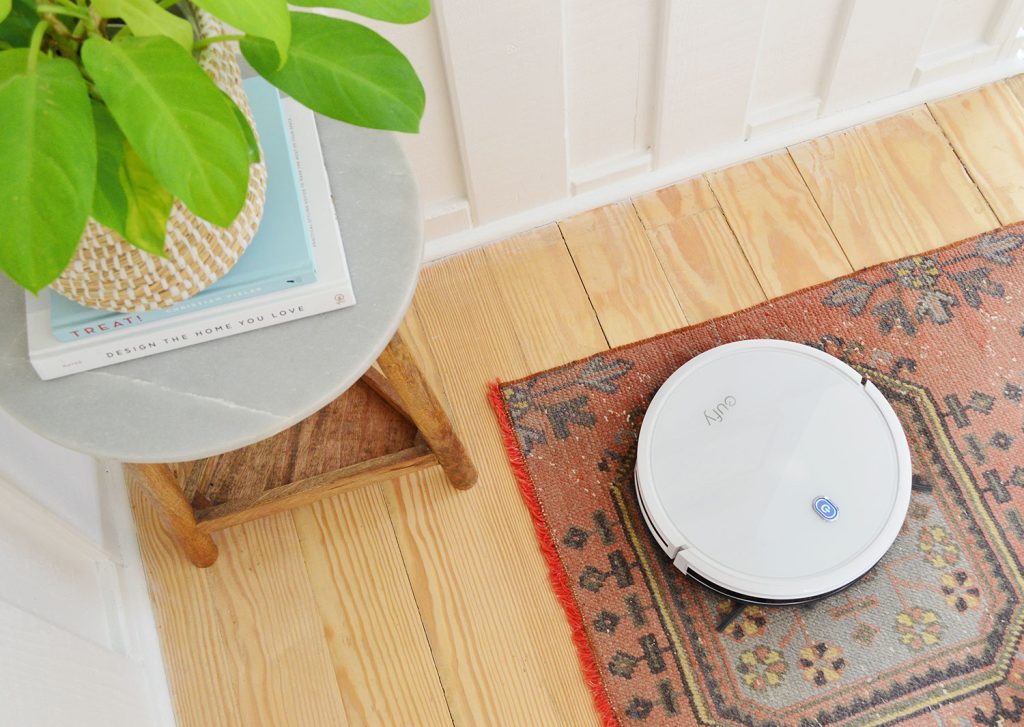
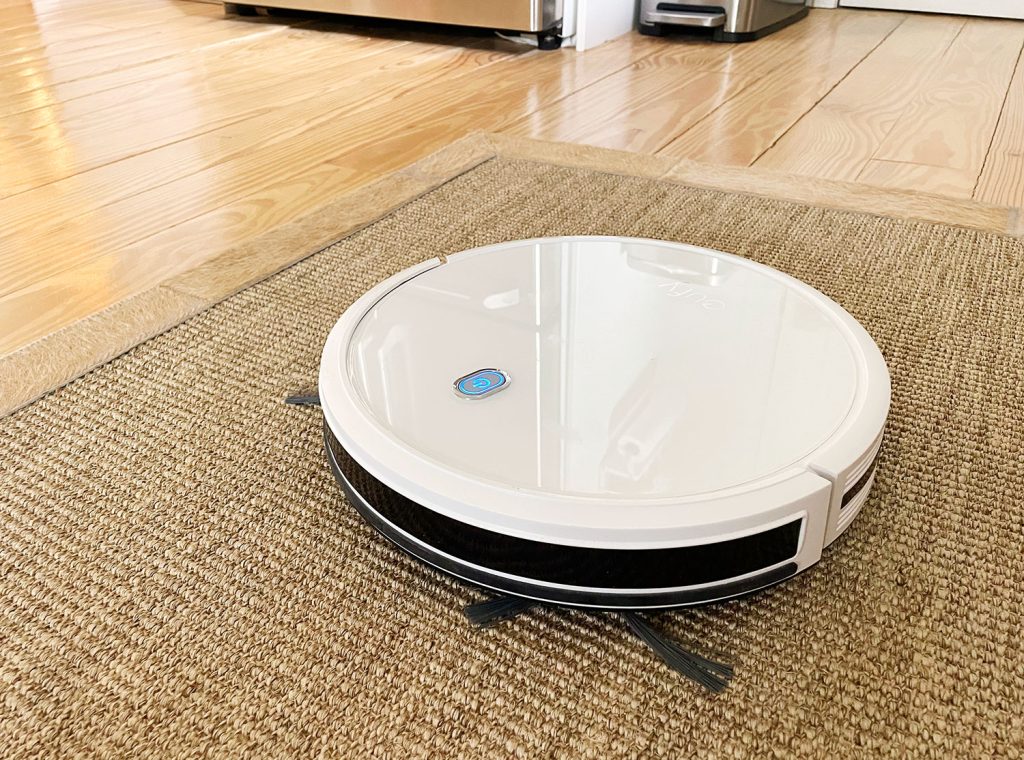
What Is Our Favorite Robot Vacuum?
Earlier this year we purchased a Eufy RoboVac 11S after Sherry’s best friend waxed poetic about hers. We said “no we hate robot vacuums.” But she was unrelenting in how much better her experience with her newer robot vacuum has been, and, well, she wore us down. So we decided to click “order” because it was on sale for $159 and fully returnable. That was 8 months ago and spoiler, it definitely didn’t get returned.
We run our Eufy EVERY SINGLE DAY. There’s a super convenient schedule you can set so it’s autopilot, and it has become an essential part of our house cleaning routine (that’s done by someone, er, something other than us). It’s probably a bit of a stretch to call it “a member of the family,” but even the kids address her by name (“Is Eufy in your room?” “Yeah, she’s cleaning under my desk.”).
We tried a more creative name – the kids called her Cheerio for a little while – but Eufy just stuck. Sherry highly enjoys hearing all the clever names that people have come up with for theirs on Instagram though. Some favs include: Meryl Sweep, Dustin Bieber, Sir Sux A Lot, and Optimus Clean.
How Much Does It Cost?
The other thing that makes having this particular robot vacuum “worth it” is the cost! Our Eufy RoboVac 11S retails for $199.99 but the price is often discounted (at the moment there’s a $60 off coupon on Amazon). This makes it one of the most affordable robotic vacuums on the market.
It’s essentially the cost of one or two professional house cleanings, yet it’s here every single day, working away for hours while we sit on our butts – and it comes back full each time. Many other models can be hundreds of dollars more (some well over $1,000!) and even the most affordable Roombas (made by iRobot, the “big name” in robotic vacuums) are more expensive than the one we have and love.
Obviously, the more expensive the model is, the more features it’s likely to have. Pricier vacuums may come with wifi connectivity, voice control, phone apps, or even self-emptying dust collection stations. But we’ve been beyond happy with our entry-level Eufy.
So if you’re worried about not getting your money’s worth out of buying a robot vacuum, our advice is not to fret about splurging on bells and whistles. Our Eufy was half the cost of the standard upright vacuum we own, and these days we rely on our robot vacuum waaaaay more (it does about 95% of the vacuuming in our house). And the best part is that our house has never felt this clean!
How Our Robot Vacuum Works & What We Love Most
A robotic vacuum automates the vacuuming chore in your house by wirelessly traveling around your home, vacuuming as it goes, and then it parks itself back on its charging base when it’s done. Our Eufy 11S model is delightfully uncomplicated, but it still has the essential features you’d want in a robot vacuum – which we’ll get into below. But first, here’s a quick video where we show exactly how it works and how we use it in our home (psst- if you worry about a dog-poop-smearing incident, we address that in the video below):
Now on to what we love about it…
It Runs On An Automatic Daily Schedule
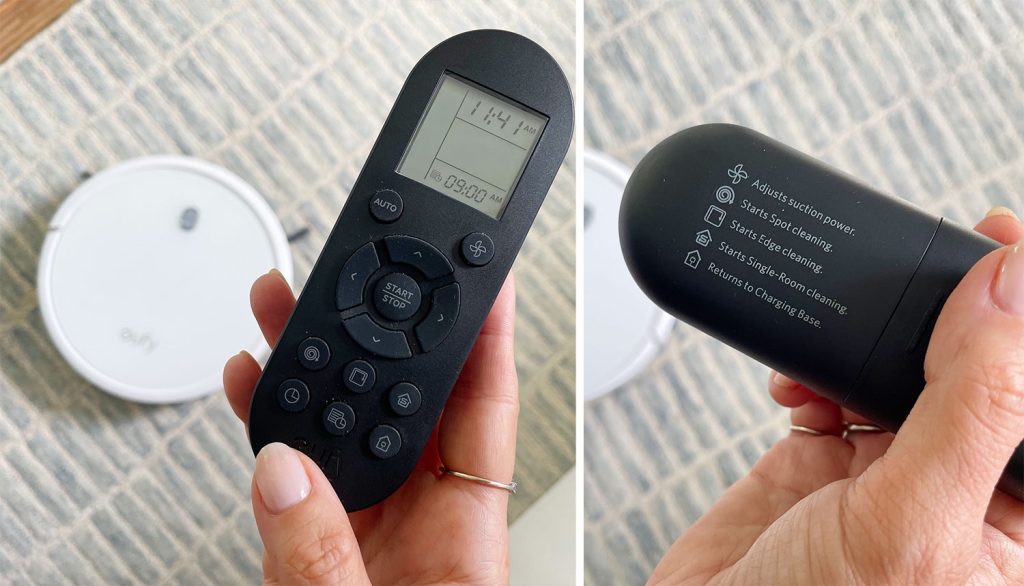
Using the included remote, we set up our robot vacuum to begin vacuuming at a designated time every morning. So without any effort on our end, Eufy “wakes up” (she beeps from her charging base as a warning) and then emerges & does a 90-ish-minute cleaning of our first floor every single day. We can also manually start or stop it at any time with the remote or the button on the vacuum itself, but it’s largely a “set and forget” type of routine.
I know we talk a lot about the remote in the video, but honestly, we RARELY use it. Once we programmed our daily start time, it became very autopilot. We use the button on top to pause or restart it, if needed, so our remote usually just lives in a nearby drawer.
It Navigates Around Obstacles Gently & Doesn’t Bang
Sensors on the vacuum help it gently move around objects like chair legs, cabinet bases, and any other obstructions. Sherry has been asked if she moves the kitchen chairs for example or does anything to “set up” the house before it vacuums every day. Other than calling out “Eufy’s starting, pick up any charging cords that might be on the floor!” to our kids, we do nothing (remember: Eufy beeps before emerging, which is a really nice warning).
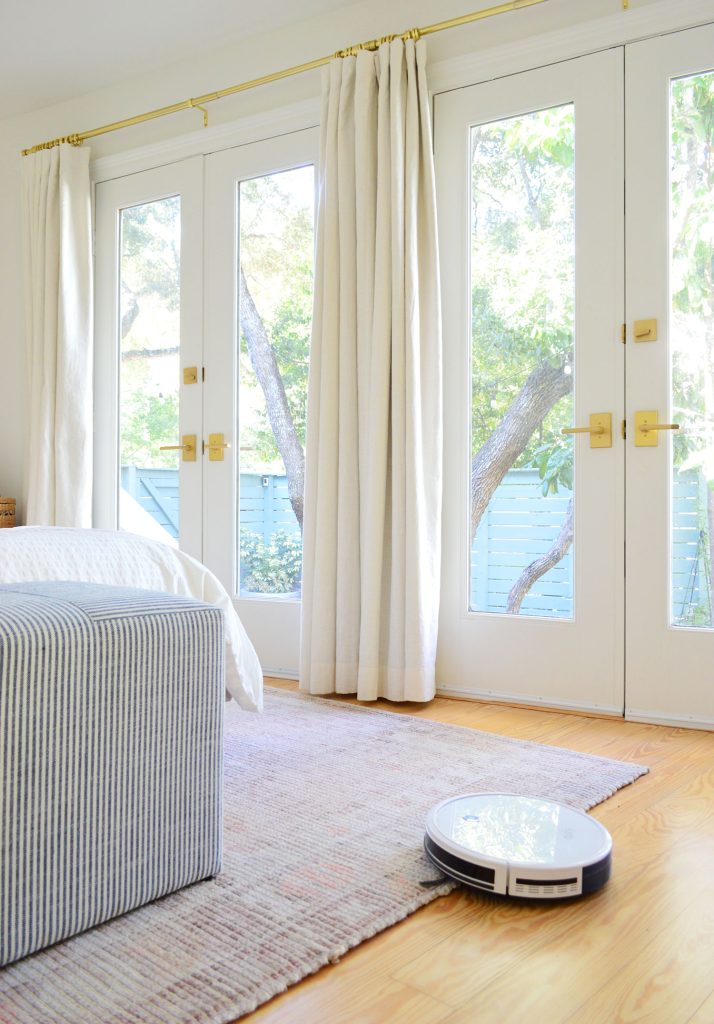
Sherry used to do a lap around the house to make sure nothing was going to catch Eufy up, but we’ll share later how we stopped needing to do that. Anyway, it vacuums everything – including under tables, desks, and chairs… even when we’re still in them!
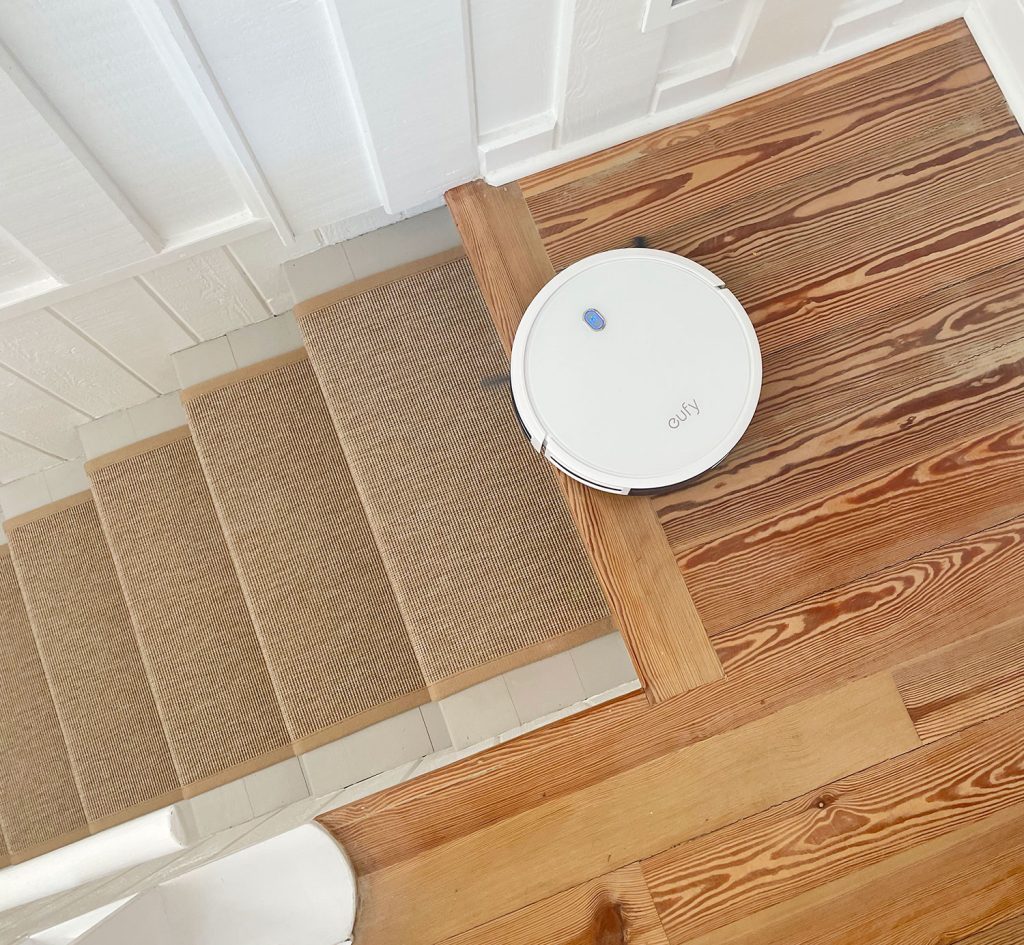
Our Eufy feels much smarter than our old Roomba vacuum (which used to bang around a lot more) and it never leaves scuffs or scrapes on walls, baseboards, cabinets, furniture, or appliances. It deftly maneuvers over ridges like thick carpet edges and never falls down the stairs when running on our second level. Truly, it’s a fully different experience than our old Roomba from 9 years ago.
It’s Much Quieter Than Our Old Robot Vacuum
We used to feel like we couldn’t hear ourselves think when our first robot vacuum was running back in our second house – but thankfully the newer models are much less noisy across the board. We have zero issues working or chatting while it’s running, and our dog Penny is completely unbothered as well.
It Reaches Spots That We Can’t (Daily!)
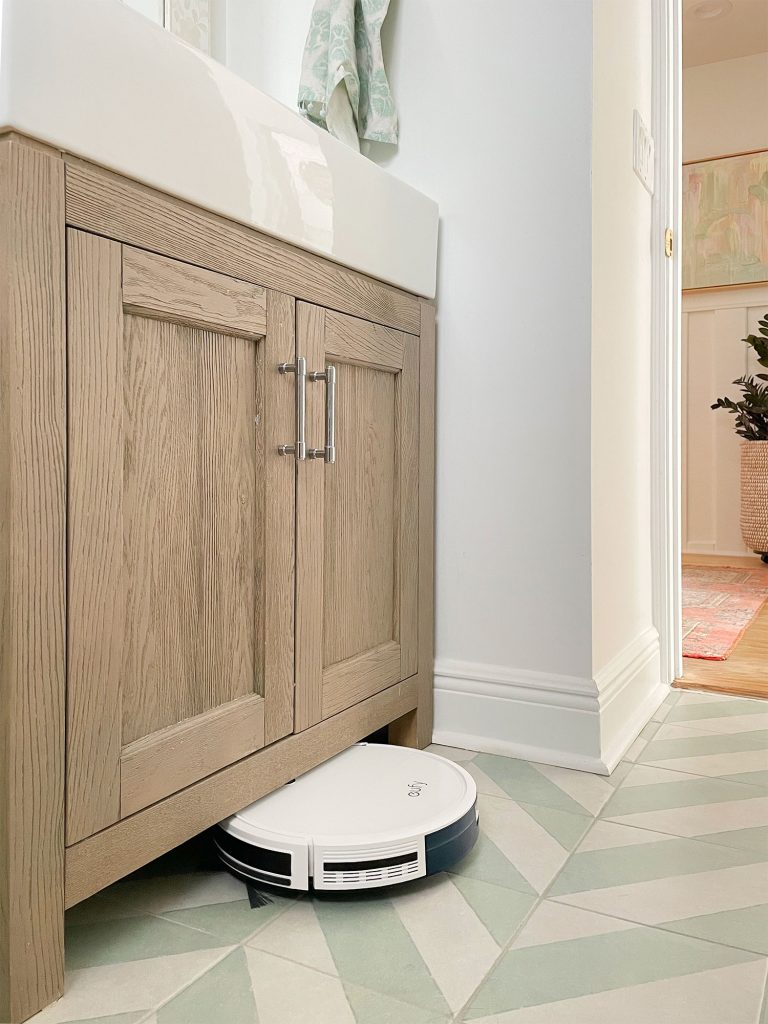
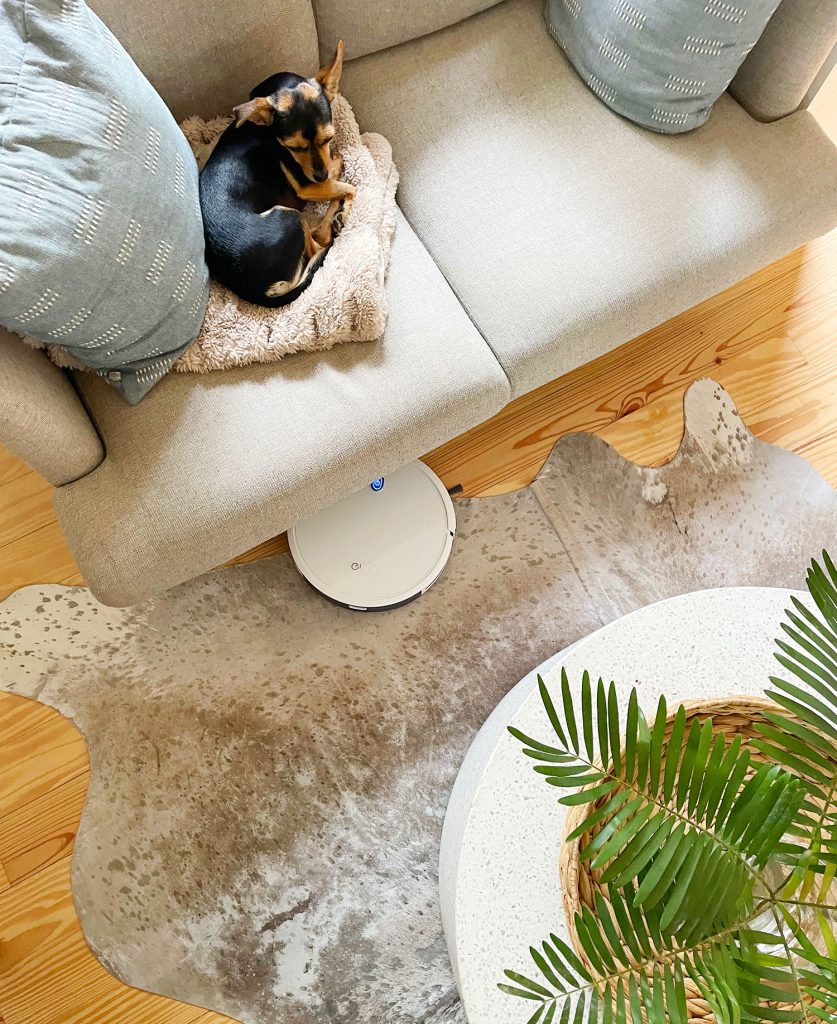
The S in RoboVac 11S stands for Slim, meaning this particular model – coming in at 2.85″ – is a lower profile than many others, which are often 3.5″ or 4″ inches. While that may seem like a negligible distinction, that inch or so can make a big difference in what furniture it can squeeze under. In fact, one of the biggest selling features for us has been how Eufy can easily get under things we couldn’t very easily vacuum otherwise – like under our bed, our loveseat, and the vanity in our bathroom.
We might have attempted to clean those areas during an occasional deep clean, but they definitely weren’t spots we were getting regularly, and certainly not every day.
If you think about how much extra dust and dirt it eliminates from your home by being slim enough to pass under things like that, it’s kind of mind-blowing. It’s especially helpful if anyone in your house has dust or seasonal allergies, because it’s getting rid of built-up dust and dirt that have probably been hiding for years AND keeping it from coming back.
Its “Whiskers” Get Into Tight Spots
Even when our Eufy can’t go under something, like the stove or the fridge, the little whisker arms that poke out from each side of it reach beyond the footprint of the vacuum itself. This means it can grab things that are hiding under the small cracks below appliances (I love that it cleans beyond its footprint, which a regular vacuum cleaner doesn’t do). It sounds weird to put so much stock into those extending whiskers, but they just leave things so clean that they deserve a shout-out.
Works In Big & Small Houses Alike
We definitely live in a much smaller home than when we had our old Roomba (in our last house), but Sherry’s best friend who recommended the exact model that we have has a very large two-story house. She carries it up and down the stairs occasionally, just like we do. However, we both find that we have to clean the upstairs less frequently since a clean first floor means a lot less gets tracked upstairs in the first place. In short: you certainly don’t need a small house for this to work for you.
That being said, if you live in a large house with two levels and don’t want to bring it upstairs, you can always get a second Eufy for the second floor. This isn’t your cue to order multiple Eufys right off the bat, but keep it in mind as a solution if you find that a second one might be helpful down the road.
It Transitions Over Different Terrain
Sherry gets questions about how it navigates going up onto a thick rug or over a small wood threshold in a doorway, and it’s definitely made for multiple surfaces like rugs, carpet, wood, tile, etc. So you shouldn’t really have any issues with it hopping up and down over small things like that. If you do have a large threshold that you worry about, you can just let it do one section of the house and then carry it over the threshold to do that other area. Truly, it’s really easy to figure small things like that out. Don’t fret.
It Doesn’t Fall Down The Stairs Or Off Ledges
I’ve said It already, but I felt like this needed its own heading too. Eufy has sensors to keep it from falling down the stairs, so we’ve never had any issues with that. We not only have a front part of our upstairs steps where she tests this parameter, but we also have a straight drop from the side, and she never, ever has any issues with either of these. 100% success rate of sensing a drop, turning around, and continuing to clean the rest of the area.
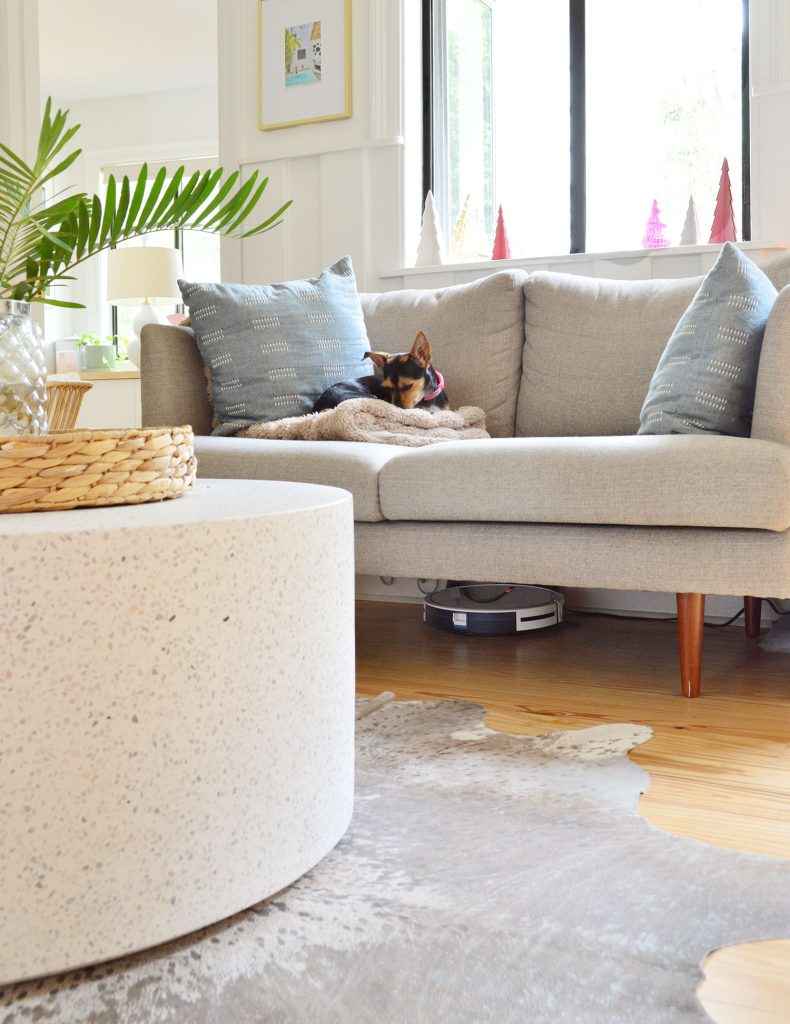
It Automatically Returns To Its Charging Base
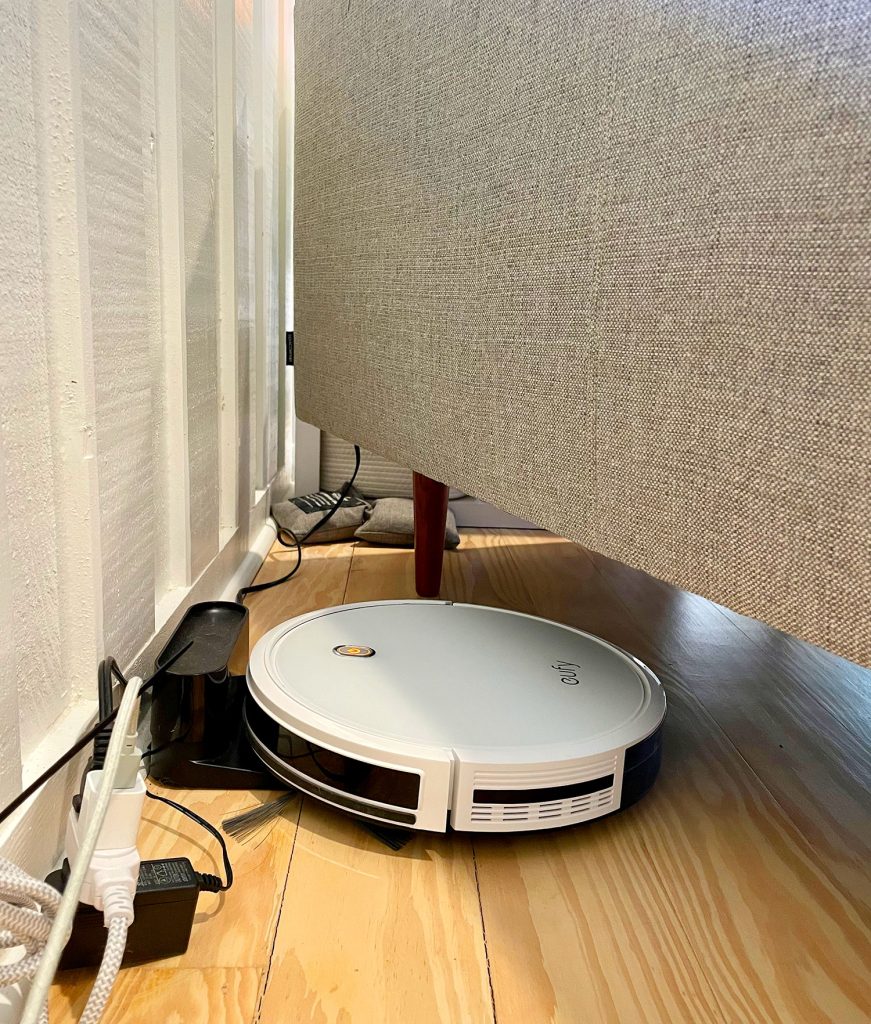
When our Eufy has completed its daily routine, it automatically navigates back to its base to recharge its battery and await its next daily cleaning. Our base is plugged in under the loveseat in our downstairs sitting room, so our Eufy stays completely out of sight when it’s not in use. And since that spot is centrally located, it’s nice and easy for Eufy to find. We just grab it from under the sofa to empty it daily – or use the remote to call it out so we can pick it up and empty it when it rolls out.
It Comes Back Full (So You Know It’s Working!)
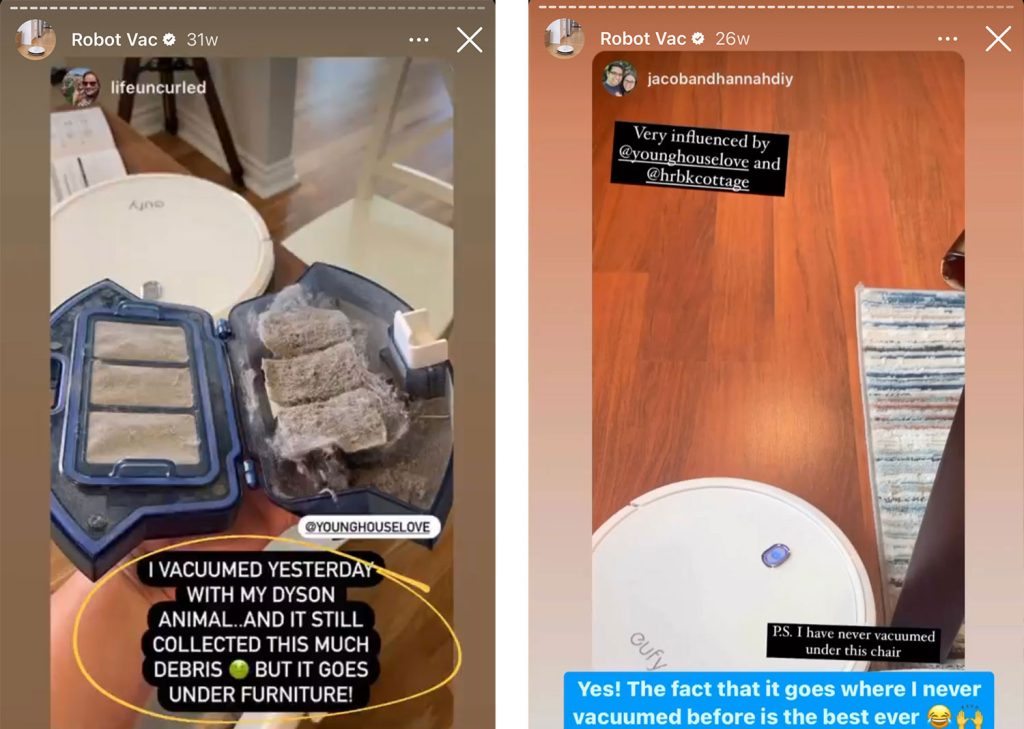
Ours always comes back to the charging base with a belly full of dirt and dust. Every day. People sometimes say to Sherry, “it seems to be running on such a random pattern – how do I know it’s working?” and for us, the visual proof is that our floors look extremely clean AND it comes back full of dust each time.
Someone who used to work for a vacuum company actually DMed Sherry on Instagram and said: “normal vacuums are meant to go over the same spot four times for it to be considered clean.” When you manually vacuum you’re rarely hitting the same spot four times from four different angles, so that’s why it might seem to you like Eufy is doing one area too much at such a random zig-zag pattern, but it’s just hitting things multiple times to suck up lots of dust & dirt. There’s a method to its madness after all.
How To Get The Most Out Of Your Robot Vacuum
Here are some tips & tricks to get the most out of your Eufy without having to worry about it daily. Autopilot cleaning that’s done by a robot instead of you really is a life hack… but it may take a little bit of prep up front. I promise you it’s worth it! When you sit on the couch while Eufy cleans for an hour and a half EVERY SINGLE DAY, well, it feels great.
Pick Your Charging Spot Wisely
If you put your Eufy in the best spot, you’re going to love it a LOT. For us, it was important to find a spot that was:
Totally hidden
Centrally located
Easy to access (for both us and the vacuum)
Near an outlet
Larger homes might have an obvious spot in a laundry room/mudroom/bathroom, but in our small home, we didn’t want to dedicate visible floor space to an ugly charger. Luckily this spot under the loveseat checked all of the boxes! I scooted the couch out so you can see what the charging base looks like:
Secure Your Charging Base
We found that Eufy can occasionally push the base around a little bit when it parks itself to charge. Sometimes it would become skewed and it could no longer align itself with the charger as easily. So we used a 3M Command Strip to stick it directly to the floor, ensuring that it would stay in place. Zero issues since then.
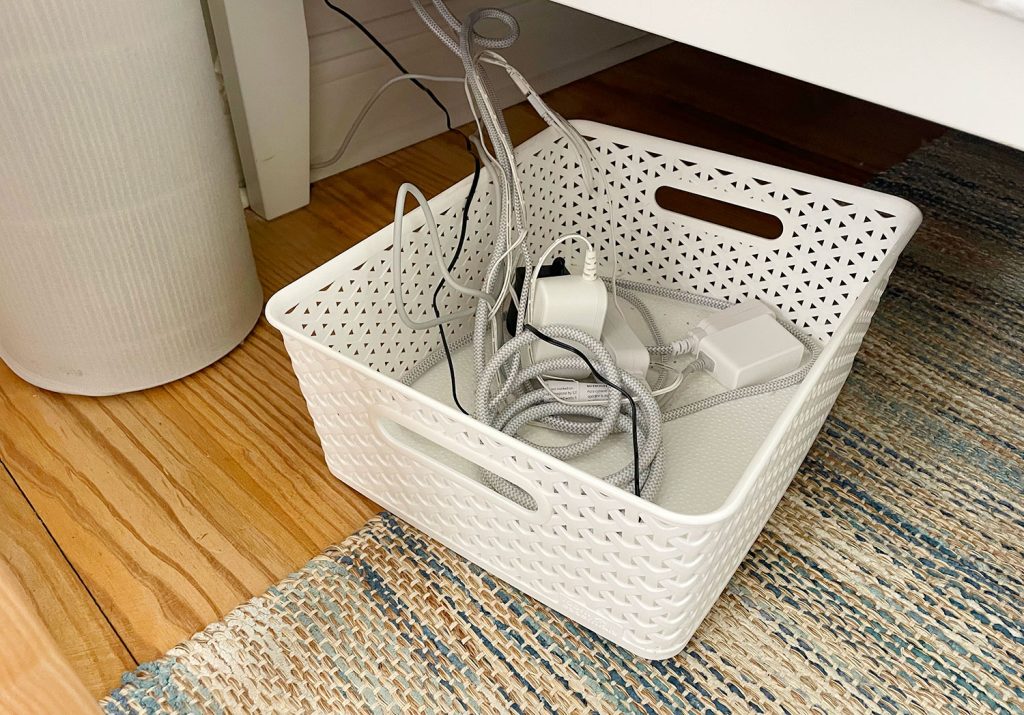
Wrangle Your Loose Cords
If a nemesis for Eufy exists, it’s wires – especially the loose end of a phone charging cord. She may try to suck them up or even pull them out of the wall (at which point she usually beeps and stops, and her cleaning cycle isn’t completed until you restart her). So when we got Eufy, we took about a half hour to corral all of our cords off of the floor, especially under beds and furniture. This meant tying some up in a bundle with zip ties (they include 5 in the box!) and putting others into low baskets like this, which we then shove under the bed. Voila: the entire bin of wires is hidden, but Eufy can’t get tangled anymore.
Even with that done, we still remind our kids (and each other!) to make sure their iPad chargers are off the floor. Thanks to that beep before it starts, nobody really forgets anymore, and it’s a nice way to encourage a little daily tidying to make sure things aren’t all over the floor.
Do (Or Don’t Do) A Little Daily Prep
You don’t have to prep for Eufy every day, but you can develop some routines to make sure your house is ready for her daily vacuuming. Like we said above, we just remind the kids to pick up their charging cords when Eufy sounds that starting beep. But here are some other things you could do (emphasis on COULD):
Do a quick loop to pick up clothes, blankets, or towels on the floor in any bedrooms/bathrooms
Pick up small toys, like tiny Lego pieces or dolls with hair that might easily get sucked up
Close the door to any rooms you don’t want it entering (like if your kid’s bedroom floor is a disaster that morning)
Move lightweight furniture, even just slightly, to let Eufy hit a spot she couldn’t get to the day before. Occasionally we roll a plant out of a corner to give her better access.
Sherry’s best friend occasionally puts her dining chairs on the table so Eufy can clean faster. We never move ours, it just takes Eufy more time to bounce around ’em, but she gets it done.
Again, these things are absolutely optional but they may save Eufy from getting stuck trying to eat a cord. It’s not a big deal if that happens, it just interrupts an otherwise automatic cycle. For us, having Eufy run every day has been a great checkpoint to make sure we’ve picked up around the house a little bit each morning. It only takes a minute and sometimes it’s as simple as the kids just tossing things on their beds instead of the floor.
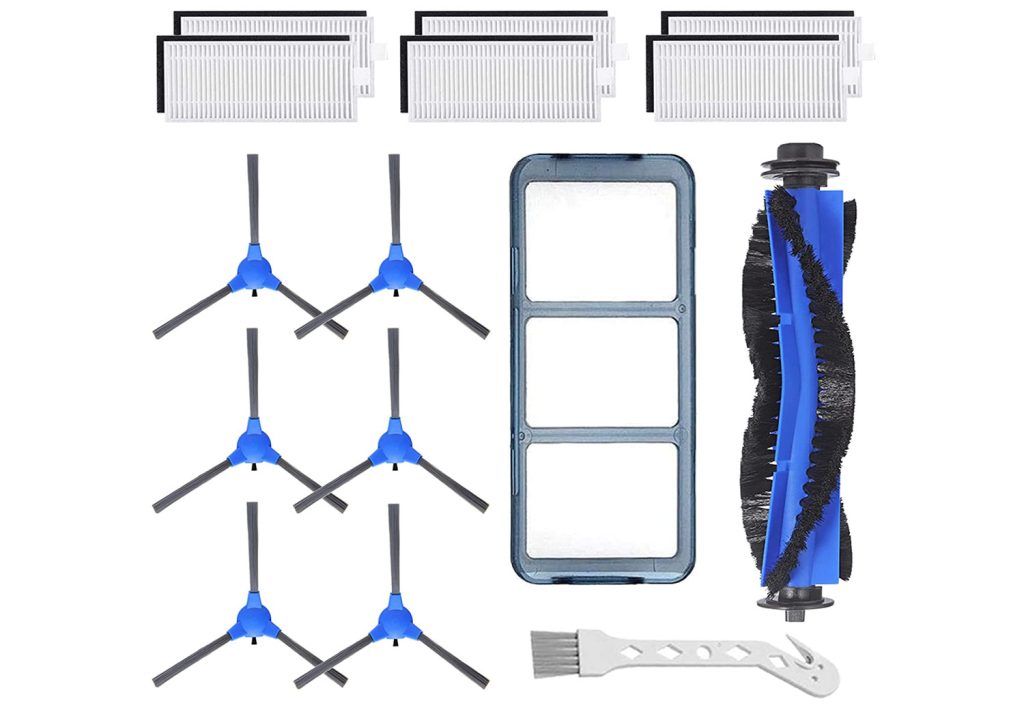
Have Backup Accessories on Hand
Like with traditional vacuums, Eufy uses small filters and stuff that will need occasional cleaning or replacing. We bought this $16 pack of replacement parts to have on hand in case something breaks, wears out, or goes missing. It has already come in handy after one of the whisker attachments came off under a rug and wasn’t found for a few days. Luckily we could just pop on a spare so Eufy didn’t miss a day.
SPEAKING OF THE WHISKERS: when you get your Eufy you need to snap those suckers on firmly. If you don’t hear the snap they’re likely not all the way on and you’ll run it and be like “why the @%#&$ do these keep falling off?!” So snap them on firmly and they’ll stay put for the long haul.
Understand That It Doesn’t Clean Every Spot, Every Day
Since this entry-level model doesn’t have any fancy digital mapping or programable guide, Eufy sort of just charts a new random path each morning. Some days she spends more time under the bed, and on other days she does one pass around the bathroom instead of ten. But over the course of the week, she will still make it to every spot many many times. In eight months we have never come across a single spot that she can access that’s been missed.
I can’t express to you how much cleaner our house looks and feels thanks to running Eufy every day on such an easy autopilot schedule. We even find that we have to do less dusting because when Eufy is running daily to eliminate dirt and particles on the floor, they have less of a chance of building up and floating up onto tables or shelves or window ledges.
Know That You’ll Still Need To Vacuum Sometimes
Don’t throw out your regular vacuum just because you’ve purchased a robotic one. For instance, we keep this one in our utility closet. For one, Eufy can’t do stairs, so we still vacuum those manually once a week. She also can’t move furniture, so there are definitely some corners she can’t get (like behind a plant stand or trash can unless we move them before she runs). So those are areas we just tackle ourselves when we do the stairs.
Also, if you spill something like dirt from a pot, Eufy does have a “spot clean” mode on the remote, but we find it’s not the most efficient way to clean up after a big mess. We usually just sweep things up or grab our small handheld vacuum to tackle that kind of task.
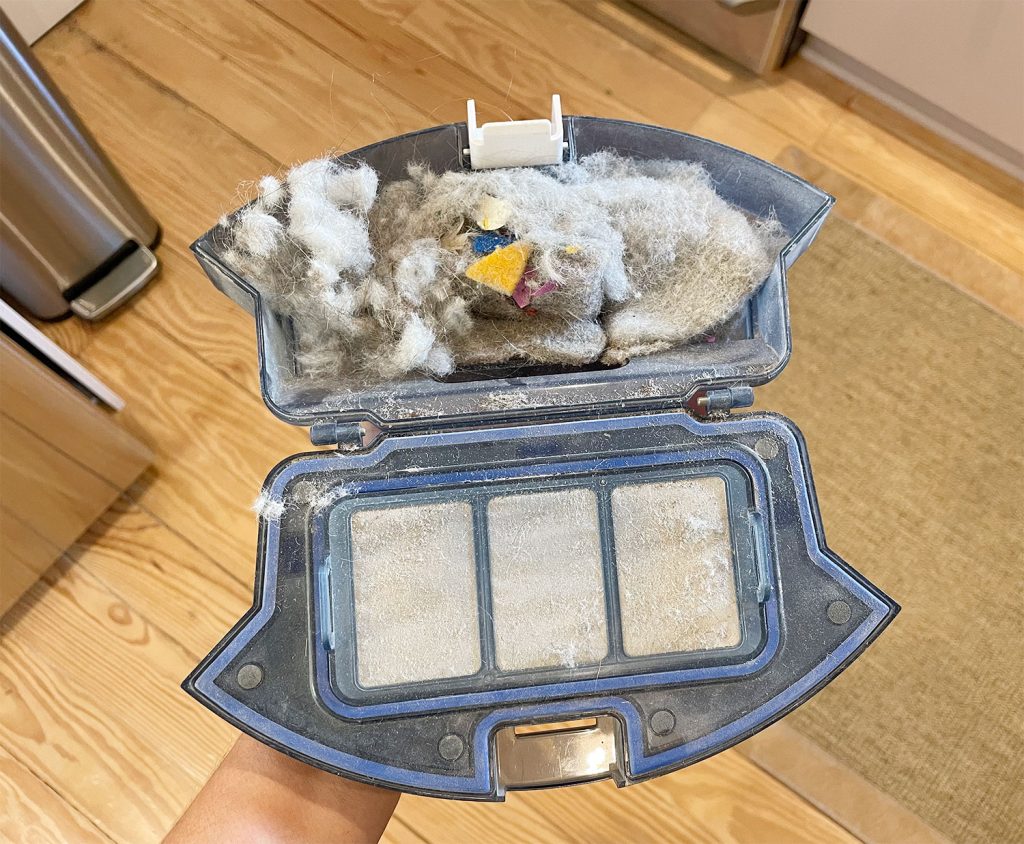
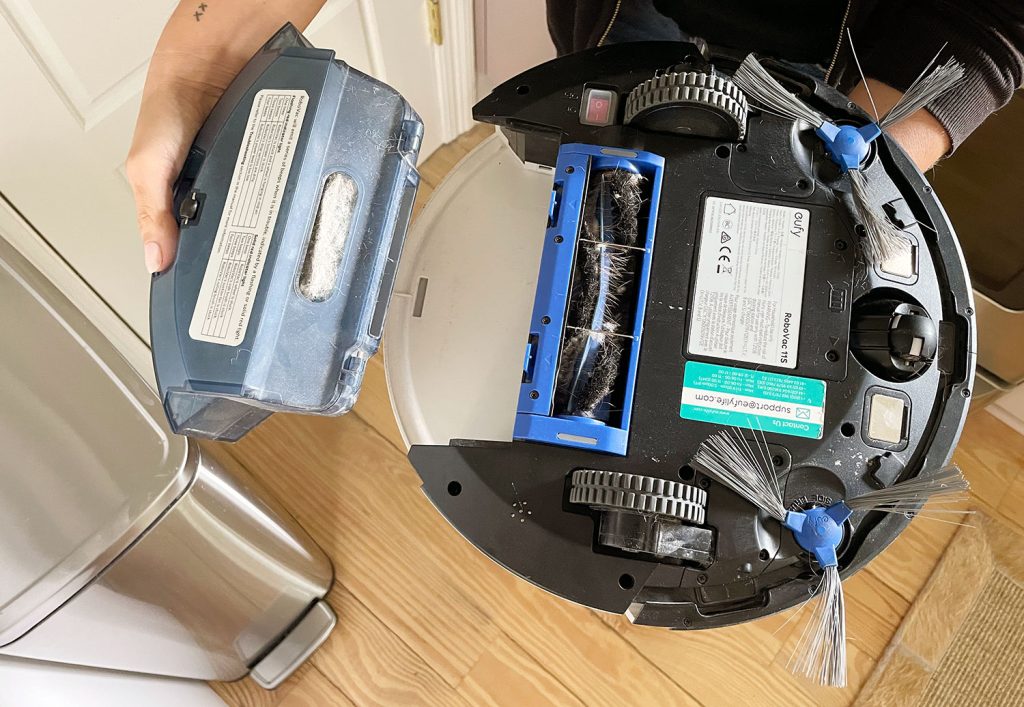
Empty It Daily
The built-in dust canister on our Eufy is typically completely full after every cleaning. At first, I thought we were just exceptionally dirty (how is there THAT MUCH dust EVERY DAY?!) but we’ve heard lots of others report the same thing. Now I’ve decided to be glad those piles of dust make their way into the trash and aren’t still on our floors.
Our Eufy doesn’t have an automatic self-emptying feature (they call it dust-collection and some fancier models transfer it into their charging base, like the Roomba i3+ EVO or Eufy RoboVac L35 Hybrid+, both $550). Those still have to be emptied eventually, and we don’t mind the daily routine of just manually emptying ours so it’s ready to fill up again the next day. We recommend setting an alarm on your phone if you find that you forget, or group this action with something else you do every day (like when you take your vitamins, for example).
It’s quick & easy to empty – the compartment just pops out of the bottom. So we usually just reach under the loveseat and pull it off its charging station for a quick empty. You can also pick it up when it begins vacuuming to empty it from the day before (it automatically pauses when lifted off the ground). Then just put it back down and press the button on the top & it’ll pick up where it left off.
What Other People Think About It
We thought it would be helpful to hear from other Eufy owners as well (perhaps with bigger, hairier dogs), and thanks to the good people of Instagram, Sherry has heard from a lot of other Eufy owners. You can read more in the archived circle on Instagram under our bio called Robot Vac, but here’s a sampling below:
“Between our old doggies and sandy soil this has been the best purchase I have ever made.”
“My life is changed. We have 3 dogs (!!!) and 3 children and I was vacuuming every day. Now Eufy does it every evening for me. I don’t know how, but it’s better than my Dyson. Is it just that I don’t have to do it? Maybe, but I’m here for it.”
My husband was adamant that we would never have a robot vacuum. Bought the one you recommended and ran it right after the cleaning lady left. It was completely full after running on our main level (not even under the couch or on the rug) just basically all open spaces that had just been cleaned. Husband has been converted and now appreciates the robot vacuum.”
“Last week while watching your stories, I thought if I got that, it’s possible that it could take away a huge stressor for me. I bought it that day (which I never do) and have LOVED it every day since! It vacuums my kitchen while I’m cooking dinner, provides entertainment to my two littles, and cleans up whatever dirt my boys always manage to bring in. I just didn’t think it was possible for something to bring such relief!”
“I brought it to my parents’ house while visiting them for the weekend. They had vacuumed in preparation for my visit, and we were all SHOCKED at how much it still picked up!”
“Got a robot vacuum almost immediately after your story last week… ten days later and I’m living a whole new life. And here’s the best part: it only runs on our main level, but I haven’t needed to clean upstairs because there is no debris to track up!”
It is LIFE CHANGING! We got a new dog that sheds everywhere and I was ready to lose my mind. Our loving and ever-so-hard-working Eufy has made the dog hair a non-issue. And now my mom and sisters have bought one!
“We had our house professionally cleaned, got a Eufy the next day, and have run him 3X a day for the last 3 days. Our house looks spotless and without a crumb, but somehow he comes up with a full dustbin every time! Game changer. Best money we have spent in a long time.”
And so ends this lovefest for an item we had literally sworn off almost a decade ago. Hooray for smarter robots that can clean your house but will hopefully never take over the world someday.
Oh and if you want to see some other ways we automate and simplify our home, these posts might interest you:
*This post contains affiliate links, so we may earn a small commission when you make a purchase through links on our site at no additional cost to you.
Walking onto the plane carrying just a duffel and a purse for 7 days in two different areas of France (and a stop in Germany!) was my goal. And here I am standing at the airport, right after John dropped me off and took this shot. Yup. Just a purse and a duffel. I did it (with space to spare!).
And because I’m nothing if not a minimal wardrobe hype woman (more on that here), please allow me to sensually tip your head back and shout directly into your mouth: “knowing how to maximize your options without dragging your entire closet with you is a real actual life hack.” So read on to see how you can get the most out of packing this way (it was my first trip to Europe – so I definitely didn’t want to forget anything!). And if you already pack with a similar mindset (I certainly didn’t invent it)… welcome to the club 😉
Not only does packing light mean there’s nothing you have to check and worry about getting lost in transit, you also don’t usually have to gate-check a small duffel like this on a packed flight (those carry-on-sized rolling suitcases tend to get gate-checked a lot more when a flight is full, which means more waiting when you land).
Quick note: you can absolutely use this packing method & put your own spin on the looks, so please don’t think this is me telling you to pack these specific things. I’m just sharing what my brain does to get a whole lotta flexibility out of a relatively small number of pieces (all of which I wear – nothing goes into the suitcase and rides around the world & comes home unworn). This is more of an “intentional” packing approach than anything else.
Also, my outfit poses in the mirror are truly awful. Please laugh and then immediately erase them from your mind. It’s like I suddenly have no idea what to do with my hands. #somethingsneverchange
What I Did In France
For anyone who missed my Instagram Stories about my France trip last month, I went on a painting retreat with 14 women hosted by the amazing Jessi Raulet, an artist (also known as Ettavee) who lives in Strasbourg. She made this entire trip possible along with the amazingLiz Lidgett.
I paid for this trip just like everyone else (it wasn’t sponsored or anything) and there’s an archived story called France Trip under our IG profile. Scroll over to the right and it’ll be one of the circles under our bio that will get you all caught up on many things I enjoyed doing in Strasbourg, Baden-Baden, and Paris.
Shout out to Elsie Larson who agreed to come with me after I sent her a one-sentence pitch about why we should go, as well as to all of the other awesome women I met while I was there. Also, hat tip to my amazing husband who said “You have to do this. We will be fine. Go have the best time!” It was truly the trip of a lifetime & I came home feeling so inspired. Insert all the magical twinkle emojis here.
I feel like it makes sense to mention the range of things I was doing for those 7 days abroad – because it was quite the smattering. Here are just a few of them:
painting in a studio a bunch of times
a walking food-and-wine tour
touring a cathedral
soaking in pools & the sauna at a spa in Germany
an African dance class
an evening riverboat cruise
a bunch of mostly casual meals
one fancy meal at a Michelin five-star restaurant
miles of flea market hunting in Paris with Elsie
and so much more (including getting a few more tiny tattoos)
It’s safe to say that a whole lot of ground was covered, and I needed everything from the usual suspects (like casual everyday outfits along with a top layer like a jacket for warmth and comfortable shoes) to a bathing suit for the pools in Germany and workout clothes for the African dance class.
What I Packed
My duffel bag was brimming with options. Because again, my method of packing light isn’t about bringing nothing – it’s all about strategy. I had 3 pairs of shoes with me, 3 purses, 3 dresses, 2 pairs of jeans, and 3 jackets to choose from! Not to mention 5 tanks & a leopard sweater for layering options galore. My packing approach doesn’t mean giving anything up – it’s really just all about figuring out what pairs well with what *before* you leave (and identifying which bigger items to wear on the plane versus pack). A whopping 9 items in the infographic below weren’t in my duffel bag, which is why the rest of them easily fit. But more on that in a second.
Of course I also had underwear, socks, and PJs packed in my duffel – but those aren’t going to get an infographic. So let’s get to my first tip, which covers how I like to keep things organized.
Tip #1: Packing Cubes
As you can see below, I used four of these packing cubes that easily slipped into my duffel bag to keep myself organized and to group categories of clothing together. Yup, those packing cubes below are all of the clothes I packed for this entire weeklong trip – and they also contain two pairs of shoes! Here’s what was in each one:
Top left: a jean jacket, my green blazer, 3 dresses, and a pair of jeans
Top right: my comfiest stack heel sandals
Bottom right: 4 tanks, a leopard sweater, & a pair of Rothy’s flats
Note: those quantities don’t add up to the overall number of items I listed earlier because they don’t include the items I wore on my body while traveling too 😉 More on that in a sec.
I feel like packing cubes are hard to understand at first because they sound like this trendy unnecessary thing. I mean, we didn’t have them for decades and we all survived. But once I got them it was INCREDIBLY HELPFUL. I love that now I don’t have to dig through a whole duffel to find something at the bottom (pull out the packing cube with your PJs or socks, and there’s said thing – without anything else getting jostled around or unfolded). They also help me stay organized while I’m packing (this is where the tanks go, this keeps my socks together, etc).
Oh and for anyone wondering where my chargers, European plug converters, and even my two extra purses were (I brought a small black crossbody bag &a brown leather one too) – they were all in my large purse, along with my phone, wallet, passport, etc. It was nice to have a large black purse, a smaller brown crossbody one, and an even smaller black one (you can kinda see it in the photo below) for… once again… say it with me… a variety of options! They all basically paired with any outfit I brought. Three cheers for purse versatility!
There are not one but two photos of me in this outfit, and I’m sorry to say that you can’t see my black crossbody bag any better in this second one. But it’s this bag if you’re curious. I also wore it with jeans for many hours of walking through Paris flea markets. It’s always smart to have a small bag that zips in front of you in Paris so you can keep an eye on it 😉
Tip #2: Plan What Pairs Well
Ok, so now that I have my first tip (PACKING CUBES!) out of the way, I’m just going to show you how I plan for a trip before I go. Basically, I try on outfits and when I like something and want to bring it, I try to think of at least a few ways I can wear one or two of the items. For example, packing a jean jacket and a pair of sneakers for one outfit is a whole lotta bulk… but if you can wear both of them with a long comfy black dress…
… and then again with a different dresson another day – they feel like good staples that can come in handy a few times each, right? It’s worth noting that both of these outfits can also be worn with both of the other shoes I packed. So although I planned to wear sneakers with the long dress, as you can see in my picture above…
… I actually ended up wearing my stacked-heel sandals because it was warmer that day and I wanted my toes out. Ha! Also, how convenient is this giant mirror by the hotel elevator that I used to snap a few outfit pics for this post (as long as nobody was there – if they were… no pic for you 😉
I guess my point is that I’d never set out 7 different complete outfits on the bed for a weeklong trip and attempt to wrestle them all into a suitcase (and then shove in a few fancy things in case you have a nice dinner or need that special hat or something). I think that’s how people end up with heavy giant luggage they have to check (and lots of things they don’t end up wearing).
Instead, I like to think of layers and combo moves. Bringing three pairs of shoes (pointy flats + stacked heel sandals + sneakers) was SO VERSATILE. Same with having three different purses. And three different dresses. And two different blazers + a jean jacket that can be paired with 5 different colored tanks and a patterned sweater.
It just adds up to so many MORE outfits than seven, thanks to different pairing options that you can make on the fly (depending on things like how warm it is that day, what shoes your feet feel like wearing, etc). Let’s do some quick math:
The 3 dresses I packed, which could be paired with any of the 3 jackets I brought = 9 outfit options right there. And then any of the 3 shoe options I bought could be chosen, along with any of the 3 purses… which leads to SO MANY OPTIONS.
And the 6 tops I brought (5 colored tank tops + 1 leopard sweater), which could be paired with 3 different jackets = 18 more outfit options out of the gate. And then I got to choose any of my 3 different shoe options along with any of my 3 purses. THAT’S A LOT OF COMBO MOVES!
In simpler terms, if every day was a combination of choosing some tank/sweater/dress (of which I had 9) + a jacket pairing (of which I had 3), I had 27 different outfit pairings to choose from. Not to mention those 3 purse options & 3 shoe options to further customize things.
That’s what I mean when I say this way of packing is flexible! And it’s also what I mean when I say that being intentional and ensuring that your outfits can mix & match is so much better than bringing a jacket or a dress that doesn’t go with anything else – or even a pair of shoes that only work with one or two outfits instead of choosing things that working interchangeably with all of them.
I also have to acknowledge that someone who dresses more boldly can demonstrate this thesis even more clearly. Imagine one of the items being a floral dress, one of the tanks being checkered, one of the jackets being bright red. A super colorful shoe in the mix? It really can add up to so many different and fun options. Again, I’m just basic 😉
I should also mention that I’m not re-wearing anything dirty over & over again with this method. Different colored tanks under blazers & jackets (along with my leopard sweater) each typically get one wear (as do the dresses I packed – and socks & underwear of course). So if you notice I’m wearing a black tank in France as well as on the plane, it’s because I wore one and packed another one (along with a white, green, and taupe one). Tanks are awesome because they take up so little space.
It’s only the outer layers like my jean jacket and my blazers (I bought my green one and a classic black one) that can make multiple appearances with different things under them, earning me a bunch of different looks with those key pieces. Like so:
See what I mean? Different shoes & a different tank + a classic jacket or blazer is a good deviation for me. Again, someone could make this outfit look a lot more different with patterned tanks or a floral dress under the green jacket. Put your own spin on it for sure.
I’m also a person who doesn’t mind wearing jeans multiple times like the experts recommend, but do whatever works for you! Packing another pair of jeans (or two) would not make or break this approach. Honestly, I had so much room in my duffel that I came home with a pretty large painting I made while I was there, along with lots of treats for the kids.
I know those two photos in a row of my green blazer with different tanks & shoes might make you think… uh, those outfits still look pretty similar. It’s like Clark Kent putting on glasses. How could that fool anyone? The key is that I wouldn’t wear the same green jacket two days in a row – and when those outfits are among a mix of other things, they feel a lot less repetitive. So if you saw me in a different dress in between each of those photos and added in some outfits with the black blazer between them as well, you’d get more of the full picture. Picture a week of clothing that I’m mixing & matching looking more like this:
The thing I love about this method is that it’s flexible. Nothing is set in stone, so you have an easily pivot-able game plan with lots of options for deviation. For example, I ended up pairing the taupe top with my black blazer and leopard flats, not the sneakers. The key is that you can do things like change shoes on a dime if your feet want to – or bring a larger purse based on wanting more room to carry stuff that day. And you can do that because everything you brought works together (no long jeans that only work with a certain height of heel for example – or a specific dress that clashes with every jacket except one).
It’s really just about not looking at packing as: I have seven days, I need to stack up seven complete outfits in my suitcase – because that’s when it gets huge. I also think that planning outfits you like beforehand beats throwing everything you own in the suitcase “just in case” because you arrive at your destination with a thoughtfully considered plan. Every morning of this trip I got dressed in a few minutes. It wasn’t a panicked process in the hotel mirror trying to figure out what to wear. And I loved that for something as simple as “my feet will be happier in sneakers today” I had that option with every outfit.
Tip #3: Optimize Your Plane Outfit
Let’s revisit the outfit that I wore on the plane, because strategy #3 is: wear something comfy on the plane that includes a few of your larger items so you don’t have to pack them. When I’m traveling and I want to have boots and a winter coat, you bet your buns I wear them onto the plane. In this case, it was about 50-70 degrees while I was in France, so there was less pressure to get huge things onto my body, but in wearing the outfit below, I knew I didn’t need to find room in my bag for my sneakers, my black blazer, and this second pair of jeans. They all got to come with me on my body – and the blazer, sneakers, and jeans all got to reappear in other outfits – as well as the purse.
Like so…
And like this (picture me shouting REMIX!):
In short, a thoughtfully considered plane outfit = efficiency at its finest.
Sidenote: please do whatever works for you – like if you prefer a sweater on the plane, the leopard sweater I packed is about as big as my black blazer, so you could travel in that and pack the blazer. And please remember that using this method can look SO MUCH MORE VARIED if you don’t always wear basics and a whole lot of black. I just like what I like 😉
And if you remember me saying that 9 whole items on my infographic of what I brought to France didn’t end up in my duffel, those items are: my bracelet, my sunglasses, all 3 purses (2 were nested inside the biggest black one, but none were in the duffel) and of course the black blazer, sneakers, black tank, and second pair of jeans that were on my body weren’t in that duffel either 😉
Tip #4: Things Don’t Always Have To Be Combined
This might seem obvious to point out, but just because you can layer things doesn’t mean you have to. A sweater doesn’t have to be under a blazer, but it’s nice and flexible that way. I ended up wearing this outfit during the day…
… and then added a blazer for warmth during the evening riverboat cruise.
Same for this white tank. It was just that + an apron while painting in a workshop, but then around town I added the jacket & my brown purse again.
Tip #5: Analyze Your Trip When You Unpack
You’ll always learn something when you travel, so taking a second to reflect on what worked extra well and what you might change for next time is definitely worth those ten minutes while you load things into the washing machine. One thing I took away from this trip was that sometimes I just bring sneakers and a nicer heeled sandal or boot – but these Rothy’s that I’ve had for years were truly the MVPs of the trip, and they’re so small to pack. So my takeaway from this trip = you don’t have to choose between sneakers or comfy flats when the flats are so tiny and easy to pack! I’m always just going to throw them into my bag.
I also really liked having a large purse + two smaller bags with me to choose from – so because I now know they can nest into my larger purse so easily, I think those will be coming with me on a lot more trips as well!
Actually, those two realizations are a great example that packing light isn’t all about trying to just bring fewer and fewer items every time – it’s about trying to bring a nice mix of useful things that will give you lots of options and make you feel good. It can be extremely luxurious to have so many choices come out of one purse and one small duffel. Maybe we should call it the Mary Poppins approach 😉
P.S. If you’re at all intrigued about a minimal wardrobe and why I love mine so much, this post explains how you can simplify your closet & save money. Plus you’ll recognize a few pieces that came to France that I owned back in 2018 when I wrote that post!
*This post contains affiliate links, so we may earn a small commission when you make a purchase through links on our site at no additional cost to you.
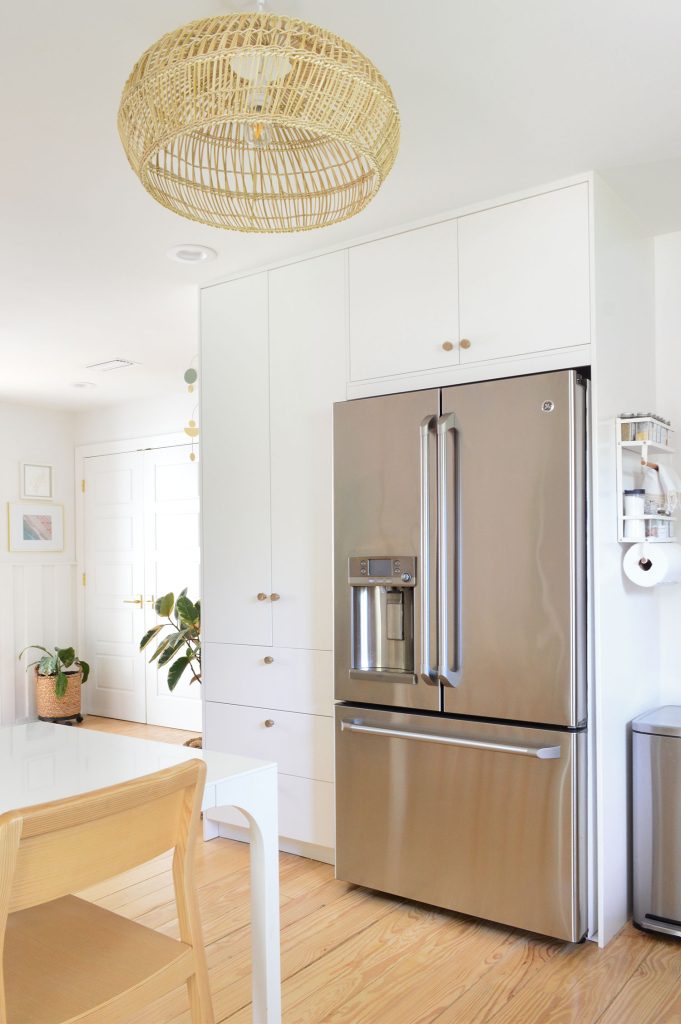
Today we’re talking about the stock market! Just kidding. Exactly as the title suggests, we’re going to show you how we earned some really useful extra storage in our new kitchen by upgrading a formerly VERY PACKED utility closet. It used to basically just have a water heater and an HVAC system in it without much room for anything else, and now there’s, say it with me… so much room for activities. Ok, not for like cartwheels, but significantly more room to store stuff than before. Like maybe 500% more. Really.
If you watched our drawer-by-drawer kitchen organization video, you already got a peek at what we have going on in there, but today we’re sharing all the angles, and explaining how we were able to take this closet from “mostly water heater” to “so much everything else.”
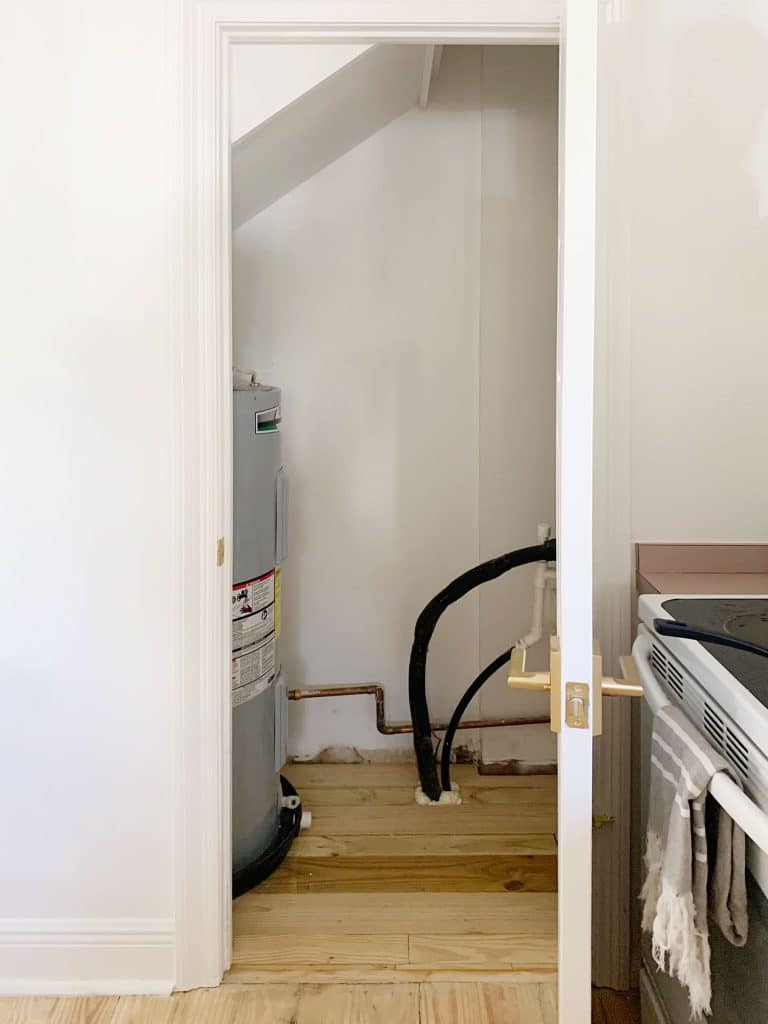
The Utility Closet Before
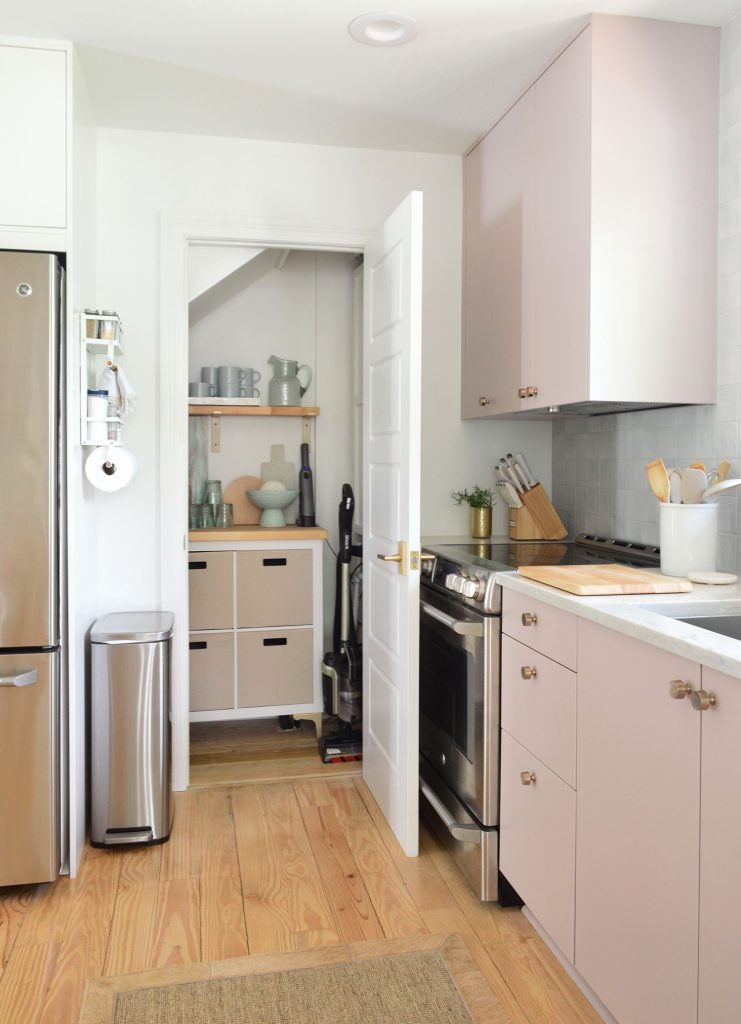
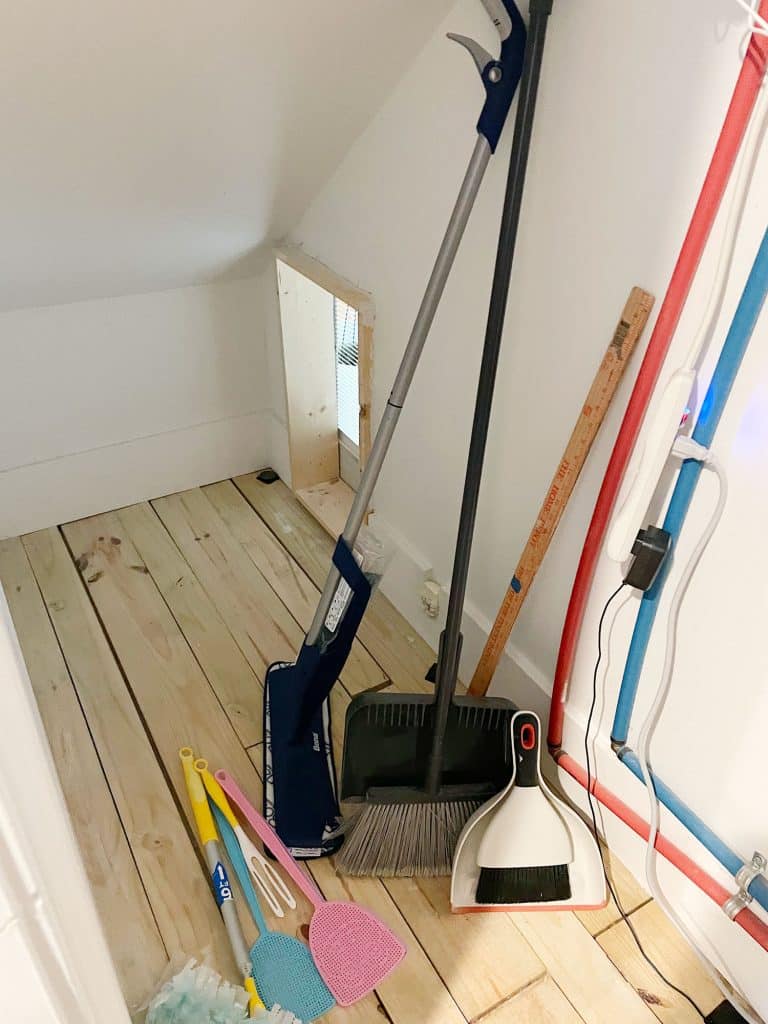
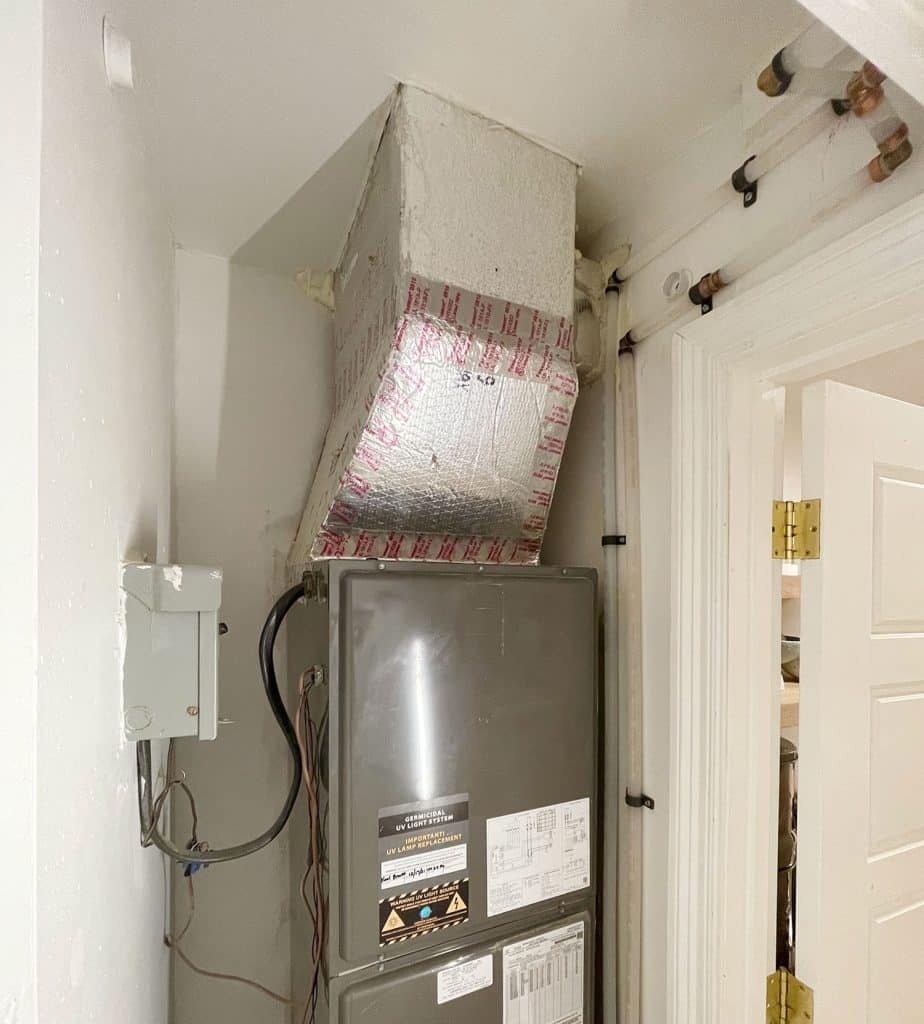
We don’t have a lot of “before” photos of this closet because it was absolutely nothing to write home about. In a smaller house like ours, you need a spot for the ugly stuff like the HVAC system and the water heater and this closet was it. The photo below was taken right after we moved in. The HVAC system is to the right of that doorframe (the black tubes lead to it) and although this closet is pretty deep (it goes all the way under the stairs), the water heater completely blocked more than half of the closet that continues to the left of the doorframe.
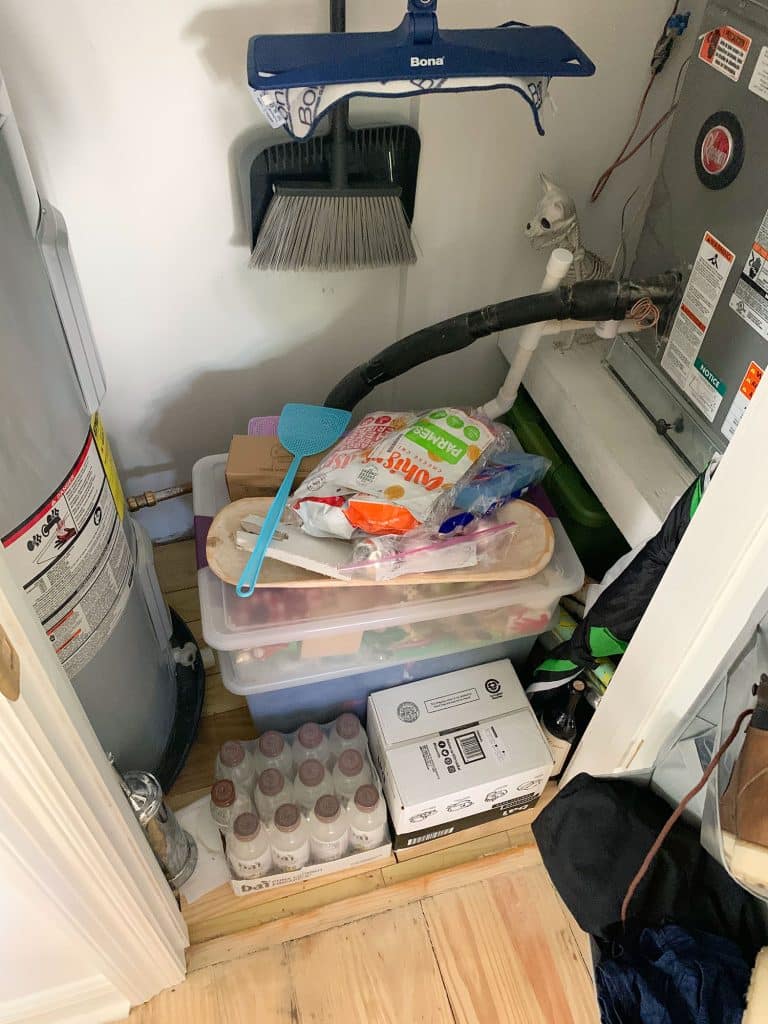
This is an example of an extremely random pile of stuff we stored in there on that random patch of floor space between the water heater and the HVAC system in our first few days of living here. I think it was mostly bins of Christmas stuff and miscellaneous items we hadn’t found a spot for yet. Don’t mind the (not real) chihuahua skeleton. Our Halloween stuff now lives in a fabric bin in the laundry closet with the easter eggs and our pumpkin carving tools. And all of our Christmas stuff is in one of the wardrobes in our bedroom. Our house’s organization had nowhere to go but up from the day we took this photo.
I already mentioned the most frustrating thing about this set-up, which is that the water heater was blocking A LOT of potential storage space under the stairs, rendering it totally inaccessible and unusable. And especially in a smaller house, it’s painful to know that there’s a big empty cavity of perfectly functional storage space THAT YOU CAN’T GET TO.
So that leads us to the first step in our mini makeover…
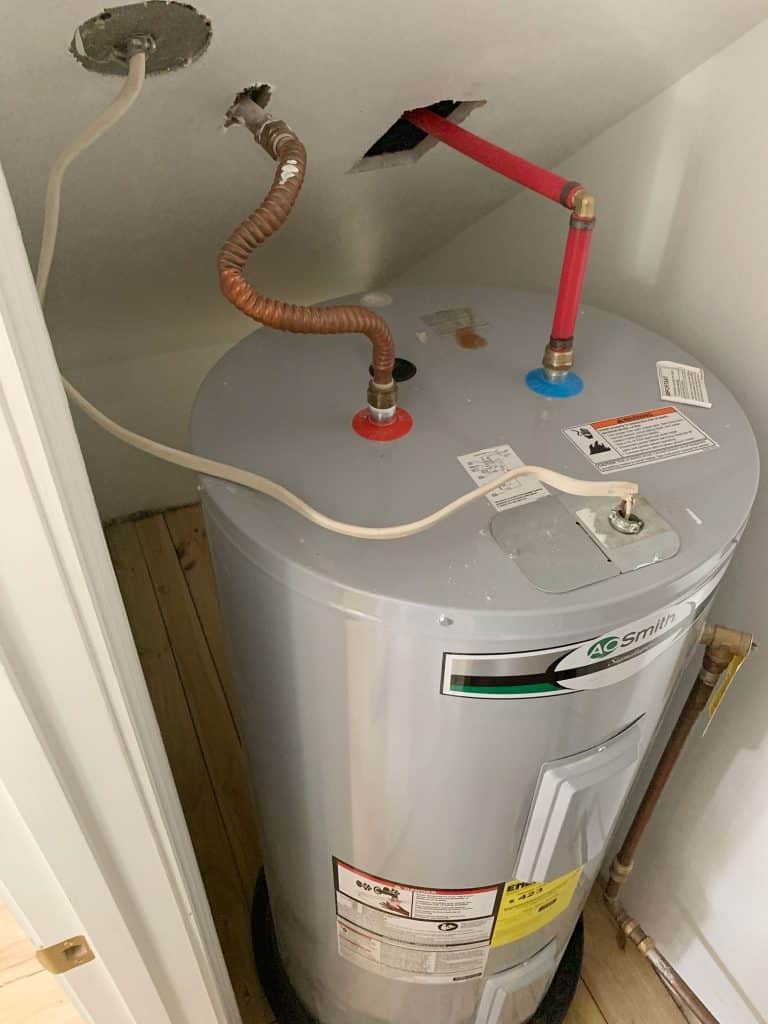
Step 1: Update (& Relocate) The Water Heater
In a move that can only be called the MVP of this project, we had that bulky electric water heater replaced with a more energy-efficient tankless model. We used tankless water heaters in our pink beach house and our duplex (see below), so we knew it would take up a lot less space and give us better access to the back of the closet if the switch could be made.
And – to our pleasant surprise! – we learned that tankless water heaters are typically installed on the OUTSIDE of homes around here (call us Florida novices). Thar she blows, mounted to the siding right outside of that closet on the back of our house where we put all the ugly stuff because nobody can really see it (it’s also where our pool equipment, gas meter, and generator live – all hidden behind a tall gate).
So not only had we earned a much more efficient water heater, we suddenly gained access to TONS of extra storage space that runs all the way under the stairs. Which, when you downsize, is basically your love language.
We did our best to take advantage of the new space, but it was kind of a slapdash approach for a while because we weren’t quite sure what would work best. We hung some wire shelves to wrangle tools and miscellaneous supplies & threw some larger items we wanted to store in that newly accessible area under the stairs, but it was clearly a chaotic vibe (and not the best way to store that stuff, we pretty quickly realized), hence having zero photos of it. This is actually an old video screenshot from a quick spin around the house that Sherry does for insurance purposes every time we leave on a trip because Shavonda says so. Note: the theory is if you’ve recently recorded every nook & cranny of your house, you have that to reference if something happens while you’re gone, and you can show your insurance carrier to make sure they reimburse you for all the items you lost (which you won’t forget, because you have it all on tape).
We lived with things like that for a while, knowing it wasn’t working flawlessly, but also trying not to rush into some other idea that also wouldn’t work well, and over time as the rest of the kitchen renovation started to come together, we had more clarity on how we wanted to use this bonus space. And let’s just say it didn’t involve shallow wire shelving.
But before we could bring in some better-looking storage, we had a few things in our way. Quite literally.
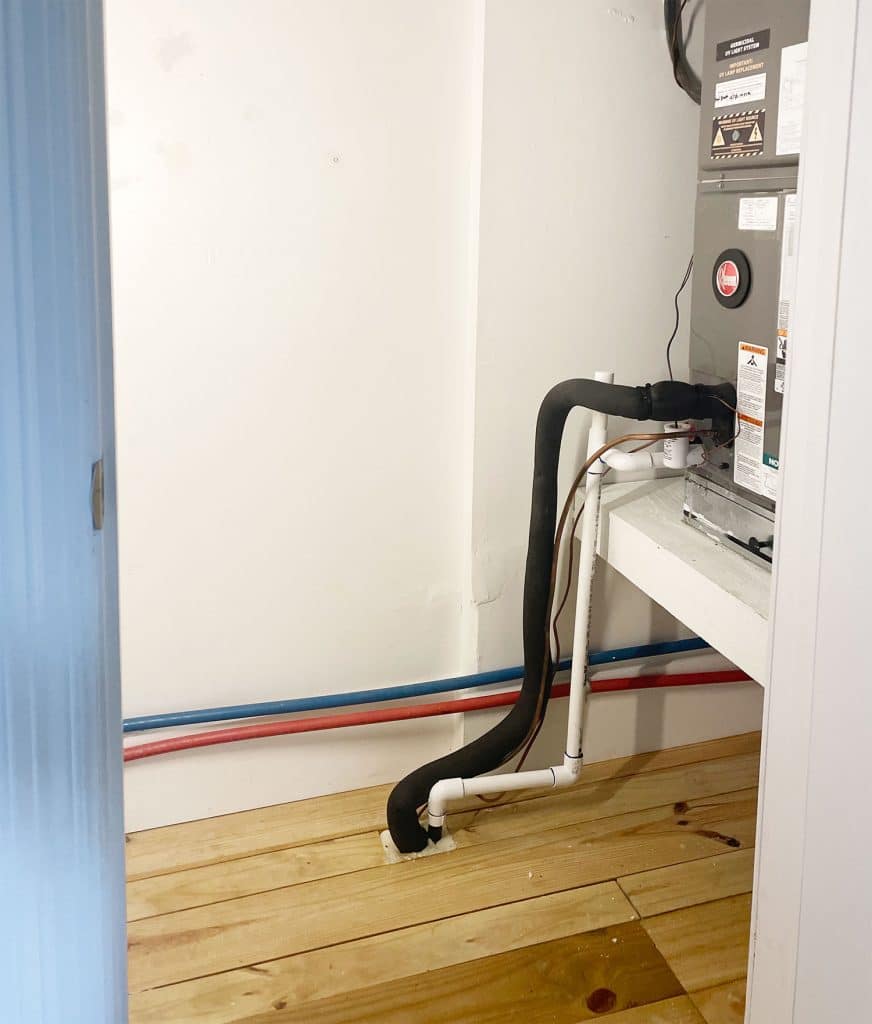
Step 2: Reroute The Pipes & Wires
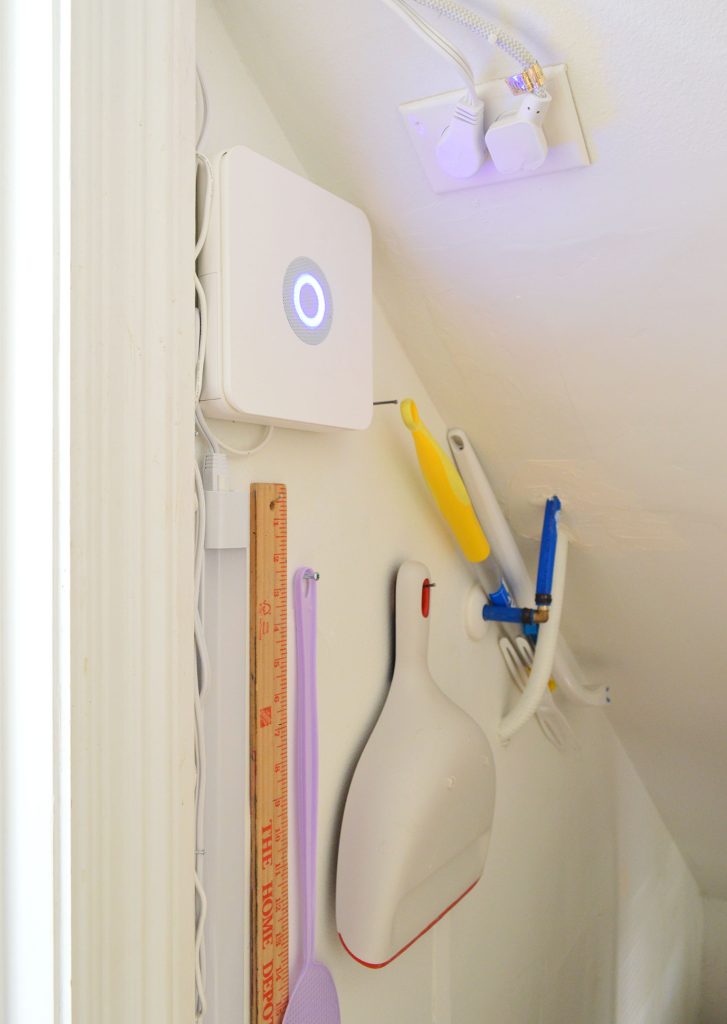
The closet still had various wires, tubes, and pipes that prevented us from putting things where we wanted them. So we paid around $280 to get two pros to come out and move them for us. First our favorite HVAC guys rerouted the thick black tubing and white pipe for the HVAC system as far to the right side as possible (so they no longer arc out so widely into the closet). Note: never compromise your system by changing things with a handyman or DIY if you’re not sure how that system works. We always use a really good HVAC guy when we’re making HVAC changes because a comfortable house temp is key 😉
Later that same day we had our favorite plumber out to re-route the water lines that run out to our tankless water heater, so those water lines are no longer obstructing the back wall at all. We hid them behind the doorway so you can’t even see it from the kitchen anymore! See the blue and red water lines that run above the baseboards in the photo above? Now they sneakily snake behind the doorway (they’re those clear tubes you see in this photo below):
So with everything out of the way, we were finally able to get to the fun part…
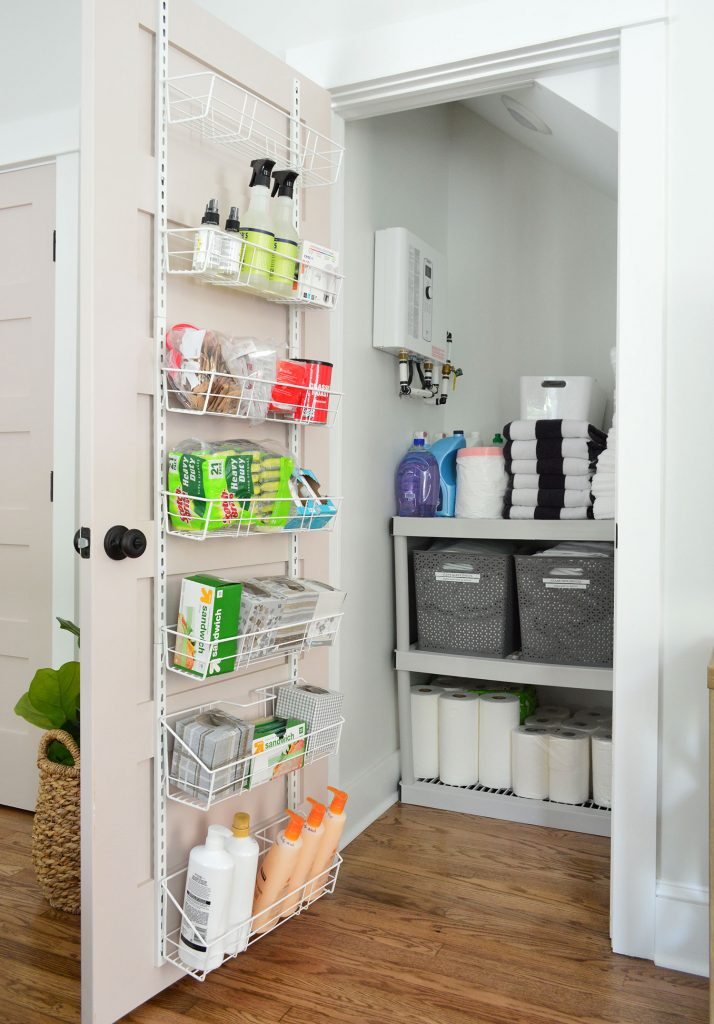
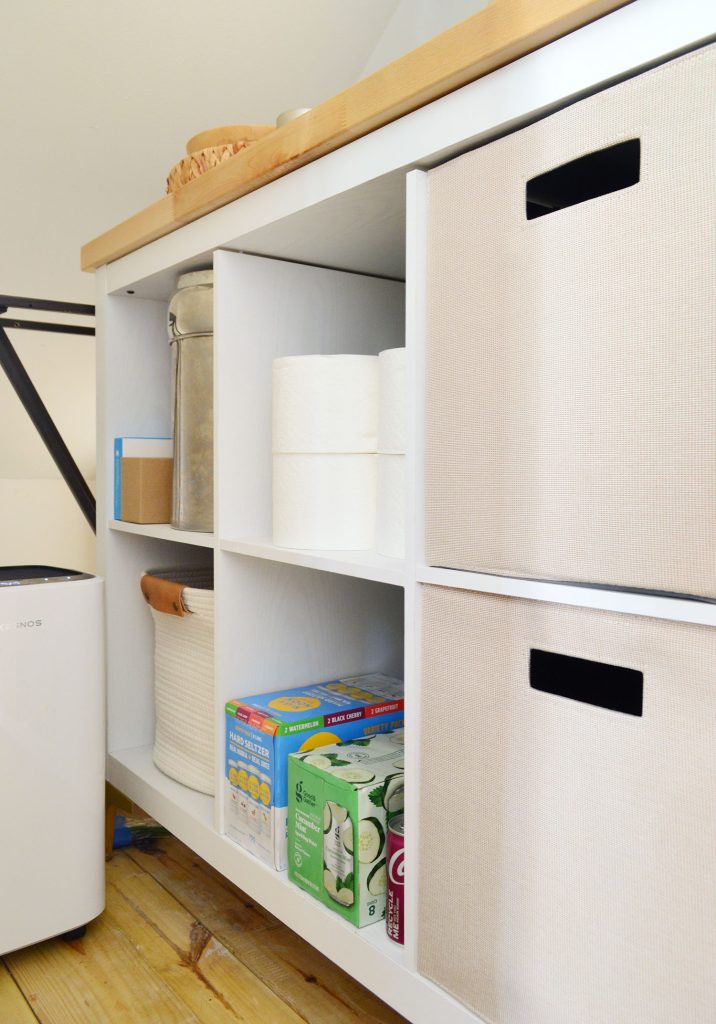
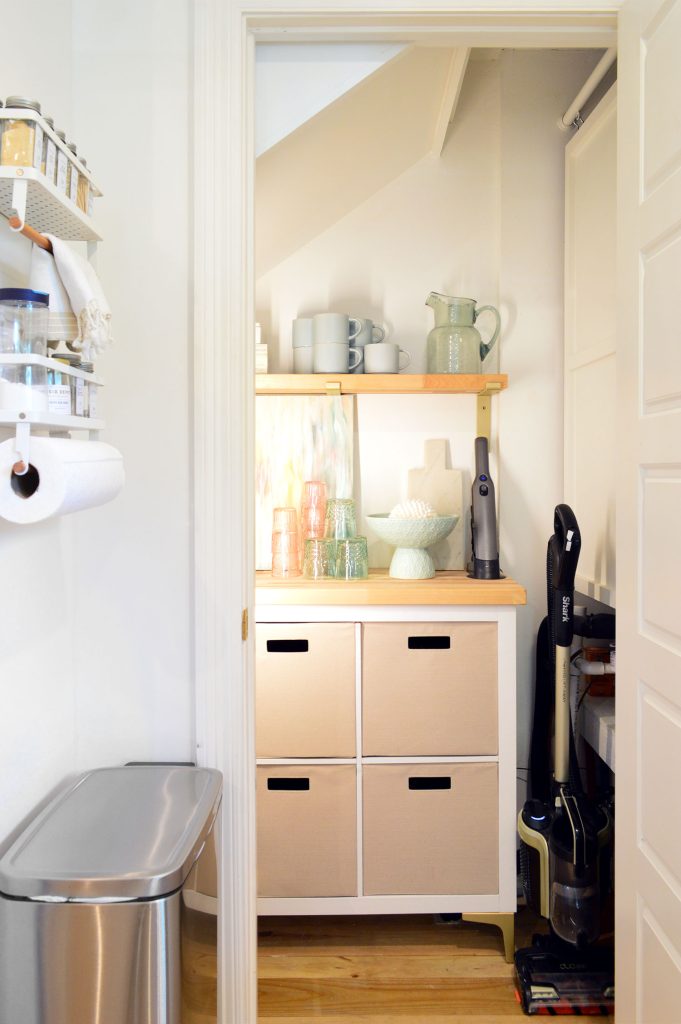
Step 3: Customize A Cube Storage Shelf
Hold onto your butts, because this is where it starts to get even more exciting.
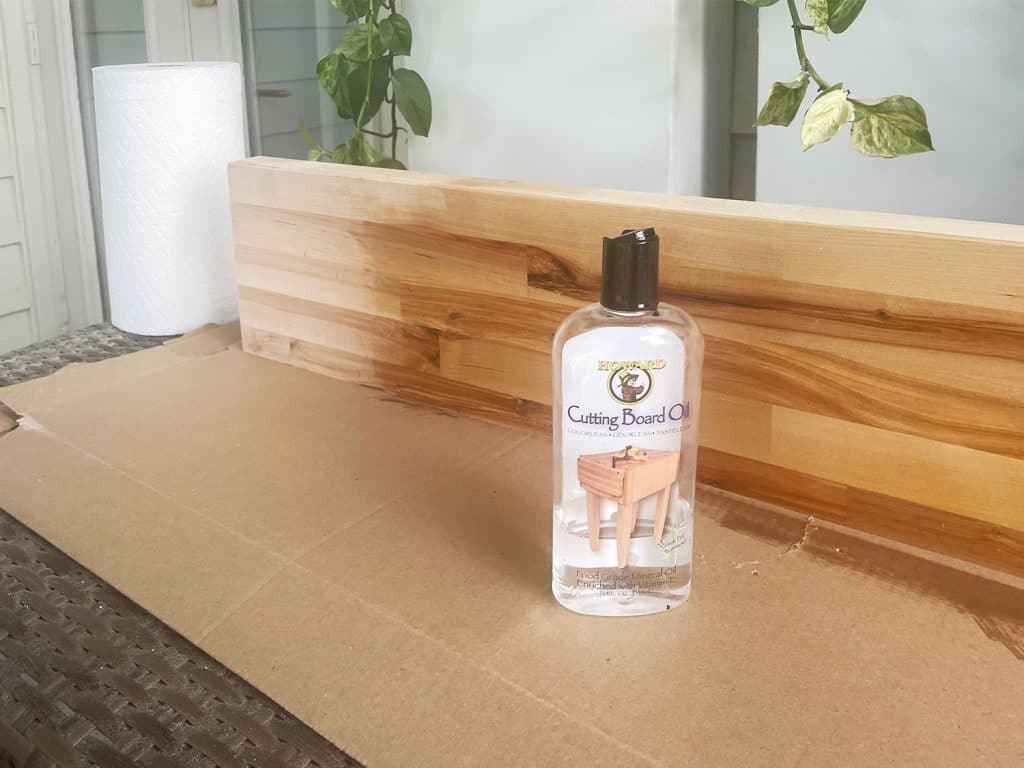
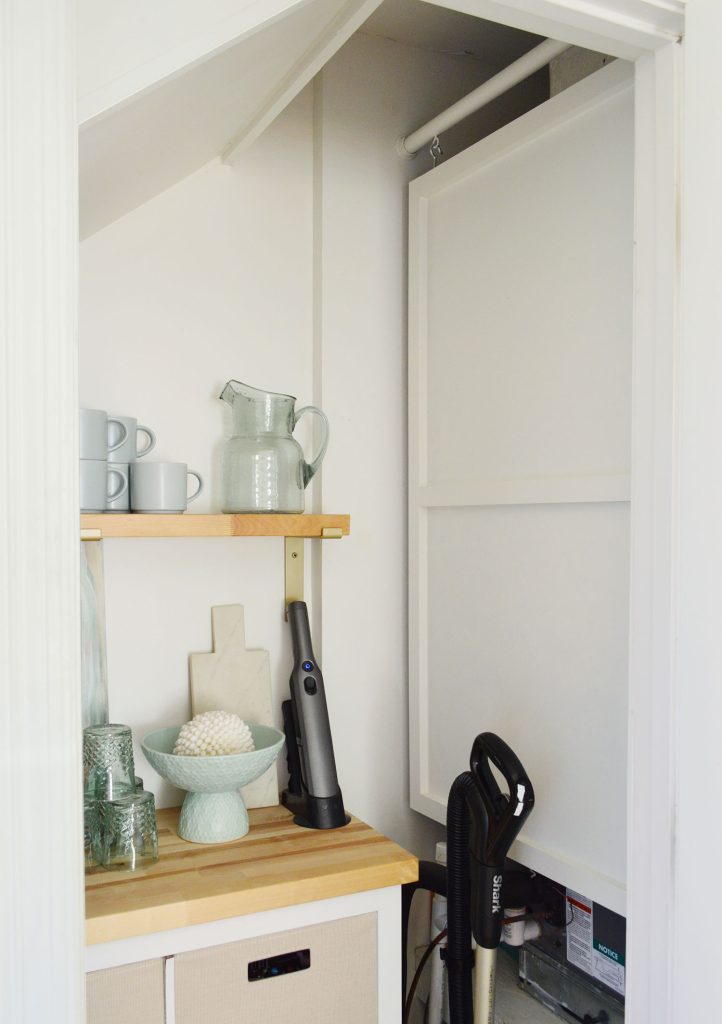
We upgraded from that shallow wire wall storage to a basic cube shelf organizer – and we made it look a little less-than-basic by adding 5″ brass furniture legs and topping it with a piece of butcher block counter that we cut to size and sealed with 2 coats of cutting board oil (it always dries a little lighter once it’s soaked in).
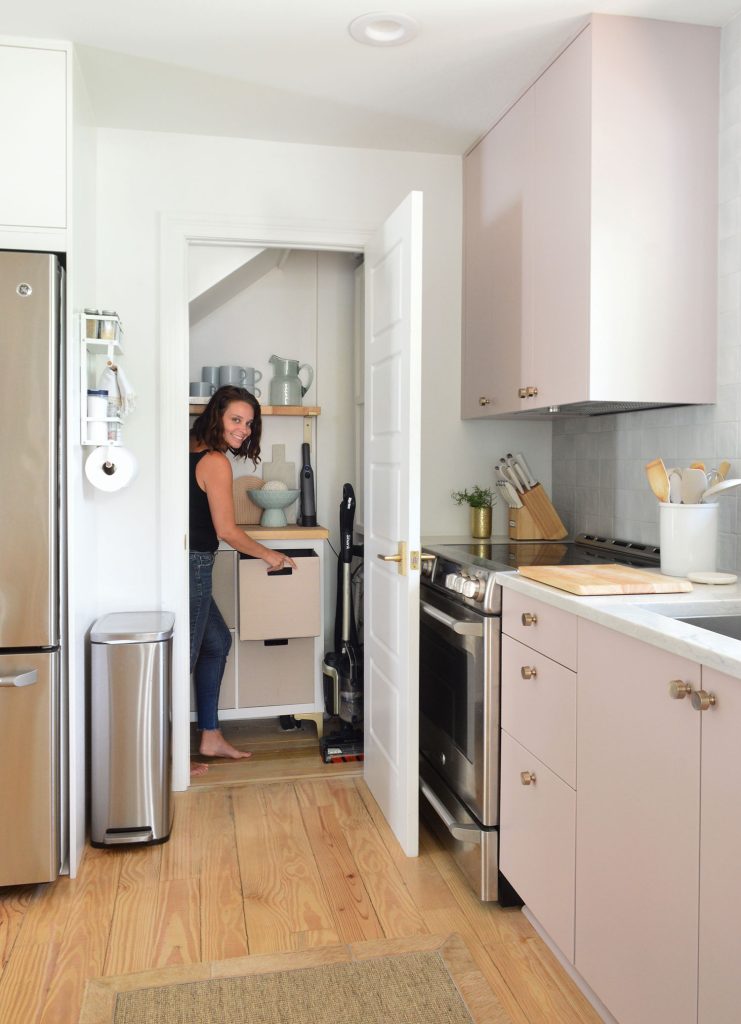
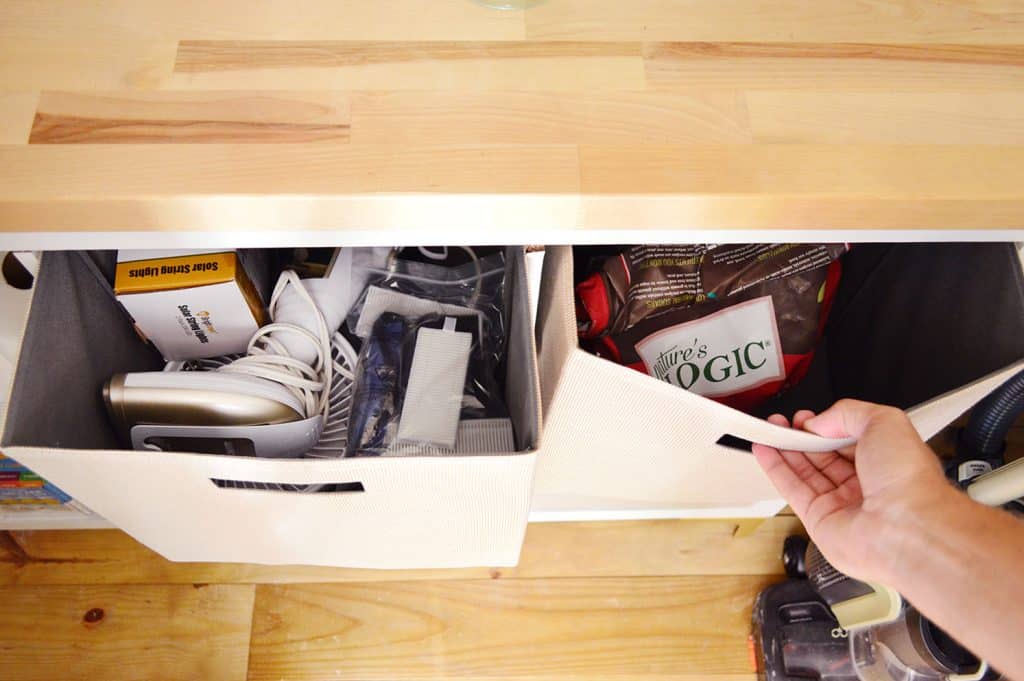
Since you can see 4 of the 8 cubes when the closet door is open, we used matching taupe fabric bins to make the things look tidier than they really are. Those bins hold SO MUCH STUFF. Absolutely thrilling.
We use one of them to store dog food & treats, another one has our steamer & vacuum attachments, one has random things like spray paint & caulk & our a caulk gun. Let’s just say it’s about 5X more pleasurable than trying to balance that stuff in shallow wire shelves (which never could hold our dog food anyway).
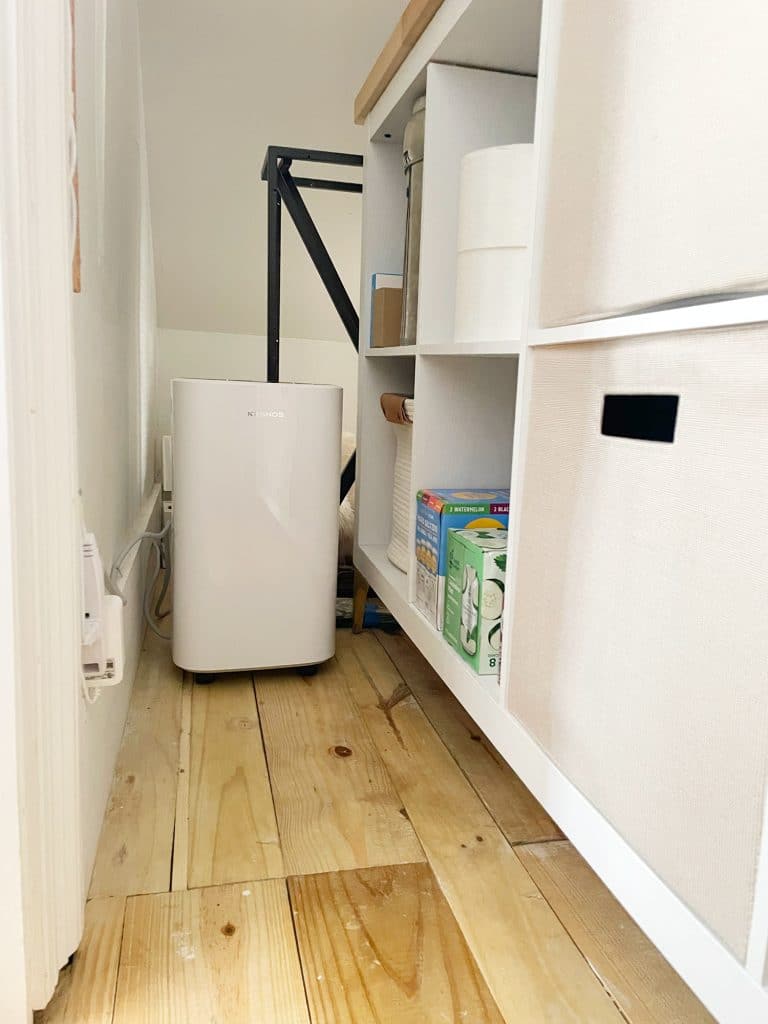
We left the other 4 cubes bin-less and open, and those also hold a smorgasbord of stuff like extra toilet paper, overflow beverages, emergency supplies, and even our Berkey water filter. A few people have asked what happened to it since it’s not out on our counter anymore, and the answer is that during the final stage of our kitchen reno, we finally ran a waterline to our fridge (which created filtered always-cold water on demand – plus ICE!). After over two years without one, having a cold water & ice dispenser has been awesome. The fridge also dispenses hot water for tea so it has basically changed our lives. If this were Cribs on MTV I would welcome you in and talk about my fridge for ten minutes.
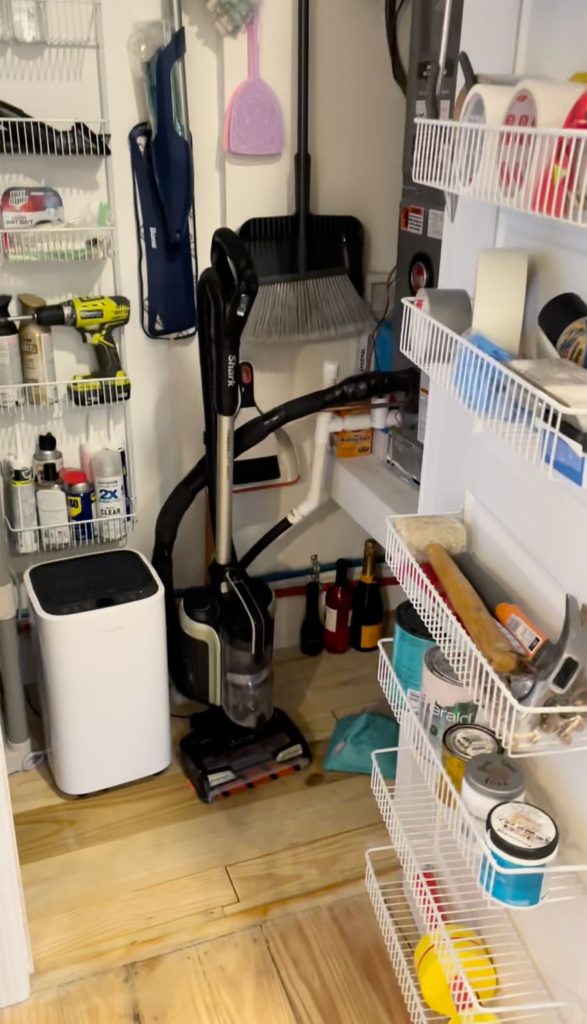
Anyway, back to the Berkey. We had it assembled on the counter in the utility closet for a while, but we all tended to just use the fridge when we wanted a drink. But we love our Berkey so we’re keeping it in case we ever need a truly amazing water filter (it can literally make pond water potable!), like a hurricane or other emergency. We have one cube dedicated to hurricane supplies where it sits, which also holds a crank radio, a solar-powered charger, some flashlights, etc.
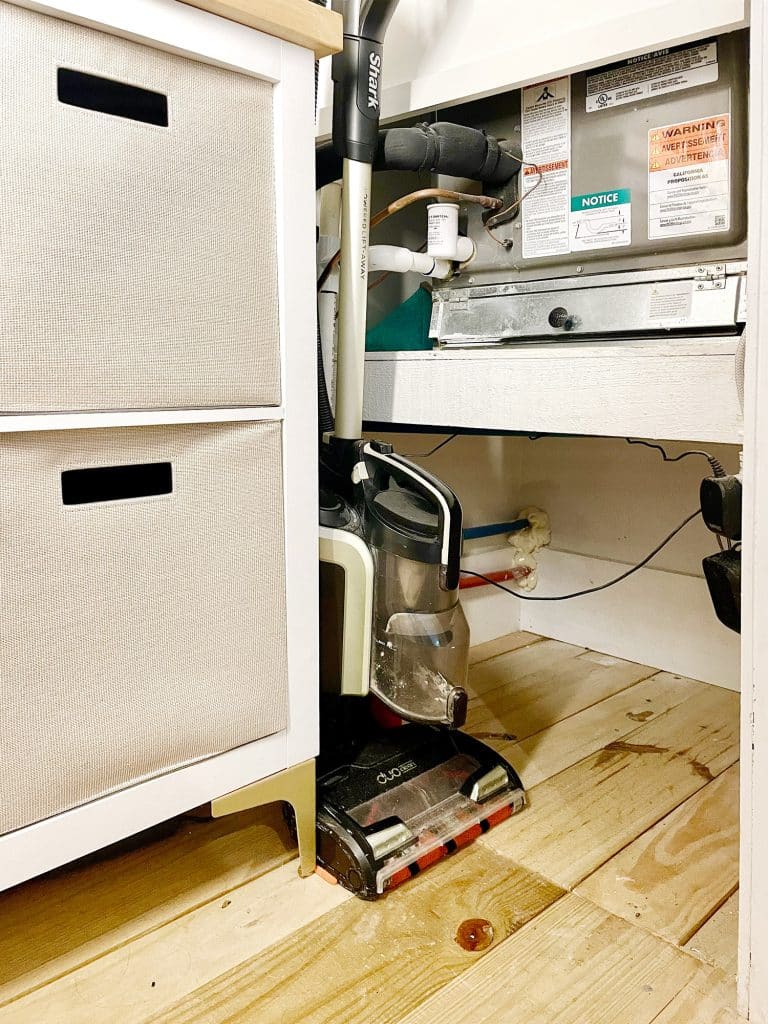
There’s additional space beyond the storage shelf for some random bigger stuff to sit on the floor. And yes, that’s a dehumidifier that you see running because, well, Florida. Since it sits between the intake vent and our HVAC unit, it actually helps dehumidify the whole house.
And as a reminder, this used to be the view from this angle. So yeah… big difference.
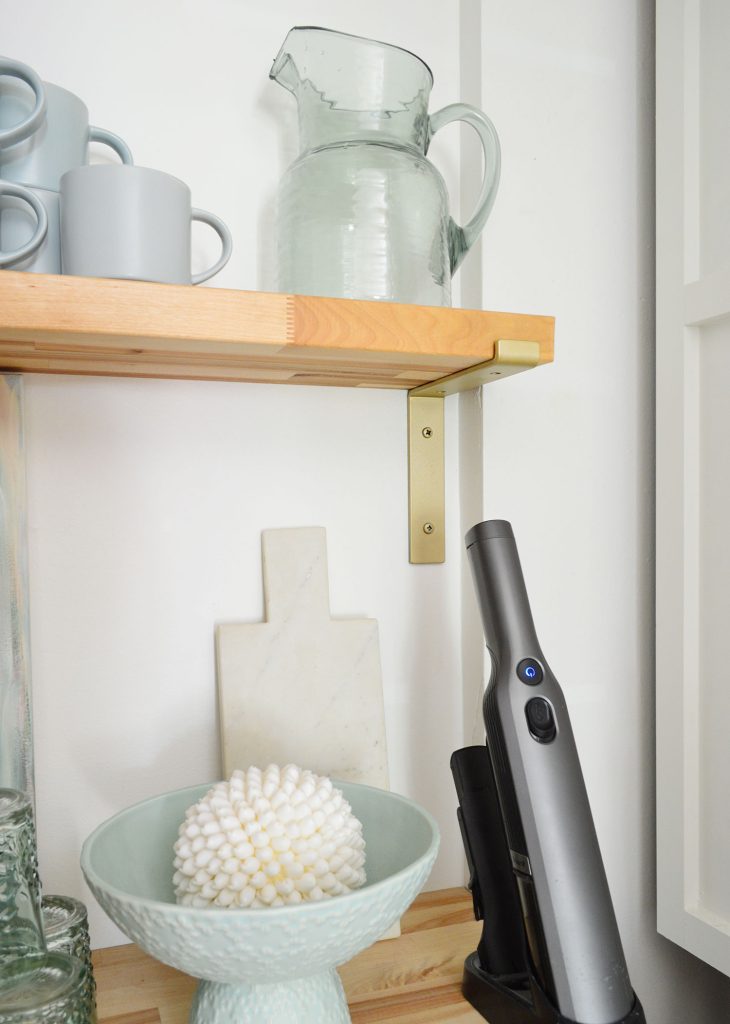
Step 4: Add A Floating Shelf
Honestly, the cube organizer turned out to be more-than-enough storage for us at the moment, but we had some extra butcher block after we made the counter and we thought it would be nice to add a shelf for even more vertical storage.
We created a simple shelf with the help of these metal shelf brackets that we spray-painted Rust-Oleum’s Sunlit Brass to match the feet that we added to the cube storage shelf below. We actually used the same paint on the metal legs on the cube shelf after realizing they were more of an orange brass, and now everything matches.
The shelf and the countertop do store some functional things, like mugs and extra cups, a pitcher Sherry uses to water her 438 plants, and a handheld vacuum that’s easy for the kids to use. But Sherry threw some decorative things in there too because, well, we now have room for that. This closet really went from feeling like a wasted underutilized space to giving off an almost-pantry or bonus-bar vibe that we appreciate so much.
So yeah, framed illustrations of your dog and pretty vases can live in a closet too. Live your best life.
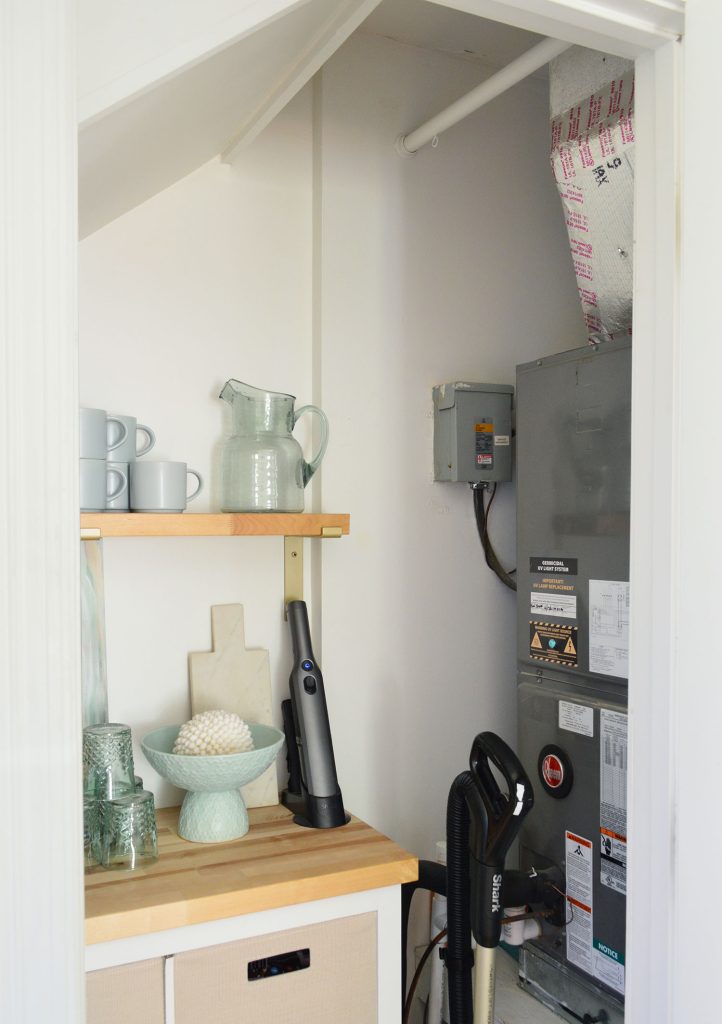
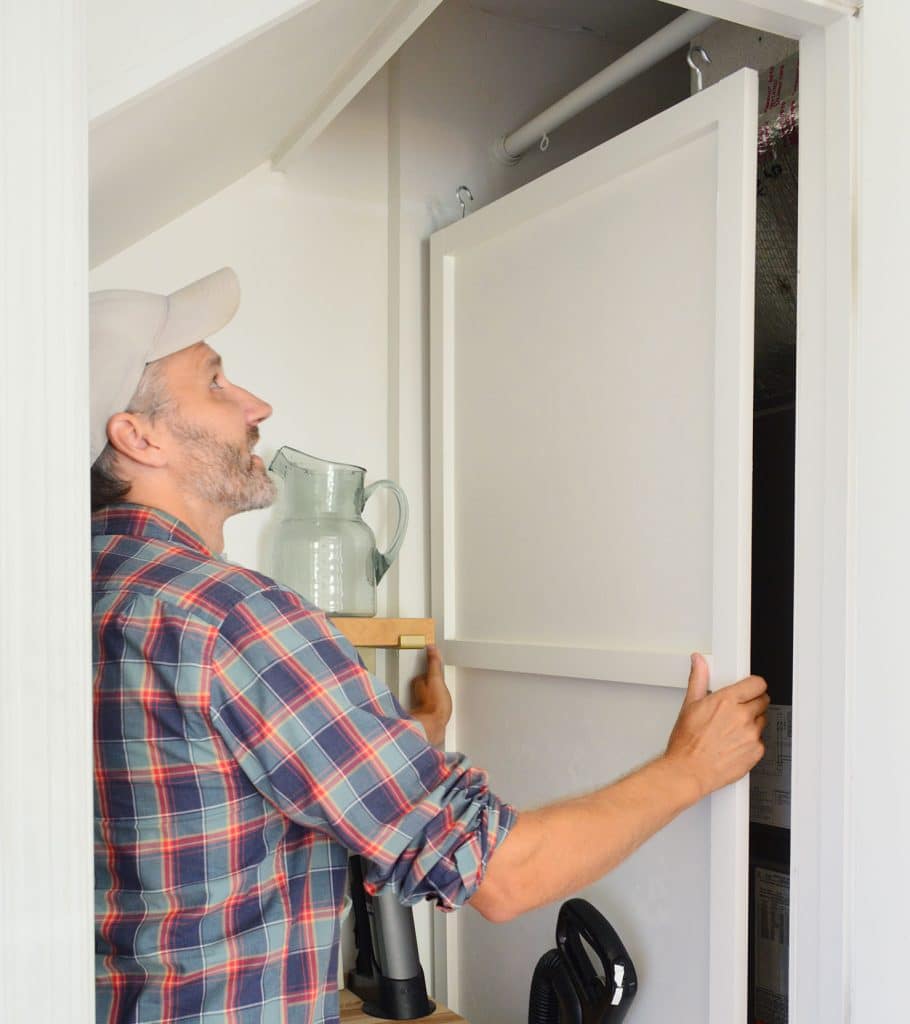
Step 5: Cover The Ugly
We still had that extremely utilitarian-looking HVAC unit right next to the area we had just spruced up… but I had an idea.
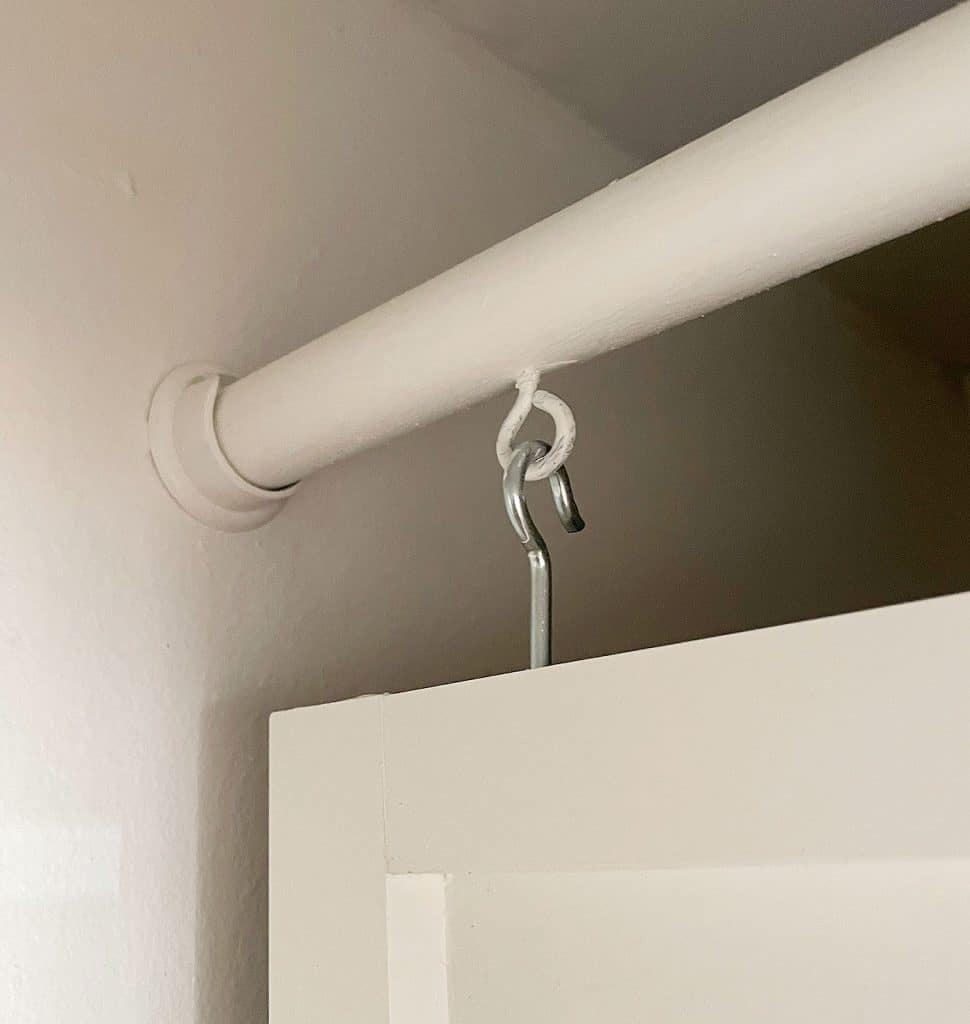
We built a simple cover panel from a sheet of thin plywood that we trimmed around the edges with 1 x 2″ boards and painted the wall color (SW Pure White).
The whole thing hangs from some eye hooks that we screwed into a basic wooden closet rod that we added near the ceiling.
This means we can easily remove the panel whenever the HVAC unit needs to be serviced.
And, since the intake is on the bottom of the unit, it doesn’t block an inch of airflow, and we can easily change the filter without having to take it down.
The overall effect of adding that panel is surprisingly helpful. It feels MUCH less like a utility closet in here, but still has all the function.
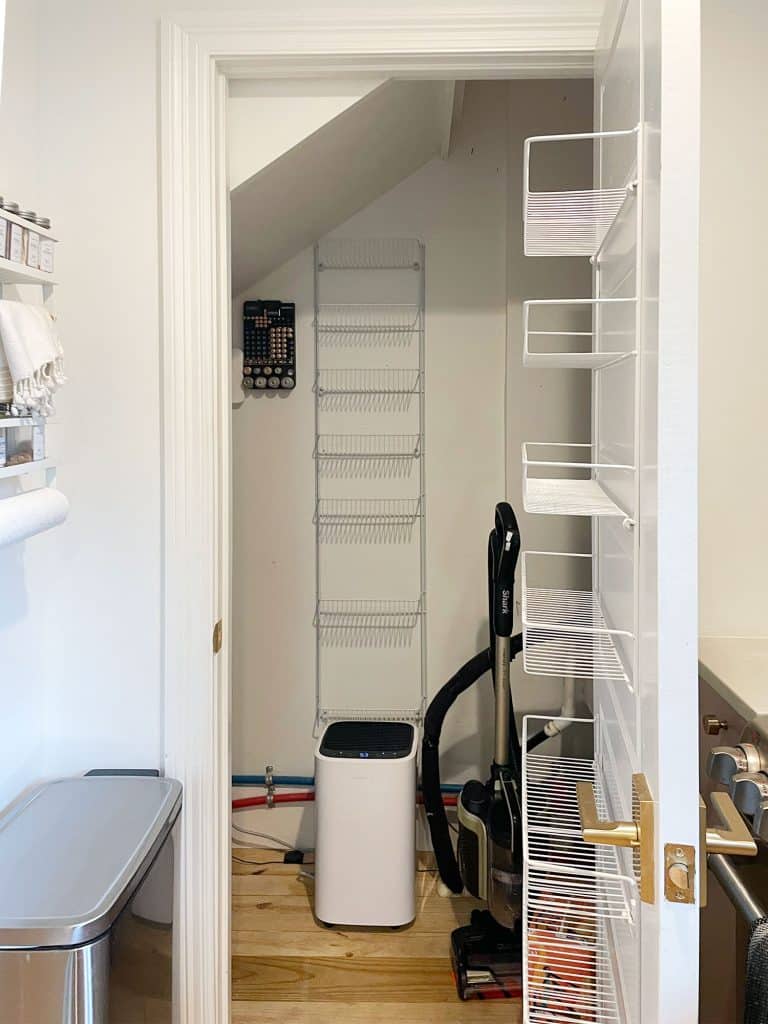
Step 6: Take Advantage of Hidden Walls
Last but not least, we utilized the inside wall (opposite the cube shelf, to the left of the doorway) to wrangle some last remaining items: a dustpan, some cleaning wands, a fly swatter… you know, the really sexy stuff.
We also hung this 24″ under-cabinet light vertically along the door molding to give us some extra light in there. It just plugs into a normal outlet (we had that added when we removed the water heater since power had been run to that spot for the water heater) and it offers two brightness settings. Toggle the switch one way for 50% brightness, and toggle it the other way for 100%. This is just 50% below, so it’s PLENTY bright.
So that’s the story of how we took this unassuming utility closet that literally only had this much accessible floor space…
… and gave it quite the glow up.
As a P.S. – I know it looks incredibly shallow in there, but we can both easily stand fully within the closet, walk all the way to the back corner to get the storage items that we have back there, etc.
If it helps, here is Sherry standing inside:
Since that likely didn’t help because she’s 5’2″, I’ll repeat this picture for you, because you can see that I’m standing fully inside of the closet (see the doorframe in front of me) to remove that HVAC panel. Thrilling, right? I can fully stand in that spot without hitting my head, and both of us have to duck to get to the back of the closet since the ceiling dips down, but that’s par for the course for a closet under the stairs.
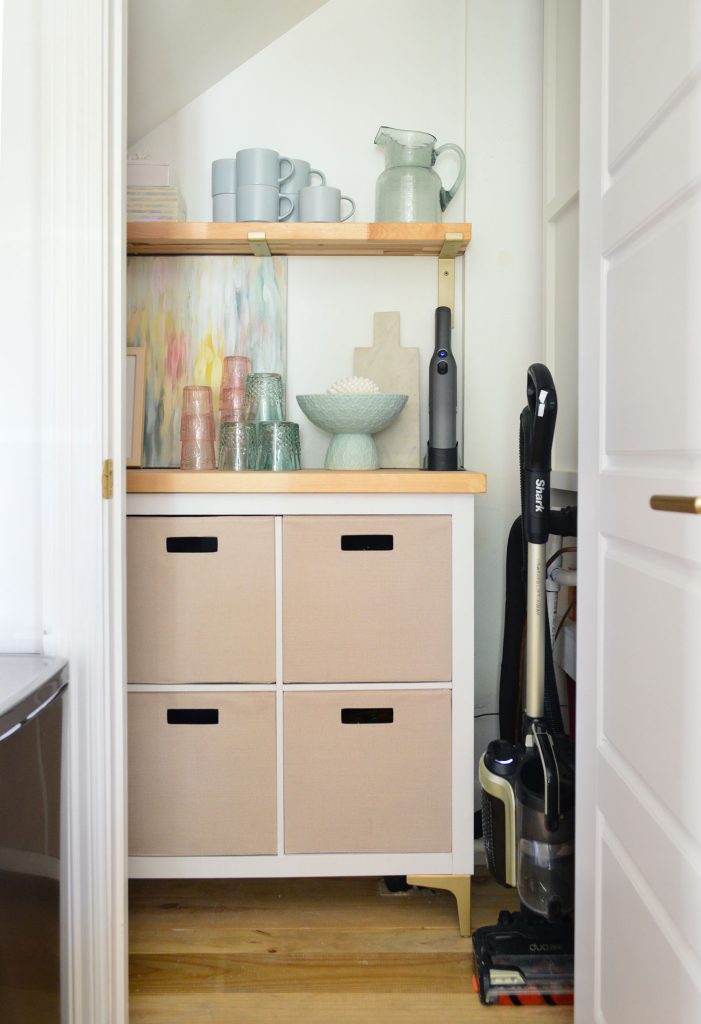
One last note about that black upright vacuum, since I know someone will ask. We broke our beloved Shark Navigator that you’ve heard us talk about approximately 42 times (it was our fault, not the vacuums’) and it was no longer sold at that moment we broke it, so we caved and got a Shark ION P50 – but don’t fall for it. The Shark Navigator is forever and always our favorite cordless vac (so glad it’s back and available again! Sherry wishes we had waited). I will admit that we rarely use a “real vacuum” now that Eufy has come into our lives, except mainly for doing the stairs (which we sometimes do with our handheld vacuumbecause we’re cool like that).
To read all about our kitchen renovation, this posthas you covered (including the cost). And if you’d like to see how our entire kitchen is organized, we throw open all the doors & drawersright here in this post.
*This post contains affiliate links, so we may earn a small commission when you make a purchase through links on our site at no additional cost to you.