Have you ever been in a room where one wall stands out from the rest? Chances are, that wall was an accent wall. These walls are designed to draw attention and provide a focal point for the overall design of your space. Accent walls can add texture, color, or pattern to any room in your home and can be used to create a unique look that stands out and expresses your personal style. Let’s explore some accent wall ideas and inspiration for your home.
Paint It Up
Green bedroom accent wall from Ashley Clark via Domino.tasty-pins-banner-container{display:block;margin-bottom:20px;position:relative;width:-moz-fit-content;width:fit-content}.tasty-pins-banner-container a{cursor:pointer;display:flex;font-size:14px;font-weight:700;letter-spacing:1px;line-height:1.8em;text-transform:uppercase}.tasty-pins-banner-container a:hover{opacity:1}.tasty-pins-banner-container .tasty-pins-banner{align-items:center;bottom:0;cursor:pointer;display:flex;justify-content:center;left:0;padding-bottom:1em;padding-top:1em;position:absolute;right:0}.tasty-pins-banner-container .tasty-pins-banner svg{margin-right:4px;width:32px}.tasty-pins-banner-container .tasty-pins-banner span{margin-top:4px}.tasty-pins-banner-container a.tasty-pins-banner{text-decoration:none}.tasty-pins-banner-container a.tasty-pins-banner:hover{opacity:.8}.tasty-pins-banner-container a.tasty-pins-banner-image-link{flex-direction:column}.tasty-pins-banner-container a img{margin-bottom:0}.entry-content .wp-block-image .tasty-pins-banner-container img{margin-bottom:0;padding-bottom:0}#et-boc .et-l div .et_pb_image_wrap .tasty-pins-banner-container .tasty-pins-banner{padding-bottom:1em!important;padding-top:1em;text-decoration:none}#et-boc .et-l div .et_pb_image_wrap .tasty-pins-banner-container a.tasty-pins-banner{cursor:pointer;display:flex;font-size:14px;font-weight:700;line-height:1.8em;text-transform:uppercase}#et-boc .et-l div .et_pb_image_wrap .tasty-pins-banner-container a.tasty-pins-banner span{letter-spacing:2px;margin-top:4px}.et-db #et-boc .et-l .et_pb_module .tasty-pins-banner-container a:not(.wc-forward){padding-bottom:0}Use a bold color, like this Forest green dining room accent wall from Decor Lovin
A surefire way to make an impact with your accent wall is to use paint. Painting one wall in an eye-catching hue is a great way to instantly change the look of any room. Whether you choose a vibrant color or more subtle shades, painting will instantly make your accent wall stand out from the rest of the room. If you’re feeling extra daring, why not try a two-tone effect with contrasting colors or paint one half of the wall with vertical stripes? The possibilities are endless when it comes to painting!
Another great way to bring life into any room is wallpaper. Wallpaper can be used on just one wall as an accent piece or all four walls if desired. With so many different patterns, colors, and textures available these days, wallpaper can be used to create any look imaginable—from classic and elegant designs to bold and modern ones. Plus, there’s no need for extensive preparation as most types of wallpaper come with self-adhesive backing that makes installation easy and mess-free! If you’re a renter, make sure your stick wallpaper also peels off, not all do!
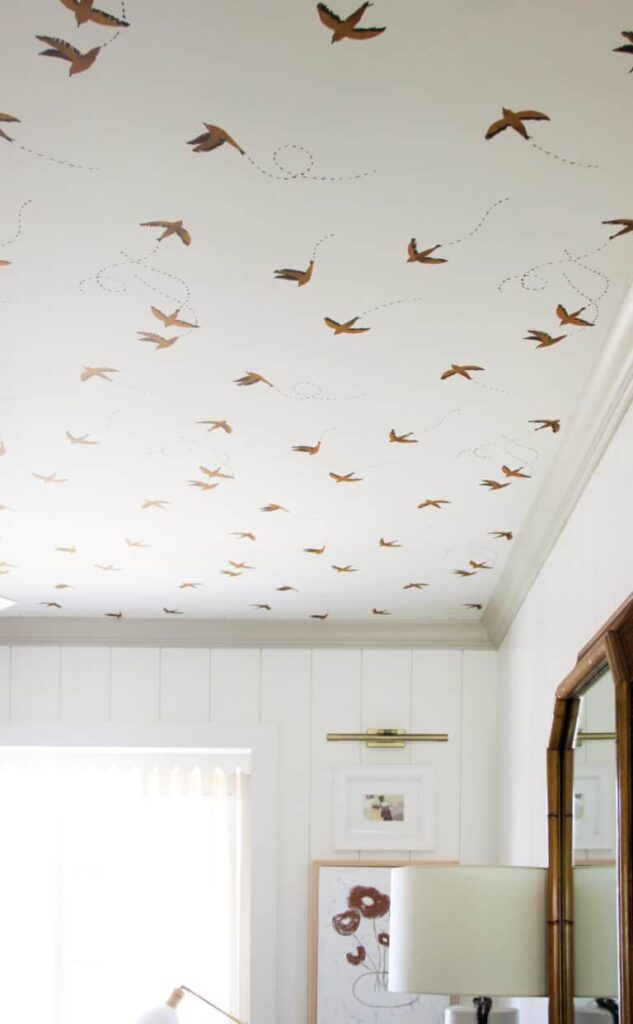
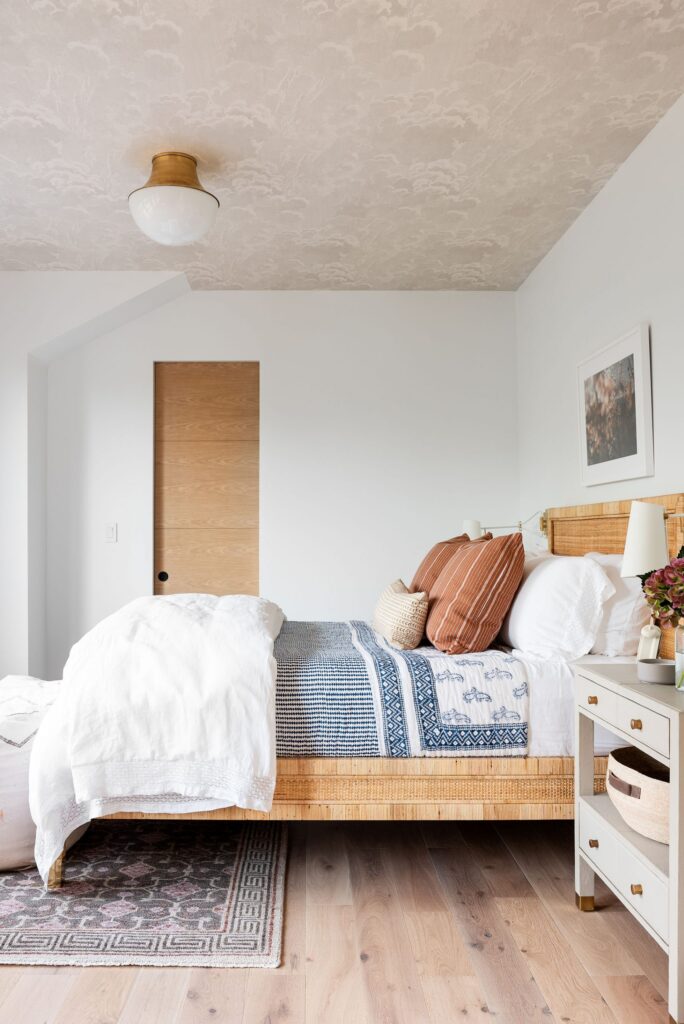
When it comes to accent walls, most people focus on painting or decorating a single wall in a room. However, using your ceiling as an accent wall is a unique and creative way to add visual interest and personality to a space. A painted or patterned ceiling can create a stunning visual effect and draw the eye upward, making the room feel more spacious and inviting. It can also be a great way to highlight architectural details or add an unexpected element of surprise to a room.
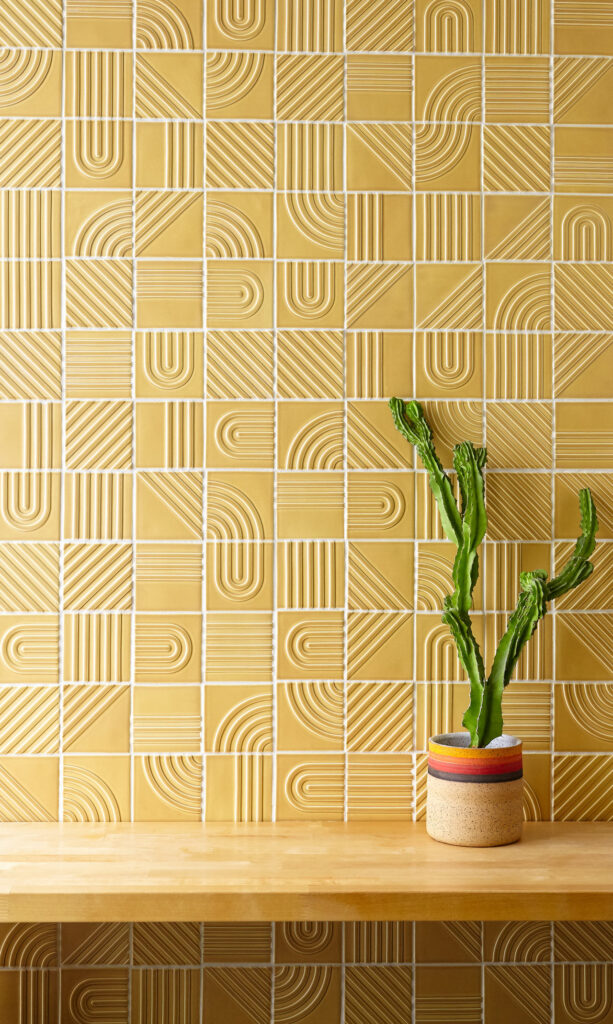
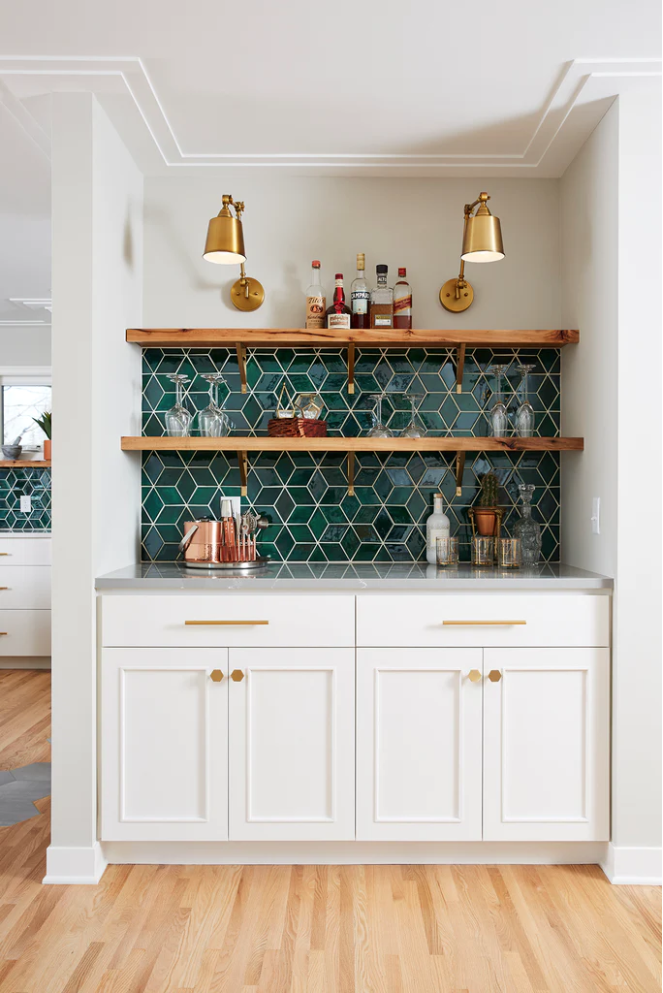
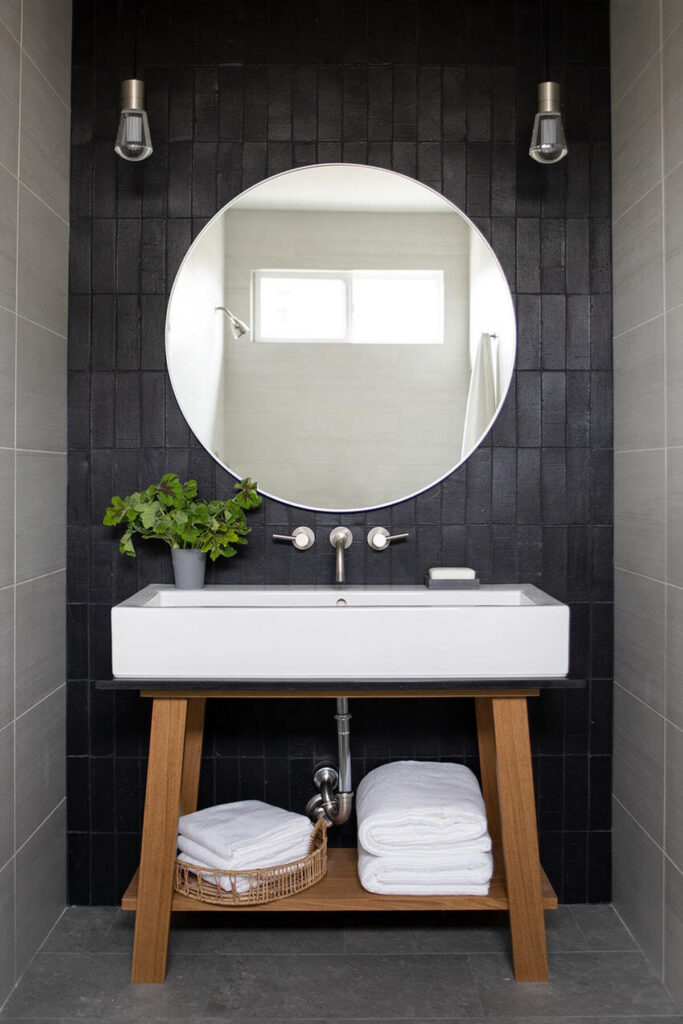
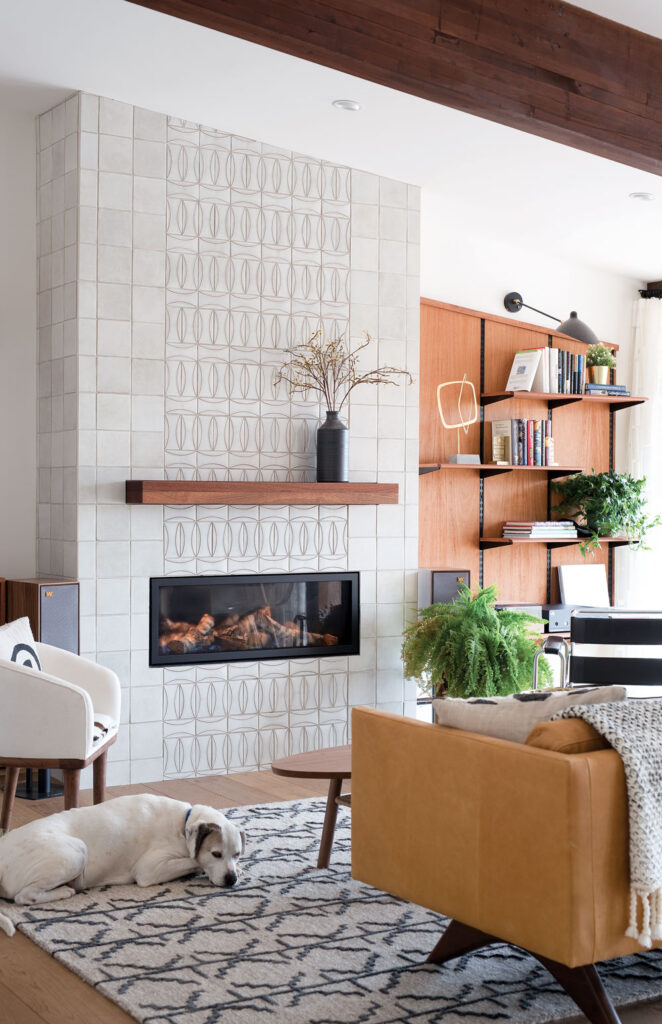
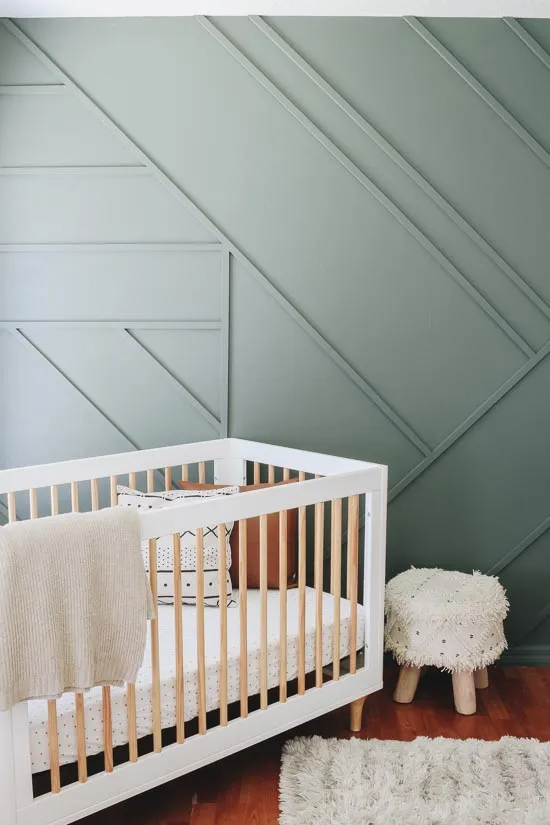
Adding tile or other textured materials to one wall can give your home an instant upgrade without breaking the bank. Tiles are available in various shapes and sizes which means you have plenty of options when it comes to creating the perfect look for your space—whether it’s a rustic feel with natural stone tiles or something more modern with geometric shapes like hexagons or chevrons! And if tiles aren’t quite what you had in mind, wood panels offer a timeless alternative that never goes out of style.
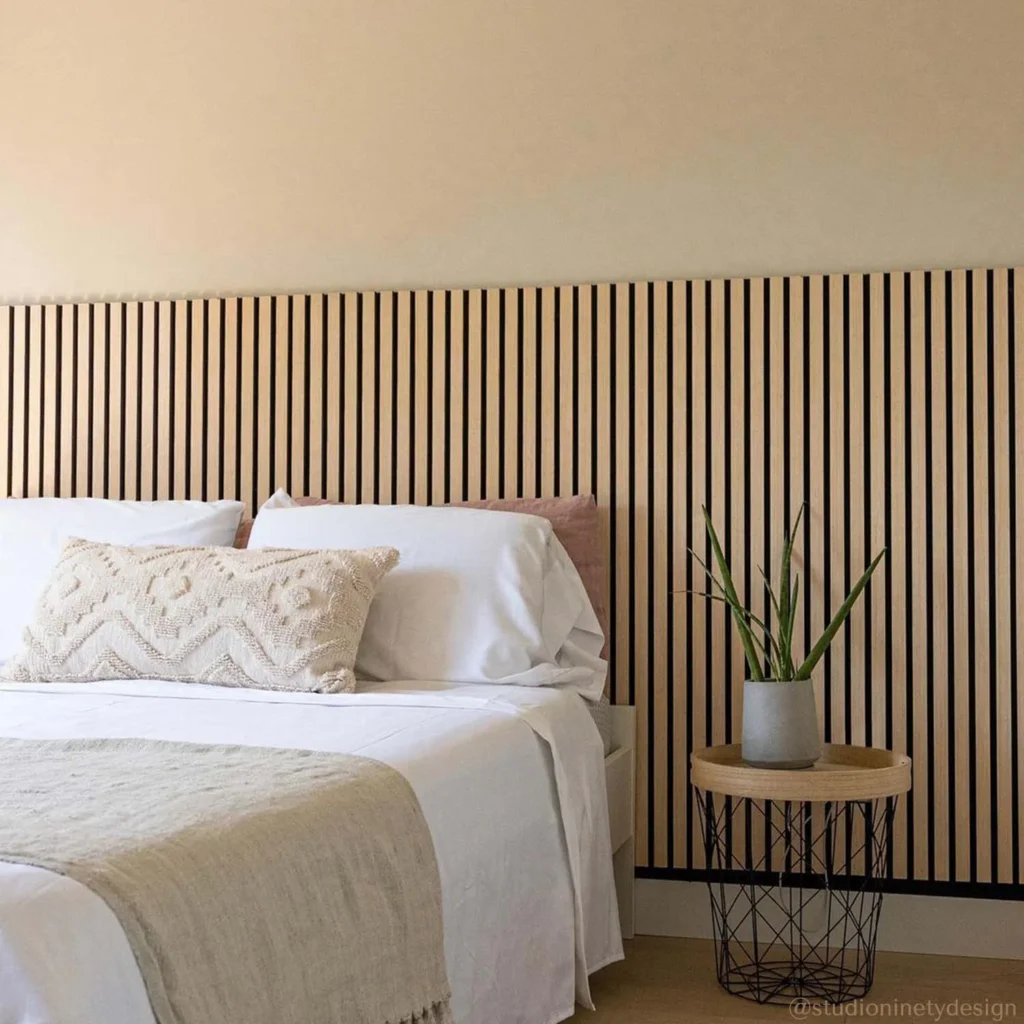
Wood paneling can add warmth, dimension, and texture to any room, making it a popular choice for accent walls. You can use reclaimed wood, shiplap, or other types of wood paneling to create a rustic or modern look. Wood paneling can also be painted or stained to match the existing decor in the room. Wood paneling is also the perfect option for creating a headboard like effect in your bedroom, like the example above from Andor Willow, adding a nice texture to a bedroom with neutral colors.
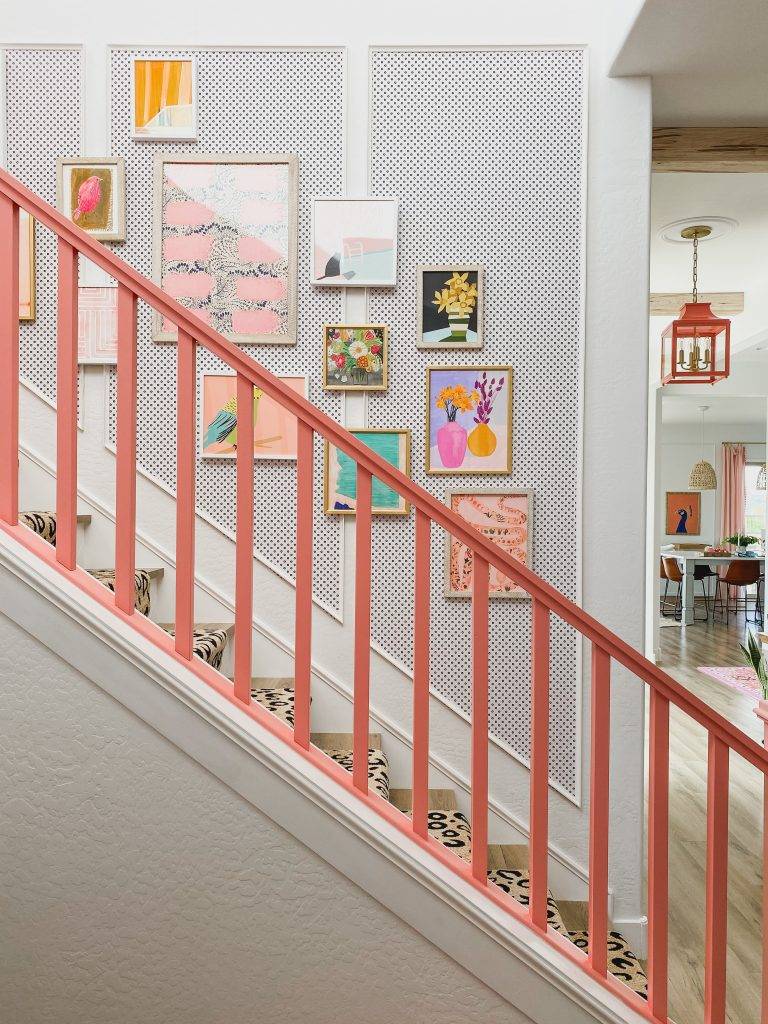
A gallery wall is one of our favorite accent wall ideas and is a great way to showcase your personality and interests while creating an accent wall. You can hang photos, artwork, and other decorative items in a collage-like arrangement to create a statement wall in any room of your house, from living room to bathroom. You can also mix and match different frame styles and sizes to create a unique and eye-catching display. Wall decor is perfect for renters and homeowners alike!
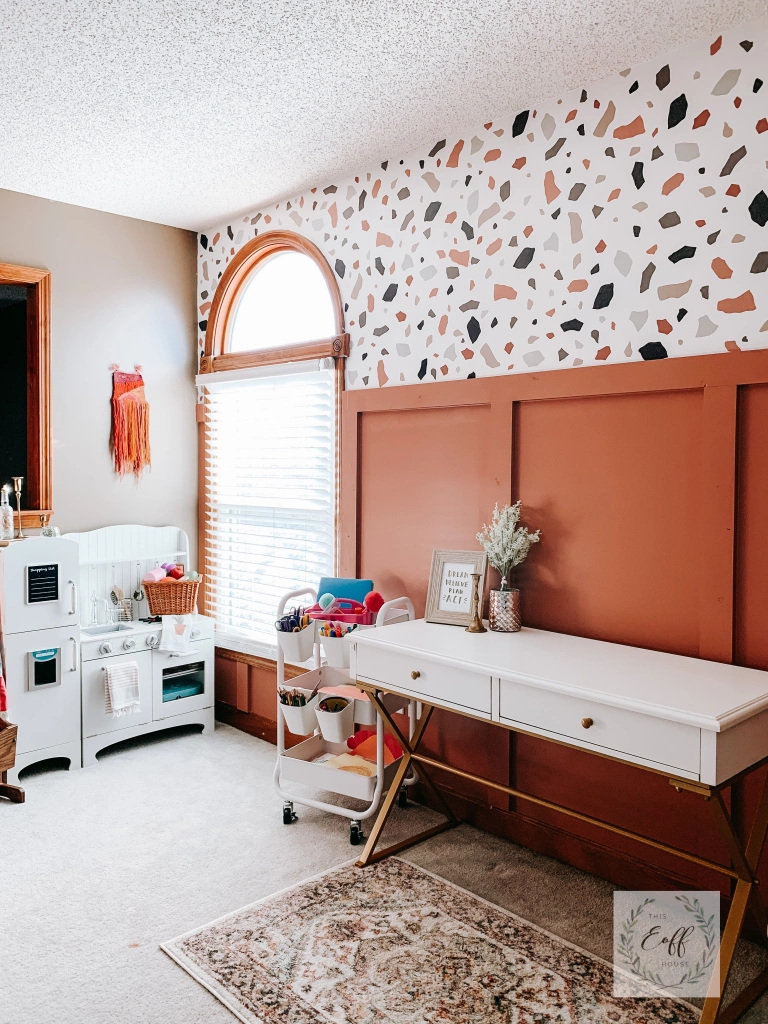
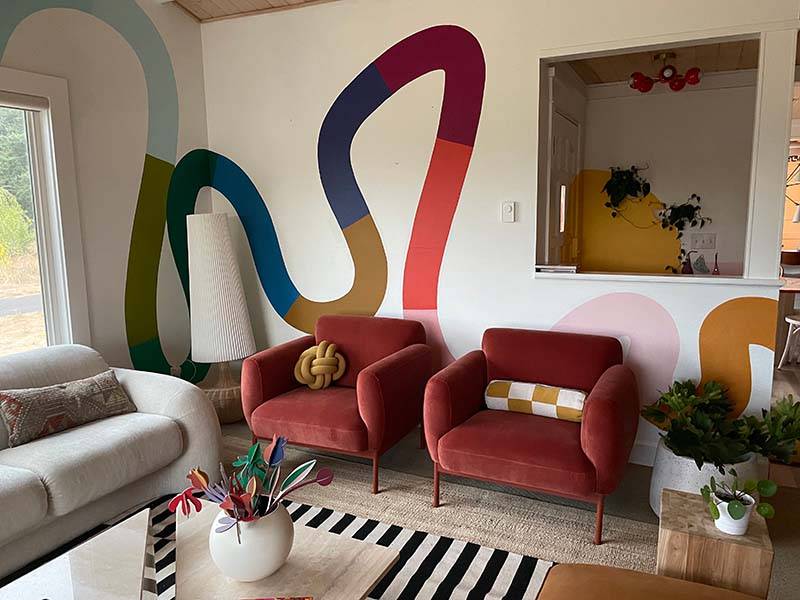
Finally, consider using bold patterns to transform your white walls and create an accent wall in your home. You can use patterned wallpaper, stencils, or even create your own patterns using paint or tape. Bold patterns can add a fun and playful touch to your home, and they’re a great way to showcase your creativity and design skills.
When done right, an accent wall can truly transform any room in your home. There are so many creative possibilities when it comes to creating an eye-catching design—from paint colors and wallpaper patterns to tile shapes and textures—that will bring character and personality into any space!
Whether you opt for something bold like two-tone paint effects or something more subtle like wood panels, adding an accent wall is always worth considering when looking for ways to spruce up your home interior design. Hope you enjoyed this roundup of some of our favorite accent wall ideas!
.tasty-pins-banner-container{display:block;margin-bottom:20px;position:relative;width:-moz-fit-content;width:fit-content}.tasty-pins-banner-container a{cursor:pointer;display:flex;font-size:14px;font-weight:700;letter-spacing:1px;line-height:1.8em;text-transform:uppercase}.tasty-pins-banner-container a:hover{opacity:1}.tasty-pins-banner-container .tasty-pins-banner{align-items:center;bottom:0;cursor:pointer;display:flex;justify-content:center;left:0;padding-bottom:1em;padding-top:1em;position:absolute;right:0}.tasty-pins-banner-container .tasty-pins-banner svg{margin-right:4px;width:32px}.tasty-pins-banner-container .tasty-pins-banner span{margin-top:4px}.tasty-pins-banner-container a.tasty-pins-banner{text-decoration:none}.tasty-pins-banner-container a.tasty-pins-banner:hover{opacity:.8}.tasty-pins-banner-container a.tasty-pins-banner-image-link{flex-direction:column}.tasty-pins-banner-container a img{margin-bottom:0}.entry-content .wp-block-image .tasty-pins-banner-container img{margin-bottom:0;padding-bottom:0}#et-boc .et-l div .et_pb_image_wrap .tasty-pins-banner-container .tasty-pins-banner{padding-bottom:1em!important;padding-top:1em;text-decoration:none}#et-boc .et-l div .et_pb_image_wrap .tasty-pins-banner-container a.tasty-pins-banner{cursor:pointer;display:flex;font-size:14px;font-weight:700;line-height:1.8em;text-transform:uppercase}#et-boc .et-l div .et_pb_image_wrap .tasty-pins-banner-container a.tasty-pins-banner span{letter-spacing:2px;margin-top:4px}.et-db #et-boc .et-l .et_pb_module .tasty-pins-banner-container a:not(.wc-forward){padding-bottom:0}Photo: Faith Towers Provencher
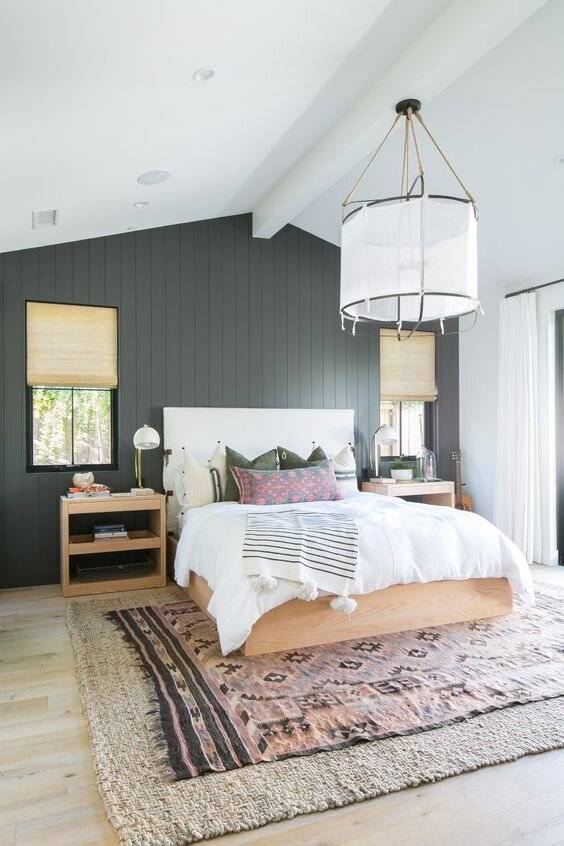
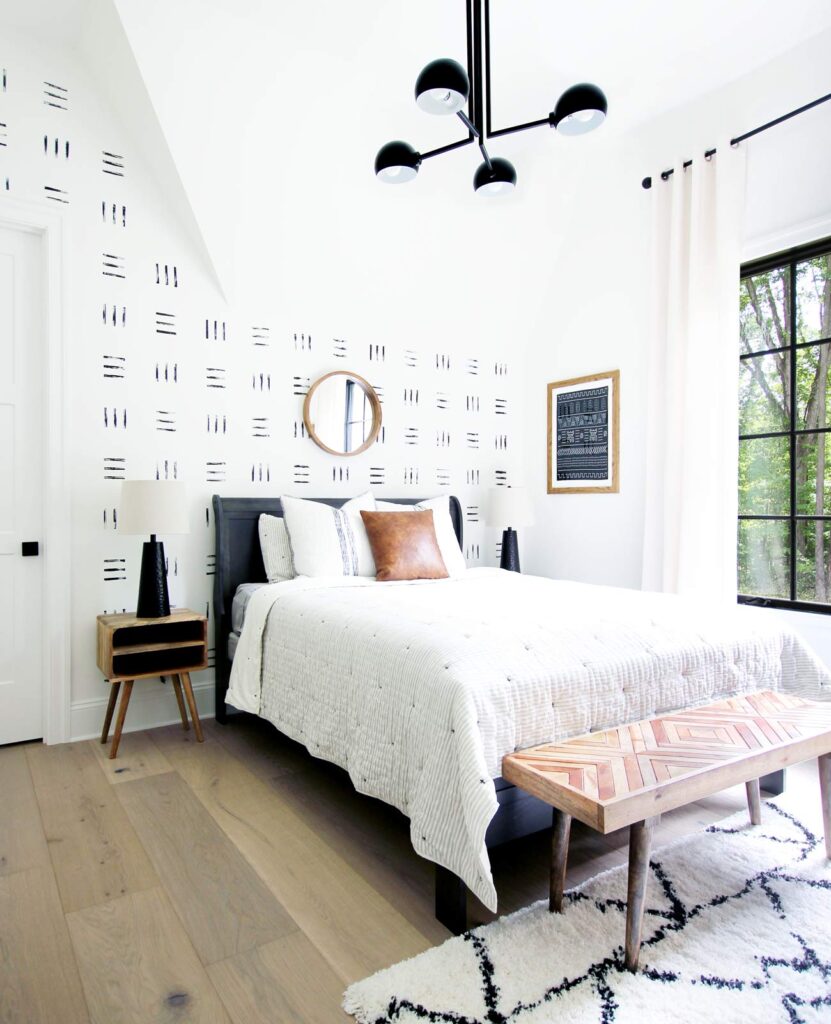
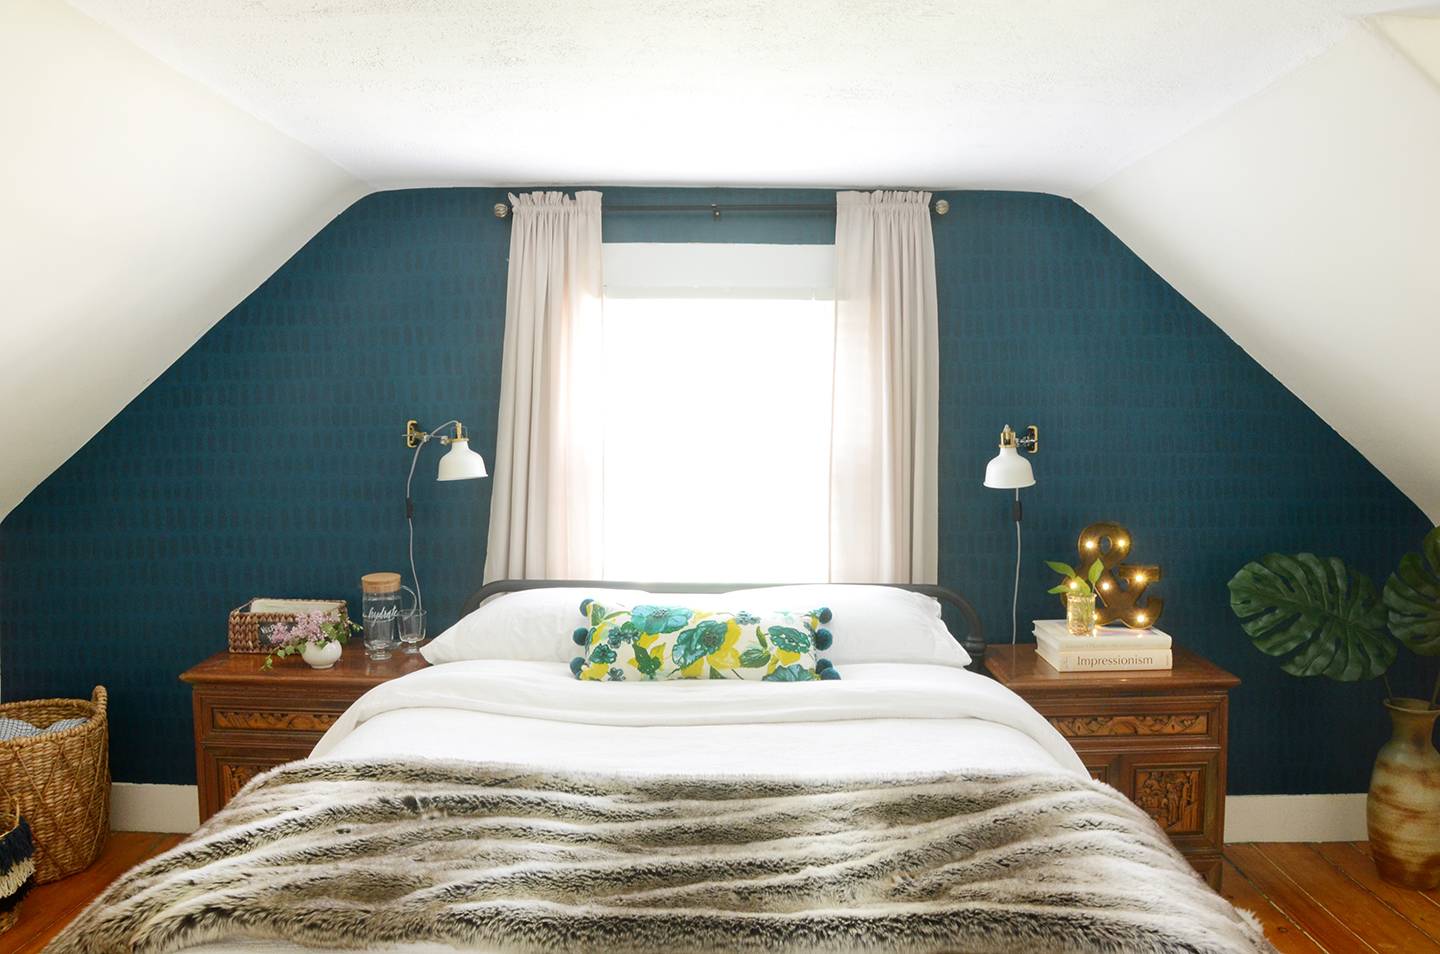
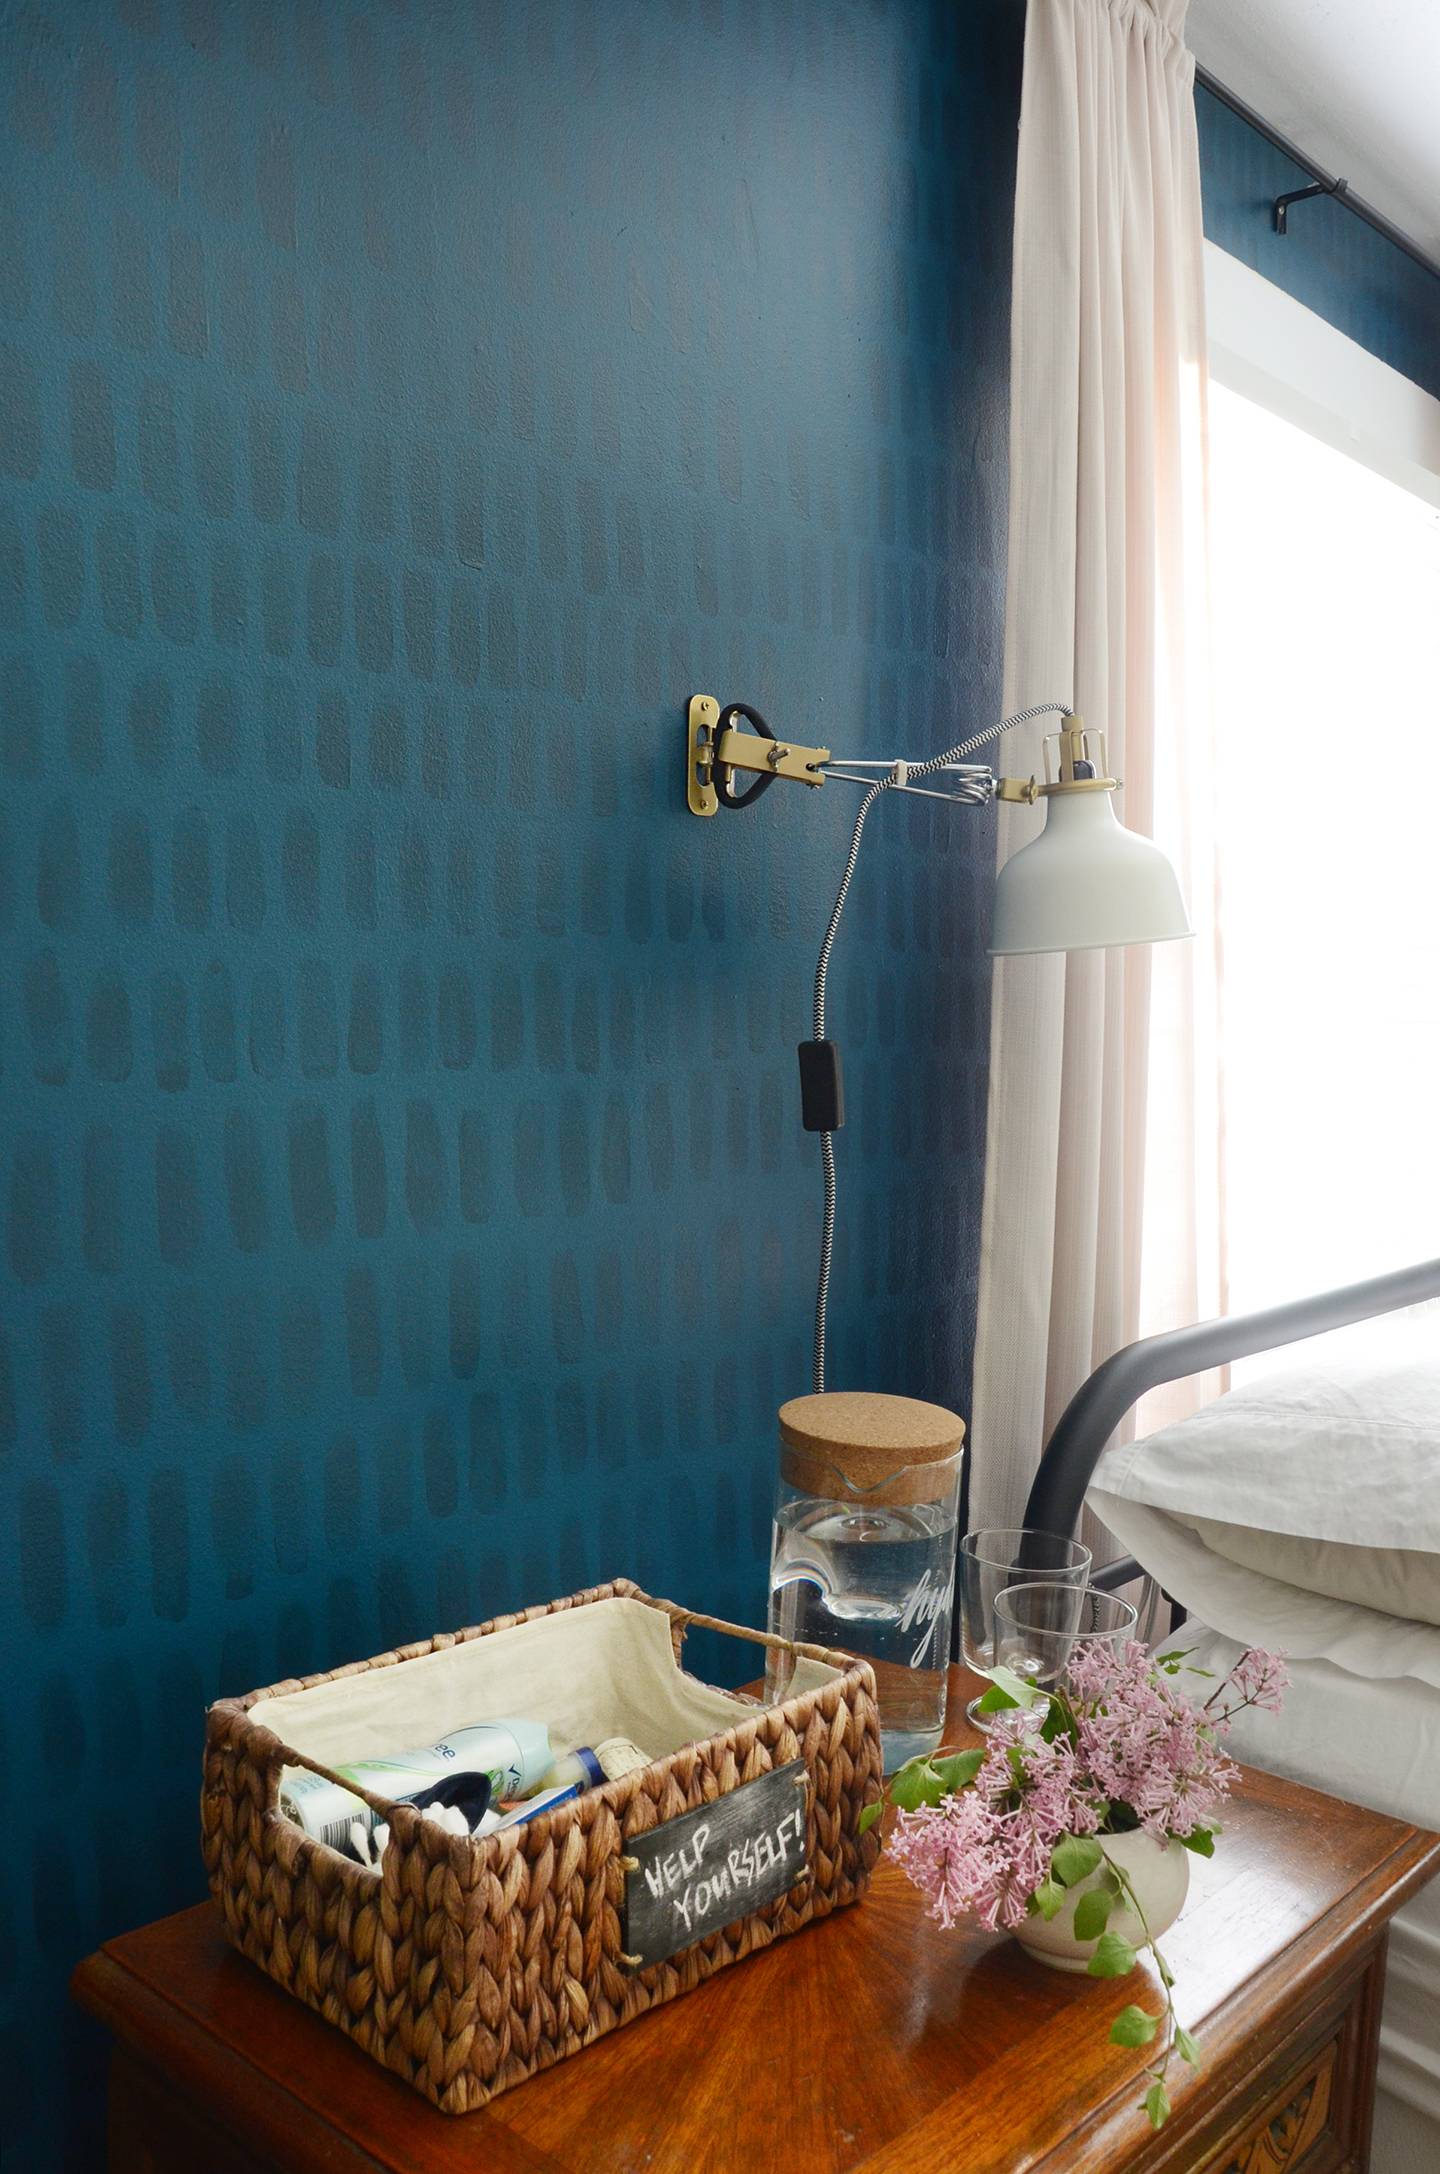
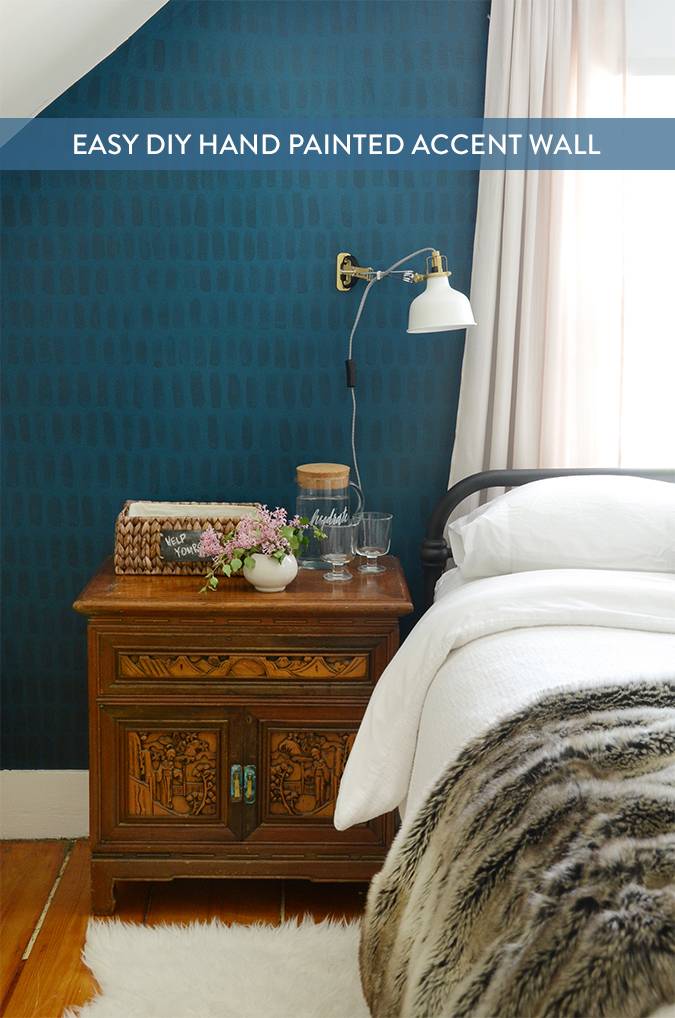
Your bedroom is your personal sanctuary, so why not make it stand out with an accent wall? This budget-friendly how-to for painting an accent wall in your bedroom is the easiest way to add a touch of personality and style to your space without all the fuss and expense of wallpaper.
Whether you’re looking for a way to refresh your space or create a cozy atmosphere, an accent wall can make all the difference. We added this accent wall design to our bedroom, where dark walls are relaxing, but you could you this same treatment in pastels or brighter colors in any other room in your house. So grab your paintbrush and get inspired!
How to Make a Hand-Painted Brushstroke Accent Wall
The textures and shades of this bedroom accent wall are for a minimal and relaxing vibe, but feel free to make it your own with different colors or hues for any room in your house, from living room to dining room or your home office.
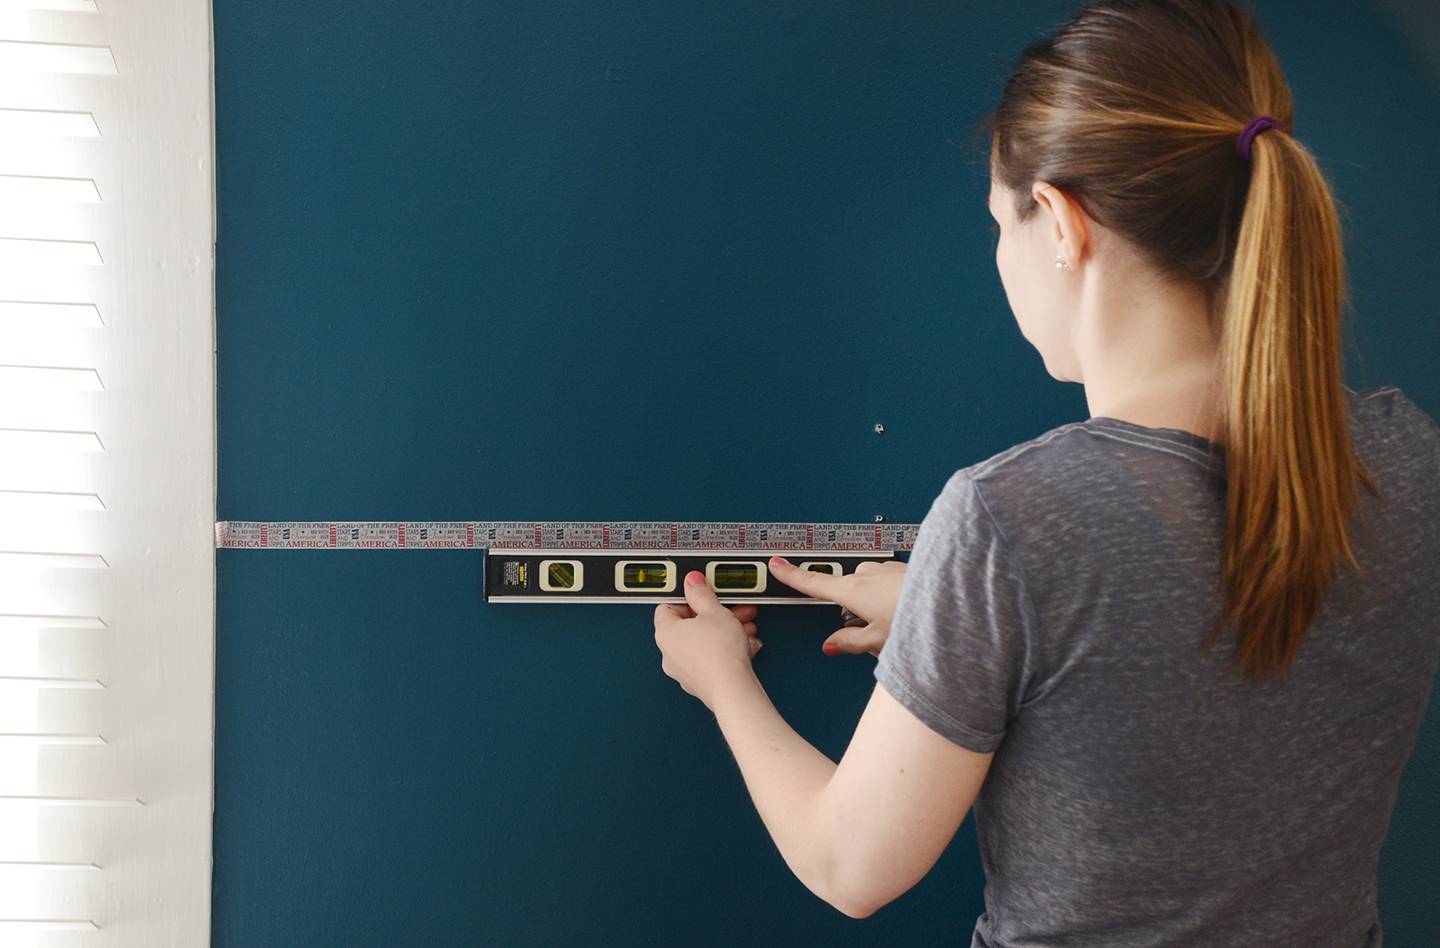
Step 1
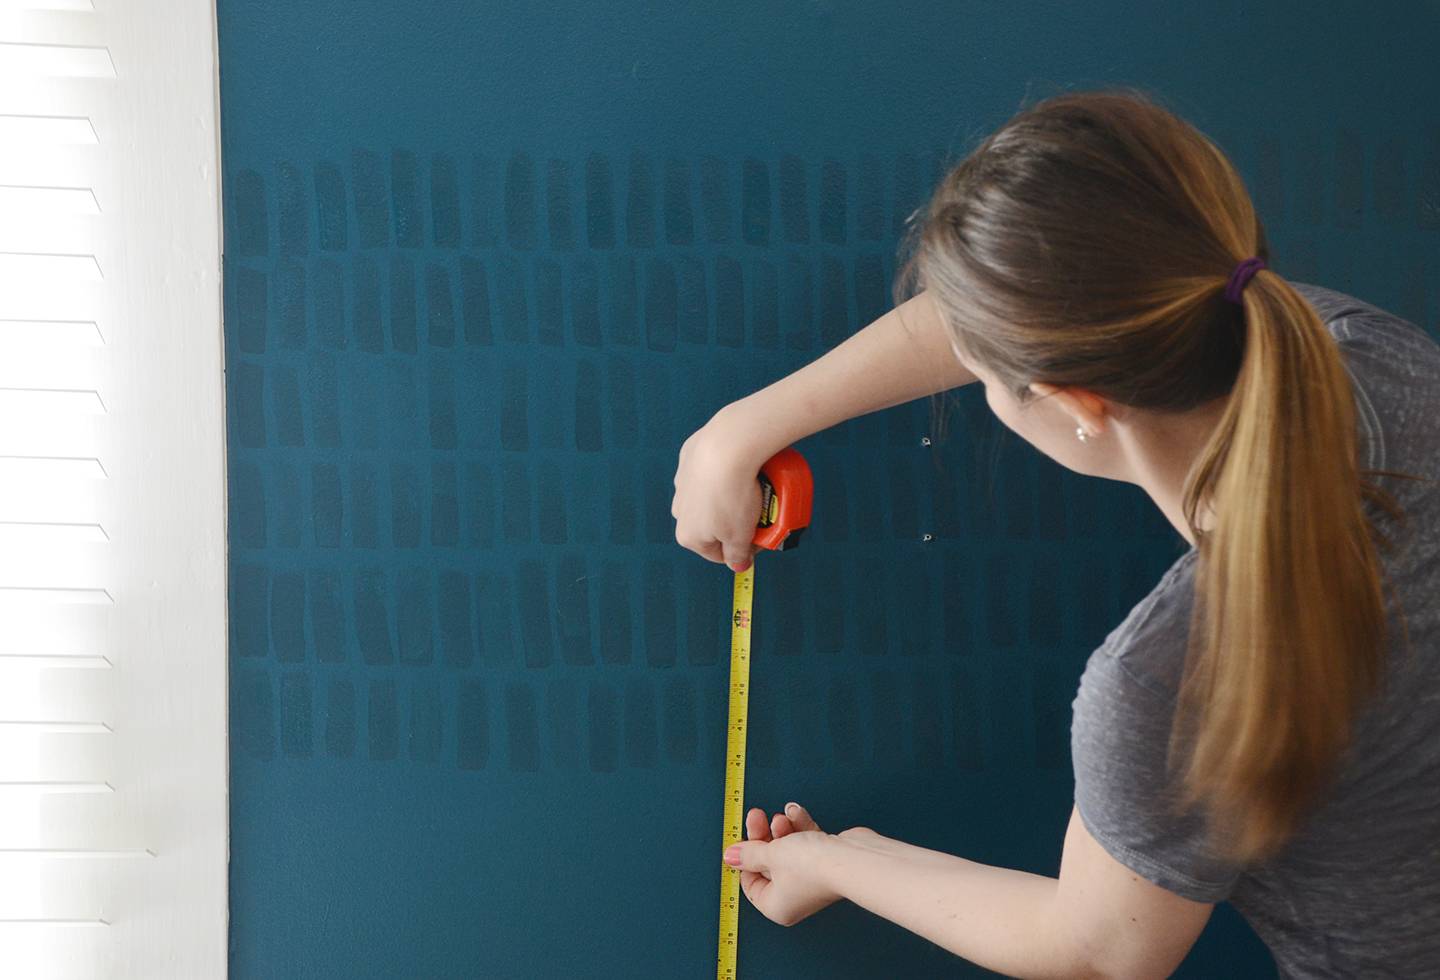
Begin by stretching a piece of washi tape across the wall, somewhere in the middle. Attach it lightly, and then use a level to make sure it is straight.
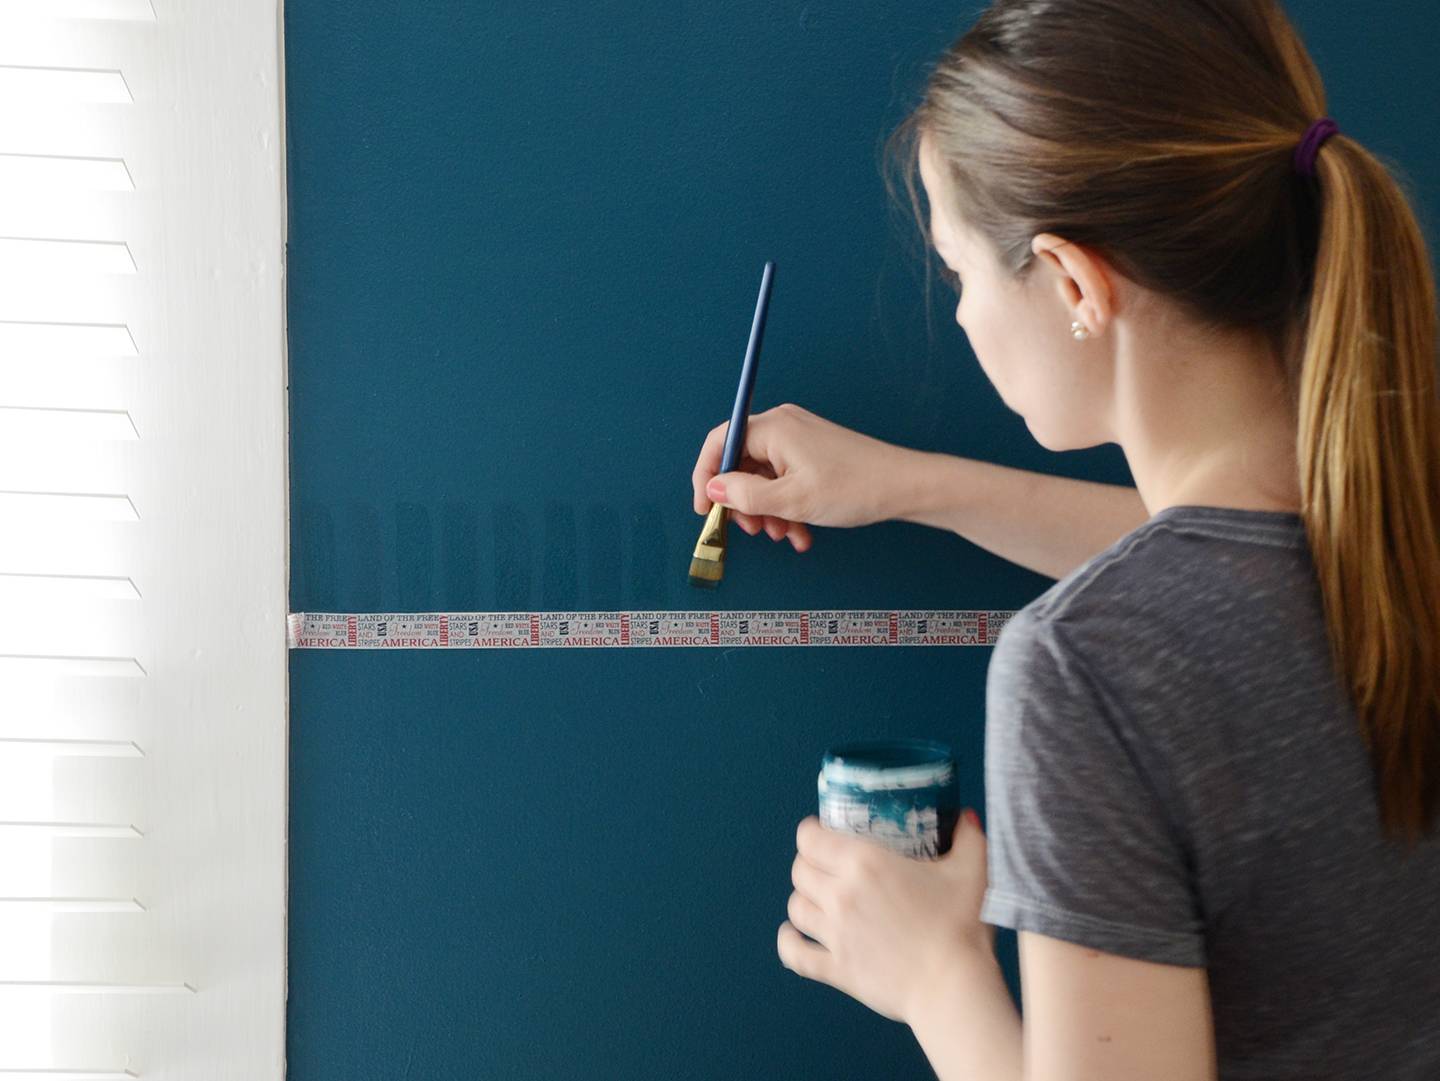
Next, mix a small amount of black with your wall color. I used about a 1 to 10 ratio of black to blue. Mix it up really well and test it in an inconspicuous area. Let it dry and see how you like the color. Mine looked almost the same as the original color when wet, but dried darker.
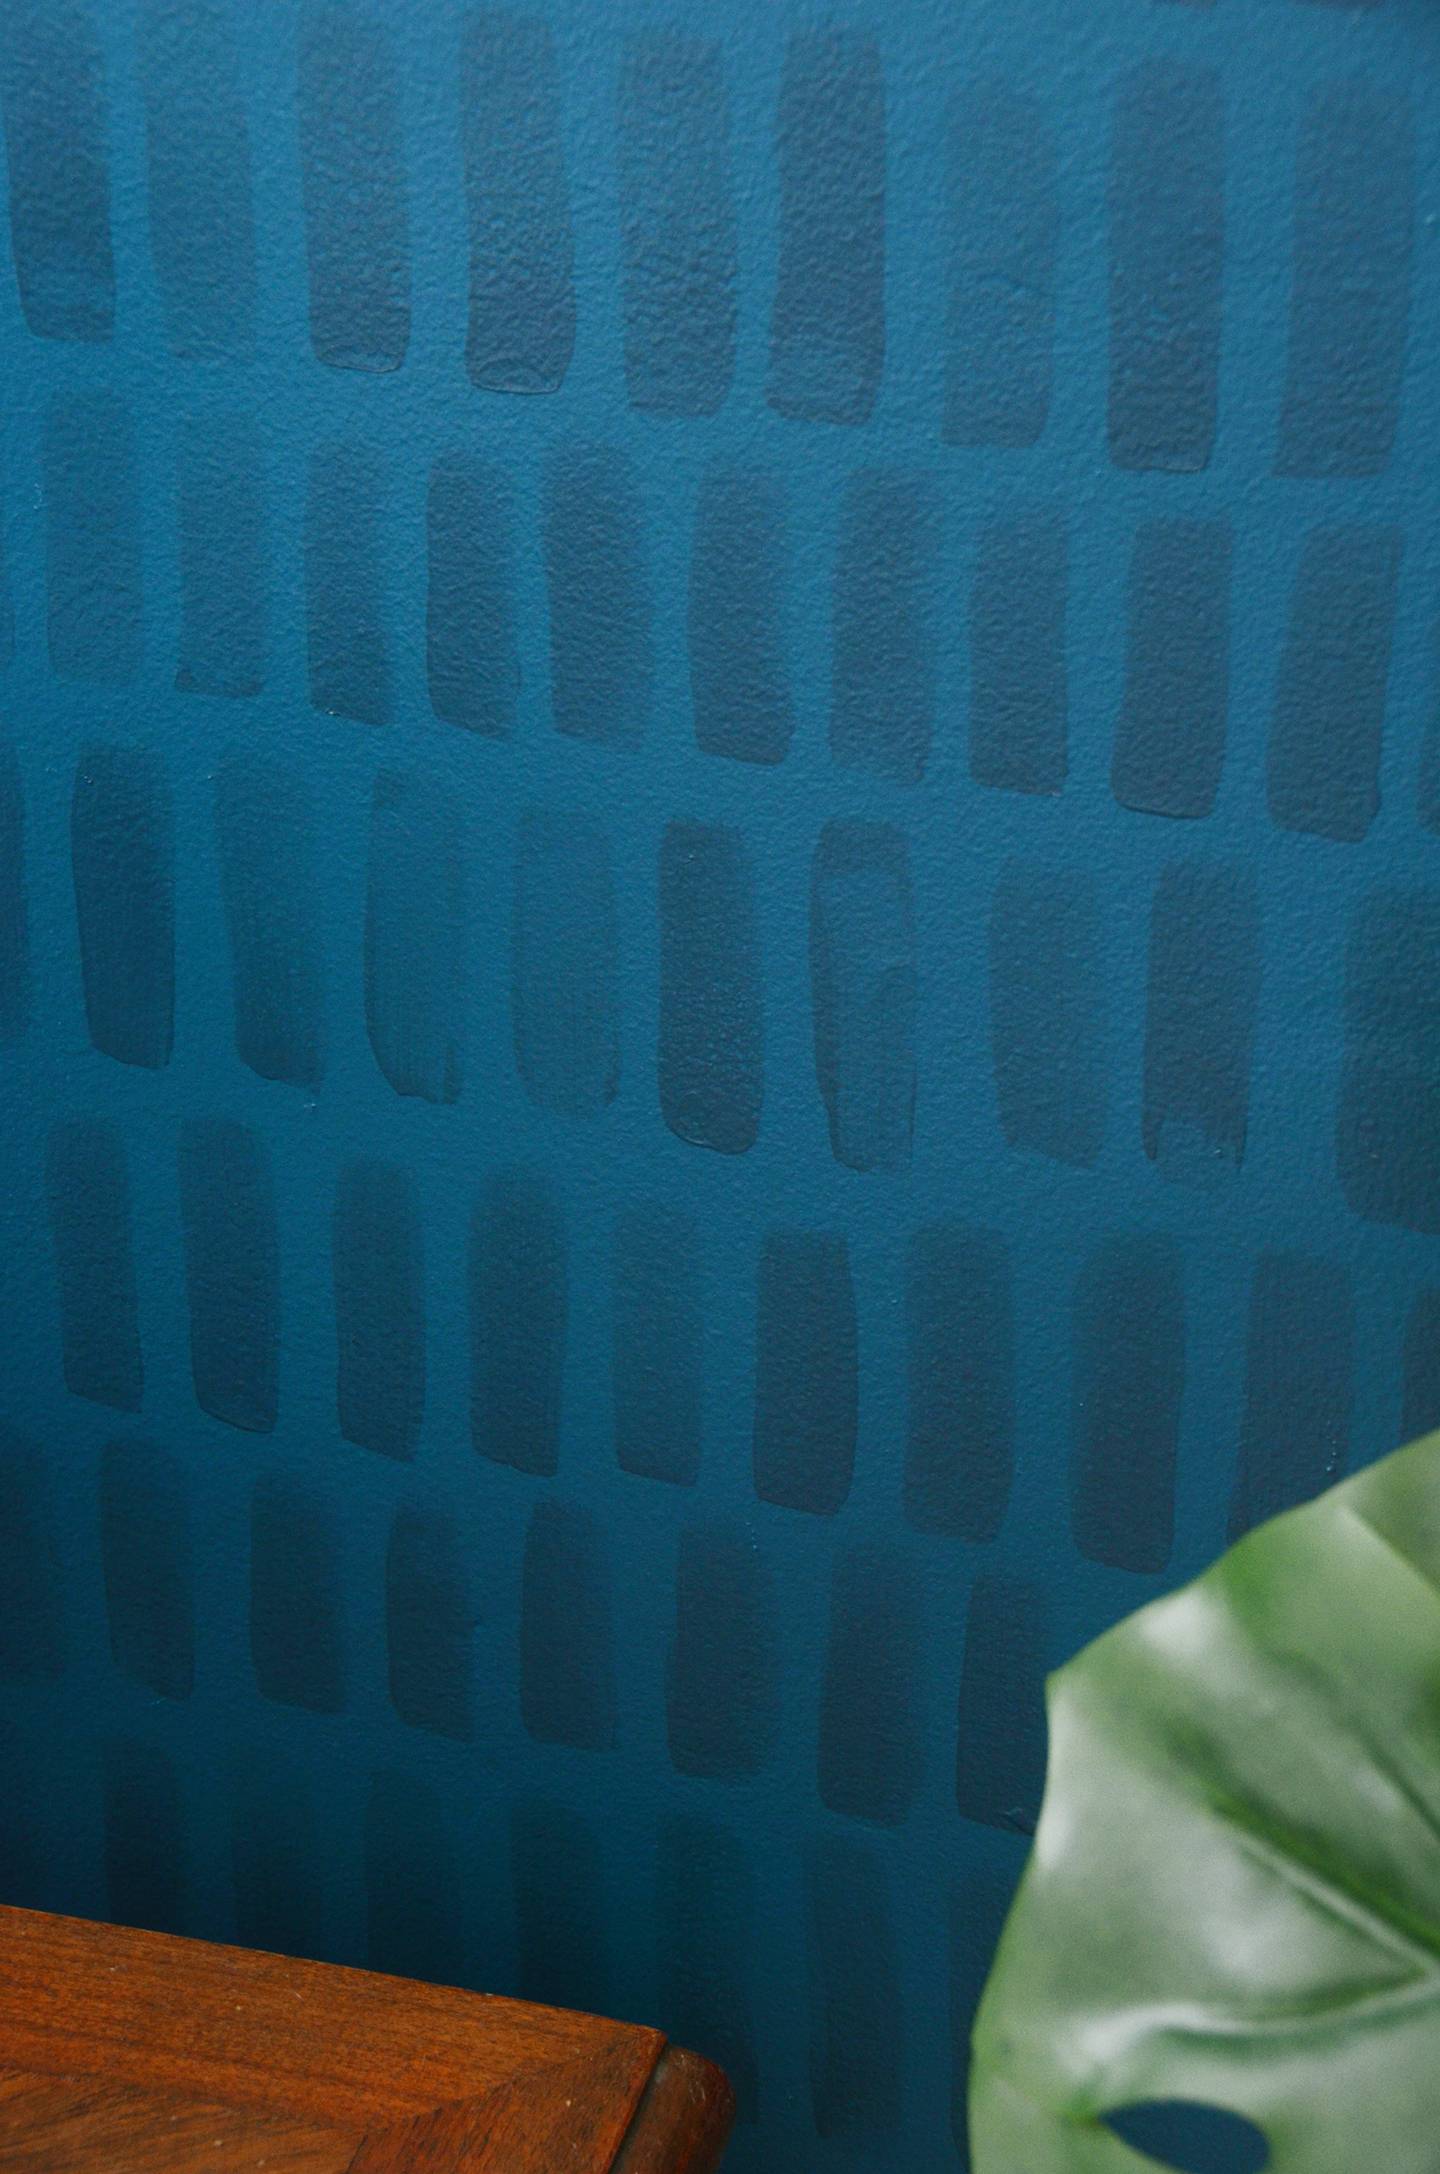
Once you’ve decided on your color, begin making brush strokes above the tape. They should be about 3 inches tall, and I had the best luck going from bottom to top.
Continue painting all the way across the wall, and then do additional rows below. You can apply the tape each time if you want to let each row dry in between, but I was going for a more casual look so I did it freehand. I periodically measured up to the bottom of one side of the row and compared it with the other side of the same row to make sure I wasn’t going diagonally instead of straight across.
Continue on until you’ve finished your entire wall, and voilà – you have a fun patterned accent wall that will add some serious character to your space.
I think it looks a bit like crocodile skin, in a subtle way. But if it’s not bold enough for you, feel free to add more black! Check out what a difference a pattern makes… here’s our original guest room before the big makeover.
.tasty-pins-banner-container{display:block;margin-bottom:20px;position:relative;width:-moz-fit-content;width:fit-content}.tasty-pins-banner-container a{cursor:pointer;display:flex;font-size:14px;font-weight:700;letter-spacing:1px;line-height:1.8em;text-transform:uppercase}.tasty-pins-banner-container a:hover{opacity:1}.tasty-pins-banner-container .tasty-pins-banner{align-items:center;bottom:0;cursor:pointer;display:flex;justify-content:center;left:0;padding-bottom:1em;padding-top:1em;position:absolute;right:0}.tasty-pins-banner-container .tasty-pins-banner svg{margin-right:4px;width:32px}.tasty-pins-banner-container .tasty-pins-banner span{margin-top:4px}.tasty-pins-banner-container a.tasty-pins-banner{text-decoration:none}.tasty-pins-banner-container a.tasty-pins-banner:hover{opacity:.8}.tasty-pins-banner-container a.tasty-pins-banner-image-link{flex-direction:column}.tasty-pins-banner-container a img{margin-bottom:0}.entry-content .wp-block-image .tasty-pins-banner-container img{margin-bottom:0;padding-bottom:0}#et-boc .et-l div .et_pb_image_wrap .tasty-pins-banner-container .tasty-pins-banner{padding-bottom:1em!important;padding-top:1em;text-decoration:none}#et-boc .et-l div .et_pb_image_wrap .tasty-pins-banner-container a.tasty-pins-banner{cursor:pointer;display:flex;font-size:14px;font-weight:700;line-height:1.8em;text-transform:uppercase}#et-boc .et-l div .et_pb_image_wrap .tasty-pins-banner-container a.tasty-pins-banner span{letter-spacing:2px;margin-top:4px}.et-db #et-boc .et-l .et_pb_module .tasty-pins-banner-container a:not(.wc-forward){padding-bottom:0}
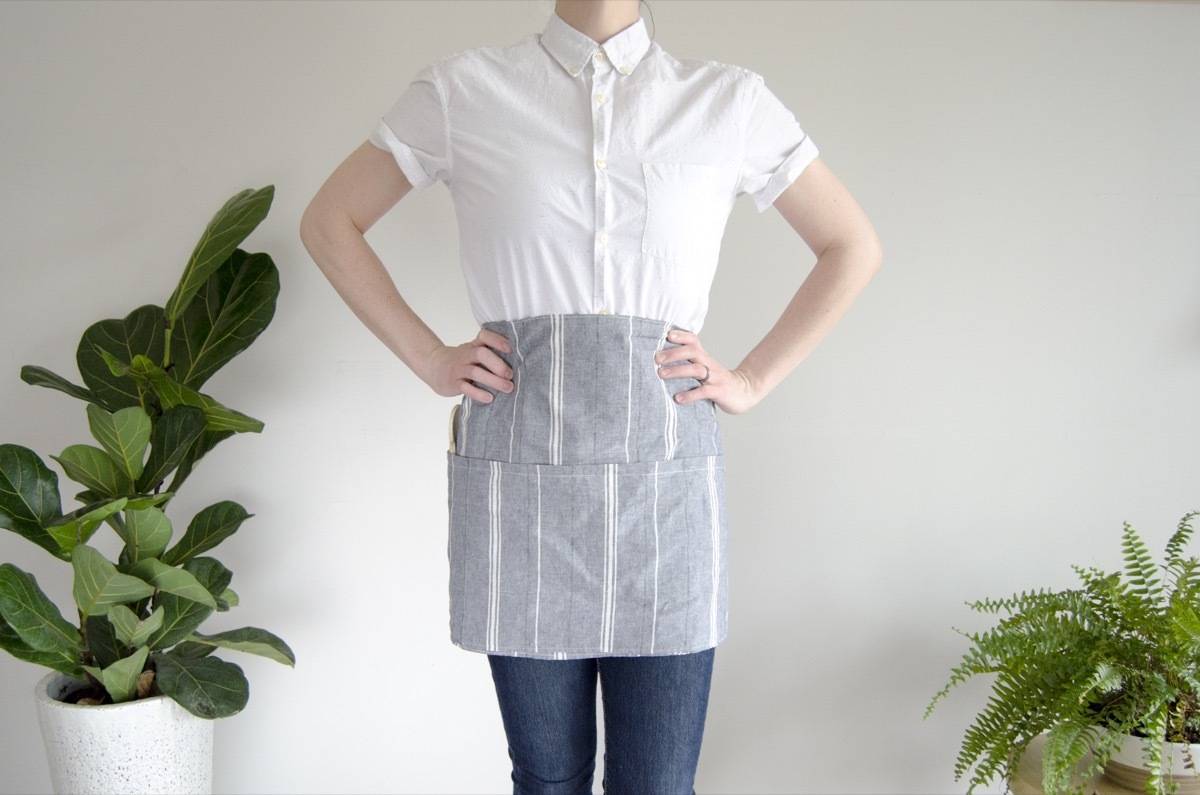
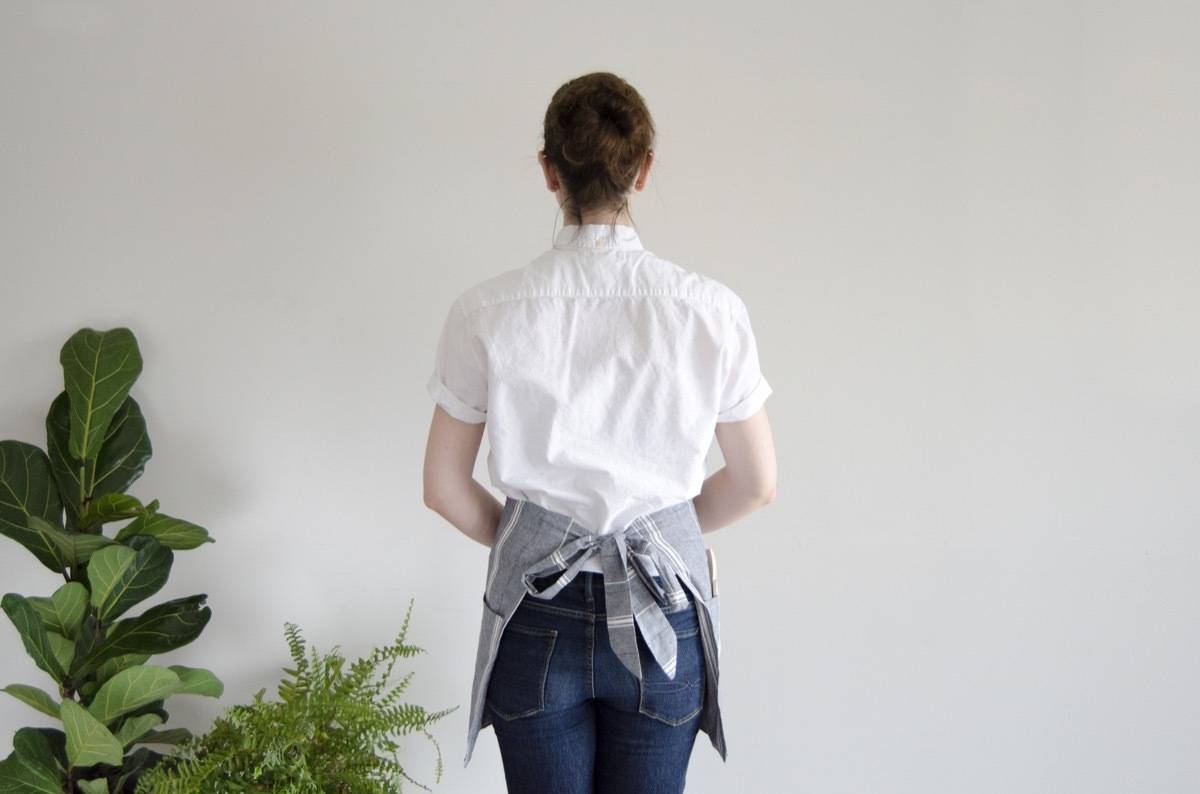
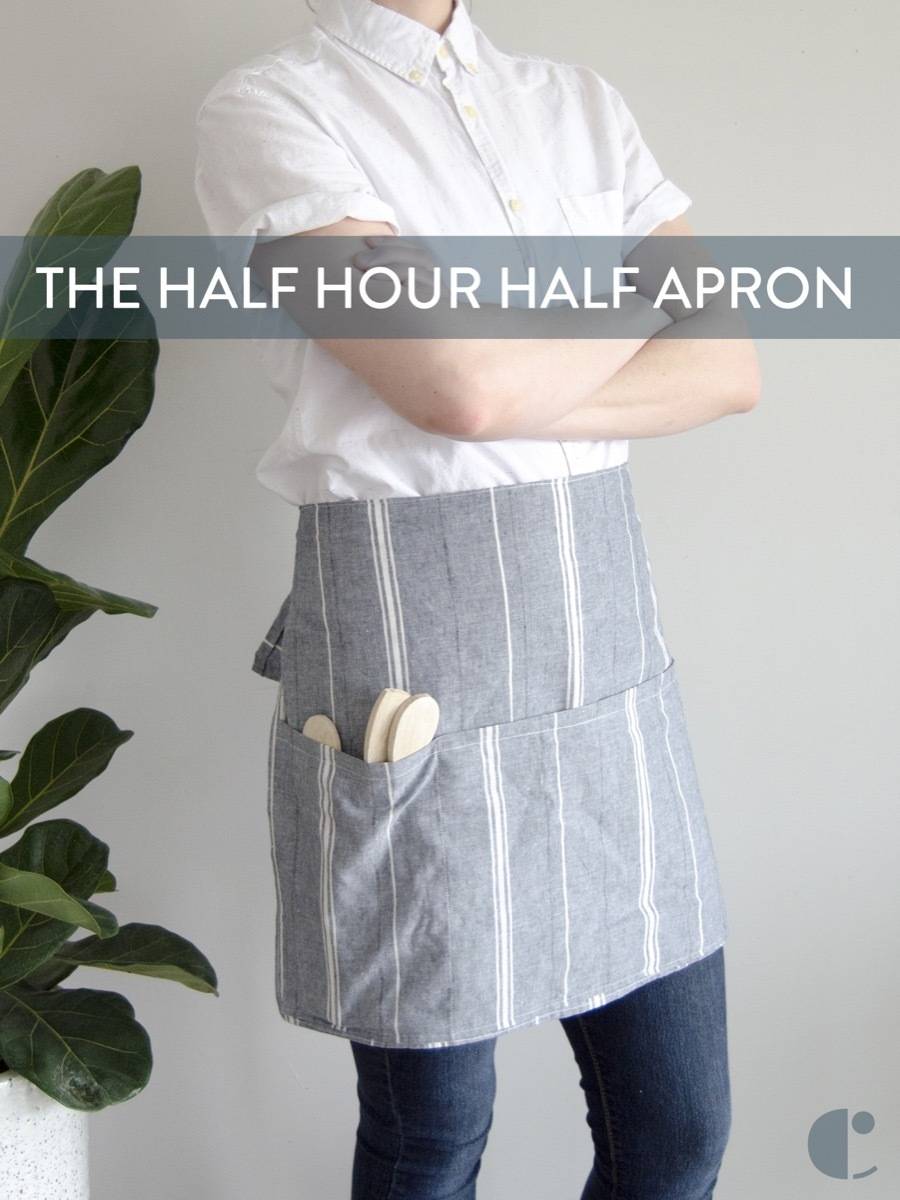
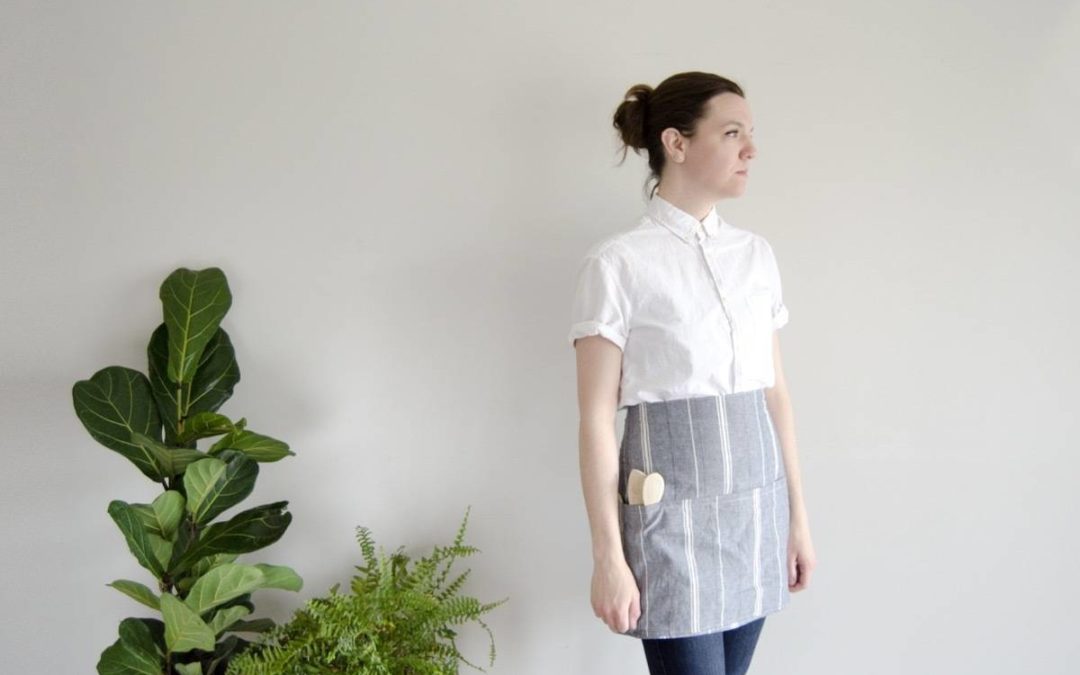
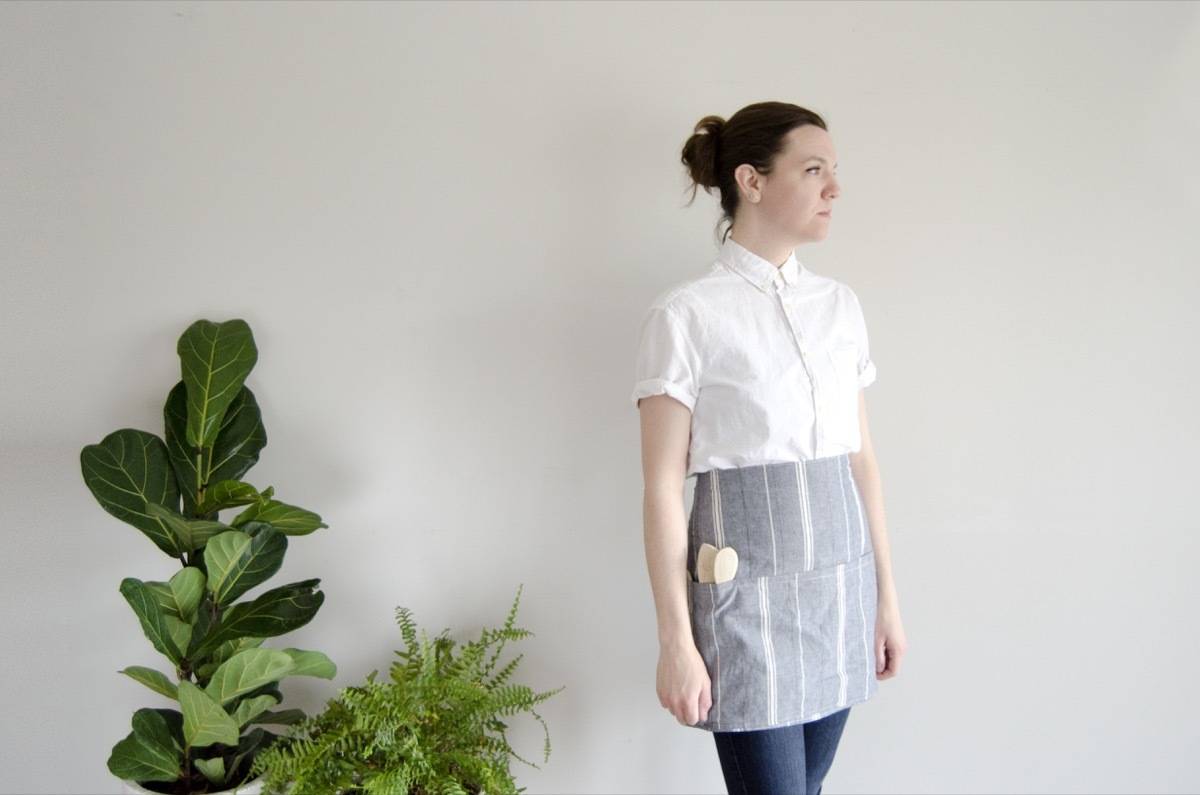
Are you ready for a crazy-quick sewing project? I’m calling this the “half hour half apron” because it’s one of the fastest sewing projects I think I’ve ever completed. Honestly, if I busted out a few more of these half aprons, I believe I could get my time down to 15 minutes. No sweat. My point is, this half apron is a breeze to make. This is a perfect project for beginner sewers. Plus, who doesn’t need an adorable handmade apron in their kitchen?
This half apron is made up entirely of rectangles, all of which are the same width. You only need to be able to single stitch in a straight line, and you don’t need a pattern. You guys – if you’ve ever doubted that you could sew something, this is not that project! I’ve even put together a video so you can watch how to stitch this half apron together. Watch on, or keep reading for the step-by-step guide.
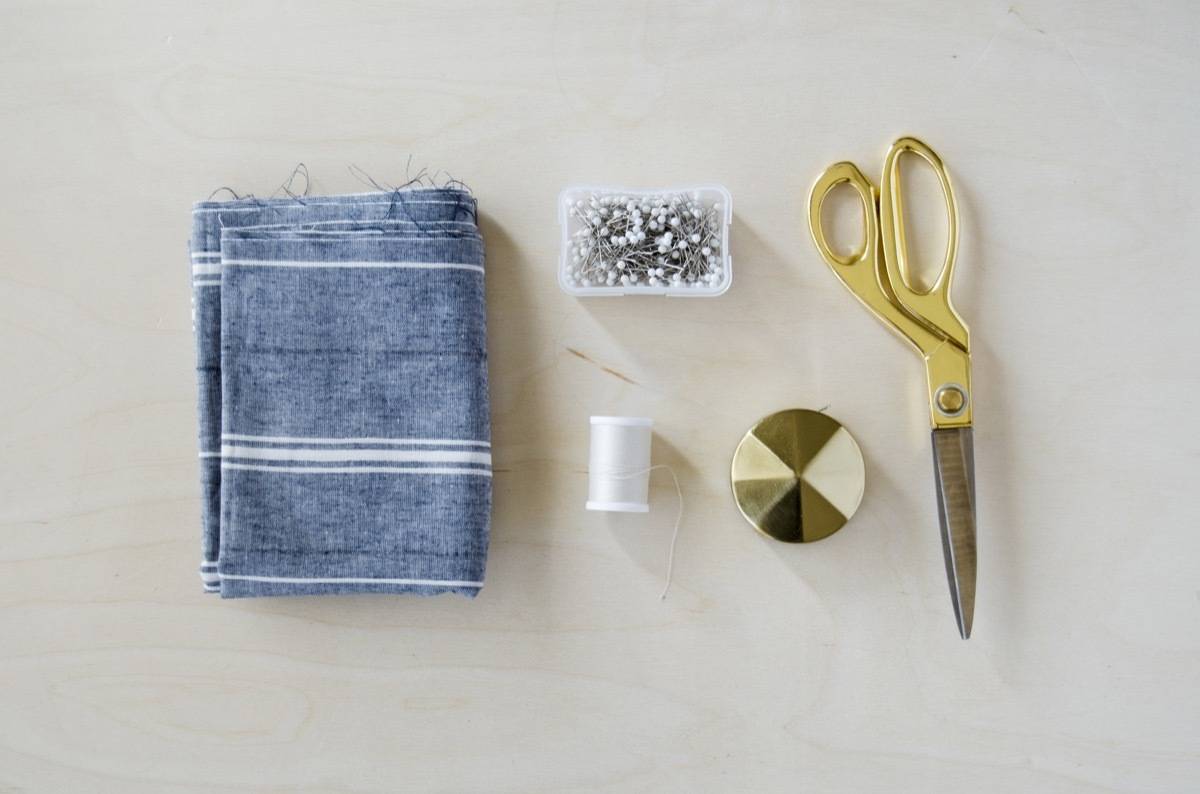
Materials
28″ of non-stretchy fabric (with a width of 58″)
Matching thread
Scissors
Sewing machine and notions
Iron and ironing board
Step
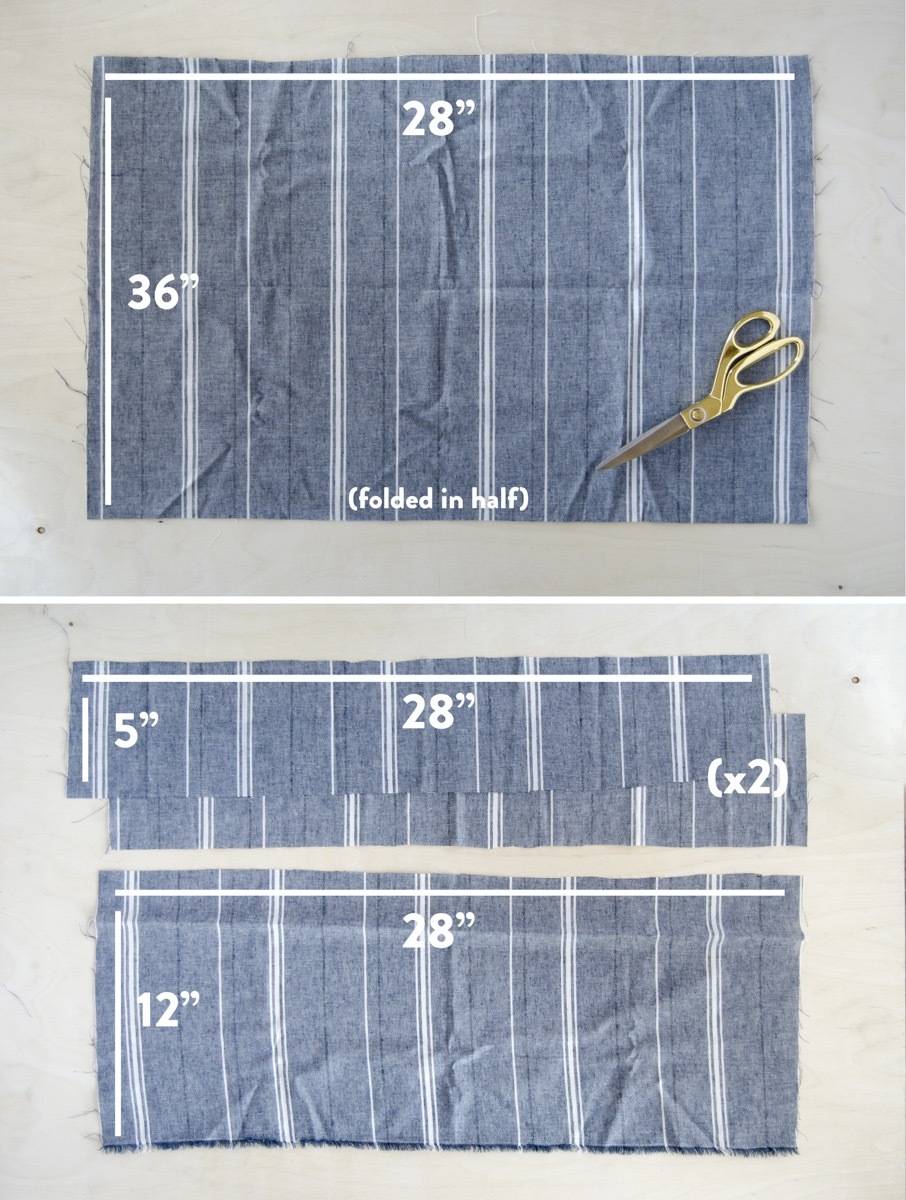
Start by cutting the pieces. There are four pieces total, all cut at a 28″ width.
The first piece is the body of the apron, and is 28″ wide and 36″ tall (in the picture this piece is folded in half lengthwise).
The straps are made up of two identical pieces, both 28″ wide and 5″ tall.
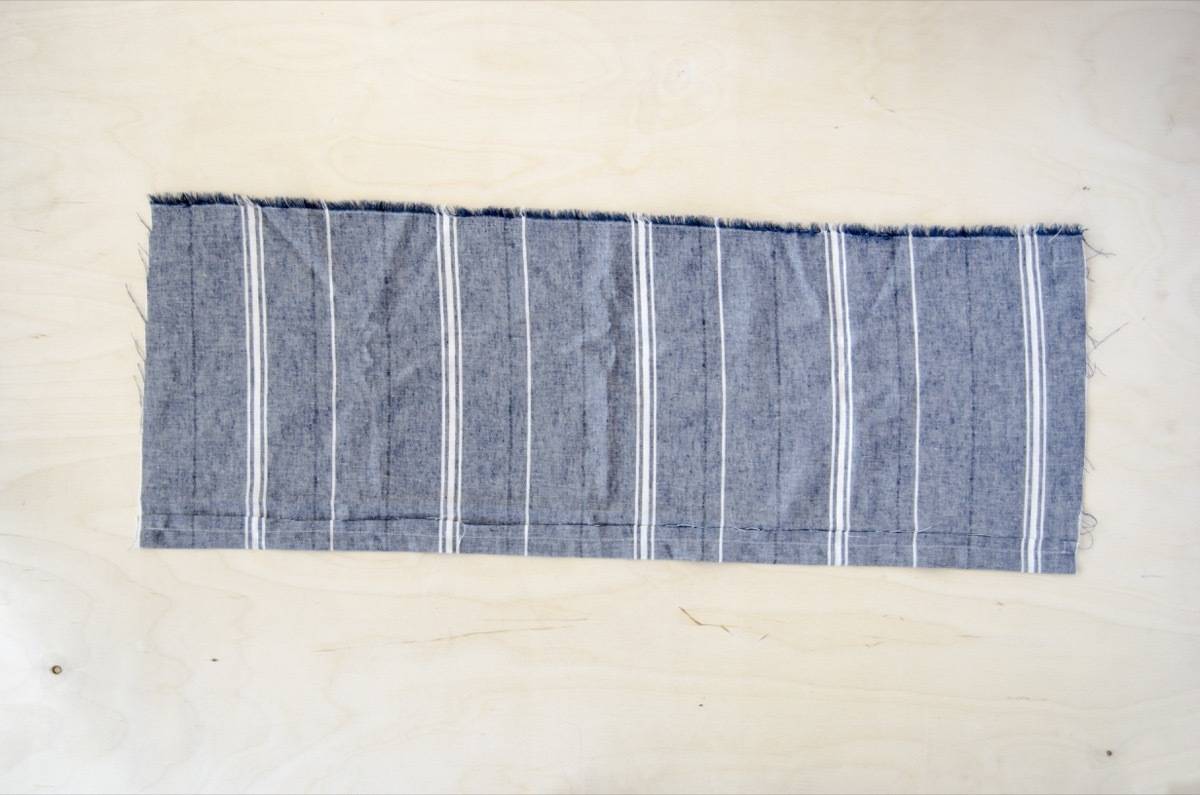
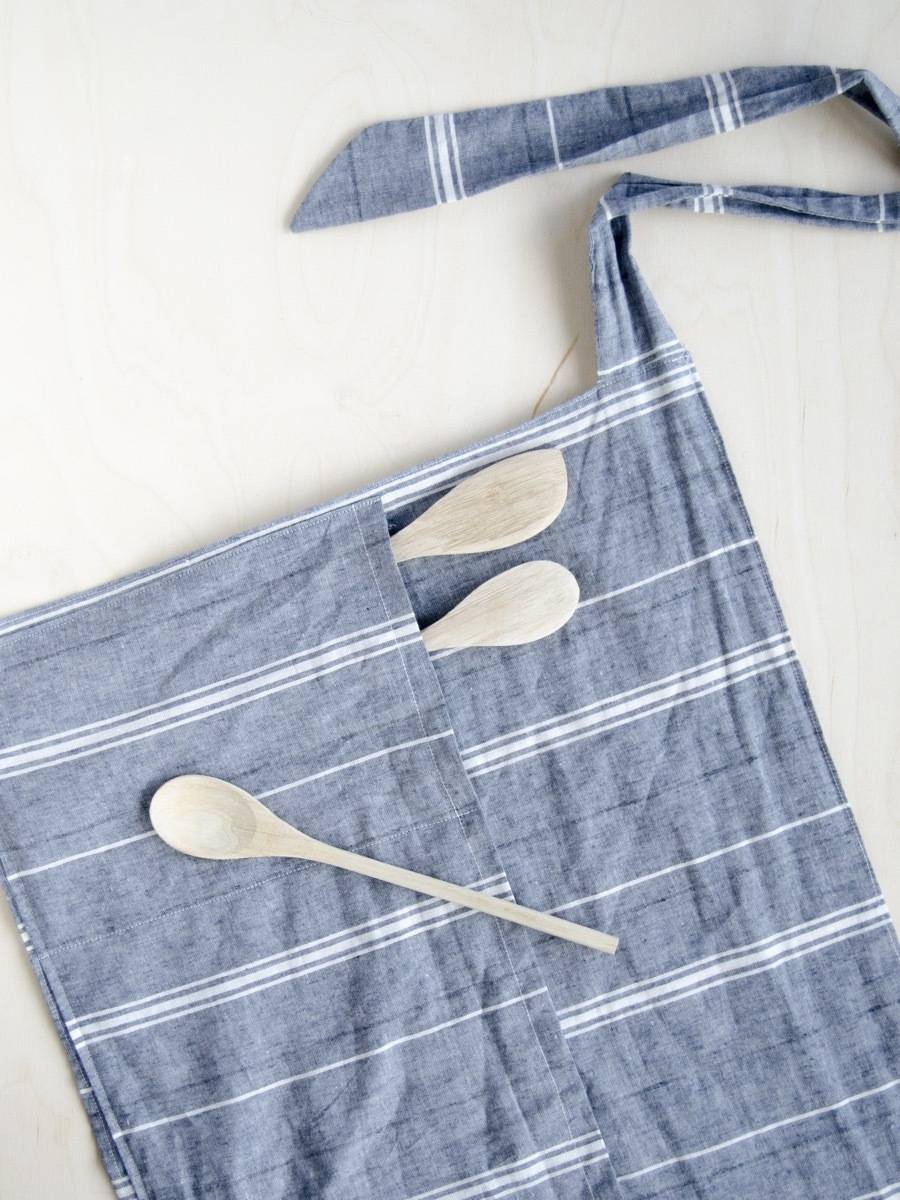
Finally, the pocket is what’s left of your original piece of fabric, being 28″ wide and 12″ tall.
Step
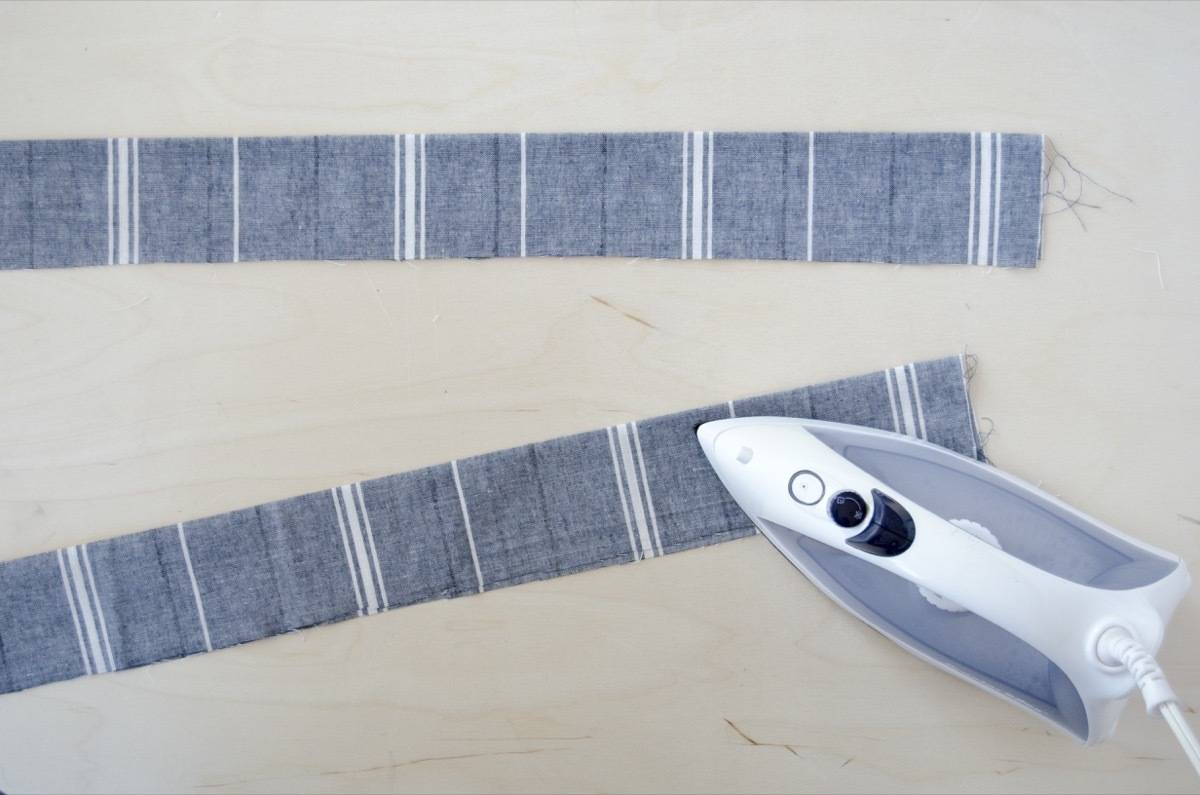
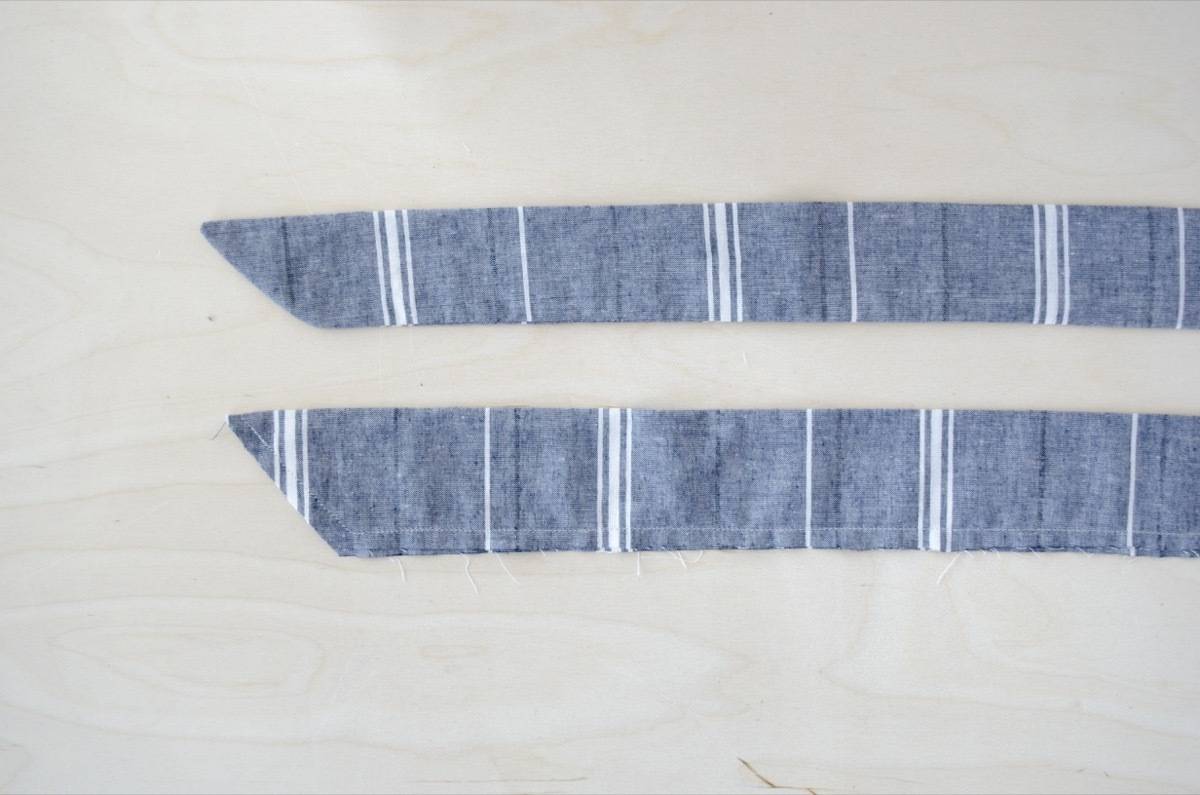
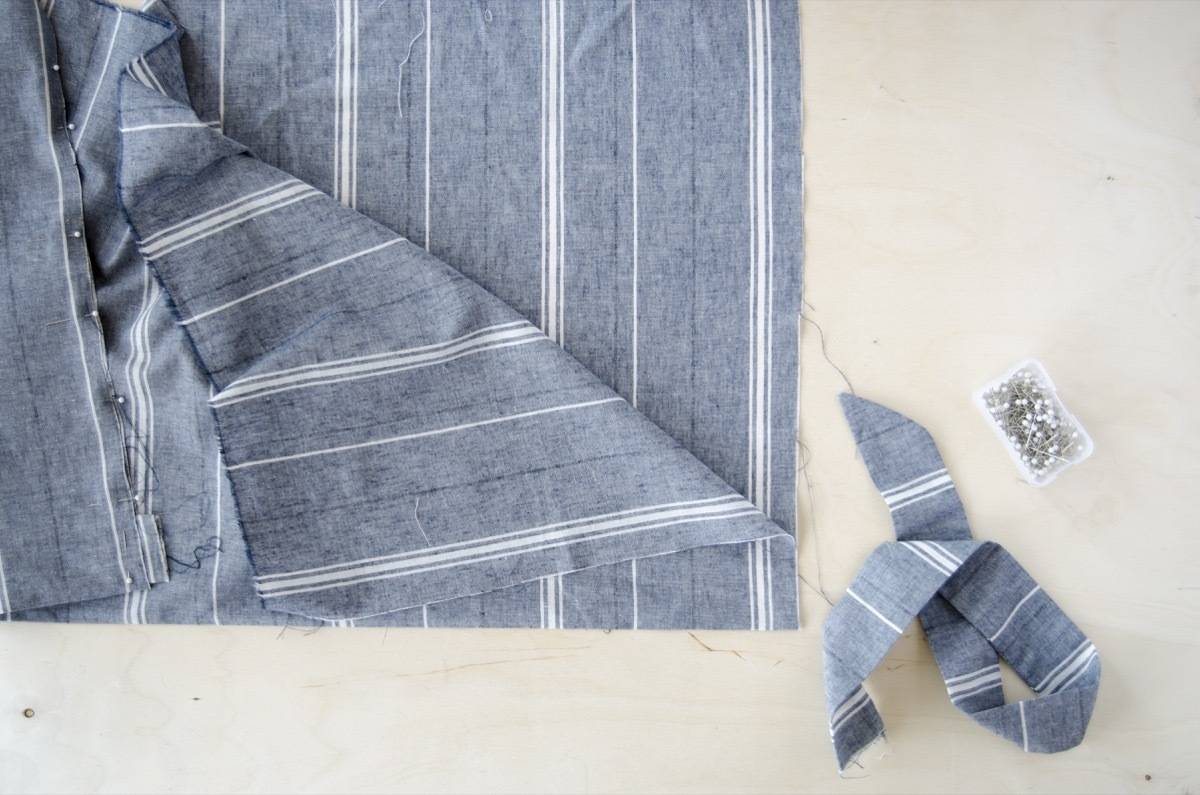
Let’s start with the straps. Fold each strap piece in half, right sides in. Iron the fold flat.
Using a straight stitch, sew down the long side of each strap. At one end, make a 90-degree turn and sew to the opposite corner, creating a right angle.
Turn the straps right-side out, and press.
Step
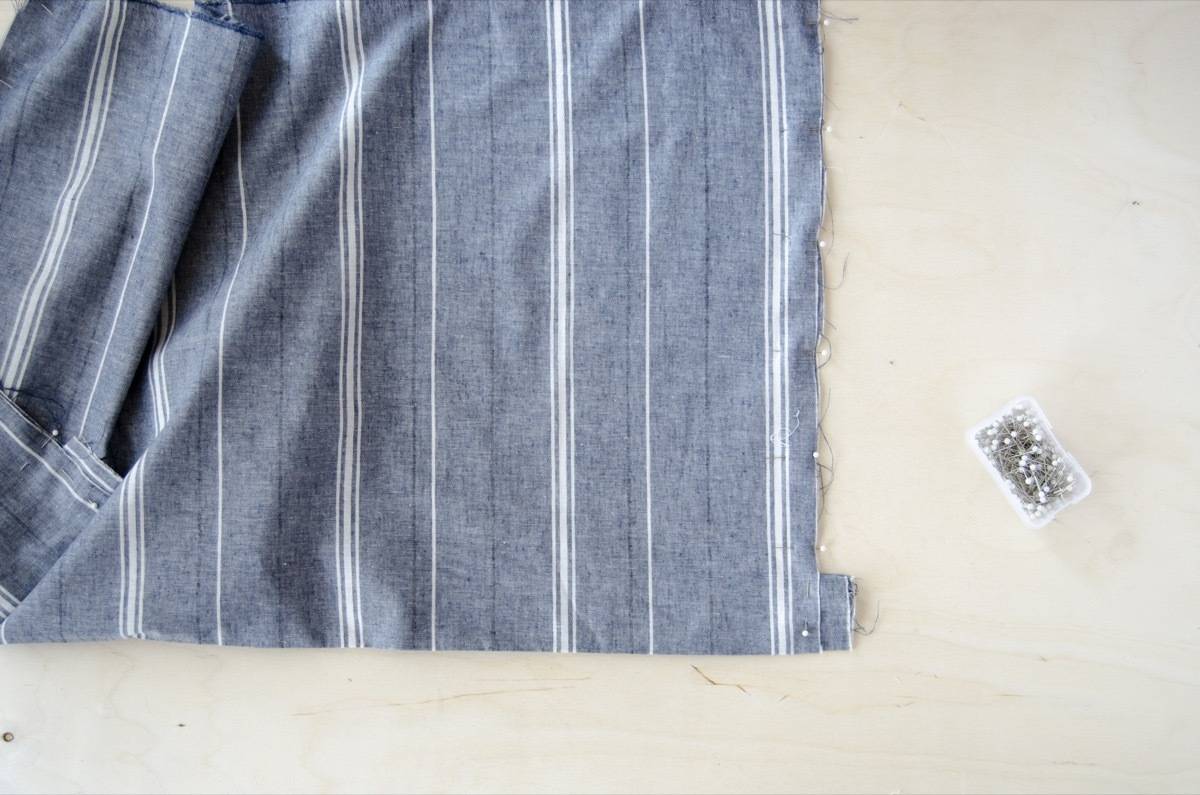
Now to attach the straps to the body of the apron. Take the largest piece of fabric, and fold it in half right side in. It should measure 28″ wide and 18″ tall when folded. Open the fold, and pin the raw end of one strap to the inside of the fold, with the strap leading inside the folded fabric. Repeat with the other strap on the other side of the fold. Both straps should sit inside the folded fabric.
Pin up the sides of the folded fabric. Do the same along the bottom, but leave a 3-4 inch gap in the middle.
With a straight stitch, stitch along the three sides where you pinned, sewing the straps in place. Do not sew across the gap in the bottom.
Step
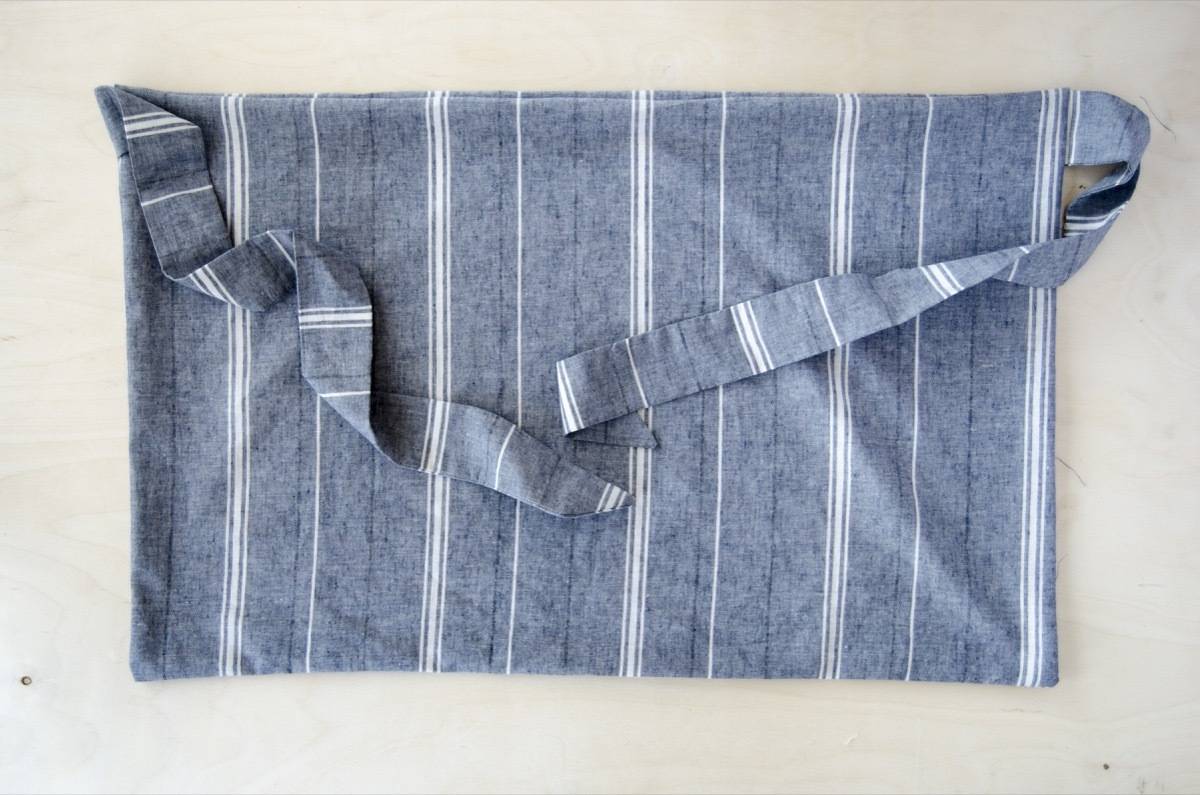
Through the gap along the bottom, turn the apron right-side out. Iron flat.
Step
And finally, the pocket! Press and sew a 1/4 inch hem along one long side of pocket fabric.
Step
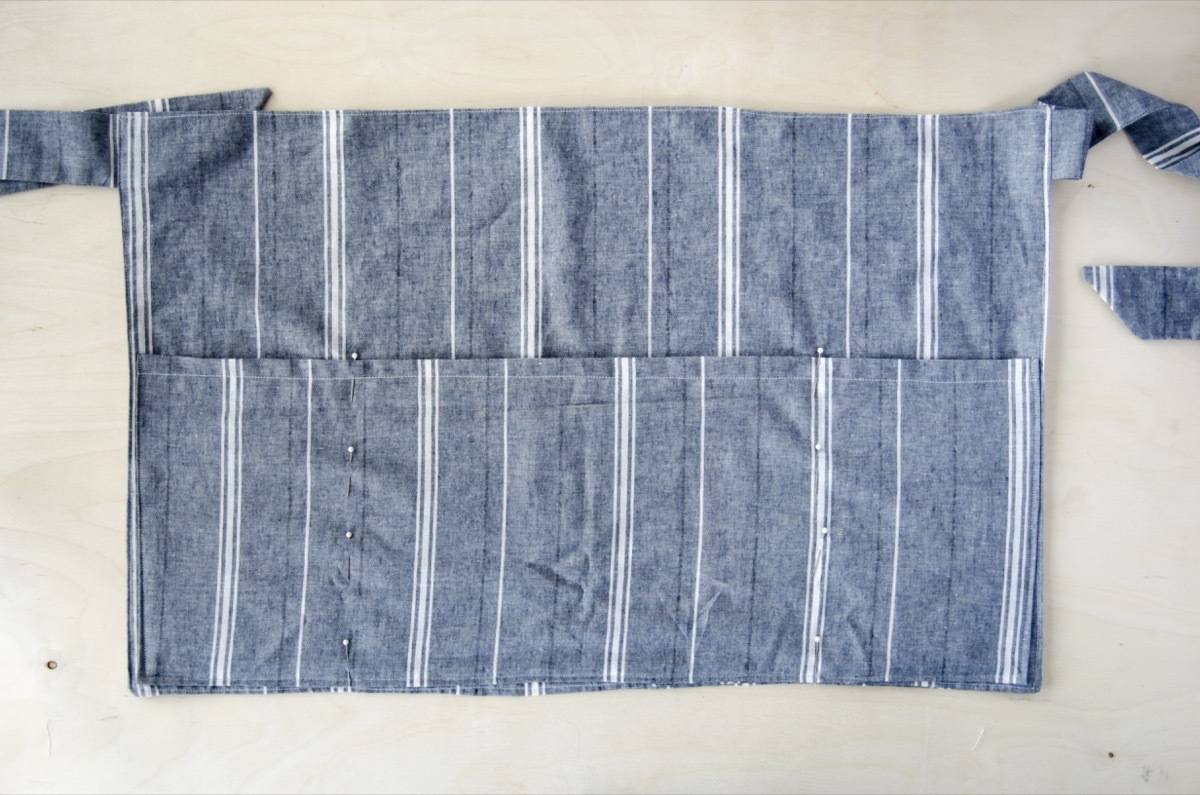
With the hem-side up, pin the pocket to the apron, lining up the bottom of the apron with the bottom of the pocket. Turn and press the sides and bottom of the pocket in, and pin in place. With a single stitch, sew the pocket in place along the sides and bottom.
Next, mark 6.5″ in from both sides of the pocket. This divides the pocket into three sections – two small pockets on the side and one large pocket in the middle. Starting from the bottom of the pocket, stitch along both pinned marks with a single stitch.
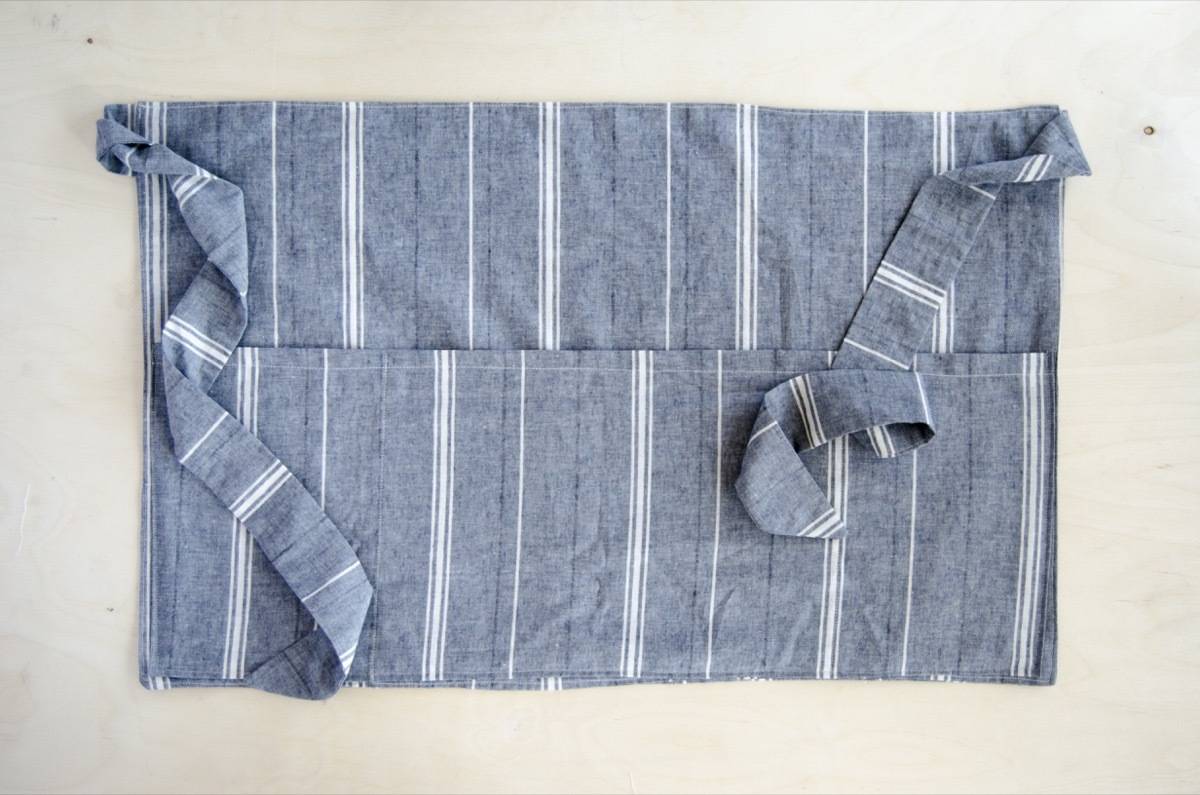
And done!
Share this project on Pinterest!
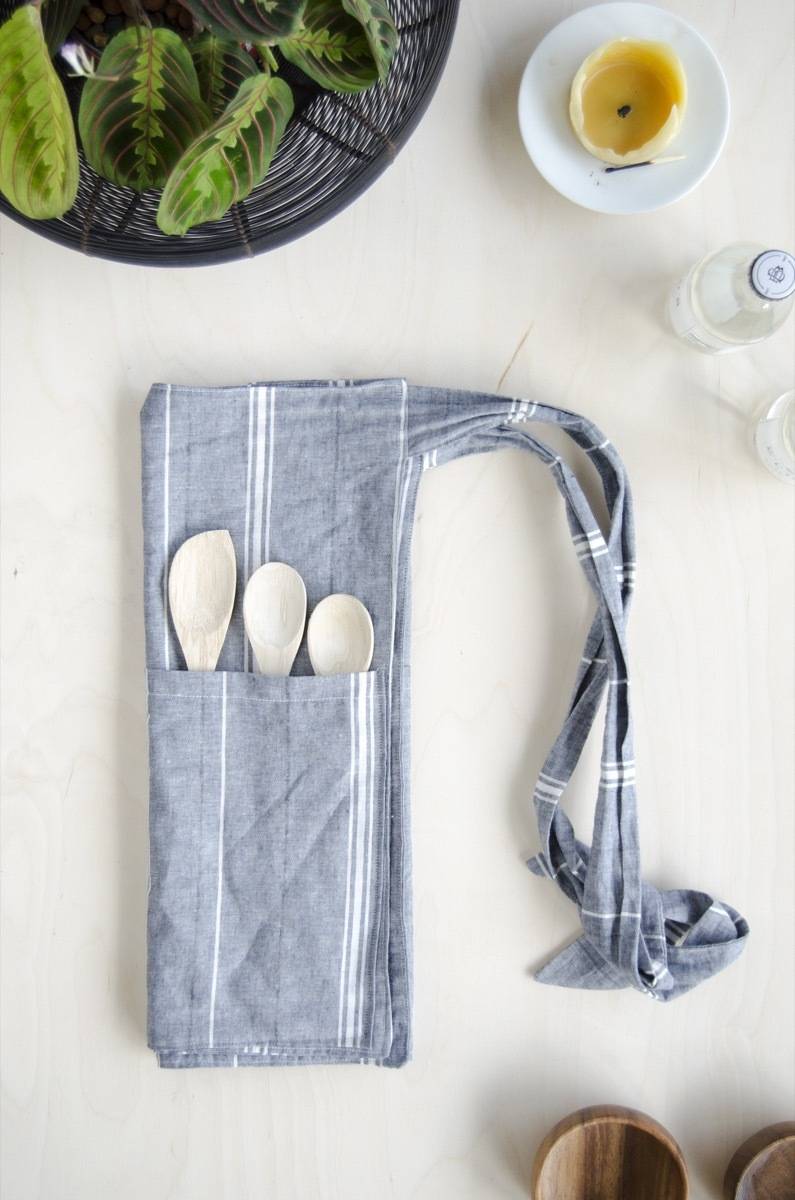
I made my half apron from this sweet and simple linen print that I’m absolutely in love with. I’m already scheming alternative uses for this fabric so I can buy more of it. Anyone else on a major linen kick right now?
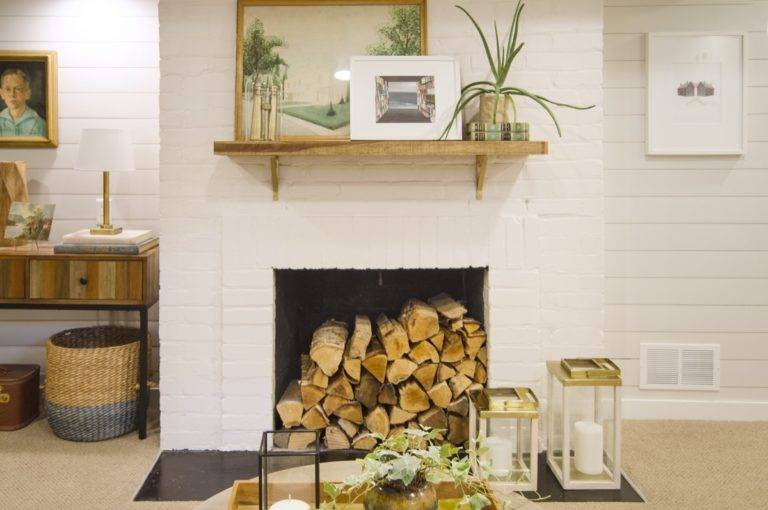
An acrylic coffee table stands at the height of minimalism, allowing its contents and its surroundings to take center stage. Want to highlight a beautiful area rug? Or preserve every ounce of natural light that your living room receives? An acrylic coffee table can do just that. In this post, we’ve collected a variety of our favorites to suit any style. This compilation includes everything from minimalist acrylic-only tables to pieces that pop with glamorous gold and silver details, to vibrant modern selections that glow with neon-like coloration. There’s a whole world of acrylic tables to explore.
.tasty-pins-banner-container{display:block;margin-bottom:20px;position:relative;width:-moz-fit-content;width:fit-content}.tasty-pins-banner-container a{cursor:pointer;display:flex;font-size:14px;font-weight:700;letter-spacing:1px;line-height:1.8em;text-transform:uppercase}.tasty-pins-banner-container a:hover{opacity:1}.tasty-pins-banner-container .tasty-pins-banner{align-items:center;bottom:0;cursor:pointer;display:flex;justify-content:center;left:0;padding-bottom:1em;padding-top:1em;position:absolute;right:0}.tasty-pins-banner-container .tasty-pins-banner svg{margin-right:4px;width:32px}.tasty-pins-banner-container .tasty-pins-banner span{margin-top:4px}.tasty-pins-banner-container a.tasty-pins-banner{text-decoration:none}.tasty-pins-banner-container a.tasty-pins-banner:hover{opacity:.8}.tasty-pins-banner-container a.tasty-pins-banner-image-link{flex-direction:column}.tasty-pins-banner-container a img{margin-bottom:0}.entry-content .wp-block-image .tasty-pins-banner-container img{margin-bottom:0;padding-bottom:0}#et-boc .et-l div .et_pb_image_wrap .tasty-pins-banner-container .tasty-pins-banner{padding-bottom:1em!important;padding-top:1em;text-decoration:none}#et-boc .et-l div .et_pb_image_wrap .tasty-pins-banner-container a.tasty-pins-banner{cursor:pointer;display:flex;font-size:14px;font-weight:700;line-height:1.8em;text-transform:uppercase}#et-boc .et-l div .et_pb_image_wrap .tasty-pins-banner-container a.tasty-pins-banner span{letter-spacing:2px;margin-top:4px}.et-db #et-boc .et-l .et_pb_module .tasty-pins-banner-container a:not(.wc-forward){padding-bottom:0}Photo by Maude Frédérique Lavoie on Unsplash
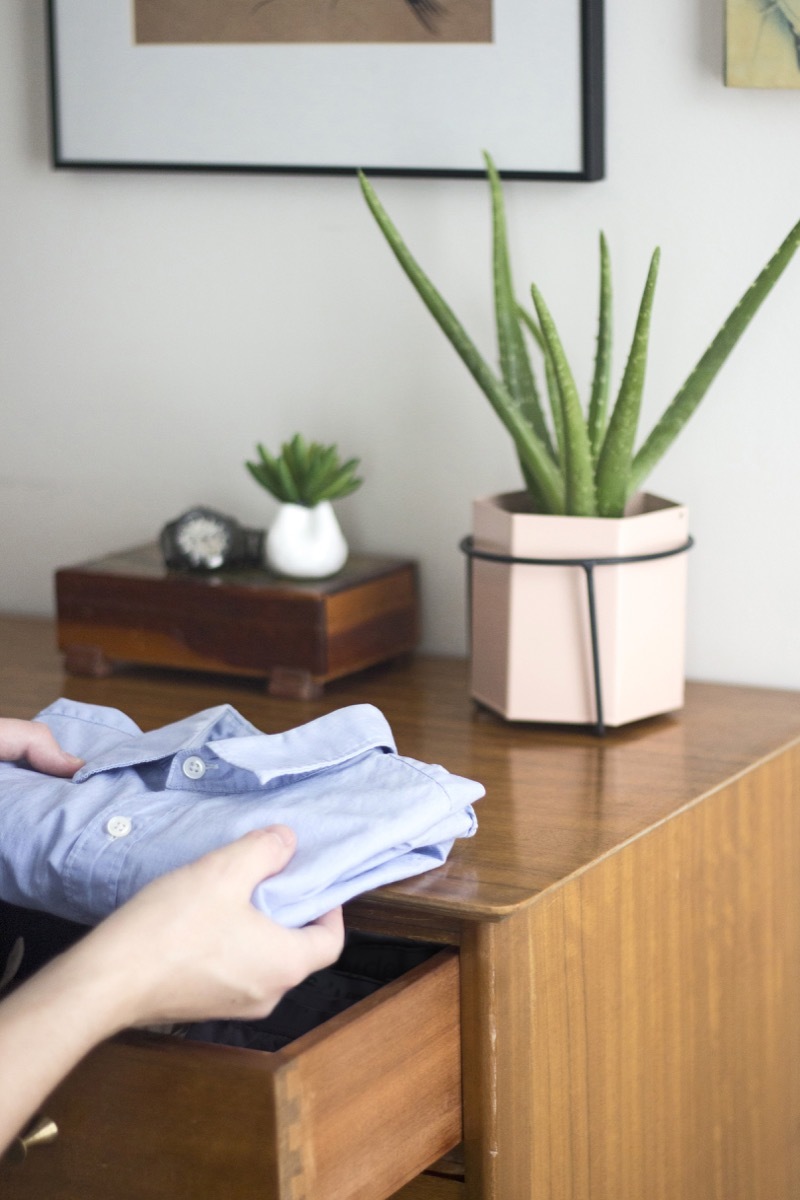
There’s nothing quite like the frustration of trying to find a shirt in a dresser drawer packed full of balled up clothes. There’s no order, and everything is kind of just shoved in there. While it may be tempting to just close up your dresser drawers when they start to get chaotic, being able to have everything nicely folded and visible will make getting ready in the morning a million times easier and maximize your storage space. So, rather than just tossing that tee in the back of the drawer, fold it properly the first time so you can find it when you need it. Keep reading for the best way to fold shirts, pants, socks, even underwear!
Watch this video on how to fold everything in your closet, and keep reading for the full details.
The easiest way to fold laundry is on a clean, flat surface. So clear off your coffee table or dining buffet, and let’s get to folding.
Table of contents
Before we get into how to fold t-shirts, I wanted to mention which kinds of shirts you should be storing in your dresser, versus hanging in the closet. Generally speaking, you want to fold t-shirts, tanks, undershirts, or anything that isn’t heavily affected by wrinkles. We’ll cover how to fold a dress shirt, but personally I prefer to hang dress shirts to prevent creases. You always want to fold a sweater, never hang. Using a hanger will pull on the weave of a sweater, leaving stretch marks at the neck and shoulders.
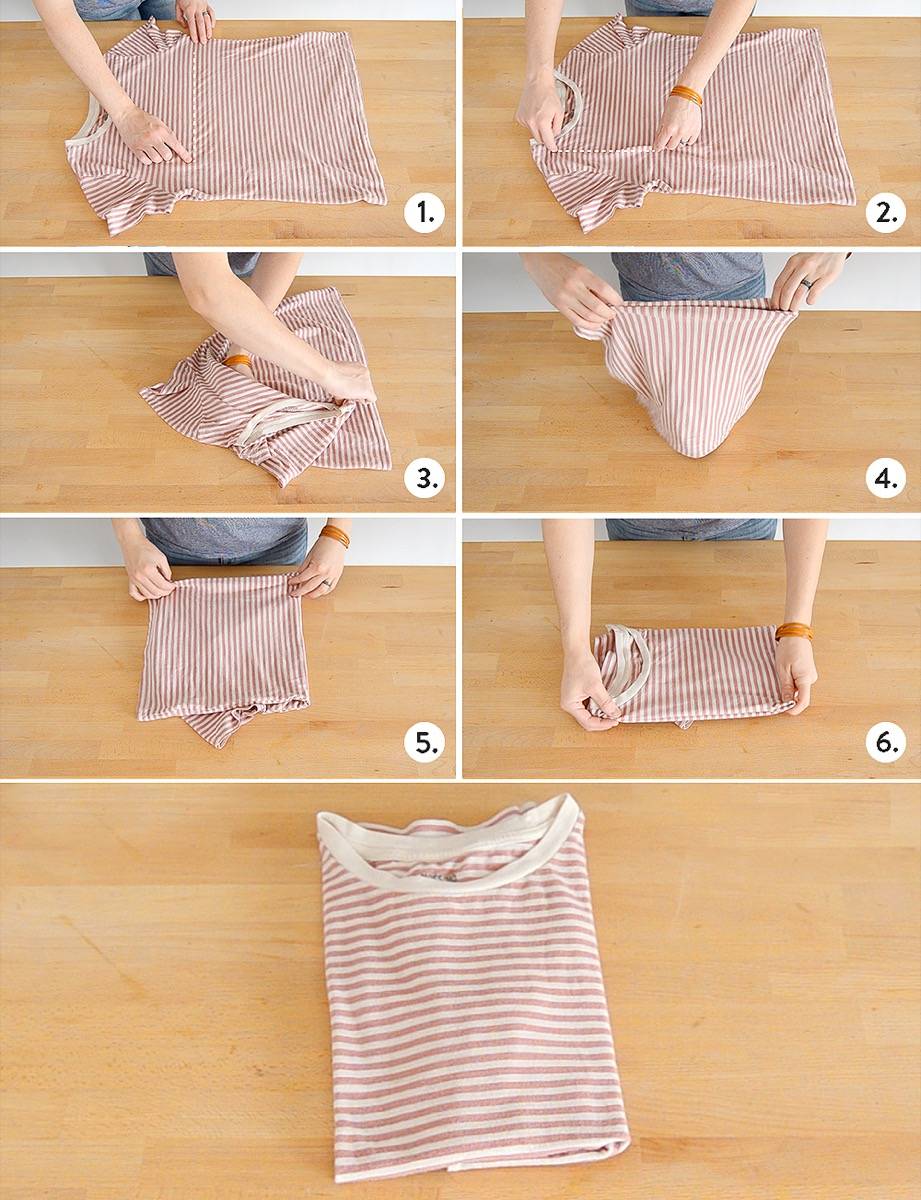
How to fold a t-shirt
This is the famous “two second” folding trick—however, on the first few tries it’ll take you just a little longer. It might seem like magic, but after a bit of practice, you’ll be folding your shirts in a jiffy!
Make an invisible line across the chest of the shirt, stopping just past where the collar ends. Pinch here, making sure to grab both the front and back fabric of the shirt.
Make an invisible line up to the top of the shirt, and pinch here with your second hand.
Still pinching the fabric, move your second hand down to the bottom of the shirt. Pinch the fabric here too, still holding onto the top of the shirt.
Uncross your arms.
Lay the shirt down.
Fold in half.
Fold in half again if you want to save even more space in your dresser.
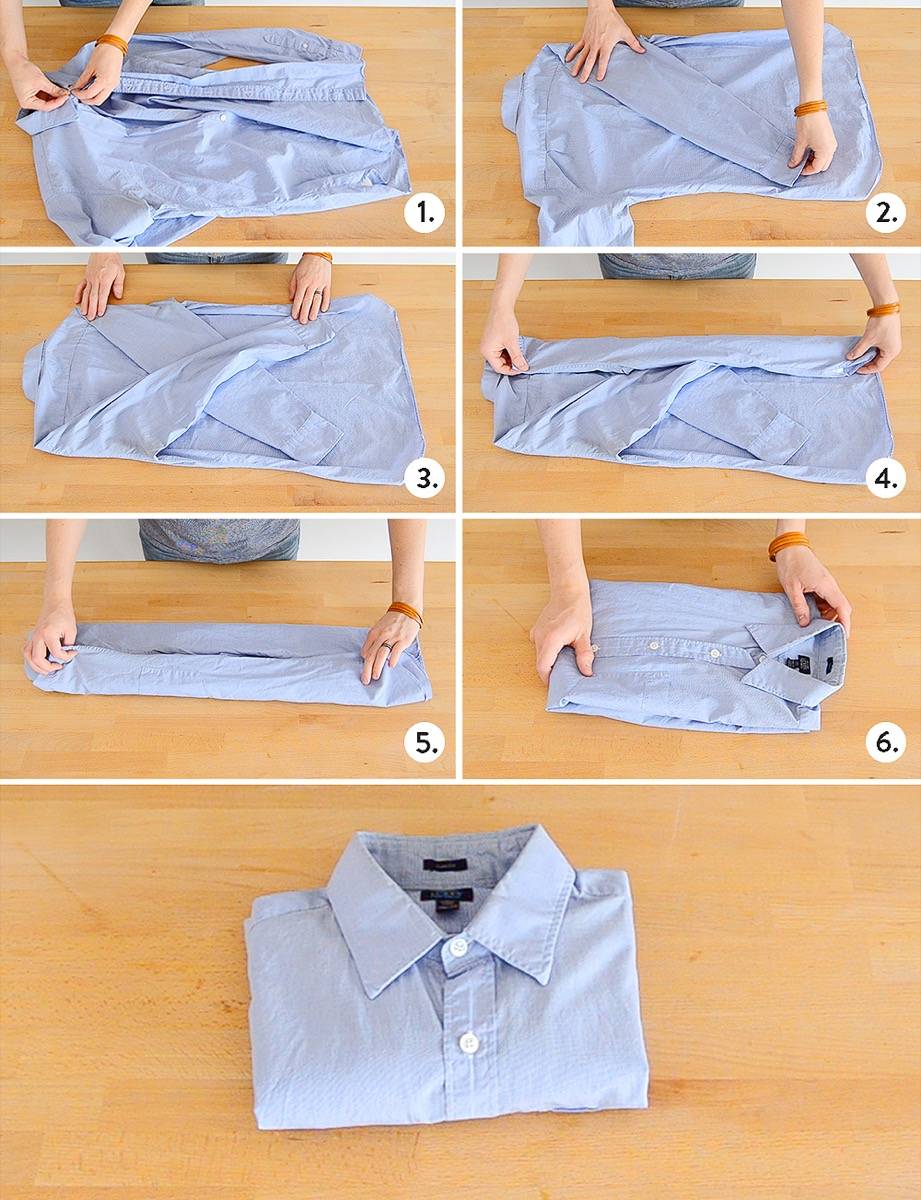
How to fold a dress shirt
Whether you’re packing for a trip or packing your dresser, you want to learn how to fold a dress shirt in a way that minimizes wrinkles, and protects the collar. Here’s how:
Button up the shirt.
Flip the shirt over, and fold the sleeve over so it crosses the back of the shirt.
Fold the second sleeve over the same way.
Fold in the shoulder, so it meets the middle of the shirt.
Fold in the second shoulder in the same way.
Fold the shirt in half.
If you need to save more space, fold in half again.
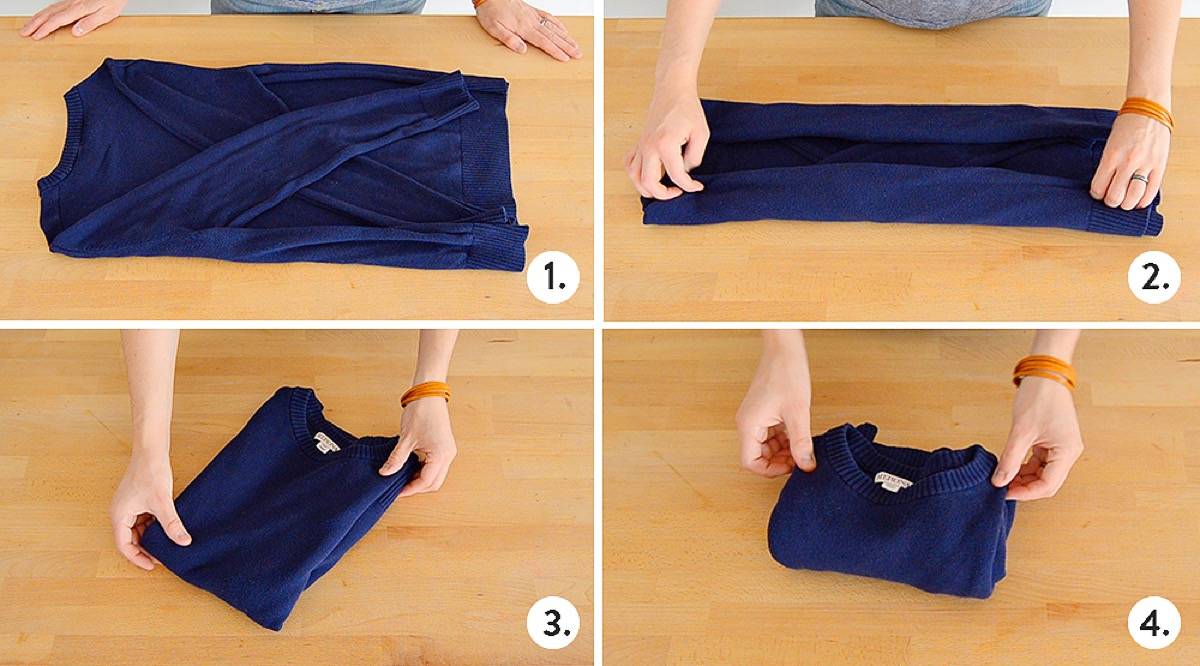
How to fold a sweater
Hey, guess what? Now that you’ve learned how to fold a dress shirt, you can fold any long-sleeved shirt! Simply fold the same way.
Flip the shirt over, and fold in the sleeves.
Fold in the shoulders to the middle of the back of the shirt.
Fold the shirt in half.
Fold in half again if you need to save more room.
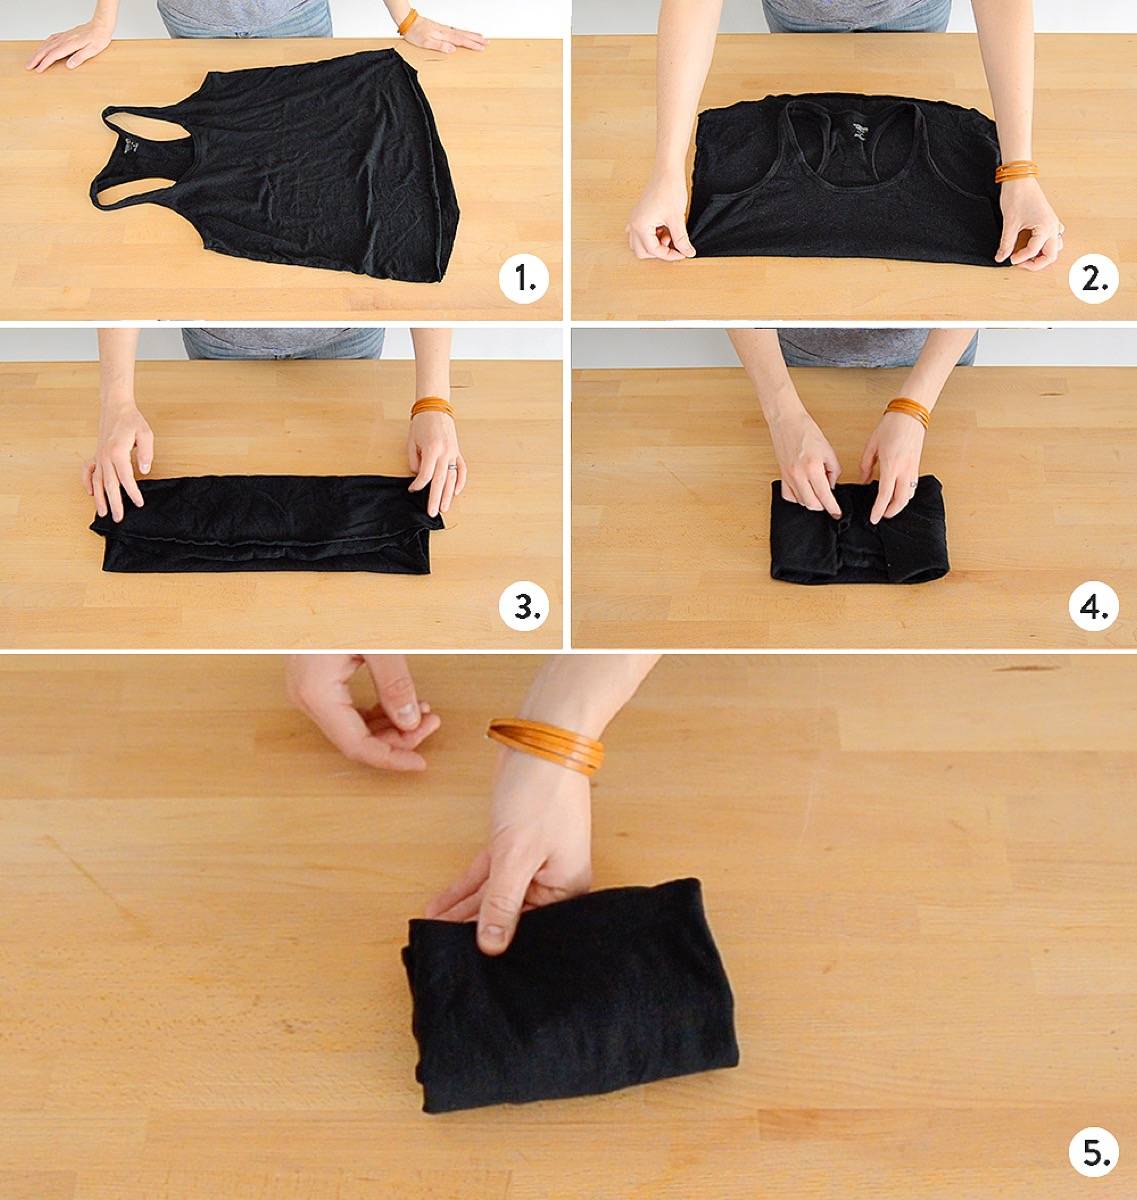
How to fold a shirt with straps
Tank tops and spaghetti strap shirts are a little awkward looking when folded, unless you know the secret (psst – the secret is to hide the straps!).
Lay the shirt face up.
Fold the shirt in half, with the top of the straps meeting the bottom of the shirt.
Fold in half again.
Fold the sides in, meeting in the middle.
Fold in half again.
Now that our tops are folded and put away, let’s talk bottoms. Folding pants in a way that keeps them wrinkle-free is simple.
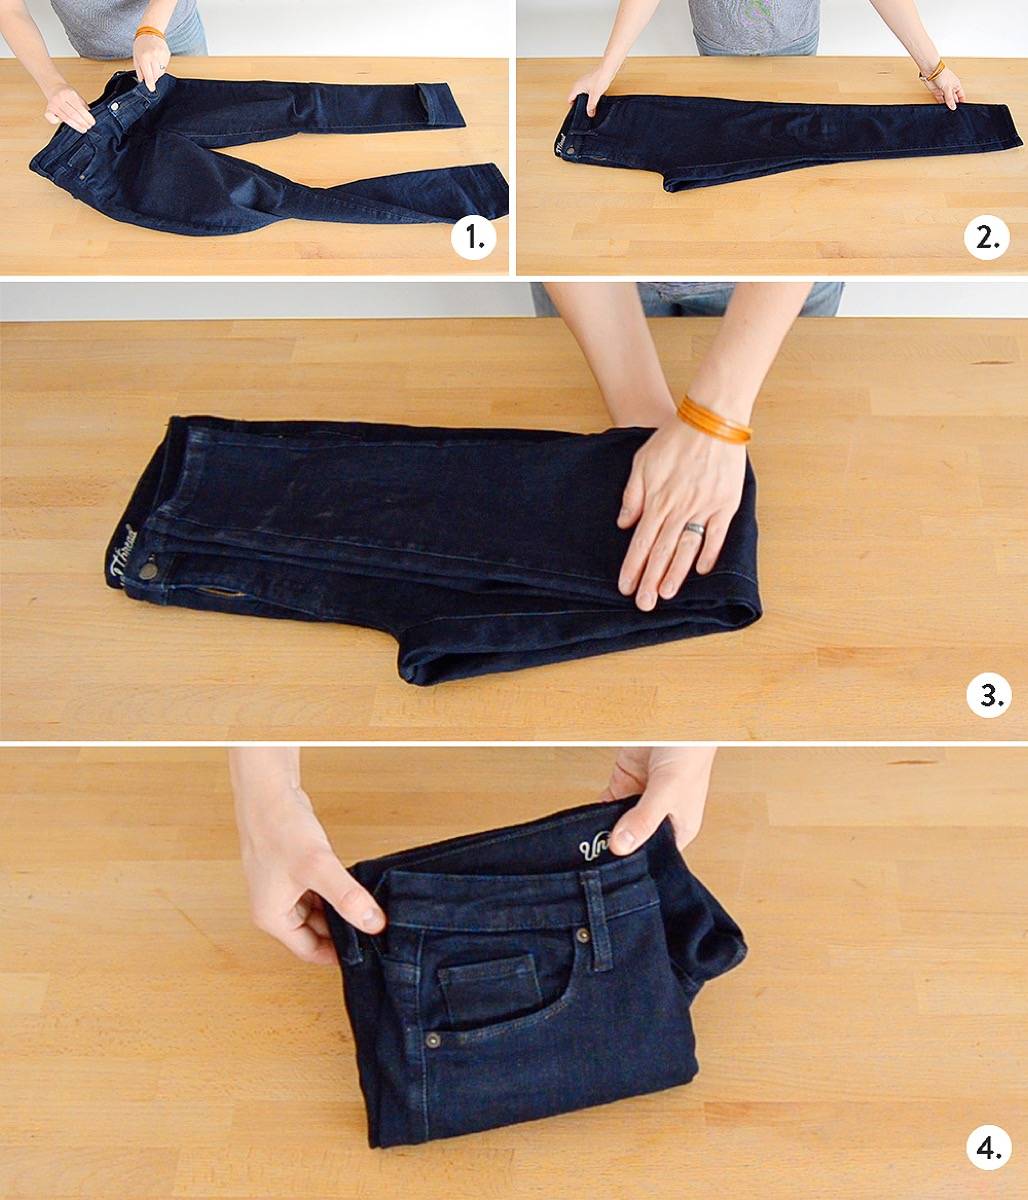
How to fold pants and jeans
Button the waistband.
Fold them in half, front side out.
Fold in half, lengthwise.
Fold then in thirds, lengthwise.
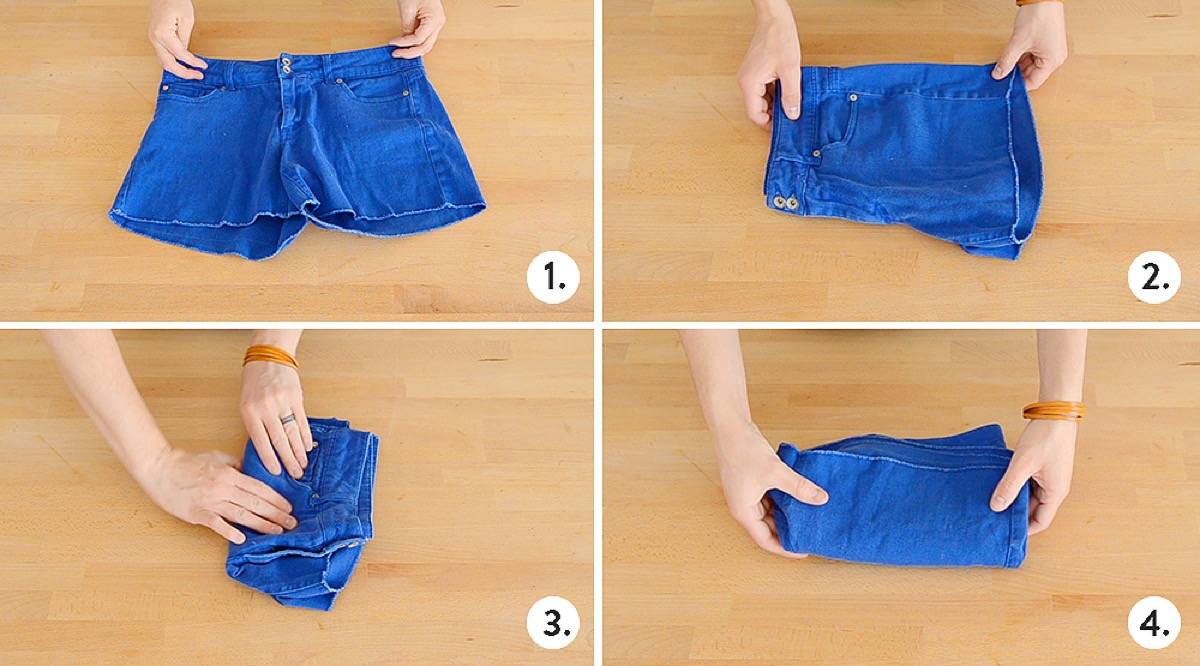
How to fold shorts
Folding shorts is just like folding pants, only… shorter!
Button the waistband.
Fold them in half, front side out.
If your shorts are short, fold them in half, lengthwise.
If your shorts are longer, fold them in thirds, lengthwise.
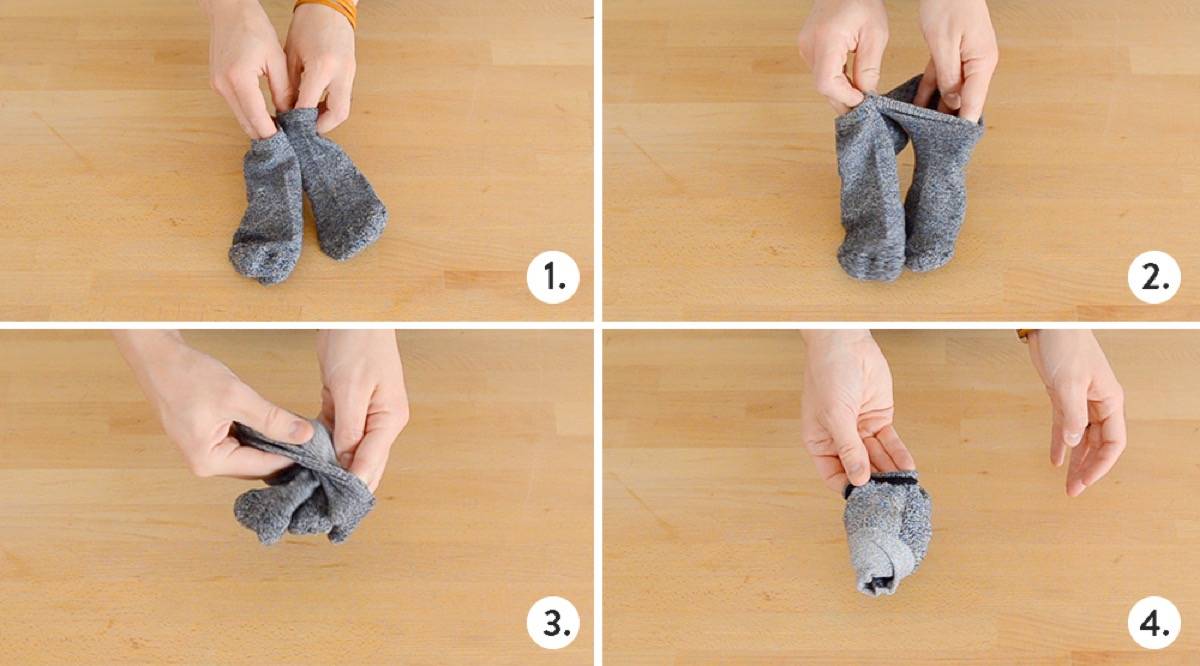
How to fold socks with an ankle (knee-high, crew, quarter-length, etc.)
You probably already know how to fold socks, but let’s go over it again, shall we?
Line the socks up, side by side.
Put your hand inside one of the socks, opening it up.
Grab onto the other sock through the first, and begin to turn the first sock inside out.
Turn the first sock inside out entirely.
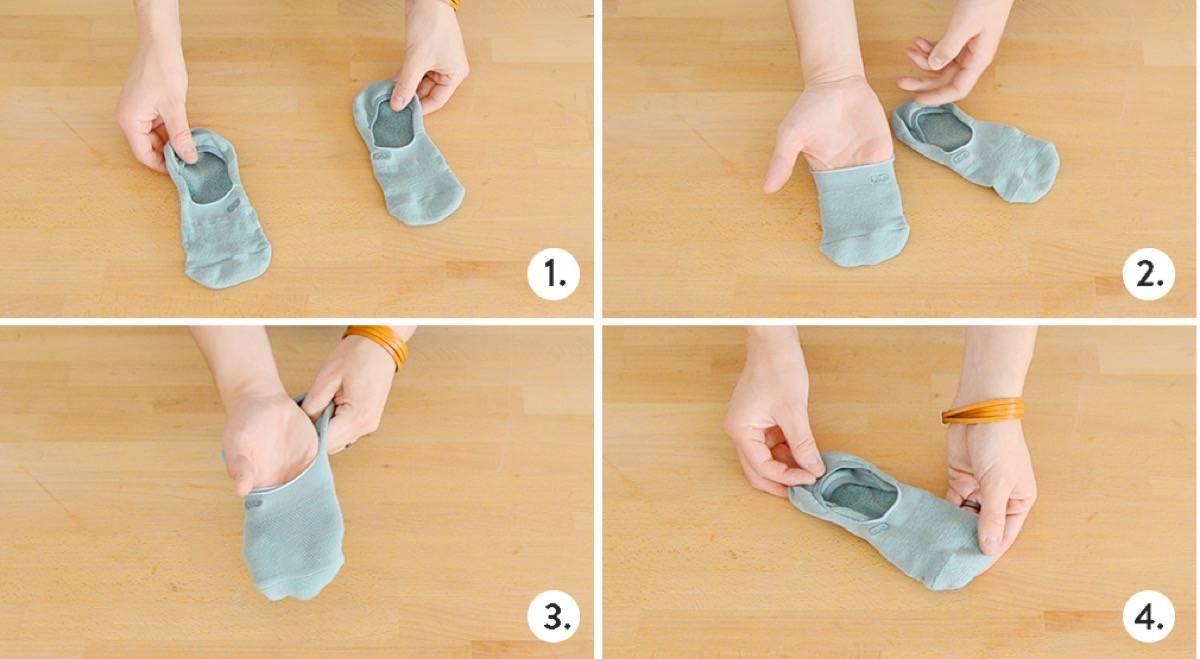
How to fold socks without an ankle, a.k.a. no-show socks or low-cut socks
So, what about socks that are teeny-tiny? We can fold those too!
Lay socks together, pointing in the same direction.
Put your hand inside one of the socks.
Put your socked-hand inside the other sock.
Pull your hand out, leaving one sock inside the other. Done!
How to fold a bra
Bras are like necklaces, they get all tangled up when you’re not looking! Keep them organized by folding them like this:
Open the bra.
Fold in half, with both cups pointing in the same direction, nesting into one another.
Tuck the straps into the cups.
Done!
How to fold underwear
Finally, let’s talk about how to fold underwear. Do you fold your undies? A lot of us don’t, but folding them sure makes it easy to see what you have available in your drawer.
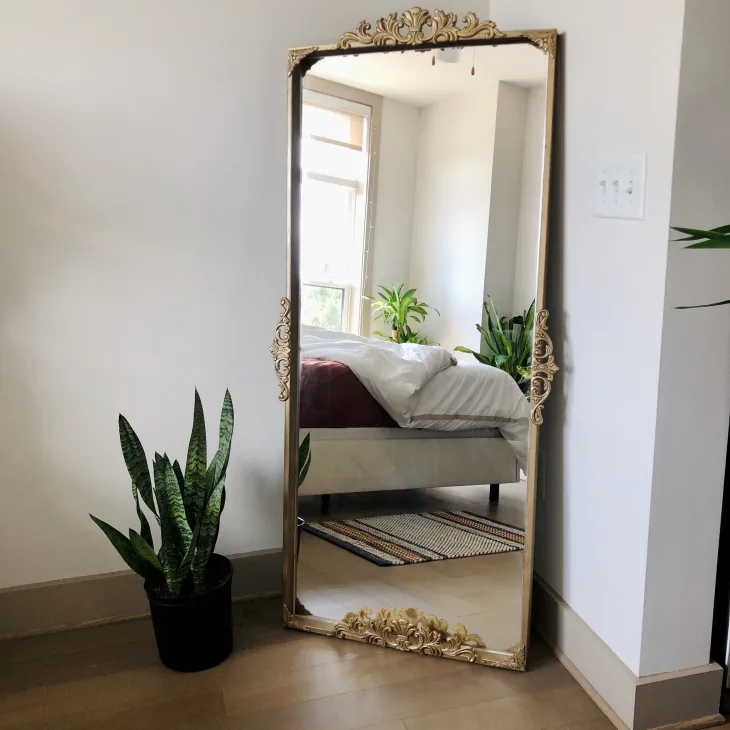
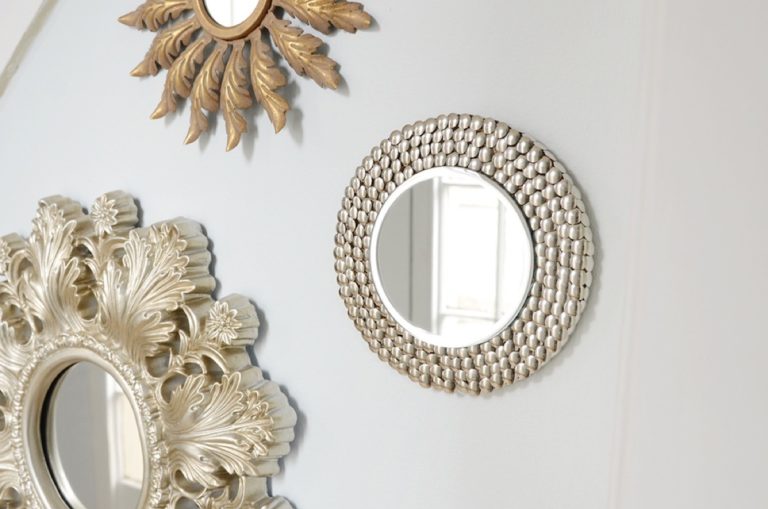
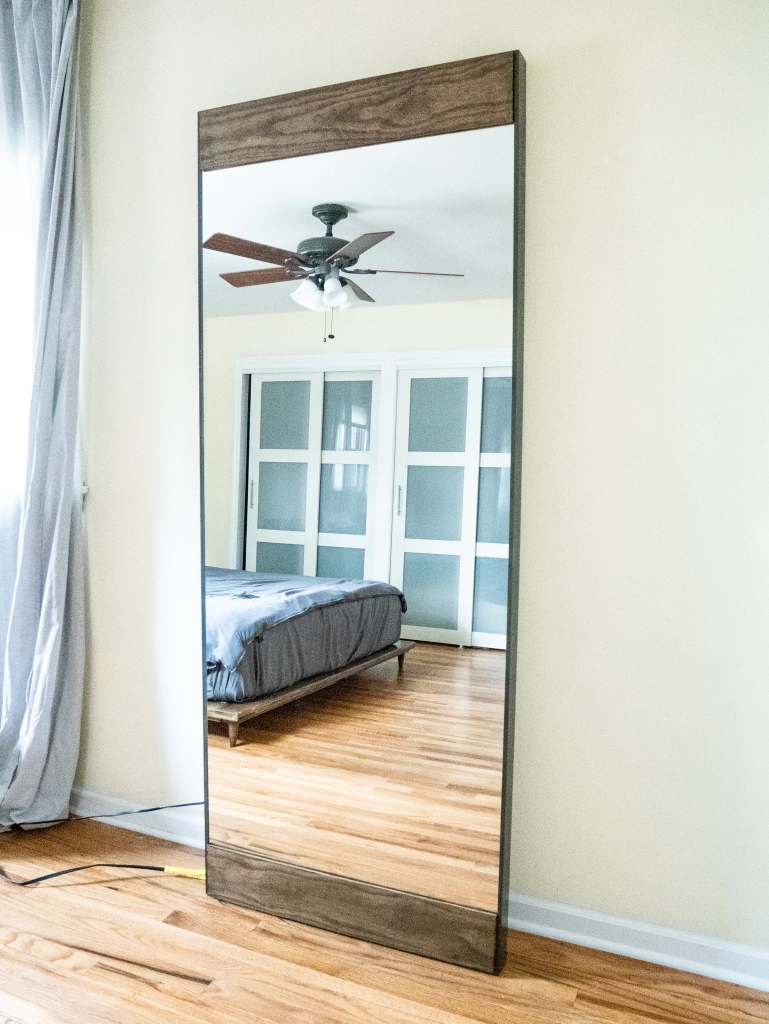
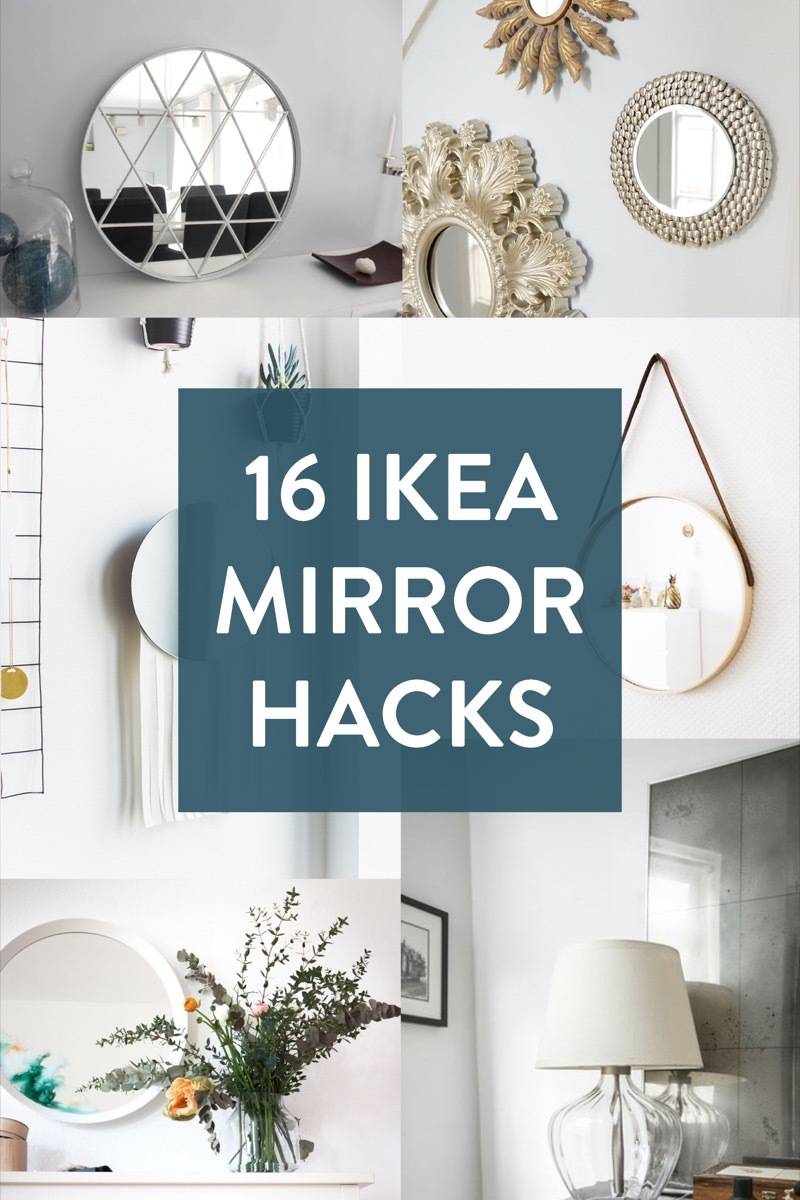
IKEA mirrors are an inexpensive way to add depth and interest to a wall. Mirrors reflect light and movement in a room, they’re eye-catching, and they can make a space appear bigger than it is.
If you know us here at Curbly, you know we LOVE a good IKEA hack. While mirrors serve their purpose, many people look for ways to hack and personalize mirrors to make them unique and more fitting for their individual tastes and needs.
Whether in your entryway, bedroom, or bathroom, a mirror makes a great addition to any space. And luckily for everyone, hacking a one-of-a-kind mirror is easy, thanks to IKEA. Happy crafting!
Here we’ll create a unique mirror by transforming a cork trivet from IKEA into a wall mirror. Read on to check out this impossibly simple process.
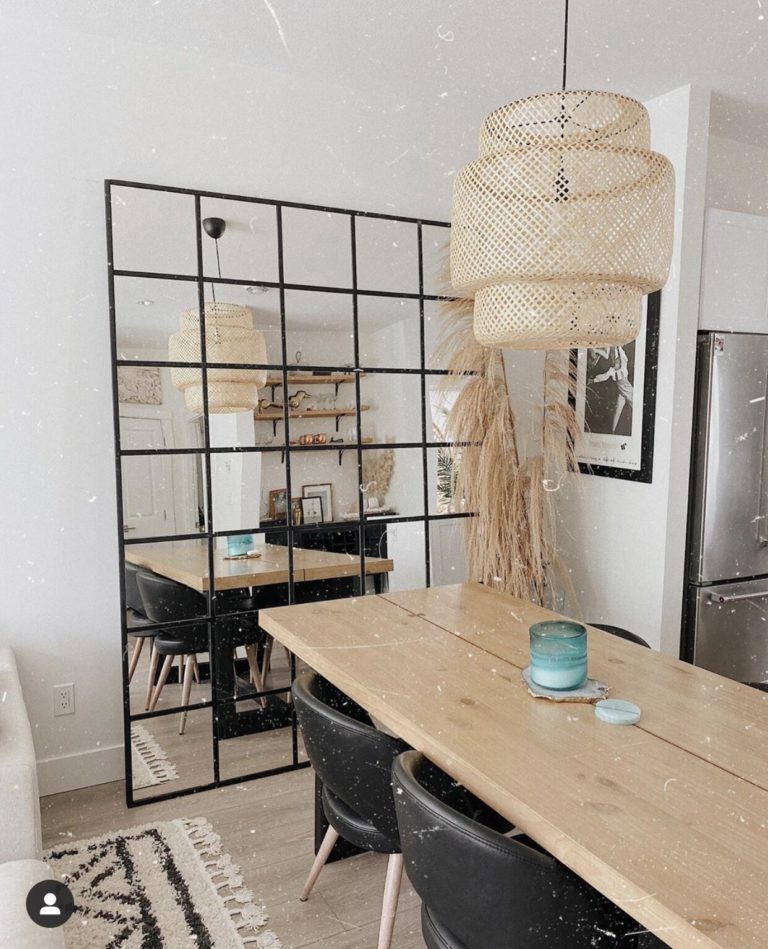
Industrial IKEA Mirror Hack
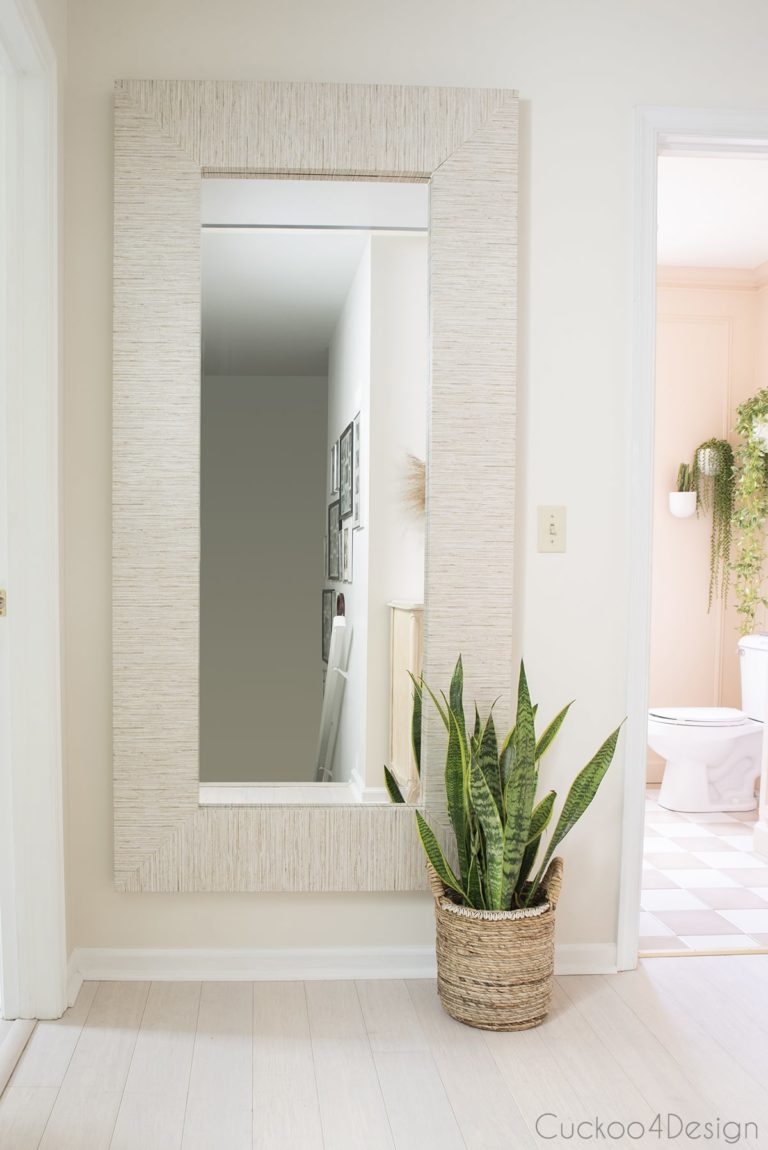
This post features a creative and affordable solution for home decor enthusiasts looking to add a statement piece to their space—a giant IKEA hack mirror inspired by the latest TikTok trends.
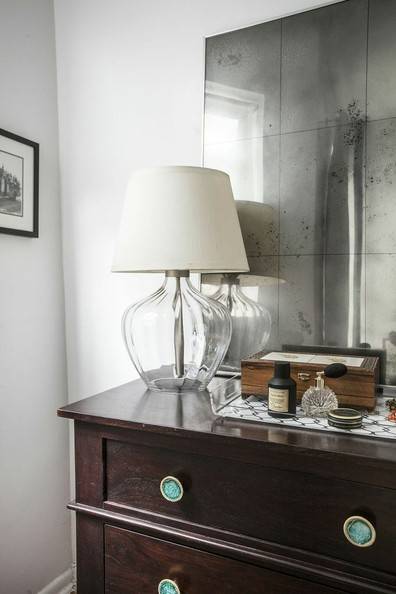
A DIY Antiqued Mirror
This IKEA mirror hack goes back in time with an antiqued look. Believe it or not, to make this aged piece, you don’t need a mirror—it all starts with a picture frame.
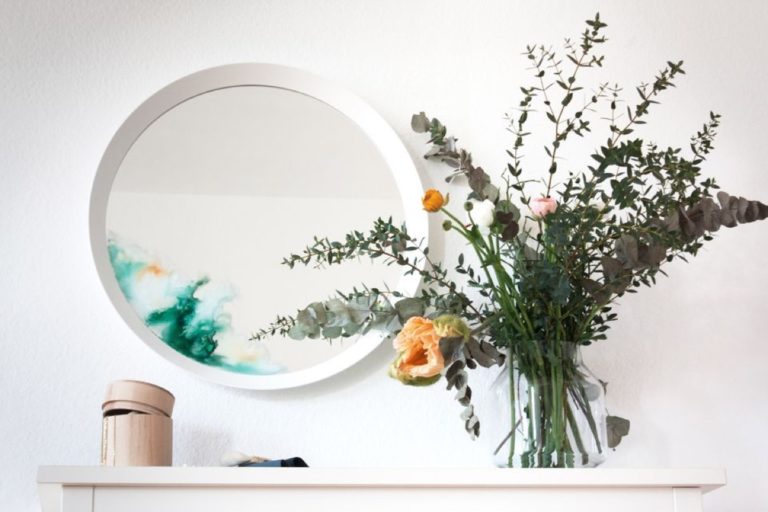
Abstract Watercolor Mirror
Add abstract interest to any IKEA mirror (or any glass, period!) by adding some watered-down glass paint. Here they’re using an IKEA LANGESUND mirror (it costs $27.99), perfect for a small entryway.
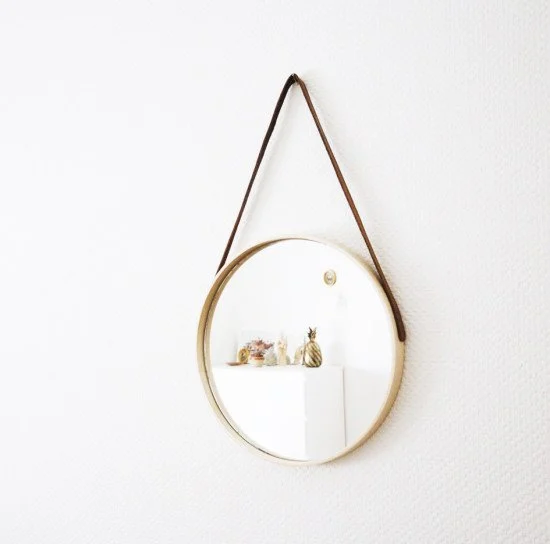
West Elm Mirror Hack
In this post, Victoria walks us through, step-by-step, her process for making this gorgeous West Elm dupe from a much less expensive IKEA Hovet mirror.
Suspended Mirror Hack
This hack doesn’t use an IKEA mirror at all—it’s the tray that’s the hacked piece, paired with a few other simple supplies.
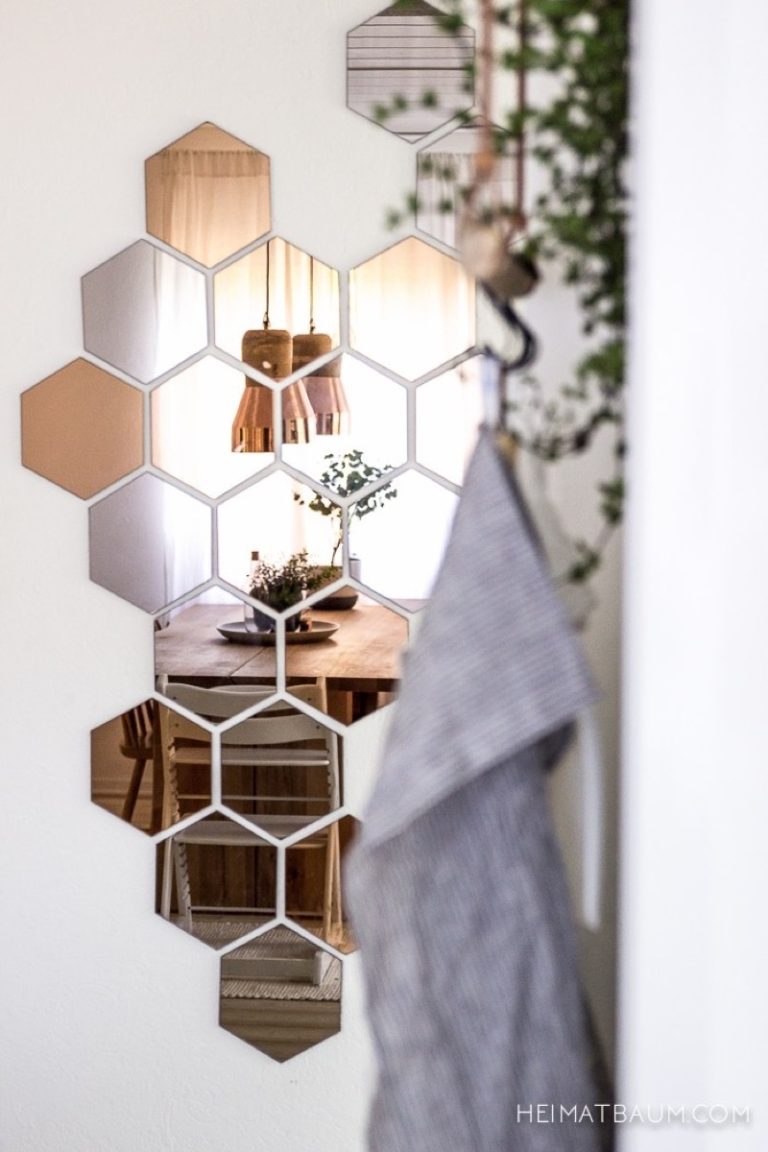
IKEA HONEFOSS Tiled Entry
This one is less of an IKEA mirror hack, and more inspiration. Check out how these HONEFOSS mirror tiles are hung.
Note: these mirror tiles aren’t available in the US anymore, but you can purchase them on eBay, details are at the end of the post.
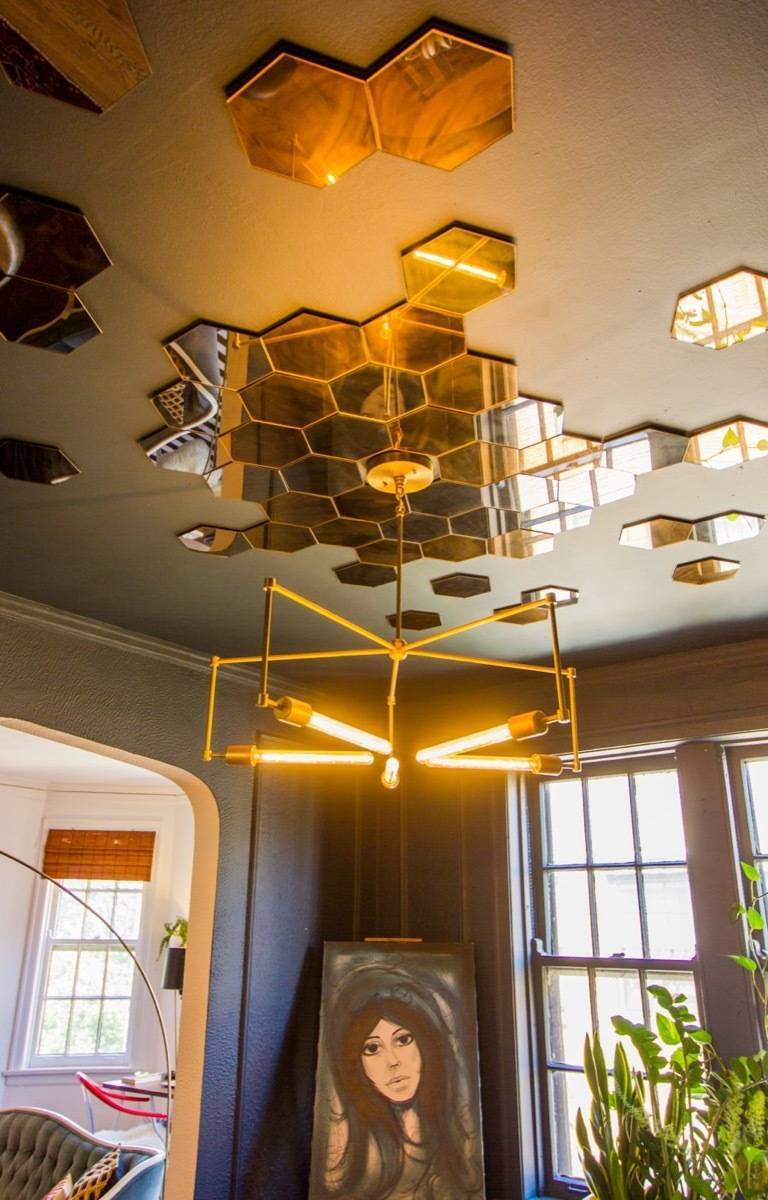
IKEA HONEFOSS Tiled Ceiling
More HONEFOSS tile inspiration from Lauren’s Bold Chicago Apartment tour on Apartment Therapy. This time they’re adding height and interest to a dark ceiling.
Note: these mirror tiles aren’t available in the US anymore, but you can purchase them on eBay, details are at the end of the post.
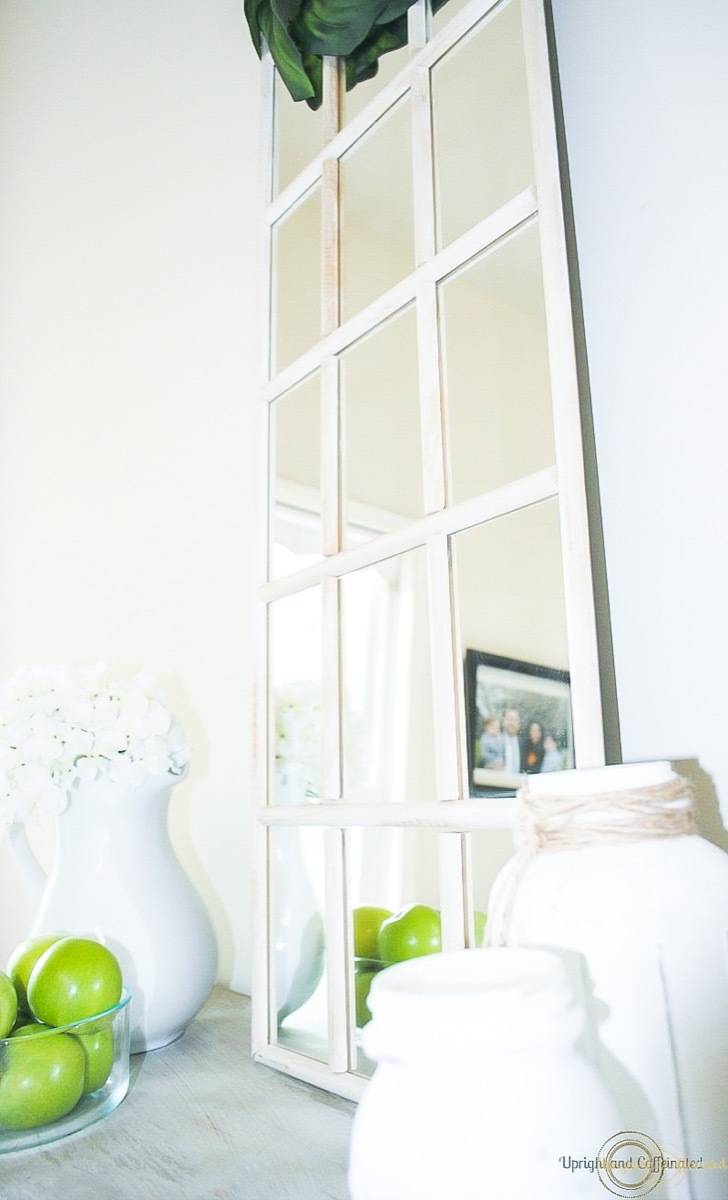
Farmhouse Window Mirror Hack
Check out this tutorial for transforming an IKEA floor length mirror into a faux farmhouse window mirror on the cheap.
The Ultimate Gilded Mirror Hack
Donovan transforms a simple IKEA mirror into a gilded thing of beauty using little more than some wood appliques and some spray paint. Head over to Apartment Therapy for the details.
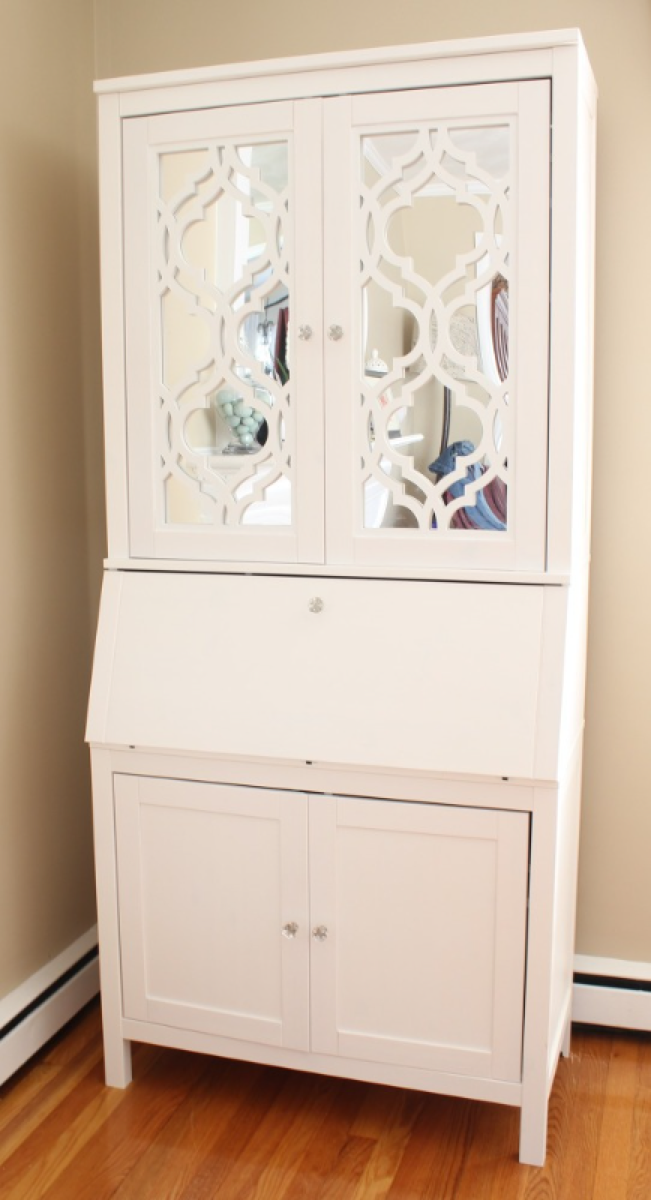
DIY Mirrored Secretary Desk
There’s no need to limit reflection to walls—check out this DIY mirrored secretary desk using a HEMNES secretary desk and some overlays. This treatment could be applied to all kinds of IKEA pieces, from nightstands to the back of shelving.
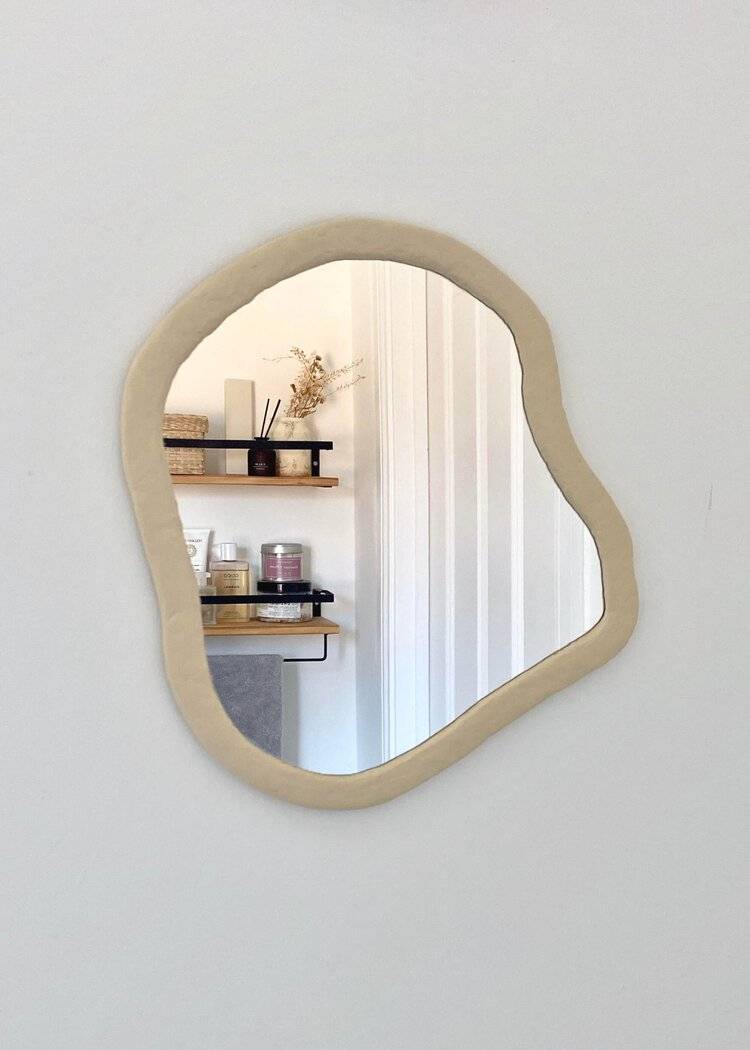
DIY Organic Mirror
This organic mirror is one of the more creative IKEA mirror hacks we’ve found and it all comes together with a simple mirrored tile and a little cardboard and clay. Head over to Isoscella for all the details and buy them a coffee while you’re there!
Ikea MONGSTAD Faux Grasscloth Wallpaper Mirror
Who would have thought coving a dark, drab mirror with a little wallpaper could completely transform a hallway from a black hole to a lighter and brighter space? In just a few hours, you could be there too.
Lighted Mirror With IKEA Nissedal
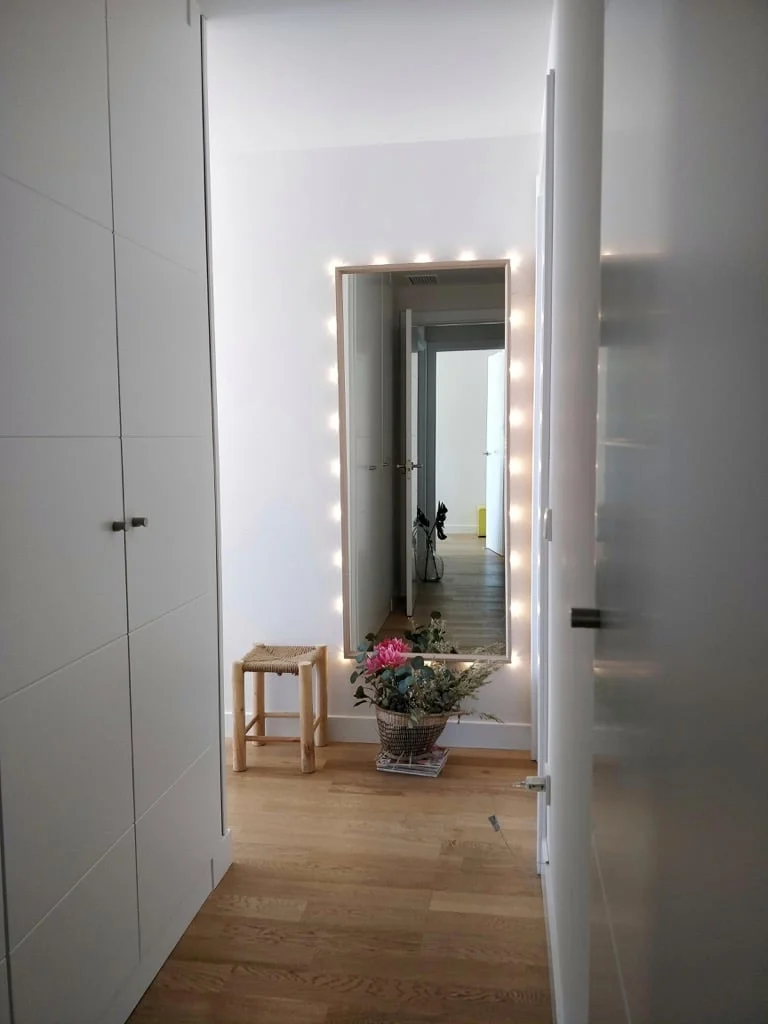
Add a little ambient lighting to your space with this clever mirror project from IKEA Hackers.
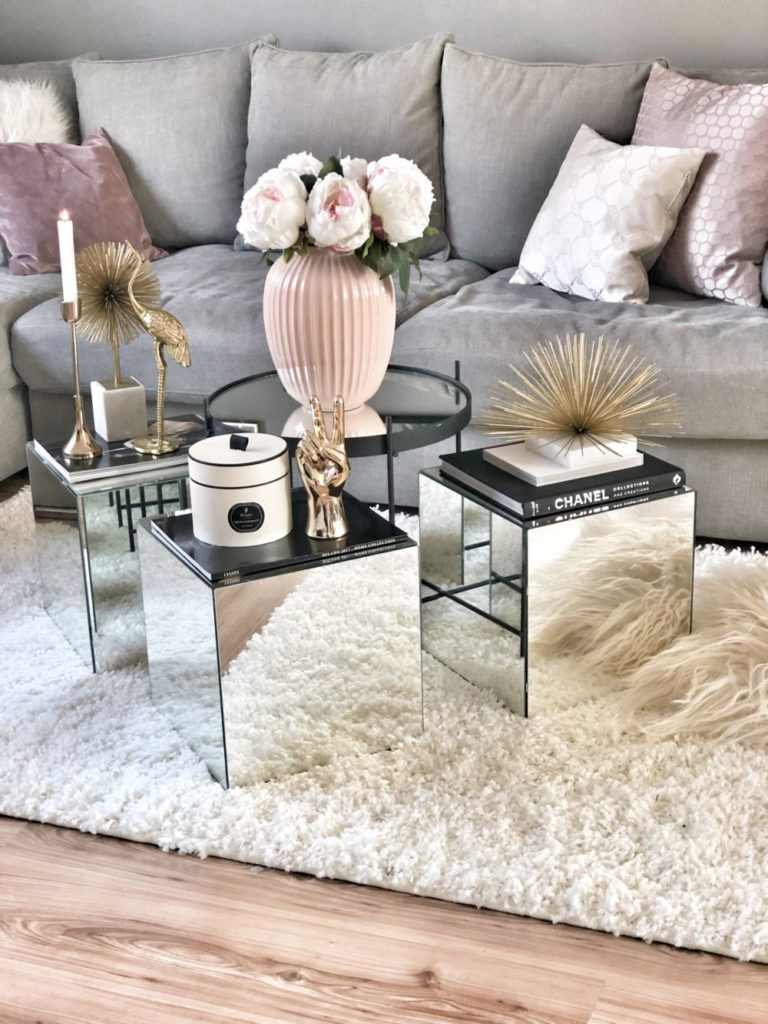
Mirrored Table Cubes
No need to keep mirrors on the wall! Add some light to your living room with this project from Easy Interior.
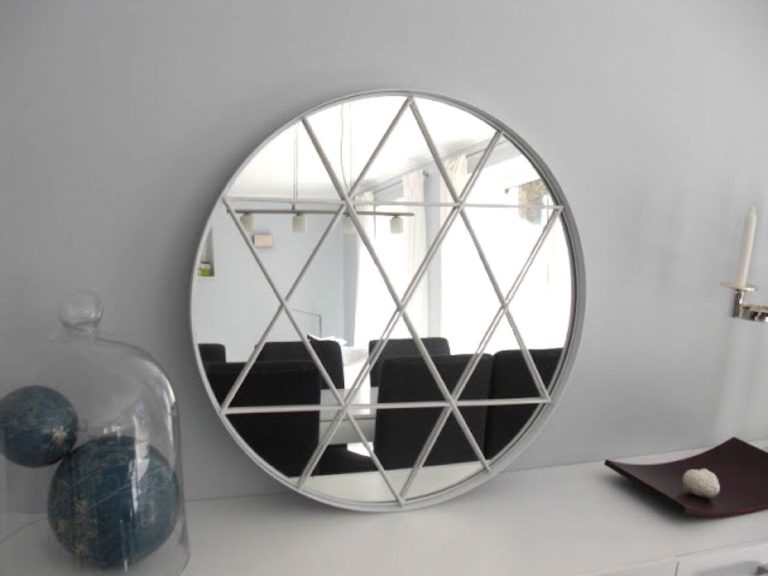
Star Mirror Project
Sure, this may look expensive, but don’t be fooled! This hack only cost a few dollars. All you need is a mirror, some wooden dowels, and a can of spray paint.
Share this roundup on Pinterest!
There are many different ways to hack and personalize IKEA mirrors to make them unique and fitting for your individual needs and tastes. Whether you’re looking to add a touch of glamour to your space, or simply create a functional and stylish element, these hacks are a great starting point. So, try out these ideas and get creative with your IKEA mirrors today!


 This half apron is made up entirely of rectangles, all of which are the same width. You only need to be able to single stitch in a straight line, and you don’t need a pattern. You guys – if you’ve ever doubted that you could sew something, this is not that project! I’ve even put together a video so you can watch how to stitch this half apron together. Watch on, or keep reading for the step-by-step guide.