Do you love the smell of yummy food cooking outside? Want to make tasty meals without a lot of work? Let us tell you about something awesome: Green Mountain Grills (GMG). These cool grills help you cook like a pro, even if you’re just starting out. Let’s find out why they make grilling easy and fun!
1. Super Easy to Use (Even for Beginners!)
Some grills can be tricky. But not a Green Mountain Grill.
Works Like a Smart Oven: GMGs use special wood pellets, not charcoal or gas. You just pour in the pellets, turn it on, and pick your temperature.
Set It and Forget It: Once it starts cooking, you don’t need to watch it all the time. You can relax, play, or hang out while your food cooks just right.
Phone App Control: You can even control it from your phone! Change the heat, set a timer, or turn it off, all with a tap!
2. Delicious Smoky Taste with Wood Pellets
GMGs make food taste better with real wood smoke. Yum!
What Are Wood Pellets? Tiny pieces of real wood that burn clean and give great flavor. No yucky chemicals.
Flavor Explosion: Wood smoke soaks into your food and makes it taste amazing, like ribs, chicken, burgers, or even veggies.
Try New Flavours: Use different wood types like apple, cherry, or hickory to try new tastes every time you grill.
3. One Grill = So Many Ways to Cook
Ledge Prime 2.0
GMGs are more than just a grill. They’re like a cooking superhero.
Grill: Make burgers, hot dogs, or steaks.
Smoke: Slow-cook ribs or brisket for hours.
Bake: Make pizza, cookies, or cornbread!
Roast: Cook a juicy turkey or chicken.
Braise: Slow-cook meats in sauces or soups.
One grill, so many meals. You can cook breakfast, lunch, dinner, and even dessert, on your GMG.
4. Saves Time and Easy to Clean
Who wants to spend hours cleaning a grill? Not you!
Heats Up Fast: No need to wait forever like with charcoal.
Less Mess: Wood pellets leave just a little ash, so are super easy to clean
No Big Flames: No scary flare-ups. GMGs cook your food safely and evenly.
5. Great for Friends, Family, and Fun!
A Green Mountain Grill makes your backyard the best hangout spot.
BBQ Hero: Your food will be so good, people will ask for seconds.
Party Time: Great for birthdays, holidays, or just dinner outside.
Learn New Recipes: Try new foods and flavors. Cooking becomes a fun hobby.
Ready to Start Grilling?
If you want easy, tasty, and fun backyard BBQ, a Green Mountain Grill is the way to go! Go and see one in person at Take A Break Spas & Billiards, in Springville, American Fork or West Jordan, Utah. They’ll help you pick the perfect grill so you can start cooking awesome food right away.
Basements were once considered the dusty part of your home where forgotten boxes and childhood trophies lived. Now you can turn the space into a room where your fitness goals manifest. Turn your basement into the home gym of your dreams with our list of creative, organized, and aesthetic ideas that’ll transform your basement from basic to bodybuilders’ dreams.
From cardio to the curls, these ideas are sure to pump up your space (and your motivation). Let’s goooo!
.tasty-pins-banner-container{display:block;margin-bottom:20px;position:relative;width:-moz-fit-content;width:fit-content}.tasty-pins-banner-container a{cursor:pointer;display:flex;font-size:14px;font-weight:700;letter-spacing:1px;line-height:1.8em;text-transform:uppercase}.tasty-pins-banner-container a:hover{opacity:1}.tasty-pins-banner-container .tasty-pins-banner{align-items:center;bottom:0;cursor:pointer;display:flex;justify-content:center;left:0;padding-bottom:1em;padding-top:1em;position:absolute;right:0}.tasty-pins-banner-container .tasty-pins-banner svg{margin-right:4px;width:32px}.tasty-pins-banner-container .tasty-pins-banner span{margin-top:4px}.tasty-pins-banner-container a.tasty-pins-banner{text-decoration:none}.tasty-pins-banner-container a.tasty-pins-banner:hover{opacity:.8}.tasty-pins-banner-container a.tasty-pins-banner-image-link{flex-direction:column}.tasty-pins-banner-container a img{margin-bottom:0}.entry-content .wp-block-image .tasty-pins-banner-container img{margin-bottom:0;padding-bottom:0}#et-boc .et-l div .et_pb_image_wrap .tasty-pins-banner-container .tasty-pins-banner{padding-bottom:1em!important;padding-top:1em;text-decoration:none}#et-boc .et-l div .et_pb_image_wrap .tasty-pins-banner-container a.tasty-pins-banner{cursor:pointer;display:flex;font-size:14px;font-weight:700;line-height:1.8em;text-transform:uppercase}#et-boc .et-l div .et_pb_image_wrap .tasty-pins-banner-container a.tasty-pins-banner span{letter-spacing:2px;margin-top:4px}.et-db #et-boc .et-l .et_pb_module .tasty-pins-banner-container a:not(.wc-forward){padding-bottom:0}Photo by Petr Magera
Declutter Like a Champ
First things first: clear out the clutter. If your basement is still stocked full of childhood memories and a bicycle you haven’t ridden in a decade, it’s time to make space.
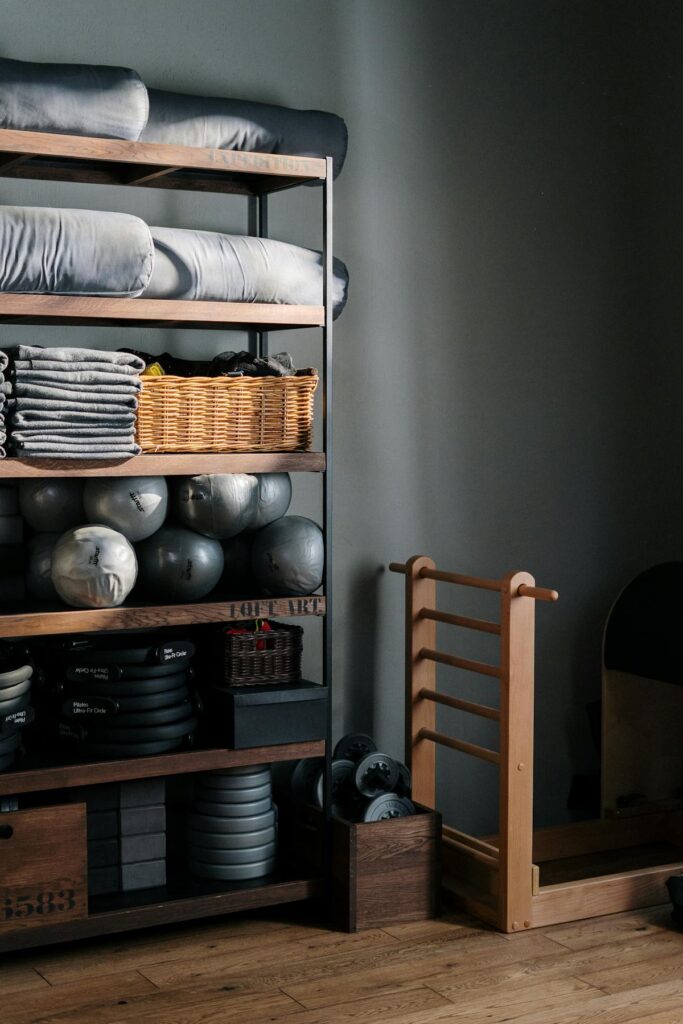
If you aren’t ready to toss everything, consider moving some items to another part of the basement, using storage shelves to keep things organized and out of the way.
Flooring Matters
The right flooring can make or break your workout, your body, and your basement floors. Like we said in the title, “no pain” – and we mean it!
Rubber mats or foam tiles are great options (and make your basement look like a real gym). You can also consider using a yoga mat to use during sessions temporarily.
Add Adjustable Dumbbells
Short on space or want more room for other equipment (like that stationary bike you’ve been eyeing since the holidays)?
Swap the 20 pairs of weights for one set of adjustable dumbbells. They’re compact, sleek, and kinda fun.
Strength Training Station
Get those gains in with a squat rack, power cage, and a dumbbell rack. This equipment is ideal for working with a large basement space, offering a range of options for targeting specific muscles.
Foldable Bench Press
Make the most of your space with a foldable bench press.
Even though they’re compact, they offer a range of positions for workouts that include inclines, declines, or flat press without taking up the entire gym space.
Hang Resistance Bands
Add a little touch of DIY into the mix by installing some simple wall hooks or shelves to organize resistance bands. Not only does this give a “fit and tidy” vibe, it also keeps hanging equipment from turning into a tangled disaster.
Build a Towel Station
Nothing says high-end gym like a stack of fresh towels.
The best part?
This high-end gym is located right in your basement. Stay dry with fresh towels stacked on a small shelf or rack. Add a mini fridge for water bottles if you’re feelin’ fancy.
Mood Lighting = Gymcore
Pump up the jam with LED strip lights or soft overheads to create a vibey gym aesthetic (you won’t remember it was once a basement).
Keep it moody and motivated for ultimate gains or opt for softer natural lighting for an active, calm vibe – shotout to the yogis.
Treadmill or Stationary Bike
Is cardio your thing? Whether you’re training for a 5K or just hate hiking in cold weather, a treadmill or bike is a solid move. Be sure to go with a foldable option if you’re low on square footage.
Cool Down with a Ceiling Fan
It’s getting hot in here! (And no one wants to sweat that much.) For moments when you need to cool down, a ceiling fan or tower fan keeps the airflow fresh and keeps your gym from feeling like a sauna.
Use Mirrors to Maximize Space
Mirrors aren’t only for checking out your gains.
Big mirrors are great for making sure you’re maintaining proper form. You’ll lift without straining important muscles and make sure your deadlifts look like something from a ’90s fitness VHS.
Zen Gains
A healthy physique isn’t only made in your basement gym – yoga is also a great way to build strength and connect your body, mind, and spirit.
Dedicate a corner of your space for a yoga mat and foam blocks. Add a small speaker and next thing you know you’re in downward dog with ocean sounds playing in the background.
Kettlebell Keepers
Kettlebells offer a killer workout and save on space. Not only are they great for strength, core, and cardio, they also double as gym decor. Store them on a tiered shelf for extra gym aesthetic.
Make It Multi-Purpose
Having a few different types of equipment is especially important to add variety to your workouts. Consider installing a pull-up bar, TRX system, or climbing rope.
Your workouts will never get boring, and you’ll have a good balance between weights and bodyweight workouts.
Smart Storage = More Space
Depending on the size of your basement, you can use vertical space to store gym equipment. Use vertical storage like pegboards, wall racks, or floating shelves, and keep the floor open for those dreaded burpees.
Add a Whiteboard or Corkboard
Use a whiteboard or corkboard to track your fitness goals, write down your workout schedule, or write motivational quotes like “You’re stronger than you think” or “Believe you can and you will.” You got this!
Climbing Wall for a Total Body Workout
Got extra wall space and feeling adventurous?
Install a mini climbing wall. Rock climbing works major and non-major muscles and is the perfect cross of strength training and cardio for a functional (and unique) workout.
Zone Out the Distractions
Maintain a no-distraction zone and turn your basement home gym into an oasis of self-care. Do this by keeping out TVs (and other tech) and clutter. Keep it low-tech with a speaker playing your fave pump playlist.
Keep Moisture in Check
Basements get hot, and without the right ventilation, they can turn into a breeding ground for moisture and mold. Invest in a dehumidifier to keep your basement air and lungs clear.
Your gym deserves it.
Customize the Decor
You want your gym to feel like you, especially since it’s a place where you’ll be working toward your goals.
Add elements of your personality or things that will boost your energy, like posters, quotes, neon signs, or even paint a motivational mural. Your gym, your rules.
Create a Cardio Nook
Basement corners are underrated (and often dusty and overlooked). Use all your basement space to your advantage! Add a yoga mat, jump rope, and a mirror to create a cozy cardio corner.
Foam Rolling Station
Recovery is just as important to a workout as the workout itself. It helps your muscles repair and heal so they can grow stronger.
There are different ways to recover (like a cold plunge, whew), but to keep it simple, you can add a foam roller, massage balls, and maybe a heating pad in the space.
Cardio on Demand
You don’t need a treadmill or fancy elliptical to get a good cardio workout. Simply keeping a jumprope handy in your basement gym is more than enough. Jump ropes are cheap, compact, and more intense than you think.
It’s time to transform the basement gym into a motivating space that helps you achieve your fitness goals and feel great. With the proper setup and some creative thinking, it can be your ultimate escape without needing to leave your home.
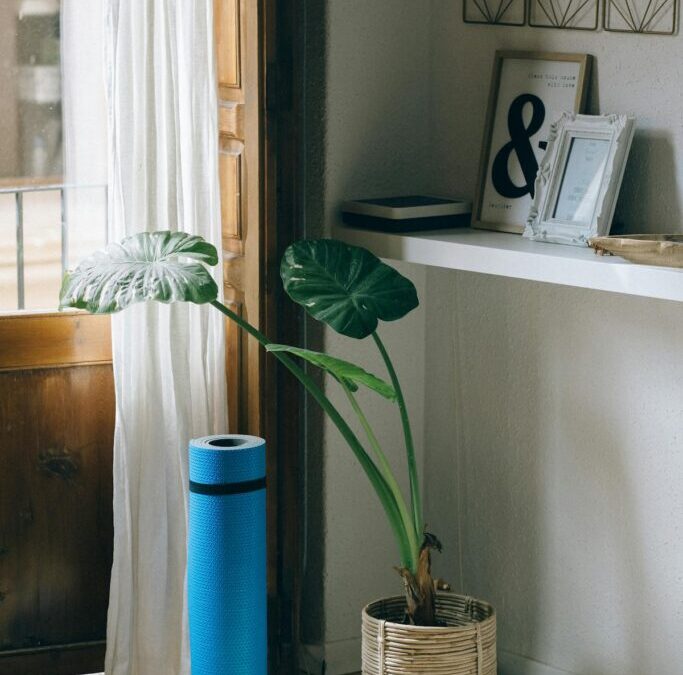
Did you know you can still achieve significant gains in small spaces? Sometimes it’s nice to just have a workout right at your fingertips, right from the comfort of your home, but not everyone has a fancy gym membership (or even wants one). Although you may not have a spare garage or basement to convert into a perfect home gym, you can still create an effective one.
Whether it’s a cozy uptown loft, a shared home, or you simply don’t want your home gym to dominate your entire living space, our guide will help you explore a range of home gym ideas. So grab your foam roller, towel, and resistance bands and let’s go!
Planning makes perfect, so before you fill up your cart, be sure to take inventory of your space. Here are a few things to ask yourself and consider before you get started:
How much space do you have available? Be sure to factor in elements like ceiling height and floor space into account. Ventilation is also important (because you don’t want to turn your pilates session into a heated workout, unless that’s your thing).
Do you know what types of workouts to prioritize? Maybe you love yoga, or strength training is your jam, or you prefer a multi-use space.
What are your storage options? Convenience is key. Consider if you need to purchase a storage bench or shelf designed to stylishly hide your equipment and keep it close by.
Have you created a budget? With so many equipment options, it’s easy to get carried away. Be intentional by creating a budget and sticking to it, so you can splurge without overdoing it.
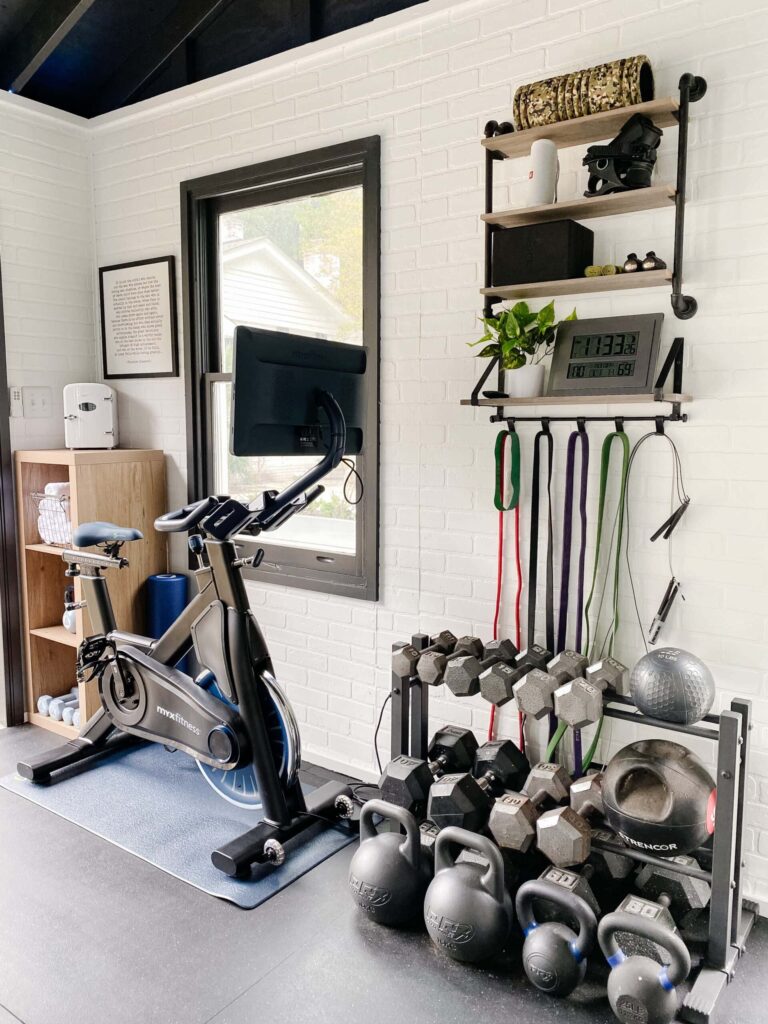
With a home gym, it goes without saying that you want to be mindful of your space, especially when you’re limited. Try using equipment that offers multiple uses or is compact enough to store away with ease. Versatility is your friend, so here are a few equipment pieces to consider:
Adjustable Dumbbells
Instead of buying an entire rack of traditional dumbbells, opt for adjustable dumbbells. They are great space savers, and many brands offer models that let you change weights quickly and compactly.
Resistance Bands
These lightweight bands are portable and can mimic almost every strength training movement. You can loop them under doors, anchor them to furniture, or even carry them when you travel.
Look for a compact bench that folds flat to store under a bed or behind a door. Use them for strength workouts, step-ups, and even incline ab exercises.
Suspension Trainer (TRX)
A TRX system is perfect for building strength and toning, offering you a full-body workout and takes up virtually no space. It can be attached to a door, beam, or ceiling mount.
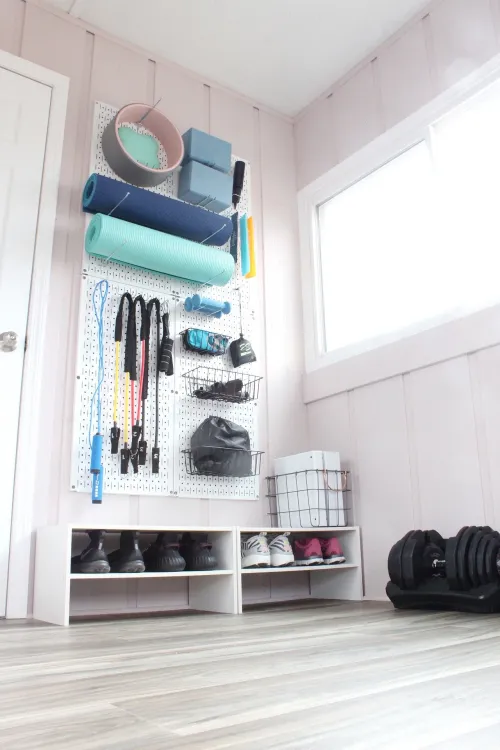
What if you’re limited on floor space? Think upward! From wall mounts to mirrors, you can make that small corner of gym space feel bigger and functional.
Wall-Mounted Storage
Consider installing hooks, shelves, or pegboards to keep equipment off the floor. Hang resistance bands, jump ropes, yoga mats, or even small weights.
Pull-up bars require no permanent installation, can easily hang on your door, and can be removed after workouts. Some models even fold for easy storage.
Mirrors
Mirrors are a great way to open up the space visually, and you don’t need an entire wall. One large panel mirror can do the trick, and now you’re able to check out your form without fuss.
Some gym equipment might be too bulky, but that doesn’t mean you need to skip a cardio session. Here are a few ways to make it work:
Mini Steppers or Ellipticals
Compact versions of full-sized cardio machines, like mini step machines, walking pads, and ellipticals, are designed specifically for small homes and apartments. They can effortlessly slide under a desk or bed for easy storage and are great for multi-tasking during workouts (like catching up on your favorite show while getting in steps).
Compact, simple, and budget-friendly, jump ropes are an incredibly effective cardio tool. Just make sure your ceiling is high enough and you have some clearance. If you have downstairs neighbors, be sure to take that into consideration too.
Some rowing machines are designed to fold upright after use and roll away easily. They are great for cardio because they offer a full body workout, targeting core, back, legs, and arms.
Shadowboxing or Dancing
Get your energy up and blood pumping right from home (and often for free) using apps and YouTube channels. You’ll find a variety of intense cardio videos without needing any equipment or much space. Just clear the area and get moving!
Not feeling like dedicating one permanent corner of your home to working out, or you realistically don’t have the space? Make your gym mobile with these tips:
Store your equipment in a rolling cart, storage ottoman, or large bin with wheels.
Pull out your equipment when it’s time to work out and tuck it away afterward.
Remember, a yoga mat can act as your workout surface and easily rolls up for storage.
Smart mirrors combine sleek design with guided workouts. We love them because they mount on your wall and function as a full-fledged personal trainer and gym.
YouTube & Streaming Services
Free? Yep! YouTube and other streaming services have workouts tailored for small spaces that are widely available. Look for search terms like:
“Apartment-friendly HIIT”
“No jumping workouts”
“Small space weight training”
You can even find tons of options for yoga and pilates.
Protecting your floors is essential for comfort and safety. Whether you have enough space for a small garage gym or your setup is in your living room or bedroom, you want to protect your floors from heavy equipment and wear. Flooring also helps signal that “this is workout time,” even in a small space.
Interlocking foam tiles are ideal for absorbing impact.
A thick yoga mat works for bodyweight training and stretching.
Foldable gym mats are great for HIIT workouts and can be stored easily.
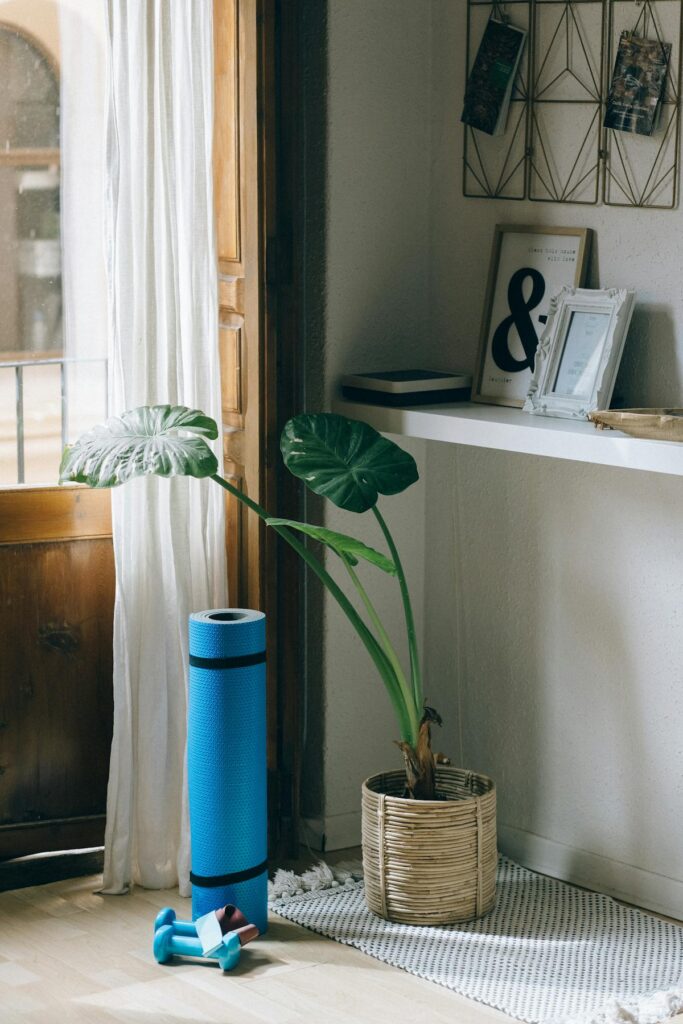
Maybe it’s hard to see the potential in your space. But even the most cramped homes have underutilized nooks to use as workout areas or storage. Here are some ideas:
Under the bed: Perfect for stashing a yoga mat and a few dumbbells.
End of a hallway: Use for stretching, resistance band workouts, or yoga.
Closet: Convert a linen or coat closet into a gym storage space by adding shelves, hooks, and storing equipment vertically.
Under the stairs: Often ignored, but can be ideal for wall-mounted gear or compact cardio equipment.
Design your space with a custom layout to be somewhere you want to spend time. Add inspirational wall art throughout the space, including quotes or images to keep you going. Use color-coded weights or sleek black and white gear to match your home’s aesthetic. Include a small plant or diffuser to make the space feel more inviting.
Feeling fancy? Mood lighting can give your space a boost – yep, turn off the lights, set up a blue light, and blast music out of your Bluetooth speaker. Now you’ve turned part of your home into a high-end luxury gym or yoga studio.
If your indoor space is just too tight, consider a small patio, balcony, garage, or backyard workout station (depending on what’s available) with a weatherproof mat and resistance bands. If you don’t have a dedicated outdoor area, a trip to your nearby park will do the trick. Try adding an outdoor storage bench to keep gear safe and dry.
You don’t need a huge space or a huge budget to get fit at home. All you need is a little creativity, flexibility, and quality equipment that fits your specific goals and space. By choosing versatile gear and designing your workout zone with intention, you can create a home gym that’s efficient and motivating.
Boilers are practical, efficient, and keep us toasty when the British winter does its worst – but let’s be honest: the pipework that comes with them can be downright ugly. Those exposed pipes snaking down your wall or criss-crossing behind cupboards are rarely attractive, and they certainly don’t fit in with that clean, curated look many of us want in our homes.
But before you go into full avoidance mode (you know the one – rearranging your furniture just so you don’t have to see them), let’s chat through some brilliant ways to cover, conceal, disguise, or even embrace your boiler pipes. Because with the right approach, those awkward lines of copper and plastic and unattractive pipes can be tamed into something far more elegant.
Why Hide Boiler Pipes in the First Place?
While some interior design styles like to celebrate raw, functional features – think industrial chic and loft conversions – most people would rather keep things sleek. Boiler pipes, by their very nature, are usually exposed in the most inconvenient places: above kitchen cupboards, in utility corners, running along walls in bathrooms or hallways.
These visible pipes can clash with your room’s aesthetic, make a space feel cluttered, or simply look unfinished. And when you’ve gone to all the effort to pick the perfect wall colour, tile pattern, or flooring, a clunky copper pipe really can ruin the vibe.
The good news? There are boiler pipe cover ideas for every style, every budget and every type of home. Here are some of our favourite solutions.
Let’s start with the tried-and-true method and a popular way of disguising – boxing in your boiler pipes. Pipe boxing is essentially creating a neat cover (like a little cabinet or column) around the pipes using MDF, plywood or another panel material, and then decorating it however you like.
What you’ll need:
Timber or MDF panels
Battens or brackets
Screws or fixings
Paint or wallpaper
You can paint your cover for boiler pipes to match your walls for a seamless look, or use wood panelling or wallpaper to turn it into a decorative feature. It’s also a perfect opportunity to carry a wall detail – like tongue-and-groove panelling – right across, making it all look intentional.
If you choose to opt for this route, make sure you leave space for ventilation (especially around hot water or heating pipes) and easy access for maintenance.
Not ready to build a whole box to cover boiler pipes? No problem. You can tidy things up in minutes with boiler pipe casing or pipe covers. Boiler casings are usually snap-on tubes or sleeves that slip over existing pipework to hide the surface material; they’re especially useful for hiding unsightly pipes and a mismatch of copper and white plastic.
These attractive casings and covers now come in plenty of finishes, including:
Chrome pipe cover
Brushed brass pipe cover box
Matte black boiler pipe casing
White or paintable PVC heating pipe cover
Wood-effect style pipe box cover
They’re a quick, no-fuss fix that works particularly well in visible kitchen or bathroom areas. Just choose a finish that complements your taps, radiator valves or cabinet handles, and voilà – instant cohesion.
This one’s for the detail-lovers: if you’re already planning some joinery or wall work, it can be well worth designing a skirting board or false wall that tucks the pipes neatly out of sight.
Let’s say you have vertical pipework running down from the ceiling in a hallway. You could build a narrow stud wall around it, plaster over, paint to match, and – just like that – it disappears. Or, for horizontal unsightly boiler pipes along the base of a wall, add an extra-deep skirting board. It hides the pipe, adds architectural charm, and no one will suspect a thing.
This method takes a little more time and effort, but the results can be seamless. It’s ideal during renovations or if you’re making broader updates to a room anyway.
If your boiler pipes are part of a central heating system and connect to radiators, radiator covers can be a fantastic double-duty option. A stylish radiator cover doesn’t just conceal the radiator itself – it can often hide much of the connected pipework too.
Many off-the-shelf radiator covers have hollow legs or a frame base that will hide pipe runs beneath. Or you could commission a made-to-measure design that tucks away everything except the heat.
Similarly, a narrow side cabinet or tallboy placed cleverly next to or in front of pipes can make them all but vanish – while adding valuable storage to boot. Just make sure there’s enough ventilation.
This one’s great for smaller spaces: if you’ve got a few vertical pipes running down the wall in a kitchen, bathroom or utility room, consider installing open shelving around or even across them.
Wooden shelves supported on either side of the pipe run can frame the piping and divert the eye. Display plants, jars, towels or books and you’ll soon find the pipes fade into the background.
If you’re working in a kitchen or bathroom, opt for moisture-resistant materials or glass for a more minimal look. In living areas, rustic wood can add warmth and charm, especially when paired with clever styling.
Integrated Cabinets and Utility Cupboards
[embedded content]
If your boiler itself is wall-mounted (as most modern boilers are), why not build a shallow boiler cupboard around it and its pipework? It’s common in newer homes to hide boilers in kitchen cabinets, but even if your boiler is in a hallway or bathroom, slimline boiler covers in the form of a cabinet can work wonders.
Include cutouts for ventilation and servicing, and make it part of a wider built-in storage unit if you’ve got space. You could even include shelves above or below for cleaning products, towels or tools.
Want to take it further? Use matching doors or paint the cabinet in the same colour as your walls for a true camouflage effect. Or go bold and make it a design feature with bright colours, slatted panels or rattan fronts.
Paint Them Out
Sometimes the simplest solution is the best. If boxing-in or cabinetry isn’t an option, try painting the pipes the same colour as the wall behind them. It’s a trick decorators have used for years, and it can be incredibly effective – especially in small or narrow spaces.
By removing the colour contrast, your eye stops catching on the pipework and simply glides over it. Want to go the other way? Paint them in a bold contrasting colour and make them part of the aesthetic, especially if you’re leaning into a modern, playful or industrial look.
Just make sure you use heat-resistant paint if the pipes carry hot water or heating.
Embrace the Industrial Vibe
Let’s flip the script for a second: what if the pipes weren’t a problem, but part of the solution?
In certain settings, such as converted warehouses, contemporary kitchens or minimalist bathrooms, exposed pipework can actually look fantastic. Especially if they’re clean-lined, run in a logical or symmetrical way, and have a beautiful finish like brushed copper, aged brass, or matte black.
You can clean up the surrounding area, tidy up any old insulation, polish the metal or even use spray finishes for an intentional look. Paired with clean tiles, concrete floors or raw plaster, the pipes can become design accents in themselves and can look modern, considered, and far from accidental.
Fabric Panels or Soft Screens
For a softer, more flexible approach to boiler pipework – particularly in rented properties – fabric panels or screens can be a smart workaround. You can use tension rods and curtains to hide awkward pipework, or add a fabric panel in a corner where the boiler sits.
This method can feel especially cosy in laundry spaces or utility nooks. Choose a pretty ticking stripe, linen blend or bold print to turn it into a design moment. Plus, it’s easy to remove if needed for maintenance.
Wall Art, Plants and Distraction Techniques
Sometimes, it’s not about hiding the pipes involved in your heating system; it’s about drawing the eye somewhere else. A well-placed mirror, a vertical row of framed art, or a tall potted plant can distract beautifully from exposed pipework.
In bathrooms or utility rooms, a hanging rail with towels or baskets can serve the same purpose. Create a gallery wall, place a ladder shelf or lean a tall mirror nearby – any of these tricks will help soften the space and redirect attention.
Disguise can be subtle, clever, and layered, not just brute force cover-ups.
A Few Things to Keep in Mind
Before you grab your screwdriver or MDF panels, here are a few quick things to remember about boiler pipe covers:
Proper ventilation is crucial – Especially around boilers and hot water pipes. Don’t seal things off too tightly or you risk reducing airflow, which can affect efficiency or safety.
Accessibility matters – Your plumber (or future you) will thank you if the pipework is easy to reach for regular maintenance, routine servicing or leak-checks.
Use appropriate materials – Heat-resistant paint, moisture-proof MDF, compliant sustainable timber and safe fixings will all help your covers for boiler pipes last longer.
Check with your gas engineer – If you’re working near your boiler, particularly around flues or controls, always make sure any work complies with safety regulations.
Final Thoughts: From Eyesore to Elegant
Let’s face it – none of us asked for boiler pipes to be part of our décor dreams. But the truth is, with a little creativity and a few smart design tweaks, they don’t have to be an eyesore. Learning how to cover boiler pipes effectively can transform them from something awkward and intrusive into a seamless part of your home’s aesthetic.
Whether you go down the route of custom joinery, pick up a clever entire boiler cover, or simply wave a paintbrush in their direction, the goal is the same: to make your space feel like yours. Calm, clean, clutter-free – and free from those little design irritations that make your eye twitch every time you walk past. Because a well-designed home isn’t just about what you add, it’s about what you choose to hide. And now that you know how to cover boiler pipes in a way that works for your style and space, you’ve got all the tools you need to create a room that feels truly finished.
Dryer sheets are a commonly used laundry solution, but they aren’t the most environmentally friendly. For those who are looking for an option that’s sustainable and zero waste, there are alternatives you could find right in your home.
These dryer sheet alternatives are affordable, get the job done, and help reduce your carbon footprint.
We’ve rounded up a few options that will keep your clothes feeling fresh while also honoring the environment.
From essential oils to aluminum foil, you’d be surprised what you can do to spruce up your loads of laundry.
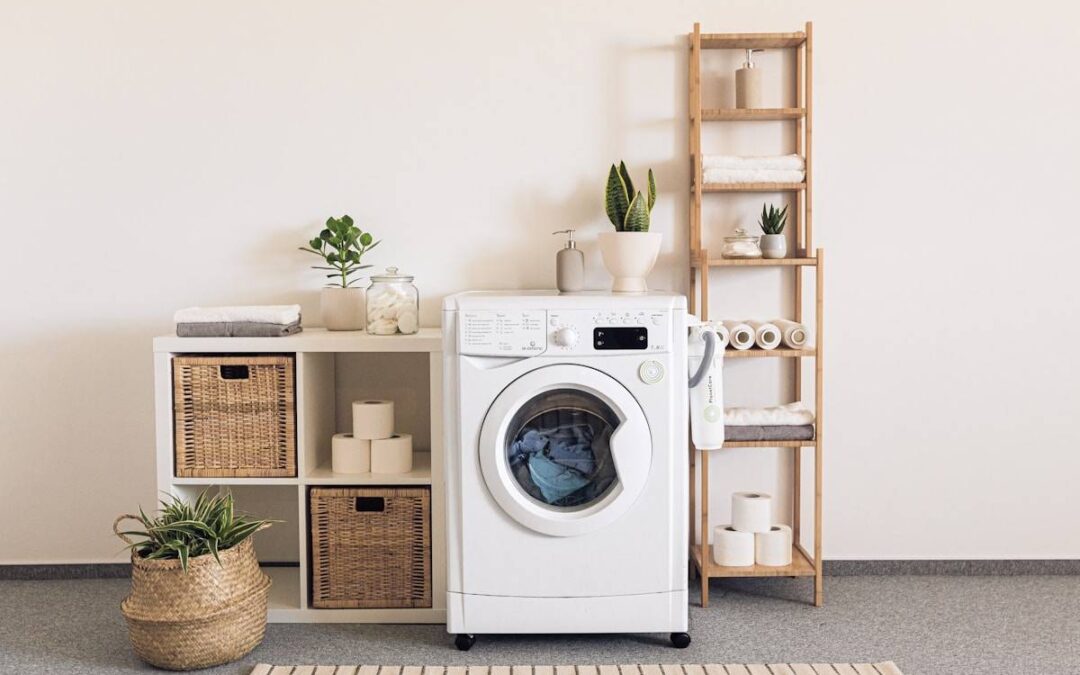
.tasty-pins-banner-container{display:block;margin-bottom:20px;position:relative;width:-moz-fit-content;width:fit-content}.tasty-pins-banner-container a{cursor:pointer;display:flex;font-size:14px;font-weight:700;letter-spacing:1px;line-height:1.8em;text-transform:uppercase}.tasty-pins-banner-container a:hover{opacity:1}.tasty-pins-banner-container .tasty-pins-banner{align-items:center;bottom:0;cursor:pointer;display:flex;justify-content:center;left:0;padding-bottom:1em;padding-top:1em;position:absolute;right:0}.tasty-pins-banner-container .tasty-pins-banner svg{margin-right:4px;width:32px}.tasty-pins-banner-container .tasty-pins-banner span{margin-top:4px}.tasty-pins-banner-container a.tasty-pins-banner{text-decoration:none}.tasty-pins-banner-container a.tasty-pins-banner:hover{opacity:.8}.tasty-pins-banner-container a.tasty-pins-banner-image-link{flex-direction:column}.tasty-pins-banner-container a img{margin-bottom:0}.entry-content .wp-block-image .tasty-pins-banner-container img{margin-bottom:0;padding-bottom:0}#et-boc .et-l div .et_pb_image_wrap .tasty-pins-banner-container .tasty-pins-banner{padding-bottom:1em!important;padding-top:1em;text-decoration:none}#et-boc .et-l div .et_pb_image_wrap .tasty-pins-banner-container a.tasty-pins-banner{cursor:pointer;display:flex;font-size:14px;font-weight:700;line-height:1.8em;text-transform:uppercase}#et-boc .et-l div .et_pb_image_wrap .tasty-pins-banner-container a.tasty-pins-banner span{letter-spacing:2px;margin-top:4px}.et-db #et-boc .et-l .et_pb_module .tasty-pins-banner-container a:not(.wc-forward){padding-bottom:0}Photo by Point3D Commercial Imaging Ltd.
Why Use Dryer Sheets?
Dryer sheets are used for a variety of reasons. Some of the most common uses include reducing static in clothing, releasing wrinkles, softening fabric, and adding a clean, fresh scent.
They’re quick and convenient, offering noticeable results with little effort. They work by transferring a solution (fabric softening agents, for instance) found on the sheets to clothing as they heat in the dryer, and voila, fluffy clothes that smell great!
Are Alternatives Better?
Many of us want are clothes to feel and smell fresh after washing, but at what cost?
Traditional dryer sheets are often filled with toxic chemicals and synthetic fragrances.
Sure, these chemicals quickly make your clothes feel soft and smell like roses, but they also transfer those same chemicals onto your skin.
If you have sensitive skin, allergies, sensitivities to harsh chemicals, or simply prefer to be more environmentally conscious, traditional dryer sheets may not be the best option for you.
Beyond personal health, single-use dryer sheets aren’t biodegradable, meaning once they’re used they go straight to a landfill.
Switching to dryer sheet alternatives allows you to cut back on chemical exposure and environmental impact. Many of the available options are cost-effective (or free) and already availabe in your home.
So, how what dryer sheet alternatives will help you toss the chemicals and embrace the natural? Keep reading!
Vinegar
Whenever we think of natural all-purpose cleaning solutions, vinegar is usually at the top of the list. Plus, it’s something you can easily find right in your kitchen.
To make this dryer sheet alternative, apply a mix of 1/2 cup white vinegar or apple cider vinegar with 1/2 cup water to a rag or cloth, then add it to clothes during the drying cycle.
Using vinegar will help your clothes feel clean and soft and minimize static.
And if you are worried about a strong vinegar smell, there’s nothing to fear – there’s no lingering scent, but a little essential oil can naturally offer a nice scent boost.
Note: Be sure to avoid using vinegar if you’ve used bleach in your clothes due to any potential chemical reactions.
Baking soda
Baking soda isn’t just for neutralizing smells in your refrigerator; it also works on clothes!
It naturally adjusts to your water’s pH levels, working to eliminate odor, bacteria, and helping clothes feel softer. We recommend adding 1/2 or 1/4 cup (depending on load size) to the laundry before adding detergent, then proceeding with your usual wash settings.
This alternative is a great option for those extra smelly laundry loads, especially thanks to its bacteria-busting power. Just make sure not to mix with vinegar, or else your laundry will turn into a science project!
Ice cubes
This is probably one of the easiest dryer sheet alternatives on the list since it’s using the most readily available item in your home: water.
Just freeze up some ice cubes to get this idea going and add them during the last 15-20 minutes of your dryer cycle.
It probably seems counterintuitive to use ice cubes for all the reasons you could think, but it works. The steam from the ice cubes works to reduce wrinkles and static.
Just a couple of ice cubes will do for a small to medium-sized load.
Aluminum foil balls
Foil as a zero waste dryer sheet option may be the most surprising on the list. But before you skip ahead, here’s why it works.
The negative ions from the aluminum foil discharge static electricity which releases which works to make your clothes static-free.
You’ll want to add two or three small balls of foil to your dryer with your wet clothing. Remember foil won’t soften your clothes or boost scents – but other options on the list will do the trick.
Wool dryer balls
Dryer balls made from wool are a great, eco-friendly option because they reduce static and soften clothes.
This natural fabric softener is loved for being so sustainable because they made with natural fibers and is designed to be reusable with multiple loads. Adding them to your dryer can also reduce drying time and increase airflow as the balls work to soak up extra moisture in fabrics.
Wool balls are also great for sensitive skin because they are free from synthetic fabrics and dyes.
Give them an extra boost by adding your favorite drops of essential oil (like lavender or citrus) to help naturally improve the scent of your clothes without harmful chemicals.
Soap nuts
Soap nuts, or dried berries, are made from saponin-containing trees. They serve multiple purposes: you can use them by adding them to the washer, dryer, or on their own.
Saponin contained in soap nuts helps remove dirt from clothing during the washing process and releases a fresh scent during drying.
Simply add a few soap nuts to a muslin or cotton drawstring bag to use for washing and transfer the same bag to the dryer.
After use, remove the bag and let it completely dry – soap nuts can be reused for several more wash cycles.
Special note: Soap nuts are also compostable and can be added to your garden after you’re done using them.
DIY Dryer Sheets
Feeling ambitious? Try making your dryer sheets.
This is an especially useful option if you’d prefer an alternative that closely matches traditional dryer sheets. All you need is an old cloth – think a worn-out t-shirt or some old hand towels – and cut a few squares to size.
Place them in an airtight container, adding a little vinegar (until damp) and essential oils. Next time you have a load of laundry to dry, you can toss one of these in without any extra prep.
One of the simplest DIY options is just hanging your sheets out to dry. Yes, it’s very traditional, but the sun naturally sanitizes. Make sure to shake your clothes before hanging, and if you have allergies, consider hanging to dry indoors.
Dryer sheets are a commonly used to keep laundry fresh and fluffy post-dryer, but the harmful ingredients may give you pause. If you have sensitive skin or just prefer a more sustainable zero waste option, there are plenty to choose from vinegar to aluminum foil. Here’s to happy washing (with less worry).
In the era of smart technology, the way we secure our homes is evolving rapidly. Traditional locks and keys are gradually being replaced by advanced, intelligent systems that offer enhanced convenience, security, and control. Among the frontrunners in this revolution are smart door locks – innovative devices that allow you to manage access effortlessly while boosting safety.
This article explores the concept, benefits, and technology behind smart door locks, with a special focus on TCL, a leading technology brand that has made significant strides in smart home security solutions. We will delve into the features, advantages, and future trends in smart locking systems, highlighting how TCL’s smart door locks stand out in the market.
Understanding Smart Door Locks
Smart door locks are electronic locking devices designed to replace or supplement traditional mechanical locks. They enable users to lock and unlock doors remotely or through various authentication methods such as biometric scans, smartphone apps, RFID cards, or PIN codes.
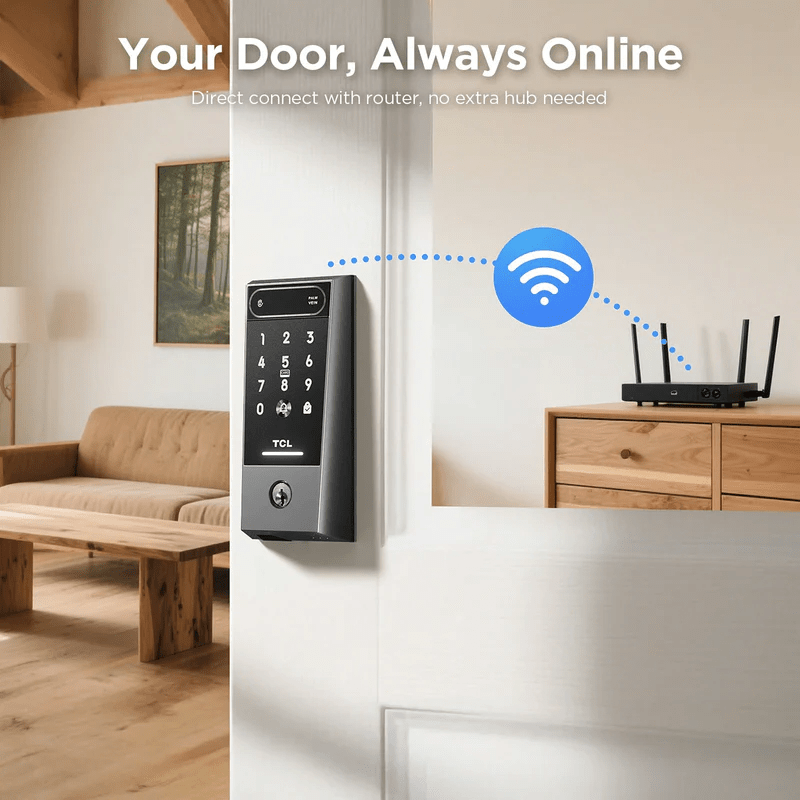
Unlike conventional locks, smart door locks connect to home networks or Bluetooth, providing real-time control and monitoring of access. This capability transforms door security from a physical barrier into a dynamic, tech-enabled system.
Key Components of Smart Door Locks
Smart door locks typically include:
Electronic locking mechanism: Replaces or supplements mechanical bolts.
Control interface: Mobile apps, voice assistants, or remote controls.
Sensors and alarms: Detect tampering or forced entry.
Power source: Rechargeable batteries or wired power.
Benefits of Smart Door Locks
One of the main advantages of smart door locks is superior security. Traditional locks are susceptible to lock picking, bumping, or key duplication. Smart locks reduce these vulnerabilities through encrypted digital communication and multiple authentication options.
TCL’s smart door locks incorporate advanced biometric recognition and encrypted wireless communication, providing robust protection against unauthorized access.
Convenience and Flexibility
Smart locks allow users to control access remotely. For example, homeowners can unlock doors for guests, delivery personnel, or maintenance workers without being physically present. Access can be granted temporarily or permanently, and activity logs provide detailed access histories.
TCL smart door locks feature user-friendly apps that streamline management, making security effortless and adaptable to individual lifestyles.
Integration with Smart Home Systems
Many smart door locks, including those from TCL, are compatible with smart home ecosystems. Integration with voice assistants like Alexa or Google Assistant enables hands-free operation and enhances the overall smart home experience.
Improved User Experience
Fingerprint recognition, keyless entry, and remote unlocking eliminate the hassle of carrying physical keys. TCL smart door locks provide quick, reliable biometric access, enhancing user comfort and accessibility.
Improved Security
For homeowners, smart door locks represent a leap forward in safeguarding property and family. TCL’s smart door locks offer flexible access options suitable for families, providing peace of mind and ease of use.
In the case of rental properties and holiday lets, they can leverage smart locks to provide temporary access codes to tenants or guests, reducing the need for physical keys. TCL smart locks support dynamic access control, ideal for such environments.
TCL’s Approach to Smart Door Locks
TCL, a globally renowned electronics manufacturer, has extended its expertise into the smart security market with innovative smart door locks. Known for quality and technological innovation, TCL’s smart locks stand out by combining advanced security features with user-centric design.
Key Features of TCL Smart Door Locks
Biometric Fingerprint Scanner: TCL smart locks employ high-precision fingerprint sensors that recognize authorized users with exceptional accuracy and speed.
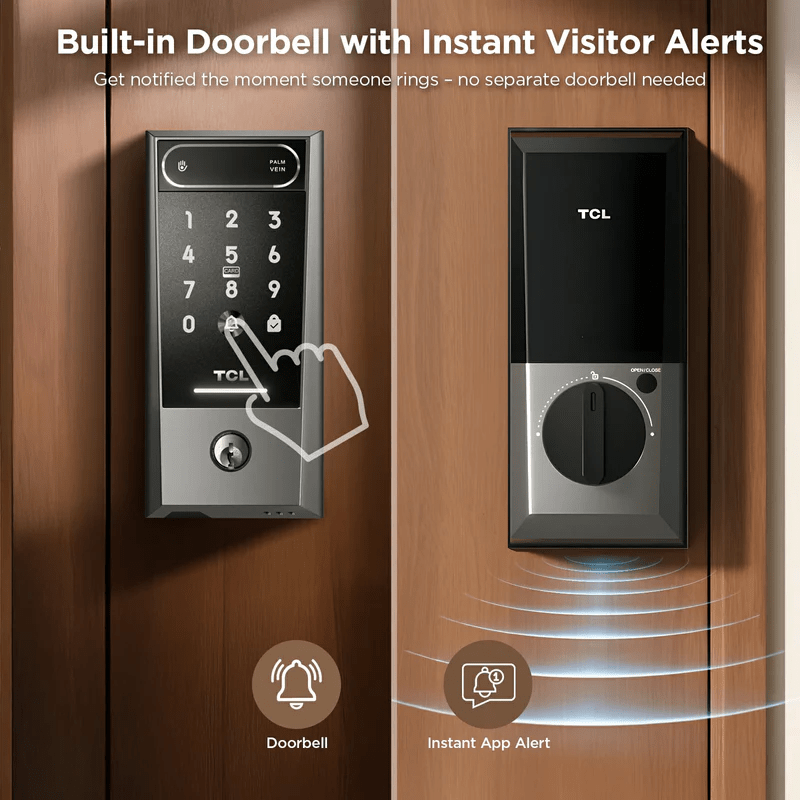
Multiple Unlocking Methods: Besides fingerprint scanning, TCL locks support PIN codes, RFID cards, and mobile app control.
Mobile App Integration: TCL provides a comprehensive mobile app that allows users to lock/unlock doors remotely, share access permissions, and monitor entry logs in real-time.
Durable and Stylish Design: The smart locks are crafted with premium materials that provide durability and a sleek modern aesthetic to complement any door.
Robust Security Protocols: End-to-end encryption safeguards communication between the lock and controlling devices, preventing hacking or interception.
Battery Efficiency: The smart door locks are designed for low power consumption, providing extended battery life and timely alerts for replacements.
How Smart Door Locks Work
Smart door locks utilize a combination of hardware and software to operate effectively:
Authentication Process: When a user attempts to unlock the door, the smart lock verifies their credentials through fingerprint, code, card, or smartphone authentication.
Signal Transmission: If remote access is enabled, the lock communicates with the user’s device through Bluetooth or Wi-Fi.
Lock Actuation: Upon successful verification, the electronic locking mechanism disengages, allowing the door to open.
Access Logging: Every interaction is recorded in the system, accessible via the controlling app for security audits.
Alerts and Notifications: Users receive alerts for unauthorized attempts, low battery, or when the door is left unlocked.
TCL’s smart door locks excel in delivering seamless execution of these steps, ensuring security without compromising convenience.
Installation and Maintenance
Installing a smart door lock is generally straightforward, especially models designed for retrofit on existing doors. TCL smart door locks come with clear instructions and customer support to facilitate hassle-free setup.
Regular maintenance involves:
Battery replacement or charging.
Firmware updates via the TCL app.
Periodic sensor cleaning.
Monitoring lock status and alerts.
TCL’s customer service provides ongoing support to ensure optimal lock performance.
Comparing TCL Smart Door Locks with Other Brands
When compared to other brands, TCL smart door locks offer competitive advantages:
Affordability: TCL balances advanced features with reasonable pricing.
Technology: Cutting-edge biometric technology often surpasses competitors.
Integration: TCL smart locks seamlessly integrate with a variety of smart home platforms.
User Experience: Intuitive mobile app design simplifies management.
Customer Support: Robust after-sales service.
While many brands provide smart locks, TCL stands out by delivering a holistic package of security, technology, and usability.
Future Trends in Smart Door Locks
The future of smart door locks is promising with several emerging trends:
Artificial Intelligence: AI-powered facial recognition and behavioral analytics will enhance security.
Blockchain for Access Control: Decentralized systems could prevent hacking and enhance privacy.
Energy Harvesting Locks: Self-powered locks using solar or kinetic energy.
Expanded Integration: Deeper connection with smart city infrastructure and IoT devices.
Biometric Innovations: Beyond fingerprints to palm vein, retina, or voice recognition.
TCL invests in R&D to stay at the forefront of these developments, ensuring their smart locks continue to evolve with the latest innovations.
Conclusion
The shift towards smart door locks represents a significant advancement in home and property security. By combining convenience, security, and modern technology, these locks offer a superior alternative to traditional locking mechanisms.
TCL’s commitment to innovation and quality positions its smart door locks as a leading choice for consumers seeking reliable and intelligent security solutions. With advanced features, ease of use, and robust protection, TCL smart door locks are paving the way for a safer, smarter future.