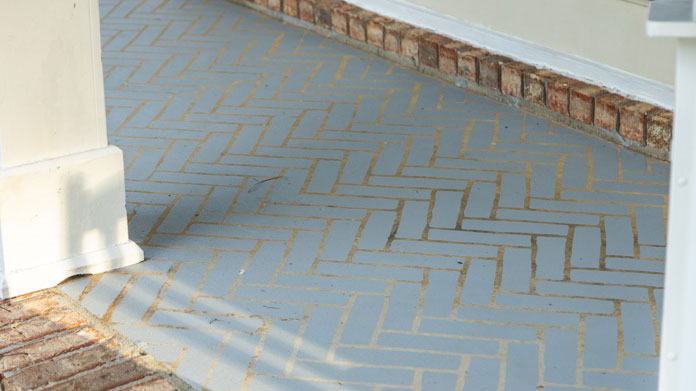
If you want to give your concrete porch some extra flair, paint a pattern on it! Using a stencil makes this a do-it-yourself friendly project.
You don’t need special skills or tools to tackle this project, but do you need patience and time, because attention to detail is a must!
Materials Needed
Stencil kit
Paint
Paint roller
Tape
1. Pick a Pattern
Before you begin, find a pattern you like. The stencil kit we’re using on this project includes two pattern types: a smaller version for edges and a larger version for wide-open spaces.
Registration marks on the stencil edges ensure proper alignment for the next application.
The key to painting an even pattern is to perfect the stencil’s position.
2. Perfect the Position
Remember that attention to detail? It starts before you even paint a thing!
Precision is key, so it’s important to carefully tape the stencil in the middle of the space, and then work toward the edges.
Working from the inside out helps to keep the pattern even across the entire surface.
When you paint over the stencil, do so in one direction — never back and forth.
3. Paint, Paint, Paint
Paint over the surface in one direction. We’re using a One Part Epoxy Coating designed specifically for concrete.
To avoid bleed-through, remove the excess paint from the roller each time you dip it in the tray. It’s also a good idea to wipe the paint off the underside of the stencil after each application.
For sharp pattern edges and a clean look, take your time while applying, removing and painting the stencil.
This formerly plain concrete floor now has some style, and the transformation cost less than $100!
Costs
It doesn’t cost much to transform an old, worn-out concrete porch into a stylish surface for gliders, rocking chairs and outdoor sofas.
Here’s what you can expect to pay for this project:
Changing the color of the mortar on your fireplace can give the whole room a new feel.
Mortar is the “grout” in your rock fireplace. The term grout is more commonly used when referring to ceramic tile installations. Grout fills joints between tiles, and mortar joins stone together.
In addition to providing a solid bond between the stone, it can also add to the design and interest of stone or brick.
In any case, you can change the color of the mortar a couple of ways.
Muriatic Acid
If the mortar is just a touch too dark and you want to lighten it up a wee bit then start with a 10-percent solution of muriatic acid. Apply the solution to the mortar joints only using a small bristle brush or similar device. A little of this mild acid on the stone or brick will generally not hurt so long as you don’t allow it to remain for very long.
Allow the acid to remain on the mortar joints for at least five minutes or until it has stopped fizzing. Rinse the area completely and allow it to dry. You may need to wait a few days until it has dried completely to determine if the process worked. If the mortar has lightened but the desired result has not been achieved, give it another acid treatment and allow it to dry to check the results.
Remember, safety first. Wear rubber gloves and eye protection. Make sure there is plenty of ventilation in the area when working with acid.
Apply a New Mortar Layer
Another way to change the color is to remove about a 1/4″ layer from the surface of the existing mortar using a hammer and chisel and apply a new layer in its place. Mix powdered pigment in with the new mortar to create a color to suit your decorating needs.
First, make a few test samples on a board to make sure that you have the desired color. Be sure to allow the sample to completely dry since mortar will typically lighten as it dries.
A mending plate repairs or strengthens joints in wooden furniture, picture frames, shelving and many other household connections.
These metal connectors are available in straight, T-shaped, flat L-shaped and bent L-shaped designs.
Regardless of the shape, mending plates are pre-drilled and countersunk for use with flat head screws. This allows flat-head screws to be screwed down flush with the surface of the plate, thus, minimizing the total thickness of the connection paraphernalia.
How to Use
Generally, lay a mending plate onto the surface of the area to be joined, repaired or strengthened and screw it into place with four flat-head wood screws (more for the T-shape).
For additional strength, use plates on both sides of the connection. And, for even more strength, through-bolting provides the most secure connection.
Mending plates also connect, strengthen and repair plastics, metals (steel, aluminum, etc.), glass and other solids. Naturally, in some cases, you must use rubber gaskets and through-bolting to make an effective connection.
Straight-Shaped Plates
Use straight-shaped plates for end-to-end and side-to-side connections. You can also join split-wood with a straight mending plate.
For example, when fixing a split sideboard on a bed, use glue and several mending brackets to repair the split. Then add mending plates to the other side as a preventive measure for the “next jump”.
To make this kind of repair, place the plates perpendicular to the split with an equal number of holes on either side of the damage.
T-Shaped Plates
The T-shaped mending plate connects two or three pieces of material that intersect in a T-shaped fashion.
A good example of a T-connection would be where the horizontal center rail of a screen door connects to each of the side rails.
Another example would be where a spindle and handrail meet.
L-Shaped Plates
For corner connections, use the Flat-L-shaped mending plate.
A picture frame with loose corners would be a prime candidate for L-shape mending. The bent L-shaped mending plate is designed to be used on inside corners.
Strengthen furniture like cabinets and chairs quickly with the addition of bent L-shaped connectors.
The L-shaped connector is perfect for stabilizing tall pieces of furniture such as armoires, china cabinets, entertainment centers, bookcases and breakfronts. Screw one side of the bracket through the wall covering and into a wall stud and the other side of the bracket into the piece of furniture that you want to stabilize. An ounce of prevention can provide tons of cure in the event of an earthquake, tornado or hurricane.
Installation
Installing a mending plate is really easy to do. If the connection is new, simply place the pieces into their desired positions and connect them in the normal way (glue, nails, screws, etc.).
Next, lay the mending plate in place and use a pencil to mark the screw holes. Next, use a punch, awl or drill to prepare the material for screws.
Finally, with the material predrilled, simply install the brackets.
By the way, when making a glued connection be sure that the clamps remain in place until the glue has completely dried.
Using mending brackets should never preclude the use of the regularly accepted attachment method for the project. For example, when making an L-shaped connection, glue and nail or screw the corner joint together in the conventional fashion.
Remember, use the mending bracket to “improve the strength of a connection” – not as the “only” connection.
Geary is concerned about some asbestos tape that has separated from the outside of his heating ducts and plenum on the forces-air heater in his 38-year-old home.
The question: Is this a condition he should attend to, and if so, how?
The asbestos tape was originally used to help hold the ducting together at the joints, and to assist in preventing air from escaping from the system at those joints. Modern duct tape is asbestos-free.
There’s not much asbestos in the taping. You can remove the old tape yourself. Moisten the old tape and remove as much as possible. Then, simply retape all the joints with two or three winds of new 2-inch-wide silver duct tape.
Contractors are allowed to work on up to about 120 feet of asbestos piping without special restrictions. A few inches of asbestos tape fall well within safe limits.
Also, here’s a suggestion. Since you can see the duct tape on your metal heat-supply ducts, it is apparent to us that they are not insulated. While you are at the store getting duct tape, purchase a few rolls of 1-inch-thick by 12-inch-wide insulation and wrap those ducts. Save yourself some heating-bill bucks this winter.
Ingredients are key when it comes to purchasing good-quality paint.
A thin film of good paint, only a few thousandths of an inch thick, protects, seals, hides, decorates and is not hazardous to the user. It gives surfaces long-term protection at a very moderate price, for some.
It’s in millions of homes and businesses, in nearly all rooms. So, what’s in that paint you’re putting on your walls?
Here are the three main ingredients you should know about!
Pigment
Pigment is the ingredient most people first consider when purchasing paint. It provides the texture, color and hiding properties of the paint.
Pigments actually used to be pretty dangerous and included: lead, chromates and asbestos. Dangerous pigments are in very rare use and are outlawed in most places. Titanium dioxide and iron oxides are safe, high-grade pigments and are found in better quality paints. Clay and silica are also used but don’t hold up as well.
Cheaper pigment materials cannot be ground as finely as the better pigments can be ground. You can actually tell whether paint is good or not by rubbing it between the tips of your thumb and index finger. If it feels gritty, it more than likely contains either a cheap pigment or lot of cheap filler — like clay.
Paints with cheaper pigment materials will not normally last as long as paint that contains mostly titanium dioxide or iron oxides, which tests very smooth to the touch.
Binder
The paint ingredient that holds everything together is called the binder.
Linseed oil is usually the binder in oil-based paint, which is frequently mixed with one or more other vegetable oils.
However, in water-based paint, one popular binder is polyvinyl acetate (white glue). Also, there is a latex undercoating called PVA which is short for Poly Vinyl Acetate.
Solvent
The solvent in water-based paint is water. In oil-based paint, the solvent is thinner (petrochemical distillate).
When the water is evaporating out of latex paint and when the thinner is evaporating out of oil base paint both processes are referred to as drying. Before they evaporate, the solvents keep their respective pigments and binders in solution and help them penetrate deeply into the surface.
After the solvents have evaporated, they leave a thin hardened layer of pigment and binder that we know as paint.
Other Paint Qualities
There are other additives that help flow, reduce bubbles, control consistency, etc., but remember good paints are not gritty.
Here’s another test you can make. Apply a spot of good paint to any surface. Apply a spot of cheap paint next to it. Once the it has dried completely, put a drop of food coloring onto each spot. The good paint will hold the food coloring together. The cheap one will allow the food coloring to spread.
When it comes to home maintenance changing a tub spout is about as simple as it gets. The variables related to installation are limited to two basic configurations: threaded connection type and slip connection type
All you have to do is first determine which configuration exists at your tub. Then, proceed based on your findings.
Threaded Connection
A threaded connection is just that – where the spout “screws on” to a threaded pipe that protrudes out from the wall.
No locks, no latches and no other gismos to worry about. Simply turn the spout counterclockwise with enough force and removal will occur.
Slip Connection
A slip connection is a little different. Here you will need to find a set screw at the underside of the spout near the wall end.
The set screw is usually an Allen head and recessed. The trick here is to loosen the set screw. Turn the Allen screw counterclockwise several turns – all the way out if you like – and “slip” the spout off the pipe that comes out of the wall. No threads with this one.
Installation
First, clean the area thoroughly and perform the above in reverse. With a threaded connection, you will also want to clean the threads on the nipple coming out of the wall with a wire brush. Then apply either pipe joint compound or Teflon tape. We prefer the Teflon tape for two reasons:
It is cleaner – way less messy to work with than pipe joint compound
The spout connection is not high pressure. Even when the shower diverter is in the spout, the connection is still not high pressure.
Finally, make sure that the area where the spout joins the wall is properly sealed with plumbers putty and/or tub caulk.
Because the tub spout is not a high-pressure connection installation, should involve gentle force when reconnecting. Remember, your intention should be to achieve a clean, well-positioned installation. Forget water leaks. They won’t happen.
Tips
Although there are only two kinds of tub spout types (threaded and slip) there are several “sizes” (lengths) in each group. This is where your patience is important. Not every store carries every length in each type. When we refer to size, we do not mean the overall length.
Where two different spouts may be the same overall length, they may be quite different. Inside the spout is where dimensions need to be compared. The threads on a threaded spout begin at a certain distance from the very back edge.
Measure the distance in your old spout and then the distance in the new one. If they exactly compare, you have a match and an easy installation that should be seamless. Diameter is rarely ever a problem.
If you’ve looked for several days and can’t find a threaded spout to fit then you may want to consider replacing the pipe that comes out of the wall.
Attempting the removal of this nipple can often result in broken pipes in the wall and a plumbing nightmare. By altering the length of the nipple, you can use any size that’s available.
Find the right spout and leave the nipple alone. Slip spouts are slightly less difficult to remove and replace – no threads to clean, no pipe joint compound, etc. – but there is the problem of size here too. The end of the wall pipe must fit into a rubber gasket near the front of the spout. The gasket seals the connection between the pipe and the spout.
Therefore, the replacement spout needs to be the same size as the original. Again, the distance from the end of the spout to the location of the gasket should be measured and compared in the old and new units.