Samsung’s 4-Door Flex Zone Refrigerator features a beverage center for quick access to a water dispenser and an AutoFill Water Pitcher with the option to infuse with flavor.
Just place the pitcher into the beverage center and let it fill itself while you move on to other tasks. No more standing in front of the fridge watching as the pitcher slowly fills up!
The dual ice maker lets you pick between ice bites and smaller nugget ice that chill you drink faster.
Need more space in the fridge or freezer? The Flexzone allows you to customize your lower-right storage space to be a refrigerator or freezer, with five adjustable settings.
This page contains affiliate links. If you purchase a product from these links, we will earn a small commission at no additional cost to you.
A built-in deodorizing filter guarantees you’ll have great-tasting ice. (Image from The Home Depot)
Clean Cooling and Freezing
Keep the air in your fridge fresh day after day with a built-in deodorizing filter with UV technology that continuously cleans the filter itself.
This fridge features a flexible storage drawer that is perfect for storing meats, veggies or cheeses at their optimal temperature, with two customizable temperature settings.
Also, the premium Triple Cooling system has three evaporators for ultimate freshness. The precise temperature and humidity controls in all three zones help your food stay fresher longer.
With 23 cubic feet of storage space, plus the option to change the temperature in the flex zone, this fridge is fit to hold all your favorite food. (Image from The Home Depot)
Sleek Design
Samsung’s 4-Door Flex Zone Refrigerator has a modern, built-in look that blends seamlessly into your kitchen. The horizontally separated doors match countertop height.
Plus, the 23 cubic feet of flexible storage space fits all the food you love, with room for more.
The fingerprint-resistant finish withstands everyday smudging. And, the outside is treated with antimicrobial technology to deliver long-lasting protection of high-touch handle surfaces.
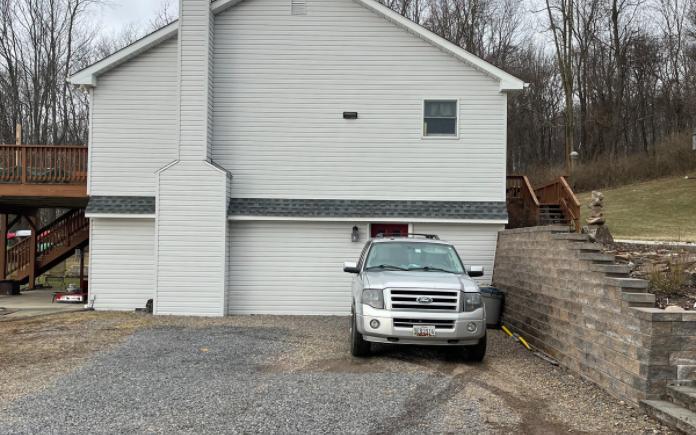
Can this retaining wall be repurposed for an attached garage wall? The short answer is no. (Photo by Johanna Carr)
Johanna Carr from Maryland wants to add an attached garage to her home. A stacked stone-block retaining wall runs along the side of her house, and she’s wondering if she can build a new wall up against it.
Retaining walls are not designed to be structural in that way. A local engineer or building inspector would not allow it.
From what we can see, the retaining wall is built into the house, so there’s likely moisture leaking in. This also is a problem you’ll want to fix.
You’ll need to remove this retaining wall and build a conventional wall with poured concrete or cinder blocks. Be sure to have a substantial foundation, and use vertical rebar to add extra support.
Because the retaining wall extends into the home’s interior, it needs to be replaced to prevent moisture issues. (Photo by Johanna Carr)
If you’re worried about the soil collapsing once the wall is out, don’t. The grassroots should hold it in place.
Another thing you’ll need to do is waterproof the backside of the wall. You don’t want a garage that has moisture seeping in.
Waterproofing only the inside wall will not be sufficient. Even though it’s not a living space, it’s still important to keep the moisture out.
You’ll need to dig out at least a foot of dirt to install the membrane. Once it’s there, you can backfill the dirt.
After the attached garage wall is built, use a traditional French drain and soft pipe to route the water onto the driveway and away from the new attached garage.
This is a somewhat routine job for concrete foundation repair specialists. Consult with one to make sure the wall is done right.
Skip to [9:18]for the full segment on the Today’s Homeowner Podcast.
Also on this episode:
Organizing a Garage
Painting Tile and Grout
Repairing a Crack in a Driveway
Venting a Bathroom Exhaust Fan
Smoothing a Concrete Curb
Best New Product
Samsung’s 4-Door Flex Zone Refrigerator lets you choose: More fridge or more freezer space? Learn more>>
Simple Solutions
Fertilizing Hard-to-Reach Plants — Fertilizing thick shrubs, bushes or other dense plants can be difficult because you can’t easily reach the base of the plant. Here’s how to simplify that chore.
Take a length of 2-inch diameter PVC pipe and cut it to 5 feet long.
Trim one end to 45 degrees, and square-cut the other end.
Now, stand close to the plant and slide the square-cut end down to the base of the plant.
Pour the fertilizer down the pipe through the 45-degree end; the angle-cut end creates a larger, easy-pour opening.
The pipe can also be used to water thick, dense plants.
4 Flowerbox Tips — Here are four ways to keep plants in your flowerbox or window box healthy and happy.
First, be sure to drill 3/8-inch diameter drainage holes in the box bottom so the soil doesn’t stay soggy. Space the holes about eight inches apart.
To stop the soil from washing through the drainage holes, cover the box bottom with an inch of gravel. Or, if you’re concerned about the added weight of the gravel, line the bottom with empty 12-ounce water bottles instead.
Plant a variety of flowering species of different colors. Put flowing vines in front, short plants in the middle and tall plants toward the rear to create an attractive tiered presentation.
At the end of the season, remove the boxes, empty out the soil and store the boxes indoors until next spring.
Question of the Week
Q: I want to put pavers on top of my existing concrete patio, but our patio is only 8-by-10 feet. Is it best to pour another concrete slab beside the existing patio, and then lay pavers across both the old and new concrete sections?
A: You don’t have to pour a new concrete slab to get the pavers even. Remove vegetation and put down two to three inches of paver base. Lay the paver base flush with the concrete slab, and compress it with a tamp.
Add more paver base if needed to make sure it’s level with the adjacent slab. Then, lay down the pavers, and fill the spaces between them with sand.
For the pavers on the concrete slab, you can glue them down.
It will be tricky to get them exactly even, but if you take your time it will work out. If you can’t get them even with the concrete slab pavers, this will cause a tripping hazard.
To avoid this, create an absolute change in elevation, where one part is clearly a step up or down.
Skip to [34:57]for the full segment on the Today’s Homeowner Podcast.
Other Products and Links Mentioned
This page contains affiliate links. If you purchase a product from these links, we will earn a small commission at no additional cost to you.
Further Reading
Ask a Question! (Podcast)
Ask a question and we could answer it on the “Today’s Homeowner Podcast!” We also may use it on our nationally syndicated radio broadcast or on todayshomeowner.com.
Companion planting is an ancient practice where two different plants, often vegetables, are planted together to benefit one or both of them. Because of that, this simple gardening technique will have you enjoying a harvest you’ve only ever dreamed of.
One of the best examples of companion planting is the Three Sisters method, according to the Master Gardners of San Diego County. Centuries ago, early American colonists observed Native Americans planting corn, pole beans and squash in the same plot. Contrarily, Europeans would typically plant these three plants in separate beds. Planting the three together not only conserved garden space but also benefited one another:
Corn provided support for the bean vines as they grew.
Beans, which have symbiotic bacteria on their roots, are “nitrogen fixers” and added this essential macronutrient back into the soil for the benefit of other plants, especially the corn.
The squash leaves provided shade and increased soil moisture retention while discouraging pests with their prickly leaves.
This biodiversity helps each crop grow to its full potential. If you’re looking to find your plant a companion, don’t worry — you’re not limited to these three sisters.
Deciding which plants go together is no sweat at all. All it takes is a little research! Refer to this helpful companion planting chart for an in-depth look at all the plants that you should and shouldn’t plant together.
Marigolds and tomatoes make the best neighbors when companion planting. (vandervelden/Getty Images Signature)
Companion Planting Do’s
The most grown crops — tomatoes, corn, beans and squash — go great together.
Planting marigolds and tomatoes in close proximity helps repel predatory bugs that like eating tomatoes and spreading blight.
Squash and corn go great together because corn provides some necessary afternoon shade to the growing squash.
Beans and corn also make a perfect pair because the corn acts as a natural trellis for the beans — giving them a structured place to grow upward and climb!
Some plants don’t make great neighbors, so refer to this guide when choosing which plants to pair. (Dcwcreations/Getty Images)
Companion Planting Don’ts
While planting certain plants together does help growth, some plants are bullies towards others — acting just like the nasty bugs, weeds and soil disease that are also trying to harm your plants.
For example, planting garlic and onions near beans is a big no-no. Both absorb nutrients from the soil that will stunt — and inevitably kill — the beans. Watch out for bullies like these!
Some plants will draw the attention of pests, like this Japanese beetle, away from your prized produce. (PaulReevesPhotography/Getty Images)
Use Four O’clock flowers to attract Japanese beetles out of roses.
Plant mustard to deter cabbage worms and harlequin bugs from cabbages, broccoli, cauliflower, Brussels sprouts.
Garlic deters rabbits as well as tree borers, aphids, cabbage looper, codling moths, Japanese beetles, snails, carrot root flies, ants and cabbage maggots. What’s more, it’s especially beneficial when planted near, roses, cucumbers, peas, lettuce or celery.
Plant spearmint and peppermint to attract bees and repel black flea beetles, ants, mosquitoes, white cabbage butterflies, aphids, and cabbage maggots. Do not plant mint near parsley. Plant mints in containers as they can easily get out of control.
For squash bugs, plant mint, chives, garlic, onion, tansy, radishes, nasturtiums, marigolds and bee balm near and among vines of winter and summer squash.
Watch this Backyard Smart video to learn about companion planting and take your first steps into a wider world of gardening.
The more you fall in love with having a great backyard, the more you realize how much you don’t know. Exmark’s Backyard Smart answers the lawn-and-garden questions homeowners are looking for.
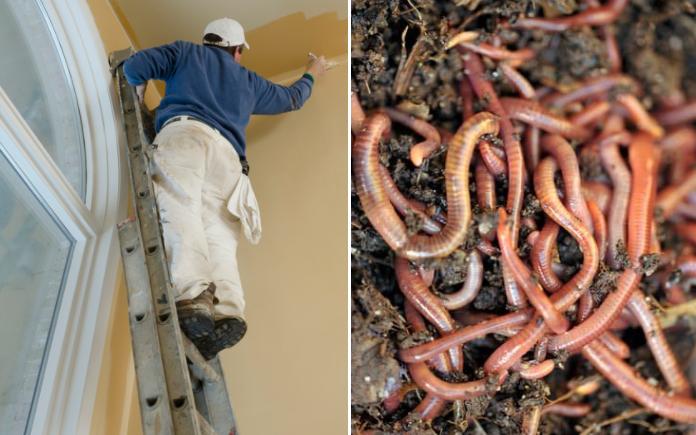
This week, what to ask when hiring a house painter and what’s worm grunting? (Split images: MPKphoto/Getty Images Signature, Grahamphoto23/Getty Images)
In this week’s radio show — what to ask when hiring a house painter, how to troubleshoot a leaky shower, and what’s worm grunting?
Hiring a house painter can be a daunting task, but if you know what to ask, it will be easier. (Andy Dean Photography)
What to Ask When Hiring a House Painter
When painting your home’s exterior, the hardest decision is choosing what paint color. After that, the next difficult thing is to find a reliable and trustworthy contractor to do the job right.
First, ask your friends and neighbors. Take a look at their home, and see if you like the results.
Next, find some paint-only stores where the pros buy their materials. Call them and tell them what you’re looking for, and they should be able to recommend someone.
Then, get everything in writing. Make sure they detail for you what they will do, like washing the surface, caulking, how many coats of paint, and what brand of paint they will use.
The paint brand is important because there’s a big fluctuation in paint costs. Go the middle of the road when it comes to paint pricing — don’t get the cheapest and don’t get the most expensive.
Don’t be afraid to ask questions. You won’t hurt anyone’s feelings. Make sure they have insurance. You don’t want to be stuck paying medical bills if a painter falls off your roof.
If someone is trying to put too much pressure on you, turn away. If they’re offering a special price or say they have leftover paint to use, those are red flags.
Get an estimated work schedule with a start and finish date, and be sure you can get in contact with them easily.
Never pay 100 percent up front, because what’s the incentive to come back? Usually, you pay a third up front, a third midway, and the last third when the job is complete.
Skip to [45:35] for the full segment on the Today’s Homeowner Radio Show.
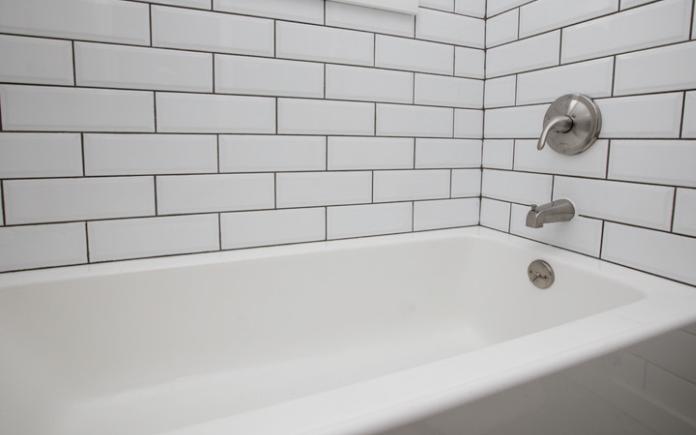
Stop shower leaks in a second-story bathroom fast to save the living area below it. (Andrei310/Getty Images)
Fixing Shower Leaks
A leaky shower on a second story means trouble for the living space below it. Do you have to remove the tile, or can it be re-grouted and resealed?
Unfortunately, 90 percent of the time you have to take out the tile. Many times, the leak is coming from a microscopic crack from where something has settled, especially on the second floor.
Before you take out the tile, try resealing the shower. Clean the tile thoroughly, and seal around the drain.
Next, seal the grout along the floor and about six to eight inches up the sidewall.
Doing this might solve the problem, but if the leak continues, you’ll have to remove the tile and find that crack.
Skip to [43:02] for the full segment on the Today’s Homeowner Radio Show.
Worm grunting is a neat technique to drive earthworms to the soil’s surface.
Worm Grunting
This week, I’m hanging out with the grandchildren to do some worm grunting.
The National Wildlife Federation describes the practice as driving a stake into the ground, then rubbing the stake with a long piece of steel in order to produce a sound that drives earthworms to the surface, where they could be collected for bait.
According to Modern Farmer, worm grunting works because the vibrations created by the metal and wood sound, to worms, like the sounds of a hungry mole.
The practice of worm grunting dates back at least 100 years and reached its peak in the 1960s in Sopchoppy, Fla., Vanderbilt University reports. This was when hundreds of worm grunters tramped the Apalachicola National Forest, harvesting millions of worms to sell to sports fishermen.
I hope we have the same luck as those worm grunters past so we will have a happy fishing trip soon!
Skip to [1:09:36] for the full segment on the Today’s Homeowner Radio Show.
Gorilla Ladders 18-foot MPXA Aluminum Multi-Position Ladder is four in one! Learn more>>
In The Aisles of Home Depot
With a little creativity, DIY projects can be a great way to refresh your home and be budget-friendly.
The Home Depot’s free, interactive livestream workshops with expert associates can help you tackle your DIY projects, teach you how to care for different areas of your home and more.
A favorite spring project is How to Build a Greenhouse Project Guide. DIY greenhouses allow you to customize and form-fit them to your individual needs, and The Home Depot’s guide can help you determine which materials would be best suited for you.
This is one of more than 6,000 DIY projects available on The Home Depot website.
If you’re not looking for a long-term DIY project, start small with spring cleaning. It’s a great way refresh without tackling too large of a project. The Home Depot has everything you need from start to finish — including cleaning supplies, paint and new furniture pieces to brighten up any space. Check out our Spring Cleaning Checklist on HomeDepot.com to help guide you this season.
Whether you’re in need of home maintenance or in the process of remodeling your home, you can save time and money when you hire The Home Depot’s certified Home Services professionals. The Home Depot has everything you need for your installation, repair and design needs, offering over 400 services.
Other Products and Links Mentioned
This page contains affiliate links. If you purchase a product from these links, we will earn a small commission at no additional cost to you.
Further Reading
Radio Show: Send us your question!
If you have a comment, general question about home improvement, or something we’ve featured on Today’s Homeowner, please fill in this form:
If replacing an ugly bathtub isn’t in your budget, try painting it with a do-it-yourself refinishing kit.
Has your old bathtub seen better days?
If you don’t want to pay to replace it or fit another one over it, try painting it. But be warned, painting a bathtub is not for the faint of heart.
Before you start, you need to get the right kind of paint for your tub. Standard paint or spray paint will flake and peel in a hot and humid bathroom.
You can get that high-gloss, new tub finish with Rust-oleum’s Tile and Tub Refinishing Kit. It’s a two-part epoxy acrylic designed to provide excellent adhesion, durability and color retention in high moisture areas. It’s ideal for ceramic tile and porcelain, fiberglass, acrylic, cast iron and steel tubs and sinks.
Preparation is key, and safety is first. Be sure to wear a respirator to control lead exposure and filter out any airborne particles. You’ll be using lots of products that will emit strong fumes, so turn on your bathroom fan and open nearby windows.
Remove caulk and hardware
Scrape away any caulk around the tub’s edges with a utility knife or putty knife.
Then, remove metal drains and hardware with the necessary tools.
Repair imperfections
Remove loose paint and rust with a wire brush or sandpaper, and repair chips and cracks with a patching compound similar to Liquid Steel.
Clean mildew
Clean the bathtub thoroughly to remove any mildew. Use a solution of 10 percent bleach and 90 percent water and rinse thoroughly.
Scrub dirty or stained surfaces with an abrasive cleaner like Comet. Rinse with fresh water and allow to thoroughly dry. Then, wipe the area down with a clean cloth.
Prepare Bathtub for Painting
Now that you’ve removed imperfections and cleaned mildew, the next step is prepping the tub for the paint. Scrub the entire tub with an abrasive pad and Lime-A-Way. Rinse and repeat if necessary.
Next, sand the entire surface with #400 or #600 grit wet/dry sandpaper. Vacuum or rinse away any residue.
Wipe the surface with a tack cloth immediately before painting to remove dust.
Painting a Bathtub
Use painter’s tape to protect the tile surrounding the tub and any fixtures that you couldn’t remove. Like all projects, it is good to test in a small, hidden area before painting to test adhesion and appearance.
Follow the directions to mix the epoxy paint, and apply it to the tub within six hours of mixing.
If using a brush: Use a fine quality, fine bristle varnish brush. Only brush in one direction for a smooth surface and feather the edges as you paint to avoid a hard line between painted areas.
If using a roller: Use a high-quality, quarter-inch short nap roller made for kitchen or bath use. Before you roll on the paint, be sure to remove any loose fibers from the roller. Wrap the roller with painter’s tape and pull it off to get rid of any excess material.
You can also use a conventional HVLP or airless paint sprayer.
Whether you use a brush, roller or paint sprayer, avoid excessive brushing to ensure an even coat and smooth finish.
Don’t worry if you see any small bubbles on the surface while painting. As the paint dries, the self-leveling properties will eliminate these bubbles.
Apply two coats, waiting at least one hour between coats. If necessary, you can apply a third coat the next day.
Dry Time
Let your painted bathtub dry for three days before exposing it to water. It may feel dry to the touch after an hour, but it will take at least three days for the epoxy acrylic to cure.
After the three-day drying period, recaulk your tub and replace the hardware.
Lastly, and most importantly, enjoy your new bathtub!
Skip to [21:08]for the full segment on the Today’s Homeowner Podcast.
Also on this episode:
Fixing Front Porch Cracks
Changing Brick Color
Painting Dark Wood Paneling
What to Ask When Contracting a House Painter
Best New Product
Gorilla Ladders 18-foot MPXA Aluminum Multi-Position Ladder is four in one! Learn more>>
Simple Solutions
Easy Organizer for Garden Tools — Most people store their lawn and garden tools in the garage by simply standing them up and leaning them in the corner. There’s nothing particularly wrong with this except that it’s a little messy and makes it hard to get a tool out. You have to go through a bunch of tools, and sometimes, they fall over.
Here’s a super simple solution to that problem that only requires three concrete blocks. All you need to do is stack up the blocks wherever you want to store your tools. What you end up with is two deep compartments for storing long-handled tools.
The blocks are heavy enough that you don’t have to worry about them falling over, no matter how many tools you put in there.
If you don’t have enough headroom, you can use two blocks so you can lift the tools out. This will give you a neat place where your tools are out of the way and easily accessible, and you don’t have to worry about them falling over.
Garden Coffee Break — Use leftover tea leaves and coffee grounds to acidify the soil of acid-loving plants such as azaleas, rhododendrons, gardenias and even blueberries.
A light sprinkling of about one-quarter of an inch applied once a month will keep the pH of the soil on the slightly acidic side.
Question of the Week
Q:The wood vertical 4×4 posts on my deck are starting to rot at the bottom where they go down into the concrete. Is there a way to repair the posts or must I replace them entirely?
A: Over the years, people have stopped putting the posts down in the concrete because of this.
When you place a post into wet concrete, the moisture stays in the wood even after the concrete is dry. This eventually leads to wood rot.
It might not be too late to cut the rotted part of the post off and put a metal saddle in it. The flat part of the saddle screws down to the concrete and the sides are bolted onto the non-rotted wood. This will keep the wood off the concrete but still utilize the concrete foundation to support the deck.
If the rot is farther up the wood than what a metal saddle can hold, you can try scabbing a fresh piece of post to the existing post. Scabbing is joining two pieces of wood together and shoring them up to increase strength. To do this, you need to support the corners of the deck with temporary posts, and do one post at a time.
Pour a concrete pad or column where the base of the post will be, then put the post on top of a metal anchor.
Skip to [34:49]for the full segment on the Today’s Homeowner Podcast.
Other Products and Links Mentioned
This page contains affiliate links. If you purchase a product from these links, we will earn a small commission at no additional cost to you.
Further Reading
Ask a Question! (Podcast)
Ask a question and we could answer it on the “Today’s Homeowner Podcast!” We also may use it on our nationally syndicated radio broadcast or on todayshomeowner.com.
The answer is a resounding “yes,” but now the question is “How many do I need?”
A short step ladder? A tall A-frame ladder? Or a tall extension ladder? Well, Gorilla Ladders made the answer an all-in-one “yes” with its new 18-foot MPXA Aluminum Multi-Position Ladder.
This four-in-one ladder has 20 telescopic positions!
Multiple Positions for a Variety of Projects
This ladder is the next generation of safe, strong, innovative and versatile climbing products that is perfect for all your project needs.
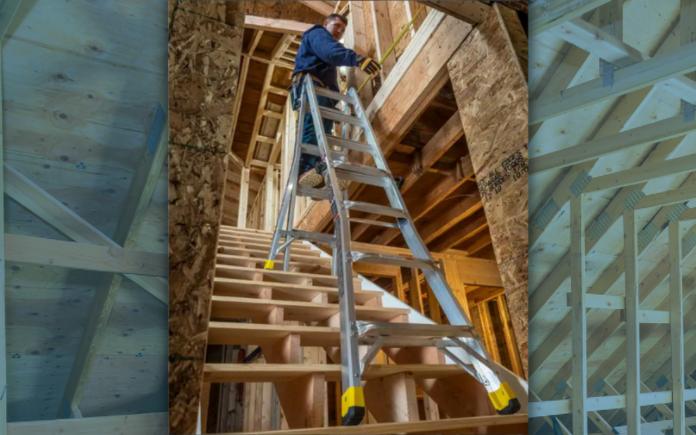
Get four ladders in one — an extension ladder, double-sided twin stepladder, 90-degree wall ladder and stairway stepladder.
You can also use it as two-scaffold bases with the purchase of the MPX Rail Brackets.
Made with lightweight aluminum, this ladder is easy to transport from project to project.
Its innovative rail design makes this ladder lighter yet stronger than comparable models, which means no more broken toes if you drop your ladder!
This page contains affiliate links. If you purchase a product from these links, we will earn a small commission at no additional cost to you.
Oversized hinges can be adjusted with just one hand!
Easy Adjustments
With 20 telescoping heights, you can easily adjust the height with one hand thanks to the user-friendly speed locks which operate with a simple quarter turn in either direction.
These extra-large, heavy-duty MPXA hinges give you improved strength with less flex and sway for safer climbing.
This aluminum ladder’s armored feet with slip-resistant pads provide twice the wear surface, so you’ll be confident knowing your ladder will stay in place while you’re working.