Does your kiddo have dreams of exploring galaxies far away? A space-themed kids’ room is the perfect way to support their intergalactic curiosity. The best part is having options, whether you want to make small changes or do a complete room makeover. All you need is a little imagination, and a few ideas to create a mini-universe that sparks wonder.
.tasty-pins-banner-container{display:block;margin-bottom:20px;position:relative;width:-moz-fit-content;width:fit-content}.tasty-pins-banner-container a{cursor:pointer;display:flex;font-size:14px;font-weight:700;letter-spacing:1px;line-height:1.8em;text-transform:uppercase}.tasty-pins-banner-container a:hover{opacity:1}.tasty-pins-banner-container .tasty-pins-banner{align-items:center;bottom:0;cursor:pointer;display:flex;justify-content:center;left:0;padding-bottom:1em;padding-top:1em;position:absolute;right:0}.tasty-pins-banner-container .tasty-pins-banner svg{margin-right:4px;width:32px}.tasty-pins-banner-container .tasty-pins-banner span{margin-top:4px}.tasty-pins-banner-container a.tasty-pins-banner{text-decoration:none}.tasty-pins-banner-container a.tasty-pins-banner:hover{opacity:.8}.tasty-pins-banner-container a.tasty-pins-banner-image-link{flex-direction:column}.tasty-pins-banner-container a img{margin-bottom:0}.entry-content .wp-block-image .tasty-pins-banner-container img{margin-bottom:0;padding-bottom:0}#et-boc .et-l div .et_pb_image_wrap .tasty-pins-banner-container .tasty-pins-banner{padding-bottom:1em!important;padding-top:1em;text-decoration:none}#et-boc .et-l div .et_pb_image_wrap .tasty-pins-banner-container a.tasty-pins-banner{cursor:pointer;display:flex;font-size:14px;font-weight:700;line-height:1.8em;text-transform:uppercase}#et-boc .et-l div .et_pb_image_wrap .tasty-pins-banner-container a.tasty-pins-banner span{letter-spacing:2px;margin-top:4px}.et-db #et-boc .et-l .et_pb_module .tasty-pins-banner-container a:not(.wc-forward){padding-bottom:0}Photo by Displate Magazine
From glow-in-the-dark galaxies to spaceship beds, we’ve rounded up a list of 20 space-themed room ideas that are truly out of this world. Let’s blast off!
Navigate the Post
Why Space-Themed Rooms Work
A space-themed bedroom doesn’t just look cool—it nurtures imagination, curiosity, and a sense of wonder.
Kids love to explore, ask questions, and dream big. Whether it’s identifying planets, pretending to float in zero gravity, or learning about black holes, your child will feel inspired to explore both outer space and their inner world.
And if you’re worried about growing out of the theme? Start with changeable elements like art, bedding, and lighting that can evolve as your child grows.
Stunning Space-Themed Walls
Walls are a great place to start with space-themed room decor. It’s an effortless and affordable way to set the foundation for a room full of space adventure.
1. Galaxy Wallpaper
Go big with a bold galaxy mural that sets the scene instantly. Use rich navy or midnight blue paint to create the perfect base color for this cosmic backdrop and add decor that brings out elements found in the mural.
Murals with oversized illustrations of Jupiter, Mars, and Earth are perfect for captivating young minds.
2. Wall Decals
Use removable decals of rockets, planets, and stars for easy decorating. Consider constellation stickers – they are subtle and educational, and add a sparkly, educational touch.
You can even take it up a notch using glow-in-the-dark paint to help constellations stand out even more.
3. Space-Themed Wallpaper Panels
As an alternative to traditional murals, you can purchase space-themed wallpaper. It’s easy to add and switch out depending on what your tiny space traveler likes.
Get them involved too! This is a perfect opportunity for their creative input – try giving them a few wallpaper choices and let them pick their favorite.
4. Paint for Depth
Choose deep, rich tones like purple or dark blue to mimic deep space. If you’re feeling daring, add chalkboard paint to one wall (think accent wall style) and let your kids draw their own rocket paths and starscapes.
Out-of-This-World Furniture
Don’t just stop at walls. Space-themed furniture is a must, especially if you’re looking to go all out. From bedding to chairs, these details are sure to send your kids into orbit.
5. Rocket Ship Bed
Use this statement piece as the command ship for dreams and playtime fuel. Kids will love jumping into a fun, yet cozy bed, but first, they’ll need a chance to play space pirates before their bedtime stories.
6. Planetary Crib for Babies
There’s also something for your littlest space explorers. Start your future astronaut off right with a planetary crib featuring plush planets and mobiles.
7. Glow-in-the-Dark Bedding
Pretty much every kid loves things that glow-in-the-dark, so why not make their room feel like they’re on the coolest planetary exploration with stars and planets on bedding that light up at bedtime.
8. Astronaut Bean Bag Chair
Your kids will love this cozy and thematic seating that doubles as décor. Create a space-themed reading nook in the corner of their room and use the bean bag chair as a way to kick up the “weightless” space vibes.
Stellar Accessories
Accessorize your kids’ room with lights and stars to add a little more detail and a lot more adventure.
9. Big Moon Night Light
If you want to add a simple touch to your kid’s room, a soft, glowing moon night light will do the trick. It adds magic and comfort, and gently illuminates other celestial aspects of the bedroom at night.
10. Spaceship Curtains
Another simple, affordable and easy room addition are curtains. Opt for curtains featuring rockets, stars, and galaxies.
Want to keep the nighttime vibes anytime of day? Try blackout curtains with a cosmic print for sleep and dreamy visuals.
11. Glow-in-the-Dark Ceiling Stars
Does your kid love star gazing? Turn their room into a starry dream! Glow-in-the-dark ceiling stars are our favorite because they’re a classic way to illuminate your kid’s room, affordable and fun.
12. Plush Planet Toys
Let your kiddo cozy up after a long day of space travel to decorative plush planet toys – some ideas are stars, rockets, planets, and more.
Themed Zones for Play and Learning
Cultivate curiosity and learning with dedicated space-themed spaces for your kids to enjoy their love for faraway galaxies while being productive little space cadets.
13. Command Center Desk
Create a space for homework with space-themed desk accessories like peel-and-stick space-themed paper for their desk and planetary pens.
Consider even turning this area into a science lab corner, encouraging STEM learning with a telescope and planet posters.
14. Reading Nook with Star Pillows
Create a dedicated space for your little astronauts to read their space-themed books under fairy lights. Bonus: Decorate a small bookshelf with space-themed peel-and-stick paper.
15. Space-Themed Play Rug
This simple bedroom addition serves as the perfect foundation for play with your kid’s favorite space vehicles and moon rovers.
Creative DIY Touches
Let your creativity shine with these DIY space-themed room ideas. They’re also perfect for kids to contribute their unique touches, from paintings to photos.
16. DIY Rocket Lamp
Create a rocket lamp with a decorative lamp base with fins and a cone for lift-off vibes. Need a helping hand? Have the kids add drawings or fun stickers to the lamp base for a personalized touch.
17. Hand-Painted Planets
Add your artistic flair to walls with hand-painted planets. If you’re not an artist, stencils can create a solid base for painted pieces. Don’t forget this is a group project, so get the kiddos involved!
18. DIY Rocket Tent
Save the most exciting interstellar explorations for a rocket themed tent. Use PVC pipe and fabric to create this cozy hideaway and space-themed fabric. Include starry pillows and a moon-shaped rug.
19. Space-Themed Growth Chart
Track your little one’s height from Earth to the Moon with this idea.
20. Painted Ceiling Fan
If you already have a blank ceiling fan canvas to work with, all you need is paint (maybe some stencils) and brushes. Consider designing each blade as a different planet.
Tips for Creating a Space-Themed Room
Stick to a Palette: Colors like navy, silver, deep purple, and black for an outerspace feel.
Add Light Play: Projectors, fairy lights, and lamps to display stars and planets after dark.
Go Easy on Budget: Many ideas (like wall decals or DIY starscapes) can be done for a low cost.
Shop Small Businesses: Find themed accessories through curated shops for unique finds.
Designing a space-themed room for your kid is one of the most fun and meaningful ways to create a nurturing, inspiring environment. All you need is the right mix of creativity, functional pieces, and a dash of stardust.
Designing a garden might seem overwhelming at first, especially if you’re new to it. But with some thoughtful planning and a dash of creativity, you can transform any outdoor space into a charming garden that mirrors your personal style.
.tasty-pins-banner-container{display:block;margin-bottom:20px;position:relative;width:-moz-fit-content;width:fit-content}.tasty-pins-banner-container a{cursor:pointer;display:flex;font-size:14px;font-weight:700;letter-spacing:1px;line-height:1.8em;text-transform:uppercase}.tasty-pins-banner-container a:hover{opacity:1}.tasty-pins-banner-container .tasty-pins-banner{align-items:center;bottom:0;cursor:pointer;display:flex;justify-content:center;left:0;padding-bottom:1em;padding-top:1em;position:absolute;right:0}.tasty-pins-banner-container .tasty-pins-banner svg{margin-right:4px;width:32px}.tasty-pins-banner-container .tasty-pins-banner span{margin-top:4px}.tasty-pins-banner-container a.tasty-pins-banner{text-decoration:none}.tasty-pins-banner-container a.tasty-pins-banner:hover{opacity:.8}.tasty-pins-banner-container a.tasty-pins-banner-image-link{flex-direction:column}.tasty-pins-banner-container a img{margin-bottom:0}.entry-content .wp-block-image .tasty-pins-banner-container img{margin-bottom:0;padding-bottom:0}#et-boc .et-l div .et_pb_image_wrap .tasty-pins-banner-container .tasty-pins-banner{padding-bottom:1em!important;padding-top:1em;text-decoration:none}#et-boc .et-l div .et_pb_image_wrap .tasty-pins-banner-container a.tasty-pins-banner{cursor:pointer;display:flex;font-size:14px;font-weight:700;line-height:1.8em;text-transform:uppercase}#et-boc .et-l div .et_pb_image_wrap .tasty-pins-banner-container a.tasty-pins-banner span{letter-spacing:2px;margin-top:4px}.et-db #et-boc .et-l .et_pb_module .tasty-pins-banner-container a:not(.wc-forward){padding-bottom:0}
Whether you’re dreaming of a vibrant kitchen garden, a sanctuary for bees and butterflies, or a serene corner to unwind, this guide is packed with practical ideas to get you started.
In this beginner’s guide, we’ll explore everything about designing a garden for beginners, from understanding your space and setting your goals to choosing the right plants and creating an inviting layout.
Navigate This Post
With a clear vision and some helpful tips, you’ll soon be on your way to crafting a garden that feels like an extension of your home.
Understanding Your Space
Knowing your garden space is key to the best garden plans.
Start by assessing the garden dimensions and shape of your area, taking into account any existing features like terraces or water bodies that could impact your layout.
Sunlight exposure is crucial, so note how the light moves across your garden throughout the day. Different plants have different sunlight needs, and this information will guide your plant selection.
Don’t forget about your soil—different plants thrive in different types of soil. Is your soil sandy, clayey, or loamy? A simple soil test can help you determine its type and pH level. If the soil isn’t ideal, don’t worry! Raised beds or soil additives can improve your growing conditions.
Also, think about access to water. Easy access to a water source will make maintenance tasks like watering and cleaning much easier. Consider the paths you’ll walk regularly; make sure they’re easy to navigate and won’t become muddy after rain. You may want to add gravel or pavers to the paths.
You can also incorporate ornamental grasses and groundcovers to address large, open areas.
Lastly, observe any natural slopes or drainage issues. Poor drainage can lead to waterlogged plants, while a slope might require terracing to prevent erosion.
It may be helpful to take a photo of your backyard or garden space to take to the nursery for recommendations from a master gardener.
By understanding these aspects of your space, you’ll be better equipped to make choices that ensure your garden flourishes.
Setting Your Goals
Setting your goals early on is crucial to guiding your garden design. Think about what you want from your garden.
Do you envision a peaceful retreat, a vibrant space for entertaining, or a practical area for growing your own produce? By identifying your main goal, you can make decisions that align with your vision.
Make a list of the specific plants and features you want to include. Maybe you’re dreaming of a lush, colorful flower garden that attracts bees and butterflies, or perhaps a kitchen garden brimming with fresh vegetables and herbs is more your style.
Think about whether you want a particular theme, like a Japanese garden or a rustic, country vibe. Your choices should reflect your personal preferences and how you plan to use the space.
It’s also worth considering any functional aspects. Do you need shaded areas for hot days or a pathway that can handle foot traffic without getting muddy? These practical needs will help shape your design.
Remember to plan for the future too. Consider how much time you can dedicate to maintenance and whether you’ll need easy-to-care-for plants or are ready for a more hands-on gardening experience.
By setting clear goals, you’ll be well on your way to creating a garden that is both beautiful and functional.
Choosing the Right Plants
Choosing the right plants can feel like picking out the perfect ingredients for a recipe.
Start by looking into plants that are well-suited to your climate zone and soil type. There will likely be a wide range of plants to choose from. This ensures they’ll thrive and save you from future headaches.
Consider what you want your garden to look like year-round. Mix in plants with different heights, colors, and bloom times to keep things interesting through every season of the year.
You’ll want to consider if you prefer annuals or perennials, or a mix of both.
Think about functionality too. Want to attract bees and butterflies? Go for flowering plants like lavender, coneflowers, or bee balm. If a kitchen garden is on your wish list, herbs like basil, rosemary, and thyme, along with vegetables, are great picks.
Also, be mindful of the light conditions in your garden. Some plants love soaking up the sun, while others prefer shady spots.
Remember to check the growth habits of the plants you choose. Some plants spread quickly and can take over if not managed, so it’s important to place them where they have enough room to grow without crowding out their neighbors.
With these tips in mind, you’ll be on your way to a great selection of plants that not only look great but also thrive in your unique garden space through different seasons of the year.
Creating a Layout
Creating a garden layout is like putting together a puzzle, and the key is to start with a rough sketch.
Outline your garden design needs, such as where you want paths, garden beds, and any key features like benches or arbours. Think about how you’ll move through the space and ensure there’s a good flow.
Raised beds can be a fantastic way to add depth and structure to your garden, making it easier to manage plants and giving your garden a polished look.
Consider the sunlight and water needs of your plants when deciding their placement. Some may prefer full sun, while others need part shade. Group plants with similar requirements together to make watering and care more straightforward.
Also, try to visualize how your garden will change with the seasons. By thinking ahead, you can ensure that something is always in bloom and that your garden has year-round interest.
Don’t forget about the little details that can make a big difference, like the placement of decorative elements. Birdbaths, fountains, or even a cozy bench can add charm and functionality to your space.
And remember, the best garden layouts are flexible—don’t be afraid to tweak your design as your garden grows and evolves. Your favorite garden designs may change over time or with the season change.
Adding Features and Accents
Adding features and accents to your garden can truly elevate its charm and functionality.
Think about incorporating benches for a cozy seating area, or maybe a fountain to add a soothing water element.
Birdbaths not only look lovely but are a useful feature to attract feathered friends, bringing your garden to life. Sculptures and garden lights can highlight your favorite spots, adding a touch of elegance and whimsy.
Don’t forget to use decorative pots and planters to create focal points and add layers of visual interest. Consider a trellis for climbers.
Little touches like these can make your garden not just a visual treat but also a space where you’ll love spending time.
Maintaining Your Garden
Once your garden is up and running, keeping it healthy and vibrant requires a bit of regular care.
Start with a good watering routine, keeping in mind the specific needs of your plants. Some plants need a good soak every few days, while others prefer lighter, more frequent watering. Check the soil moisture before watering to avoid overdoing it.
Weeding is another crucial task. Weeds can steal nutrients from your plants, so it’s best to pull them out as soon as you spot them. Mulching can help suppress weeds and retain soil moisture, making your life a bit easier.
Pruning is also essential for plant health and aesthetics. Trim back any dead or overgrown branches to encourage new growth and maintain a neat appearance. Each plant has its own pruning needs, so a quick lookup can guide you on the best times and methods.
Keep an eye out for pests and diseases. Early detection is key to preventing an infestation from spreading. If you notice any unusual spots, holes, or bugs, identify the issue and treat it promptly with the appropriate methods, whether that’s organic solutions or more conventional treatments.
Don’t forget about feeding your plants. Regularly apply a balanced fertilizer suited to your plant types to give them the nutrients they need to thrive. Compost is also a great option, adding organic matter to the soil and improving its structure and fertility.
Finally, pay attention to seasonal changes. Some plants may need extra protection in the winter, while others might need more water during hot summer months.
Adjust your care routine accordingly to keep your garden looking its best all year round. With consistent maintenance, your garden will remain a beautiful and inviting space.
Final Thoughts on Designing a Garden
Designing a garden offers a fantastic opportunity to showcase your personality while creating a beautiful outdoor space.
Remember, it’s not about achieving perfection right away; it’s about enjoying the journey and learning as you go. Start with a clear plan, but stay flexible—gardens are living, evolving spaces. Don’t hesitate to make adjustments as you see what works and what doesn’t.
Experiment with different plant combinations and decorative elements to see what makes you happiest. And don’t be afraid to ask for advice from local gardening centers or neighbors who have gardening experience. Their insights can be incredibly valuable.
Keep in mind the maintenance aspect and try to incorporate features that make your garden easier to care for in the long run. With patience, creativity, and a bit of effort, you’ll have a garden that not only looks great but also serves as a delightful retreat right outside your door.
Enjoy every moment you spend nurturing your green oasis!
Have a brown thumb, live a busy lifestyle, or are new to gardening? This is for you. Outdoor plants don’t have to be complicated. You can create a beautiful garden and upgrade your landscaping game with a few easy options. So if you’ve ever worried while you watered your outdoor plants, it’s ok, we’ve got you.
Whether your outdoor space has full sun, partial shade, or somewhere in between, these resilient beauties are here to make your life easier and your garden gorgeous.
.tasty-pins-banner-container{display:block;margin-bottom:20px;position:relative;width:-moz-fit-content;width:fit-content}.tasty-pins-banner-container a{cursor:pointer;display:flex;font-size:14px;font-weight:700;letter-spacing:1px;line-height:1.8em;text-transform:uppercase}.tasty-pins-banner-container a:hover{opacity:1}.tasty-pins-banner-container .tasty-pins-banner{align-items:center;bottom:0;cursor:pointer;display:flex;justify-content:center;left:0;padding-bottom:1em;padding-top:1em;position:absolute;right:0}.tasty-pins-banner-container .tasty-pins-banner svg{margin-right:4px;width:32px}.tasty-pins-banner-container .tasty-pins-banner span{margin-top:4px}.tasty-pins-banner-container a.tasty-pins-banner{text-decoration:none}.tasty-pins-banner-container a.tasty-pins-banner:hover{opacity:.8}.tasty-pins-banner-container a.tasty-pins-banner-image-link{flex-direction:column}.tasty-pins-banner-container a img{margin-bottom:0}.entry-content .wp-block-image .tasty-pins-banner-container img{margin-bottom:0;padding-bottom:0}#et-boc .et-l div .et_pb_image_wrap .tasty-pins-banner-container .tasty-pins-banner{padding-bottom:1em!important;padding-top:1em;text-decoration:none}#et-boc .et-l div .et_pb_image_wrap .tasty-pins-banner-container a.tasty-pins-banner{cursor:pointer;display:flex;font-size:14px;font-weight:700;line-height:1.8em;text-transform:uppercase}#et-boc .et-l div .et_pb_image_wrap .tasty-pins-banner-container a.tasty-pins-banner span{letter-spacing:2px;margin-top:4px}.et-db #et-boc .et-l .et_pb_module .tasty-pins-banner-container a:not(.wc-forward){padding-bottom:0}Photo by Aniston Grace
Black-Eyed Susans (Rudbeckia)
This North American native boasts sunny yellow petals and a dark center. We love them (and we think you will too) because they’re drought-tolerant, deer-resistant, and bloom from mid-summer through fall. Plus, butterflies love them!
Fun fact: They look similar to daisies because they are a type of daisy.
Sedum (Stonecrop)
These succulent-like cuties are thick with pinkish blooms and thrive in full sunlight and dry soil. If you’re truly looking for a “set it and forget it” perennial, these are perfect.
Yarrow
From yellow, pink, and white, yarrow is handy and unfussy. These fern-like flat-topped plants are great for the outdoors because they’re pollinator magnets and add texture to perennial borders.
Coneflower (Echinacea)
Coneflowers are gorgeous, purple daisy-like flowers that bloom all summer. These beauties attract butterflies and bees, but they aren’t just attractive — they’re also resilient, able to handle drought and poor soil.
Gaillardia (Blanket Flower)
Gaillardia features warm orange and red tones, adding warmth and dimension to your garden beds. They’re great because they love the sun and hate fuss.
Aloe Vera
Aloe vera is a cactus-like succulent that loves well-drained soil. The queen of minimal care, it grows particularly well in dry and hot climates. Bonus? Aloe vera gel is great for your skin.
Zinnias
Zinnias are vibrant, long-lasting flowers that are beloved for their low maintenance and fast growth. They thrive in sunlight and are great for filling garden beds.
Milkweed (Asclepias)
Adored for their unique “clustered” shape and variety of colors, this perennial flower blooms in the summer and thrives in dry soils. Not only are they easy to grow, but monarch butterflies and caterpillars love them.
Lavender
Inhale worry and exhale calm. That’s how it feels to smell the relaxing scent of lavender. This fragrant favorite is drought-tolerant and thrives in sandy, well-drained soil.
Hostas
Large with lush leaves, hostas are a foliage favorite because they need very little care. With blue-green or variegated leaves, they thrive in shade or partial shade.
Russian Sage
Featuring soft silver stems and purple-blue flowers, Russian sage is a staple for garden elegance. It’s deer-resistant, loves sun, and is resilient (even in poor soil).
Cosmos
If you’re looking to add a whimsical, airy touch to garden beds, try cosmos. Once planted, these pretty, soft pink to sunny orange flowers only need occasional watering.
Zebra Grass (Miscanthus)
Add some movement and dimension to garden beds with zebra grass. Its variegated leaves sway beautifully in the wind, offer a unique touch (without overpowering), and require little upkeep.
Lamb’s Ear
Lamb’s ear is a velvety, soft silver foliage plant that’s low-growing, drought-tolerant, and pest-resistant, making it the perfect groundcover for a low-key lush vibe.
Coreopsis (Tickseed)
Cheery and golden-yellow, coreopsis plants love to soak up the sun. We love them because they bloom beautifully without asking much in return.
Daylilies
These beauties come in almost every color and are beloved as low-maintenance perennials. Since they bloom again and again, they are great landscaping focal points.
Catmint (Nepeta)
This pollinator favorite is a fragrant purple-flowered plant that grows happily with little care.
Salvia
Commonly known as “sage,” this easy-to-grow plant is often burned for ceremonies or to clear out bad energy. In its purest form, it’s a pretty blue or at times fiery red plant that’s drought-tolerant, and a hummingbird favorite.
Bee Balm (Monarda)
Pollinators love a good bee balm plant. Not only is it aromatic, it’s bold in color – you’ll love it too because it’s perfect for attracting bees, butterflies, and even the occasional hummingbird. Yep, it’s a garden fairy dream.
Succulents (Various)
Succulents are popular – you can pretty much find them in any nursery, especially in dry climates. Just make sure you store them in well-drained containers and don’t overwater.
Snapdragons
Snapdragons are colorful, vibrant, and low-fuss — everything your garden needs. They bloom in early spring or fall and love the sun.
Heuchera (Coral Bells)
Got a shady spot? Coral bells are the answer. This bell-shaped perennial flower has vibrant foliage in purple, lime, or bronze tones that remain beautiful year-round.
Hydrangeas (Panicle or Oakleaf)
Some hydrangeas require more care, but panicle and oakleaf hydrangeas are surprisingly low-maintenance and beginner-friendly.
Dusty Miller
Soft and silvery, these plants add contrast and variety to any garden bed. Dusty miller is perfect for edging and thrives with very little help.
Butterfly Bush (Buddleia)
A butterfly favorite, this fast-growing and fragrant shrub thrives in full sun and well-drained soil. Prune it in early spring, then let it flourish.
Ice Plant
Another succulent stunner, ice plants have vivid daisy-like blooms and thick foliage, perfect for sunny, dry spots.
Knock Out Roses
These aren’t your typical roses. Unlike the traditional variety, knock out roses are low-maintenance, disease-resistant, and bloom like crazy. (Not to be biased, but if you’re going to plant roses…)
Newbie Gardener Tips
Even the most resilient plants need a little love. Here are a few pro-tips (whether you’re new, novice, or consider yourself a pro) to keep your low-maintenance garden looking lush:
Start with the soil: Well-drained soil is key – add compost or sand to loosen things up.
Use a slow-release fertilizer once per season to keep your plants fed.
Install a soaker hose or drip system for low-effort, water-efficient irrigation.
Mulch it up: Mulching helps retain moisture and block weeds.
Group by needs: Place drought-tolerant plants together, and shade lovers in the same bed.
Cut and enjoy: Many of the options on the list make amazing cut flowers for a fresh indoor bouquet!
Pick Your Garden Aesthetic
Whether you’re drawn to a dreamy cottagecore aesthetic or a desert oasis vibe, here are a few simple ways to design your garden:
Pick a palette: Orange and yellow (gaillardia + black-eyed susans), purple and white (salvia + yarrow), or monochrome.
Play with contrast: Mix dusty miller, lamb’s ear, and dark purple coral bells.
Add dimension: Vary taller plants with shorter plants to add depth and visual interest.
No matter where you are on your gardening journey, there’s a low-maintenance plant just waiting to be yours. These fuss-free favorites simply need a little sunshine, water, and a whole lotta love. So grab your garden gloves and cue up your favorite playlist – your dream garden is only a few blossoms away.
Got little bugs buzzing around your kitchen? Congrats, you may have fruit flies! Don’t fret – these annoying pests are pretty common. And luckily, it doesn’t take a lot of money, supplies, or effort to get rid of them. In fact, you can probably find everything you need in your cabinets! We recently had a fruit fly problem in our home and I seized the opportunity to test 7 different methods of eliminating them. So today I’m sharing the best fruit fly traps and how to make them.
Each homemade trap is easy to make and uses natural ingredients that we already had around the house. So let’s just call this extremely D.I.Y friendly and chemical free. We’ll also share some tips for preventing a fruit fly infestation in the first place.
What Are Fruit Flies?
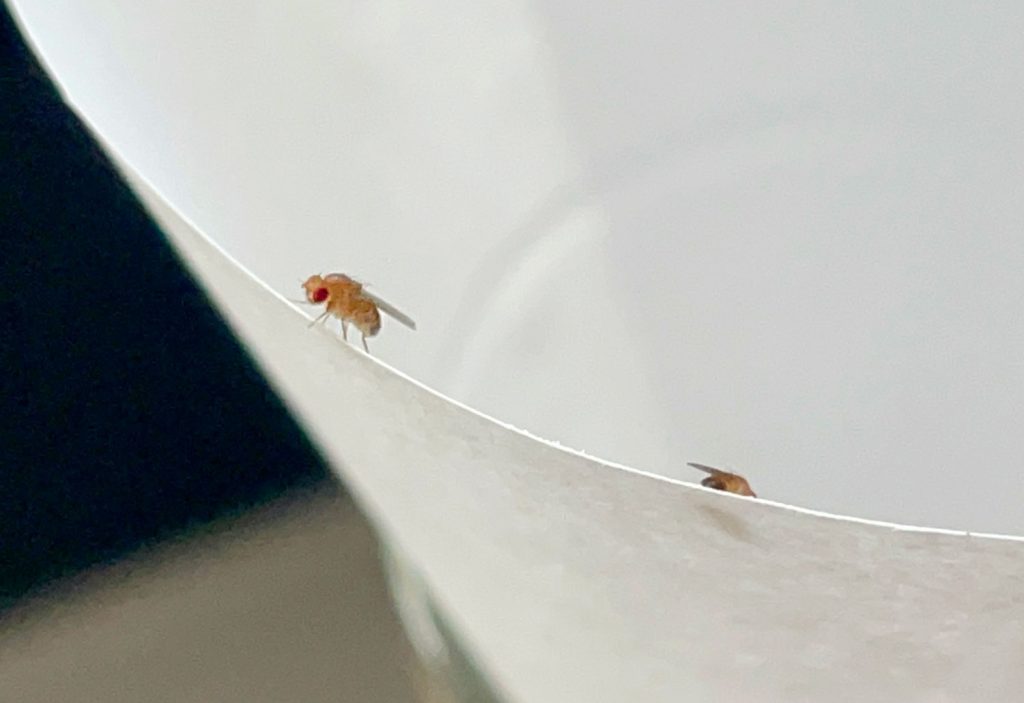
Fruit flies are small flying pests that are attracted to sweet fruits and some vegetables. They’re also drawn to sugary or fermented beverages like beer, wine, or juice. You may spot them swarming around fruit bowls, garbage cans, and even kitchen drains. They’re about the size of a grain of rice and look like small, tan, or brownish houseflies with red eyes. They tend to show up in the summer or late fall when many fruits are in season.
Your problem may begin when a few fruit flies hitch a ride home on a piece of storebought fruit. But females can lay hundreds of eggs in their short lives, each hatching within as little as 12 hours. Since they reach adulthood in just a few days, a few pests can quickly turn into a swarm. That’s why it’s important to get rid of fruit flies as quickly as possible.
Fruit Flies Vs. Fungus Gnats Vs. Drain Flies
Fruit flies are easy to confuse with other common household pests, especially fungus gnats and drain flies. All are small flying insects but correctly identifying them will ensure you pick the right way to get rid of them. We’ve found the easiest way to distinguish them is by where you spot them and what larger insect they resemble.
Fruit flies look like small flies. They’re found near fruit bowls, trash, or other smelly food sources.
Drain flieslook like small fuzzy moths. They’re typically found near sinks and drains.
Fungus gnats look like small mosquitos. They’re typically found near houseplants, since they breed in damp soil.
If you’re unsure, you can try one of the traps below and if it attracts the pests in your home, you’ve got fruit flies!
4 DIY Fruit Fly Traps
Getting rid of fruit flies isn’t complicated or expensive. All you need are some household supplies and a little bit of patience. Each trap follows the same basic formula: attract the fruit fly + keep it from escaping. We tried the following 4 DIY methods and definitely had a clear winner in the end. Here are the first 4 methods I tested out:
Funnel Trap
Plastic Wrap Trap
Dish Soap Trap
Rotting Fruit Trap
I’ll share more details about each method below, along with our verdict at the bottom. Just be prepared that some traps work faster than others, and all techniques may take several days to fully eradicate your issue.
#1: Funnel Fruit Fly Trap
This trap attracts fruit flies into a container through a small hole in the bottom of a homemade paper funnel. The flies find their way in but have difficulty getting back out through the small hole.
Supplies needed:
Small clear jar, cup, or container, preferably with a small or narrow opening
Piece of paper or cardstock
Tape
Scissors
Apple cider vinegar (ACV)
Instructions
Choose your container. Find a small (preferably clear) container like an old food jar or plastic soda bottle. For this method, it’s easier if it has a small or narrow opening.
Add apple cider vinegar. Pour a little bit of apple cider vinegar (ACV), old beer, or wine into the bottom of the container. The smell will attract the fruit flies.
Make your funnel. Wrap a small piece of paper or cardstock into a cone shape with a very small opening at the tip. Secure the shape with tape. You can also cut this opening at the end if that’s easier. It only needs to be about the size of a grain of rice.
Set your funnel. Place your paper cone into the opening of your container. You may need to reshape your funnel so it’s wide enough to rest on top of the opening of your container without touching the ACV. Make sure it rests firmly against all edges of the opening, so flies can’t escape through any gaps.
Wait & release outside. After you’ve trapped several flies, carefully bring the trap outside, remove the funnel, and let them fly away. Be careful not to shift or knock over the funnel inside before you’re ready to release the flies.
You can also try this method with a storebought funnel, however you may find that the opening at the bottom of storebought funnels is too large and lets too many fruit flies out of your trap.
#2: Plastic Wrap Fruit Fly Trap
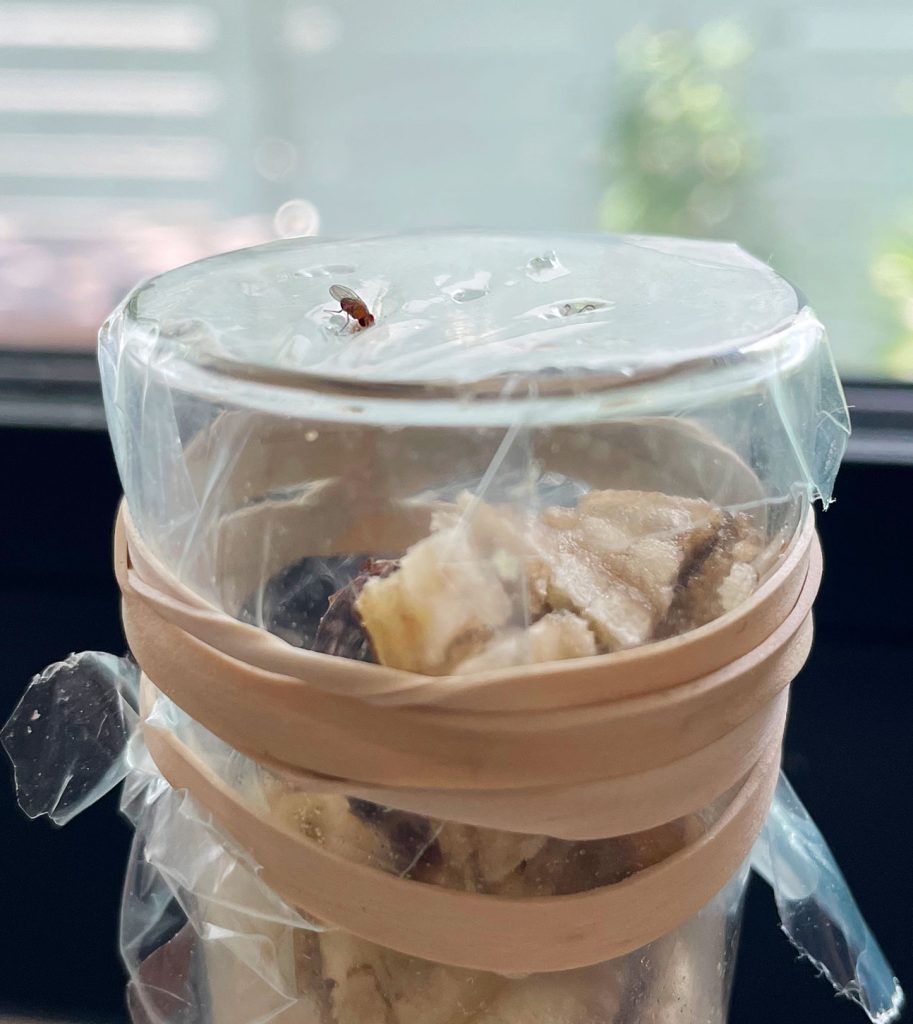
This trap works by attracting fruit flies with the smell of apple cider vinegar. They enter the trap through small holes in the plastic-wrapped top, but then have trouble finding their way back out, just like the trap above.
Supplies needed:
Small clear jar, cup, or container
Rubber band
Plastic wrap or plastic bag
Toothpick
Apple cider vinegar (ACV)
Instructions
The steps to creating this plastic wrap trap are very similar to the funnel trap described above. Here are the steps:
Choose your container. Find a small clear, jar, cup, or other glass container. Just about anything works and it doesn’t need to be large. Using something clear makes it easier to see the flies your trapping, but an old soda or beer can works too.
Add apple cider vinegar. Pour apple cider vinegar into your container. The scent will attract the flies. Old beer or wine also works too, but not regular white vinegar.
Cover with plastic. Wrap the opening tightly with plastic wrap and secure it with a rubber band. Saran wrap works, but you can also cut scraps from a plastic bag.
Poke small holes. Use a toothpick to poke a few small holes in the top of the plastic. You don’t need a lot, but make sure they are big enough for a fly to fit through.
Optional outdoor ending. Bring the entire contraption outside carefully without removing the plastic wrap cover (or they’ll all escape before you make it out the door) and then remove that and let them fly away.
This technique can also be done by poking a hole in the lid of a metal jar lid. You can use a mason jar or old food jar for this. Use a hammer and nail to puncture the top.
#3: Dish Soap Fruit Fly Trap
Unlike the previous two methods, this fruit fly trap doesn’t require making any covers. Instead, it relies on a soapy surface to keep these pets from flying away. Note: this one doesn’t allow you to set them free outside, as they get coated in the soap.
Supplies needed:
Small container, bowl, or dish
Dish soap
Apple cider vinegar (ACV)
Instructions
Put out some apple cider vinegar. Like the other traps, fill the bottom of a small container, bowl, or dish with apple cider vinegar. This scent will attract the fruit flies.
Add dish soap & mix. Squirt several drops of dish soap into the ACV and mix to create a soapy solution. Flies will land on the mixture but then find it difficult to fly away.
This technique can also be combined with the plastic wrap and funnel method. Just add some dish soap to the apple cider vinegar before you cover the top. This introduces another way the flies can get stuck in your contraption.
#4: Rotting Fruit Trap
We also tested out some of these traps where we swapping out apple cider vinegar for what fruit flies love most: actual fruit!
Supplies needed:
Small glass jar, cup, or container
Plastic wrap or paper funnel, depending on your chosen trap mechanism
A small fruit scrap like a banana peel or apple slice
Instructions
To create a rotting fruit trap, just substitute apple cider vinegar for a piece of banana peel, apple slice, or peach in either the Plastic Wrap Trap or Funnel Trap. You can also add this fruit scrap to your ACV as well. Just be prepared to swap out your fruit scrap every day or two so you don’t introduce unwanted smells to your kitchen.
The Best Fruit Fly Trap
As you can see in these photos, we set out 4 different DIY traps to see which performed the best. The four homemade traps we tested were a combination of techniques. They were:
Plastic Wrap Trap with banana peel
Funnel Trap with ACV + banana peel
Plastic Wrap Trap with ACV + soap
Dish Soap Trap with ACV
For us, the clear winner was less about what type of trap we used and more about the lure. Anything with banana peel performed MUCH better than apple cider vinegar. Our two Plastic Wrap Traps were nearly identical, but the one with the banana peel dramatically outperformed the one with the ACV + soap. Maybe ACV is less enticing when there’s real fruit nearby?
So our suggestion would be – no matter what trap you set up – add a fruit scrap to it! We had a slight preference for the plastic wrap trap because it was easier to make and less prone to disruption. I accidentally knocked over our funnel once and released half of the flies back into the kitchen. Oops!
What Attracts Fruit Flies Best?
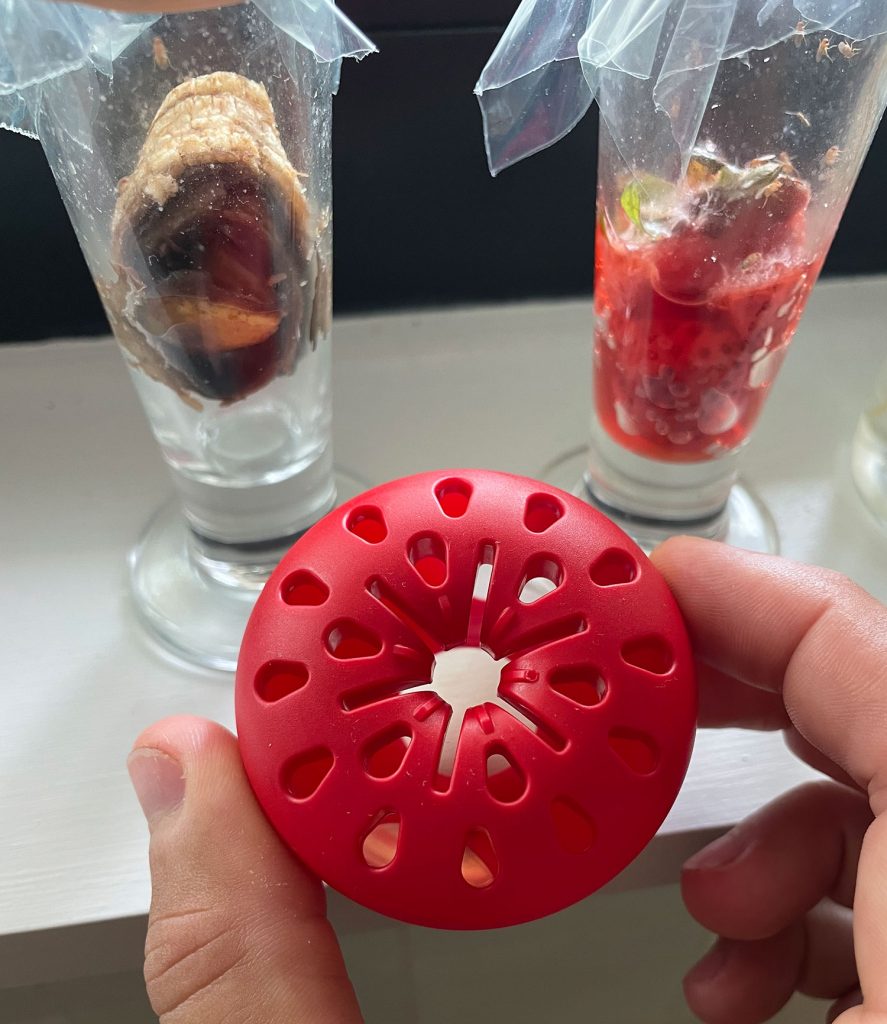
Here’s where I jumped at the chance to continue this weird little experiment. Since we had such good luck using fruit scraps, we wanted to test which kind of fruit was the best bait. We used three fruits we already had on hand: a banana peel, apple slices, and a strawberry. We put each in a Plastic Wrap Trap side-by-side on our countertop for 24 hours.
Although the banana peel started off strong (it was the most rotten at the beginning), the fruit flies ended up being the most attracted to the strawberry. The banana peel still snagged several flies, but the longer the strawberry rotted, the more flies it caught. The apple slices didn’t catch a single one!
Storebought Fruit Fly Traps
If you’re not having any luck with these DIY solutions or don’t have the time or materials to make them, there are premade traps you can buy instead. All have thousands of positive reviews and cost less than $20. They might be worth considering if you want something that catches other types of flying insects, or if you want something more discreet than than a DIY trap.
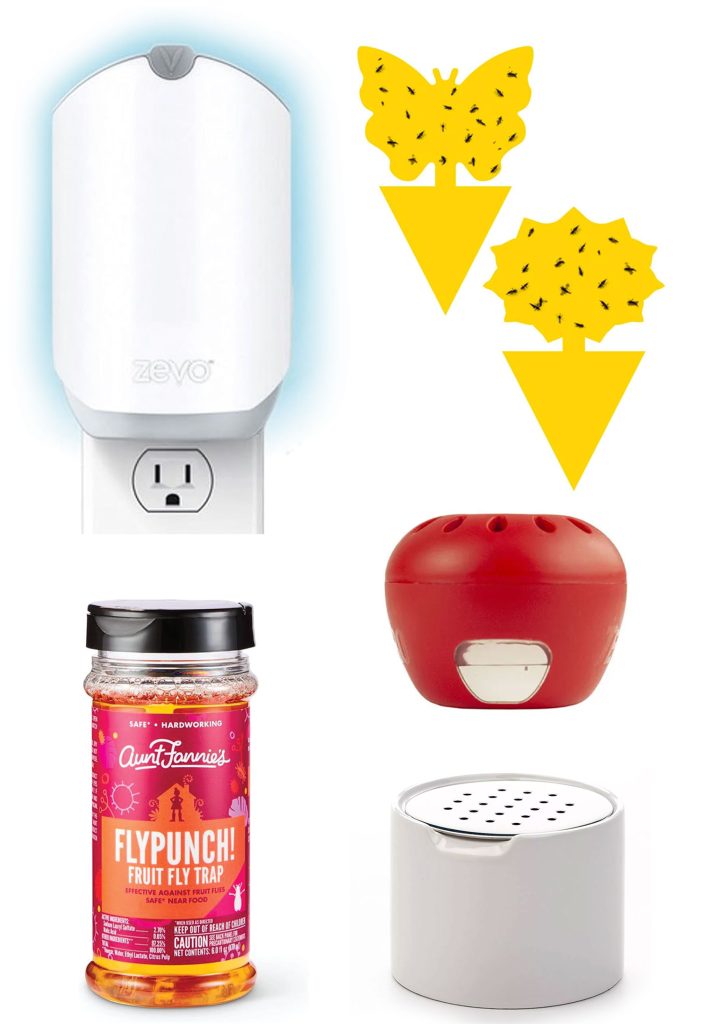
Zevo Flying Insect Trap ($19): This trap plugs into an outlet and uses UV light to capture fruit flies, fungus gnats, houseflies, and more.
Landisun Sticky Traps ($12): These small sticky traps can be staked close to the source of the problem, whether they’re fruit flies on your countertop, mosquitos outside, or fungus gnats near your plants.
Terro Fruit Fly Traps ($15): Apple-shaped traps that lure fruit flies in with liquid bait and prevent them from escaping. This works only for fruit flies.
Aunt Fannie’s FlyPunch ($8): This plant-based liquid bait trap looks like a stylish spice jar filled with a pungent punch that fruit flies are drawn to.
Sur La Table Fly Trap ($15): This stylish trap disguises its less-than-pretty function, but doesn’t come with any lure (you need to add your own ACV or fruit).
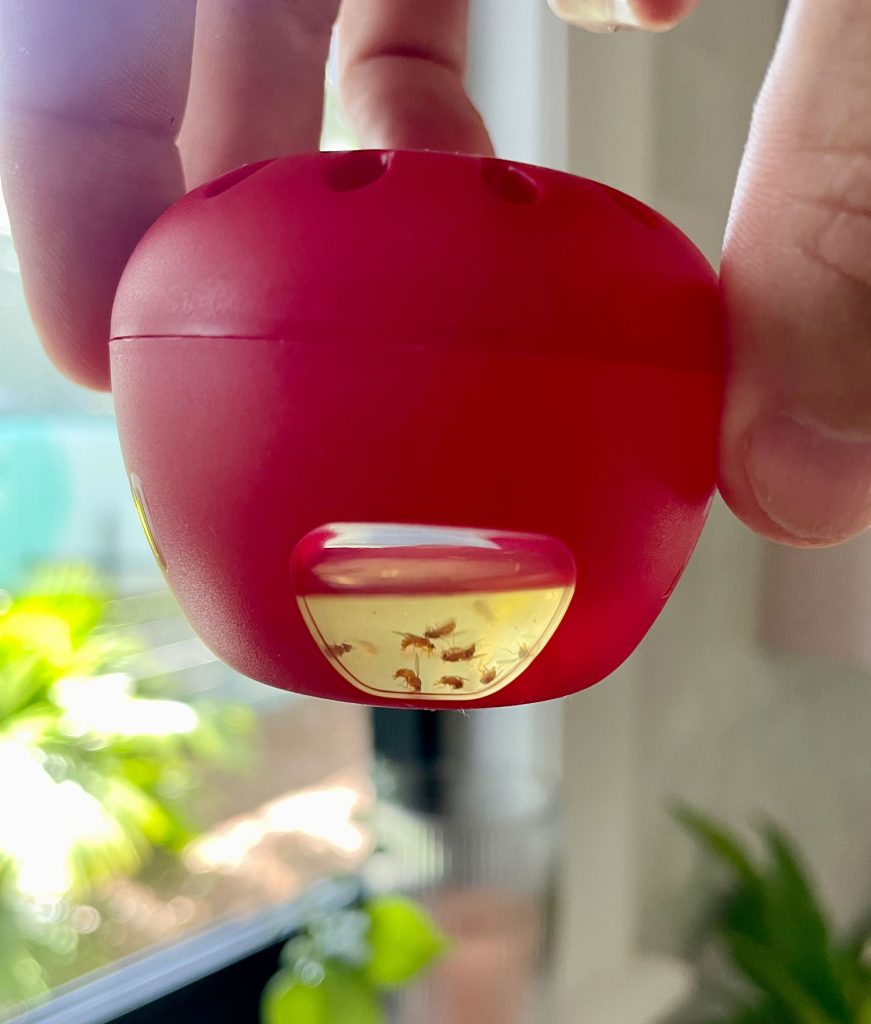
During our little experiment, I picked up a pack of Terro Traps to see if they performed better than my homemade methods. I left one out for 24 hours next to our banana & strawberry traps to see which of the three performed best.
Once again, our homemade strawberry trap did best, followed closely by the homemade banana peel trap. The storebought trap caught only one. HOWEVER…
Just to be sure, we discarded both of our DIY traps and left the storebought trap out for another 24 hours. That’s when it caught the collection you see above. So it definitely worked, just not as well or as fast as our homemade traps did. Our verdict? Use storebought traps if you want something more discreet looking, especially if you plan to leave it out indefinitely… but there is nothing bad about the homemade ones, in fact we found them to be the best way to get the fruit flies right away!
How To Prevent Fruit Flies
Getting rid of fruit flies is pretty simple, but the best-case scenario is to stop them from invading in the first place. Here are some simple ways you can prevent fruit flies from taking up residence in your home.
Clean kitchen surfaces. Wipe down kitchen counters, stovetops, tables, and any other surfaces that may collect food residue or spilled liquids. Fruit flies are especially attracted to fruit, sweet juices, and alcohol so don’t let those sit!
Take out your trash. Leaving food scraps in your garbage overnight can quickly turn your trash can into a fruit fly breeding ground.
Dispose of overripe fruit. Monitor your fruit bowl for browning or rotting apples, bananas, etc so you can get rid of them before they become a problem.
Wash your fruit as soon as you get it home. You can eliminate eggs or larvae that might come home from the store by washing produce right away (except for berries, which could rot faster from the moisture).
Store produce in the fridge when possible. Fruit flies won’t flourish in the cold, so when in doubt, try storing your fruit and vegetables in the refrigerator.
Clean your sink drain. Food scraps left in your drain can also attract fruit flies, so make sure you run your garbage disposal and/or flush the drain regularly.
Lastly, don’t panic when you spot fruit flies in your home. Yes, you want to take action quickly to prevent the problem from getting worse. But the solutions in this post are easy, effective, and fast-acting. You might even have some fun becoming a fruit fly scientist like I did.
*This post contains affiliate links, so we may earn a small commission when you make a purchase through links on our site at no additional cost to you.
Discover an easy-to-follow bathroom deep cleaning checklist designed for busy families. From gathering supplies to tackling tough spots like grout and mildew, this guide covers step-by-step cleaning tips and practical advice for involving kids. Learn how to organize your bathroom for long-term cleanliness and turn a dreaded chore into a manageable, even enjoyable, routine.
Cleaning the bathroom is often seen as one of the least enjoyable household chores, but it doesn’t have to be a dreaded task. With a clear plan and the right tools, you can make this chore manageable and even satisfying.
.tasty-pins-banner-container{display:block;margin-bottom:20px;position:relative;width:-moz-fit-content;width:fit-content}.tasty-pins-banner-container a{cursor:pointer;display:flex;font-size:14px;font-weight:700;letter-spacing:1px;line-height:1.8em;text-transform:uppercase}.tasty-pins-banner-container a:hover{opacity:1}.tasty-pins-banner-container .tasty-pins-banner{align-items:center;bottom:0;cursor:pointer;display:flex;justify-content:center;left:0;padding-bottom:1em;padding-top:1em;position:absolute;right:0}.tasty-pins-banner-container .tasty-pins-banner svg{margin-right:4px;width:32px}.tasty-pins-banner-container .tasty-pins-banner span{margin-top:4px}.tasty-pins-banner-container a.tasty-pins-banner{text-decoration:none}.tasty-pins-banner-container a.tasty-pins-banner:hover{opacity:.8}.tasty-pins-banner-container a.tasty-pins-banner-image-link{flex-direction:column}.tasty-pins-banner-container a img{margin-bottom:0}.entry-content .wp-block-image .tasty-pins-banner-container img{margin-bottom:0;padding-bottom:0}#et-boc .et-l div .et_pb_image_wrap .tasty-pins-banner-container .tasty-pins-banner{padding-bottom:1em!important;padding-top:1em;text-decoration:none}#et-boc .et-l div .et_pb_image_wrap .tasty-pins-banner-container a.tasty-pins-banner{cursor:pointer;display:flex;font-size:14px;font-weight:700;line-height:1.8em;text-transform:uppercase}#et-boc .et-l div .et_pb_image_wrap .tasty-pins-banner-container a.tasty-pins-banner span{letter-spacing:2px;margin-top:4px}.et-db #et-boc .et-l .et_pb_module .tasty-pins-banner-container a:not(.wc-forward){padding-bottom:0}
In this post, we’ll walk you through a bathroom deep cleaning checklist that covers everything from scrubbing the tiles to maintaining a sparkling sink. We’ll also share some tips on keeping the bathroom tidy when you have kids at home.
Navigate This Post
Ready to turn your bathroom into a spotless sanctuary? Let’s get started!
Gathering Supplies
Before you start, make sure you have all your cleaning supplies ready to go. This will streamline the process and save you time.
You’ll need essentials like a toilet brush, mop, scrub pads, microfiber cloths, all purpose bathroom cleaner, and wipes. Keep glass cleaner handy for your mirrors, and have vinegar on hand for a natural disinfectant.
For those tough spots like grout and mildew, specialized products will be a big help. Don’t forget your tile cleaner and a reliable all-purpose cleaner for other surfaces.
A sturdy pair of rubber gloves and a mask can also be beneficial to protect yourself from any fumes. Having everything within reach means you can dive right in without any interruptions.
Step-by-Step Cleaning Guide
The key to effective bathroom deep cleaning is working from top to bottom.
Start by dusting off the ceiling, vents, fans, and light fixtures to get rid of any cobwebs or dust. Next, move on to the light switches, walls, and tiles, making sure to clean the grout lines well.
Use a spray bottle with a mix of vinegar and water for a natural cleaning option.
For the sink, use a brush to scrub away grime and water spots.
Clean your mirrors with glass cleaner and microfiber cloths to avoid streaks.
When it comes to the toilet, give it a thorough scrub with a toilet brush and disinfect it with a toilet bowl cleaner properly. Don’t forget the exterior and lid.
If your shower curtain looks dingy, either wash it in the washing machine or replace it if necessary.
Lastly, shake out or vacuum any rugs and tackle the floor with a mop to catch any dust, dirt, or debris that’s fallen during the cleaning process.
By following this order, you’ll make sure areas you’ve already cleaned stay clean.
Tackling Tough Spots
Some spots in the bathroom can be particularly stubborn.
For soap scum and hard water stains on tiles, a glass shower door, and fixtures, a mix of vinegar and baking soda can work wonders. Apply it to the affected area, let it sit for a few minutes, and then scrub away the residue.
Mold and mildew are common issues, especially in damp areas like the shower.
Use mildew-specific bathroom cleaners or a mixture of vinegar and water to treat these spots. Be sure to ventilate the bathroom well and wear gloves to protect your hands from harsh chemicals.
Regular attention to these areas can prevent buildup and keep your bathroom healthy.
Maintaining a Clean Bathroom with Kids
Getting kids involved in keeping the bathroom clean can be both fun and educational.
Start by giving them age-appropriate tasks. Younger children can wipe down the sink and faucet with disinfectant wipes, empty trash bags, or tidy up bath toys, while older kids can help with more challenging chores like scrubbing tiles or mopping the floor. Use colorful wipes and playful scrub brushes to make these tasks more appealing to them.
Establishing a routine is crucial for managing bathroom mess.
Teach your kids to put things back in their place after use. This includes hanging up towels, closing shampoo bottles, and putting away personal items. You could even make a game out of it, rewarding them with stickers or small treats for completing their tasks.
Another great idea is to set up a kid-friendly cleaning kit. Fill a small caddy with safe, non-toxic cleaning supplies that they can use. This empowers them to take charge of their chores and fosters a sense of responsibility.
For families with multiple kids, a chore chart or weekly bathroom cleaning checklistcan help divide tasks fairly and ensure everyone participates. Rotate duties weekly so that each child learns to handle different aspects of bathroom upkeep.
Lastly, keep storage within easy reach for kids. Install lower hooks for their towels and use baskets for their bath toys and other items. This will make it easier for them to tidy up, turning cleanliness into a team effort.
Organizing for Long-Term Cleanliness
A well-organized bathroom is the cornerstone of long-term cleanliness.
Start by decluttering your space and getting rid of items you don’t need or use regularly. Invest in shelves, baskets, and hooks to keep everything in its place.
Clear containers are great for storing small items like cotton swabs, hair ties, and makeup, and labeling them makes finding what you need a breeze.
Think about adding vertical storage solutions to maximize space. Over-the-door racks and hanging organizers can hold everything from towels to toiletries. Drawer dividers are another excellent option to keep your drawers tidy and easy to navigate.
Another tip is to keep daily essentials within easy reach. Use a caddy or a small tray on your countertop for items you use every day, like toothpaste, face wash, and hand soap. This not only keeps things organized but also speeds up your morning routine.
Don’t forget about the shower area. Use shower caddies or shelves to store shampoos, conditioners, and body washes. This prevents bottles from accumulating on the floor or tub edge, making it easier to keep clean.
Finally, ensure your cleaning supplies are stored in an accessible spot. This way, quick touch-ups are convenient and you’re more likely to stick to your cleaning routine.
With these strategies, maintaining a tidy bathroom becomes a lot more manageable.
Final Thoughts on Bathroom Deep Cleaning
Deep cleaning your bathroom might seem daunting, but with a bit of planning and the right tools, it’s totally manageable.
Remember, the trick is to work from top to bottom, making sure you don’t miss any spots along the way.
Keep an eye on those tricky areas like grout and mildew, as regular attention can keep them from becoming bigger problems.
Getting the kids involved not only helps distribute the workload but also teaches them valuable life skills. Plus, it can turn a mundane task into a fun family activity.
Staying organized is crucial; it makes future cleanings easier and quicker. With a solid routine and some teamwork, maintaining a clean bathroom becomes a much simpler task.
When the sun goes down, a little lighting can go a long way. Outdoor uplights add a beautiful touch to landscaping and give an otherwise simple setting that extra oomph. Plus, the right lights do more than you think, like setting the tone from cozy to dramatic to even magical. You can use outdoor uplights in several areas, including walkways, foliage, patios, and walls.
We’ll explore beautiful ways to enhance the exterior of your home with uplights (along with a few design tips and tricks).
.tasty-pins-banner-container{display:block;margin-bottom:20px;position:relative;width:-moz-fit-content;width:fit-content}.tasty-pins-banner-container a{cursor:pointer;display:flex;font-size:14px;font-weight:700;letter-spacing:1px;line-height:1.8em;text-transform:uppercase}.tasty-pins-banner-container a:hover{opacity:1}.tasty-pins-banner-container .tasty-pins-banner{align-items:center;bottom:0;cursor:pointer;display:flex;justify-content:center;left:0;padding-bottom:1em;padding-top:1em;position:absolute;right:0}.tasty-pins-banner-container .tasty-pins-banner svg{margin-right:4px;width:32px}.tasty-pins-banner-container .tasty-pins-banner span{margin-top:4px}.tasty-pins-banner-container a.tasty-pins-banner{text-decoration:none}.tasty-pins-banner-container a.tasty-pins-banner:hover{opacity:.8}.tasty-pins-banner-container a.tasty-pins-banner-image-link{flex-direction:column}.tasty-pins-banner-container a img{margin-bottom:0}.entry-content .wp-block-image .tasty-pins-banner-container img{margin-bottom:0;padding-bottom:0}#et-boc .et-l div .et_pb_image_wrap .tasty-pins-banner-container .tasty-pins-banner{padding-bottom:1em!important;padding-top:1em;text-decoration:none}#et-boc .et-l div .et_pb_image_wrap .tasty-pins-banner-container a.tasty-pins-banner{cursor:pointer;display:flex;font-size:14px;font-weight:700;line-height:1.8em;text-transform:uppercase}#et-boc .et-l div .et_pb_image_wrap .tasty-pins-banner-container a.tasty-pins-banner span{letter-spacing:2px;margin-top:4px}.et-db #et-boc .et-l .et_pb_module .tasty-pins-banner-container a:not(.wc-forward){padding-bottom:0}Photo by Easten Outdoors
What Are Outdoor Uplights?
Uplights are an outdoor lighting feature which includes fixtures designs to cast light upward. These lights are typically found in the ground, either by superficially adding them or building them into surfaces (like a recessed area or low base structure). These lights are more focused and directional, making them a great addition for illuminating trees, architectual elements, walls and even scultpures.
So, why should you add uplights? If you’re on the fence, here are few reasons to explore.
Add drama. Use uplights to add dimension, texture, and contrast to otherwise flat spaces without needing to redesign or update other landscape elements.
Boost safety. Light the path to your entryway, stairs, garage, or yard with strategically placed uplights.
Enhance curb appeal. Highlight details of the outside of your home that you love the most.
Elevate other lights. Complement flood lights, path lights, wall sconces, and even string lights.
Uplights come in a variety of sleek designs, and many offer energy-efficient LED options at an affordable price, so you can give your home a design boost on a budget.
1. Highlight Your Home’s Best Features
Maybe you’re wondering if the outside of your home needs “something,” but you don’t quite know what to update. Keep it simple (and budget-friendly) with uplighting. Highlight key features of your home like archways, high windows or even textured walls. This is also very effective for stone or brick exteriors because it adds drama without minimal effort.
2. Illuminate Your Entryway
Light the path leading up to your front door with in-ground uplights. Soft lights are great for welcoming guests and elevating curb appeal. You can also install built-in up lights (like the example below) for a sleeker finish. Pathway/entrway uplights are functional and add beauty to the entrance of your home.
3. Uplight Trees
Need an easy outdoor element to highlight? Use existing trees in your back or front yard. Uplighting the base of the trunk and canopy casts beautiful shadows and depth. Use color temperature and shadowing to your advantage to evoke different feels from whimsical to relaxed.
4. Mix it Up with Downlighting
Uplighting pairs really well with downlighting to add dimension. Mount fixtures with light facing down directly or close above uplights below to intentionally feature different aspects of your home (like tall windows or large entryways).
5. Define Walkways
Consider incorporating subtle uplights at the edges of walkways to add definition. Not only will this make walkways easier to navigate, but uplights can highlight greenery or stonework. Mix and match different lighting with uplights for a polished and elevated feel.
6. Add Grazing to Walls or Fences
Mounting uplights near the base of a wall is a technique called grazing. It brings out surface texture and architectural details by creating highlights and shadows. Grazing is one of the easiest ways to elevate basic landscaping.
7. Give Patios and Decks Some Extra Light
Uplights around patios or decks can enhance seating areas and transition spaces. You can pair them well with outdoor wall lights, string lights, or even step lights for extra ambiance.
8. Create Focal Points Outdoor Uplights
Have a garden statue or fountain that you love? Make it stand out with uplights placed below to make it the perfect nighttime centerpiece. Consider playing with different beam sizes, like narrow beams for tall sculptures and wider beams for broad pieces.
9. Backlight Shrubs or Foliage
Shrubs and foliage need attention, too. While trees are a great option for uplight placement, it’s also just as important to highlight plants that either light pathways and outline front or backyards. Place lights behind plants to create a silhouetting effect that’s especially stunning with large tropical leaves or ornamental grasses.
10. Mix Uplights with Spot Lights
Mixing flood lights or spot lights with uplights can create a soft balance in areas that already have strong architectural features. Try a layered lighting design to help your landscaping shine from multiple angles.
11. Play with Color Temperature
Bulb colors can create a warm and cozy vibe or offer a cooler, energizing feel. Warmer bulbs (around 2700k) are great near entryways, while cooler tones (4000k+) make white trim and stonework pop. Varying color with uplights lets you fine-tune your outdoor space to match your mood.
12. Choose Stylish Finishes
Brass uplights are as beautiful as they are classic. Plus, they can handle different types of weather (making them a win-win year-round). Powder-coated aluminum is another finish go-to for a sleek look that pairs well with other outdoor design features.
13. Go In-Ground for a Clean Look
In-ground uplights can create a minimalist feel. They sit flush with your lawn or pavers, virtually disappearing during the day, but making a big statement at night.
14. Use Uplighting to Improve Security
The right lighting plan can offer beauty and safety. Strategically placed uplights around dark corners, fences, or entries can help increase visibility and deter intruders. Consider pairing uplights with security or smart home systems for even more peace of mind.
15. Uplight Outdoor Art or Murals
If your home features an exterior mural or mounted art piece, uplighting can help it shine. Choose wide-beam fixtures with adjustable angles and use a dimmer or smart controller to fine-tune brightness depending on the mood.
Photo by Fancy House
16. Use Path Uplights to Frame Garden Beds
Highlight your garden by installing uplights at low angles beside garden beds. This creates a cozy glow that helps flowers and foliage pop after sunset.
Tips and Tricks for the Best Outdoor Uplighting
DIY Installation
Uplighting is very DIY-friendly. Follow the outdoor lighting installation tips from the brand you purchased and check that the transformers and wiring match the fixture load.
Best Lightbulbs
LED lightbulbs are our top choice for uplighting because they’re long-lasting, energy-efficient, and available in various beam widths and temperatures.
Places to Purchase
Most local retailers, both in person and online, will carry a range of options. Large home improvement stores often have the widest selection.
Avoid Light Pollution or Glare
Keep beam spreads narrow to avoid washing out nearby areas (or annoying your neighbors). Test fixture angles at night and adjust as needed.
Uplighting is all about stylishly illuminating landscaping to highlight the most beautiful aspects of your home. They are a great way to easily add dimension, artistry, and mood to your outdoor space. No matter what your current landscaping looks like, you can take it to the next level with uplights.