Mirrors can do a lot more than just reflect your outfit, especially when you pick the right pieces and place them thoughtfully, across from windows, near light sources, or anywhere a space could use more depth & brightness. The catch is, the ones that actually look this good tend to come with a higher price tag, which is exactly why we’ve put together a list of 4 statement mirrors under $200 that still feel high-end 😉
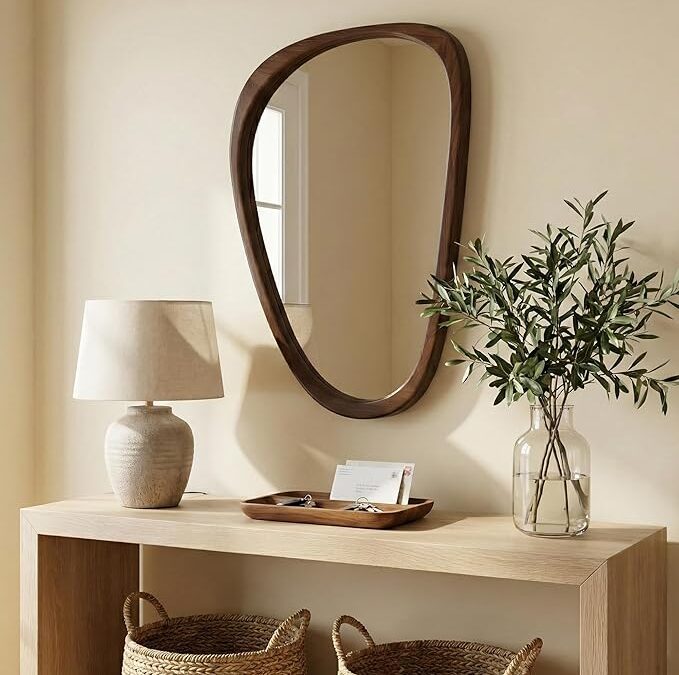
Every space needs a focal point, and an asymmetrical organic mirror handles that very well. Hang it over an entryway console or above your dresser, and pair it with simple decor to allow those subtle curves to carry the moment.
Does your room still feel a little flat, even when everything matches? Well, maybe you need a vintage-style metal mirror to pull it all together, because remember…
Streamlined Decor + A Single Character-Rich Accent = A Designer Interior
Small corner? Tight room? Not enough light? A full-length mirror solves all three at once. Now you’ve got better lighting for makeup, a full view for your OOTDs, and a space that looks so much more aesthetic.
Mirrors can be a fun addition to your gallery wall, and when it’s something as quirky as a brass convex mirror? Absolutely worth it. Minimal or boho, it slips into almost any style, introducing a head-turning detail that makes a stunning statement.
A place of rest and relaxation, the bedroom should be your solace from the hustle and bustle of everyday life. Transitioning a bedroom from bland to luxurious could mean adding high-end accessories or pushing the boundaries with an intricate accent wall. If you can’t put your finger on what your space needs, follow us through our curation of 25 inspired luxury bedroom design ideas.
Luxury Bedrooms
Our collection features the best luxury bedrooms with photos and tips, so you can finally find that perfect design.
Archways instill a sense of elegance into interiors but they don’t have to be architectural. Faux archways can be achieved with gypsum, contrasting materials, or panel molding. Modern furniture designs will usher in complementary curves. In this luxury bedroom interior design, shallow bedside alcoves have been constructed and emphasized with reeded gypsum. A center arch is filled with a dreamy mural.
In Brooklyn, New York, this earthy luxury bedroom design keeps the homeowner grounded in nature. A textured wooden headboard and a solid wood accent table establish a warm brown decor palette, while a statement bedcover and area rug usher in soothing moss-green accents. No matter if you’re in the middle of a cityscape, you can always grow your own natural style.
Modern homes can appear boxy with lack of quirky architectural features. So, why not create your own areas of interest with texture, lighting, and intriguing curves? Create a cocoon around your headboard with a concave focal wall, clad with wood-slatted panels. Contradict the natural wood grain with an underlining wraparound of sleek black gloss. To finish, accentuate your creation with LED perimeter lighting.
It’s tempting to balance out a centrally positioned bed with identical nightstands on either side, the same light above them both, and a perfectly symmetrical focal wall. However, asymmetrical headboard walls offer a much more exciting approach. This concept demonstrates finely reeded gypsum and smooth paintwork at one side of the room, contrasted by extruded wooden wall paneling on the other. Similar yet non-identical bedroom pendant lights are suspended over distinct bedside units.
Elevate a large and spacious bedroom layout with a dedicated lounge area. Define the sleeping zone from the sitting spot with soft area rugs. Incorporate a coffee table into the bedroom lounge setup to hold your morning beverage and current book. A tall, floral table centerpiece will sprinkle in a sense of formality, and a small footstool will increase the cozy factor.
Combine rustic charm with upscale fashion by installing chunky wooden wall paneling behind luxury king bedroom sets. This wood-clad interior design supports a tactile gray velvet upholstered bed, sleek gray bedside units, a plush gray bedroom rug, and contemporary black pendant lights. Round wall mirrors make a reflective feature upon the warm timber backdrop where they double the views of the garden.
An all-white bedroom decor scheme may seem uninspired for a luxury home but there are many ways to enrich the look. Here, contoured wall panels imprint an organic, sculptural essence into the space that is dramatized by concealed mood lighting. The perimeter lighting extends above the bedroom drapes and voiles too to create a halo of atmospheric warmth around the entire room.
Although this sage bedroom has a simple setup with minimal furniture items, a deeply framed platform bed is enough to exude a sense of luxury. The plush green bed is perfectly color-matched by the wall paint to ensure a soothing, steady flow for the eye. Landscape photography incorporates the green accent color. Unique bedroom pendant lights introduce eye-catching organic form.
Classic panel molding applied across a tall headboard wall, gracefully arched bedroom windows, a traditional ceiling rose, and a stunning chandelier will make you feel like a lord or lady of the manor. Balance out traditional elegance with modern counterparts to keep your home current, such as pieces of abstract contemporary art, minimalist bedroom furniture silhouettes, and modern area rugs.
By fitting your headboard to the entire width of the bedroom, you can achieve a seamlessly bespoke aesthetic. A single width of natural wood or an upholstered panel will transform the space but the designer of this modern bedroom has combined the two. Overlapping wood grain and gray upholstery build a textural focal point that gives the room depth. Two differing pendant lights are married to echo the layered effect.
Channel tufting, biscuit tufting, and diamond tufting can be employed to add a deeply sumptuous appeal to your headboard focal wall. Take the upholstered treatment up to the ceiling line to achieve a luxurious effect and frame the fabric with a deep, wooden border. The diamond-tufted headboard feature is flanked by sophisticated wooden slats in this space, creating a textural juxtaposition.
Brighten a dark bedroom decor scheme with strips of custom-cut mirror. Whether you choose to install a wide full-length mirror behind each bedside table or apply thin slivers of mirrored glass between decorative wall panels, the reflective surfaces will make your bedroom appear lighter and more spacious. This effect works particularly well in rooms that suffer a lack of natural light from small windows or a less sunny aspect.
Private master suites don’t require solid ensuite bathroom walls. A glazed wall between the sleep space and the bathroom will increase the sense of space and open both rooms to more natural light. In this gorgeous luxury bedroom suite, the bright white, glass-walled bathroom becomes a headboard feature wall to the dark, wood-clad bedroom design. A soft, biscuit-tufted platform bed plays alongside the texture of extruded bathroom wall tiles.
A rockface headboard feature wall makes a commanding statement of natural beauty and wild texture. The rugged surface contrasts strikingly with soft furnishings, creating a balanced interplay of strength and sophistication. Organic rock tones complement neutral bedroom decor palettes and wooden design elements, enhancing the room’s tranquil ambiance while making a bold statement. Be sure to fully illuminate your rock feature with a frame of LED strips too.
Not only does this upscale bedroom design display an enveloping textile headboard design but it demonstrates an exciting array of bedroom lighting options. Note how the tall, upholstered headboard design is overlaid with an exciting modern chandelier duo, while the opposite bedside is decorated with chic floor lamps of differing heights. A ribbon of LEDs completes the atmospheric glow.
Botanical decor elements naturally uplift your mood, so they’re great to wake up to in the morning. Hang botanical artwork on your bedroom walls, install rattan pendant lights over natural wood bedside tables, and welcome in the garden with a decorative vase or two of flowers. Complement your natural accessories with an earthy brown accent palette for bed throws and scatter cushions.
Marble always gives any room a glow-up. Take this mesmerizing black-veined white marble headboard slab for instance; its understated presence creates undeniable opulence. In this luxury bedroom concept, the smooth, cool marble headboard is warmly contrasted by a textile focal wall. Pull vertical layering together with a tall floor reading lamp beside the bed that will draw the eye from top to bottom.
Luxury hides in the details of your bedroom design. If you need to add a vanity table to your bedroom for applying makeup or styling your hair, you might consider a streamlined wall-mounted design. A vanity unit without legs subtracts visual clutter and makes your bedroom floor space appear larger and cleaner. Install a full-length mirror behind to amplify the floating effect.
Alternatively, why not draw attention to a small bedroom vanity area with a brightly backlit wall mirror? An illuminated mirror not only spotlights your face but will add mood lighting to the overall scheme. This works especially well for vanity areas that double as a bedside table, where the mirror light will balance out a bedroom pendant light on the opposite flank.
Bouclé fabric has conveyed a sense of luxury since it wrapped the iconic creations of Eero Saarinen and Florence Knoll and graced Chanel catwalks. Bring this soft, looped fabric into your bedroom space in the form of a curved modern headboard design or an inviting end-of-bed bench. A special mention goes to the artistic installation in this bedroom headboard wall design, which peacefully picks up on the intricate texture of the bouclé fabric.
Statement bedroom rugs serve as an exciting centerpiece, adding a splash of personality to your space. Whether bold in pattern or rich in color, these rugs anchor the room’s design, creating a focal point that ties together other elements. This striking black and greige bedroom rug complements the high-end furniture and finishes, merging the curation into a harmonious blend of comfort and style.
Do you have trouble sleeping? Don’t just stop at blackout blinds and drapes, surround yourself with a cocoon of sleep-inducing darkness. A black bedroom scheme can appear seriously luxurious when formulated with a succinct sense of style. Choose each piece to promote comfort through simplicity while adhering strictly to your shadow palette.
Truly think about how you use your bedroom; if you get the absolute most out of your space you will always feel a sense of luxury. Do you need an end-of-bed bench to assist you in dressing or as a place to lay down a tray for breakfast in bed? Is a small bedside table enough or do you like to spread out your belongings? Do you require a bedroom work area or a vanity table? With careful planning, you’ll feel supported by your space.
Instantly, the eye is drawn to the bronze Atollo lamps and a magnificent circle chandelier in this luxurious bedroom design. They are not loud or garish in appearance but they do carve out iconic silhouettes. When selecting your own bedroom furniture and lighting pieces, go for shapes that speak to you or choose designs that have already stood the test of time.
Combine black bedroom walls with a sophisticated brown faux leather platform bed and moody gray textiles to conjure an atmospheric aesthetic. Lighting is key in a dark design scheme, so always incorporate a number of lamps and bedroom pendant lights. In this deeply dramatic scene, two linear wall sconces subtly light the bedsides while a modern chandelier provides overhead brightness.
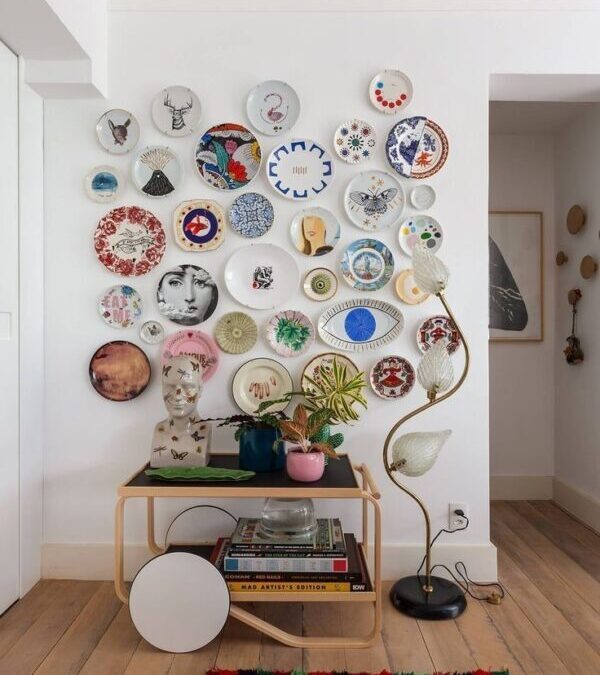
Console table decor is incomplete without shape & contrast, elements that are added by none other than a lovely sculptural object. Present it as a standalone, or use it as a base to showcase precious heirlooms.
Want a softer look? Swap the bowl for a reading figurine or abstract sculpture. Same role, different mood, one that leans more personal and a little more lived-in.
A trailing plant, a loose stem, or even a bunch of dried florals softens the edges and breaks the structure just enough. Plus, it’s super easy to switch out with the seasons!
Pro Tip- Let it spill a little. Perfectly contained plants can feel stiff, while a bit of asymmetry makes the whole setup feel more natural.
Decor trends have a way of circling back, but rarely in the exact same form. Plate walls are a perfect example. Once associated mostly with traditional dining rooms or farmhouse-style kitchens, they’re now showing up in every kind of space, from modern apartments to minimalist homes. The difference today is how they’re styled. Instead of predictable matching sets, designers are mixing eras, colors, and layouts to create displays that feel personal and layered. A plate wall works because it’s both decorative and storytelling. Each piece adds character, texture, and history. When arranged thoughtfully, it becomes a focal point that feels curated rather than themed. Here are 18 ways to embrace the plate wall comeback without falling into the overly rustic look many people are trying to avoid.
The most interesting plate walls rarely rely on a single matching set. Mixing vintage finds with newer pieces creates contrast and character that feels intentional rather than decorative. A delicate antique plate can sit comfortably beside a modern ceramic design, giving the display a sense of history and personality. This approach prevents the wall from looking overly themed while allowing each plate to stand out in its own way.
For a more relaxed and expressive look, mixing patterns can make the display feel lively and unique. Floral designs, geometric motifs, and hand-painted ceramics can all work together if the overall scale and spacing remain balanced. The result feels spontaneous and personal rather than overly coordinated.
Using plates to frame a doorway is an unexpected way to extend a plate wall beyond a standard flat surface. Instead of limiting the display to one section of wall, arranging plates around the edges of a doorway creates a more immersive and architectural look. This approach helps connect different areas of a home while adding visual interest to spaces that are often overlooked. When done with balanced spacing and a consistent color palette, it feels intentional and modern rather than overly decorative or traditional.
If you prefer something more relaxed, a salon-style arrangement allows plates of different sizes to overlap visually. Instead of strict spacing, the display grows organically outward from a central piece. This method feels more collected and personal, making the wall look like it evolved over time rather than being installed all at once.
A plate wall doesn’t have to consist only of plates. Mixing in framed artwork, small baskets, mirrors, or sculptural pieces can add depth and variety to the arrangement. This layered approach helps the display feel more like a curated gallery wall rather than a traditional china showcase. The contrast between ceramic plates and other materials, such as wood, glass, or woven textures, creates visual interest and balance. When arranged thoughtfully, combining different decorative elements makes the wall feel more dynamic, personal, and modern instead of overly themed or predictable.
A plate display doesn’t have to stay in kitchens or dining rooms. One of the most creative placements is above the bed, where plates can form a gentle arch that mirrors the shape of the headboard. This arrangement feels artistic and unexpected, turning the display into a soft focal point rather than traditional wall decor. Choosing plates in similar tones keeps the look calm and cohesive, while the curved layout adds movement that makes the wall feel thoughtfully designed.
A plate wall doesn’t have to cover a large space to make an impact. Even a small section of wall can become a striking feature when styled thoughtfully. Areas like kitchen corners, narrow hallways, or spaces above a small console table are perfect for a compact plate arrangement. By grouping a few plates together in a balanced layout, you can transform an otherwise empty wall into a focal poin
Plate racks are a timeless way to display decorative dishes without committing to a permanent wall installation. Mounted racks allow plates to be arranged upright, making them easy to swap out or rearrange whenever you want to refresh the look. This approach works especially well in kitchens where plates can function as both decor and practical pieces. The rack itself also adds structure, giving the display a more architectural presence on the wall.
Open kitchen shelving provides the perfect opportunity to incorporate decorative plates into everyday styling. Instead of hiding them in cabinets, plates can be leaned against the wall or layered with bowls and glassware. This creates depth and visual interest while still keeping the arrangement functional. Mixing decorative pieces with everyday dishes helps the display feel natural rather than staged, making the kitchen feel more personal and lived-in.
Bathrooms are an unexpected but charming place for a plate wall. Arranging small plates around a mirror creates a unique frame that adds personality without taking up extra space. Because bathrooms tend to be compact, even a small grouping can make a strong visual impact. Choosing ceramic plates with subtle patterns or textures keeps the display elegant while adding warmth to a space that often feels purely functional.
11. Keeping a Plate Wall in a Soft Neutral Palette
For homes with a calmer aesthetic, a plate wall doesn’t have to be colorful to stand out. Choosing plates in neutral shades like cream, taupe, or soft grey creates a display that feels subtle and refined. The texture and shapes of the ceramics become the focus rather than bold patterns. This approach works particularly well in minimalist or modern interiors where the goal is visual interest without overwhelming the space.
Pastel-colored plates bring a gentle, playful quality to a wall display. Shades like soft pink, pale blue, mint, or lavender can create a light and airy arrangement that feels cheerful without becoming overwhelming. When combined with neutral walls and simple furnishings, pastel plates add just enough color to brighten the space. This style works especially well in kitchens, breakfast nooks, or creative spaces where a softer palette enhances the overall atmosphere.
Floral plates can create a striking wall display when arranged thoughtfully. Instead of scattering them randomly, try grouping plates with similar botanical patterns or complementary colors so the arrangement feels cohesive. The floral designs naturally bring movement and softness to the wall, making the display feel lively rather than overly decorative. When paired with simple furniture and neutral surroundings, a floral plate wall becomes a focal point that adds personality and charm without overwhelming the rest of the room.
Pairing plates with wallpaper can create a beautifully layered design moment. The key is choosing plates that echo the colors or motifs already present in the wallpaper rather than competing with it. When the tones or patterns align, the display feels intentional and integrated into the room’s design. This approach works especially well in dining areas, kitchens, or powder rooms where wallpaper often adds character. Instead of looking busy, the plates become part of the overall visual story.
Combining plates with framed artwork creates a gallery wall that feels more dynamic and modern. The mix of materials,ceramic surfaces alongside framed prints or paintings,adds contrast and depth. Plates can break up the rectangular shapes of artwork, making the entire arrangement feel more relaxed and creative. This styling approach prevents the wall from looking overly traditional while allowing both the plates and the art to stand out in an interesting way.
A color-coordinated plate wall is one of the easiest ways to create a polished, intentional display. Instead of focusing on matching patterns, choose plates that share a similar color palette,like soft blues, earthy greens, or warm neutrals. Even if the designs differ, the shared tones help the arrangement feel cohesive. This approach works especially well in modern interiors where consistency helps maintain a calm atmosphere. By limiting the color range, the display feels curated and stylish rather than busy or overly decorative.
Using plates with different patterns is a great way to create a visually rich and dynamic wall. Instead of sticking to one design, mixing florals, geometric prints, and classic motifs can make the display feel layered and interesting. The key is to find a common element, such as a shared color palette or similar tones, so the arrangement still feels cohesive. When done thoughtfully, a mix of patterns adds personality and prevents the plate wall from looking too uniform or predictable.
A plate wall doesn’t have to feel busy or overly decorative. In minimalist interiors, fewer plates arranged thoughtfully can create a stronger visual impact than a crowded display. Choosing simple ceramics in neutral tones,such as white, cream, or soft grey,keeps the arrangement calm and refined. Clean spacing between plates also helps the wall feel intentional rather than cluttered. This approach works especially well in modern homes where subtle texture and form are preferred over heavy patterns or overly rustic styling.
Wrap-Up
The return of plate walls proves that traditional décor can feel fresh again when approached creatively. By mixing styles, experimenting with layouts, and placing displays in unexpected rooms, plates can become a form of wall art rather than simple decoration. For readers of Home Designing, this trend offers a way to celebrate personal collections while adding texture and personality to modern interiors.
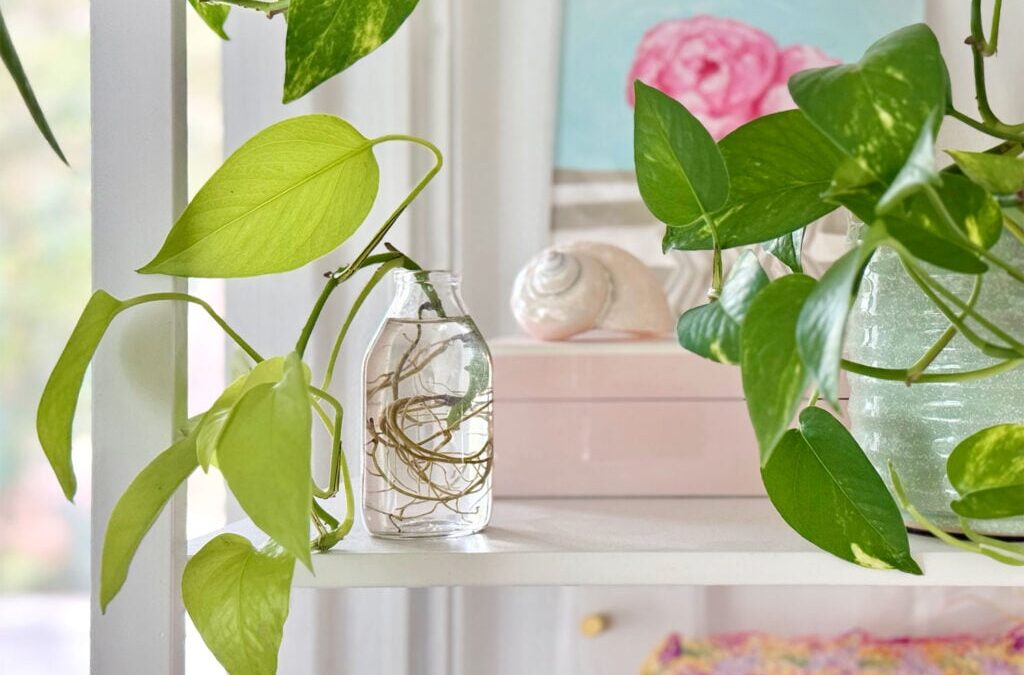
Pothos plants (Epipremnum aureum) aren’t just low-maintenance houseplants to own, they’re also some of the easiest to propagate! Propagation is a fun way to grow new pothos from your existing pothos plants, while also helping them stay healthy, full, and looking their best. And, since it requires no special tools or skills, it’s a virtually free way to grow your plant collection! We have, no joke, generated at least 12-15 free pothos plants using this method! You can even use them as gifts for friends and neighbors.
The propagation methods described below should work for all species of pothos (sometimes called Devil’s Ivy). You can read more about our favorite easy-care pothos varieties in our plant guides:
Why Propagate Your Pothos
You may think propagating plants is just for hardcore houseplant enthusiasts with too much time on their hands. But propagation is an easy and approachable way to get more out of your plants… even for beginners! It’s really a no-brainer, super-simple DIY project. Here’s why:
Low risk: Pothos are some of the easiest houseplants to propagate, so you’ll be rewarded with minimal effort.
Practically free: Most people can propagate using supplies they already own.
Healthier plants: Pruning your pothos promotes new growth. So even if your clippings don’t propagate, you’ve helped your main plant (aka “mother plant” or “parent plant”).
Less waste: Propagation keeps your clippings out of the trash
Save money: Grow – don’t buy – new plants to add to your collection
Great gifts: You can pass a new plant along to a friend or family member
Fuller pots: Propagated clippings can be planted back with their mother plant for a fuller look
And if that isn’t reason enough, propagating plants is also pretty fun to watch!
The Best Time To Propagate Pothos
Your propagation efforts have the greatest chance of success in the spring and summer months, during a pothos’ growing season. This is true for most houseplants, but it’s not an absolute rule…
You can certainly continue propagating in the fall and winter months, but cuttings may take longer to root or not root at all. During those months, we typically won’t start any new water propagations, but we will stick any pruned vines back into the mother plant’s soil. At worst, they don’t root, and we just pluck them out later. But they often will root, and we’ve helped our mother plant look fuller.
Tools & Supplies
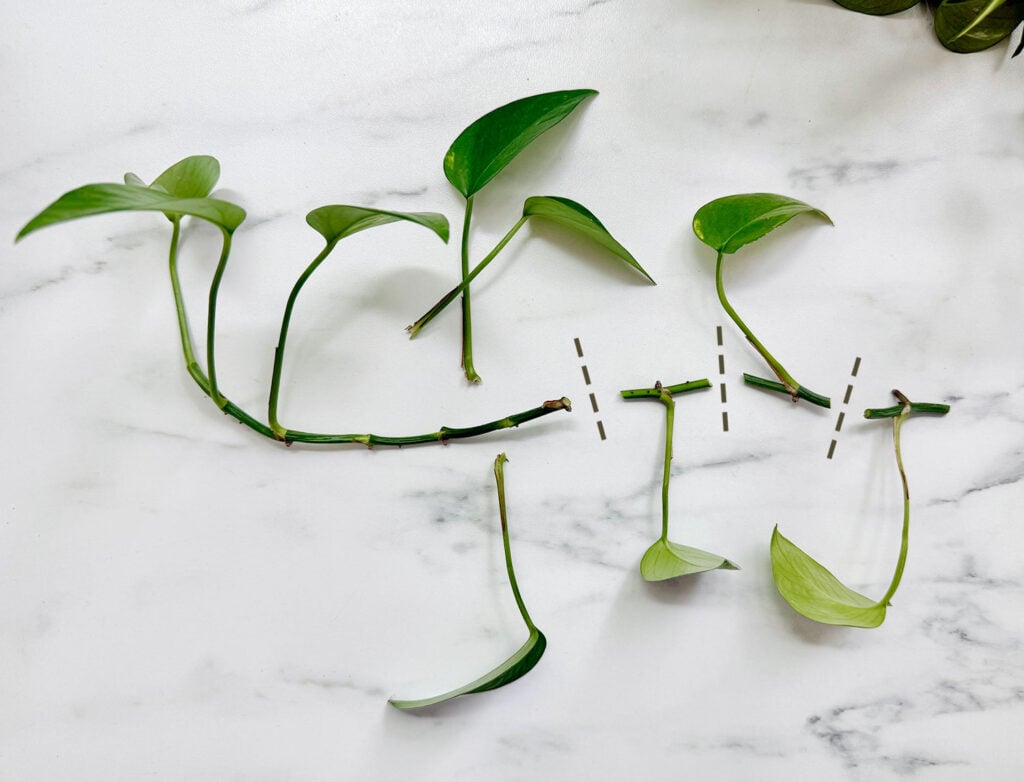
Where to Cut A Pothos For Propagation
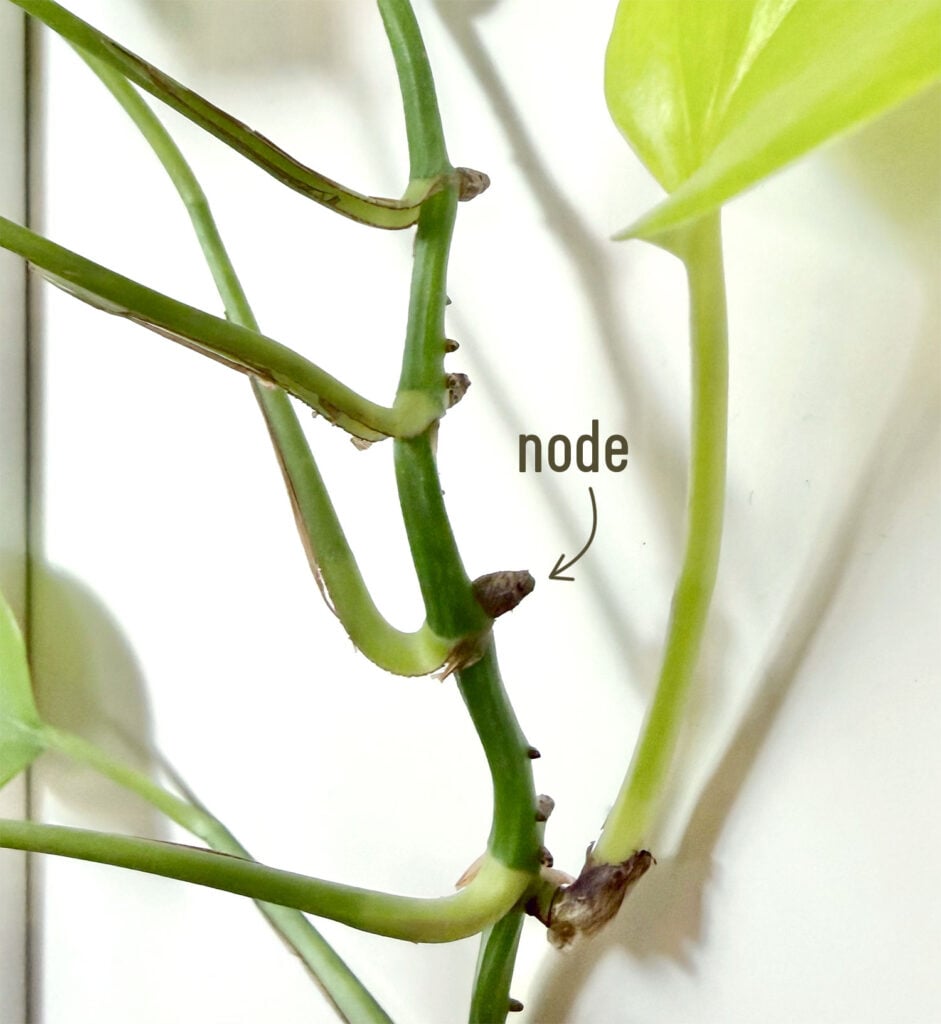
To propagate a pothos, cut your vine just below a leaf node. Luckily, nodes are easy to find on pothos plants! They are the small bumps on the vine and usually have (or had) a leaf growing from the opposite side. These nodes are where new roots will form during propagation, and each node has the potential to become a new, separate pothos plant.
The photo above has many nodes by the way. I just pointed to one, but all of those rounded nubs protruding from the stem are nodes.
You just want to pick a healthy stem or vine on your parent plant to cut from – preferably one with new growth at the bottom and a leaf near the node(s) you plan to propagate. You can cut off as few as 1 or 2 nodes, but the more nodes you take, the more new plans you can grow. Try to leave at least 1/3rd of the original vine on the mother plant so it can continue to grow.
We typically let our pruning goals determine which vines we cut from and how much we remove. We look for vines that are getting too long or leggy – like the one shown above. We will propagate the bottom and cut off the rest of the bare vine. You can also try this “miracle” paste to regrow pothos leaves on bare nodes. We’ve had luck with it working about 75% of the time!
How To Propagate Pothos In Water
Water propagation is the most popular (and most fun) way to multiply your pothos cuttings into new pothos plants. It’s always our first choice because you can actively watch new roots grow!
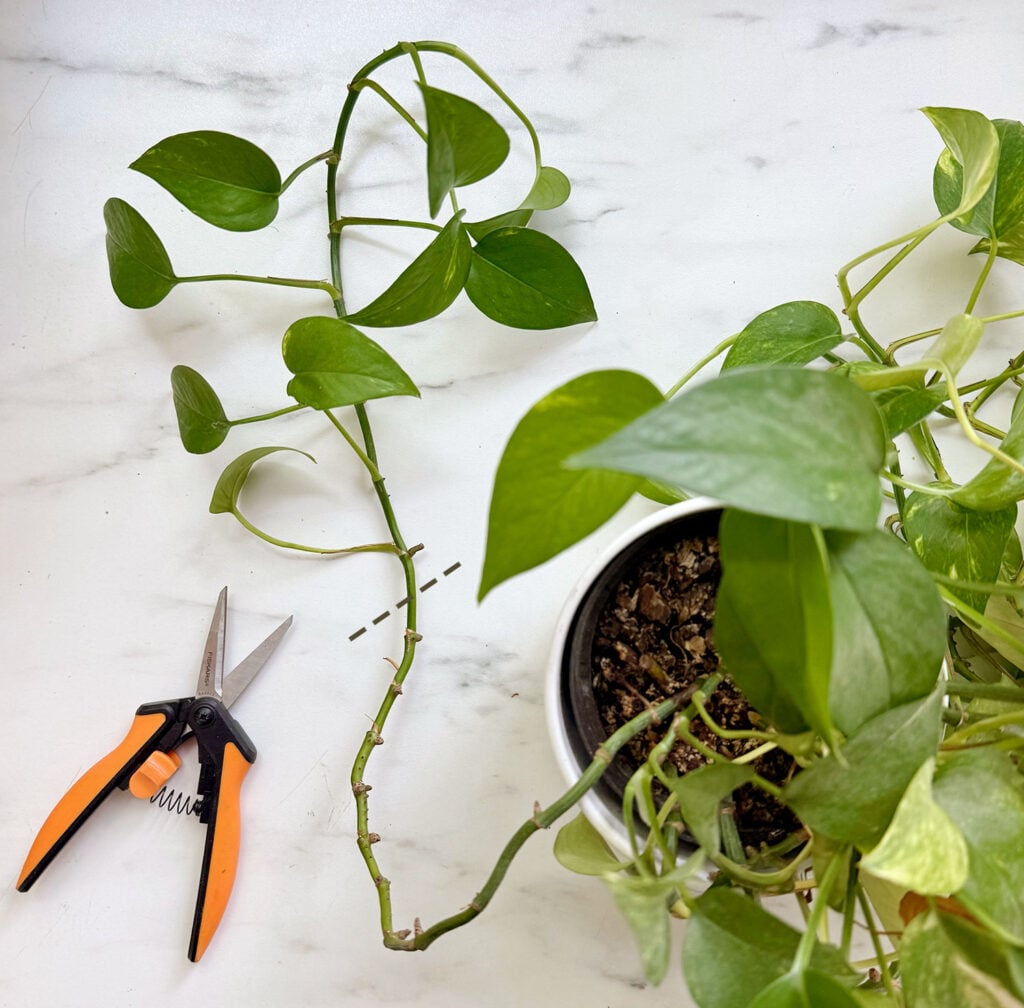
Step 1: Take A Stem Cutting
Use clean* sharp scissors to remove a healthy section of pothos vine as described above. Make an angled cut just below a node (about 1 cm under the bump). This cut vine can be used altogether, or you can cut the vine between each node to create more (but smaller) starter plants. Be sure there is at least one leaf on each cut section.
*It’s important to clean your scissors or shears to prevent the spread of bacteria or disease from one plant to another. A quick way to disinfect them is to wipe or spray them with rubbing alcohol.
For my cutting, I’m going to propagate the 3 top nodes individually and then use the remaining bottom section of the vine as a whole.
Step 2: Remove Bottom Leaves
When propagating a longer vine, remove the leaves from any nodes that will sit below the water line. Submerged leaves will rot and spoil your water & cutting. That’s why we’ve plucked off a few leaves in the photo above. Skip this step if you are propagating individual nodes.
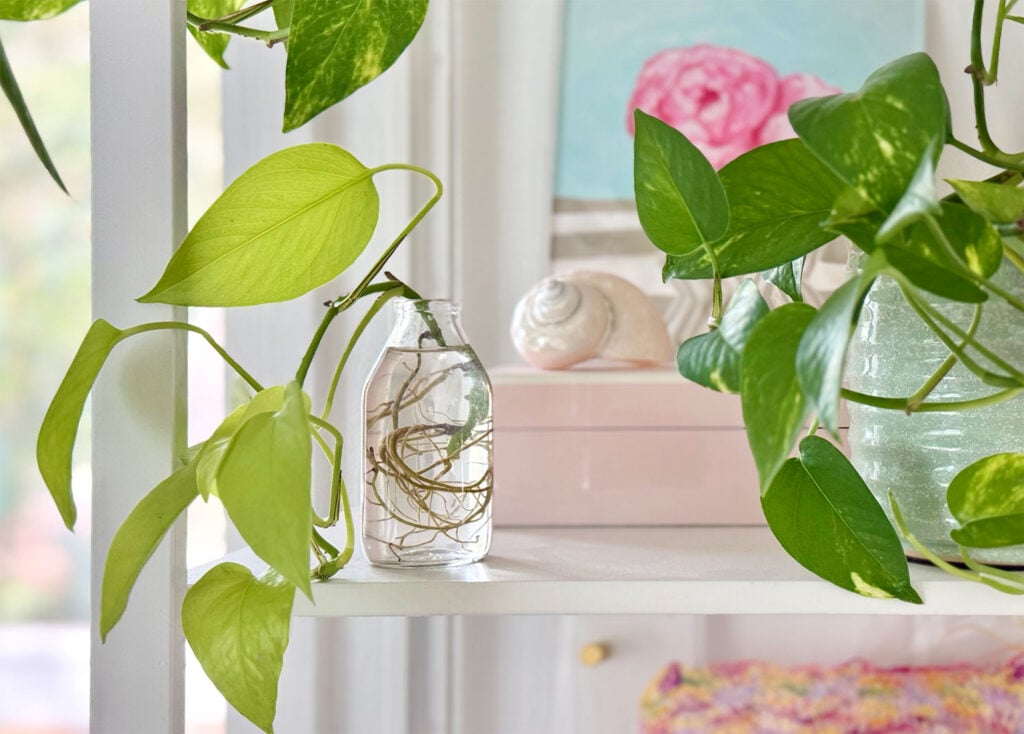
Step 3: Place Cuttings In Water
Fill clear, glass vessels with room-temperature water. Tap water works great. Make sure all the nodes that you want to produce roots are submerged, but not any leaves. You can use a clothespin or bobby pin over the mouth of your vessel to keep your cutting in place if needed.
Any type of vessel will work, but a clear glass cup or jar makes it easiest to monitor your water and watch for root growth. Clear vessels also allow the most light to reach the cutting. Place the vessel in a spot that gets plenty of bright, indirect sunlight. We love lining these up on a windowsill, desk, or bookshelf in the sun.
Step 4: Monitor The Water
Keep an eye on your water’s clarity and level. You may need to top off your vessel as water evaporates. You can also change the water if it starts to look excessively green or murky, but we rarely experience this.
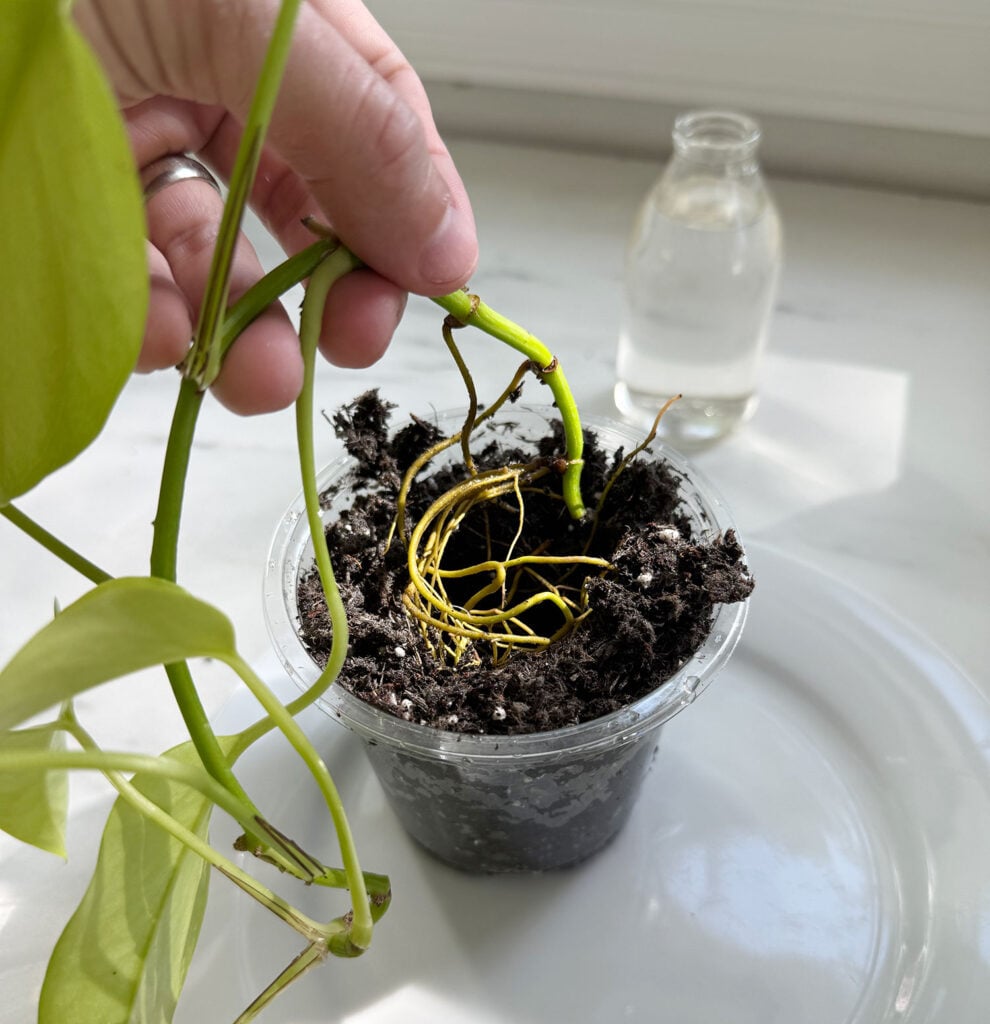
Step 5: Transfer Rooted Cuttings To Soil
Pothos roots may develop from the node in as little as 1-2 weeks, but we usually leave them for a month or two. They are very happy in water, so there’s no “ticking clock” to remove them at any point. But let the roots grow at least 2-3 inches before transferring the cutting to soil.
Be sure to use a well-draining potting mix and a nursery pot with drainage holes. Once potted, give your new plant a good watering and return it to a spot with bright indirect light. Keep the soil moist for the first couple of weeks to help the roots establish in their new home.
How To Propagate Pothos In Soil
Soil propagation is another popular technique for pothos plants. The advantage of this method is that it eliminates the step of transferring your cutting from water to soil. However, you won’t be able to watch new roots grow, which makes it a bit harder (and less rewarding) to gauge your success.
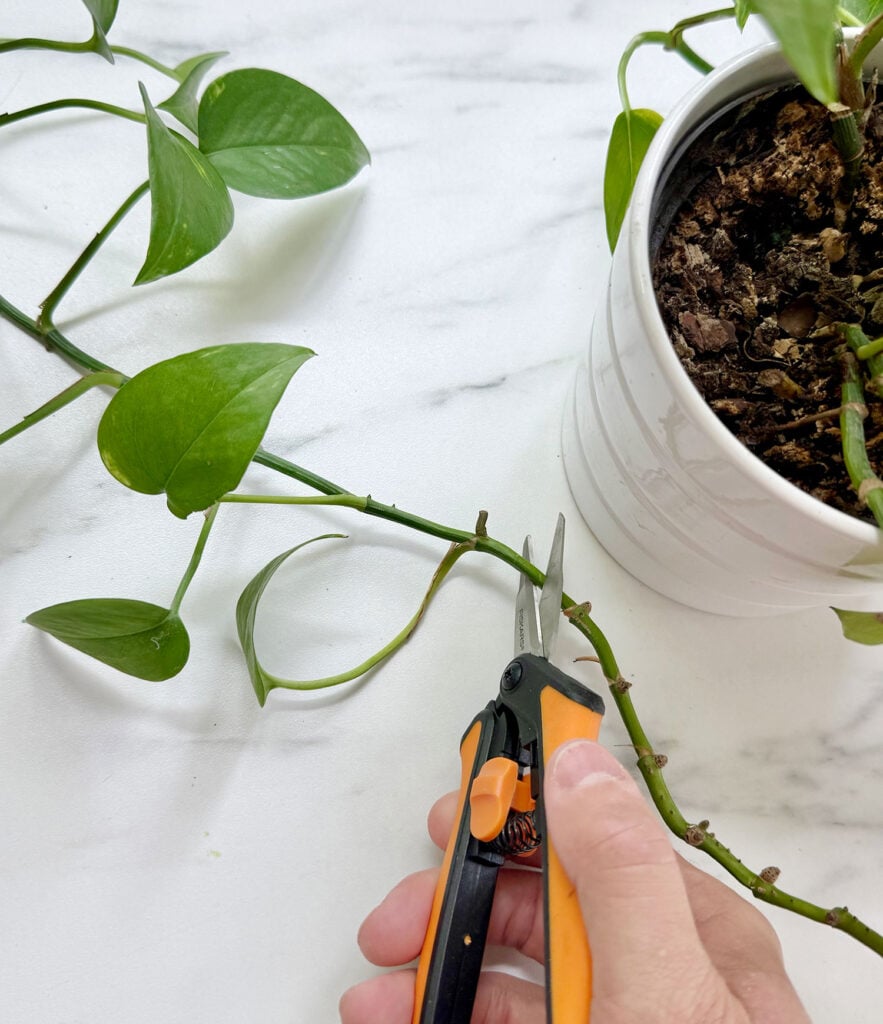
Step 1: Take A Stem Cutting
Like with water propagation, use a clean, sharp pair of pruning scissors to cut your pothos vine slightly below a node. We like to take a cutting with at least 3-4 healthy leaves.
Step 2: Remove Bottom Leaves
Pluck off the leaves from the lower 2-3 nodes on your cutting so that they can easily be buried in the soil. The more nodes you bury, the more chances you’ll have for strong root development, so feel free to do more. Just be sure to leave 2-3 leaves above the soil as well.
Step 3: Plant In Soil
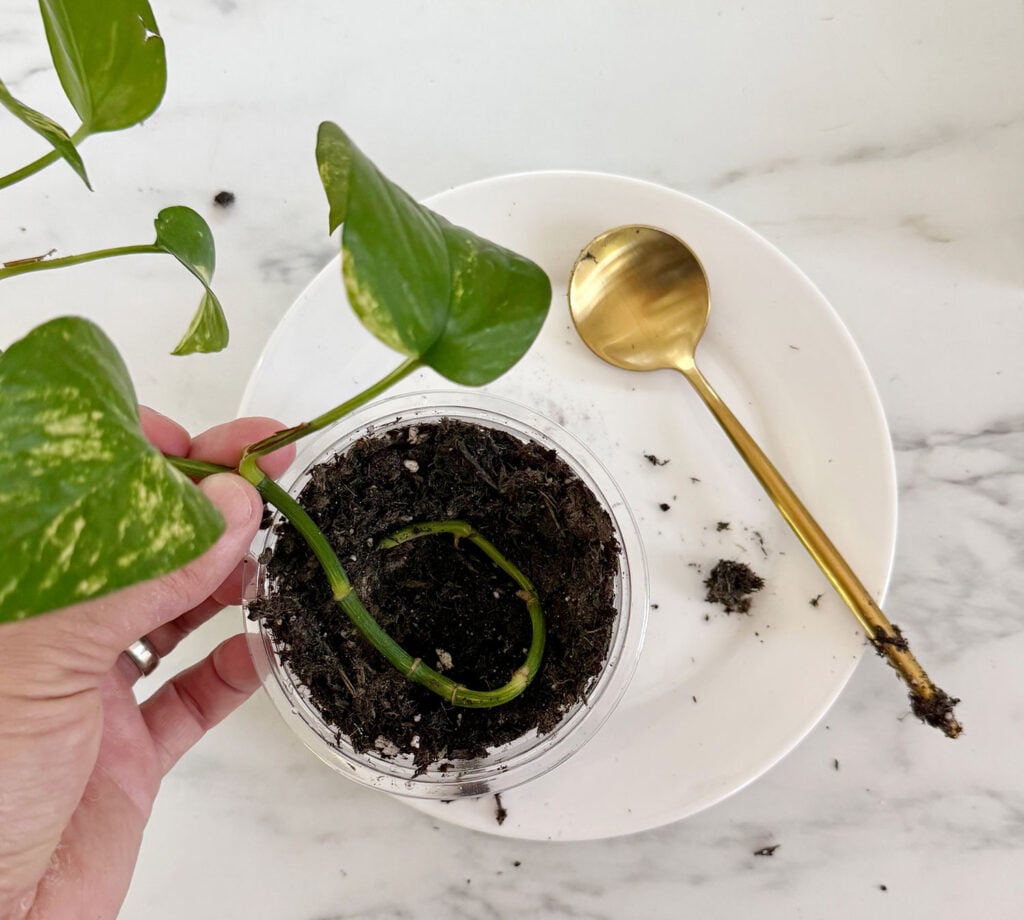
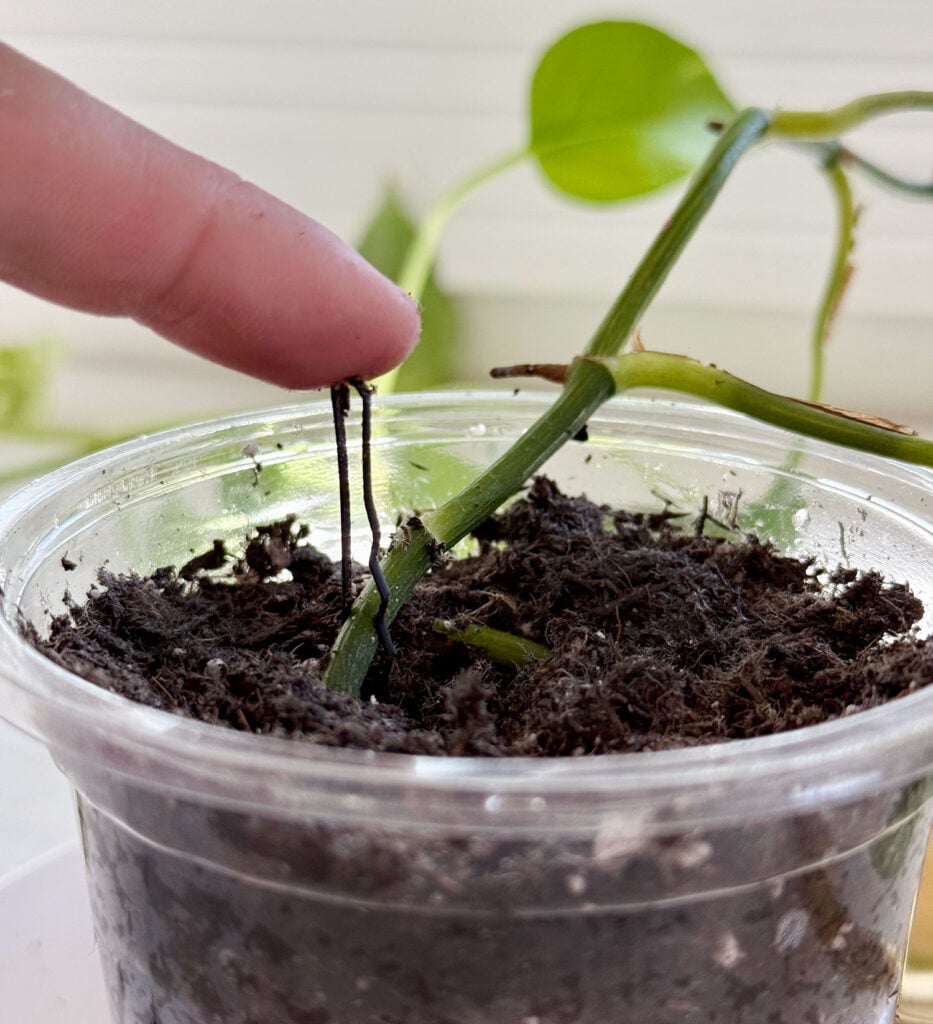
Fill a small nursery pot with well-draining potting soil. We like to moisten the soil first by running water through the pot and letting it drain out the bottom. Just don’t compact the soil too much. Then, plant the cut end of your vine in the soil, making sure the appropriate nodes are fully buried (no leaves should be under the dirt). Cover and pat the soil gently to keep the cutting in place.
You can also use a bobby pin, paper clip, or plant pins to keep the cutting in place. These help the nodes stay in contact with the soil so they can develop roots. This is especially great for longer clippings, where you may need to coil the excess vine on the surface of the soil.
You can also plant multiple cuttings in one pot or follow this process in the same pot as the mother plant. This method (which is often called “basketing”) is a great way to keep your pothos looking full and healthy.
Step 4: Water Regularly
Put your potted cutting in a location that receives bright, indirect light and keep the soil moist for the next several weeks while roots develop. You will need to water it more regularly than an established pothos. Just be sure the pot drains well so it doesn’t sit in water (which can rot the roots). If your new plant seems to be doing well after a few weeks, you can begin to space out your waterings.
Other Pothos Propagation Methods
Propagate Pothos In Sphagnum Moss
Sphagnum moss is an absorbent natural material that can be used as a propagation medium, with similar steps to soil propagation. Some prefer to use sphagnum moss because it retains moisture very well, which helps to promote root growth. However, there’s no strong advantage over other methods, especially if you don’t already have it on hand.
Spaghnum moss is sold when it’s dry, so it must be soaked in water for about 30 minutes before use. Wring out most of the water, leaving the moss moist, and place it in a jar or other vessel. Plant your cutting in it (just like you would with soil) and water it regularly to keep the moss moist while roots develop. Once they’ve grown a couple of inches, you can remove the plant from the moss and plant it in soil.
Pothos Basketing
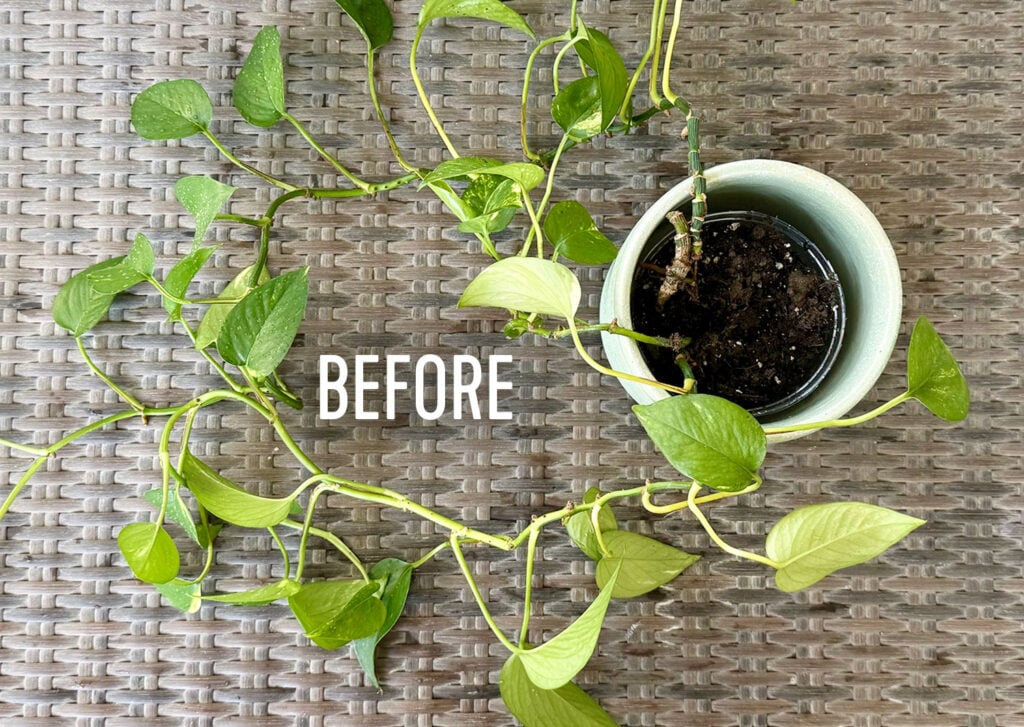
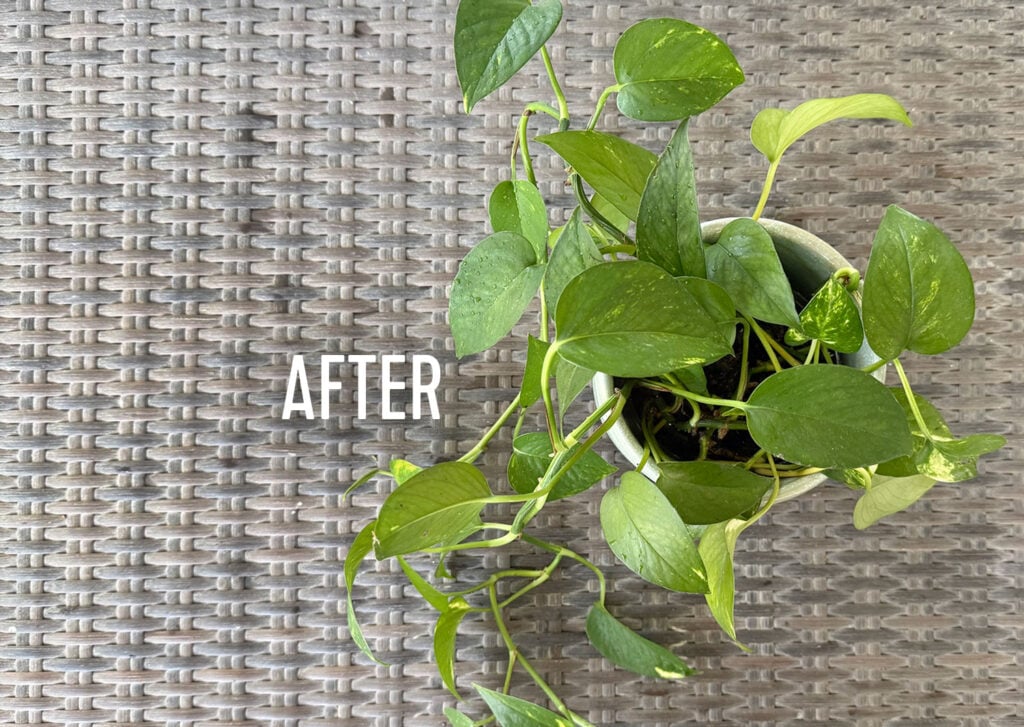
I mentioned this method a few paragraphs ago, but another option for propagating an established pothos is called “basketing.” It doesn’t produce new plants, but can help a stringy or leggy pothos look much fuller and healthier. Pothos, especially those with dangling vines, tend to look bare at the top over time. This is because the plant is focusing its energy on growing new leaves at the end of the vine. As older leaves at the top die and fall off, the upper part of the plant can become sparse and bare.
To fix this, just coil those long vines into the pot so that several nodes come into contact with the soil. Pretend like you’re making a basket or nest of vines atop the dirt. If needed, you can use plant pins, bobby pins, or paper clips to hold the nodes tightly against (and ideally, slightly under) the soil. Over time, these nodes will establish new roots and may shoot new growth down into the potting soil.
Even if new roots don’t establish quickly, basketing your pothos immediately helps the plant look fuller and healthier. And don’t worry if you miss those long, dramatic vines – they’ll grow back quickly!
Where to Place Your Propagation Vessel
It’s best to place pothos propagation vessels in areas that receive lots of bright, indirect light. Even though pothos are one of our favorite low-light plants, they need ample sunlight to produce new growth during propagation. Windowsills or sunny bookshelves are great options, but avoid spots that get prolonged direct sunlight. This can cause your water to evaporate quickly, burn your leaves, or accelerate algae growth – although we’ve never had this happen, even in a sunny windowsill.
Your propagating plants also need warmth, so keep them away from drafts or blasts from your A/C vents. We also suggest putting them somewhere you can easily check on them – like a kitchen window. This will help you better monitor water levels and root growth.
How to Care For Pothos
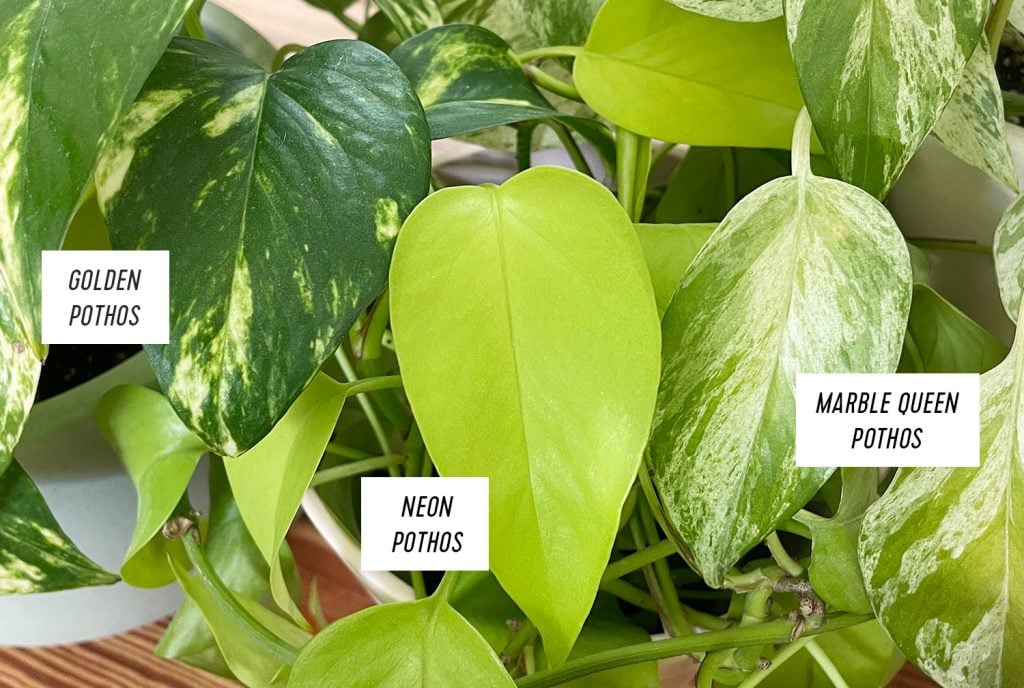
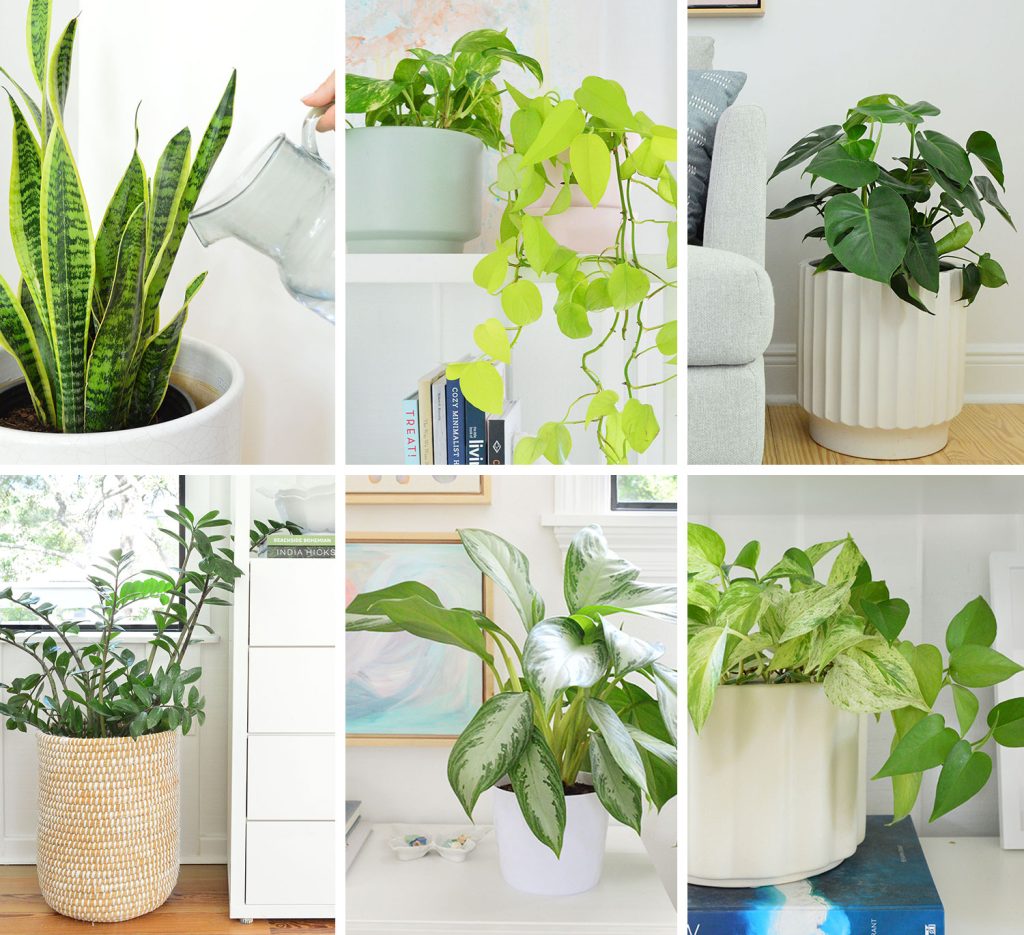
Once your propagated pothos has had a few weeks to establish in moist soil, it can be cared for just like your mother pothos plant. We have detailed plant care guides for golden pothos, neon pothos, and marble queen pothos varieties (along with tips for telling them apart). Also Marble Queen would make a great band name.
Overall, these plants enjoy locations that receive medium, indirect light but also tolerate low-light conditions as well. They like to be thoroughly watered every 7-10 days, allowing the soil to dry out between waterings. Underwatering is preferable to overwatering, and make sure they don’t sit in excess water. We typically like a layer of small rocks on the base of a planter full of potting soil, which helps to ensure that there’s not a bunch of standing water gathering at the bottom of the pot.
More Plant Guides
If you’re looking for more information on some of our favorite plants, check out some of these posts below:
*This post contains affiliate links, so we may earn a small commission when you make a purchase through links on our site at no additional cost to you.


