Seed starting kits are available for purchase, but why not make starting your summer vegetable garden a fun family activity?
Starting seeds indoors is less expensive than buying mature plants. Plus, you can grow as many varieties as you’d like. It also gives you maximum control over growing conditions and planting time.
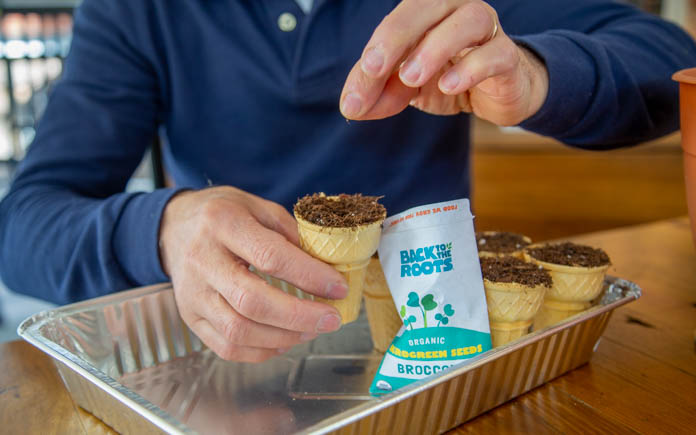
Ice cream cones are great for starting seeds because they are biodegradable and you can easily transplant them into containers once the seedlings have sprouted.
Using these as seed starters is also a great opportunity to teach children about the science of gardening. Here’s how to do it.
Use flat-bottom wafer ice cream cones.
Fill the cones up with potting soil.
Use a pencil to poke a hole for your seeds. Plant the seeds in the recommended depth according to the packet.
Cover the seeds with more topsoil.
Place your ice cream cones in an aluminum baking pan.
After you plant your seeds in the ice cream cone, mist them regularly to keep the soil moist. Once the seeds germinate, place the pan in a south-facing window so the seedlings get 16 hours of light. The sunlight will dry the soil out, so be sure to regularly spray the seedlings with water.
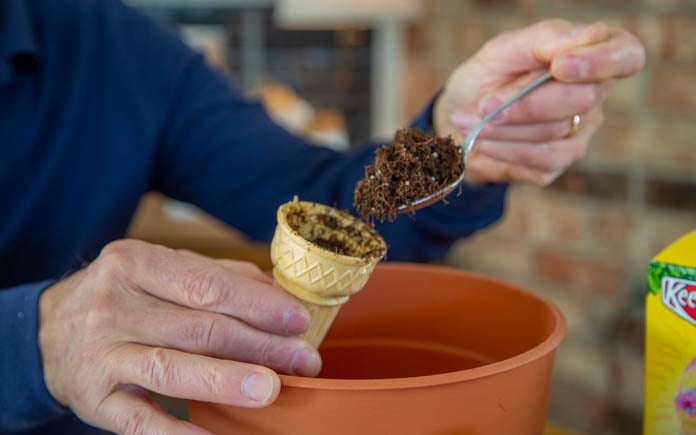
Once they’re grown enough to transplant, you can pick up the seedling in the ice cream cone and plant the whole thing in a larger container.
Plant the seedlings at the same depth they were in the ice cream cone. However, some plants, such as tomatoes, squash, and cucumbers, can be re-potted up to the leaves to encourage additional rooting along the buried stem.
When you move your seedlings outdoors, place them in a shaded area for about a week so they can adjust to the outdoors. To protect your seedlings from colder night temperatures, use a soda bottle as a mini-greenhouse.
After a week, move them to a sunny spot and watch them grow!
Seed starting kits are available for purchase, but why not make starting your summer vegetable garden a fun family activity?
Starting seeds indoors is less expensive than buying mature plants. Plus, you can grow as many varieties as you’d like. It also gives you maximum control over growing conditions and planting time.
Ice cream cones are great for starting seeds because they are biodegradable and you can easily transplant them into containers once the seedlings have sprouted.
Using these as seed starters is also a great opportunity to teach children about the science of gardening. Here’s how to do it.
Use flat-bottom wafer ice cream cones.
Fill the cones up with potting soil.
Use a pencil to poke a hole for your seeds. Plant the seeds in the recommended depth according to the packet.
Cover the seeds with more topsoil.
Place your ice cream cones in an aluminum baking pan.
After you plant your seeds in the ice cream cone, mist them regularly to keep the soil moist. Once the seeds germinate, place the pan in a south-facing window so the seedlings get 16 hours of light. The sunlight will dry the soil out, so be sure to regularly spray the seedlings with water.
Once they’re grown enough to transplant, you can pick up the seedling in the ice cream cone and plant the whole thing in a larger container.
Plant the seedlings at the same depth they were in the ice cream cone. However, some plants, such as tomatoes, squash, and cucumbers, can be re-potted up to the leaves to encourage additional rooting along the buried stem.
When you move your seedlings outdoors, place them in a shaded area for about a week so they can adjust to the outdoors. To protect your seedlings from colder night temperatures, use a soda bottle as a mini-greenhouse.
After a week, move them to a sunny spot and watch them grow!
Poison-free rat control is possible. You can keep those pests out and pets safe with this Simple Solution.
Rats can get into holes as small as the size of their heads. Not only can they fit into tiny holes, but they also chew open smaller holes to fit inside them.
Rats chew constantly because their teeth are constantly growing. And with this constant chewing, their teeth become sharp enough to gnaw through some unexpected material.
You can seal up holes around your home with an expanding foam sealant. However, this is only a temporary solution. The rats can easily chew through and re-invade your precious space.
Reinforce the foam by adding something that will be more difficult for the pesky critters to chew through.
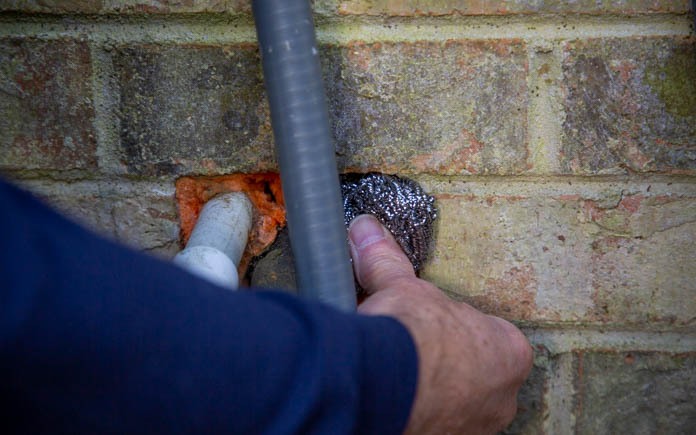
Plug holes outside your home with some stainless steel wool before you seal them off. There is a stainless steel mesh specially made for rodent control, but you can also use a stainless steel wool scrubbing pad that you use to clean pots and pans.
Just stretch out the scrubbing pad so it fills all around the hole. Press the stainless steel wool about an inch into the hole.
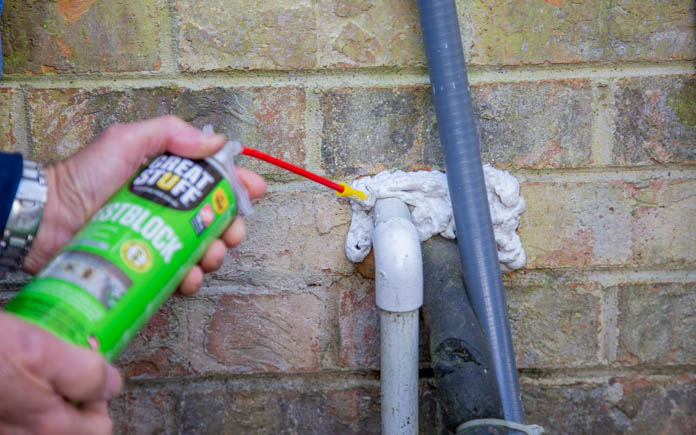
After you’ve plugged the hole, you’ll need to spray more expanding foam to seal it up. Instead of a regular expanding foam sealant, pick a pest-blocking foam sealant specially made to deter rats.
The main ingredient that deters rats in pest-blocking foam sealants is capsaicin. Capsaicin is the active compound in hot peppers that makes them spicy. Also, it’s used in muscle pain-relieving lotions like Bengay and Icy Hot.
If you do, however, have one determined rat that chews through the pest-blocking foam sealant, the steel wool acts as an extra barrier to keep that rat out.
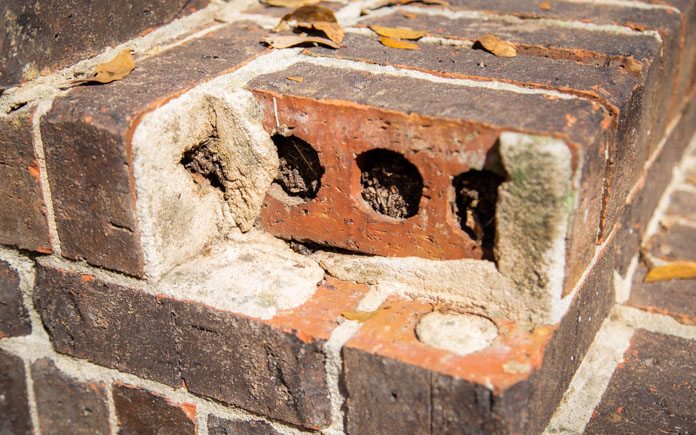
Repairing a missing brick doesn’t just up your home’s curb appeal — it also eliminates a safety issue.
If a brick is missing on a step, it could be a tripping hazard.
It’s easy to repair a missing brick if you use the right material.
Before repairing a missing brick, be sure to chip away the old mortar and clear away debris.
Chip away old mortar. The first step to repairing a missing brick is chipping away whatever remains of the old mortar to make way for the new mortar.
Clean surface. After you’ve gotten rid of the old mortar, clear the area of any dust and dirt before you mix up the mortar.
Mix mortar. A 10-pound back of Quikrete Mortar Mix is perfect for a small repair. Simply add water and stir until the mortar is the consistency of thick cake batter. Be sure to wear impervious nitrile gloves when you’re mixing the mortar mix.
Apply mortar. With a trowel, apply a mortar base that’s about a half-inch to three-quarter-inch thick. Make sure the thickness matches the surrounding bricks.
Press brick into position. Push the brick down into the mortar bed and sideways against the adjacent brick with a slight twisting motion. It may take some tapping and pressure to get the brick aligned with the ones around it.
Clean mortar joints. Finally, clean off the excess mortar to match the old mortar joints around the new ones.
Mortar typically will dry in 24 hours and reach its full strength in 28 days. However, environmental factors like temperature and humidity will affect drying time.
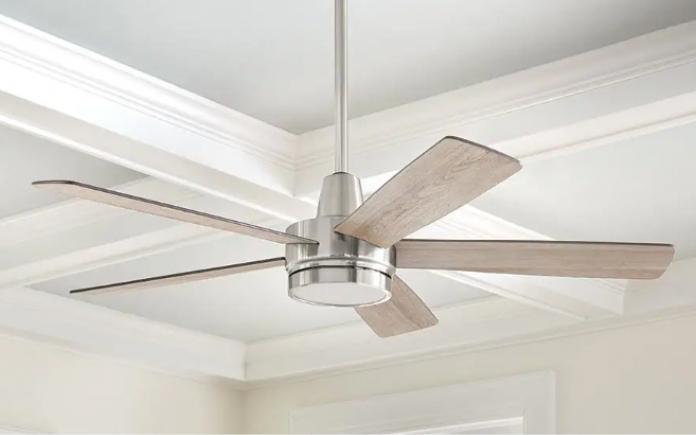
The LED lights are dimmable and also tunable. What does that mean? With a touch of the remote control or through the Hubspace app, you can control whether the lighting is warmer or cooler.
The Fanelee smart ceiling fan is compatible with Amazon Alexa and Google Assistant with no hubs or extra equipment necessary.
The integrated 31-watt dimmable LED light has 6 different light temperature settings ranging from 2700K to 6500K. Choose from daylight deluxe, daylight, bright white, neutral white, soft white and warm white.
Having a dinner party and want dim mood lighting? Switch to warm white. Working late on an important project and need to focus? Turn it up to daylight deluxe.
A brushed nickel finish and reversible blades make this smart fan a stylish choice for any room.
Stylish Smart Fan
This contemporary modern fan is smart and stylish. Five reversible blades in graywashed oak and dark oak finish are attached to its brushed nickel finish mount. The frosted shatter-resistant plastic shade mimics frosted glass with the added benefit of not breaking if dropped during cleaning.
Designed for indoor use in large rooms, the Fanelee features a quiet, yet powerful, four-speed reversible motor for year-round comfort.
You can control the fan speed with the included remote control, voice control, or free HubSpace app on your phone or tablet.
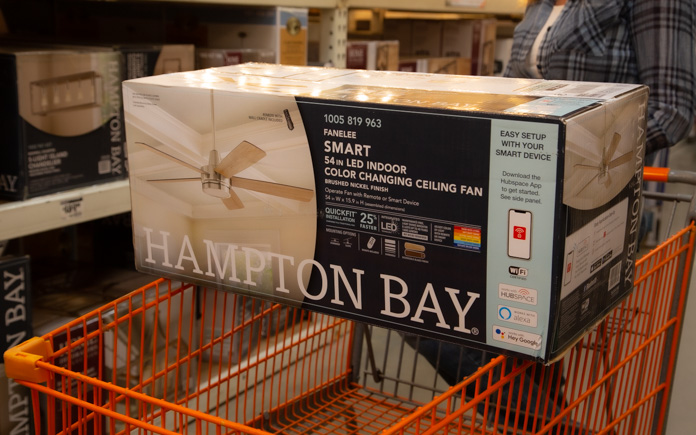
This page contains affiliate links. If you purchase a product from these links, we will earn a small commission at no additional cost to you.
You have everything you need to install your fan once you purchase it.
All Included
With a slide-on mounting bracket, twist and lock shade, and quick-connect receiver plug, installation is easy.