BRB, just changing the name of this blog to “Solving Problems With Plants.” And I know we promised a huge pool post, but the pool is still very much in progress. Hopefully it’ll be done next month and we can write one big breakdown with approximately 473 photos. But back to how plants can not only hide ugly stuff, they can also offer some pretty great privacy, as we’re about to demonstrate below.
One of the things that contributes to our house being extra walkable to shops, parks, the beach, and restaurants is that it’s less like a sprawling suburban neighborhood due to the lots being a good deal smaller (you can read more about why a walkable neighborhood and a smaller house/lot really appealed to our familyin this post).
It’s a similar feeling to our former beach house in Cape Charles, Virginia, which taught us that we really didn’t mind being that close to other homes. Even though the houses on each side of us there were nearly identical, which meant that many of our windows lined up perfectly (in fact from one of our upstairs bathrooms we could see into BOTH of the neighbors’ bathrooms on either side – but thanks to the magic of blinds it wasn’t an issue). You can read more about that house’s renovation here.
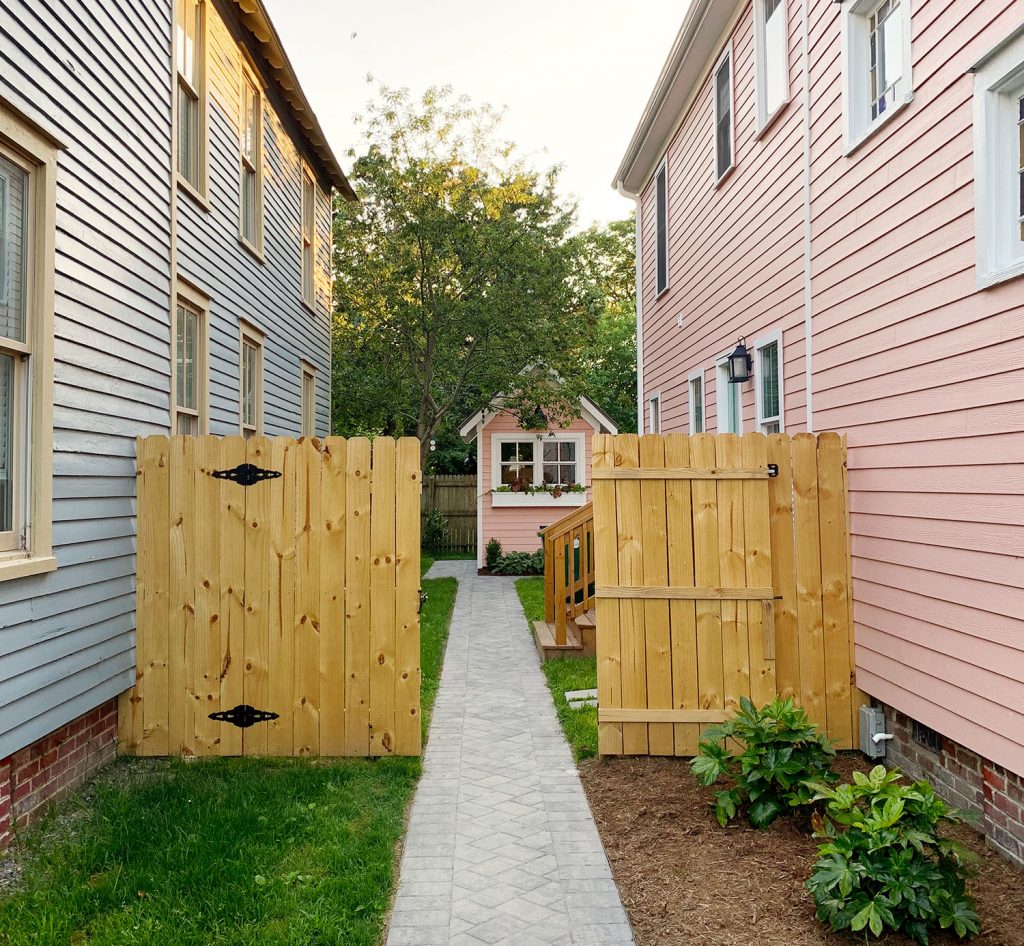
Here in Florida, our current home’s lot size is more than three times bigger than our Cape Charles lot (it’s around 4,800 square feet), but it clocks in at around eight times smaller than the one we had in Richmond (which was nearly an acre!) so it strikes a really nice balance for us. Not too much to maintain, but still roomy enough to add a pool, work in some great outdoor hangout areas, etc. And not an inch of grass to mow, which might be my favorite part. We’re also on a corner lot here, so we’re not sandwiched between two houses like our Cape Charles house was… but on this one side of the house, there’s another house that’s somewhat close:
Luckily, that house doesn’t have any windows that perfectly line up with ours – and thanks to the mature trees and the privacy fence that we added, we don’t really feel like we’re ever going to be waving at each other from inside of our respective homes. In fact, after living here a while, the only spot that we felt a little more “exposed” than we wanted was one side window upstairs, above the kids’ art desk:
It’s hard to tell from the photo above because it blows out in the picture, but in person, the left side of the window behind those two chairs overlooked the house next door just a bit more than we’d like when you’re looking at it head-on (for example, when you’re sitting in the chairs at the art desk).
Yes, blinds could have easily done the trick, but we’ve really enjoyed NOT having blinds on these upstairs windows because the up-in-the-treees views from this room are otherwise quite beautiful, green, and secluded feeling (you can read more about this room here in this post).
We figured there had to be a way to get that leafy enveloped feeling out this window too. So we hatched a PLAN with a capital T. What’s that spell? PLANTS!
Fortunately, our deck wraps around just enough to go under this window (it literally ends right at the edge of the window, as seen below). So we used a simple raised planter box + trellis setup to create a lush wall of greenery that blocks our view of the house next door (and their view of us).
First, we bought this 48″ raised planter box (it’s on sale right now) and primed & painted it white to blend with the house.
The raised planter box gave the plants a nice head start on getting them tall enough to actually create privacy, and the “trellis” was actually really simple to add too.
It’s just two pieces of 2×2″ lumber (also painted white) that we screwed to the outside of our deck railing. Then we just strung up some 1/16″ steel wire between the two, crisscrossing it between some evenly spaced out screw eye hooks. Sort of like a quick-and-dirty version of this wire trellis that we added at our last house.
The main difference here is that we weren’t trying to create a structured geometric pattern for the vines to follow. Our goal here was full coverage. So we just weaved the wire back and forth to create some wide X’s stacked above each other, creating a “wire ladder” of sorts to give our vining plants something to grab so they could easily grow up to the top and fill the whole thing in.
The last step was to add the stars of the show: the plants. Well, and the dirt. But who cares about dirt. The real stars are, literally, the star jasmine plants that we planted in the raised planter box, right below our freshly installed wire trellis. Jasmine does REALLY well in our area, so we knew this would be a smart bet (it’s all over everyone’s fences and pergolas and smells really good). So we just dug them in, untangled them from the stakes they came with, and gently wound them around the wire.
Then along the front of the planter box, since we still had some room we added some foxtail ferns for another layer of greenery. They also like our climate and grow to be large and full without any irrigation or high-maintenance needs, which is always a plus. To be clear, we don’t water this planter box. It just gets rain whenever that happens and it grows happily on its own, which seems to be the key for us.
We actually planted this back in the fall and hoped for the best. And so far, so good. The jasmine is already taller than the trellis in some parts! We’re just keeping an eye on it, and occasionally we “re-route” some vines along a different part of the wire to help fill in some of the bare spots (there are a few empty zones towards the top that we’re still working on filling in).
Here’s another shot of how it looks from the ground…
… and the other day we even had a chance to go inside the house next door to check things out from their vantage point (it’s under construction and we’re friendly with the builder). There are still some spots that need filling in, but it’s pretty awesome how much it already obscures that window, which used to be completely visible from this POV.
So while it’s certainly not as simple as adding a blind would have been, it only took us about an afternoon of work, and we’re thrilled that it has given us another lush view the enjoy from these upstairs windows.
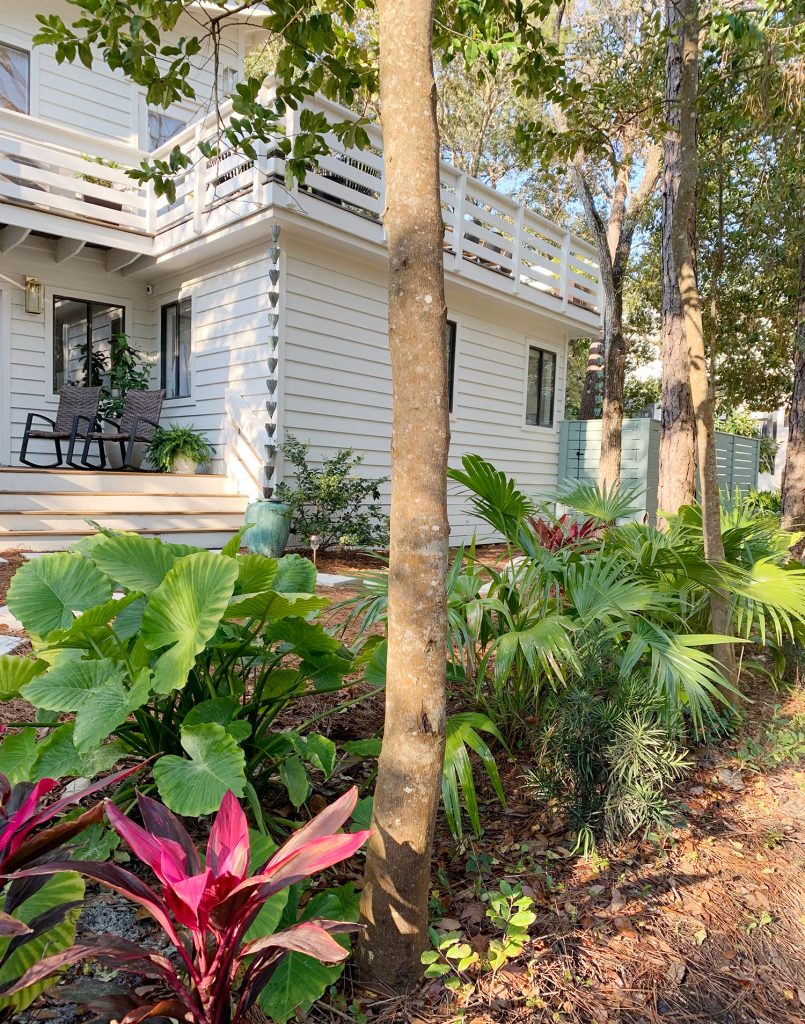
And since we’re on the subject of landscaping, we thought we’d share a newer photo of the front of the house since that landscaping is filling in nicely too.
Plants here seem to be exceptionally happy, which is convenient because we don’t have irrigation but they don’t seem to mind.
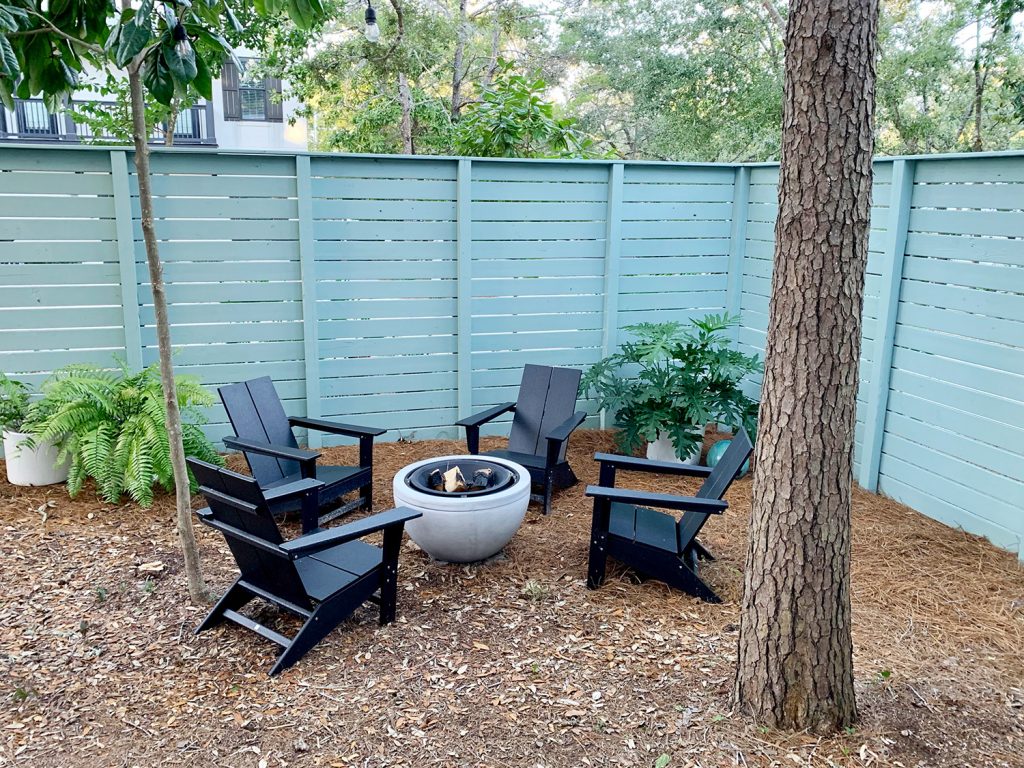
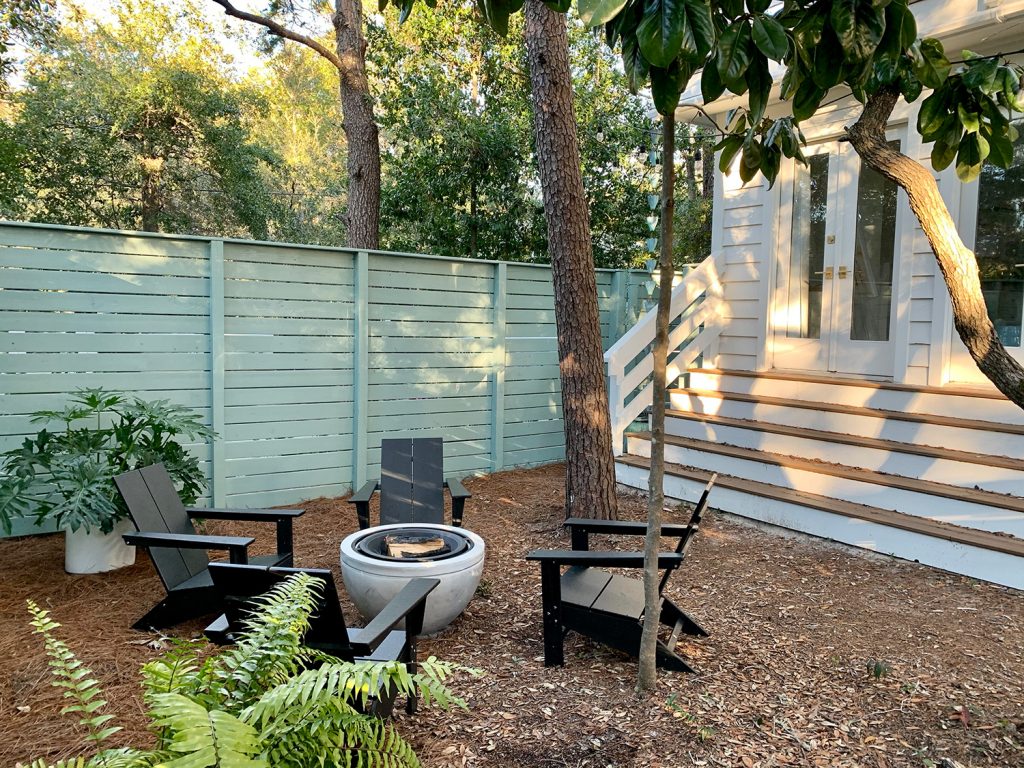
We’ve been enjoying this fire pit hangout spot for months now, but it hasn’t been on the blog… until today. This is basically a lesson in how a fence can make a HUGE difference in defining an area, which can lead to adding some simple outdoor furnishings (in this case, it was four adirondak chairs and a fire pit – which hit the ground and instantly created an entirely new “outdoor room” for our whole family to enjoy).
We hang out here and make s’mores at least once a week (and sometimes a lot more than that), so it has been a very welcome addition. Especially during a time when everyone is spending A LOT of time at home, so something novel and new like this bonus hangout zone feels extra special We even made s’mores for dessert on Thanksgiving and New Year’s Eve, so it’s quickly becoming quite the family tradition.
Here it is even before we got the fence painted. I’m telling you, the chairs and the fit pit hit the ground, and we were immediately SO EXCITED to start using them right away.
We also now consider ourselves to be s’more aficionados, so we can tell you all sorts of fun mashups we’ve tried, like cookies instead of graham crackers, peanut butter cups on top of the Hershey’s chocolate bars – and maybe our favorite alteration: Andes mints instead of chocolate (I know that sounds weird, but trust me on this).
Here’s the setup at night with the fence painted. You know John has our string lights on a smart outdoor plug so they automatically come on at dusk, which draws us outside like moths to a flame.
And here’s the new view from our bedroom during the day, which is about 780% better than what it used to be (we used to just look out onto the street). From the very beginning, we envisioned creating this private little patio off of our bedroom for enjoying some adult hangout time after the kids went to bed, which definitely happens, but with the addition of the fire pit, we also all get to enjoy this area together – which is even better.
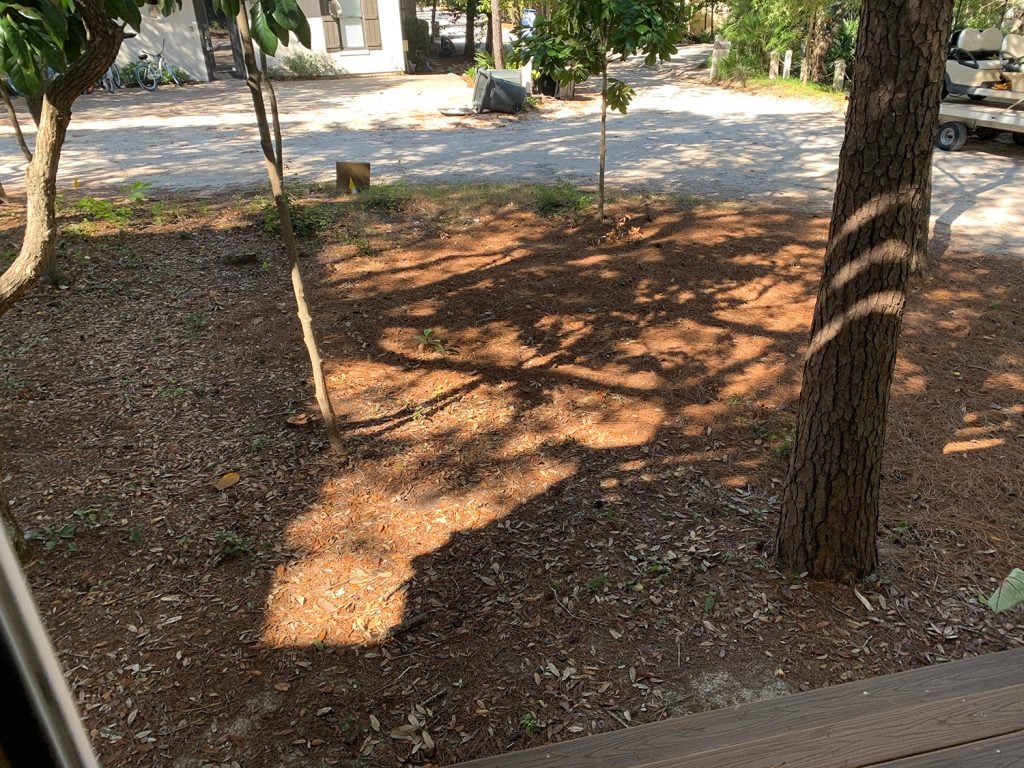
Remember how I said the view got about 780% better? Well, this is what that area looked like without the fence. Our house is on a corner, and was mostly just a field of dreams pine needles bordered by the street on two sides. We always envisioned fencing in this area thanks to our neighbor up the street who has a similar situation and their fence made allll the difference.
Here we are now, with the fence added and painted (the color is Halcyon Green by Sherwin Williams, which changes colors all day long – hence appearing greener or lighter in some of these photos, depending on the cloud cover, time of day, etc).
The hue below is probably what it looks like most often (it seems bluer than usual in the photo above, likely because the sun was behind a bunch of clouds). We were aiming for a nice calming color that layers into the greenery outside without feeling too loud and crazy or too boring, and we’re really happy with it. Note: our friend’s kitchen cabinets are this same color and they look amazing! You can see them here.
As for the details on the chairs and the fire pit, this is the exact fire pit that we purchased. We really wanted a substantial solid-looking one, and finding a pit that’s a whopping 30″ wide with a nice clean concrete-looking bowl wasn’t easy – especially at this price point. We’ve used it a ton and so far we’re really happy with it.
You can see in that photo above that the fire pit is sitting on a large square concrete paver (it’s easiest to spot the gray corner of it to the right of the base in the photo above). Here’s a closer shot below:
The fire pit instructions make it clear that it shouldn’t sit directly on a wood deck, and recommend setting it on a concrete base, so we slid a big concrete paver under ours. The white part of the bowl doesn’t really heat up at all (the metal one that actually holds the flaming logs up top does for sure though!) but we’re a fan of following directions. So we wanted to point that out for anyone else who gets one. You don’t just want to set it down on pine needles or a pile of leaves or old wood… aka: kindling.
As for the chairs, these are the exact ones that we bought. We were aiming for zero maintenance, so their no-rot fade-resistant construction was appealing, and their eco-friendly design is cool too (they’re actually made from a blend of plastics which includes recycled milk jugs and detergent bottles!).
They’re also super comfortable (the extremely good reviews are what tipped the scales for us to choose these out of 679 options – and they’re accurate – these chairs are GOOD). Like none of us want to get up and go to bed once we sit down. We stay in them for hours, even when the fire dies down to glowing embers and we definitely should go to bed.
So that’s basically the story of how a fence plus some simple outdoor furniture created yet another spot outside for us to enjoy. And let me tell you, when you intentionally choose to have a lot less indoor space… AND you move somewhere warmer in the hopes of spending a lot more time outside… maximizing your outdoor zones is one of the best things you can do! Not only does it give you more space to spread out and enjoy beyond the walls of your house, but it draws you outside all the time too.
As for how we get to the fire pit area, we can access it from the glass doors in our bedroom, or from the front door, since we added this gate that swings open to let people in right here by our rain chain.
Here’s the view from that gate as you enter the fire pit area. I love that little decorative garden ball next to our big white planter (we found the ball at a local garden center, and have about a million of these large affordable white planters around our house). The garden ball (here’s a similar one) is almost exactly the same color as our patina’d rain chain (here’s a similar one of those) and they’re both a deeper/brighter version of the fence color so it’s really calming to have those tones layered throughout this area.
Here’s a closer shot of my beloved glazed garden ball, just for kicks.
Oh and to orient you a bit more, here’s the hanging tent we added for the kids (more on that in this post) so you can get a better feel for this side of the house as a whole.
And because a video walk-through is basically worth 1,000 photos, here’s a quick spin around the fire pit area:
Note: You can also view this video on YouTube, where you can turn on auto-generated closed captions if that’s helpful for you.
Ok, now we can sleep at night knowing that this area that we love has finally been documented on the blog. Unless we’re currently sitting in the adirondack chairs, in which case we are tired but also very comfy so we will keep putting off getting up for a few more hours.
P.S. You can see every single update that we’ve made to this house over the last 9 months in this spot.From the exterior updates to each indoor room, there has been lots of progress.
Last week we shared how we built the DIY outdoor hanging daybed that we installed on our front porch. And as promised, I’m back to share how we hung it since, if you’re like me, hanging things that are meant to support the full weight of a human body (or two!) can make you a little nervous.
It was actually extremely easy to do. So easy that we did it more than once (ha!) so that it resulted in the smoothest and most non-tipsy sway possible (our first hanging attempt made it tip forward and backwards a bit, which wasn’t ideal). Thankfully the second attempt worked like a charm. Plus it meant we could document the entire thing for you, so you can just skip right to doing it the better way on the first try.
Here’s how it looked when you last saw it, after our initial hanging attempt:
We mentioned were going to rehang it in last week’s post, because almost immediately after hanging it with just two ceiling hooks, we realized that suspending it that way made the daybed swing front-to-back a bit more than we hoped, like an actual swing you’d find on a playground. When you sat on the front edge it was prone to tip forward.
When you laid on it you felt like you were rocking back-and-forth in a very shallow U-motion. It wasn’t necessarily bad, but we had envisioned more of a subtle swaying motion where the bed stayed level and flat the entire time. And we knew that would be the result of upgrading to four hooks in the ceiling. And thankfully, it worked!
The bed can still gently sway, but no more pitching forward and back like it’s an actual swing. Everyone stays level and flat while reclining, reading, or hanging out – and we couldn’t be happier with the result.
So it might seem like a small detail, but securing the daybed from four ceiling spots was a big improvement, and it’s even easier to understand on video, which is why we filmed the whole process. The video below covers everything from what hardware we used, how to account for the rope relaxing (it does quite a bit!), and why you shouldn’t be scared of complicated knots (which is something that I came to terms with as we filmed this). It definitely goes down as one of our weirder videos (I had no idea Sherry would laugh so hard when I explained what sold me on the smaller eye hooks that attach to the daybed), so hopefully you’ll find it helpful and/or entertaining:
Note: You can also view this video on YouTube, where you can turn on auto-generated closed captions if that’s helpful for you.
If you aren’t able to watch the video at the moment, I’ll cover some of the basics in the following paragraphs, but the video is especially explanatory, so come back and watch it whenever you’re actually planning to hang your daybed to hopefully error-proof your experience. You’ll also catch the difference between literal and figurative statements – and how that can DRAMATICALLY change the meaning of a sentence.
Daybed Hanging Materials
Just like the hanging process itself, the material list is pretty simple:
Be warned that this rope DOES STRETCH under the weight of your daybed and your body. So you need to hang your daybed significantly higher than your desired final height, which is where the 5-gallon buckets come in. You can see a true demonstration of this fact in the video above (they’re really helpful).
How To Hang Your Daybed
When researching methods to hang our daybed, we saw a bunch of different tutorials that all recommend one common detail: propping up your daybed with 5-gallon buckets during the hanging process (like this one and this one). Just as many of them warn, it will seem too high. But as you saw in our video, once the buckets are removed at the end, and you sit on your daybed, the rope relaxes to a much better height. So don’t skip that detail or your end result will be a crazy low (and maybe ground-skimming) daybed. Did you see how much it drops in our video? It’s almost unbelievable how many inches the ropes can relax in a second or two.
We used some heavy-duty screw eye hooks in our ceiling, being sure to screw them into a strong support beam. We have the benefit of an exposed porch ceiling, but if you don’t, use a stud finder to locate a solid spot to hang your daybed. We installed one hook for each corner of the daybed, being careful to place them at the exact same spacing as the hooks on the bed below it.
Tying Your Rope
We tied our rope through these eye hooks using a midshipman’s hitch knot because it’s an adjustable knot, meaning we would be able to tweak the height if our daybed ever became unlevel. I demonstrate how we tied them in the video (nice and slow for you to follow along at home) – or you can reference a tutorial like this one.
We used slightly smaller screw eye hooks on the bottom that were the perfect size to thread our 3/4″ rope through. Be sure to drill pilot holes before attaching them. Another tip is that you can use a screwdriver like a lever to help you twist it fully into your daybed (like you see below):
With the rope already tied to the top eye hook, we threaded it through the bottom and cut off the excess, leaving about two feet of extra rope at the bottom, just to be safe. Before tying the bottom knots, we used a tape measure to make sure our daybed was placed exactly where we wanted it (centered in the space) and that it wasn’t sitting crooked or skewed to one side. Then we just used a basic pretzel knot (I’m pretty sure that’s not the technical name) tightened right below the eye hook on the bottom of each corner.
Once we pulled all four knots tight against each of the bottom eye hooks, we removed the buckets and let the daybed hang freely. And then I sat on it. It’s an exciting, if not slightly nerve-wracking moment, especially since you’ll probably hear the rope creak loudly as it stretches and relaxes under your weight (you can see AND hear it in our video!). You’ll also probably notice that it pulls the rope tight against your bottom knots.
You can see from that picture above that we chose the fray the excess rope, trimming it so it hangs above the decking below it. You don’t want it dragging on the ground because it would likely get dirtier that way – and it would make an annoying sound if it drags as you sway.
Finishing Touches
As for if we have any issues with our daybed hitting the railing behind it, it can knock into it if you’re actively trying to do that, but if you’re just lounging on it & gently swaying, you don’t. Most porch swings & hanging daybeds are hung near some sort of railing and it’s just up to the people on them not to smash into them. We had that setup at the pink house, and it was also fine.
Our kids know it’s not some big geronimo adventure swing (they have one of those already in the yard), but just in case someone decides to come in like a wrecking ball, we did add a few of these clear furniture bumpers along the back edge, just to help protect the bed corner from getting damaged if it were to make contact.
No one really sees this side (it’s hidden by the front of the railing – which I’m peeking over and through to get this photo), so we figured it wouldn’t hurt to add them, just for peace of mind.
So here’s the finished porch daybed as it now hangs from four anchor points in the ceiling. It’s hard to describe how much this hangout zone has improved the already awesome experience of sitting out here (we used to have some simple chairs, but it’s really nice to fully extend your legs and lounge). You can see my full leg-extension right here.
And just because we can’t resist a before and after, I thought I’d throw in this photo of the same angle, taken the day we first saw this house last February. The entire side porch was screened in and full of mildew and rotten floorboards back in those days:
It’s wild to think that this Friday will be exactly one year (to the day!) since we first laid eyes on this house. This porch was one of the weirdest spots at the time (it didn’t help that it was extremely rainy and dark that afternoon) and it’s awesome to see how far it has come. (If you’re going to ask if we miss the screens, the answer is no and the secret is a good outdoor ceiling fan. Mosquitoes – and bugs in general – hate flying into moving air).
Now if we could just be done with these Florida cold snaps so we can lounge out here even more, that’d be great.
K, thanks.
(Yes, our cold tolerance has been greatly reduced since moving here – to the point that 55 feels kind of cold.)
P.S. If you’d like to keep browsing our building projects and furniture upgrades, this archive is completely dedicated to them. You can also see every single update that we’ve made to this house over the last 8.5 months in this spot.
Back in October we mentioned our plans to add a hanging daybed to the covered portion of our front porch and our entire family couldn’t be more excited that it’s finally done.
Hanging daybeds like this are super popular in our area, and we’ve always had a soft spot for them. Is there anything better than reading/napping outside on a lazy Saturday afternoon?
One of the Airbnbs that we stayed at in Costa Rica last January had one that pretty much cemented our feeling that they’re just about the perfect outdoor lounge spot. Sherry and our daughter spent hours there, each leaning up against a side arm with their legs extended towards each other, reading and chatting and swaying.
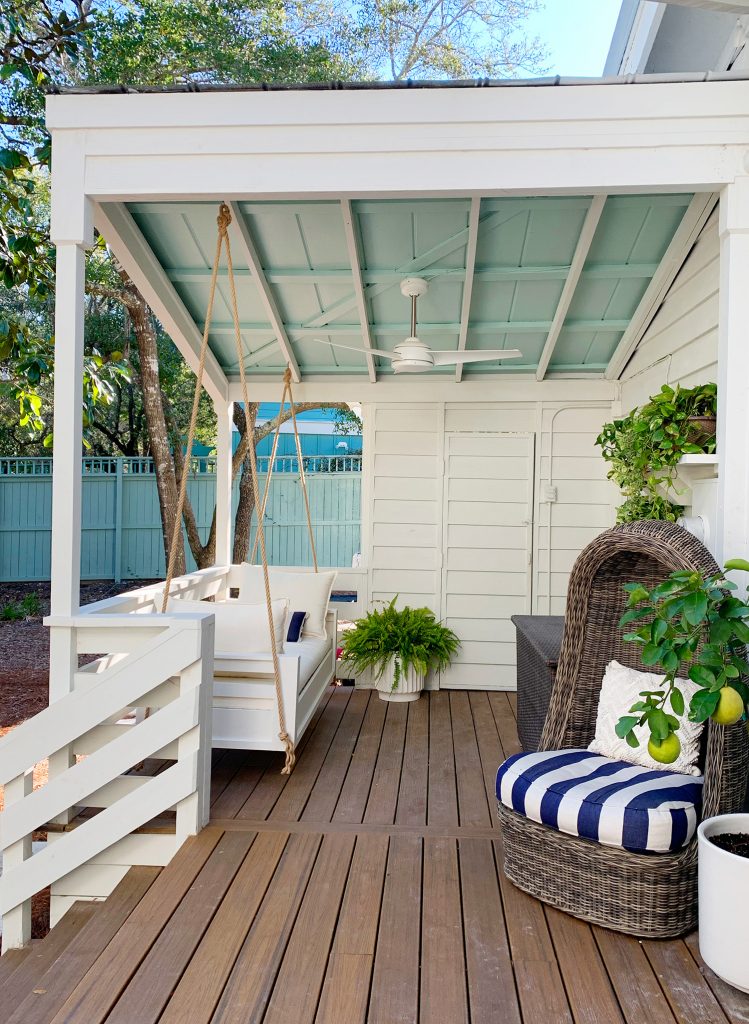
Then, lo and behold, we realized that we had a near-perfect spot for one on the front porch of this house. It’s covered to protect us from rain and the hot sun. It has nice strong exposed beams to hang it from. We even have a fan right there to keep the area cool.
The only reason I say near- and not totally-perfect is that there wasn’t quite enough depth to create the typical twin-mattress-sized daybed. We could have crammed one in there, but it would’ve encroached on our often-used path to our outdoor shower, and we didn’t want to cramp that area. We also stand at that wicker storage bin and load beach chairs on and off of our backs when we’re leaving for or returning from the beach, so extra clearance there is key.
Thankfully the cushion that we landed on is just three inches shorter than the length of a twin mattress (still clocking in at 6′ long!), but it’s 10″ less deep, which is definitely appreciated. Even with 10″ shaved off, it’s still almost 30″ deep, which is pretty much a typical sofa cushion depth, and quite comfy (twin mattresses are significantly deeper than the average sofa). And we have plenty of clearance when we walk through to the outdoor shower or while grabbing beach chairs out of the wicker bin.
That egg chair above swivels BTW, so whoever is sitting in it can rotate to face anyone who’s hanging out on the daybed. But back to the whole finding-the-goldilocks-of-daybed-cushions dilemma…
Finding An Outdoor Daybed Cushion
Even though the cushion would be covered, we still needed something that would be outdoor-friendly. My understanding from neighbors is that when someone uses a regular twin mattress, they zip it into a waterproof mattress cover and then cover that whole thing with outdoor fabric. If you’re good at sewing you might be able to make one yourself – or lots of Etsy sellers offer them (this one seems to be well-rated).
We first looked into doing something like that, but substituting the mattress for a custom-cut mildew-resistant foam pad instead. Not only was the price adding up very quickly, we also worried we’d end up with some oddly heavy or bulky cushion that would be a pain to move around whenever we needed to take it off the daybed (like in a storm or to clean it).
Then we realized that we could order a replacement outdoor cushion that’s already made for outdoor furniture and just build a daybed frame to fit that – if we could just find one that was the right size for our spot. That way it would be MADE to weather the elements, nicely tailored, ready to ship versus waiting on a custom order, and significantly less expensive than something custom-made might be! After a bit of hunting, we found this replacement cushion for the Pottery Barn Cammeray Outdoor Sofa -which was just about the perfect size, color, and material.
So way back in August, we ordered it during an end-of-summer sale (we got the bottom cushion and three large back pillows for $399). At the time they were back-ordered and the estimated ship date was October. So much for things being ready to ship and fast. We finally got them right before Christmas.
But they were well worth the wait (FYI, they’re now shipping for mid-February delivery). They’re nice and lightweight, they dry really quickly, and so far are very easy to clean. We’ve had plenty of rain, sun, and various child-related spills, and we’re very happy with the durability and how quickly it dries out.
Materials
In addition to your mattress or cushion, here’s what else you’ll need to build your hanging daybed. The quantities below are for building our specific swing (our cushion was 28″ x 72″), so you’ll need to adjust things if you’re building one around a standard twin mattress, which I mentioned is 3″ longer and 10″ deeper (38″ x 75″). Also, if you plan to stain, not paint, your finished swing, you won’t want to buy pre-primed wood like we did.
Three 8′ long 2 x 4″ boards (for the frame)
Four 8′ long 1 x 4″ boards (for the slats)
Three 8′ long 1 x 8″ primed boards
Three 8′ long 1 x 4″ primed boards
Two 8′ long 1 x 3″ primed boards
Three 8′ long 1 x 2″ primed boards
A box of 2″ exterior screws
A bottle of exterior-grade wood glue
Four 5-gallon buckets
Eight screw eye hooks (we got these for the ceiling and these for the bed)
3/4″ natural hemp rope (we got this rope in the 48-foot length)
Outdoor-rated paint and primer (we used semi-gloss exterior paint)
Building The Daybed Platform
I was a little nervous about constructing a hanging bed, but it turned out to be easy and extremely straightforward. When it came to figuring out the design that we wanted, we merged our experience building bunk beds at our beach house with this tutorial that we tweaked from Plank & Pillow, which has a nice clear step-by-step breakdown (and very fancy 3D renderings). Low and behold, we achieved a final look that we love, and it works really well for our space.
The structural core of the daybed is this simple frame made out of 2 x 4″ boards. It’s built to the exact dimensions of our seat cushion, and we connected it using outdoor screws that we had on hand. This would not only support the cushion (and those sitting on it), it would also be where our hanging hardware would eventually go into.
Since 2x4s aren’t the prettiest wood on the block AND we wanted the daybed’s base to look a bit more substantial, the next step would be to wrap all sizes of this frame with thicker wood. We chose 1x8s, but you could select something thicker or thinner depending on your desired look. And since we’d be painting our daybed, we purchased primed wood when possible, just to make our lives easier.
The only thing to consider here is how much you want your cushion or mattress to be recessed within your platform (how much is exposed vs. how much is hidden below the lip). Our cushion isn’t super thick so we wanted a minimal amount covered (nothing is worse than sitting on a bed when the mattress condenses and you scrape yourself on the bed frame). So our goal here was to have just enough of a lip to keep the cushion in place but not too much that we’d ever scrape against the lip. So before we attached the 1x8s around the side, we propped up our 2×4 frame on some scrap wood until we got the height of our lip just right.
Note: you’ll also want to be sure to account for the slats that you’ll be adding to the platform in the next step, that’s why you see one resting on the frame above – to ensure that we were factoring those in as well.
So below you can see our finished frame, once all of the 1x8s were screwed on. As you saw above, we screwed from the inside of the frame, that way we didn’t have to patch holes on the outside.
Next, we nailed in a bunch of cheap 1×4″ boards that we cut to size, creating our own DIY platform bed slats.
The next day we primed and later painted all of our exposed wood using the same exterior paint that we used on our outdoor trim/railings/etc (Moderne White by Sherwin Williams) – top, bottom, sides – we did it all. Maybe this was overkill, but we wanted to help protect the raw wood from the elements as much as possible.
You can also see that we propped it up on some 5-gallon buckets, which I’ll explain a little later. It actually made a certain step a whole lot easier.
Building The Daybed Arms
The construction of the arms and the side rails of your daybed is largely personal preference, and in our case we wanted to mimic the horizontal railings that we have around our house. We also opted to NOT build a back rail, (we just did two end rails, but not a third rail along the back side) which I realize might seem like a controversial decision.
We worried it would just encourage us all to sit against it, kinda like a couch, meaning we’d end up facing the house – rather than looking out towards the trees and the sunshine. Sherry & our daughter’s end-sitting experience in Costa Rica likely sealed the deal since they had a back on that daybed and didn’t use it. The choice feels pretty risk-free since we can always add one in the future if we miss it for some reason.
Whether you’re adding a back or not, you still need to start this step by adding simple posts to all 4 corners of your daybed’s base. These are each made from two 1×4 boards attached at a right-angle.
Arm height is also personal preference, but we kept ours relatively low – just enough to support a pillow for leaning back on each side (we also carefully measured so our horizontal rails could be evenly spaced). Our corner posts were 17.25″ tall.
I should add here that any piece from here on out is attached with a combination of exterior wood glue and brad nails. The nails make it fast and easy to patch, the glue helps it hold for the long haul. You can see that I attached my 1x4s to the frame individually…
…and then nailed them together along the edge where they met.
Once my vertical posts were secured to each corner, I added the horizontal rails using 1x3s. I nailed and glued these from the inside and used some scrap wood spacers to make sure they stayed level while I attached them (you can spot the spacers in each corner below – they’re just small blocks of wood that I cut to the right side and put in each corner below the rail I was nailing – but they pll right out and can be used on all sides as you go around).
I repeated that same step with my upper horizontal rail, making sure it was flush with the top of my vertical posts.
Next, we attached another 1×4″ board across the top to create a flat arm rest of sorts.
The last little detail we added was a 1×2″ board along the bottom edge of the frame, between all 4 corner posts. This was purely decorative, so could totally be skipped or tweaked depending on what final look you’re going for.
Once everything was constructed, we wood-filled our nail holes, sanded them smooth, caulked the seams, and painted everything with that same outdoor paint (SW Moderne White in a semi-gloss finish).
Once everything was dry, we were ready to hang it!
Hanging The Outdoor Daybed
I’m actually going to write a separate post about how we hung the daybed because we tried a couple of different methods – hanging from two anchor points (as you see below) and later hanging it from four anchor points (which had a lot more benefits). We made a detailed video to show you exactly what worked the best to save you time, trouble, and money (our multiple hanging attempts meant that we had to purchase the rope twice and that we wasted a stupid amount of time on a subpar initial method).
If you just want the material details so you can order it while we get that post together for you, we used this 3/4″ natural hemp rope, heavy-duty eye hooks (these in the ceiling, these in the bed), and some basic knots.
The rope was easy to cut with regular scissors and it does stretch out a bit under the weight of the bed, but that’s where those buckets come in handy. I read in several places that your daybed will feel a little too high when it’s propped up on the 5-gallon buckets, but they keep it level and help with placement. And once you tie your ropes and remove the buckets, your rope relaxes (ours did within the first use – once some weight was put on the daybed) and it ends up at the perfect height.
I’ll get into more detail in a follow-up post, but the main thing is to make sure you find joists or other strong anchor points within your porch ceiling that you can trust. We were lucky that our ceiling is mostly exposed so we had lots of visible anchor points to choose from.
Even though the hanging method in these photos didn’t end up being our favorite – now that everything is rehung, this spot is quickly becoming one of our favorite places to lounge around. We’ve been lucky enough to have several warm days over the last couple of weeks to actually enjoy it!
Thanks to our 6′ cushion, it’s plenty comfortable for two people to sit upright at either end with their legs tucked under them, or out like this:
It’s even big enough for a certain 6′ tall dad to sprawl all the way out on:
Budget
Apart from the cushion, the project was pretty budget-friendly. And I still feel like getting a long outdoor couch cushion, plus 3 matching oversized pillows for $399 was a pretty good find (we’ve got the 3rd pillow stored under our bed as a spare).
Here’s the cost breakdown:
Wood: $150
Buckets: $14
Eye hooks: $25
Rope: $28
TOTAL: $217
And when you add the outdoor cushion set for $399, that brings us to a grand total of $616, which isn’t cheap, but considering that many custom made ones (like these) are in the $1000-2400 range (!!!), this is a great way to get it done for 1/4 to 1/2 the price.
Also please know that more than showing you how to hang a daybed the right way (to save you time & money) – our next post is going to be a fantastic example of why we will never have an HGTV show. The video… let’s just say it’s one continuous outtake. So there’s that to look forward to.
Want to keep browsing our building projects and furniture upgrades? This archive is completely dedicated to them. You can also see every single project and update we’ve done to this house over the last 8 months in this spot.