This week, learn why a glass cooktop can shatter and hear the easy way to remove acorns from your yard. (Adobe Stock/matzaball, Getty Images Signature)
Hour 1
Hear how much money you can save by installing luxury vinyl tile yourself, what to do about thermal expansion gaps in crown molding and more.
Save Big by Installing LVT Yourself
Got a tight budget? You can save hundreds by installing luxury vinyl tile yourself. (3 Echoes Content Studio)
Luxury vinyl tile is a great option for homeowners looking for a durable, waterproof, and easy-to-clean flooring option.
Also, it’s one of the most affordable flooring options, making it a great choice for budget-conscious homeowners. Joe researched the costs and here’s what he found:
Most people pay on average $1,400 to have 200 square feet of vinyl plank flooring installed. However, you can buy luxury vinyl for $2.50-$4 per square foot at The Home Depot.
So, if you install it yourself, it could only cost you between $500-800. That’s a saving, on average, of $600-900 over a professionally installed job!
You don’t need any special tools to install luxury vinyl tile. A box cutter is all it takes to cut the tiles.
The number one mistake people make when installing is cutting it tight against a wall. All floating floors require an expansion space — you’ll need anywhere from a quarter inch to half an inch.
Run the luxury vinyl tile up to the baseboard and cover the gap with shoe molding. Just be sure to secure the shoe molding to the baseboard.
Follow the directions exactly regarding any underlayment. Depending on the type you buy, the underlayment could already be attached.
Changes in humidity or temperature can cause gaps in crown molding. (Chris Vogler)
This is the first winter that Chris in Alabama has spent in his new home, and he’s seeing the effects of thermal expansion. Over the past months, he says significant gaps have shown up in the crown molding throughout the house.
“Should I ask my builder to correct the issue? If the gaps are filled will it cause the molding to buckle when it gets warmer?” he asks.
It’s amazing how much materials in a home expand and contract, and probably nowhere is it more evident than when you’re looking at crown molding.
These gaps will usually close on their own once warmer weather comes back around. If you have some gaps that are very pronounced, here’s what you can do:
Nail it in place: Use a nail gun to secure the crown molding to the wall.
Fill it with caulk: Instead of using traditional caulk, carefully apply an acrylic latex caulk. The trick is to barely feed it into the cracked area, so that when it does close back, it remains flexible. The gap will still appear but it won’t be as deep or as noticeable.
Hour 2
Listen to learn the easy way to remove acorns from your yard, why a glass cooktop can shatter, what you need to do to cover terracotta tile and more.
Eliminating an Acorn Overload
Removing acorns from your yard can be a tricky task, but with some patience and the right tools, you can get the job done. (matzaball, Getty Images Signature)
This is nuts! A homeowner says he has more than 250,000 acorns in his front yard.
“Besides raking, which I hate, how can I pick up the acorns? My self-propelled lawnmower doesn’t have the power to pick them up. Is there a piece of equipment suitable for the job?” he asks.
Here’s what you can use to remove from a yard:
Leaf blower: A leaf blower can blow the acorns into a pile, making them easier to collect. Bonus tip: Use a tarp to contain the acorns while blowing them, making cleanup even easier!
Lawn vacuum: A lawn vacuum can suck up acorns and remove them from the yard. These can be pricey, so see if you can rent one, or hire a landscaper who owns one to use in your yard.
To eliminate this problem in the future, prevent the acorns from falling in the first place. If possible, remove the tree or prune it so that it does not produce as many acorns.
Some chemical treatments can prevent acorn production, but only a professional arborist should apply them.
Keep in mind — removing acorns can be time-consuming and you might need to repeat it as new acorns fall. Always wear safety gear to protect yourself from falling acorns and be aware of insects or critters in the acorns or hiding in the tree.
‘Why Did My Glass Cooktop Shatter?’
A glass stovetop can shatter for several reasons, including sudden temperature changes, improper installation and manufacturing defects. (Adobe Stock)
A homeowner says the tempered glass on his gas cooktop suddenly shattered the other day, even though it wasn’t on and he didn’t drop anything onto it.
“What would cause that to happen?” he asks.
Tempered glass is designed to be strong and durable, but it can shatter unexpectedly for several reasons. Some of the most common causes of tempered glass shattering include:
Improper installation: If the cooktop is not installed correctly, it can put stress on the glass and cause it to shatter. For instance, if the countertop is overlapping the cooktop, it could put some stress on the top, eventually causing it to shatter.
Thermal stress: If the cooktop or the glass is exposed to rapid changes in temperature, such as from a hot pot being placed on a cold cooktop or vice versa, it can cause thermal stress and cause the glass to shatter.
Manufacturing defects: Sometimes, tempered glass can have manufacturing defects that make it more prone to shattering. If this is the case, report it to the manufacturer.
You can call a professional to replace the glass cooktop, but it might be expensive. Consider replacing it with a stove that doesn’t have a glass cooktop.
To prevent a glass cooktop from shattering, follow these tips:
Don’t place a hot pot on a cold cooktop or turn the cooktop on high and immediately place a cold pot on it. This can cause thermal stress and can cause the glass to shatter.
Use cookware with flat bottoms to distribute heat evenly and prevent warping or bending.
Do not slide cookware across the cooktop, as it can scratch or chip the glass.
Do =n’t place heavy objects, such as cast iron pans or pressure cookers, on the cooktop as they can cause impact damage.
Clean the cooktop regularly with a mild detergent and a non-abrasive sponge or cloth to remove any dirt, grime or stains.
Use a stovetop cover to protect the cooktop from scratches or stains when not in use.
Do not overheat the cooktop, as it can cause the glass to overheat and shatter.
Always follow the manufacturer’s instructions for the care and use of your cooktop.
Covering Terracotta Tile
Terracotta tile can be cold to the touch, which may not be comfortable for some people, especially during the winter. (Michelle West)
A homeowner has terracotta tiles throughout her second-floor California condo.
“The surface is too hard, very uncomfortable!” she says. “Can we have more comfortable flooring installed on top? It seems like removal will be very expensive, disruptive and noisy.”
Because traditional terracotta flooring has such an irregular surface, you’ll want to apply a self-leveling underlayment to create a smooth, even surface for installing another type of flooring over it.
You might run into the problem of raising the floor height too much to where it can block appliances from opening or make them not level with your cabinets and counters. Check the height of the new flooring to make sure this won’t happen after you’ve installed it.
There are several options for covering terracotta tiles, including:
Vinyl flooring: Vinyl flooring can be installed over the existing tiles and is durable and easy to clean.
Engineered hardwood flooring: Engineered hardwood flooring can be installed over the existing tiles and provide a warm and natural look.
Laminate flooring: Laminate flooring can also be installed over the existing tiles and is available in many styles and colors.
Floating floor: A floating floor is a type of flooring that is not attached to the subfloor, this type of flooring can be installed over the terracotta tiles and can be made of different materials like laminate, engineered hardwood, or cork.
Consult with a professional flooring specialist to determine the best option for your specific situation.
Best New Products
Milwaukee’s new battery pack keeps tools powered for longer, so there’s less downtime during your projects. Learn more >>
Simple Solutions
Need to remove standing water from a clogged sink? This toy doubles as a siphon pump! (3 Echoes Content Studio)
Pool-Toy Plumbing Tool — Before repairing most plumbing clogs, you must first remove any standing water. Now, you could use a sponge or wet/dry vac, but here’s another option: take a kid’s water-squirting toy, commonly called a water blaster, and use it like a siphon pump. Simply place the nozzle of the toy into the water and draw back on the handle to suck up the water. Then you can squirt it into a bucket, toilet or tub. This is great for sink clogs, toilet clogs, or if you have a malfunctioning washing machine that has water standing in the tub.
Filtering paint through a window screen catches any impurities or particles. (3 Echoes Content Studio)
Paint Screen Saver — When using paint from a previously opened can, it’s best to pass the paint through a filter to screen out dried paint chips and other small bits of debris. You can buy disposable paint filters, but they’re flimsy, not reusable and the paint flows through much too slowly. Instead, use a piece of vinyl insect screening. Cut the screen about 12 or 14in. square, secure it to a new, clean paint can with three small spring clamps, and then pour the old paint through the screen. When done, rinse out the screen with a garden hose and save it for the next paint job.
We’re helping a couple who aren’t strangers to do-it-yourself projects.
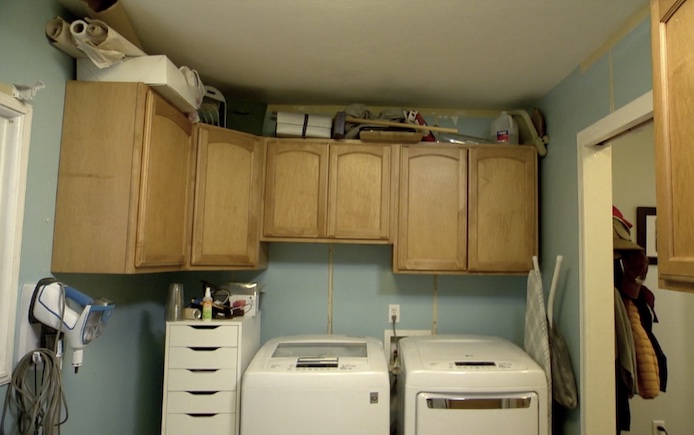
Matt and Lindsey Binion bought their mid-1950s house in the midtown area of Mobile, Ala., a few years ago and have been busy making it their own ever since.
After completely renovating their kitchen because of a water leak, they installed their old kitchen cabinets in the laundry room to give it a bit of a facelift. However, its overall look and functionality need some improvement. So, we’re here to help!
The Projects
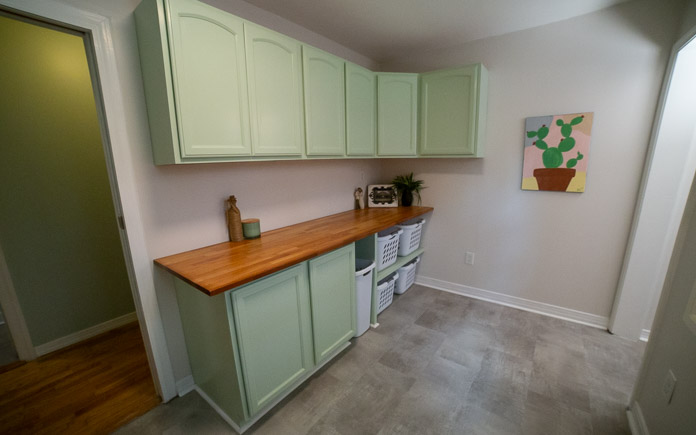
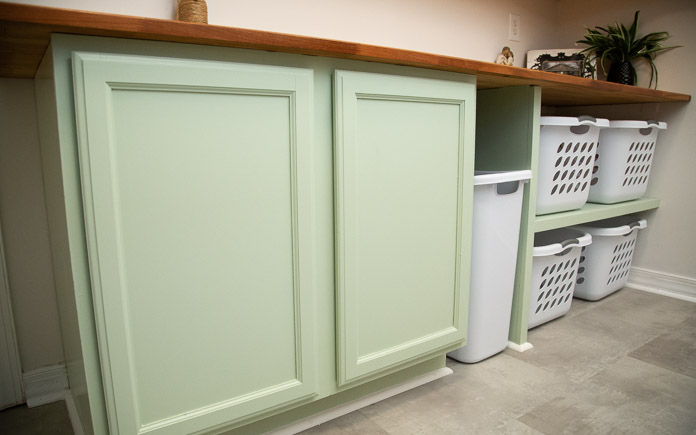
The new cabinet configuration works with the room instead of against it. (3 Echoes Content Studio)
Rearrange the Cabinets
Matt and Lindsey were on the right path when they repurposed the old kitchen cabinets for storage, but their configuration just wasn’t working for the room.
There were large gaps between the cabinets and the walls, and items ended up being placed all around. The room was treated more like an indoor garage than a laundry room.
So, we reposition them and remove some to create storage that makes sense for what the couple needed from it.
Then we sand, prime and paint the cabinets a fresh new color.
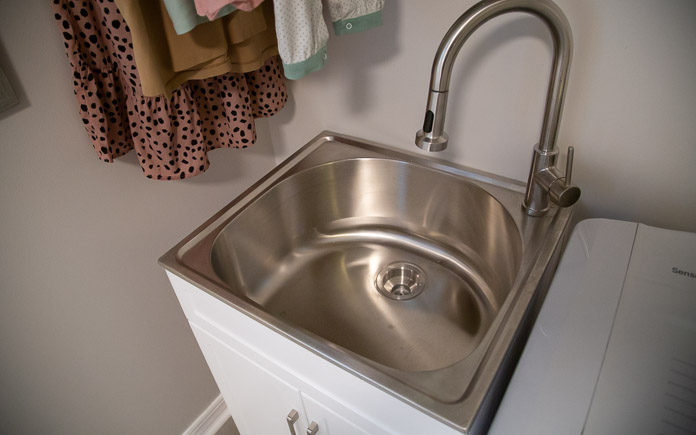
Lindsay won’t have to wash clothes in the kitchen sink now that she has a utility sink in the laundry room. (3 Echoes Content Studio)
Add a Utility Sink
In a house with four boys, a laundry room with a utility sink is a must.
Lindsey has been using their new kitchen sink to wash their boys’ muddy clothes after sports practices. And after handwashing, she has no place to hang clothes to dry.
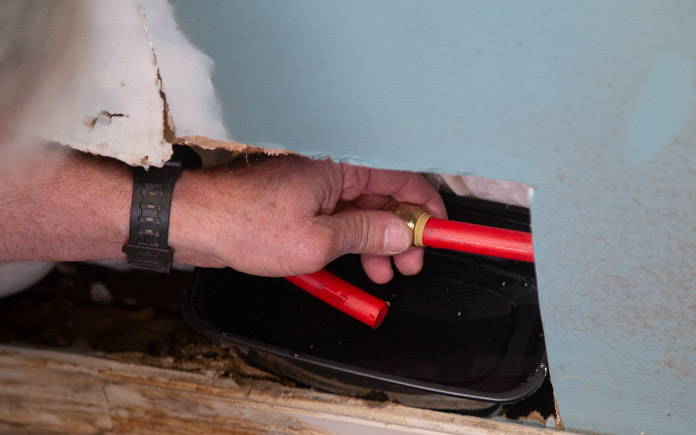
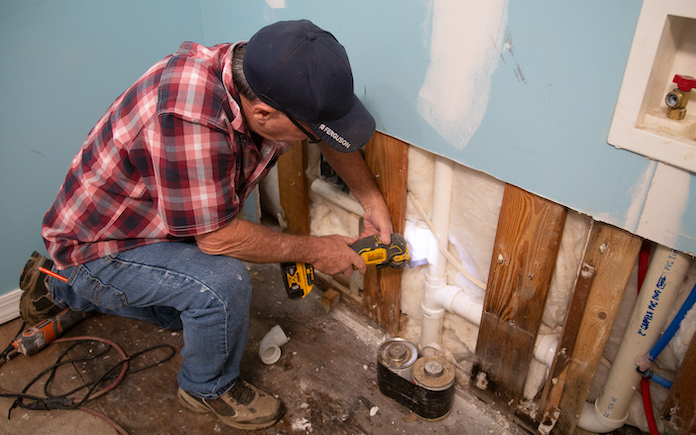
To install the utility sink, we first moved the water and dryer so we could access the plumbing. Unfortunately, we found some water damage behind the wall.
Unbeknownst to the couple, water had been dripping from the cross-linked polyethylene, or PEX, line for a few days. We immediately cap the line with a Sharkbite cap until the plumber arrives to install the sink.
Our plumber uses an oscillating saw to cut the PVC pipe so it can be rerouted to the sink. (3 Echoes Content Studio)
When our plumber arrives, we cut a hole in the drywall so he can access the pipes and reroute them to the spot the sink will be. The plumber then runs the new drain line for the sink and extends the water supply lines from the spot where we capped the leak.
We then replace the drywall around the new pipes and finally install the laundry sink cabinet and sink.
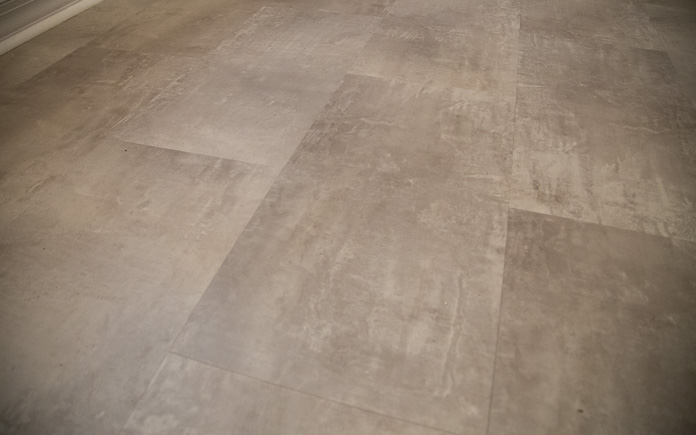
The luxury vinyl tile is the same flooring in the kitchen, so now the two rooms are connected. (3 Echoes Content Studio)
Replace Flooring
The tile grout on the laundry room floor is coming loose, so we’re going to replace it with some leftover luxury vinyl tile that the couple used in their kitchen renovation.
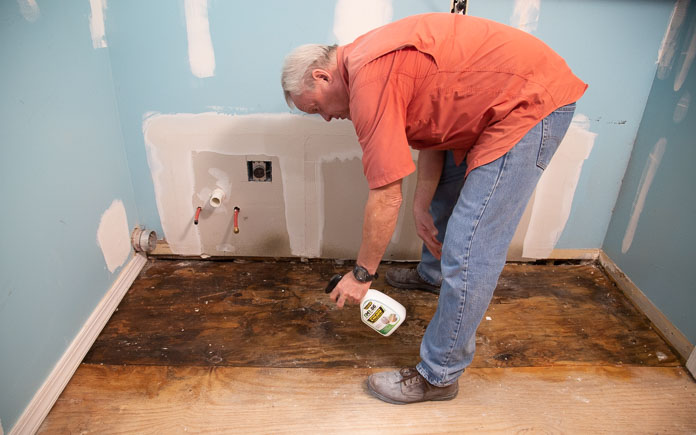
Thankfully, we caught the water leak in the hex pipe just in time for us to treat the subfloor with antimicrobial spray and let it dry overnight. (3 Echoes Content Studio)
After we remove the tiles and backer board with a pry bar, we find a wet spot on the subfloor where the PEX pipe was leaking. Because we caught the water leak early, we won’t have to replace the subfloor. We use some dehumidifiers and fans to dry it out overnight, and then treat it with an antimicrobial spray to make sure no mold comes up through the floor.
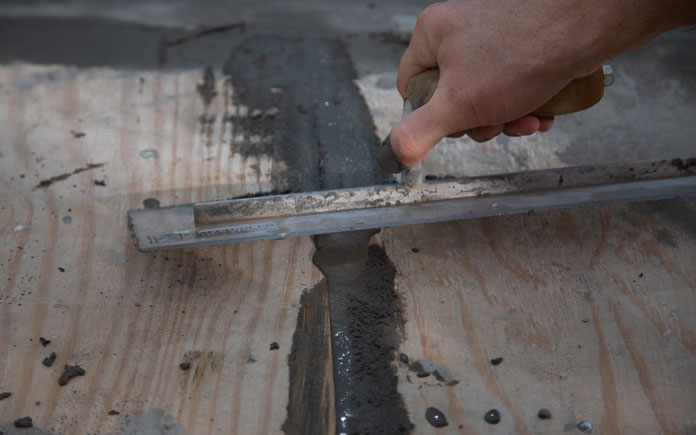
To level out the subfloor, we mix some floor patch compound that he spreads over the surface to fill in low spots and smooth out the transitions. We then installed the rectangular luxury vinyl tile long-ways in the room to complement the narrow room.
The new cabinet has room for everyone’s laundry basket, plus plenty of countertop space for folding. (3 Echoes Content Studio)
Install Countertops and Cubbies
Matt and Lindsey used a piece of plywood as a makeshift countertop for the repurposed kitchen cabinets. But, the plywood wasn’t a prime surface for folding laundry, so the couple was forced to pile laundry in the living room and fold them from their couch.
To make this counter space more functional, we first install 1-by-2 cleats to support a new butcher block countertop as well as a shelf unit that will organize the kids’ laundry baskets.
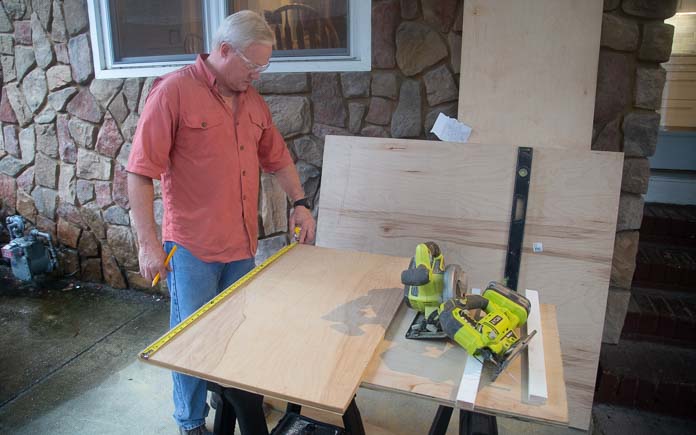
We use 3/4-inch plywood and 1×2 boards to create the cubbies for the laundry baskets. (3 Echoes Content Studio)
For our shelf unit, we cut our wood pieces on a table saw outside and assemble them with nails and wood glue. We then attach them to the cleat we installed next to the base cabinets.
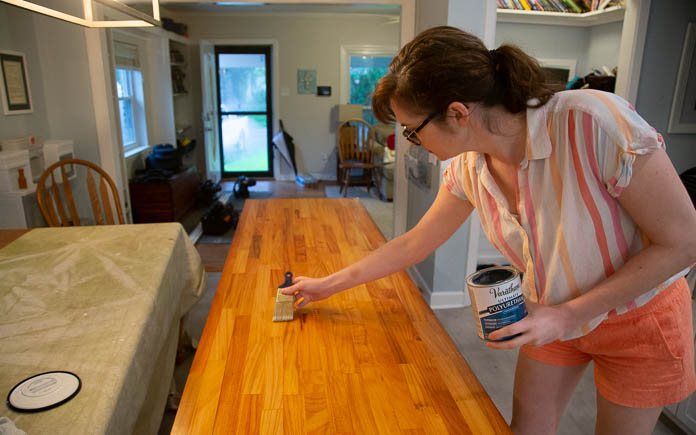
Polyurethane seals the butcher block countertop so it’s more durable. (3 Echoes Content Studio)
Next, Lindsey coats the butcher block with polyurethane. After that’s dry, we install the countertop over the shelving unit and base cabinets.
Matt and Lindsey had a decent-sized laundry room with lots of storage space, but because it had been thrown together with salvage materials from an emergency kitchen renovation, the surfaces all looked a little worse for wear and the room lacked the thoughtful organization and visual appeal they really wanted for the space.
But now, the old recycled cabinets have a clean new look and a simplified layout that works with the room rather than overpowering it. The new luxury vinyl tile flooring has replaced the old cracked ceramic tiles and connects the room to the rest of the house.
The laundry sink makes the family’s everyday chores easier and less stressful, especially with the hanging space directly above it and the new countertop is both attractive and useful for a family with lots of laundry to fold.
Plus. We did it all for less than $2,000 in materials.
Other Tips From This Episode
Products Featured in This Episode
This page contains affiliate links. If you purchase a product from these links, we will earn a small commission at no additional cost to you.
The tile we’re using has a built-in pad so there’s no need to install an underlayment. Start in a corner of the longest wall in the room, placing the tiles with the tongue side out.
The tongue on luxury vinyl tile is the small flat edge on one side of the tile that’s angled to lock into the bottom side of another tile (the groove side).
Cut the outer boards down to ensure you have equal-sized pieces on either side of the room. (3 Echoes Content Studio)
To ensure we have equal-sized cut pieces on either side of the room, we cut our first row of tiles down to 8 and 3/4 inches.
Luxury vinyl tile expands and contracts, so give it some room by spacing it about 3/8 of an inch away from the wall. (3 Echoes Content Studio)
Space each piece about 3/8 of an inch from the wall so there’s room for expansion. For this luxury vinyl tile, we’re aligning them with the base molding because it’s a little wider than that measurement.
On the first row, you’ll only need to snap the end joints together. For the next row, align the end joint then tilt the tile down so the longer joint lines up.
Staggering the rows prevents unattractive gaps between the luxury vinyl tile. (3 Echoes Content Studio)
Offset each new row by half from the previous one before tapping both joints in place with a rubber mallet.
You don’t have to use a saw to cut luxury vinyl tile. Simply score it with a utility knife and snap it off. (3 Echoes Content Studio)
When you need to cut the tile, simply align the tile and mark the edges at the obstacle, then connect the lines using a speed square. Cuts can be made with a saw or with a utility knife to score and snap the tiles.