Lawn and landscape expert Sid Sexton is back to talk more about pruning, landscaping and shrubs.
In this week’s episode of “Ask Danny,” Sid Sexton is back to tell us how to plant shrubs and give some advice on pruning crape myrtles.
Sid is the founder of Sexton Lawn & Landscape in Daphne, Ala., and is licensed in turf and ornament spraying, landscape design, and setting of landscape plants.
Sid Sexton is the founder and president of Sexton Lawn & Landscape. (Photo courtesy Sexton Lawn & Landscape)
About Sid Sexton
As the founder of Sexton Lawn & Landscape, Sid is a down-to-earth, honest businessman with a love for lawn care, landscape design, and delivering the best products to his clients.
Starting at age 16, Sid spent his summers working for a local landscape company and the local country club and golf course in his hometown of Muskogee, Okla.
After earning his bachelor’s degree in business administration with a minor in horticulture, Sid joined the U.S. Coast Guard and was stationed in Hawaii, where he met his future wife, Jourdan.
Sid was our guest for the first episode of “The Ask Danny Podcast,” and he’s back! Listen to “Ask Danny Episode 1: Improving Your Lawn’s Health” to catch up, or read on for more information about this second interview with Sid.
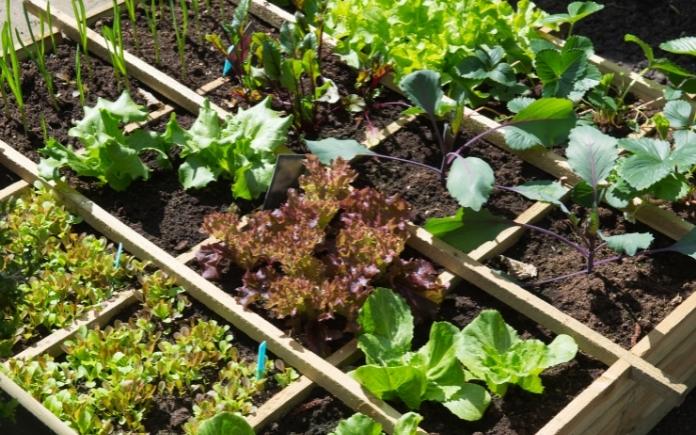
When planting shrubs, the width of the hole is more important than the depth. (Minna Kantonen, Getty Images)
Planting Shrubs: Tips for Success
What are some of the steps our listeners should take when planting shrubs?
Sid: Before you plant shrubs, follow these three steps:
Have a plan. You need the right type of plant for your environment in the right location. Think about space, sunlight and water, then ask yourself these questions: Where will the plants go? Will the area have too much or too little water? Are they the right plants for the right place for the sunlight they need?
Lay out the bed. Use spray paint to outline the bed line, then rent a sod cutter to remove the turf and vegetation.
Add soil: Make sure to build the soil up. You can use top soil, bagged soil or an organic specialty blend. The main goal is to add some kind of amendment to the existing soil so your plants will have the nutrition they need.
When digging holes for your plants, go wide. The hole should be three times the width of the container. Giving it that space to grow out is much more important than how deep the hole is.
However, you don’t want to dig the hole too deep to where water settles around it. Plant it level to the ground or about a half inch above the soil level. You want water to drain away from the base of the plant.
Then add natural mulch, like pine straw, bark and hay. It will create a mat that will prevent weeds from growing. Weeds sprout from seeds that can be spread through the wind. If you create a thick layer of mulch, it will prevent the seeds from reaching the soil.
Landscape fabric also does this, but personally, I don’t use it because of the climate I live in. It stays hot almost year-round in south Alabama, so landscape fabric tends to trap heat underground and damage roots. Also, it can push water to low areas and lead to root rot.
Mulch also insulates the roots, preventing them from getting too hot and cold. And it keeps moisture in the soil from evaporating too quickly. As natural mulch breaks down, it adds organic matter to the soil.
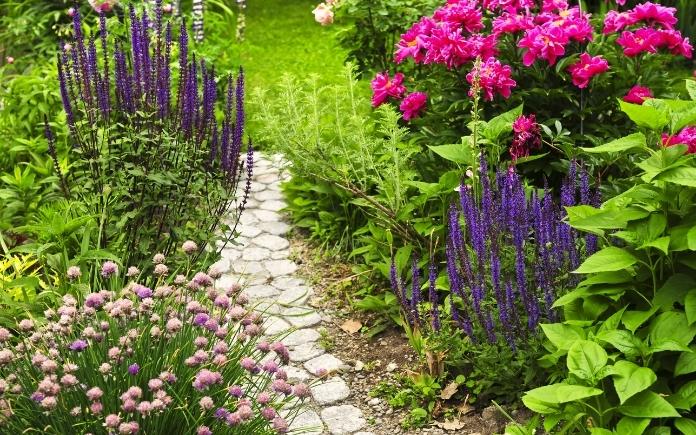
Well-pruned shrubs and trees are a hallmark of a carefully tended yard or garden. (Maudib, Getty Images)
Best Time to Prune
What are some general tips about pruning? When is the best time and are there different steps for different plants?
Sid: All plants require some pruning to keep them in shape and promote healthy growth.
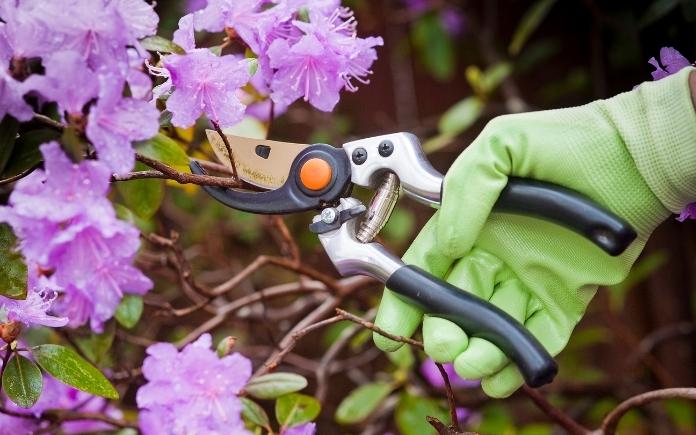
There’s lots of nuance in pruning but a general rule for flowering plants is you want to prune the plant after it blooms.
You don’t have to cut a ton of branches to encourage crape myrtle blooms. (c11yg, Getty Images)
Pruning Crape Myrtles
Many people have strong opinions on trimming and pruning crape myrtles. What’s your opinion?
Sid: A crape myrtle blooms off new growth. So, some people hack away at the branches to stimulate this new growth. But this isn’t necessary — you can still produce new growth and keep the shape of the plant with selective pruning.
Select pruning eliminates an ugly knuckle from forming and maintains full foliage. Here’s how to do it.
First, prune cross branches — branches that are rubbing together and growing across from each other. You want the tree to grow up and out, so trim the branches that are growing toward the middle.
Then, prune broken branches and any branch that’s smaller than your pinky.
Make sure you have a plan. If you fail to plan, you plan to fail.
If you’re not sure what to do, consult with a local expert, like a nursery or landscape architect.
Do it in stages so it’s not overwhelming in time and budget.
Further Reading
Ask a Question! (Podcast)
Ask a question and we could answer it on the “Today’s Homeowner Podcast!” We also may use it on our nationally syndicated radio broadcast or on todayshomeowner.com.
Making your house look great at the first glance doesn’t have to be a costly investment. These simple and affordable curb appeal ideas can update your home while boosting its appeal to visitors and potential buyers.
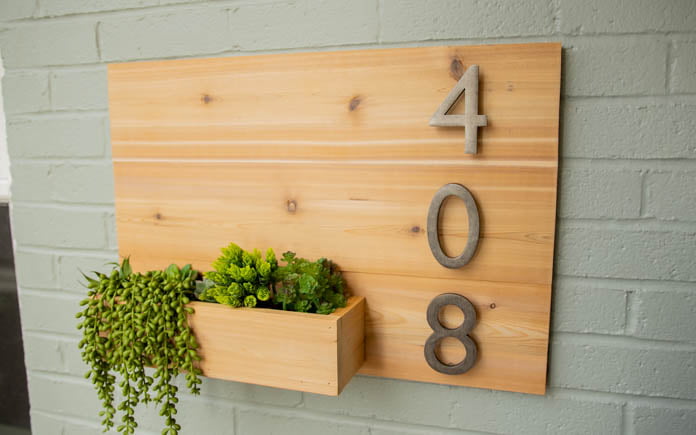
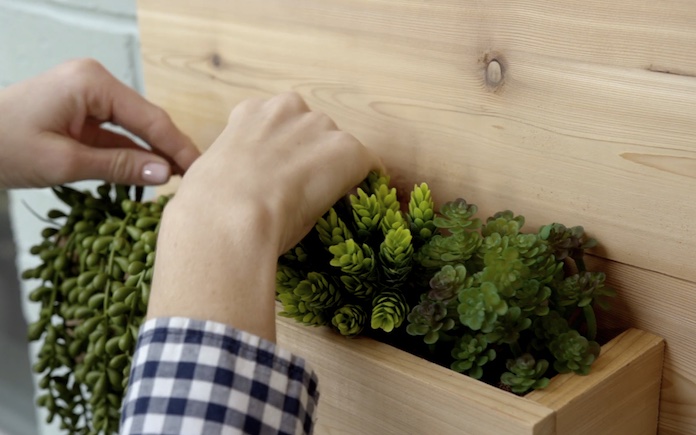
This house number wall planter adds natural texture to a brick exterior. (3 Echoes Content Studio)
1. Dress Up Your House Number
First on our list of curb appeal ideas is stylishly displaying your house number. Not only does it add curb appeal but it also clearly shows your house number for first responders and ensures packages get delivered to the right home.
This house number wall planter project is a two-for-one – you get a wall planter that also prominently displays your house number. Plus, it can be built in less than half a day.
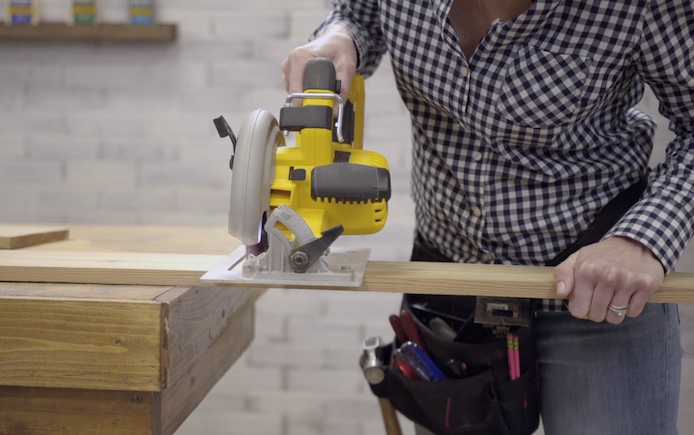
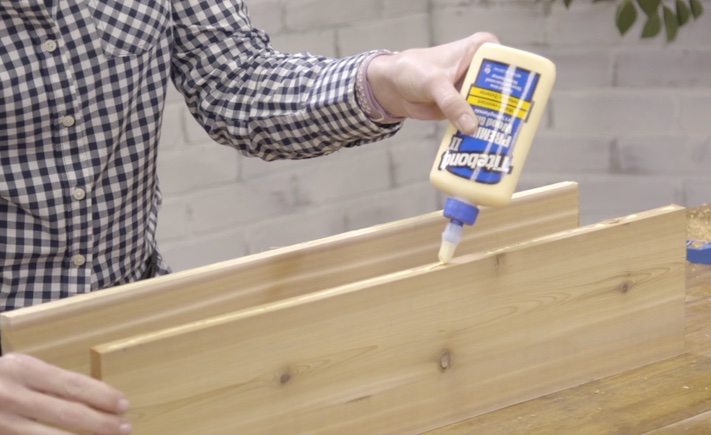
First, measure and cut the wood for your house number wall planter. For this project, we used cedar because of its scent, but you can use any type of wood.
Here are the cuts you’ll need:
Three 1x6s at 24 inches
Two 1x4s at 3.5 inches
One 1×4 at 12 inches
One 1×4 at 13.5 inches
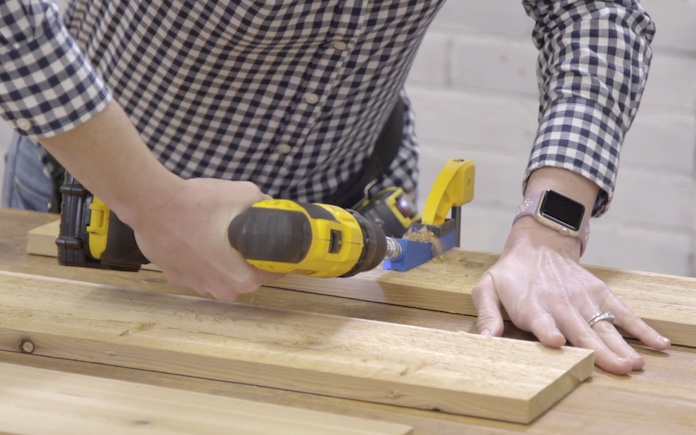
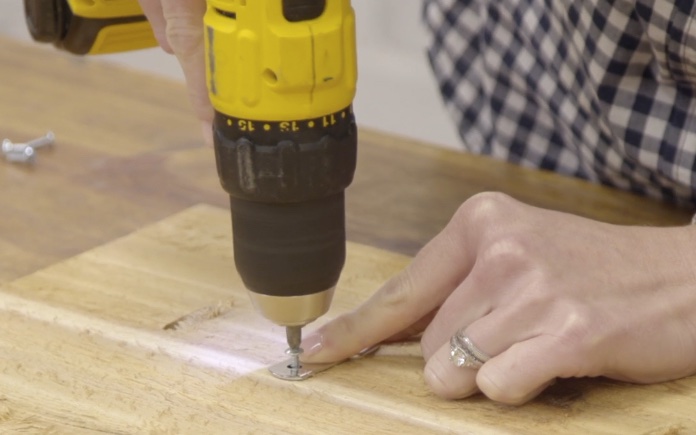
Pocket holes prevent wood screws from penetrating the panel’s front side. (3 Echoes Content Studio)
Step 2
Choose whether you want the rough side or the smooth side of your cedar facing out, then drill pocket holes on the backs of two of your 1×6 boards.
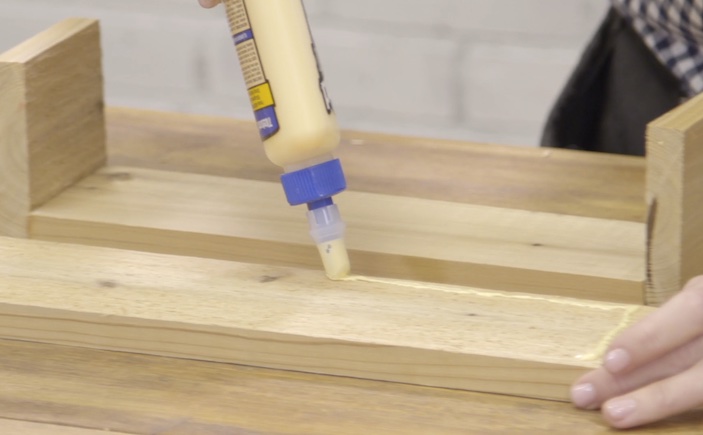
To assemble the planter box, use the 12-inch piece for the bottom, the 13.5-inch piece for the front and the two 3.5-inch pieces as the sides. Apply wood glue and then nail them together.
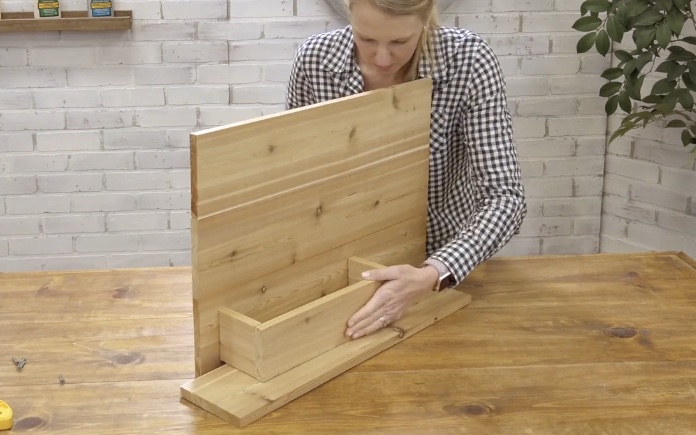
A scrap piece of wood is the perfect height to hold up the planter box place while you attach it to the panel. (3 Echoes Content Studio)
Step 6
Use a scrap piece of wood to hold the planter box three-quarters of an inch from the bottom of the panel. Then, attach the planter box to the panel using wood screws from behind. Sand the house number planter box. If you want a glossy look, apply a wood sealer.
Hang the wall planter up on your house before adding the dirt and plants.
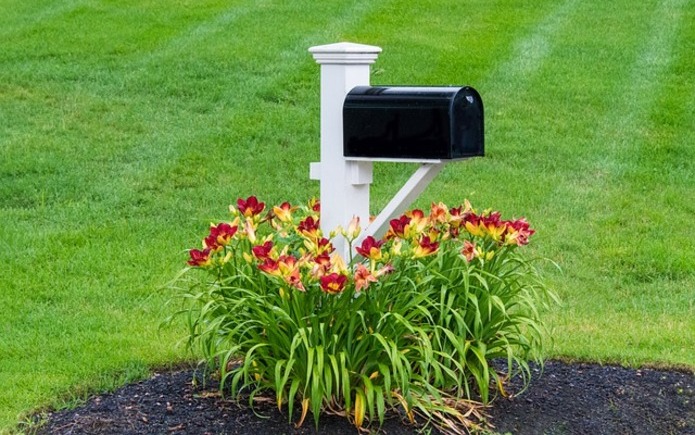
Your mailbox says a lot about your home, and you. To maintain curb appeal, keep it painted well or purchase a new one that meets United States Postal Service guidelines.
2. Replace Your Mailbox
While we’re on the subject of house numbers, give some attention to your mailbox!
Mailboxes serve a dual purpose: they collect your mail, but they also send a message about the homeowner’s attentiveness to their dwelling.
A tattered old mailbox suggests a lack of care. Don’t risk sending the wrong message: install a sparkling new mailbox.
From traditional to polished-nickel options, choose from dozens of styles and sizes. Consider whether you’ll need to enlist help for installation: a wall-mounted mailbox will only require some screws and a screwdriver, but roadside mailboxes that sit on posts might require an expert’s help.
If you have to dig a post hole for your new mailbox, call 811 before you dig to ensure that you stay clear of any utility lines.
And before you do anything, always review the US Postal Service’s mailbox requirements.
Yes, the USPS has requirements, and it enforces those requirements! For instance, roadside mailboxes must be at least 6 inches back from the curb.
If you’re installing a door slot, USPS requires that the opening be at least 1.5 by 7 inches.Find all the specifics atusps.com.
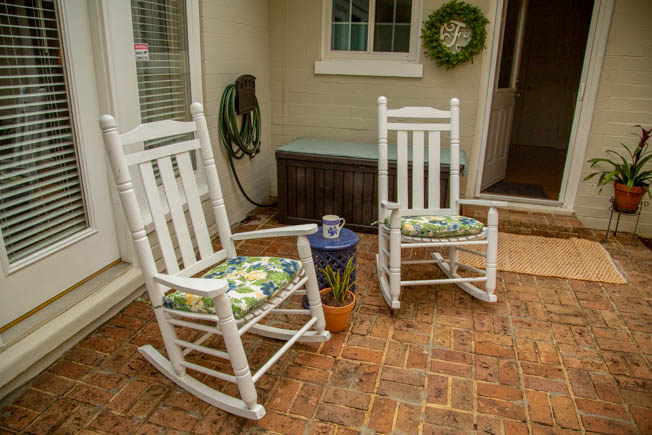
A front porch isn’t complete without comfortable chairs and potted plants.(DepositPhotos)
3. Spruce Up the Front Porch
Next on our list of curb appeal ideas is spruing up the front porch.
Here’s an easy formula to improve your front porch’s appearance: furniture, plants and wreaths.
Furniture
Front porch furniture — like gliding, lounging or rocking chairs — welcomes guests and invites them to sit, take a load off and enjoy some conversation.
You can find nice, inexpensive furniture at a thrift store to add character. Shop for something that looks good but doesn’t require refinishing.
Plants
Plants offer a nice break from your home’s hard features (such as windows, doors, roofing and siding). To add texture and soften your home’s exterior appearance, purchase plants at the home and garden center and place them in pots made for outdoor use.
Just get one or two planters — most hardware stores or gardening shops sell inexpensive faux terracotta ones — to arrange near your front entrance. Place two planters on either side of your front door or cascade multiple down the front steps.
Here’s a suggestion for a starter plant: hardy and beautiful hibiscus! These slow growers provide abundant greenery with massive (up to 10-inch) blooms.
When the weather turns colder, move the pots indoors to enjoy them through the winter months.
When you’re picking out your plants, one simple phrase should be the key to your planter or window box: “fillers, spillers and thrillers.”
Fillers: Leafy greens will fill the space and complete the look
Spillers: Flowers like Creeping Jenny flow over the container’s sides
Thrillers: These plants offer the “wow” factor. Pops of color will draw the visitor’s eye
To fully capture the senses, add some aromatics to emit a gentle fragrance as guests enter your home. Keep in mind that your climate will also play a role in what you should plant.
Check the online version of the Farmers’ Almanac to learn what will and won’t grow well in your area.
Wreaths
Who says door wreaths are just for winter holidays? Make any door look great with a year-round wreath. Embellish the wreath based on the current season and add or remove accessories — such as a large initial of your family’s last name — as needed.
Scan the web, shop around and purchase these items in advance and you can move them into position and dress your front porch in less than an hour!
You can paint a door on its hinges, but doors with lots of imperfections need special treatment.
4. Paint the Front Door
A new paint color is the most budget-friendly of this list of curb appeal ideas. Don’t underestimate the power of a fresh coat of paint. The average gallon of paint costs between $15 and $30 — a reasonable investment that packs a punch when it comes to improving the look of a home.
Options for front door colors are as endless as your imagination. However, choose one that complements the color scheme of your home’s exterior. For a monochromatic color scheme, choose darker and lighter shades within the same color. To add eye-catching contrast, pick a door color that’s on the opposite end of the color wheel as your home’s main color.
Playful pops of colors are very on trend when it comes to door updates. But classic colors and stains never go out of style. A simple coat of faux mahogany finish can give instant curb appeal and won’t cost you a boatload.
Tips
Get the most mileage out of your paint job with these tips:
1. Remove any hardware. This includes knockers, kick plates and door handles. By taking these off, you avoid getting paint on your hardware, and you can ensure that you cover the whole door with paint.
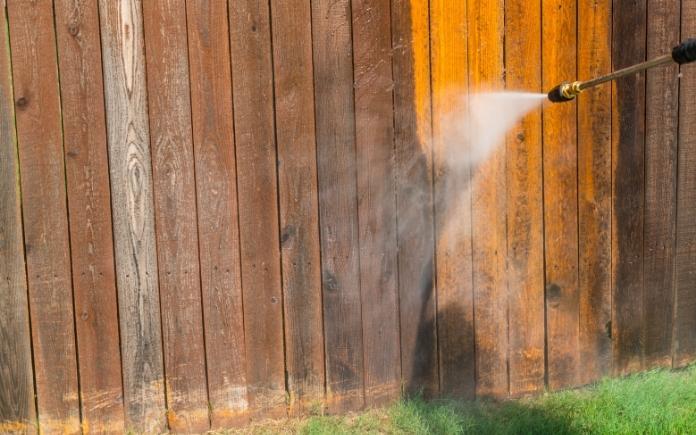
2. Clean it. Soap and water should do the job, but if there’s years’ worth of build up, use a pressure washer to power wash the grim away.
3. Lay it flat. Taking the door off its hinges is an extra step that most likely means a two-person job, but removing the door makes it easier to apply the paint in even coats.
4. Sand it. By sanding your door before you paint, you can remove dust, debris, and old paint layers. Sanding can also help your paint stick better, giving you a cleaner, crisper fresh coat.
5. Change the locks. Now is a great time to invest in some new home security. Replace your old deadbolt and handle with a brand new set and consider installing smart locks for keyless entry.
Installing a new door handle is a small change that can make a big difference. (Jason Finn, Getty Images)
5. Add New Hardware
Number five on our list of curb appeal ideas is upgrading your front door’s hardware.
It’s a simple, cost-effective and you can choose from a variety of colors and metal types, like silver, gold, satin nickel, copper, and oiled bronze.
Plus, hardware comes in many shapes and sizes, so before heading to the home center, consider the look and function you want — for instance, do you want knobs or levers? Do you want to turn, pull or push the handle to open the door?
With all of these options, you can easily find hardware to match your personal style and enhance your home’s aesthetic on a budget.
Just consider how the new hardware will look compared with your interior doors’ hardware. You may not want, say, an oiled bronze lever on the front door if brass knobs are on two close-by interior doors.
Or you may want to replace all your interior knobs with levers to match the front door for a consistent look throughout the home. Or at least spray the existing knobs with an oiled bronze finish to match.
Either way, it’s your home, and it’s your decision.
Lawn borders contain your mulch and define flowerbeds and pathways, giving your landscaping a finished look.
It doesn’t cost much to install concrete borders — expect to pay an estimated $2 per linear foot for materials. Out of all these curb appeal ideas, this is the most hands on, do-it-yourself project, so keep in mind the time and labor it will take.
Expect to dig a trench, build and install wood forms, pour in some gravel and then top that with concrete mix. Add just a few extra steps if you want to color the concrete mix, and give this project about three days to cure.
In a week, your flower beds will look better than ever and your front yard will have a sense of order to it — all thanks to a simple border!
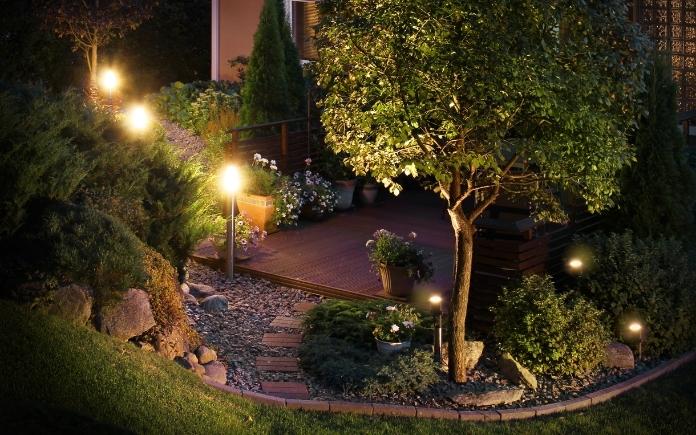
Want to add ambiance to your yard? Add landscape lighting. (Alberto Sava via Canva)
7. Install Exterior Lighting
While we’re on the subject of lawns, here’s another home curb appeal idea: install exterior lighting.
Adding a few lights to your front yard allows you to literally shine a spotlight on your home’s best features.
Landscape lightsare easy to install, and solar varieties are self-sufficient, so they won’t put a strain on your energy bill.
First, light walkways with garden lights or bollard lights, then move on to accent lighting. Use spotlights or up/down lights to highlight features like a large tree or a flag pole.
Want to add some ambiance to your patio? Hang some string lights!
Before you install landscape lighting, test the layout and determine the focal point for the brightest light. Simply tape flashlights to stakes and position them around the yard at night to see how halogen or incandescent landscape lights will look.
You can also place luminaries – composed of a white bag with sand and a candle inside – around your yard at night to mimic the look of solar-powered landscape lighting.
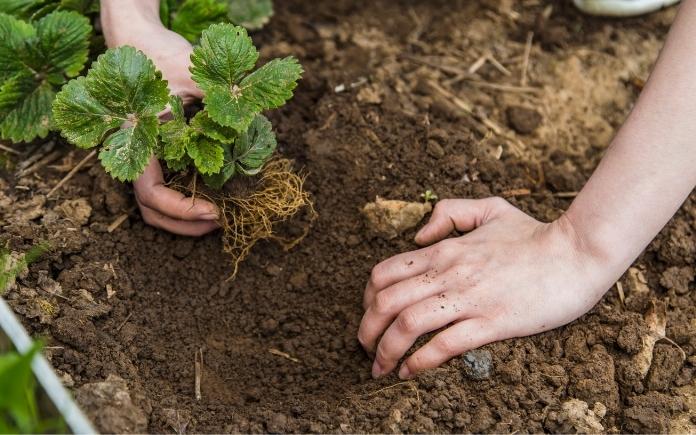
Gardening can take your mind off of daily stresses. (happy_finch, Getty Images)
Benefits of Backyard Gardening
The positive impacts of gardening are almost endless, especially when it comes to our mental and physical health. These benefits fall into two main categories: “active” and “passive.”
Active benefits are all about getting to work and doing something in your garden, helping you clear your mind while getting your hands dirty. Gardening, and similar physical activity outside, does your body wonders.
Studies show spending more time outdoors leads to fewer long-term health problems, according to the International Journal of Environmental Research and Public Health. These benefits include improved heart health, flexibility, strength, and dexterity — all leading to better mental health.
Contrarily, backyard gardening’s passive benefits are about simply being in nature or outdoor space. It provides a positive distraction from stresses in your life.
Many studies show just being in nature has a positive impact on our stress levels and brain chemistry, according to the Greater Good Science Center at the University of California, Berkeley.
Backyard gardening also helps you “feel alive,” letting you take your mind off work while giving you a new sense of purpose outside of the daily grind.
Growing your own vegetables gives you the personal satisfaction of a job well done. (Ivonne Wierink, Adobe Stock Photos)
Backyard Gardening By Your Senses
The goal of backyard gardening is to create a yard and garden that reflect how you want to live outside. Doug recommends designing your mental health garden according to your five senses.
Sight: The simple sight of a breathtaking array of plants, an arrangement of your favorite flowers, or interesting objects in your garden is bound to boost your mood.
Taste: Growing your own fruits, veggies and herbs will provide you an incredibly rewarding harvest, in more ways than one. Not only are you able to enjoy the produce you have grown for breakfast, lunch, and dinner, but you get the personal satisfaction of a job well done.
Hearing: Creating habitats for birds and other animals will add the sounds of nature to help you relax in your garden. Also, add wind chimes and water features that’ll produce soothing, stress-relieving sounds.
Touch: From the light, feathery textures of flower petals, to the rough surfaces of tree bark or bush stems, touch goes a long way in giving you a deeper sense of connection to your garden. This all ties back to a combination of active and passive benefits of backyard gardening, helping you establish a deeper sense of purpose.
Smell: Certain smells can bring back forgotten, happy memories. Add fragrant flowers and herbs to your garden bed, so you can literally “stop to smell the roses.”
Create pathways that lead to mini-spaces for a relaxing retreat. (Elena Photo via Canva)
Tips for Designing Your Mental Health Garden
When designing a garden, create “rooms” connected by meandering paths that let you get away from it all. These rooms provide mini spaces that you can retreat to, so you can rest, unwind, and feel restored.
However, your outdoor spaces don’t always need to be quiet and sedentary. If you enjoy being outside with others, creating gathering spaces in your yard is a great idea. And, if you have an outdoor hobby like exercising, painting, or writing, you can create spaces to do just that.
You shouldn’t get ahead of yourself and start creating a ginormous garden right off the bat. Start small, simple, and stress-free, and grow your garden out from there. Pick easy-to-grow plants that require little maintenance or start a simple vegetable garden in a raised bed.
So, start backyard gardening today — your mental health will be better off because of it.
Looking for more tips to breathe new life into your outdoor spaces? Check out Exmark’s Done-In-A-Weekend project series, featuring simple, budget-friendly DIY projects.
Concrete garden spheres add curb appeal or enhance your backyard with whimsical hardscaping. Think of them as a modern interpretation of the classic garden gnome!
Nestle these spheres between plants or use them to accent porch steps or the patio. No matter where you put them, they’ll make a great conversation piece.
Here’s how to make your own.
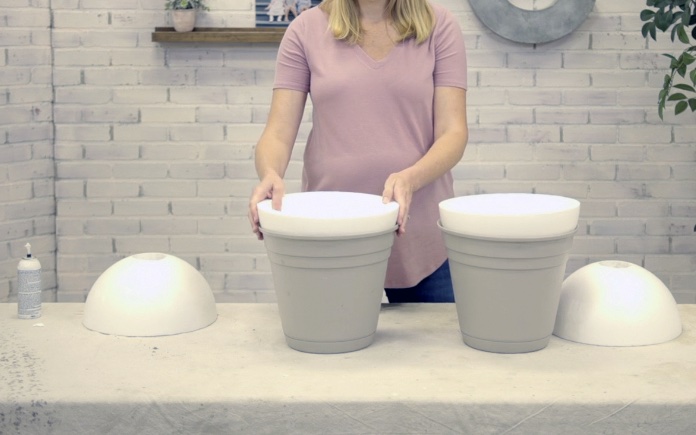
Plastic planters hold the forms in place while the concrete cures. (3 Echoes Content Studio)
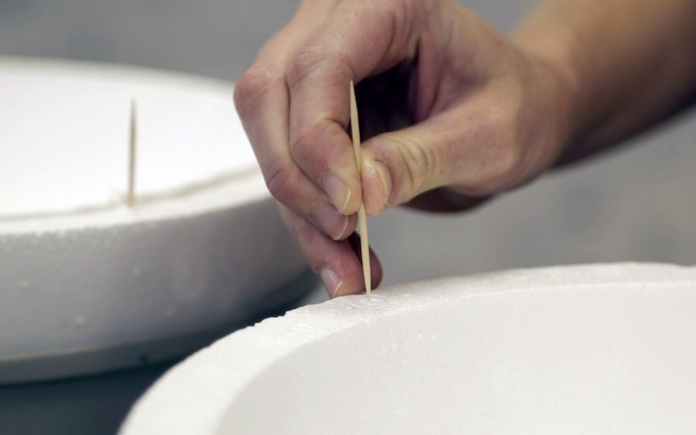
You’ll need two hollow half foam balls for each garden sphere you want to create. I’m making two spheres at a time, so I’ve got four half foam balls.
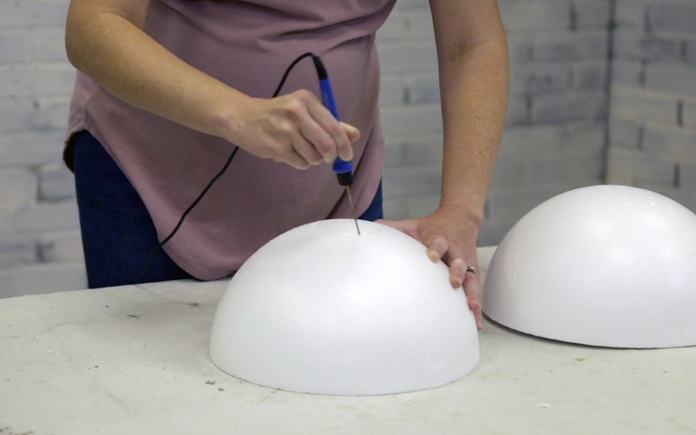
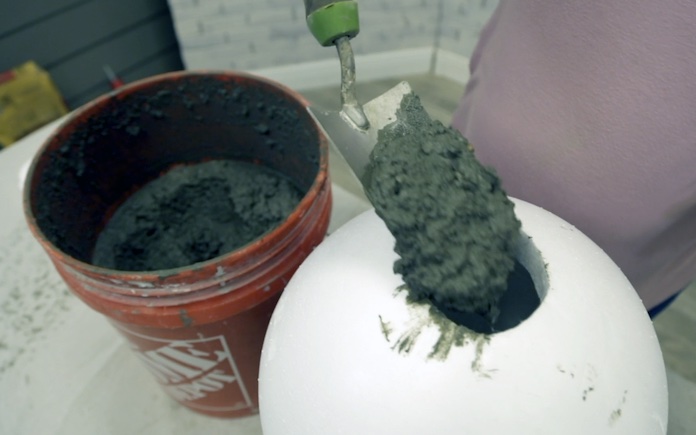
First, use a hot knife foam cutter to make a 2- or 3-inch-diameter hole in the tops of two half foam balls. (These will serve as the spheres’ tops, in which you’ll pour the concrete — but we’ll get to that later.)
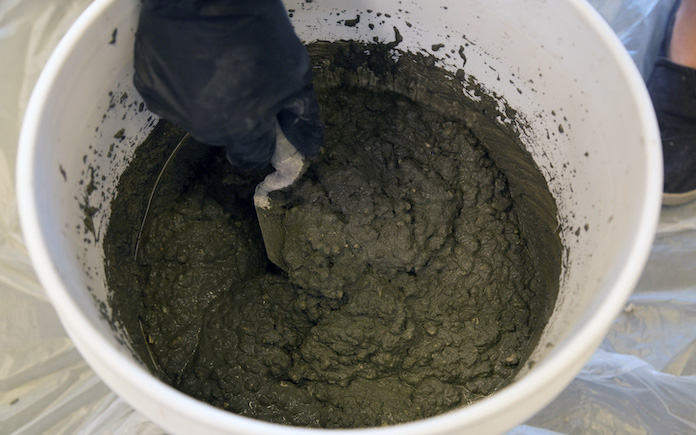
Then, set the other two half foam balls in planters or containers filled with dirt to hold them steady. (These will serve as the spheres’ bottoms.) Stick toothpicks into the rims of each bottom half foam ball and apply caulk all along the rims. The toothpicks keep the top foam ball from shifting, while the caulk creates a seal so no concrete mix seeps out.
Place the other two half foam balls on top of the bottom half balls, ensuring the toothpicks connect the bottom halves with their tops, all the way around. Wait for the caulk to dry. Most silicone caulk takes 24 hours to dry, but some fast-drying caulks only take one to three hours.
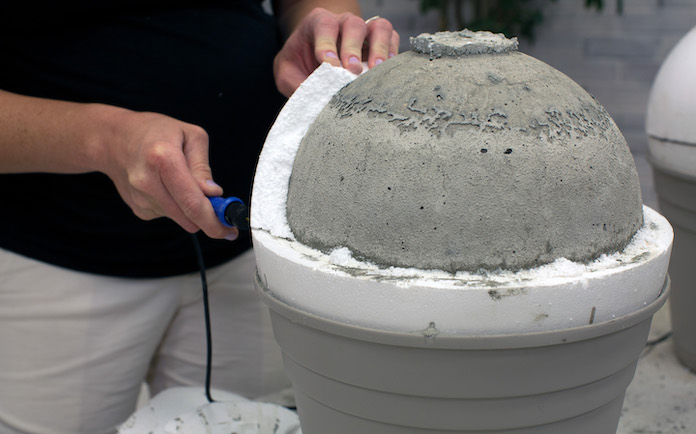
Once you remove all the foam, sand the entire sphere with 120- or 150-grit sandpaper for a smooth finish.
Sealing concrete is always a good idea — it will keep the garden spheres from getting moldy, and it will add a slight sheen. Use Quikrete Acrylic Cure and Seal once the concrete has hardened and the surface sheen has disappeared.
Now, all that’s left to do is decide where you want to show them off in your garden!
With help from our friends at The Home Depot, we’ve compiled this list of timely chores to keep your house clean and comfortable.
Listen to this special-edition Today’s Homeowner Podcast, and follow along below, to learn all about the top summer home maintenance projects!
Changing the air conditioner filter makes your AC work better to keep you cooler. (3 Echoes Content Studio)
1. Change AC & Heating System Filters
Regularly changing your HVAC system’s filters is important because a dirty filter will slow down and strain your system. It should take about two to three minutes to take out your old filter and put in a new one.
Also, once your filter is out, go ahead and vacuum the cavity in case of dust build-up.
Your AC drain line can get blocked with mold and mildew, causing its pan to overflow. Flush it with bleach twice during the summer, when it’s working at its hardest.
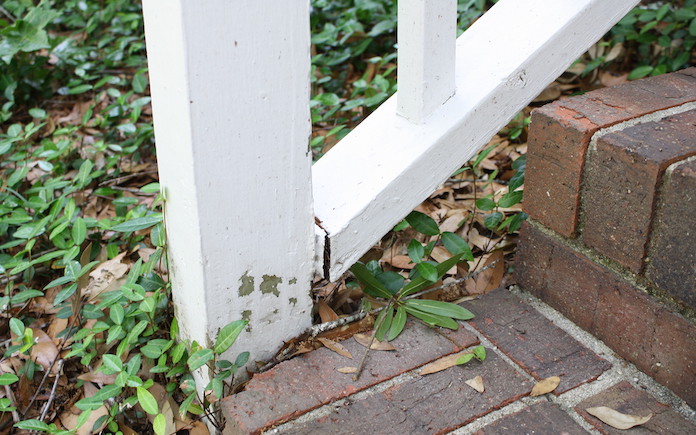
3. Check for Loose Railings or Damage on Wooden Decks
Changing weather can take a toll on your deck. Nails and screws can loosen during the temperature change and splinters can pop up once the heat rises.
Inspect and repair any damage to your deck so you can have some safe fun in the sun. Top it off with a coat of sealer to keep it protected all summer long.
Check for any loose parts or rot (if it’s wood). If you have cushions, be sure to wash them. In addition, if your cushions get wet from rain, be sure to hang them out to dry on a sunny day to avoid mold.
If you do this on a regular basis, it makes it a lot easier to keep everything clean.
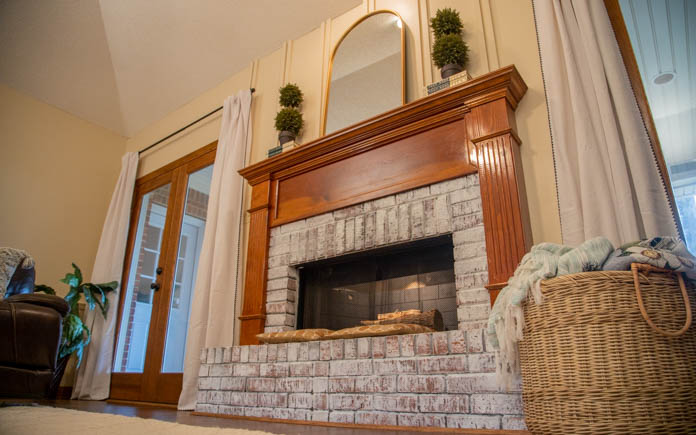
Your fireplace will be ready for winter if you have it inspected this summer. (3 Echoes Content Studio)
7. Have Chimney Inspected & Cleaned
Now’s a great time to have a professional inspect your fireplace and chimney because you aren’t using them during the summer.
Plus, you’ll have more time for repairs if needed.
Scrape off peeling paint and put on a fresh coat for an exterior refresh. (mehampson, Getty Images)
8. Scrape Loose Paint from Siding & Trim
Boost your home’s curb appeal by freshening up siding. Scrape away any loose paint, sand if needed, then prime and paint on a fresh coat.
If it’s an older paint, be sure to test it for lead as a precaution.
Mix 1 teaspoon of baby shampoo to 1 gallon of water, or 1-1/2 cups of vinegar to 1 gallon of water, and wipe windows down with newspaper for a streak-free shine.
Involve family members and tag-team to speed things up! Have one person clean the windows inside while another cleans the outside.
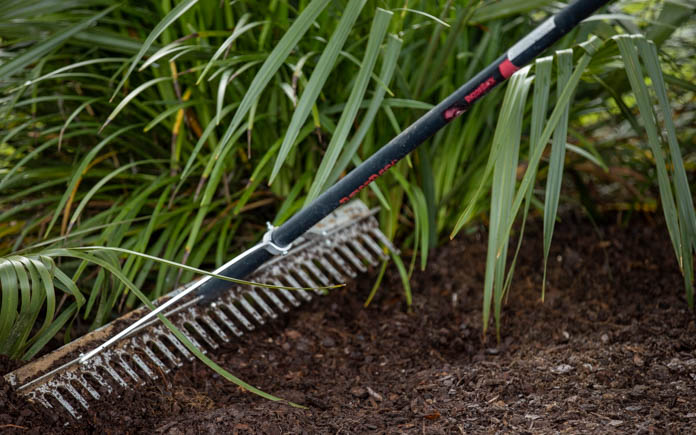
Finally, summer blooms are burgeoning! Now is the perfect time to pull any weeds from garden beds and prevent further weed growth by adding 2 to 3 inches of mulch.
Listen to this special-edition Today’s Homeowner Podcast for more summer home maintenance tips!