This week we’re helping a young couple, who both work from home, create some separation between work and home life.
Rachael and Brian Ledbetter recently returned to their hometown of Mobile, Ala., and bought their dream home. The house is a perfect fit for them except one small thing is missing — a second home office.
In the post-COVID era, this couple is both working from home. Rachael has taken over a sitting area in the master bedroom as her makeshift office, but she wants something a little more private and Zoom meeting friendly.
Building a non-load-bearing wall is easy than you think!
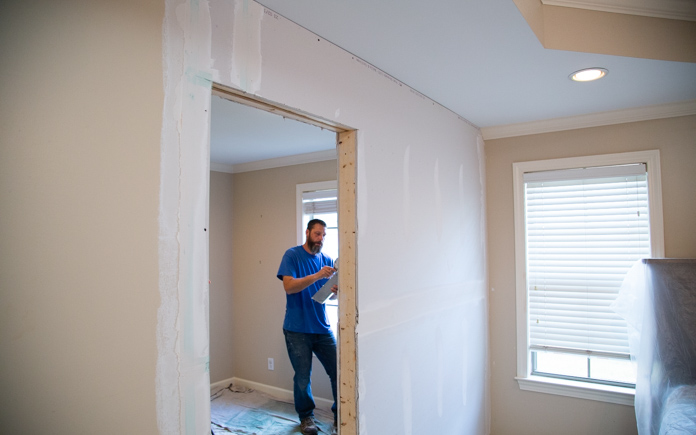
Build the Wall
First, we remove the trim from around the space we want to build the wall.
Next, we take out the drywall from where our new wall will intersect it. This includes removing the corner bead from the corner drywall on the opposite side of where our wall will be for a smooth transition.
Corner bead is a material installed under drywall to make the corners crisp and neat and prevent them from damage. Sometimes the drywall compound is built up around the corner bead, so removing ensures you get a better smooth wall.
We install a two-by-four top plate and bottom plate. After that, we lay out the locations of the studs.
When installing the studs, we work from the doorway entry out, using a level to make sure each stud is perfectly plumb. To effectively join the studs to the stud plate, we “toe nail” them. This means we nail at an angle.
Once we install the header over the doorway, we hang the drywall. Watch this video to see how it’s done.
These bookshelves up this office’s visual appeal and storage space.
Build Bookshelves
These step bookshelves will add some interest to the wall and provide some much-needed storage space.
We cut the boards to the proper measurements to fit against the new office’s wall. Before we nail the shelf boards together, we used wood glue to keep them in place.
When we start to install the unit, we discover a problem. The bookcase intersects the electrical outlet.
So we cut a new hole for the outlet, turn off the power and disconnect the outlet so we can move the wire into the new box and reconnect it to the outlet there. Then, we patch the hole from the old outlet box as well as one from an unneeded phone jack.
Finally, we are able to install the shelves.
A functioning door makes this office much more private and work-friendly.
Install Office Door
For the office door, we use a split-jamb or sandwich jamb pre-hung door. This type of door allows you to adjust to the thickness of the wall.
Before we nail the frame into the drywall, we make sure our margins are correct and the door is level.
With this brick-patterned wallpaper, there’s no need for a digital Zoom background!
Install Wallpaper
This patterned wallpaper gives the illusion of real, distressed brick. It comes prepasted, so you don’t need to buy any glue! To activate the paste, we use a paint roller and water.
Using a smoother to apply the wallpaper eliminates any air bubbles. We also make sure to line up the pattern between each sheet of wallpaper.
Wealso:
Painted the walls and trim
Installed crown and base molding
Installed a new hanging light
Post-Production Thoughts
Rachael’s home office had plenty of space, but it had very little privacy and almost no separation from the bedroom. Aside from those issues, it was functional enough but very plain.
Now, it’s a whole different space. The wall and the doorway have created the privacy and separation Rachael and Brian needed. And because of the way we built it and the materials we used, it looks like it was built that way from the start.
The built-in bookshelves offer plenty of storage and add a cool look to the most prominent wall in the space. Plus, that brick pattern wallpaper is sure to make Rachael’s Zoom calls a lot more visually pleasing.
Other Tips From This Episode
Products Featured in This Episode
This page contains affiliate links. If you purchase a product from these links, we will earn a small commission at no additional cost to you.
This week we’re helping a young couple, who both work from home, create some separation between work and home life.
Rachael and Brian Ledbetter recently returned to their hometown of Mobile, Ala., and bought their dream home. The house is a perfect fit for them except one small thing is missing — a second home office.
In the post-COVID era, this couple is both working from home. Rachael has taken over a sitting area in the master bedroom as her makeshift office, but she wants something a little more private and Zoom meeting friendly.
Building a non-load-bearing wall is easy than you think!
Build the Wall
First, we remove the trim from around the space we want to build the wall.
Next, we take out the drywall from where our new wall will intersect it. This includes removing the corner bead from the corner drywall on the opposite side of where our wall will be for a smooth transition.
Corner bead is a material installed under drywall to make the corners crisp and neat and prevent them from damage. Sometimes the drywall compound is built up around the corner bead, so removing ensures you get a better smooth wall.
We install a two-by-four top plate and bottom plate. After that, we lay out the locations of the studs.
When installing the studs, we work from the doorway entry out, using a level to make sure each stud is perfectly plumb. To effectively join the studs to the stud plate, we “toe nail” them. This means we nail at an angle.
Once we install the header over the doorway, we hang the drywall. Watch this video to see how it’s done.
These bookshelves up this office’s visual appeal and storage space.
Build Bookshelves
These step bookshelves will add some interest to the wall and provide some much-needed storage space.
We cut the boards to the proper measurements to fit against the new office’s wall. Before we nail the shelf boards together, we used wood glue to keep them in place.
When we start to install the unit, we discover a problem. The bookcase intersects the electrical outlet.
So we cut a new hole for the outlet, turn off the power and disconnect the outlet so we can move the wire into the new box and reconnect it to the outlet there. Then, we patch the hole from the old outlet box as well as one from an unneeded phone jack.
Finally, we are able to install the shelves.
A functioning door makes this office much more private and work-friendly.
Install Office Door
For the office door, we use a split-jamb or sandwich jamb pre-hung door. This type of door allows you to adjust to the thickness of the wall.
Before we nail the frame into the drywall, we make sure our margins are correct and the door is level.
With this brick-patterned wallpaper, there’s no need for a digital Zoom background!
Install Wallpaper
This patterned wallpaper gives the illusion of real, distressed brick. It comes prepasted, so you don’t need to buy any glue! To activate the paste, we use a paint roller and water.
Using a smoother to apply the wallpaper eliminates any air bubbles. We also make sure to line up the pattern between each sheet of wallpaper.
Wealso:
Painted the walls and trim
Installed crown and base molding
Installed a new hanging light
Post-Production Thoughts
Rachael’s home office had plenty of space, but it had very little privacy and almost no separation from the bedroom. Aside from those issues, it was functional enough but very plain.
Now, it’s a whole different space. The wall and the doorway have created the privacy and separation Rachael and Brian needed. And because of the way we built it and the materials we used, it looks like it was built that way from the start.
The built-in bookshelves offer plenty of storage and add a cool look to the most prominent wall in the space. Plus, that brick pattern wallpaper is sure to make Rachael’s Zoom calls a lot more visually pleasing.
Other Tips From This Episode
Products Featured in This Episode
This page contains affiliate links. If you purchase a product from these links, we will earn a small commission at no additional cost to you.
Paint trends come and go, but some shades are timeless for any accent wall.
Chelsea Lipford Wolf has tackled countless home projects as co-host of “Today’s Homeowner.” She also renovated herfirst home and is quickly updating her mid-century ranch-style house.
She’s spanned the paint-color spectrum over the years, but she keeps coming back to these three tried-and-true hues.
1. Not Quite Black
Cracked Pepper is a go-to neutral that pairs perfectly with almost any color. This dark option from Behr is just a shade off from black.
“I’ve used Cracked Pepper from Behr on several projects. It looks good in natural light and artificial (fluorescent) light too!” Chelsea says.
It’s perfect for when you need a dark color for an accent wall but don’t want a harsh black.
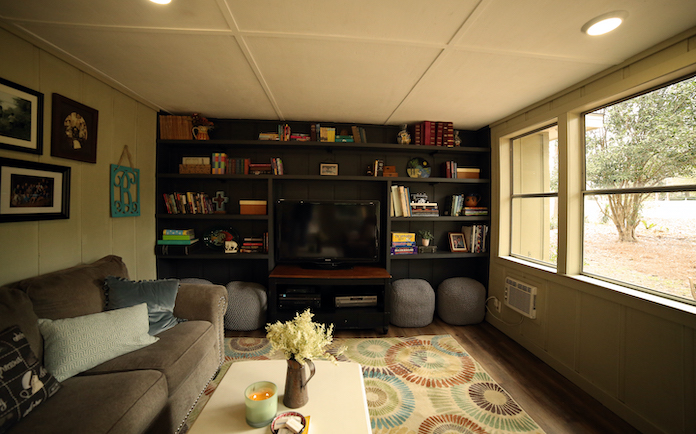
For instance, Cracked Pepper makes a wall bookshelf and TV center (pictured above) stand out in a bright sunroom we transformed for homeowners Chuck and Margy.
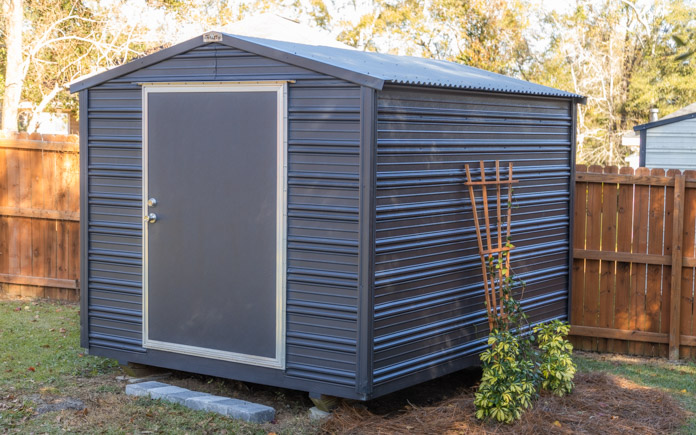
Cracked Pepper also works well outside. In this backyard makeover episode, we gave the shed a major update with just a coat of the versatile peppery color.
2. Finding Your Zen
Zen, also from Behr, is a neutral bluish-green color reminiscent of seafoam. This natural hue creates a calming atmosphere in any room.
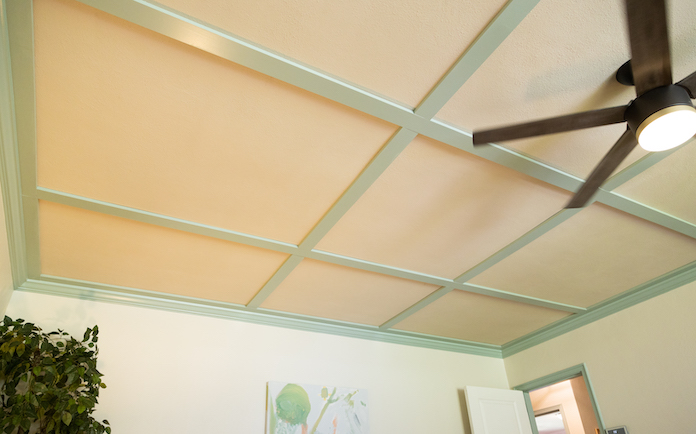
Zen looks great in work and home environments. Chelsea uses this shade in her office at Today’s Homeowner and as an accent on the wall trim and ceiling grid in her living room.
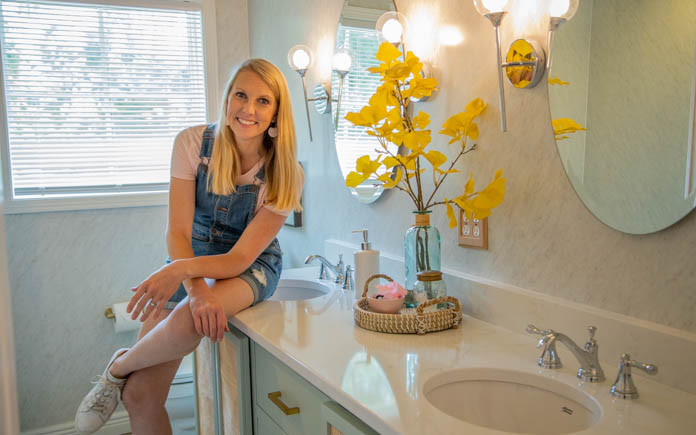
In fact, she likes this color family so much, she used Zen’s “Irish sister” Recycled Glass on her bathroom vanity. It’s slightly more green and one shade lighter on the color swatch.
3. Forest Feels
Seeking something in sage? Chelsea likes to use Eucalyptus Wreath from Behr. This shade is just green enough to give you a forest feel without being too intense.
Chelsea used Eucalyptus Wreath for an accent wall in her first home’s master bedroom. A bathroom addition left the room with only one window, so painting one wall gave the room a pop of color and complemented the natural lighting.
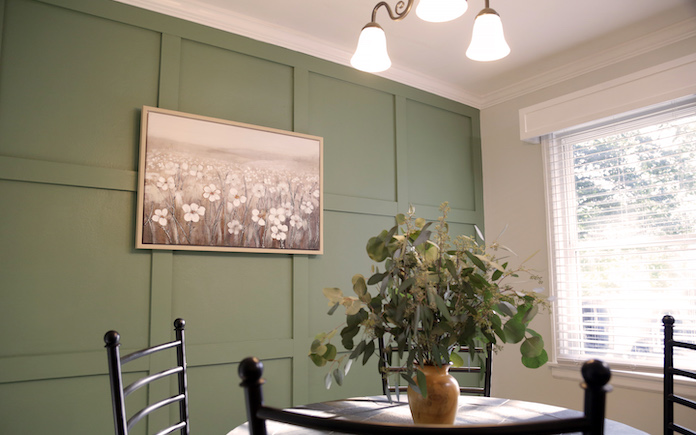
When we gave homeowner Barbara a cozy den makeover, we used Eucaplytus Wreath for an accent wall in the dining area. It enhanced the room’s design and complemented natural lighting streaming in from a large window.
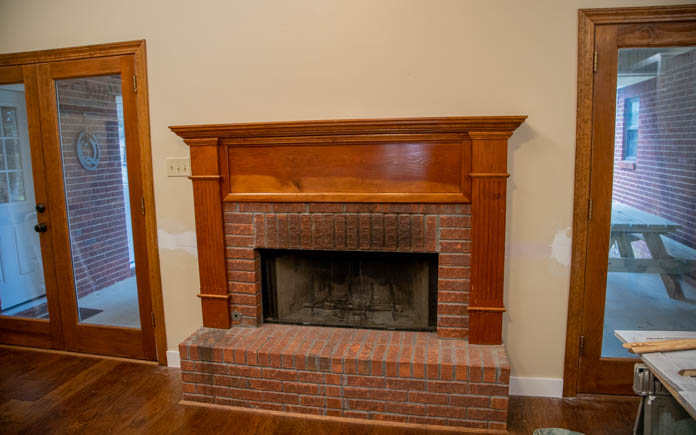
The sheerness of the whitewash paint lets some of the original brick colors show through and gives the fireplace a unique look that many people love.
Whitewashing is basically diluting white latex paint with water and lightly coating the surface of a wall or fireplace. It’s an easy project and can be done in just a weekend.
Materials Needed
It’s important to start with a clean brick surface, or else soot stains will show through the whitewash.
Clean The Bricks
Before you begin, you need to clean the bricks. Mix a little TSP, or Trisodium Phosphate, with water and use it on a scrub brush to clean the brick surface and mortar joints between.
This is important to remove soot stains and create a clean surface so the whitewash will adhere well.
Diluting the white paint will allow the brick’s color to show through the whitewash.
Create Your Whitewash Mix
When the bricks are completely dry, mix up your whitewash. We’re using ordinary flat white latex paint mixed with water at a one-to-one ratio.
Dampening the bricks with water on a paintbrush before you begin will help them absorb the stain more evenly.
The key technique when whitewashing a fireplace is to be “consistently inconsistent.”
Apply Whitewash
Begin applying the whitewash lightly until you get a feel for the bricks’ texture. In this case, they have a rough surface, so dragging the brush over them lightly leaves lots of nooks and crannies with the natural brick color.
If you apply too heavily in one area, some can be dabbed off with a rag. When it’s complete, the surface should vary from light to dark, creating interest in what was a bland brick wall.
Watch the video above for more information!
Cost
Transform your fireplace for less than $40! Here’s the breakdown of costs:
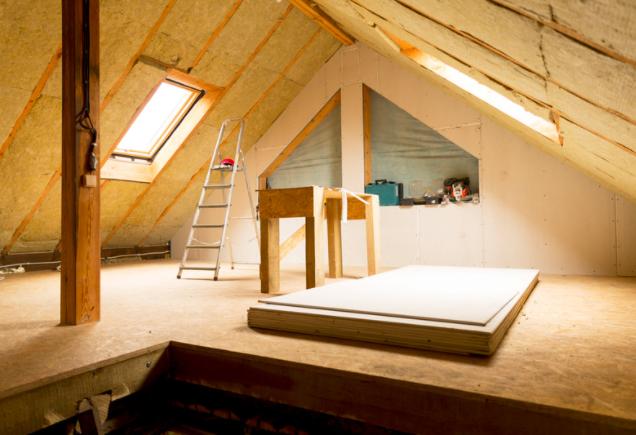
Picking the right face is essential with fiberglass insulation that has a vapor barrier facing.
The facing contains a thin layer of asphalt, which acts as a vapor barrier to block moisture. It can also be made with Kraft paper or foil attached on one side.
Properly insulated homes not only keep your family comfortable but also help with your home’s energy efficiency. Adding insulation, especially in your attic, can save up to $200 per year on your home’s annual energy bills!
Best Side Forward
It should always face the warm-in-winter side. use faced insulation with the paper facing toward the heated living space. Thus, in cold climates, it should face the interior; in hot humid climates, it should face the exterior.
Also, be sure to cut the insulation batts to fit in the space between the ceiling joists.
Problems with Wrong Side
If insulation with a vapor barrier is installed on the wrong side, moisture will be trapped inside wall cavities causing condensation to accumulate.
This results in a musty smell, and eventually will cause wood to rot; it could even promote a serious mold problem.
The Fix
Have you already installed installation wrong side up? Remove it immediately, and inspect the subsurface for moisture or mold before reinstalling or replacing it.