by Furnishly | Mar 11, 2022 | Design Inspiration, Style
We independently select these products—if you buy from one of our links, we may earn a commission.
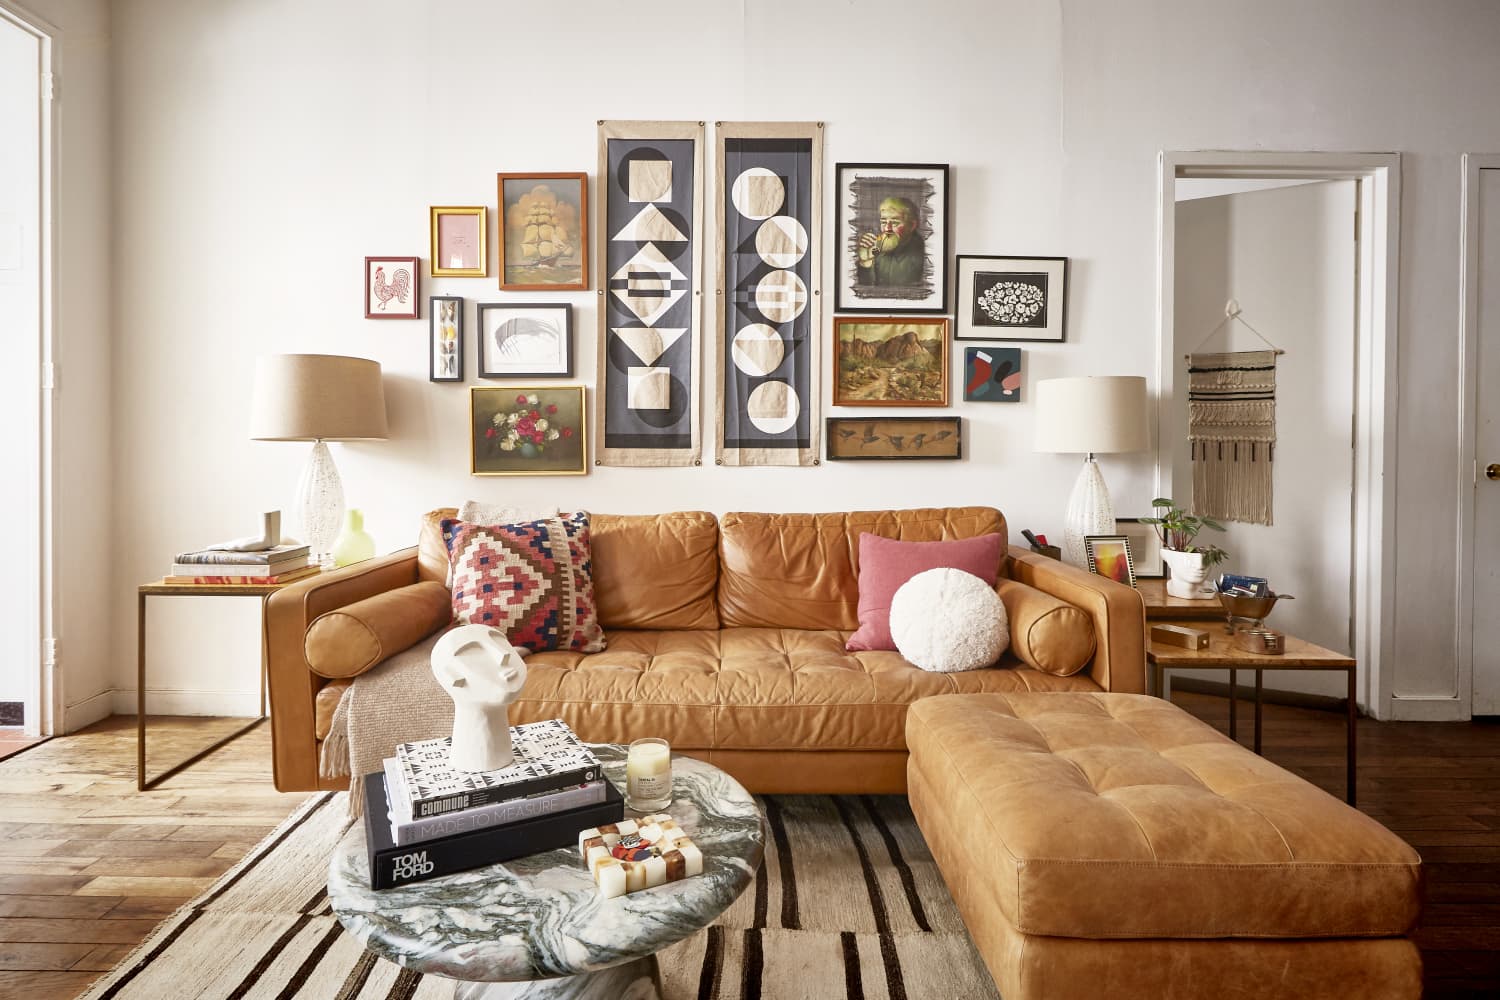
Whenever I look at the gallery wall in my living room, I’m constantly reminded of how much artwork brings me joy. I took studio art throughout high school and majored in art history in college (along with media studies), and I’ve slowly been collecting pieces to fill my walls with over the past ten years or so. To that end, I loved the above shot of my salon-style arrangement from my apartment house tour last year, but I’d be lying if I said the inner perfectionist in me wasn’t a little annoyed over the fact that the frames are most definitely askew. It’s more noticeable on the right side, and I swore I straightened them before the shot. This is a real home — not a staged one — and, I guess, things just sometimes have a mind of their own and shift.
I’ve made my fair share of mistakes hanging art; when you get in up close on this wall, you can see a few holes that didn’t quite work, and I’m still searching for the right anchor piece to replace those two geometric textiles in the middle of the arrangement. Perpetually crooked frames, though? That has to be fixable, I thought after seeing this photo. Turns out the answer is yes, and had I not been doing a million other things to my apartment for its close up last summer, I would have discovered — and implemented! — the solution sooner: The Museum Putty, which costs less than $7 a package and is available on Amazon Prime.
Maybe you remember putting up posters or magazine tear sheets on your walls as a teenager or in your dorm room with Fun-Tak, that blue sticky stuff? Museum Putty’s basically the adult version of that; it functions the same way, securely anchoring a picture or canvas in place. Generally, Museum Putty is a little bit stronger and promises not to damage walls or chip nicer frames. Even better, this putty comes in a neutral white-gray color, so I won’t spot it out of the corner of my eye when I enter my living room and am looking at the pieces from their sides.
To activate the putty, which can also be used to hold collectibles or vases in place on a shelf or table (and is utilized in earthquake zones for this exact protection), all you have to do is pull a piece off the block, mold it into a ball, and press that evenly into a corner on the back of your frame. That ball then makes contact with the wall, and voila, no more shifting once you’ve gotten your piece level and pressed it in. I used four pieces on each frame total (one in each corner), but you could probably get away with just reinforcing two opposite diagonal corners. Removal is as simple as gently twisting the putty off of the surface you put it on, and it can even be reused on another piece after this.
Now that I have this wonder product, I feel like it’s something everyone should get to keep in their toolbox. That way, you can straighten pieces as you’re hanging them and never have to worry about wonky frames again!
Danielle Blundell
Home Editor
Danielle Blundell is AT’s Home Director and covers decorating and design. She loves homes, heels, the history of art, and hockey—but not necessarily always in that order.
Follow Danielle

by Furnishly | Mar 5, 2022 | Design Inspiration, Style
We independently select these products—if you buy from one of our links, we may earn a commission.
As a professional designer, Sarah Storms of Styled by Storms may have a leg up on pulling rooms together. But that doesn’t mean she had the bandwidth to decorate every last space in her own New Jersey home right away, back when her family moved into it in November 2019. Almost twice as large as her previous residence and “in need of a lot of love,” the house had plenty of projects to tackle. The non-essential, more decorative ones, like her sons’ playroom, fell to the bottom of the list.
Motivated by the One Room Challenge makeover franchise that took place last fall, Storms decided to join in the renovating fun with this area. “I was tired of hiding the playroom behind closed doors and decided to focus on giving the playroom the personality it deserved,” she says. “The goal for this renovation was to create a moody, creative space that could be functional and grow with our family. I didn’t want to infantilize any of the design elements just because they were children.”
Storms began her design plan by commissioning custom built-ins painted in Benjamin Moore’s Tarrytown Green (HC-134) for storing boards games, puzzles, art supplies, legos, magnet tiles, and everything in between. Because the adjacent living room also has a set of built-ins flanking the fireplace, Storms wanted to maintain that same height and design across both rooms’ cabinetry for balance and symmetry. So she went the custom route. Sure, IKEA would have been cheaper (and that’s what was in her last home’s play area), but these built-ins would match the others and standup to wear and tear better over time, which justified the investment.
Prior to their installation, painters worked on readying the walls for Schumacher’s Giove wallpaper, a bold pattern that features intertwined snakes in shades of emerald and sapphire. This whimsical backdrop sets the tone for the rest of the colorful accents and spirited touches that unfold in the space’s design (not to mention all the fun the boys have within the rooms’ four walls).
“The largest part of the job was also the most time-consuming, which was smoothing all of the thick texture from the ceiling and walls,” Storms says on the scope of the prep work for the wall coverings. “It took the painter nine five-gallon buckets of joint compound to do. It was extremely messy, smelly, and did not dry quickly due to the humidity.”
The closet doors, ceiling, and trim work — with moldings original to the 100-year-old house! — also got a fresh coat of paint, and Storms and her husband added new brass replacement screens to the room’s radiator box before it received its own paint job, too.
Once the bones of the space were set, Storms turned her attention to assembling a mix of kid-friendly pieces of furniture that also jibe with the rest of her home’s eclectic decor. “The table and chairs were about function first,” says Storms. She painted the IKEA table Benjamin Moore’s Bordéaux Red (1365), turning it into a focal point as it contrasts with the bespoke green cabinetry, then added brass casters for mobility.
“This would allow the table to be easily moved around the room so it could be used for puzzles and games, but could also be pushed against the wall for fort building or obstacle courses,” she says. Constructed of heavy-duty acrylic, the table’s chairs can be wiped cleaned of any messes and stacked up to save floor space when not in use.
For a sustainable element, and to add some extra soul to the space, Storms deliberately sought out secondhand furnishings for pretty much everything else in the room, save the textiles and a few small prints hanging on the walls.
“The petite club chairs are my grandmother’s that were refinished and reupholstered in Schumacher cut velvet, and the 1950s Persian wool rug is durable and beautiful,” she says. “I love incorporating vintage antiques, even in more modern spaces. They add a layer of warmth that can’t be achieved with ‘new’ items.”
Sourced from Facebook Marketplace, the ship paintings are also vintage, and the large, “Gucci inspired” tiger is from Etsy and framed in vintage older frame. “I wanted some kind of David Bowie gentleman art and this tiger fit the bill,” says Storms. “A little bit of whimsy makes the room feel fun and not stuffy.”
From start to finish, the playroom took about nine weeks to complete. The end result made it totally worth it, especially now that the children have a space to truly call their own. “The boys want to invite everyone they know for playdates,” says Storms. “They think the snakes are really cool and like that they can easily find their toys without digging through bins.”
Storms herself also has now a room that she’s proud of, as both a mom and a designer. I love that the playroom is an extension of our home,” she says. “It is a beautiful and happy room that could be used even for an adult gathering. Good design is forever, and it’s something to really think about when making thematic decisions.”
Danielle Blundell
Home Editor
Danielle Blundell is AT’s Home Director and covers decorating and design. She loves homes, heels, the history of art, and hockey—but not necessarily always in that order.
Follow Danielle
by Furnishly | Mar 2, 2022 | Design Inspiration, Style
We independently select these products—if you buy from one of our links, we may earn a commission.
There’s a lot of advice about creating gallery walls, from where to source your art to renter-friendly ways of hanging pieces. What some people really need to hear (and may even be too embarrassed to ask about) though is how to fix a gallery wall. If you’re super-lucky, you’ll find perfect pieces that’ll make you happy every time you see them, and you’ll hang them correctly on your first try. For most people, however, the experience is the opposite.
As an interior designer, Lisa Galano, principal of Lisa Galano Design Consultancy, has had years of experience creating beautiful spaces featuring well-styled gallery walls; as an art consultant, Eli Cheatham, founder of EMC Spaces, spends her time sourcing truly unique, show-stopping pieces. According to them, plenty of reasons could be the culprit behind your gallery wall unhappiness, but these three issues below bubble up most often — and thankfully, they can be fixed with a little bit of extra effort.
You didn’t take enough time sourcing artwork.
“Too often, people approach their gallery wall as a design component to be checked off their list as quickly as possible,” Cheatham says. Think about how long it took you to obtain the pieces you’ve put up on your wall already or currently own. Did you pick out pieces deliberately when shopping, sight-seeing, or traveling — or did you scoop up anything you saw with dimensions that would fit the blank spots you had on your wall? Similar to that latter scenario, building your gallery wall too quickly means you miss out on the fun of collecting pieces that truly speak to you. “Give yourself time for treasure hunts and ‘arting’ adventures,” Cheatham suggests. “You’ll not only enjoy the process of creating your gallery walls far more, but you’ll add so much depth both visually and emotionally.”
Being patient about how you source art doesn’t mean you have to go entirely without things on your walls for long stretches of time. If you have a few prints or canvases that you do like, you can install a temporary arrangement on your walls. You can also buy (or borrow from a friend or family member) a few budget-friendly things to use as placeholders for those perfect pieces you haven’t found just yet. Think posters, prints in thrifted frames, handmade art, inexpensive textiles — look for something that’s about the size of what you might want someday. That way, you can get used to regularly seeing something with those dimensions, and you’ll train your eye to know what scale to look for when you are out “arting.”
You didn’t plan your layout properly.
The best gallery walls are the ones that look professionally installed, with every piece in a well-thought-out spot. That said, the final arrangement most people arrive on doesn’t happen magically without any planning or measuring. In other words, your gallery wall may not have the look you were going for because you didn’t consider your layout before actually hanging things on the wall. “The spacing of the pieces and establishing visual balance is a really important factor,” Galano says. “You want the art to feel cohesive and symbiotic, while retaining its individuality.” One way to emphasize that individually is with frame selection; unless you’re going for a truly uniform look, it’s often best to vary the matte sizes and frame finishes you’re including in your composition. Pick things that will complement the color palette, media, and size of each piece, and try not to place similar frame styles right next to one other in your larger configuration.
Another pro tip Galano uses when styling for herself and her clients is to start with less space between each work and move to more of a border in between pieces as you fine-tune the final, overall arrangement. Cut paper templates of your pieces out of kraft paper and play around with their placement using a ruler or a tape measure; use those templates to transpose your final layout onto the wall, long before pulling out your hammer and nails. You can also hang a smaller-scale arrangement, say, over a sofa, leaving room in the layout on both sides of the pieces for additional works down the road. Remember: Even if you have great art, the finished product can fall short if the works aren’t arranged properly, or worse — they’re crooked! Fortunately, there’s a cheap fix for wonky frames and canvases: museum putty, a wax-like, gummy substance that holds pieces in place without damaging walls or frames.
You don’t love every piece you decided to hang.
The simplest yet most important reason you may not love your gallery wall is that you don’t love the art you hung. “Always remember that if you don’t love a piece enough to display on its own, then it will fall short in a gallery wall,” Cheatham says. It might be tempting to hang pieces that you “kind of like,” but both experts agree you should resist the impulse to fill holes with things that just good enough (unless you’re deliberately using something very budget-friendly as a temporary placeholder, as explained above). “Ask yourself questions about why you are attracted to a specific style, color, or medium then build from that,” Galano says of the art curating process. “A mistake in gallery walls I’ve witnessed is when people lose focus of the content and are too concerned about the look.”
Chances are you decided to build a gallery wall because you saw one you loved and wanted to recreate that same feeling inside your own home. You deserve to have a wall of pieces that truly speak to your aesthetic, even if it take a little more time to get there. Honestly, Cheatham has the best outlook on this challenge, and don’t forget it. “Something special can always be found with patience,” she says.
Savannah West
Home Assistant Editor
Savannah is a master binge-watcher and home cook. When she’s not testing new recipes or re-watching Gossip Girl, you can find her on Facetime with her grandma. Savannah is a news producer turned lifestyle blogger and professional homebody. She has a bachelors in journalism from Clark Atlanta University, a certification in Digital Storytelling and is earning her Master’s degree from Harvard University. Savannah believes every day is a good day and there’s nothing good food can’t fix.
Follow Savannah
by Furnishly | Mar 1, 2022 | Design Inspiration, Style
We independently select these products—if you buy from one of our links, we may earn a commission.
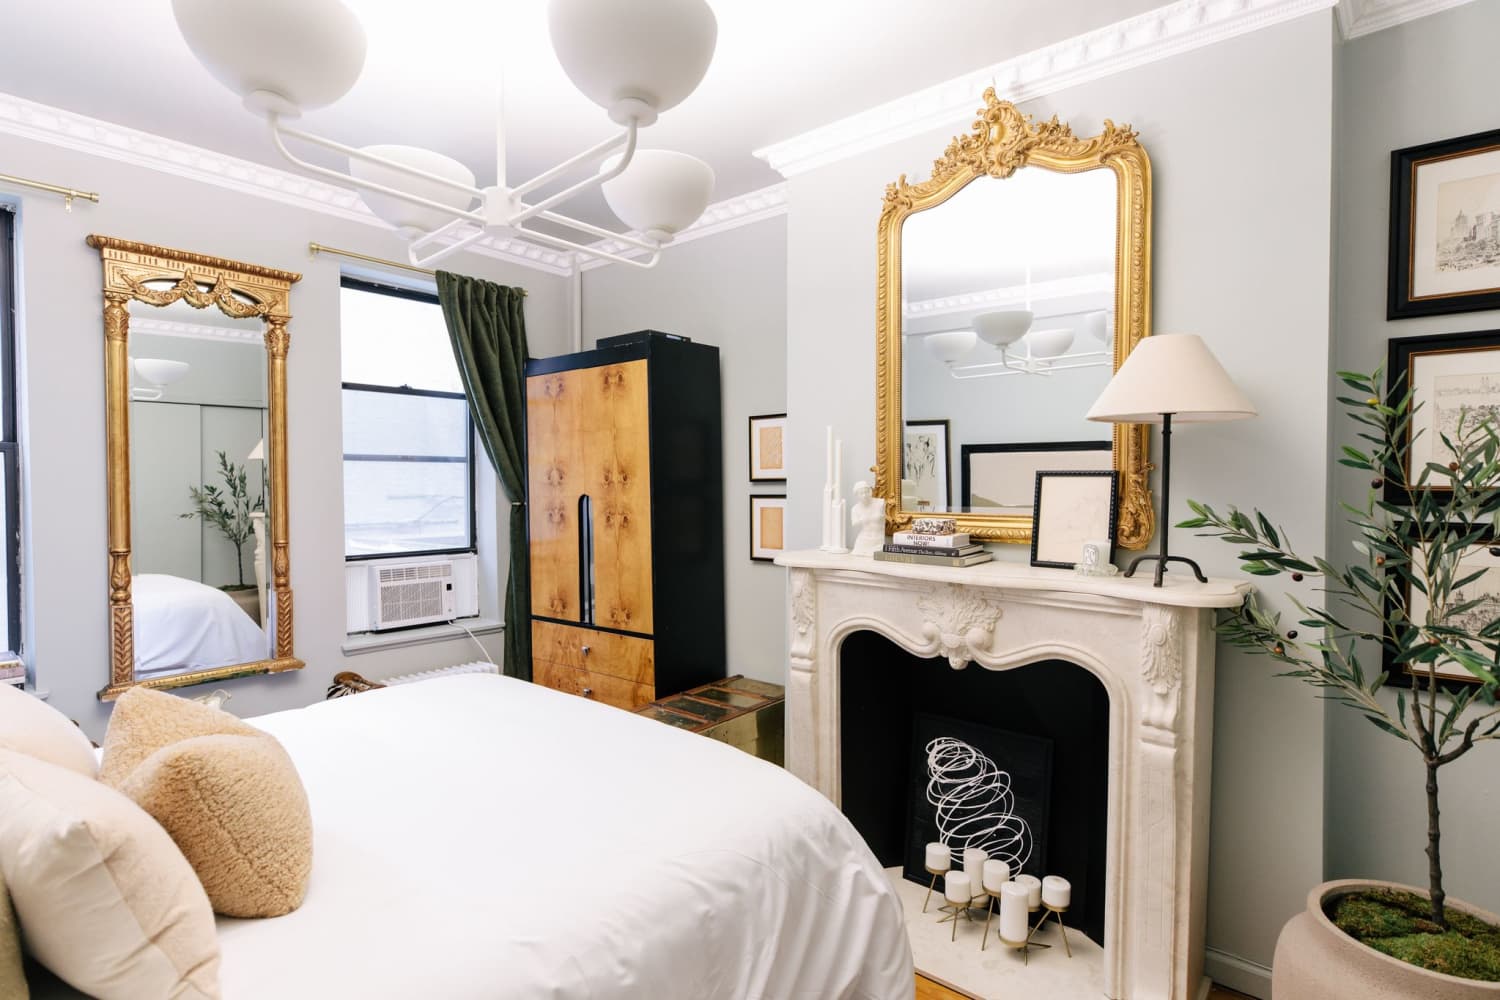
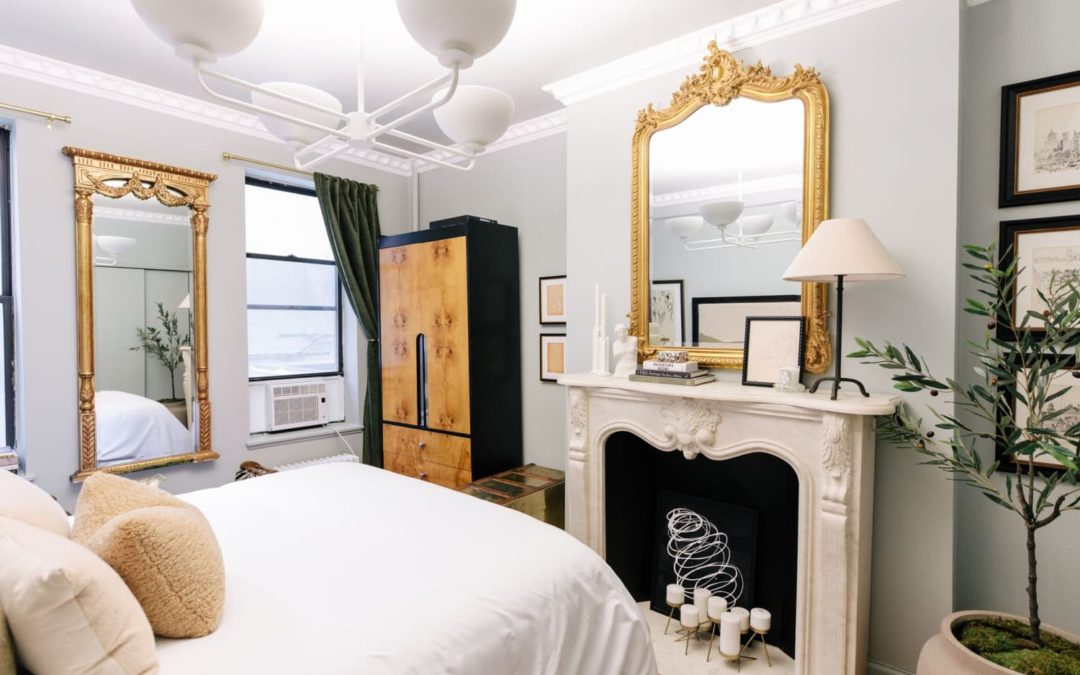
In an ideal world, my apartment would be full of charming architectural touches — molding on the walls and ceilings, built-in fireplaces, exposed brick walls — you get the picture. As a renter in New York City, I definitely had to make some sacrifices during the apartment search while hunting for a new place last summer. While I’m completely happy with where I ended up, my apartment doesn’t have the level of charm that I often swoon over when scrolling through home tours online or in my favorite magazines. So that simply meant that I had to take matters into my own hands.
I moved into my apartment in July 2021, but I wanted to live in the space for some time before making any major changes to my unit. By January, I decided to have the walls painted in Clare paint’s Grayish. The paint alone made a huge impact in my space, but I wanted to up the ante a bit by doing something even more dramatic.
My original idea was to incorporate picture frame molding on the walls, but installing molding was far out of my budget, and I wasn’t willing to go in for the splurge, particularly given that my space is a rental. Plus, the molding would be pretty difficult to remove down the line, making it even more of a no-go in my opinion.
Then I had another idea. While scrolling through Amazon looking for some renter friendly molding that wouldn’t run me nearly $4,000, I came across this beautiful faux wall molding. Picture frame molding continues to appeal to me, but this was unlike anything I’d ever seen faked in a rental before, and I knew I had to try it out. Believe it or not, this wall molding is actually made from styrofoam. I know, I know — but trust me; it looks amazing. If I hadn’t touched some of the material myself, I honestly would have been convinced it was wooden or plastic based on how nice it looks on the walls.
The carpenter I hired on TaskRabbit did an amazing job using a miter saw and the corresponding molding glue I purchased to perfectly cut each strip of styrofoam and adhere it to the wall. The whole project took him about five hours, making it perfectly manageable if you’re like me and don’t want to deal with days or even weeks of disarray in your apartment and repair people coming in and out.
After giving my TaskRabbit a large tip and bidding him farewell at the end of the day, I sat on my bed in awe. I truly couldn’t believe how much of a transformation the molding and paint combined had made. My bedroom finally had that chic Parisian feel to it that I wanted, and it really couldn’t have looked more different than it did when I first moved in (if you don’t believe me, just check out the before picture below for reference!).
This molding is renter-friendly, paintable, and can easily be removed at the end of my time in the apartment, but truthfully, I may ask my landlord if they’d like me to leave it up, assuming it’s still holding up well whenever I do decide to move out. Don’t you agree it adds all sorts of charm?

by Furnishly | Feb 24, 2022 | Design Inspiration, Style

If you’re trying to figure out how to add more color to your home, you don’t always have to pull out your paintbrush. While murals and painted arches will definitely do the trick, you might not have the time to pull these projects off properly. Don’t feel bad though! There are all sorts of creative ways to make your home more colorful and exciting. Take renter Luna Lindsay‘s 1,200-square-foot apartment in Toronto, for example, which she shares with her partner, Bruce Forrest, and her dachshund, Elmer. Originally, her apartment had gray walls and black trim, but she found a way to lighten and brighten it up with an artful mix of pastels and fresh decorating ideas. “When moving in, my now pastel palace was the complete opposite of what she’s blossomed into,” says Lindsay, a full-time content creator on Instagram and TikTok who just launched a candle business called Moonwix. “I love looking at life through color, so I knew I wanted that to be reflected where we live.”
Maybe the most unexpected way she displayed her love of color and pattern in her apartment is by applying peel-and-stick wallpaper on the stairs. She ordered a floral print from Love vs. Design, which features lavender petals on a yellow background. The print’s giving me some nostalgic, Lizzie McGuire vibes, sure, but I think the most interesting thing is that she chose to apply the paper directly to the treads — as opposed to the risers, where maybe you’ve seen wallpaper installed on staircases before. This little application tweak makes all the difference, and coating the risers in a similar pinky hue only ups the pastel perfection of this project.
In a spot people might typically modify with wood stain or carpeting — if they modify it at all, Lindsay took a different approach, and it absolutely works. Practically speaking, vinyl peel-and-stick wallpaper can be easy to wipe down, which makes a lot of sense in a household with dogs (or kids), particularly on a high-traffic feature like stair treads. Just like carpeting, removable peel-and-stick paper can actually protect a wooden staircase — or conceal one in disrepair — and it’s easy to recover any stairs that might show a little wear-and-tear over time or reverse the whole thing without forfeiting your security deposit down the line.
Lindsay went for what she truly wanted here versus looking at a staircase that didn’t bring her joy, and she couldn’t be happier with the way the project turned out. Lindsay says, “I can’t imagine living in a home that isn’t bursting with colors, patterns, prints, and texture.” For her, color knows no boundaries — even a more utilitarian, unexpected spot like her stair treads are worthy of a candy-coated makeover, and peel-and-stick wallpaper helped to get her there.
Savannah West
Home Assistant Editor
Savannah is a master binge-watcher and home cook. When she’s not testing new recipes or re-watching Gossip Girl, you can find her on Facetime with her grandma. Savannah is a news producer turned lifestyle blogger and professional homebody. She has a bachelors in journalism from Clark Atlanta University, a certification in Digital Storytelling and is earning her Master’s degree from Harvard University. Savannah believes every day is a good day and there’s nothing good food can’t fix.
Follow Savannah