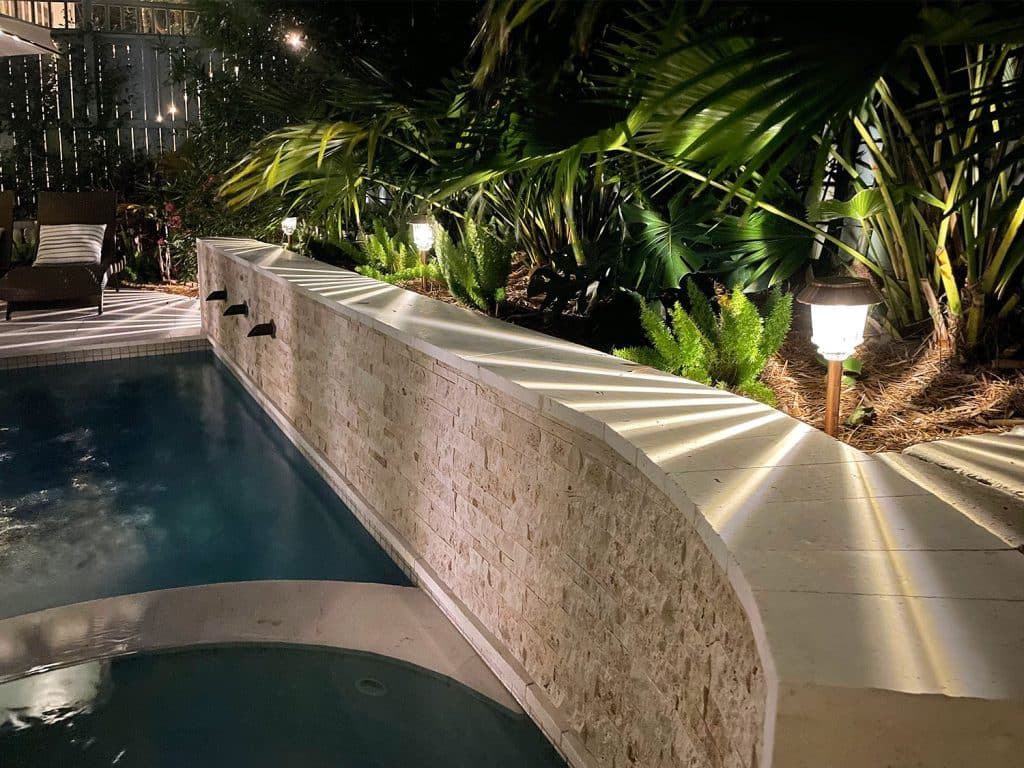
Some people are surprised to hear that we illuminate our entire pool area using nothing but solar LED landscape lights. As in: the sun provides free evening ambiance with zero effort on our part. Nothing has to be plugged in. Our electric bill feels zero impact from softly illuminating this entire area of our house. So today I wanted to share the 3 solar products we use in case you want to give your own outdoor space a literal glow-up.
Technically we have a porch light and in-pool lights too, all of which use traditional electricity, but we almost never turn them on. Honestly, they’re a little blinding and we like a soft glow that doesn’t block out our view of the stars. Instead, day-to-day (or night-to-night?) we just rely on our solar-powered LED lighting for that oh so charming come-hither glow.
I used to think solar-powered landscape lighting was a lackluster substitute for traditional, wired landscape lights (which, btw, we found very easy to install ourselves at our last house). But now we’re huge fans of solar lights, and I’ll tell you why.
Why We Love Using Solar Lights
One common reason for using solar lights is to avoid the wiring necessary for plug-in or electric-powered lights. And honestly, that’s one of the reasons we initially used them here – almost as a placeholder until we had time to install a more permanent lighting plan.
But since adding them, we’ve discovered there are TONS of pros to relying on solar lighting in your yard:
Easy to install: No wiring necessary! Just find a sunny spot for your solar panel.
Placement Flexibility: You’re not constrained by wires or proximity to a plug, put ’em anywhere!
Affordable: They’re not very expensive to buy and they’ll never add to your electric bill.
Set & Forget: They’re dust-to-dawn, so there are no switches or timers to worry about.
Eco-Friendly: Renewable resources FTW!
I even filmed this short little time-lapse video to show you how our pool area automatically transitions from day-to-night, without us having to do a darn thing!
Now, of course, the main drawback to solar lights is that they rely on sunshine, so they don’t glow as long on cloudy days – but generally they have surprised us by shining longer than we’d think they should on especially gloomy days (they might come on at dusk and shine until 11 or 12 instead of 3 or 4 like they do on a normal sunny day. Very occasionally if we’ve had a string of gloomy days they might only glow a tiny bit or not at all, but in those cases we always have that porch light and our in-pool light if we really need them.
Typically whenever we have friends over after dark, we hang around our firepit area or upper deck anyways, both of which are illuminated by plug-in LED outdoor string lights. So that pool ambiance you see in the video is mostly enjoyed by mom & dad in the hot tub, where it easily provides enough light to make sure nobody misses a step getting in, but not like a search-light level blast of light like a UFO is above us trying to beam us up.
The 3 Outdoor Solar LED Lights We Use
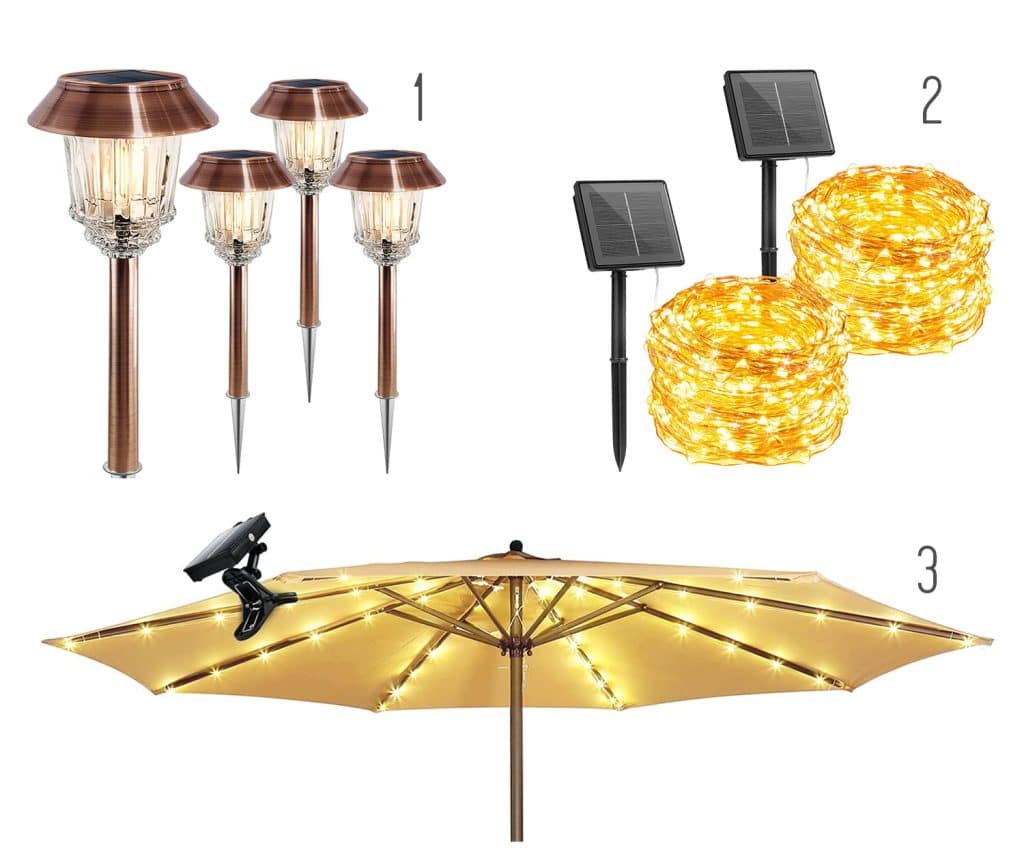
I’ll talk about each of these in a bit more detail, but for a quick rundown, here they are:
They all include the necessary solar panels, so you don’t need to buy any extra equipment. Everything is ready to go right out of the box. They are also all WARM WHITE, which helps them put off a pleasing glow, not a harsh fluorescent-colored light or anything too weirdly blue.
Solar-Powered Pathway Lights
Sherry has mentioned these solar pathway lights a ton on Instagram and I feel like they’re already building up quite a voracious following – and for good reason! So many of you have sent photos of them in your yards, and from seeing them in snow or other tropical places or just lining a front walkway in the suburbs or the city, they always look great. They’re attractive during the daytime and SO easy to install (just turn the switch in the cap on, stake them into the ground, and you’re done). The solar panel is built right onto the top of the light, and those starburst reflections shine down on the ground around them when they glow.
At dusk they automatically come on, casting a surprising amount of light that creates this cool pattern on the ground. Almost like rays of the sunshine beaming out onto your patio, path, driveway, or wherever. We’ve actually got them on all sides of our house – probably about 16 in total! We get asked if they work in the snow and colder climates and have definitely heard from people who have them and love them there – our only advice is don’t put them somewhere that gets zero sun – because, duh, they’re solar. So like under an awning that’s always shaded won’t work nearly as well as out in a garden, along a path leading to the door, etc.
I haven’t created an Excel spreadsheet to see how long they last every night to provide you with the mean, median, and mode (doesn’t that sound like something I’d do?) but the important part is that most of them are still on by the time we go to bed – so they’re functional for the time we need them to be functional. And I say “most” just because one or two of ours behind our pool wall don’t get as much sun thanks to the plants overhead, so they might fade a little faster.
Thankfully they collectively cast more than enough soft light for us to get around out there and soak up that ambient glow until around 11 or 12, we’re usually inside & sound asleep by then. There are definitely nights when Sherry’s randomly up at 3 or 4am for a glass of water or whatever and says she still sees them glowing softly out there after a sunny day.
Note: when you get them, turn them on under the cap. They have two brightness settings there as well, so you can experiment to see which one you like best. We have ours on the brightest setting and it’s still very soft and not harsh or in-your-face at all.
Solar-Powered Fairy Lights
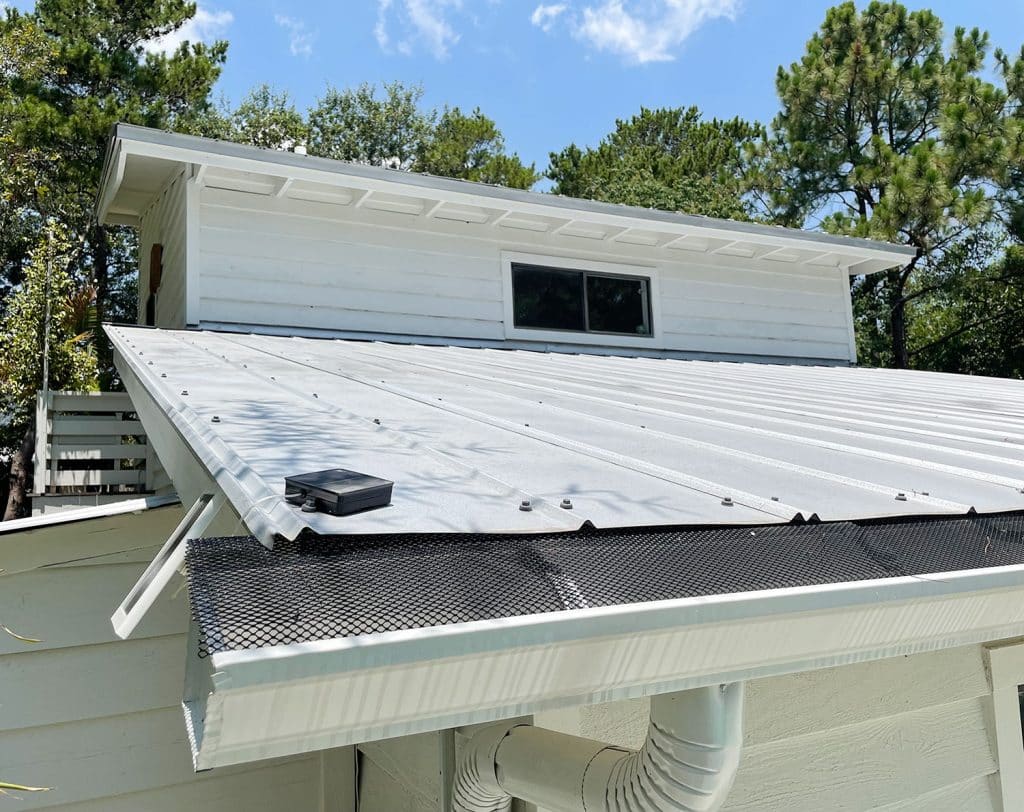
Last summer we decided to give these solar fairy lights a try and I’m so glad we did. We didn’t really have a plan for them at first, but quickly decided to run them under the eave of our house and along our fence.
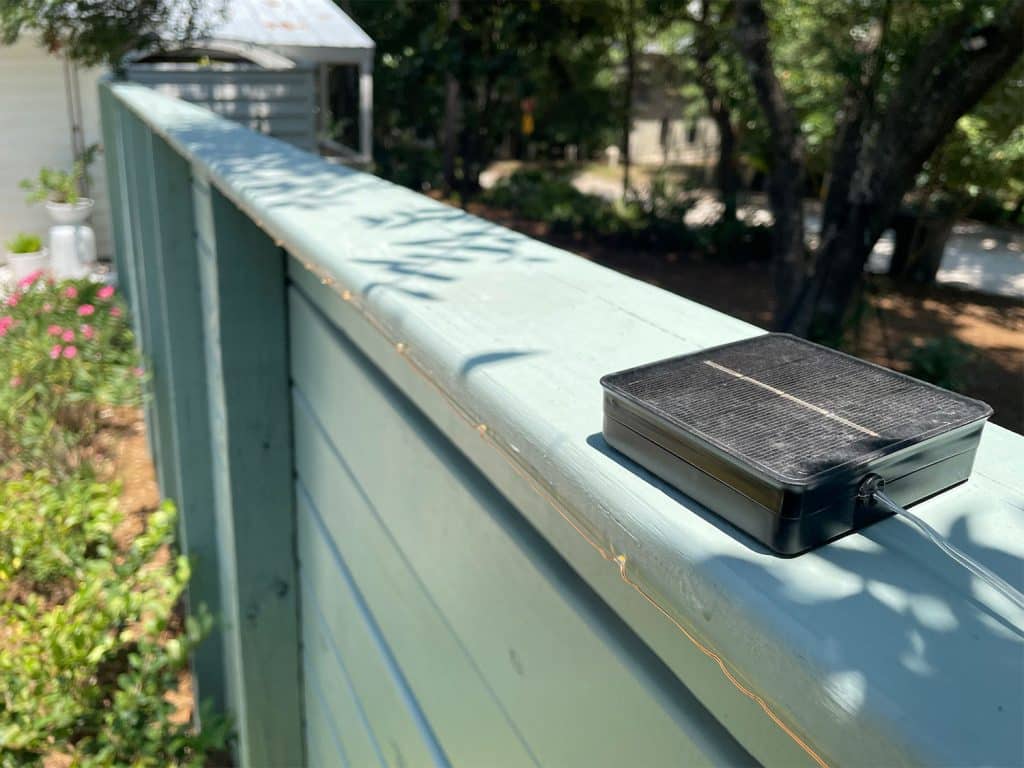
They too are easy to install. It just tacked in some small nails along the fence and wound the copper wire tightly around each nail. And instead of staking the solar panel into the ground, it literally just sits on top of the fence collecting all that beautiful free electricity from Mr. Sun. Can’t even see it from the ground (I’m standing up on a ladder for this shot).
One strand is 33 feet long, which worked out perfectly for us. We have two, and each strand starts on either side of the gate (which is how we were able to make sure the gate still swings open freely). So the one on the right side of the gate opening runs along the fence, while the one on the left of the gate opening runs the other direction across the house.
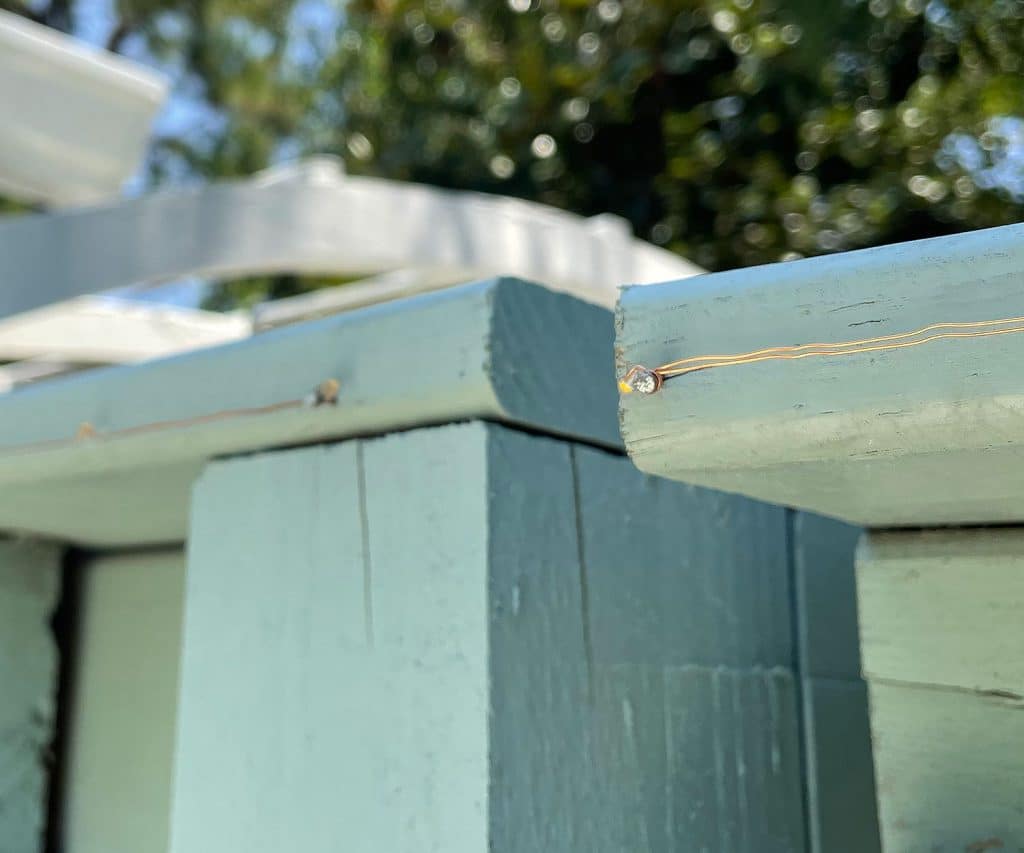
The solar panel on the other end of that strand that runs along the house just sits unceremoniously on the corner of our roof. You can’t really see this one from the ground much either from most angles, thanks to some greenery that obscures that corner and the inherent over-your-head factor (I’m up on a ladder to get this shot too).
You can see what I mean about the greenery in that corner that obscures the view of the solar pad on the roof here (it’s in that far left corner that you can’t see):
The LEDs don’t give off much heat, so a lot of people also use them more “organically” in bushes or other landscaping. They’d also be great for outdoor holiday decorations, like bunched up in a jack-o-lantern or as part of a Christmas display. Oh and if you’re hosting a disco dance party they also have various lighting modes – like flashing, twinkling, or fading in and out. We just use the solid “on” setting.
From certain angles it’s hard to see the ones under the house (thanks to the gutter) so it’s sort of like an under-cabinet glow that washes down the side of the house – and we often catch them in the pool reflection, like in the photo above. Actually, the reflection of these lights are one of my favorite things about them! Speaking of which…
Solar Patio Umbrella Lights
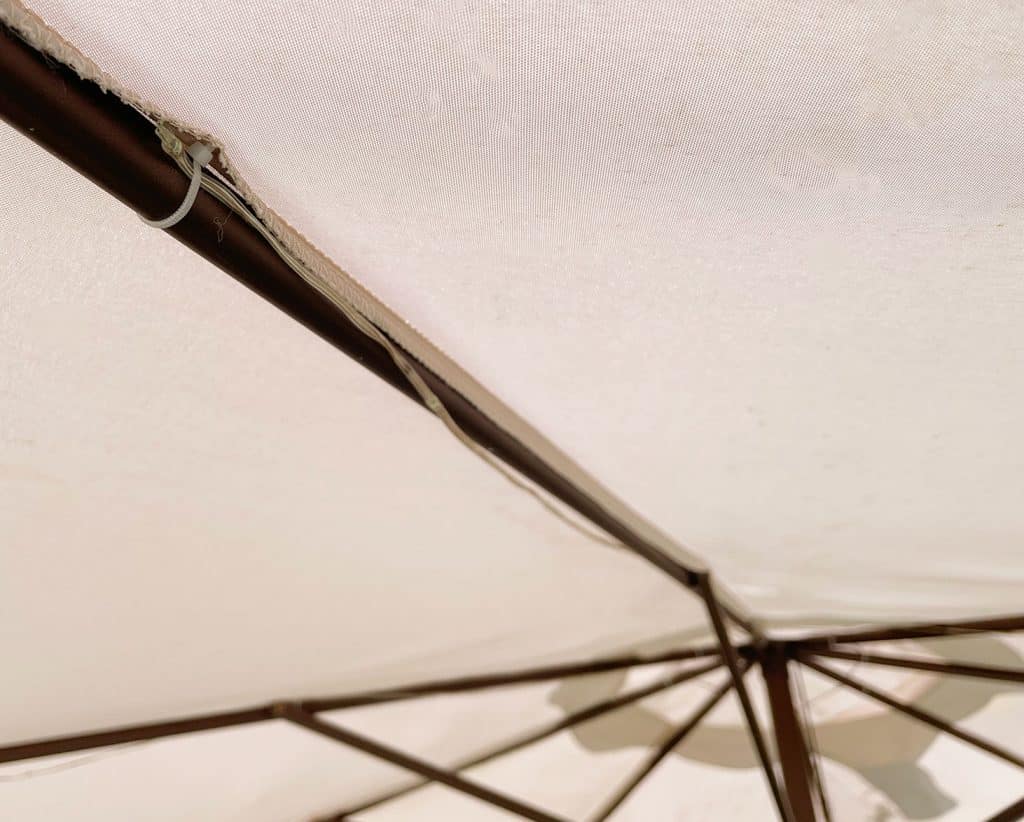
After the success of the fairy lights, I sought out some other places to add them. That’s when I came across these umbrella fairy lights specifically designed to go on the spokes of a patio umbrella.
Instead of a strand of lights that run in a straight line, these fairy lights are laid out almost like an octopus – with 8 shorter lengths of wire spidering off from a center ring. This makes it perfect for any umbrella with an 8-rib design, between 7ft – 10ft in length. We actually have this 11ft umbrella, so the lights don’t technically go to the ends, but you can see when you scroll up or watch the video it still looks really charming.
The kit comes with a bunch of small zip ties to hold the fairy lights in place on your umbrella. We also chose to wrap ours around the spokes too, because I found it required fewer zip ties (we just have one on each end) and holds the wires in place when we put the umbrella down and back up again.
The listing shows the solar panel mounted on the outer edge of the umbrella, but that made the umbrella lean a little to one side. So we just clip ours near the top of our umbrella instead – to that loose fabric around the top vent. The panel is literally like a giant chip clip, so you’ve got a lot of options for where you want to put it.
It doesn’t give off a giant amount of light (I wouldn’t be able to read a book by it, for example), but that’s not our goal here. We generally like enough light not to fall into the pool or hot tub and be able to see if we drop something but there isn’t “evening reading time” under the fairy lights. They just layer more glow into the backyard and reflect beautifully in the water of the pool.
Overall, we have found this assortment of solar-powered outdoor lights to be the perfect mix for us. We take evening hot tub dips a few nights a week (hot tubs are the best at night!), and we love that these lights offer a zero-effort, electricity-free way to make the backyard look cozy and inviting.
Oh, and one more thing, because it’s also solar. But it’s in a totally different area of our house:
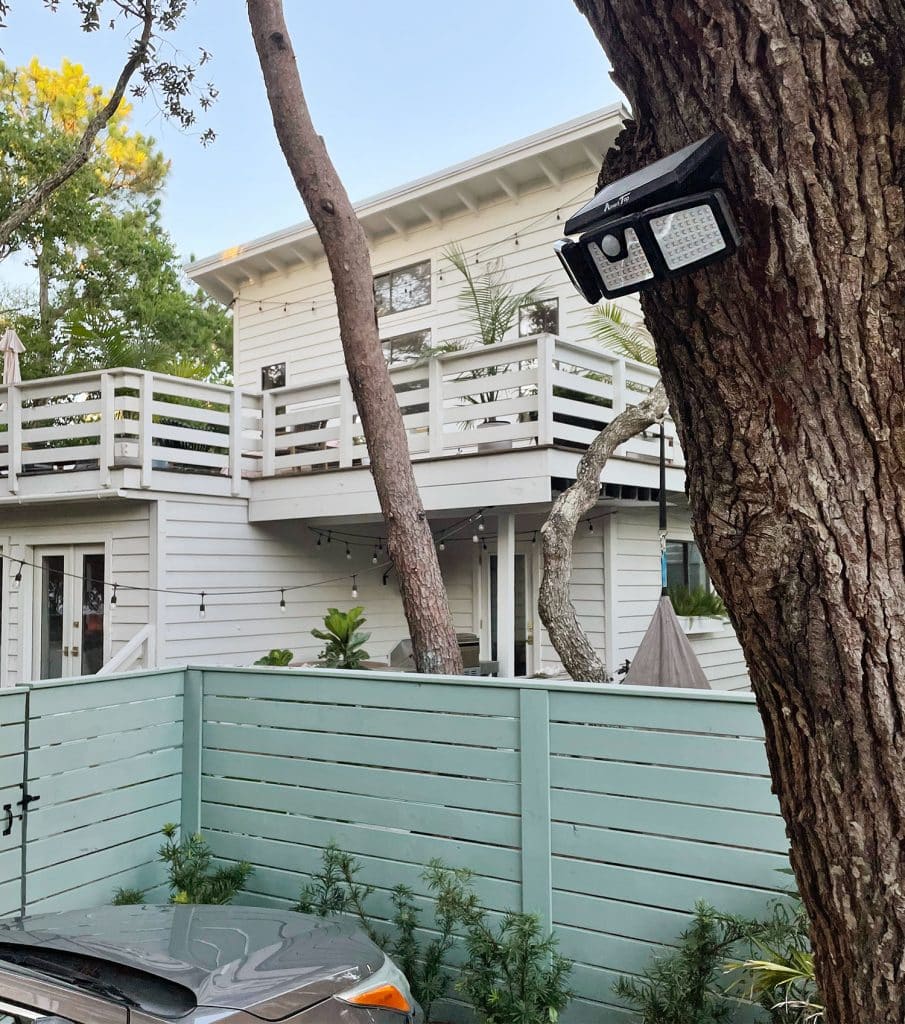
BONUS: Solar Motion-Activated Flood Light
I’m switching gears a bit, I couldn’t tie up this post without mentionig the 4th type of solar light that we love: these motion-activated flood lights (a 2 pack is currently $30). They’re not really going to add any ambiance, but boy are they surprisingly bright for being solar-powered!
We put them in a couple of dark corners of our yard, including near our driveway to give us some extra light after dark if we’re getting out of the car and we’ve been really impressed by them. We’ve got ours mounted on trees and, since every part of the device pivots, you can adjust it to make sure it’s detecting motion where you want AND shining in the right direction. Again, they’re surprisingly bright!
So we hope this post encourages you to give some solar-powered lights a try somewhere in your yard or patio. And if you’re looking for some other outdoor updates you can do yourself, here are a few ideas:
Note: We get a lot of source questions, like “where did you get those lounge chairs by the pool?” or “what’s the link to that porch lamp?” so we created a spot with all that info (and our paint colors!). This page has any and all sources for things that are outside or inside our home.
*This post contains affiliate links, so we may earn a small commission when you make a purchase through links on our site at no additional cost to you.
It’s time once again to throw open every cabinet, drawer, and door to show you how we organized our kitchen, which we slowly renovated over the last two years (more on that slow but steady reno here). This post should be an especially fun one because you’ll see just how much we’ve improved upon the original organization of this kitchen, which we shared in this post almost two years ago. And, as usual, we made a video walk-through of the whole thing too, which also explains a few future plans involving two outdoor cabinets that we plan to add to the nearby kitchen porch. So yeah… lots to cover.
We’ll start with the video, because it’s truly the most comprehensive way to understand exactly what goes where in our new kitchen. Sherry also snuck some Penny footage in there for you, because she knows what you really come here to see. Plus you’ll get a sneak peek into our utility closet, which looks completely different than it used to when it just housed our HVAC system & a big water heater!
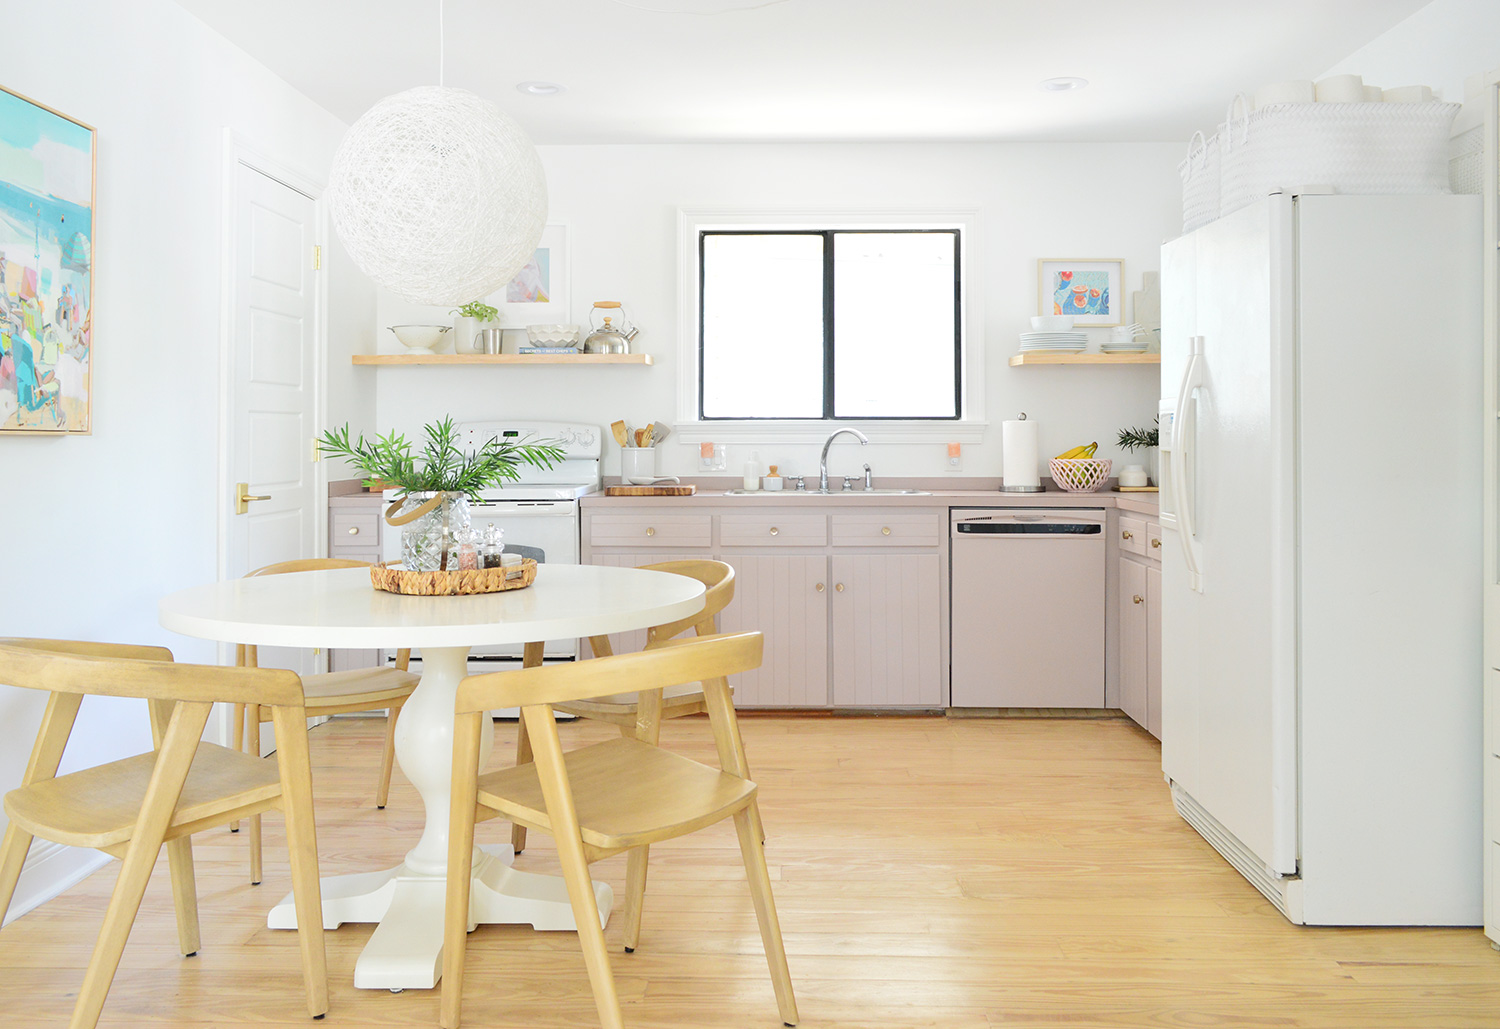
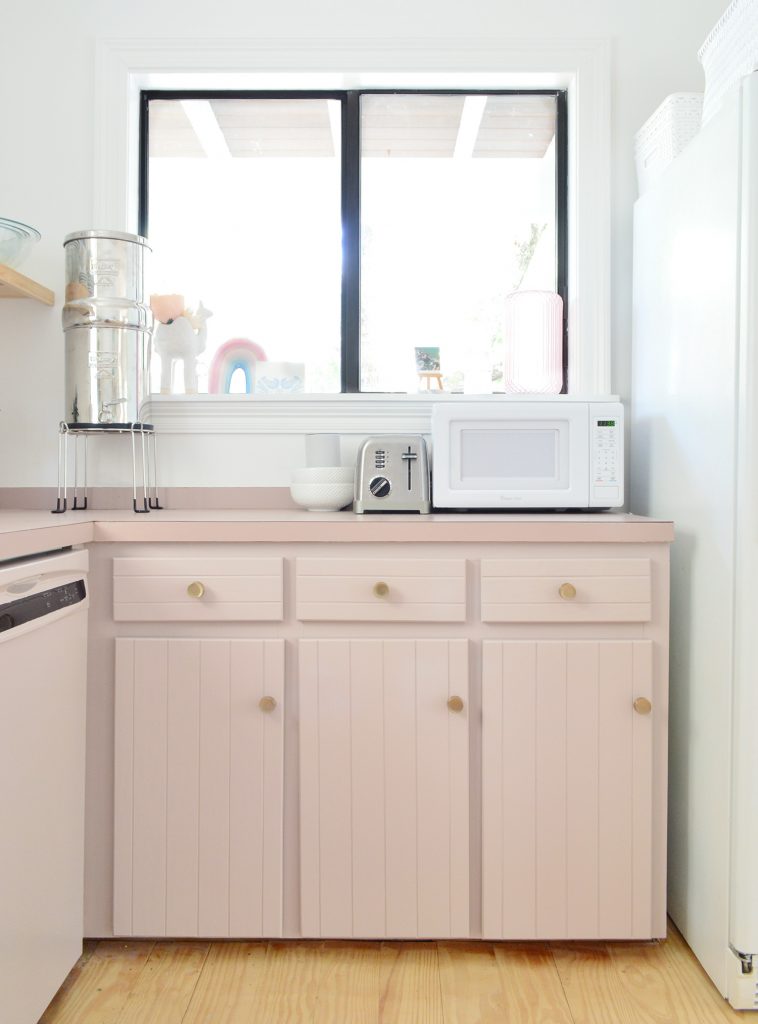
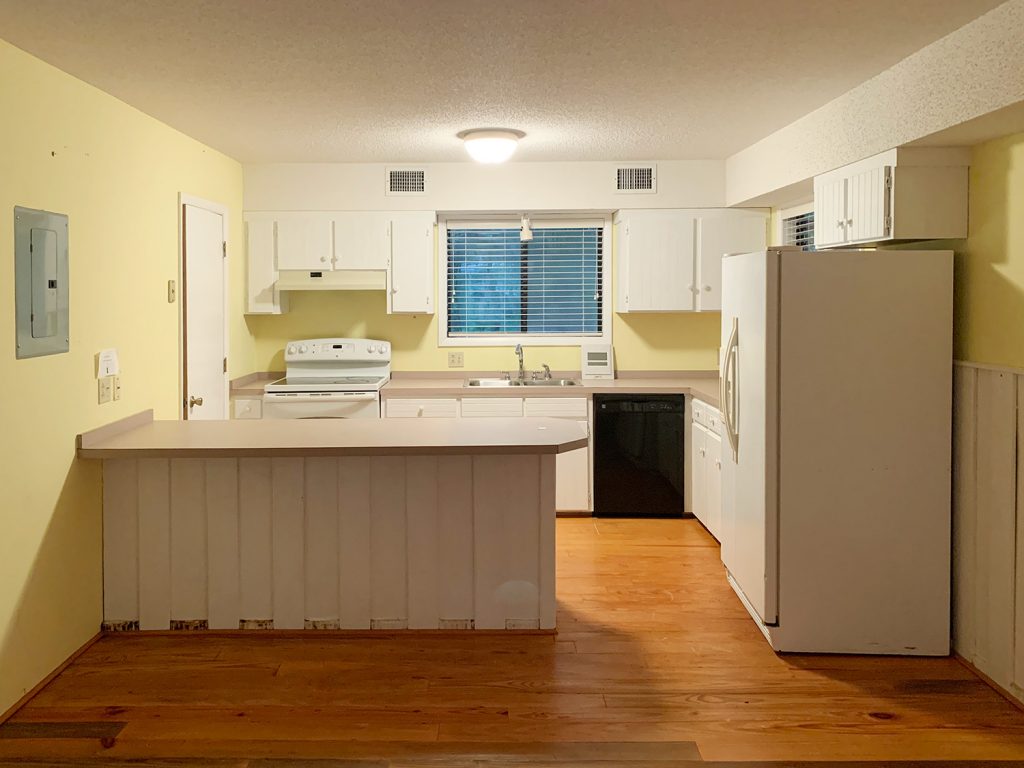
The last time we shared how we organized this small kitchen, it was September of 2020 and we’d only lived here for 3 months. We were excited about how functional we had made it in such a short period of time by working with what we had – and mostly were thrilled that we’d successfully downsized our belongings from our last kitchen and it actually worked for us. At this point in the pandemic we were cooking virtually every single meal at home and had two kids home full time doing at-home-learning… virtually every single meal we all ate was stored and prepared and consumed in this small kitchen. As a reminder, this is what it looked like at that time:
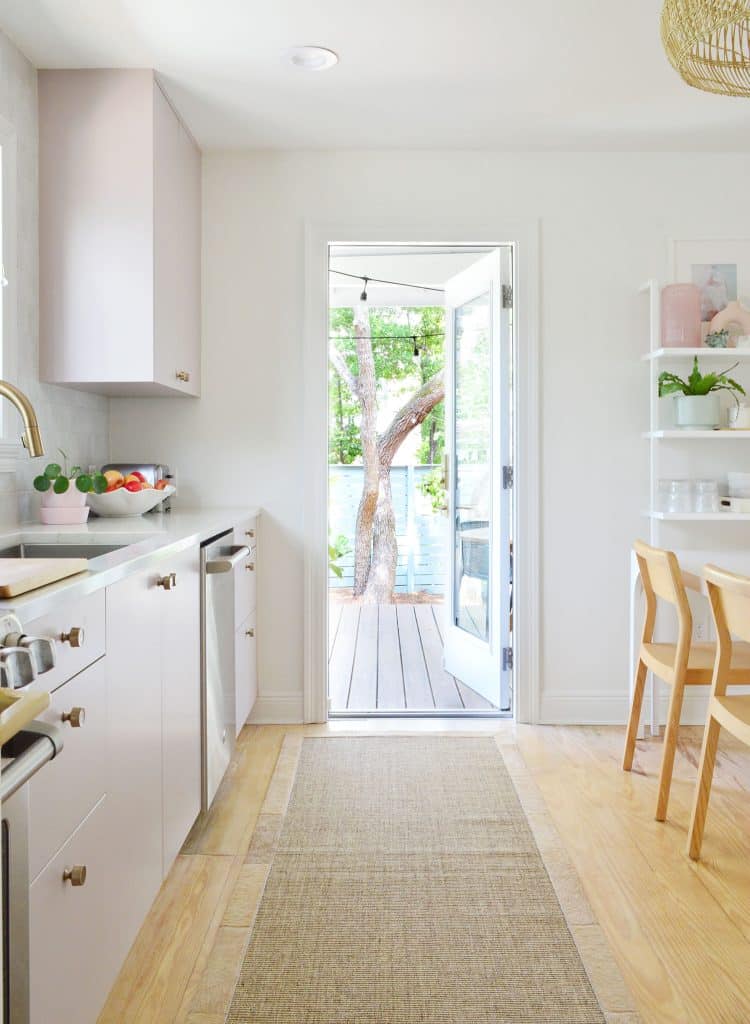
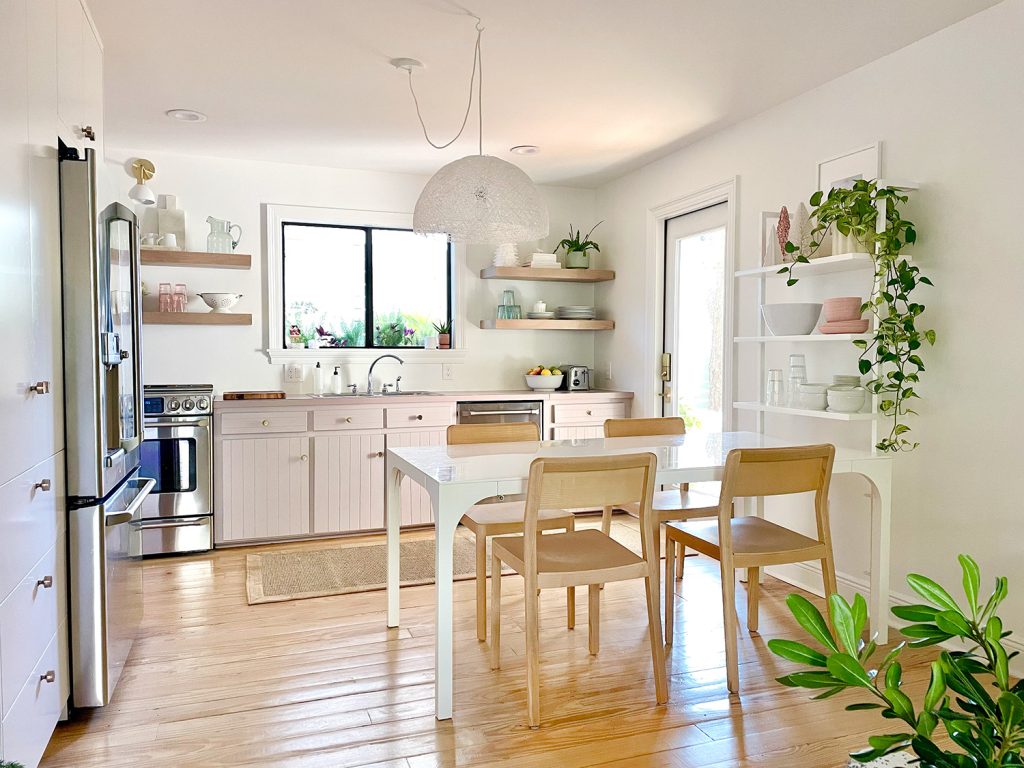
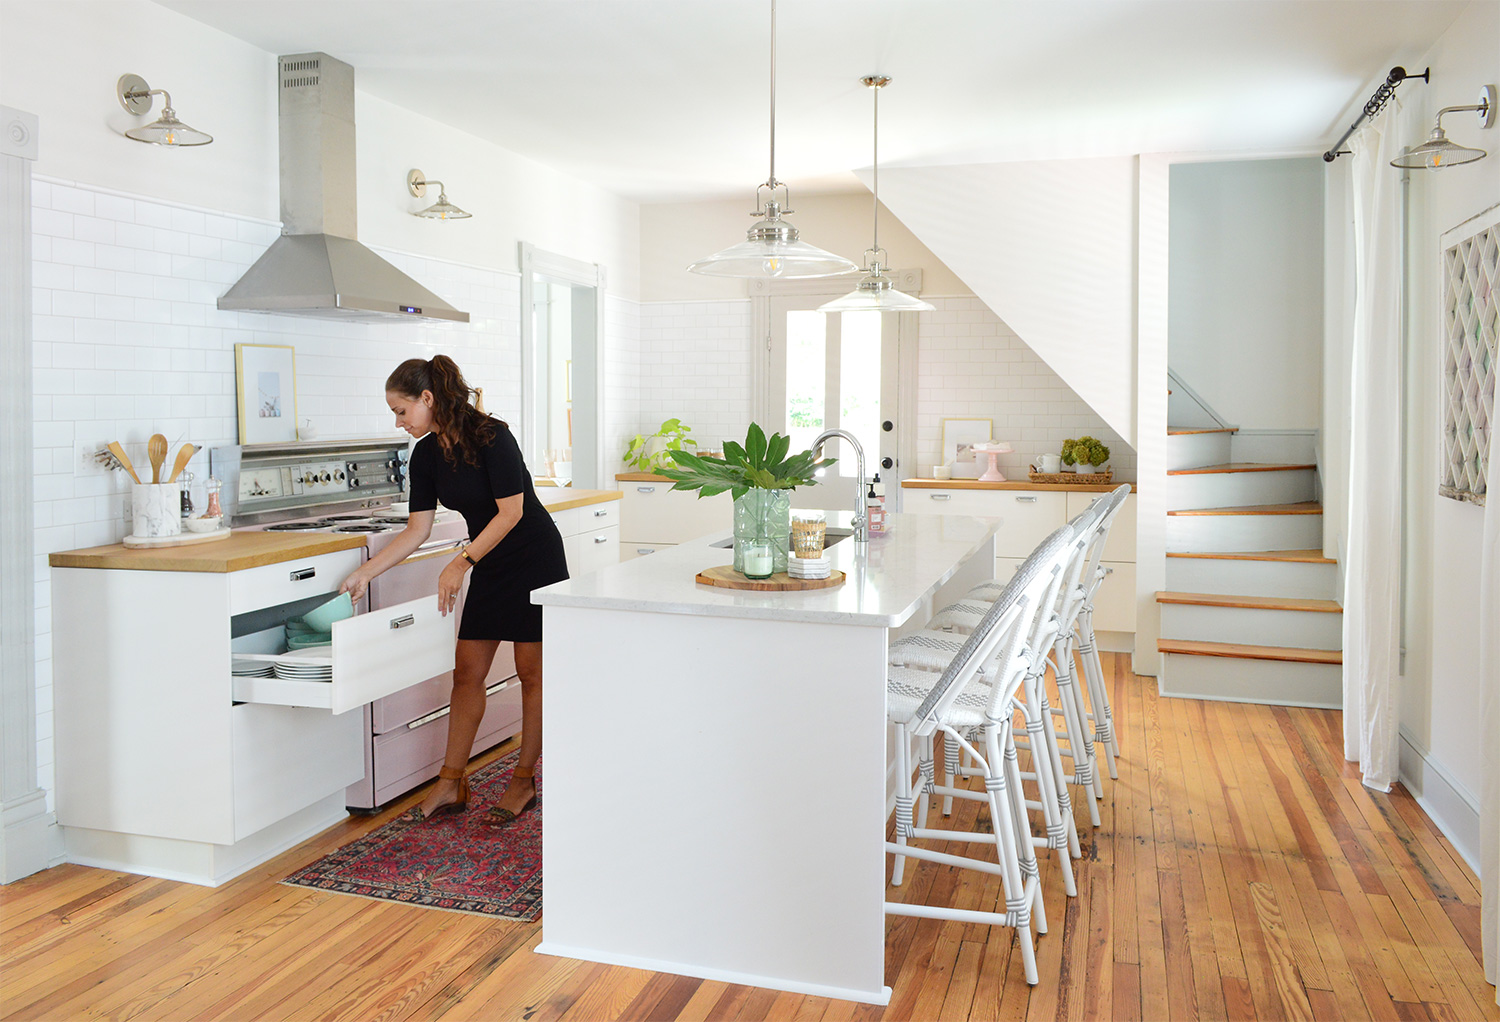
Slowly over the years, we added things like: a pantry cabinet, new (secondhand) appliances, updated cabinetry, backsplash tile to the ceiling on that back wall, etc – and as you saw in our kitchen reveal post, the kitchen now looks like this!
So let’s dive into the three major storage areas – the lower cabinets, the upper cabinets, and the pantry cabinets – to show you all of the organizational improvements we’ve made along the way. Disclaimer: the video is much more thorough than photos can ever be, plus it mentions those outdoor kitchen cabinets we ordered, and how we think things will shift a bit when they finally arrive – so watch that whenever you get a chance.
Organizing The Lower Cabinets
We actually LOST lower cabinet space as part of this renovation, which sounds like a downgrade on paper, but we gained an entire floor-to-ceiling pantry cabinet + four upper cabinets (3 along the back wall and 1 over the fridge). So it was for sure a huge gain in the long run. To jog your memory, these are the three skinny bottom cabinets that we took out:
We removed them to convert that window into a door so we’d have easy access to the porch out there, where we now have a grill and an outdoor table that we use SO OFTEN because they’re so convenient to have right off of the kitchen.
The kitchen porch is like a huge outdoor extension of our kitchen, which is pretty great to have in a place that’s warm almost year-round, so if you have a smaller kitchen with the option to create a little outdoor extension of it at your house, complete with an outdoor table and a grill (and maybe even an outdoor cabinet or two for storage of things like grill tools), we’d definitely recommend it.
This is the former storage space that we had before we added that door to the kitchen porch. The cabinets had such thick wood framing that it felt very choppy and inefficient. It was difficult to store anything wider than 12″ in there and it required a lot of bending or squatting down to see whatever you were retrieving from the back of the cabinet or that little half shelf on top. If you compare that to a pantry drawer or cabinet drawer, which pulls out and comes right to you without as much crouching, you can see why our updated kitchen has a lot more lower drawers than cabinet doors.
Those three drawers above our skinny previous cabinets also had that super thick framing, which stole a lot of room that otherwise could have been used to store things, and like all of the drawers in our old kitchen, they were shallow and narrow, which greatly limited what could be stored in them.
Here’s where things start looking up. By removing those three skinny cabinets and adding that door to the new kitchen porch…
… it allowed us to put a new 24″ base cabinet in what had previously been a totally dead corner. As you can see from this older photo below, the old cabinets didn’t have a lazy susan or some other fancy corner swing-out shelf like most modern kitchens do in that corner. The cabinets that were where the door is now literally just blocked access to anything that could have been stored in that corner.
So even though we lost about 40″ of old cabinetry, we gained 24″ right back the instant we put a nice big cabinet in that corner that used to be dead, blocked off space.
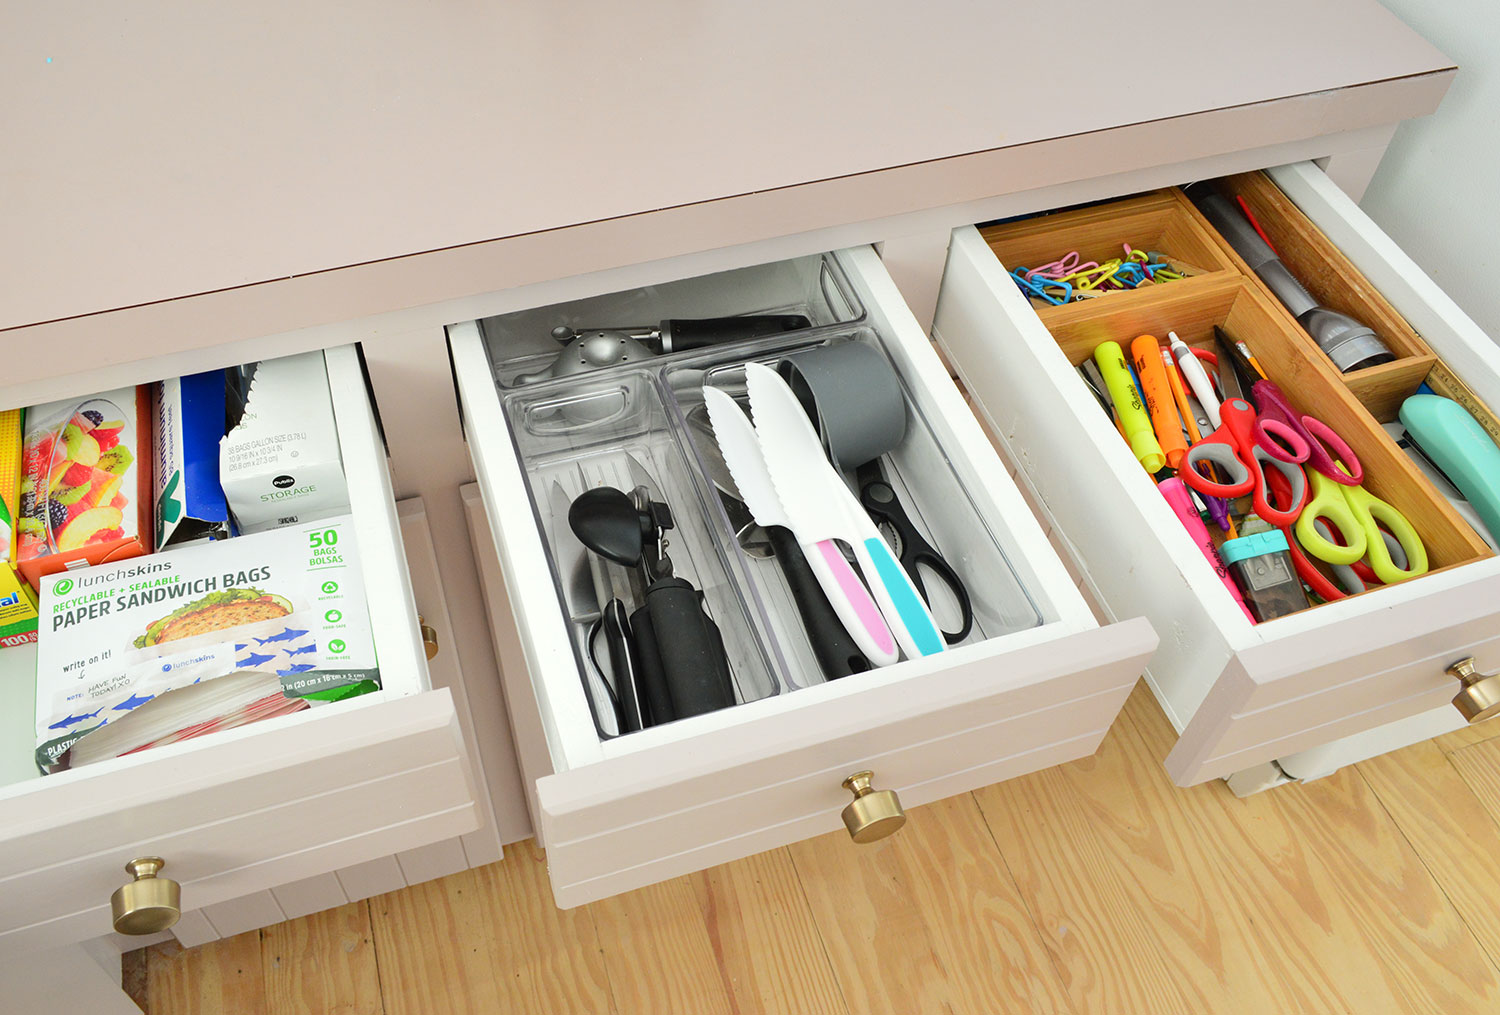
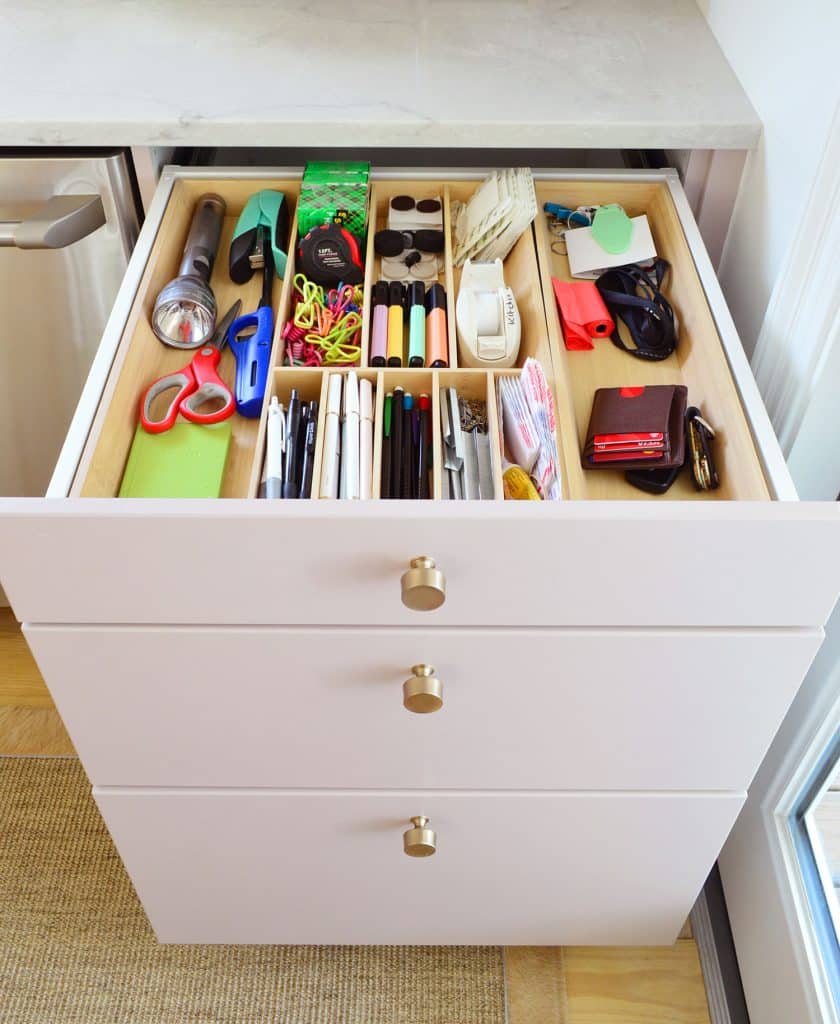
And since we’re big proponents of drawers instead of doors in your lower cabinets (so much easier to get things out! less bending! everybody wins!), this new 24″ base cabinet… which appears to have 3 drawers but actually has 4… is a WORKHORSE.
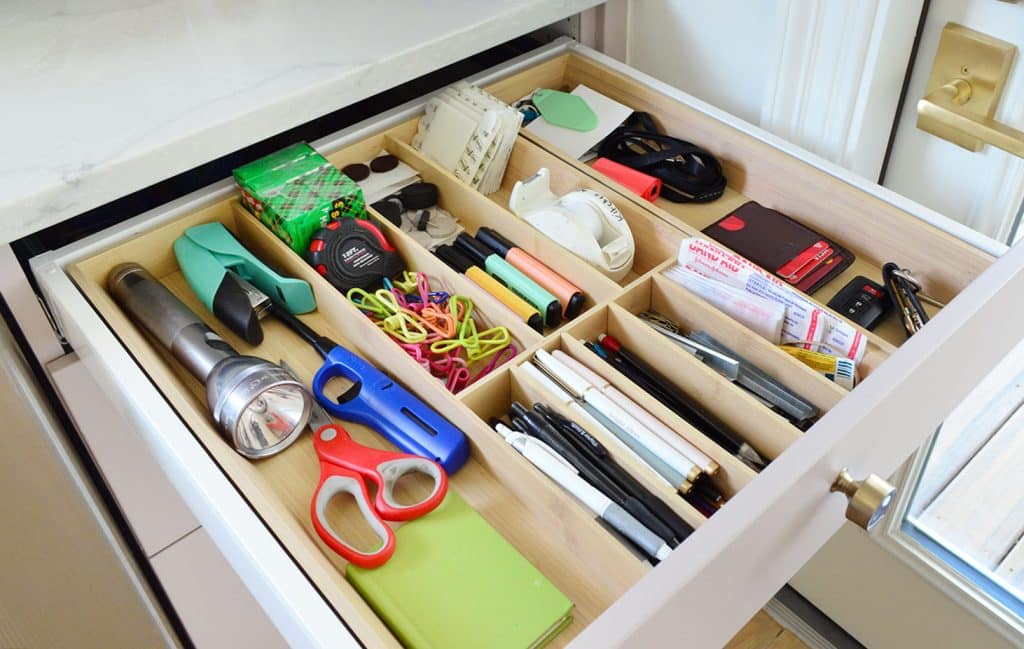
The top drawer is our “junk drawer” that we outfitted with two of Ikea’s bamboo storage trays (this and this) that fit perfectly. We had so much space in it that we added things like our car keys, the dog leash, and my wallet in there too since the drawer is right next to the door that we use most. It’s really handy for grabbing things you need before leaving, and it’s a nice clean look to have them tucked into a drawer instead of always collecting on the counter.
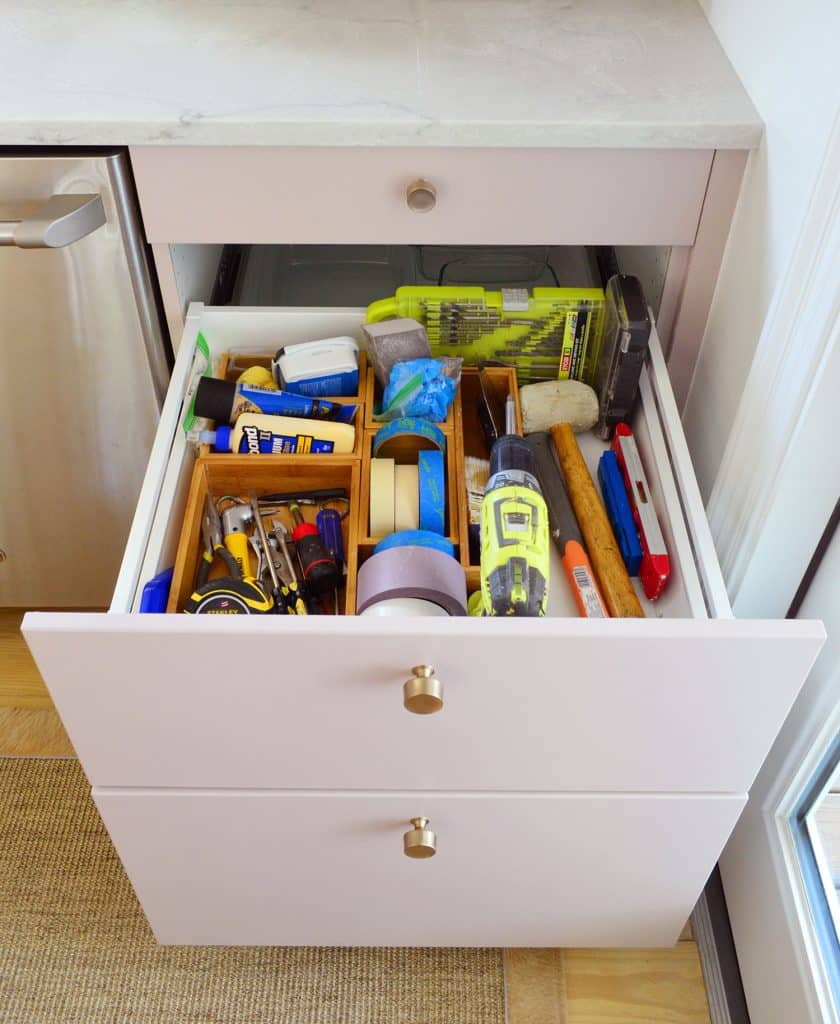
The next drawer down is our very important tool drawer. Yes, it’s weird, but we’ve always had a tool drawer (in every kitchen we’ve ever owned, throughout the past 16 years as homeowners) and it has become a habit we just can’t quit. We have some lesser-used tools stored in the hall closet, but it’s nice to have the stuff we use regularly down here so we can grab stuff to quickly hang a picture, measure something, tape something off, etc.
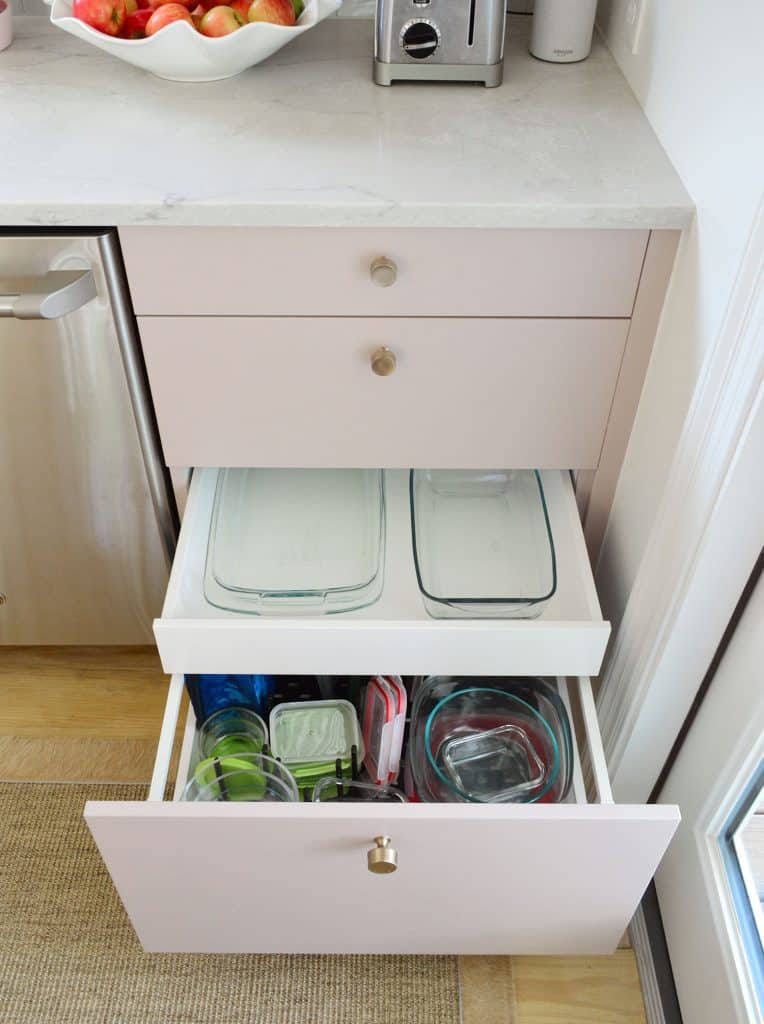
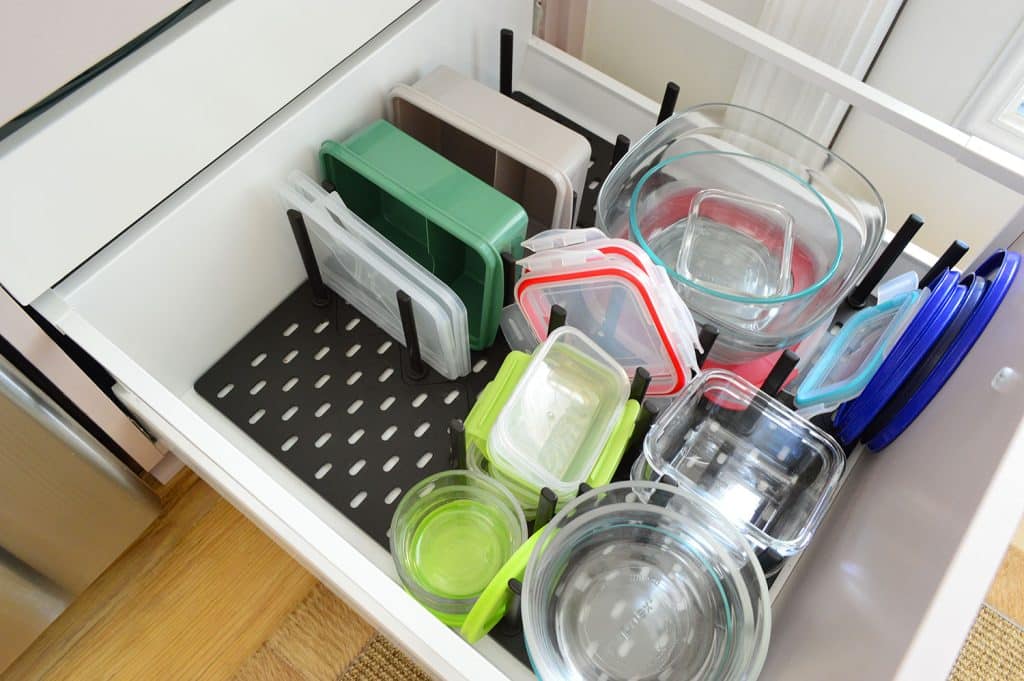
The bottom drawer is the deepest, which allowed us to add one of our favorite Ikea kitchen features: a hidden drawer! We can store ALL of our glass bakeware, containers for leftovers, and school lunch stuff in one place, which is more than I can say for the old drawers that were here.
We also added Ikea’s pegboard organizer to better wrangle all of our storage containers in our deep bottom drawer. It looks a little chaotic in this photo (if it came in white it would blend with the drawers a lot more), but it has been a big help. Things don’t rattle around in here, and there’s less digging for what you’re looking for. That open area on the back left is where the kids store their lunchboxes, but we took these photos back when they were in school… hence the lunchboxes being gone.
I know it sounds crazy, but this new 24″ cabinet has made us worlds happier than the old cabinets we removed ever did.
The Under Sink Cabinet
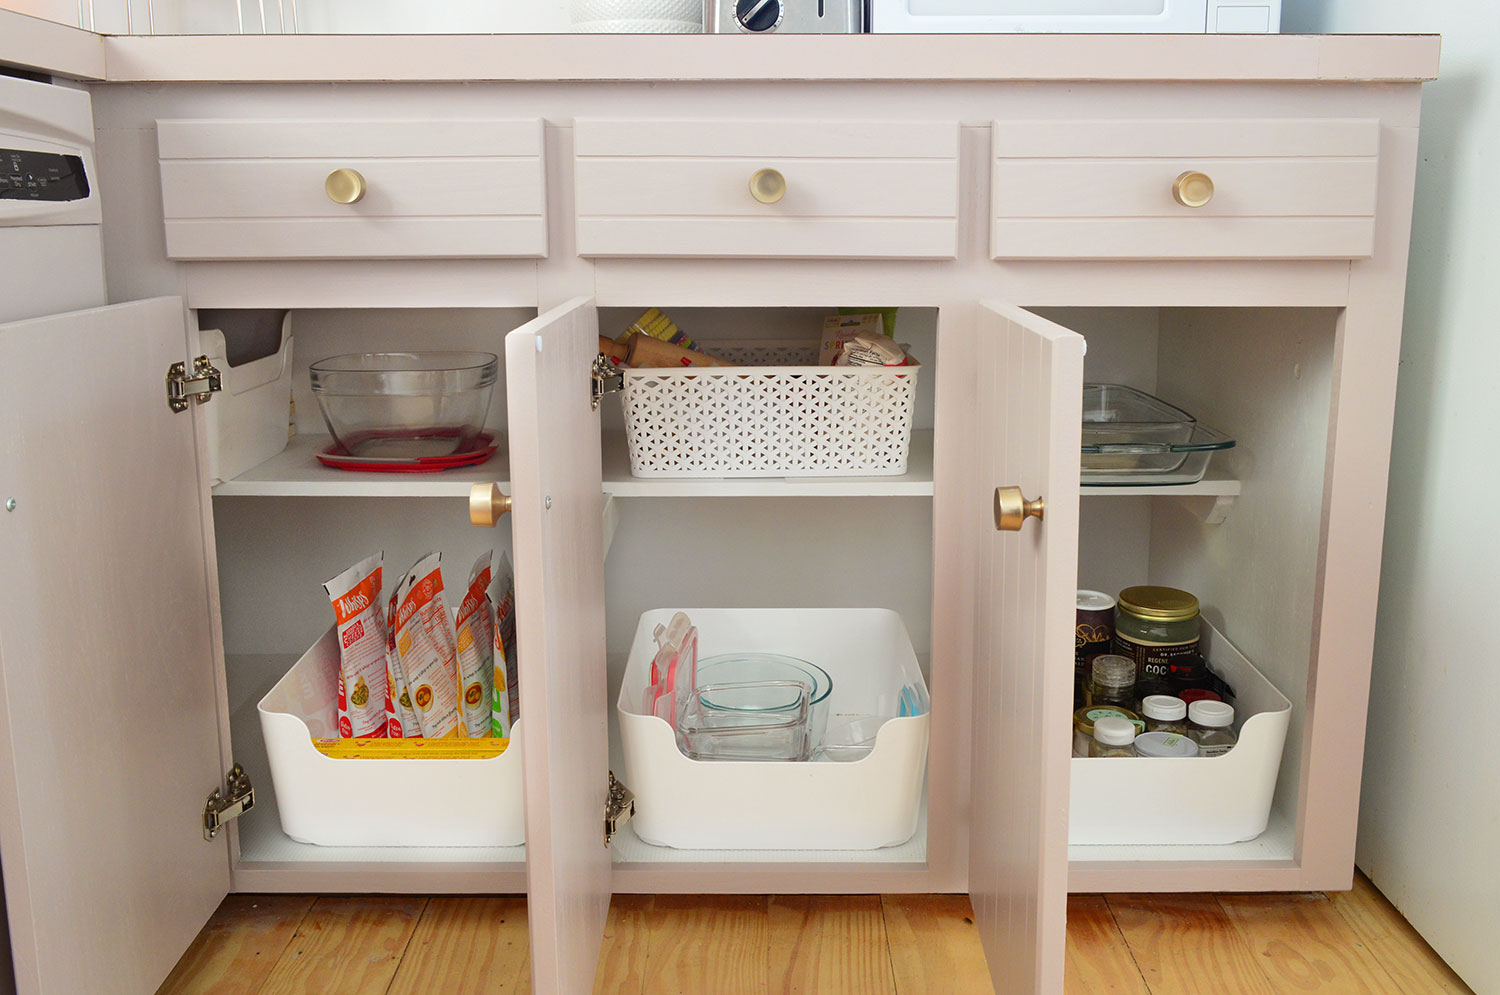
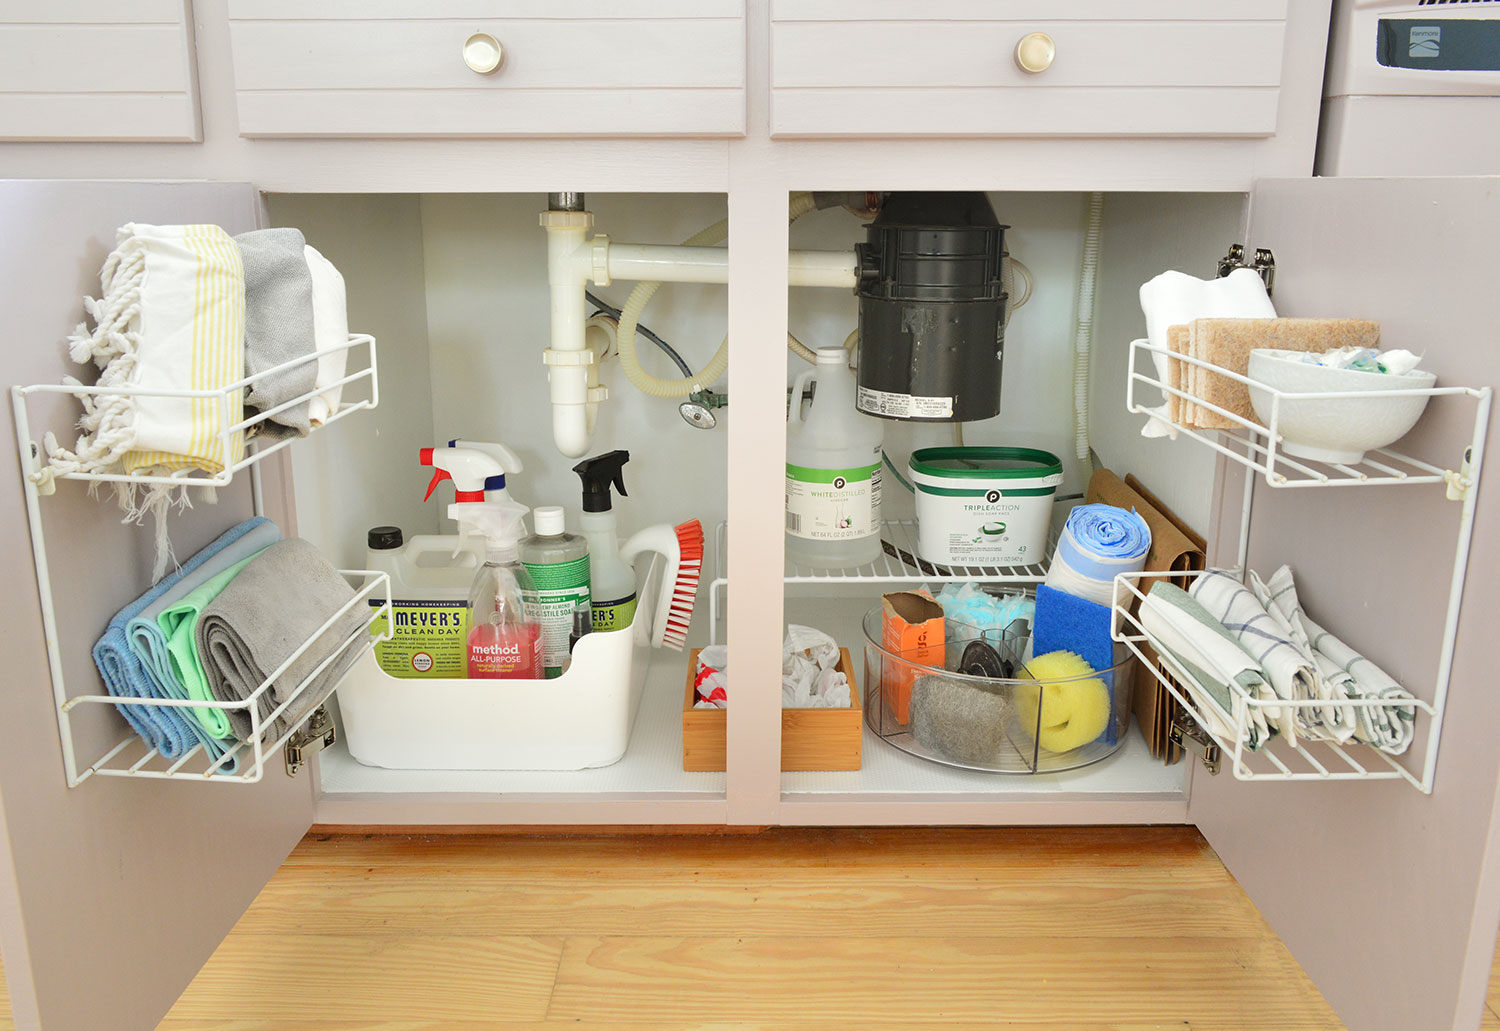
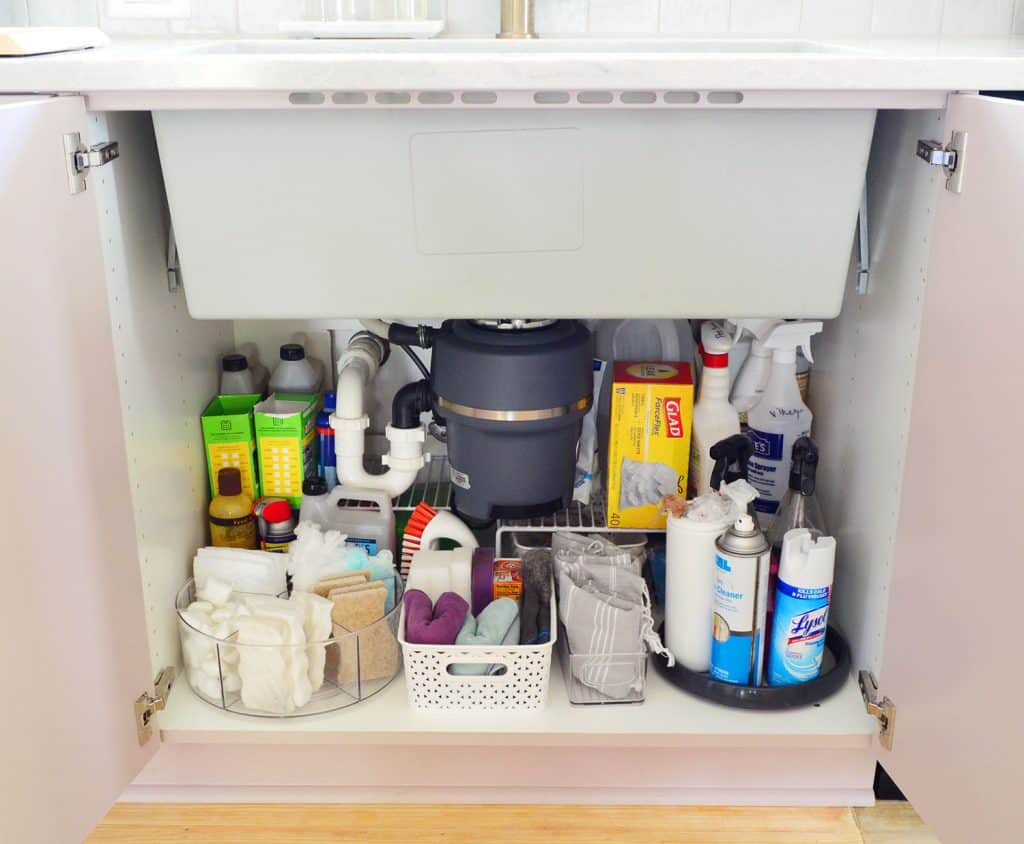
Ok, let’s move on to under the sink. As a reminder, this is what our old sink cabinet looked like. The big wood divider in the middle of the two doors was a little bit of a bummer, but we had pared down enough to make it work – especially with the help of those wire shelves on the doors.
The new cabinet is the same size (36″) but the big full-height doors make it easier to access things… so we’ve crammed more in there, I guess. Ha! I realize this is hardly Pinterest-worthy, but it’s real life. We always try to use the storage bins we have (even if they’re mismatched!) before spending money on something new, so that’s what you see going on in here. We also had stored a few things you don’t see in the photo above in our laundry closet before (like Sherry’s beloved Folex, our wood conditioning wax, the Lysol, etc), and now they all get to live down here in one spot.
That statement is true of a lot of random items actually. We definitely were just trying to find a spot for things three months into living here when we wrote that initial kitchen storage post – so some things just couldn’t be in the kitchen due to lack of room – so they were relegated to the laundry closet, the hall closet, or somewhere else. It’s VERY NICE to have things all in one spot again, so there’s not that whole “are the magic erasers under the sink…? No they’re in the hall closet!” thing.
Some things don’t change though – we’re still relying on lazy susans under the sink (we especially love this clear divided one) to access our everyday cleaning supplies. And we’ve used the same wire shelves we’ve had all this time to create two levels of storage that allow us to condense some things that had been in the laundry area/hall closet/etc. It makes the whole area really flexible for us.
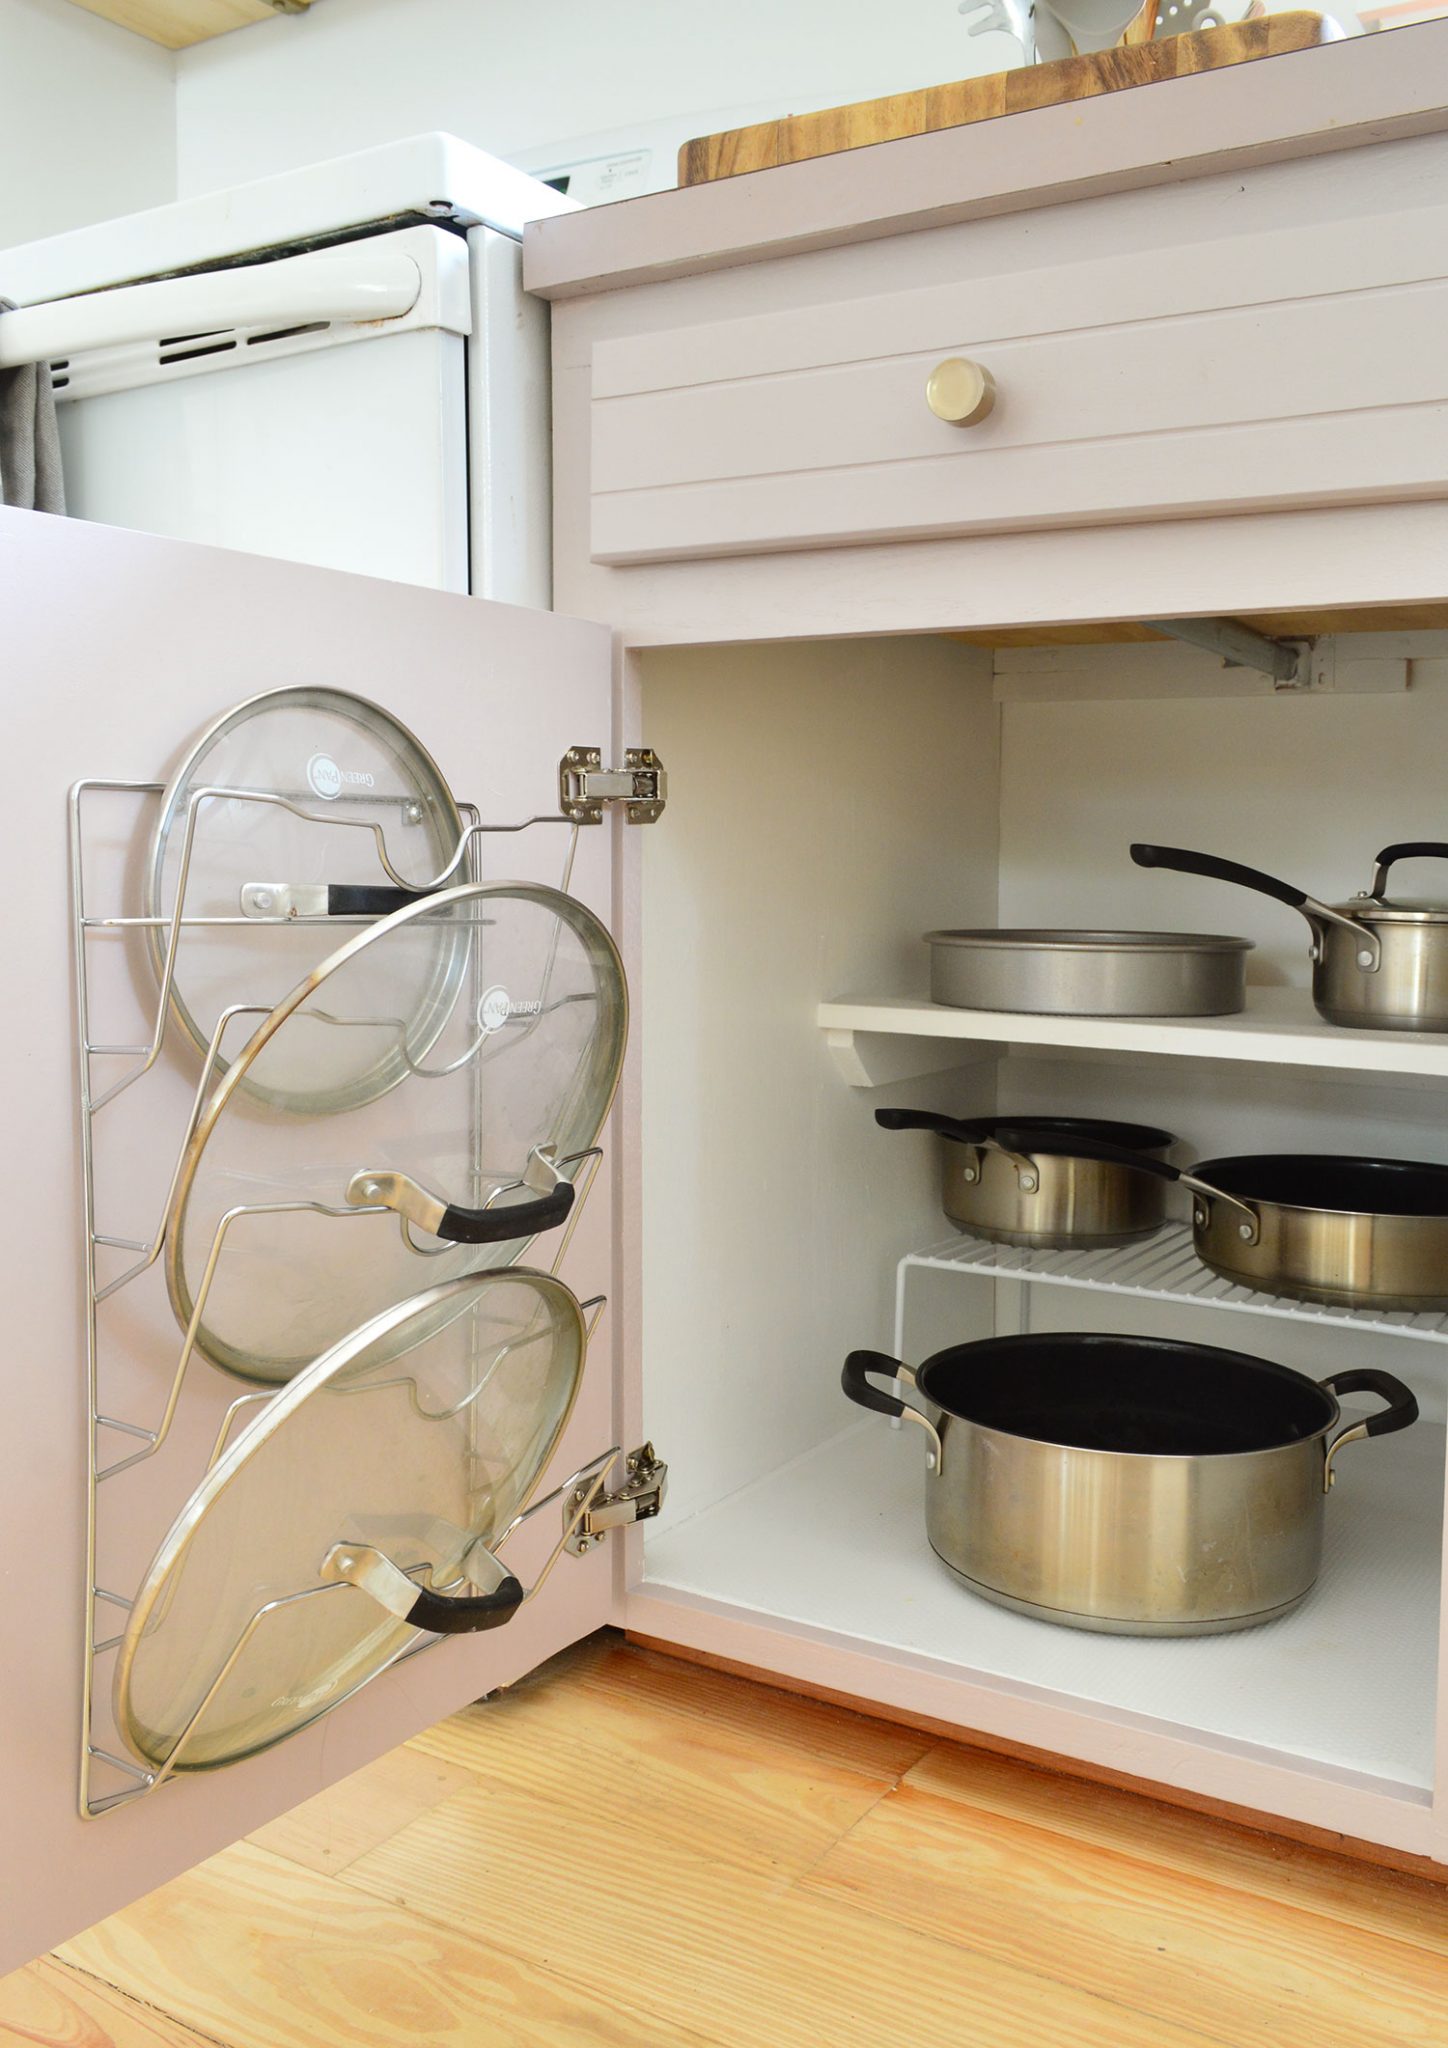
The Cabinet With Our Utensils and Pots & Pans
To the right of the sink cabinet is where we store our flatware, pots, pans, and other baking dishes (brownie pan, cinnamon roll pan, etc) since it’s right next to the stove.
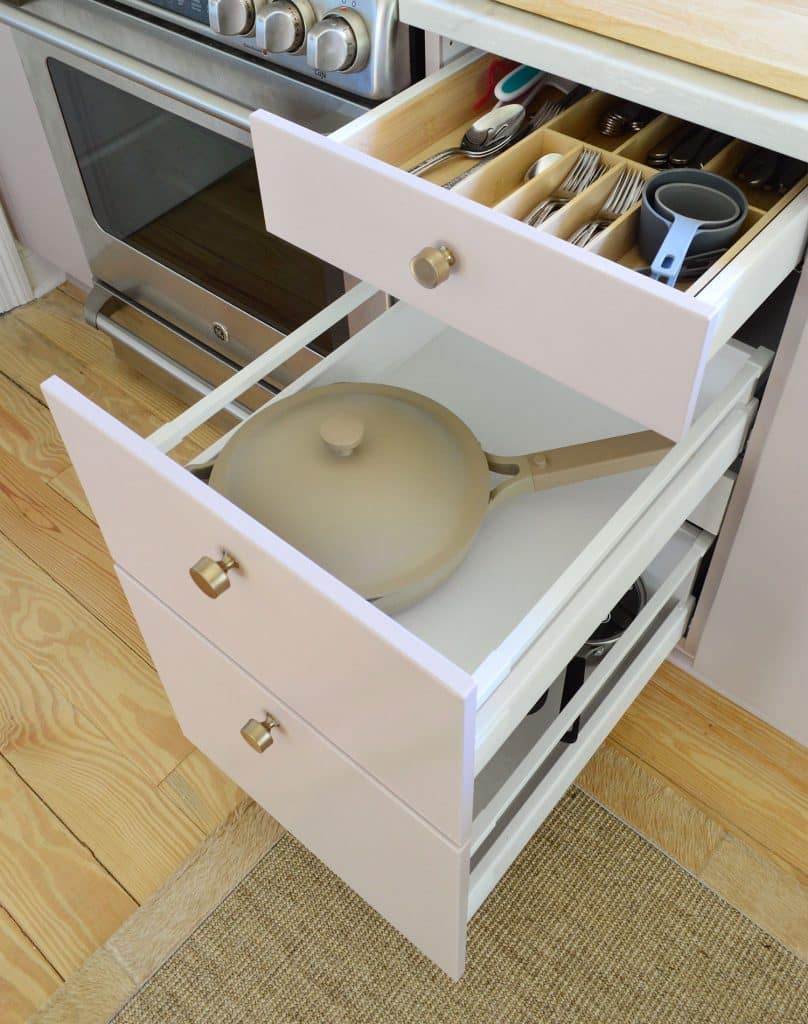
To make more room on the other side of the stove for a much more efficient cabinet than the one we had there before, this new cabinet became slightly smaller than the old one (only by an inch or two). But again, because the Ikea drawers are more efficiently designed without such thick wood framing that steals a lot of space, it works harder and allows us to store a lot more than before. The top drawer is for our utensils and we used another bamboo tray that Ikea makes (so it fits in there perfectly without wasted space) to keep all our utensils and serving spoons and stuff in place.
I know it looks incredibly weird that we have a drawer with just one single pan in it, but that’s really how our drawer looks. It’s the pan we use the most, and I figure if we ever need the drawer space for something else, we can just add it in there too, or we could keep that pan out on the stove. Always nice to have room to grow, right? And yes, it’s this pan (we had to see what the hype was about) and since I know some of you will ask for our review: we like it, it’s easy to clean, we like the color, we like that it’s non-toxic/green, and we use it basically every time we cook dinner, but since so many people sing its praises we figure you already have one too.
The bottom drawer has our deeper pots and saucepans (more than just one – ha! You can see all of these drawers better in the video, btw), plus we used another hidden drawer to store some of our metal baking pans for things like cinnamon rolls and brownies. It’s so nice not to have all of that stuff jumbled on top of itself in one big drawer.
As a quick reminder, this is what the old cabinet looked like here. We definitely made it work, but it involved a lot more bending since nothing was a pullout that came to you.
Now on to my favorite “transformation,” which we’ve gushed about before… because to know it is to love it.
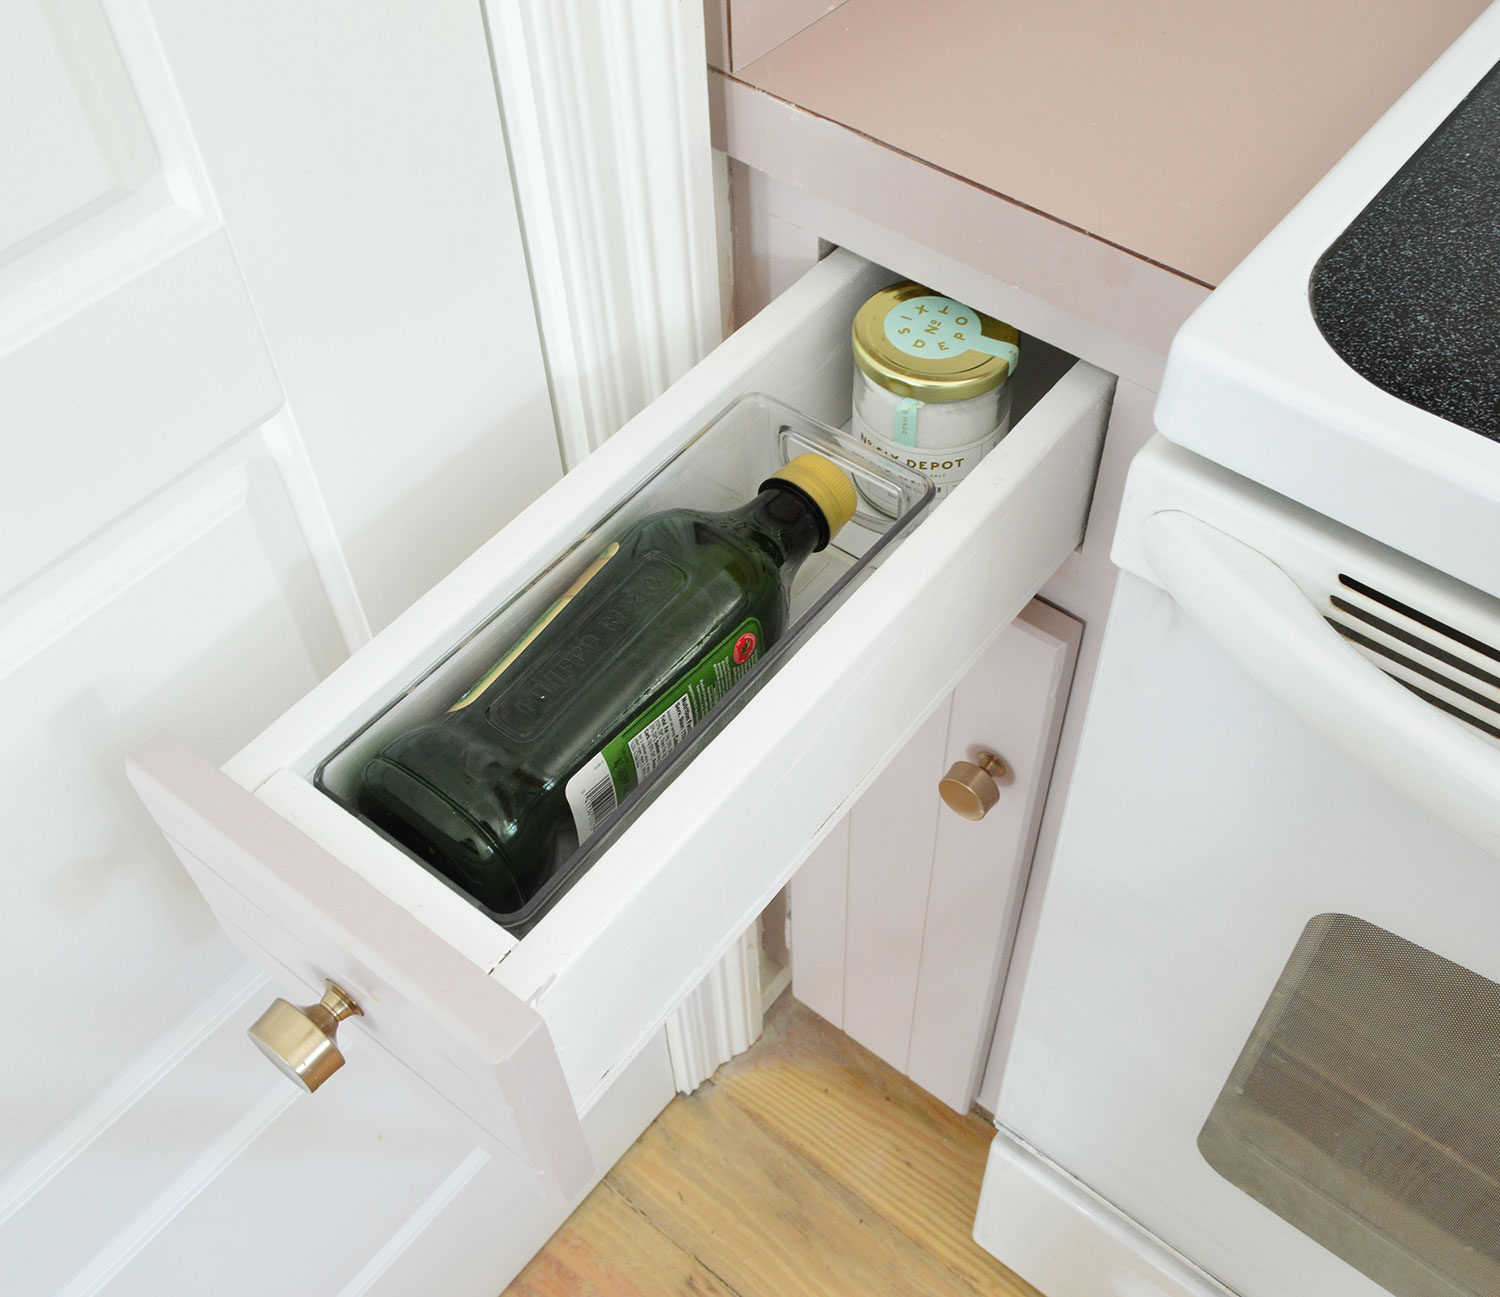
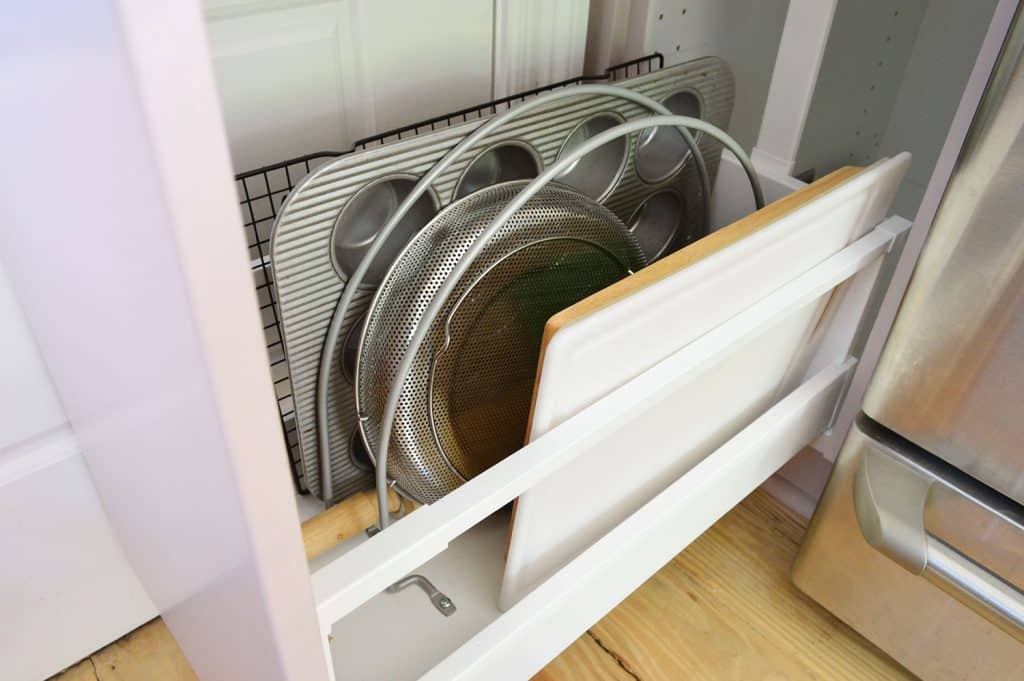
The “Oil Drawer” Cabinet
We’ve shared this picture several times as a prime example of how inefficient the old cabinet was to the left of the stove. That cabinet was 7″ wide, but because of the bulky wood frame, the actual storage space in the drawer was only around 4″ wide. After some failed attempts at storing spatulas, spoons, and dishcloths in there – everything was too big or cluttered! – it became our infamous “oil drawer.” Because that’s all that fit.
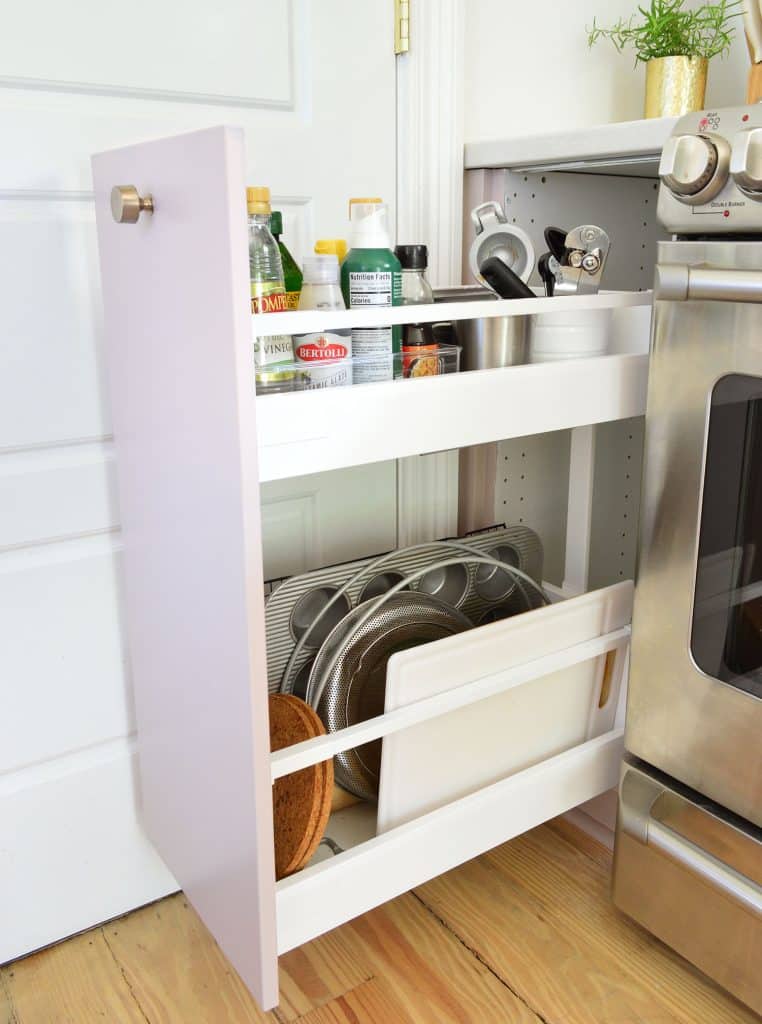
Ikea has limited options for small cabinets, so we wondered if their 12″ two-tiered drawer could really make that much of a difference (that’s still a narrow cabinet, no matter how you slice it). But IT HAS BEEN AWESOME. The top shelf is deep enough that we can store a whole slew of oils, vinegars, cooking sprays, and small kitchen gadgets (can opener, peeler, citrus squeezer thing, etc) all STANDING UP.
A lot of this stuff had previously been stored in those three cabinets we removed for the new door on the other side of the room, so it has been great having it all in one spot instead of doing that thing where you open like 3 different drawers in search of something because similar things live in all 3 places.
And that’s just half of the good stuff going on with this new pullout cabinet, because we have that whole bottom section too!
The old cabinet was teeny tiny and couldn’t even be opened all the way due to the door molding. It was vertical so it looked like it would be good for baking sheets and cutting boards, but it was always kind of a hard-to-see clutterfest in there, and you usually had to squat down and take everything out just to get to one thing at the back of the stack.
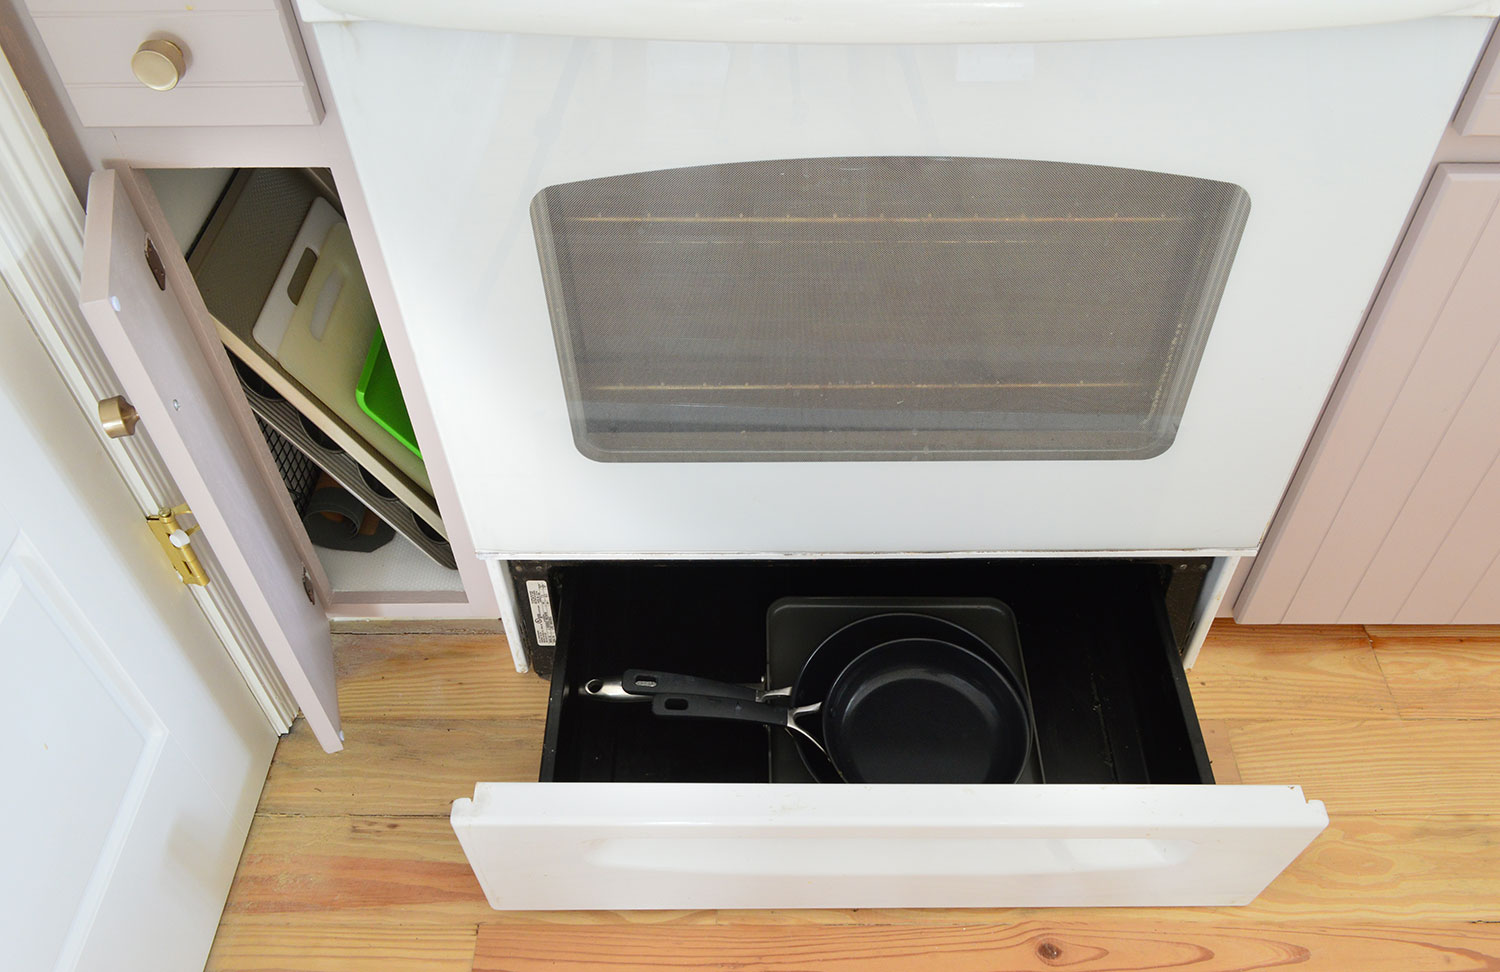
Now we have all that stuff on the bottom shelf of this pull-out drawer, and we screwed in some of these metal partitions to keep things from rattling around and to keep them all from leaning against one another. So now we can reach in and grab the muffin tin or the cutting board without having to take out everything that was formerly blocking it. And now instead of fishing around in a dark narrow cabinet, it’s a pullout, so everything rolls out to greet us. Plus it’s all much easier to see because it’s not in a dark narrow cave of a cabinet.
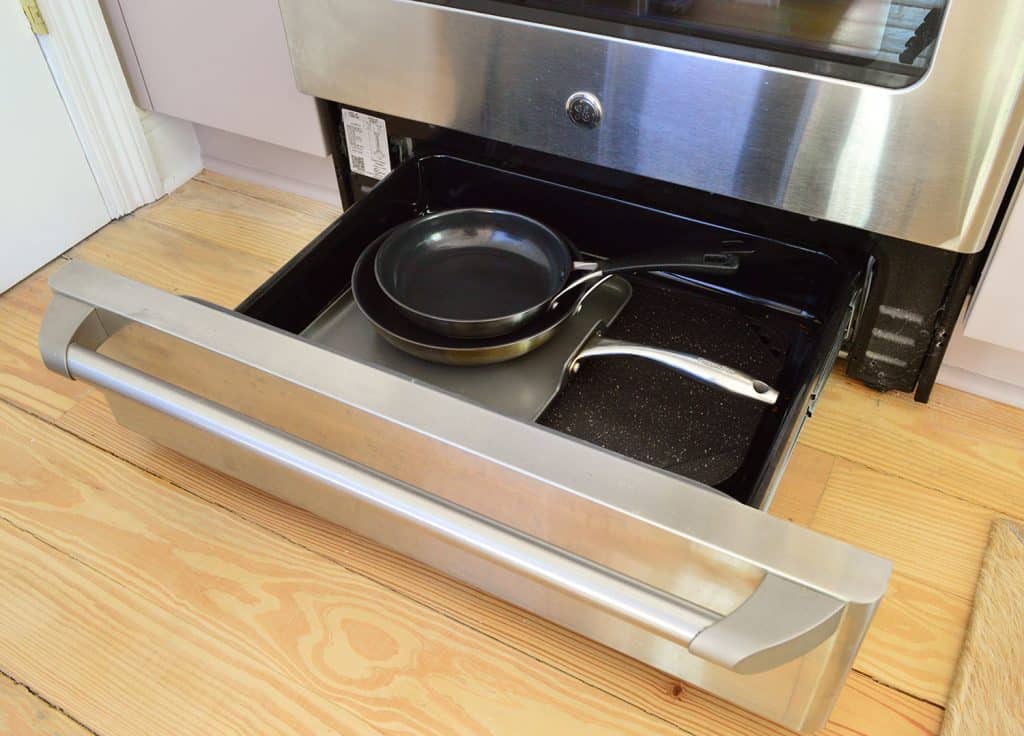
We still store flat pans and skillets in the oven warming drawer. That’s a habit that will never die. And while we might not have a ton of kitchen gadgets (we don’t own a crockpot for example, because we had one for years & never used it) but we do have a huge skillet for pancakes (it’s hard to see but it’s the black speckled thing on the bottom of the stack below that’s almost as wide as this drawer). What can I say? I take my pancakes seriously.
One last thing that I pointed out in the video too, which might seem simple, but finding a nice knife block that you like to keep out on the counter can save you from having to store that stuff in a drawer, so even just making that switch can free up some more drawer space and make things feel less cramped.
Enough about these lower cabinets. Let’s look upward to the uppers.
Organizing The Upper Cabinets
The original kitchen had uppers when we bought the house, but we took them down when we had the soffit taken out as part of our initial renovations. So by the time we moved in, this kitchen was sans upper cabinets. Which isn’t actually a crime to us. We designed the entire pink house kitchen without them (and the two duplex kitchens just had hood cabinets over the stove & a cab over the fridge).
So for as long as we’ve lived in this house, until the final phase of our kitchen reno, we just had some incarnation of open shelves. We emphatically love open shelves in a kitchen (our last kitchen had them too, as well as the one before that!) but over time we decided that the glossy white shelves next to our kitchen table were plenty of good functional open storage for us, and we didn’t also need them all along that back wall of the kitchen anymore.
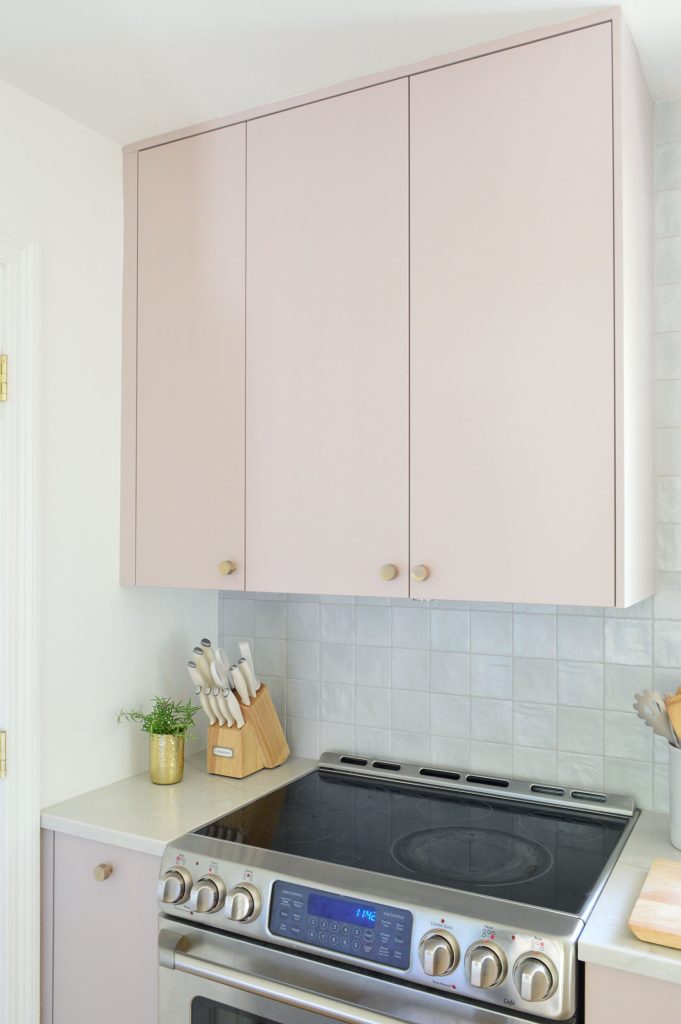
So as part of our final step of the kitchen reno, we decided to add upper cabinets – both for the overall look of the room (weirdly enough, the ceiling looks taller with the upper cabinets because they draw the eye all the way up) and bigger (maybe because the clutter is behind them and the fronts are so smooth and simple)?
The upper cabinet on the right of the room holds plates, mugs, and mixing bowls on the bottom two shelves. The top two shelves are more of Sherry’s decorative objects – fancier serving bowls, extra vases, etc. These decorative items had been in our bedroom cabinets on either side of the fireplace before this point (vases don’t feel that crazy in a bedroom cabinet – but it’s so nice to have them in the kitchen by the sink!). Plus moving them in here freed up more space in the bedroom for bedroom stuff… you know like our podcast microphone. Ha!
If you’re wondering where our bowls and drinking glasses are, those are on the (still remaining) open shelves next to our kitchen table. As I mentioned in the video, we own more glasses and bowls, the dishwasher was just full when we took these pics/made the video. We love storing glasses and bowls on that bottom shelf because they’re easier for the kids to reach when they make themselves a bowl of cereal or grab a glass of water. Maybe once they’re taller (which is happening quickly) we’ll move everything together to that upper cabinet, but for now this works well.
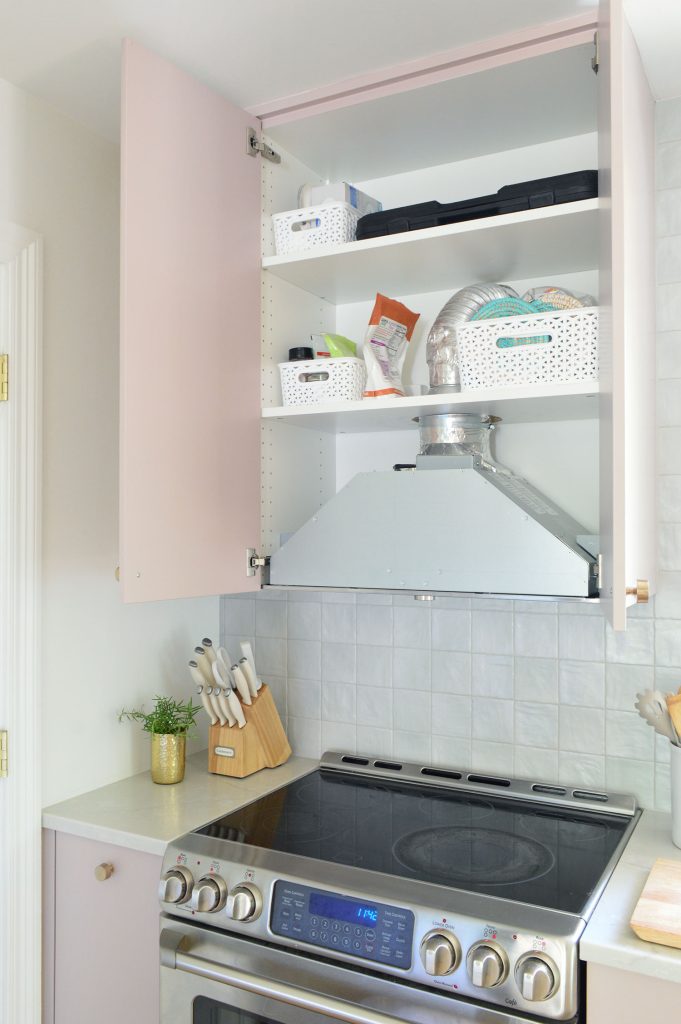
We’re still working on the organization of the upper cabinets on the left side of the room. The large cabinet primarily houses the hidden exhaust fan for our stove, but we’ve tucked some bins with extra spices, baking goods, and other miscellaneous stuff around it. The big black case on top contains our grill tools, which will eventually move outside once the two outdoor cabinets that we’ve ordered finally arrive. So that’ll free up some extra space for more bins of anything else we might need to store as time goes on.
There’s another, narrower cabinet next to this one (you can see it in the video) that holds our strainer, vitamins, and other miscellaneous baking & cooking stuff, along with Sherry’s coconut oil and apple cider vinegar stock (she is who she is). You can see it in the video if you want a peek.
We’ve ordered some additional shelves to make the most of that corner upper cabinet, so… get excited. Update: they came before we got this post up, so maybe Sherry can share a quick peek on Instagram Stories sometime.
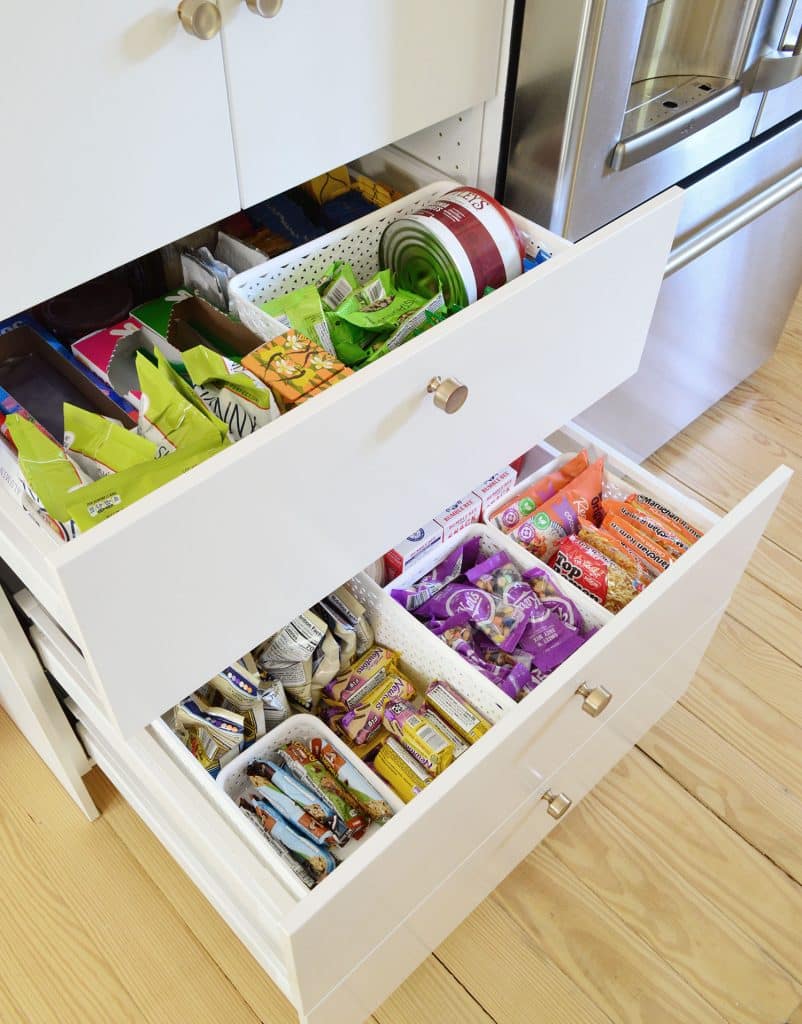
The Pantry Cabinet
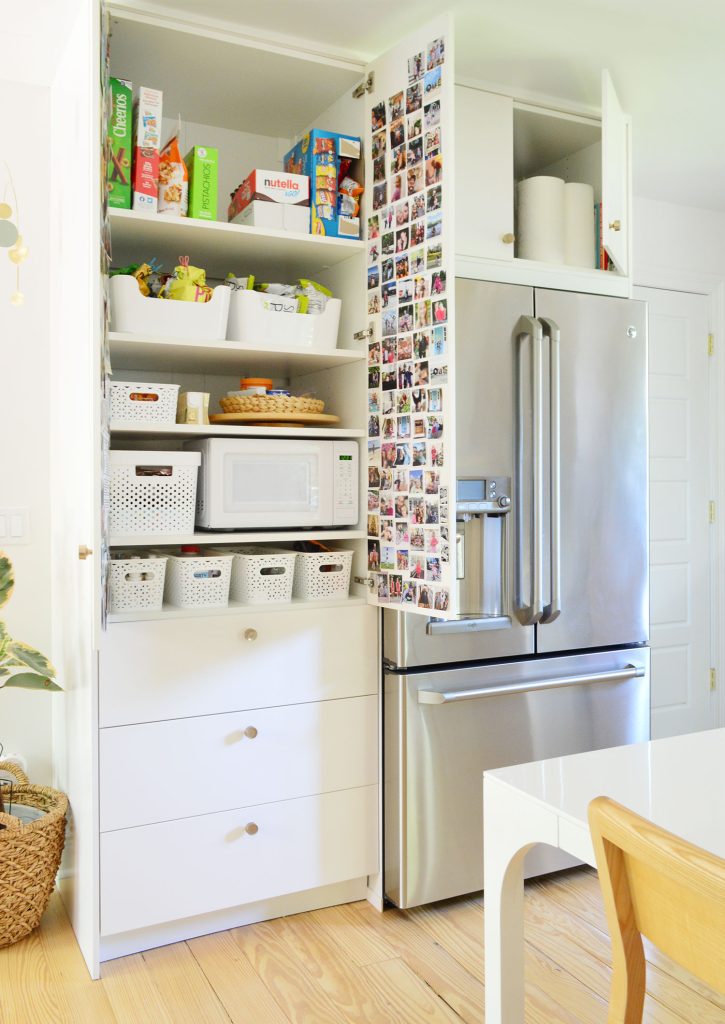
Our pantry cabinet is by far the biggest addition that we made to this room in terms of functional cabinet storage. The space simply didn’t exist in the prior incarnations of this kitchen and boy are we thrilled to have it.
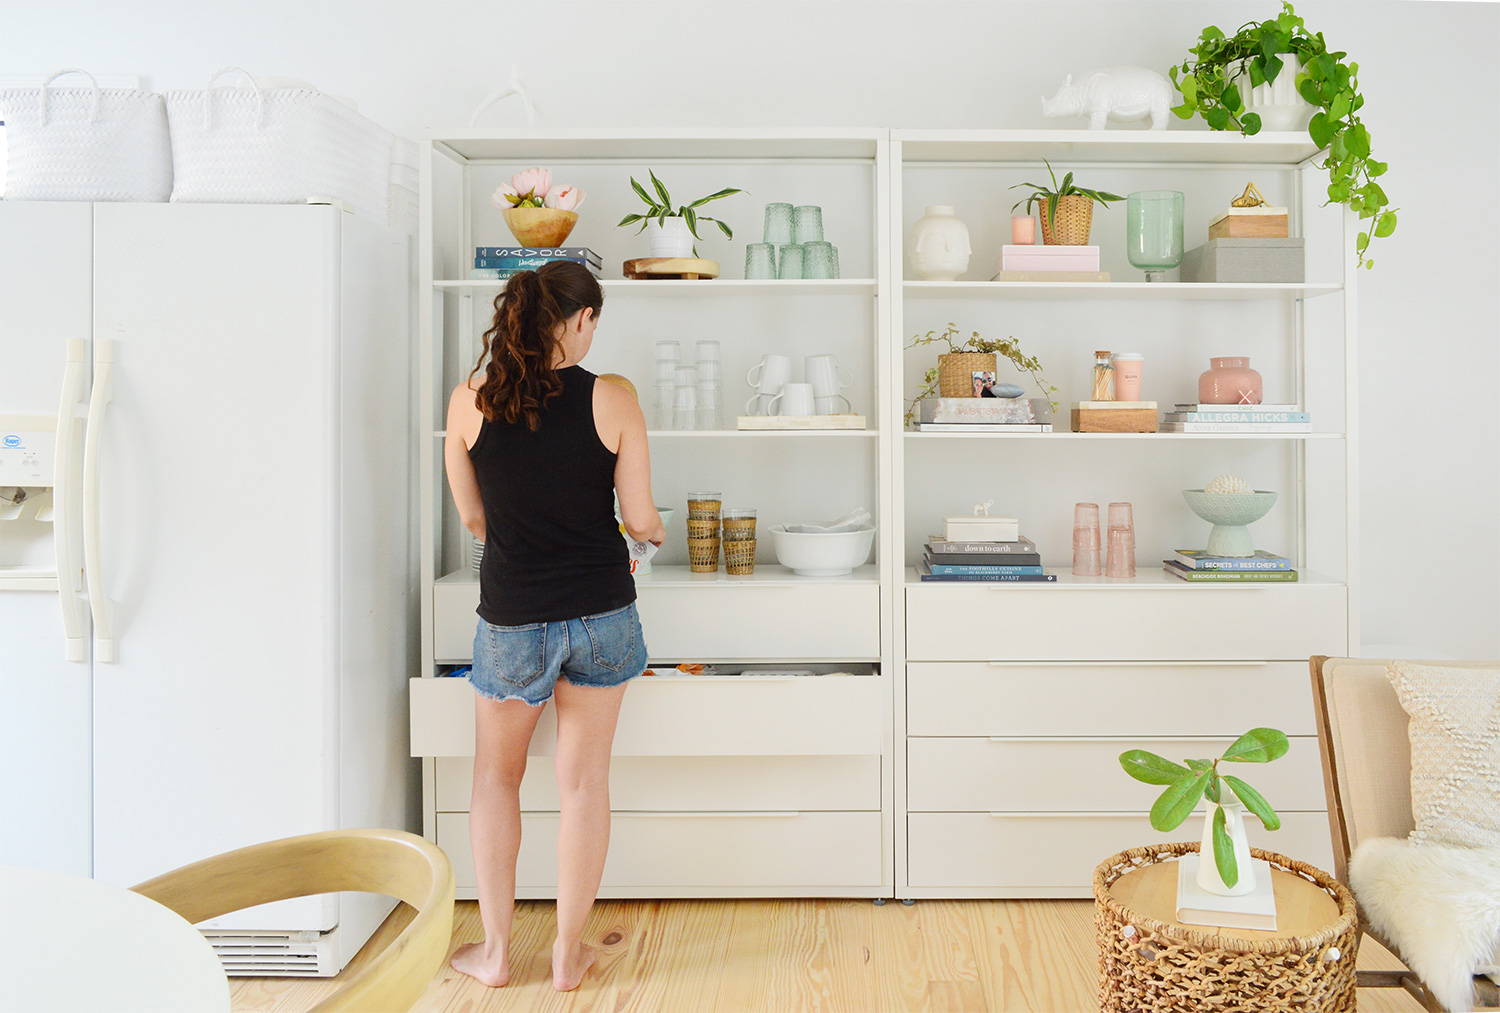
Prior to having the pantry cabinets, we used the two Ikea Fjalkinge bookcases as our “pantry storage” on the opposite wall, which is where our fridge was at the time. All of our shelf-stable food was stored in the lower drawers. It wasn’t the most spacious or flexible solution, but it worked for us for many months.
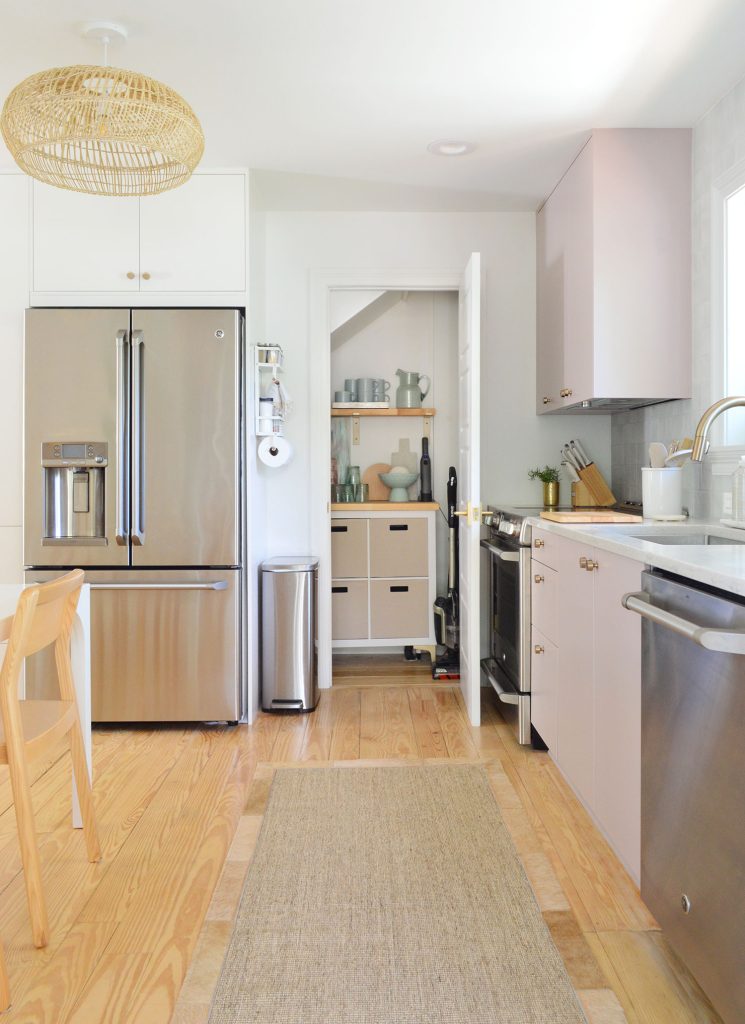
Now those two bookcases live upstairs in our family room and we’ve earned a lot more food storage on the other side of the room, thanks to these new floor-to-ceiling Ikea cabinets that we built in around our fridge, which we moved over to that wall (more on that here).
The top half is all shelving and we’ve used various bins and trays to wrangle things. There’s a variety of pantry stuff in here, but the most notable thing is that the addition of the pantry has allowed us to grab a few extras of something that’s on sale (like cereal or nutella, you know the important stuff), because we have room to keep “backstock” food on the highest shelf. That top shelf is just “surplus” – so we look up there to refill whatever needs to be refilled down below where our kids can grab everything – and if we don’t have it up there, onto the shopping list it goes. We’ve also got things like paper towels, coolers, s’mores supplies, and even our microwave in the cabinet over the fridge.
Most of the action takes place below, in the three lower drawers. This is basically snack and dry food central in our household. Both of our kids prepare their own school lunches, so keeping these well stocked helps that happen easily and without fuss every weekday morning. It looks a little stuffed in this photo, but we had just gotten back from the grocery store. Maybe it makes up for only having four glass cups on the floating shelves with the rest in the dishwasher 😉
That pretty much covers all of the kitchen cabinets in our new kitchen. By creating better storage in here, it has also helped us fine-tune the storage and organization across the rest of our house. As another example, we no longer have to keep keys and the dog leash in the laundry closet because they’re right in that drawer by the side door which we now use every day (we park on that side of the house, so it’s a great route for walking in & out).
And as for our revamped utility closet in the kitchen (which is also SUCH AN UPGRADE), we’re hoping to write a whole post about that soon. It’s wild to think that there used to just be a big water heater right behind that door that blocked us from using almost all of the closet.
If you’d like to know the sources for anything in our kitchen, from the fruit bowl to the toaster or the runner and the pendant light (all the things!), they’re linked and listedright here in this post for you. Plus this page is something we put together to try to help you find the sources for everything in our entire house.
And if you want to dig deeper into some kitchen organization posts of the past (or if you just want to virtually snoop through our other kitchens), feel free to check these out:
*This post contains affiliate links, so we may earn a small commission when you make a purchase through links on our site at no additional cost to you.
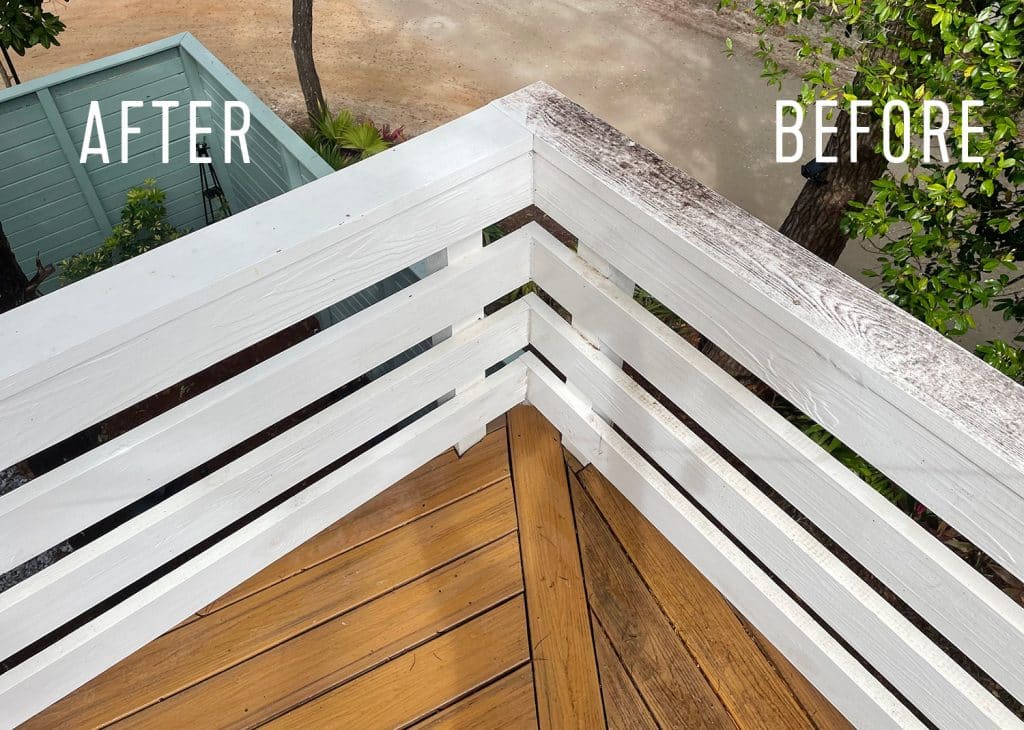
We’ve mentioned how we use our pressure washer to revive various things around the house – like outdoor furniture and even an indoor rug – but we still hear from people who fear that it’s complicated to set up or expensive to buy or hard to control… and the good news is that it’s none of those things. So this post is a comprehensive start-to-finish guide for anyone who’s finally ready to get their pressure washing feet wet (maybe even literally).
Pressure washing is an easy, affordable, and TOTALLY AWESOME way to keep your outdoor spaces looking fresh. So I’m walking you through everything from setting it up and turning it on, to where and how we use ours. It makes such an insane difference every spring, I’d even call it a DIY VIP.
We were a bit intimidated the first time we tried pressure washing nearly 10 years ago. The cumbersome gas-powered machine we rented for a day was so big it didn’t even fit in our car! So I TOTALLY understand anyone with PWH (pressure washing hesitation).
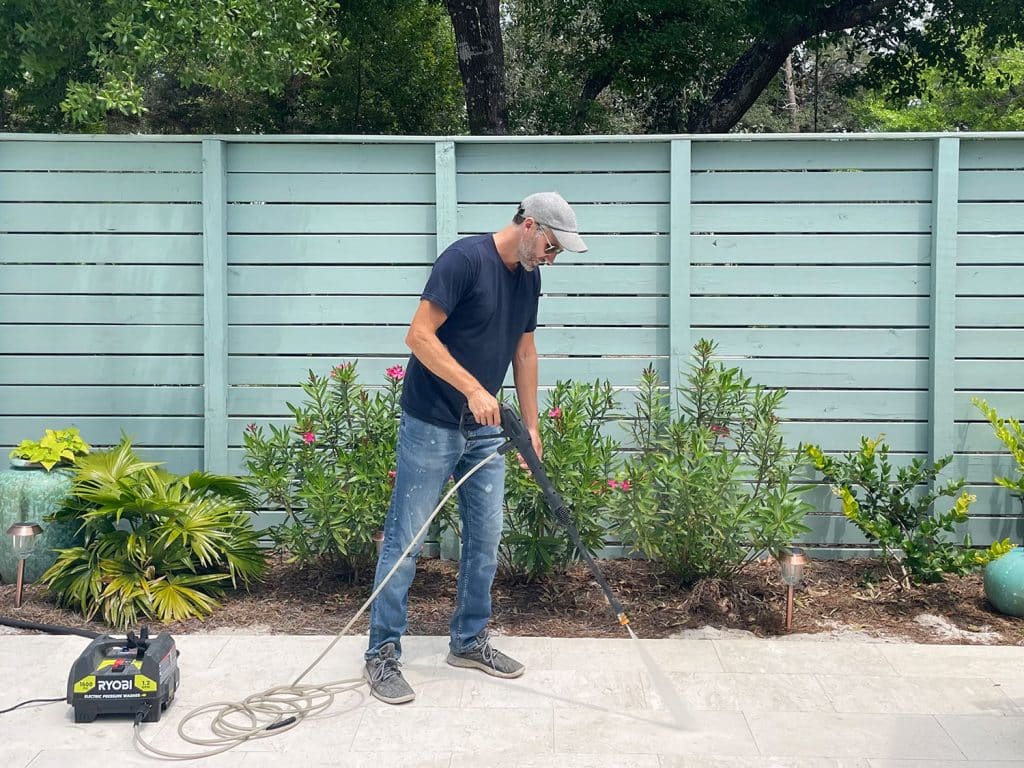
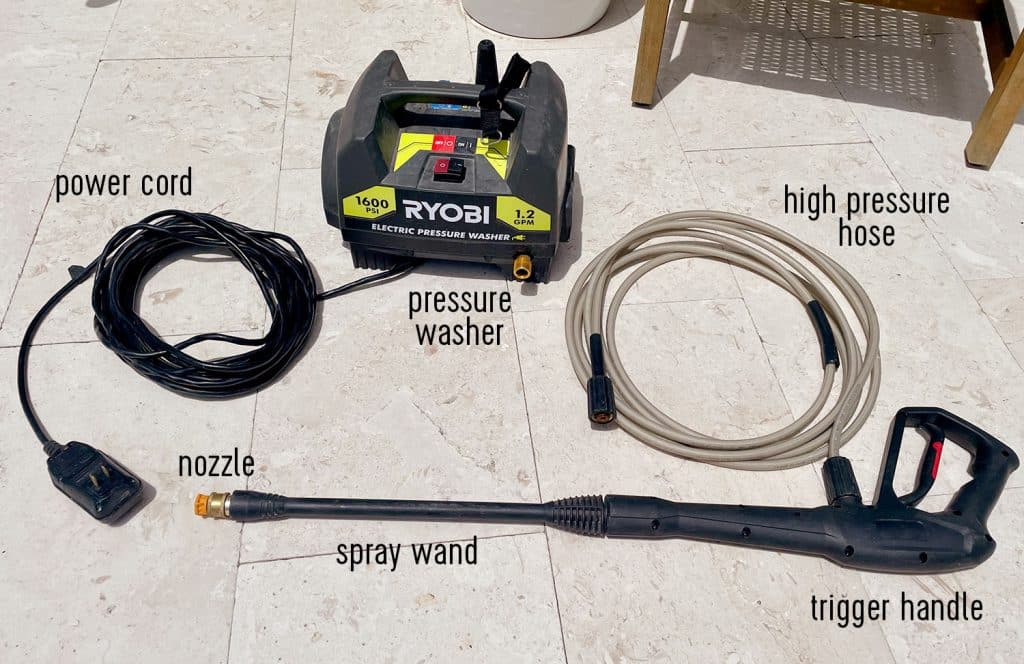
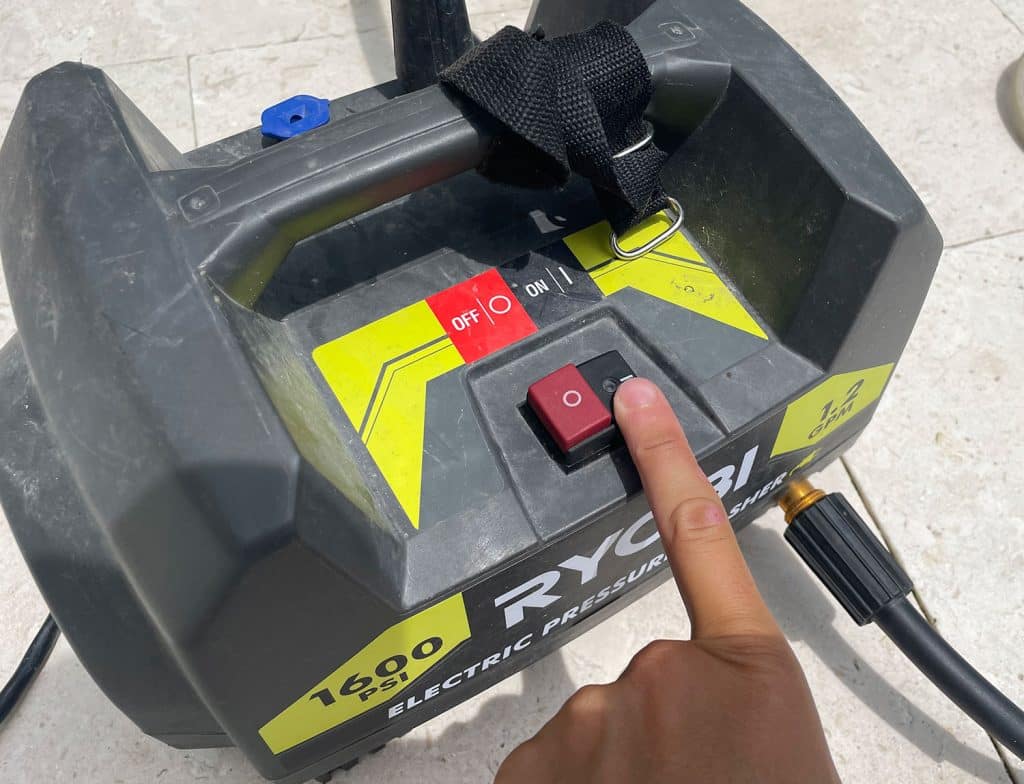
But that all changed when we found a GREAT pressure washer that’s super compact and easy to use – this $99 Electric Pressure Washer from Ryobi. Both Sherry and I use it regularly – and neither of us have any issues controlling it or having enough power to get every single task on our list done. It’ll make a pressure washing convert out of just about anyone. We bought it many years ago with our own money and love it – so nothing about this glowing review is sponsored in any way.
A Beginner’s Video Guide To Pressure Washing
We’ll cover all three of those topics in text & photos below, but if you want to see ALL of it in action and in real-time, the video below is for you. Oh yeah and there’s lots of that sweet sweet pressure washing footage that everyone’s eyeballs can’t help but love. And more importantly, several cameos by our dog Penny.
Again, we currently own this $99 Electric Pressure Washer from Ryobi. We bought it for our beach house in 2018, and when we moved we opted to bring it with us instead of an older/larger version we had before – just because this one is so compact and reliable and (most importantly) GOOD AT CLEANING. There are definitely more powerful (and more expensive) options out there, but this pressure washer has always met our needs. Always. In fact, we don’t even use it on it’s highest setting. That’s how adequately powerful it is. Plus it’s pretty much the most affordable option out there and we especially love that it’s compact and easy to use. So unless you have a special need for something more intense, this is a fantastic option.
The box includes everything shown above, you just need to supply water (via a garden hose) and power. And, as we show in the video, set-up is pretty much as easy as just connecting those two things!
Step 1: Assemble Your Wand
We typically store our wand and trigger handle assembled, but coming fresh out of the box you’ll need to lock these two pieces together with a simple twist.
Step 2: Connect Your High-Pressure Hose
The high-pressure hose is what carries the pressurized water from the machine to the spray wand. Each end has an identical black threaded collar. One end connects to your trigger handle, the other to the brass connection on the pressure washer. Just hand tighten until they’re both secure.
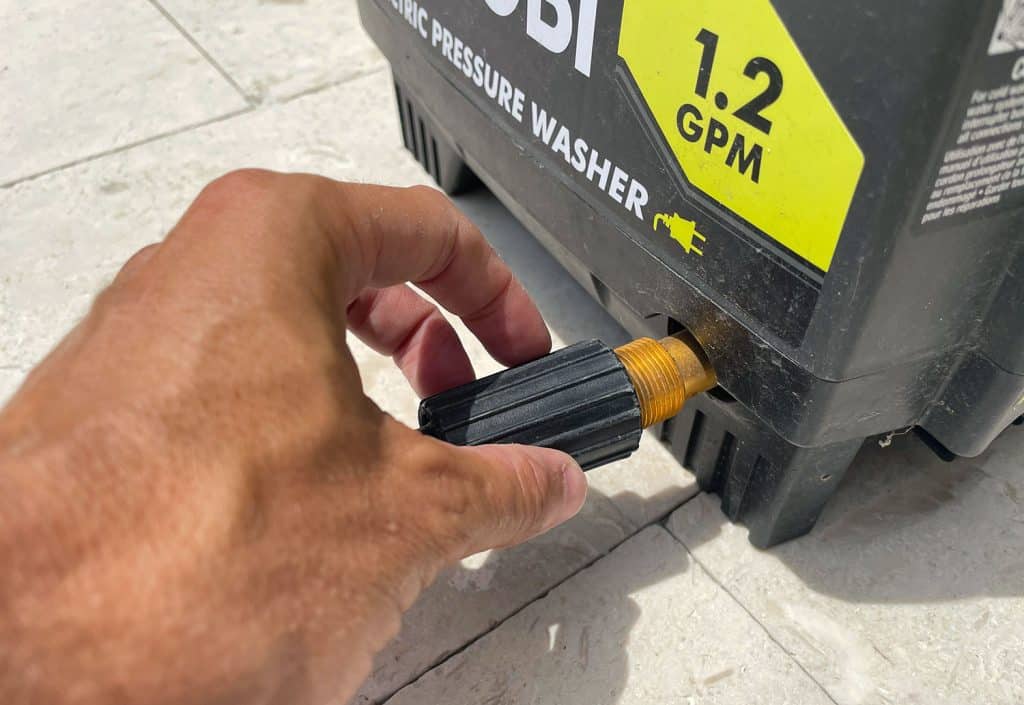
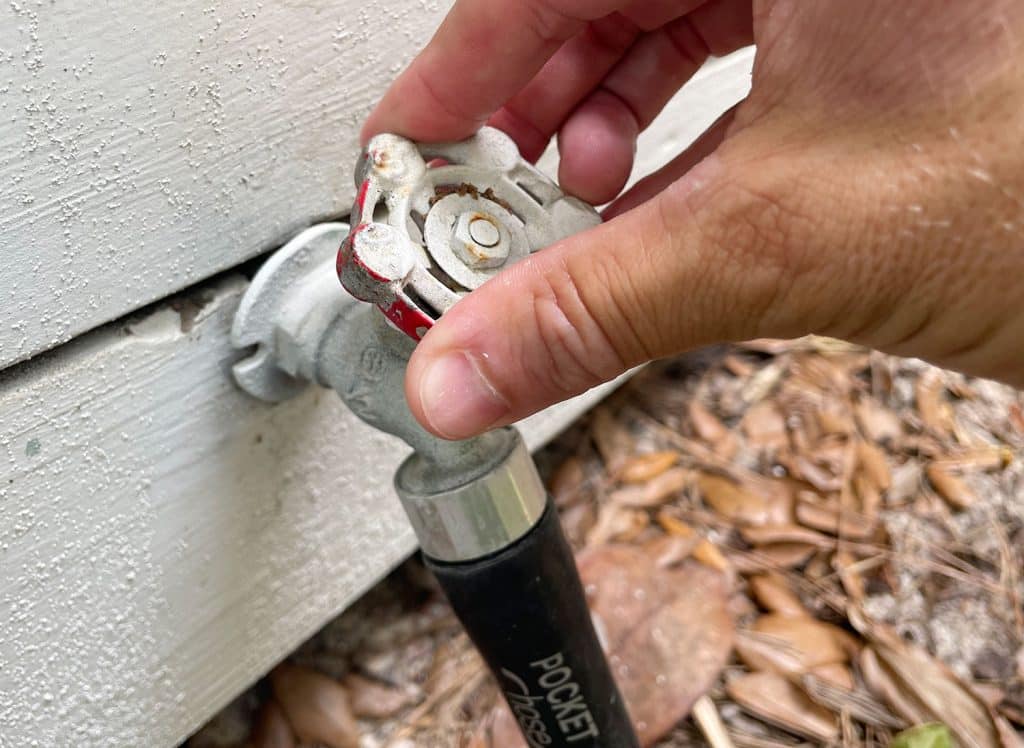
Step 3: Connect Your Garden Hose
On the opposite side of the pressure washer, there’s a black threaded connection that fits a regular garden hose. Attach your hose tightly just like you would screw it onto your home’s hose bib.
Step 4: Select & Attach Your Nozzle
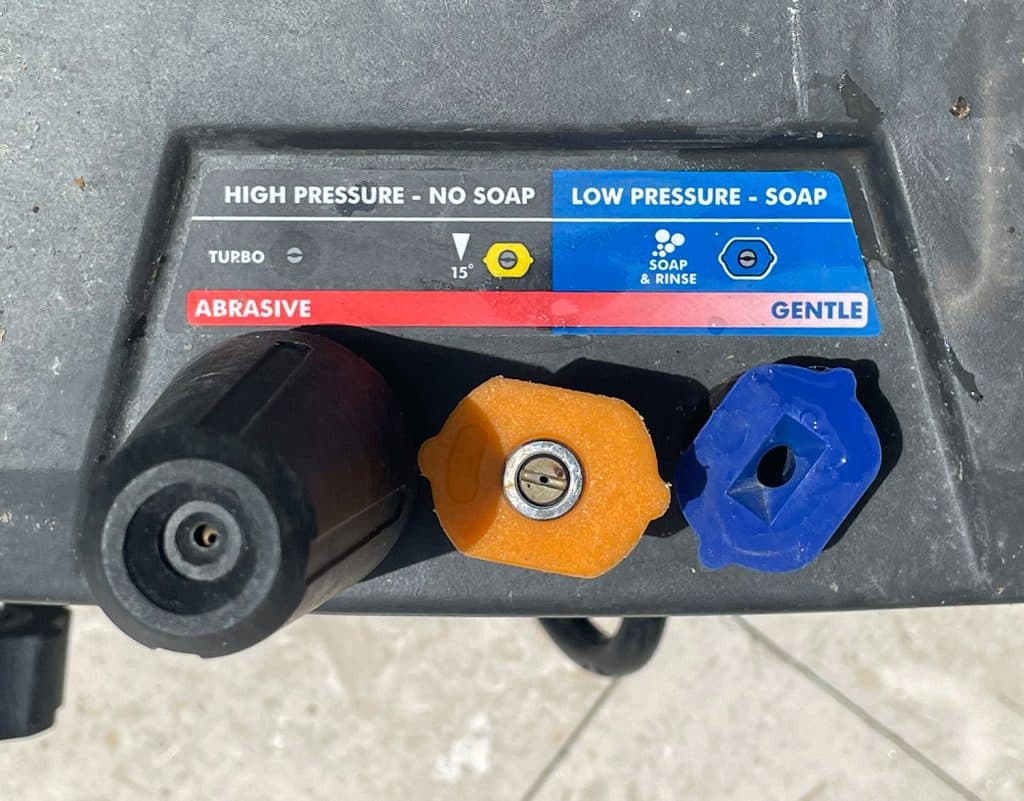
This pressure washer comes with 3 nozzle options that offer different levels of pressure for different applications (you can also purchase others as needed). There’s a handy guide on the top of the device that explains the differences between the three, along with holes to store them in.
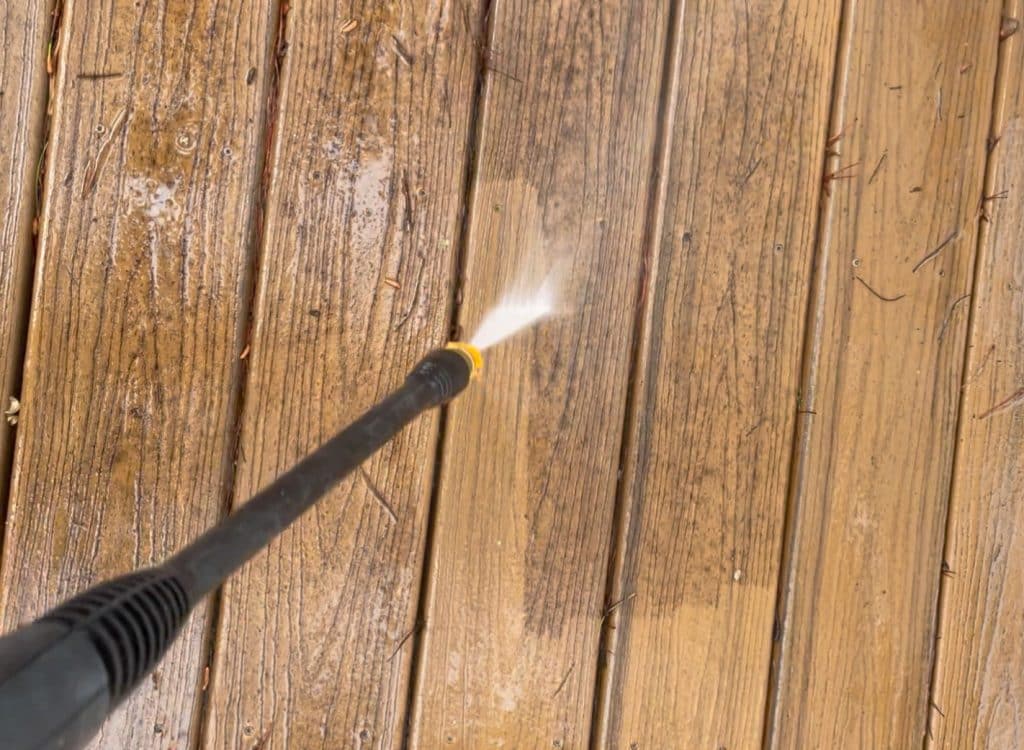
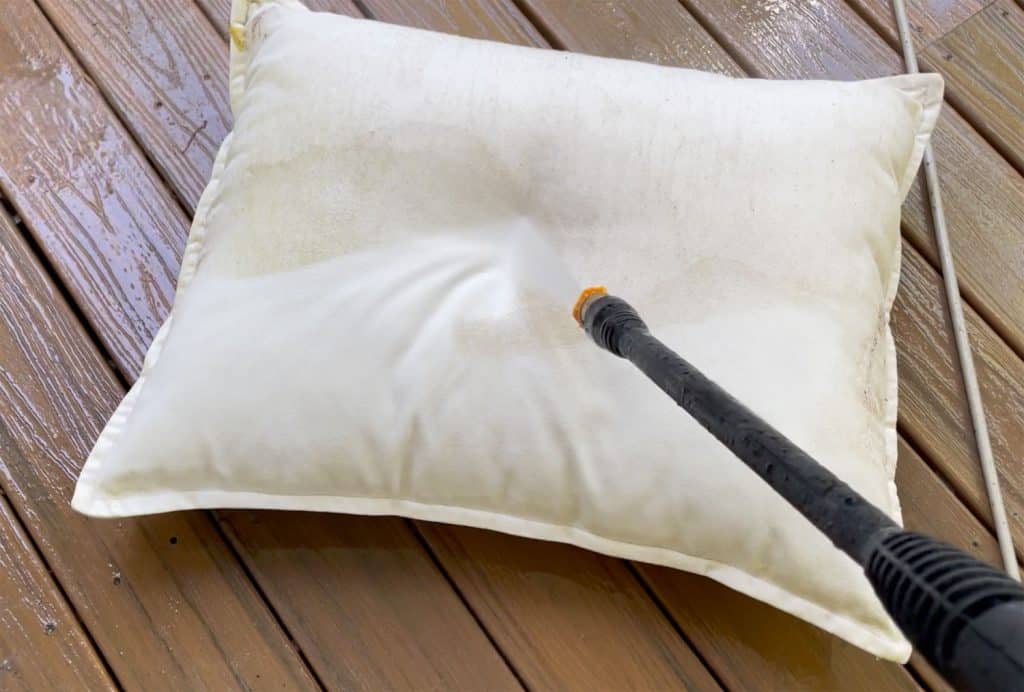
As we describe in the video, we almost EXCLUSIVELY use the middle (medium pressure) orange nozzle. It’s kind of the Goldilocks of options, giving us the “just right” amount of pressure for cleaning patios, decking, outdoor fabrics, and more. Plus, you can always adjust the pressure you’re applying by simply holding your wand closer or farther from the surface you’re cleaning.
The distance matters – so try to watch the video above whenever you can to see more of what we mean. Held too close to something, even the medium pressure nozzle can strip paint or stain off of wood – but spraying with adequate distance can mean zero removal of anything but dirt and grime – which is SO satisfying, and leaves lots of surfaces outside looking like new.
To attach your selected nozzle at the end of the wand, you just pull down on the brass collar and place the nozzle into the opening. Releasing the collar locks it into place.
This completes all of the water connections you need to make, which means you can now…
Step 4: Turn On Your Hose
With your water connections secure, you can now turn on the water at your hose bib. It’s a good idea to open that sucker ALLLLLLLL the way to be sure you’re getting the fullest flow possible from the hose.
You also want to check your hose for any kinks, leaks, or other knots that might prevent the water from flowing freely to your pressure washer. It’s also a good idea to squeeze the trigger on your pressure washer for several seconds to make sure the water is coming out steadily before proceeding.
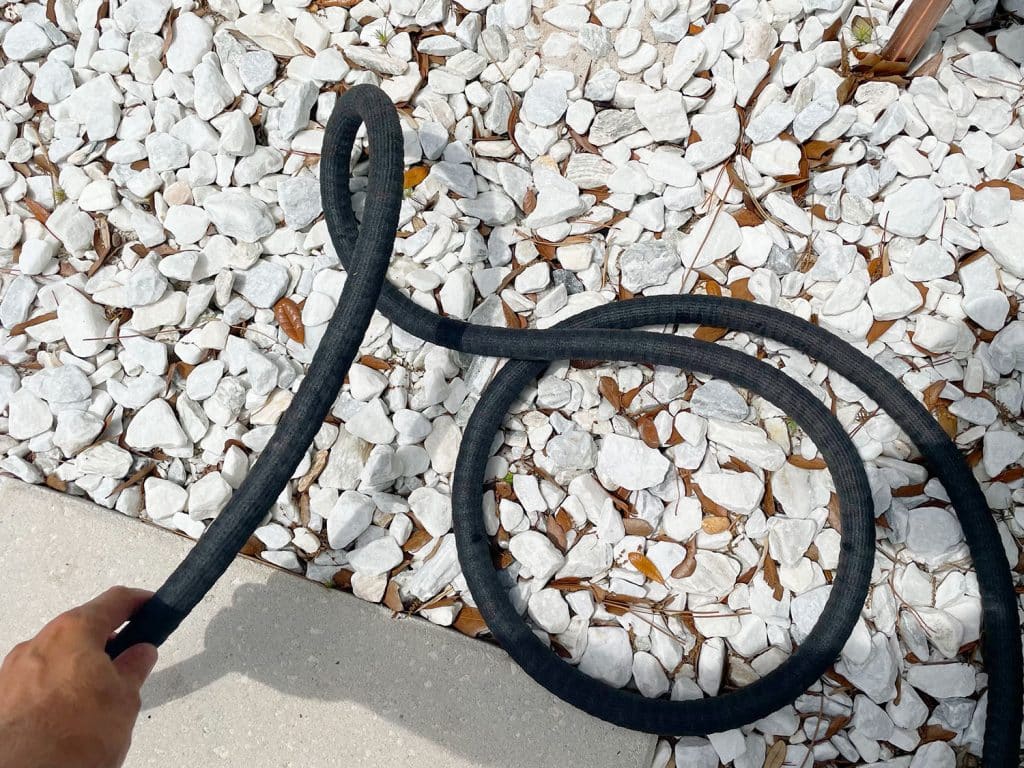
You may notice that we’re using one of those expandable “pocket hoses” that shrink up when it’s not full of water. We love these hoses because they’re less bulky and cumbersome than traditional hoses, but some may dissuade you from using them with certain pressure washers (we’ve personally never had any issue using ours).
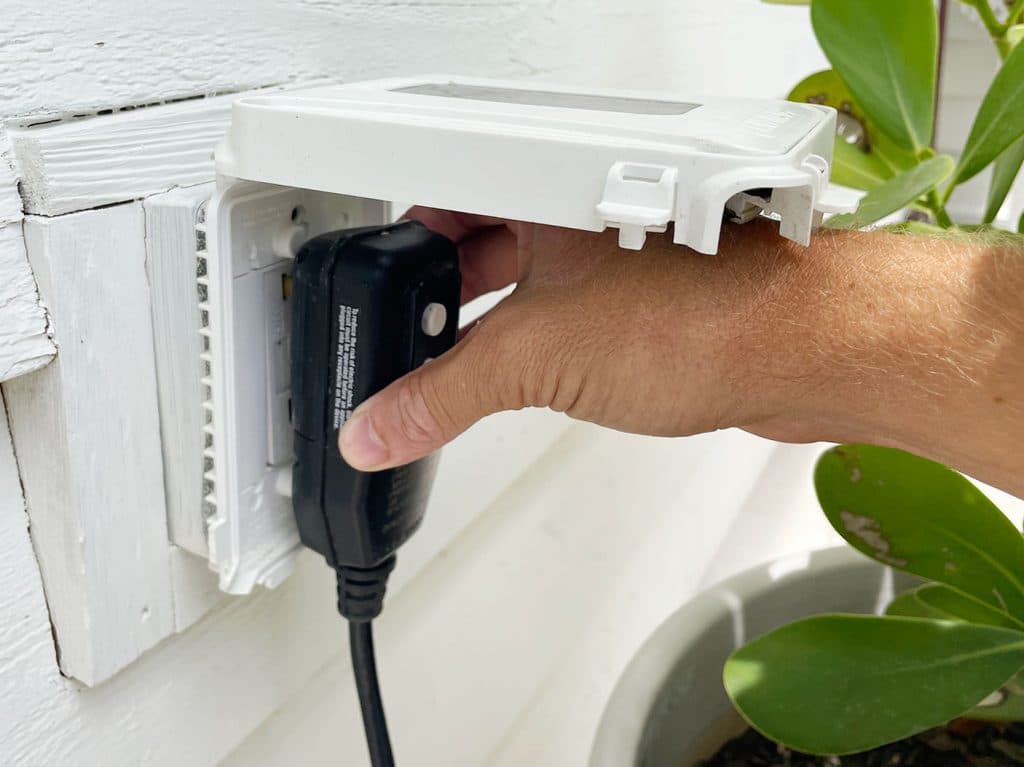
Step 5: Connect Your Power
With your water good to go, now you can plug in your pressure washer. Ours comes with a SUPER long cord, so you probably won’t need an extension cord, but you can always use one if necessary.
If you are connecting an extension cord, just be sure to elevate the connection point of the two plugs (like on a table, chair, or bucket) to prevent water from dripping toward the plugs.
Step 6: Turn On Your Pressure Washer
Turn on the pressure washer using the black button on the top of the machine. You will immediately hear the device engage and you may see your high-pressure hose stiffen as pressurized water fills it up. If this does not happen, try pressing the test & reset buttons on the plug or on your GFI outlet. Those can be common culprits for your power not working.
Now your pressure washer is set up and ready for use!
Before You Start Cleaning With Your Pressure Washer
We cover a lot of tips along the way during the video (watching that is truly the best way to get a full primer on pressure washing), but here are a handful of things to keep in mind before you start your first pressure washing adventure.
Wear close-toed shoes and pants to help protect your feet and lower legs from any accidental pressurized spray. A direct, close-range spray can sting or even break the skin.
Clean top to bottom. If your to-do list includes multiple surfaces, start with the higher ones (railings, patio umbrellas, etc) and work down to lower ones (decks, patios).
Start slow and test in an inconspicuous spot first. It’s always good to start in a hidden spot (like the back of a pillow or the area of your deck that’s under your outdoor sofa). If it’s your first time pressure washing a particular material or surface, start with low pressure and gradually increase it as needed (by bringing your wand closer or changing nozzles) to make sure you’re not damaging the surface. Don’t start by blasting something with the nozzle mere inches away ever.
Beware of sensitive materials like windows, soft woods, & vinyl siding that can be easily broken or damaged with too much pressure. We generally tend to stick to cleaning concrete, outdoor stone or tile, Trex or wood decking, brick paths or patios, wood or metal railings, and outdoor furniture/pillows as well as outdoor AND indoor rugs (more on that here). You obviously want the nozzle further away from fabric than, say, concrete.
Mind your cords. This pressure washer is super light and portable, but keep an eye on your power cord and water hoses as you move it to make sure you’re not kinking anything or creating tripping hazards.
What We Clean With Our Pressure Washer
We typically break out our pressure washer 2-3 times a year to keep our various outdoor spaces looking fresh and clean. Between all of our trees, our clay/sand road, and the salty beach air, things can get grimy – so we usually do a pretty thorough cleaning in the spring to wash off the dirt, pollen, or mildew that collected on things over the winter. Then we might do some quicker “touch up” cleanings as needed in the summer and fall.
We use it on a variety of surfaces, but here are the primary ones that we’ll cover today:
Composite Decking
Painted Railings
Outdoor Fabrics
Stone Patios
Composite Decking
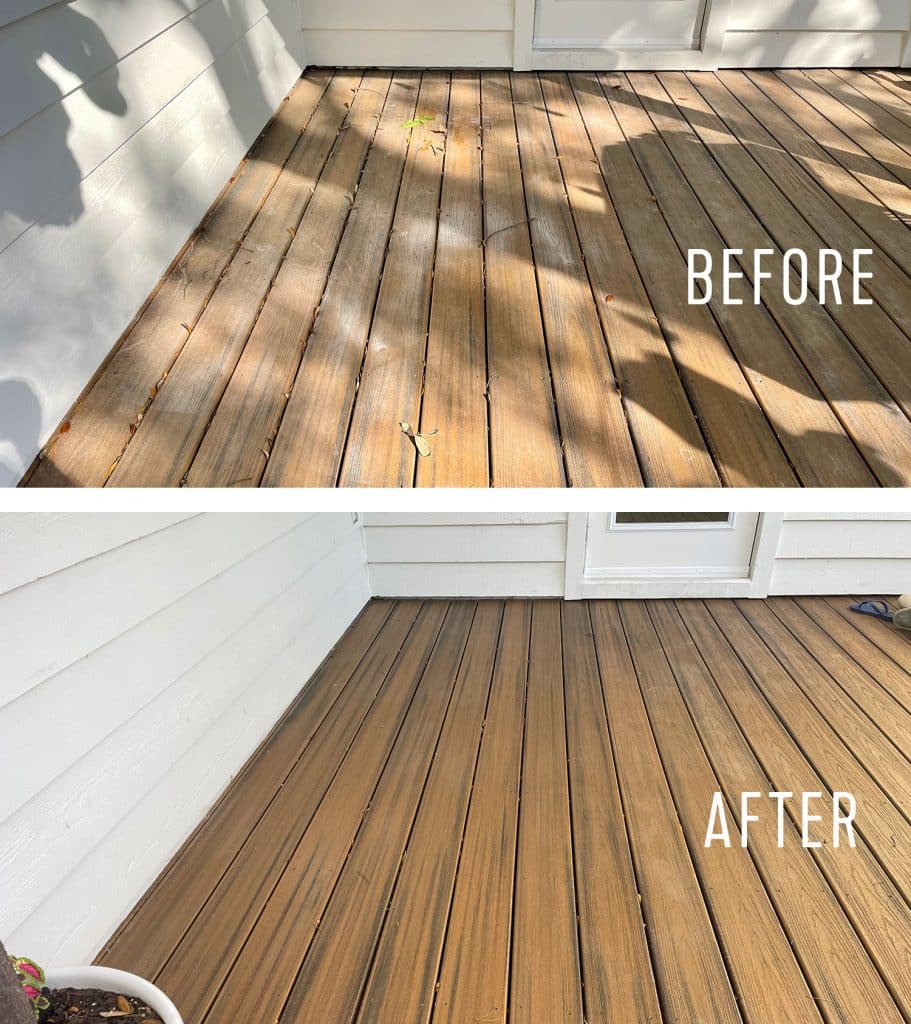
We have Trex decking on our porches and we’ve found the pressure washer to be a great way to get dirt, dust, and sand build-up off of them. The woodgrain texture on the Trex catches a lot of grime and we hadn’t cleaned our upstairs deck in a while, so it had quite the layer of black tree dirt. That made the job super satisfying though…
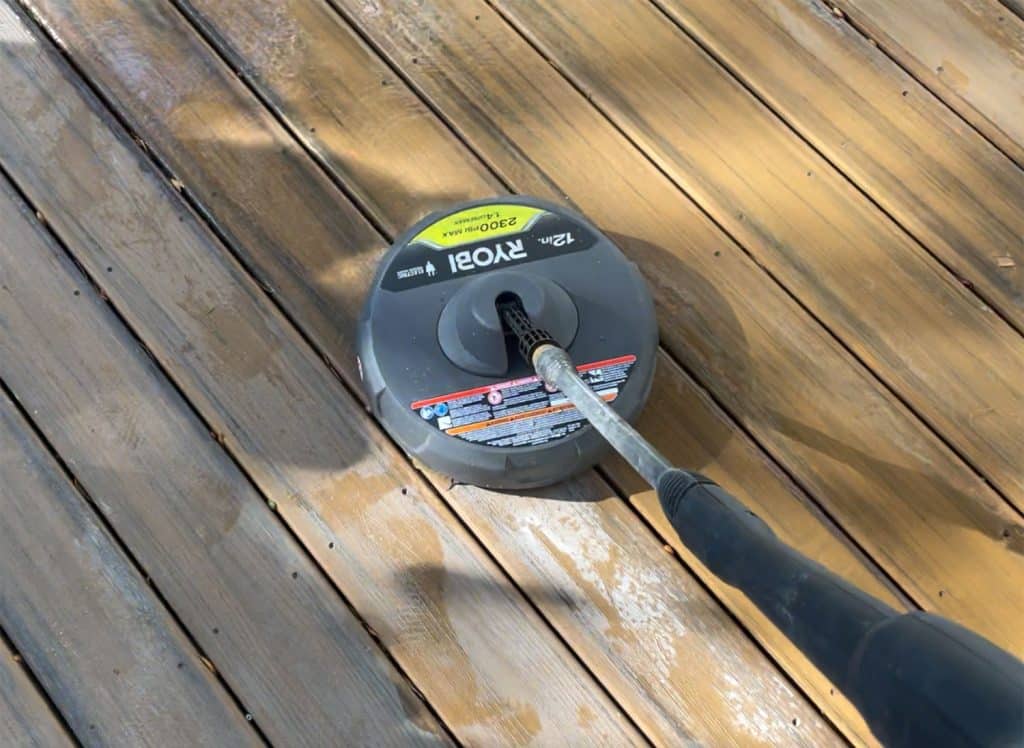
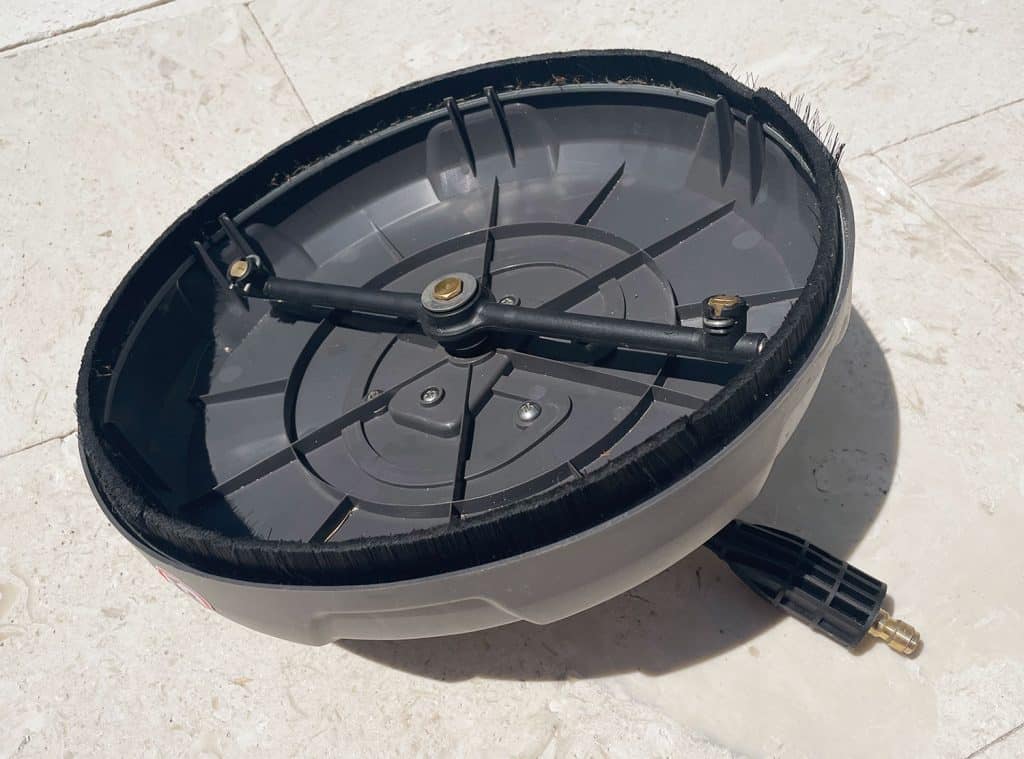
Doing that large upstairs deck was pretty tedious because we had to be slow & systematic so we didn’t miss any boards (sometimes it’s hard to see what’s still dirty once everything has gotten wet). So before doing my downstairs decks I bought this $40 surface cleaning attachment for electric pressure washers that a bunch of you have recommended for doing larger “floor” surfaces faster. Boy was it a game-changer!
It attaches to my spray wand just like any other nozzle does, but provides a much larger 12″ cleaning surface, which made pressure washing my decks SO. MUCH. FASTER.
Not only was it faster, but I didn’t worry as much about leaving “streaks” if I missed a spot or only cleaned part of a particular board. You can see below that our decks can get a lot of sandy footprints and settled sand on them. But they look much fresher now!
Railings
Another area that we hadn’t cleaned in a while was the upstairs deck railings, which had a build-up of tree dirt on them just like the Trex decking.
These railings are painted wood, and you should always use a bit of caution when pressure washing painted surfaces because the pressure can cause the paint to chip or flake. Also, if any areas have started to rot beneath the paint, the pressure washer can make the situation worse.
We just always keep a close eye on the surface as we clean, and lessen the pressure (step back!) or skip a particular spot if the paint isn’t holding up. If your biggest nightmare is some flaked paint, I’m also here to assure you that a few paint touch-ups aren’t a big deal. We’ve done them and they’re never detectible once it’s dry.
Outdoor Fabrics
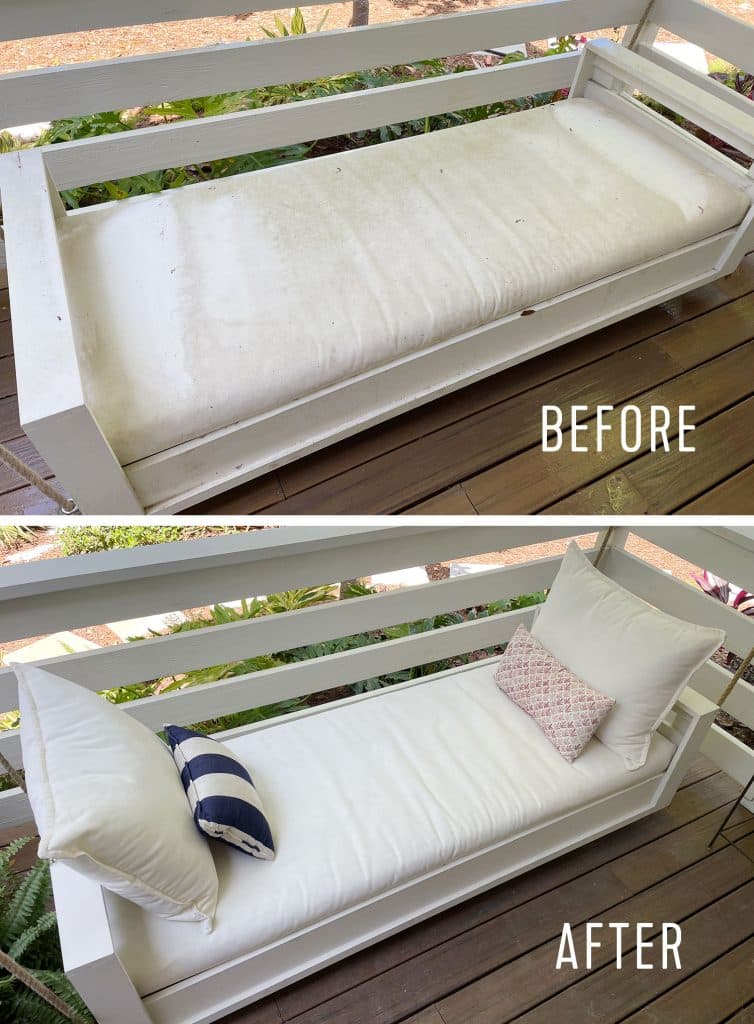
We’ve definitely extended the life of more than a few outdoor pillows and cushions thanks to our pressure washer. It’s just especially important with fabrics to take it slow because too much pressure can cause the fabric to tear or fray. So start on the back and with low pressure, especially if it’s the first time you’re cleaning that material.
Also, keep in mind that the process may not be perfect. Some stains may only get lighter, not disappear entirely. So you may need to attack certain spots with an outdoor cleaner or fabric cleaner to finish the job. But for us, we find the pressure washer does the bulk of the work getting our outdoor fabrics ready for spring. Hot tip: put them in the sun to dry. That does a great job of lightly bleaching some more stubborn stains than if you set them out to dry in the shade.
Stone Patio
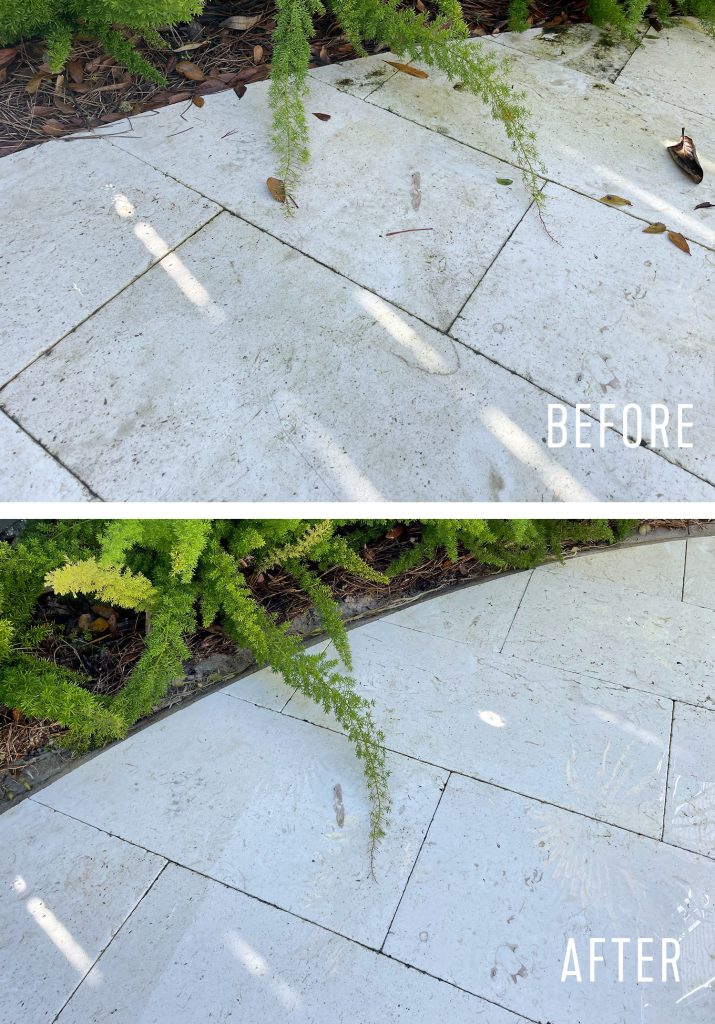
Pressure washing is a great way to get patios, driveways, sidewalks, and even some decking to look new again. This was the first season we used it to clean the stone patio around our pool, which had collected a lot of green scum in some of the more shaded areas of the yard (under and behind the lounge chairs for example).
The video shows how satisfying this really was, but the before & afters below give you an idea as well. It’s a bit hard to tell because the stone itself has some darker shell “spots” in it (and the surface is wet in the after shot), but this whole area looks totally redeemed.
*Everything except the left corner of the patio was cleaned in the photo above – see that line of darker scum? Such a difference.
When you’re cleaning patios or other stone surfaces, just be mindful of any polymeric sand (or regular sand) that you may have between the cracks. The pressure washer may blow that loose and you’ll need to refill it.
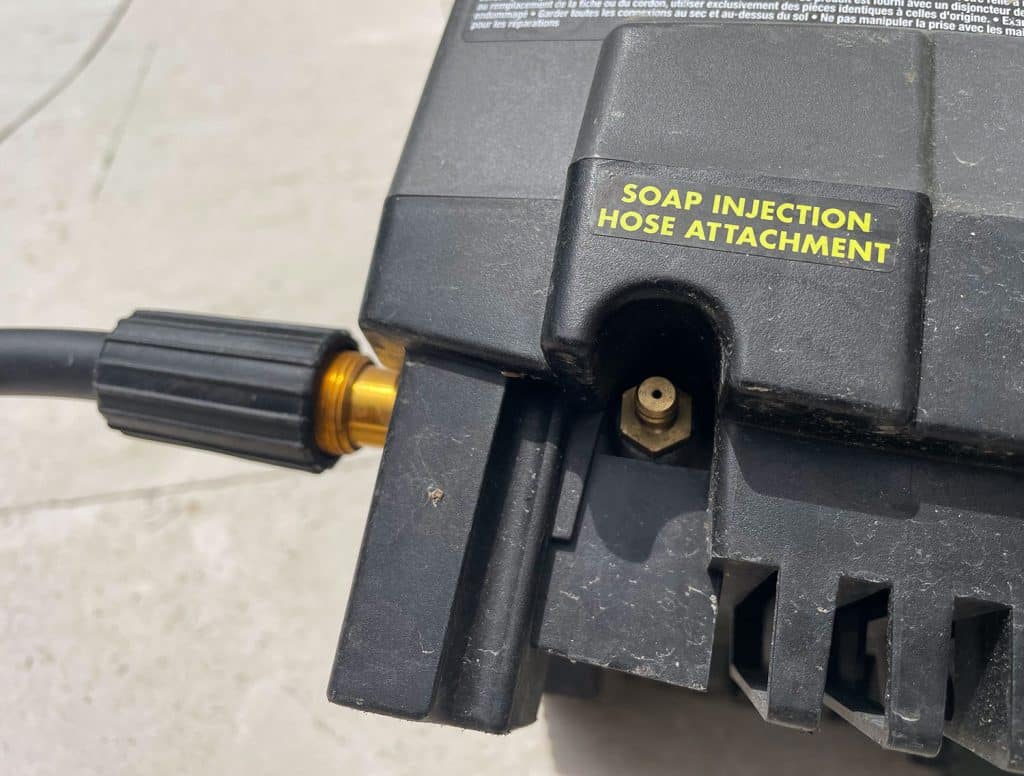
We also get asked very often about whether or not we add some sort of soap or cleaner to our pressure washer. While the machine DOES come with a way to wash with soap (it includes a hose that you can attach and connect to your bottle of soap), honestly, we’ve never used it. We just spray outdoor cleaners on certain items (mainly stubborn fabric stains – for example, we use this fabric cleaner) by hand and then pressure wash them to move those suds all around and rinse them away.
The last thing to keep in mind when cleaning outdoor fabrics is to make sure you have a sunny spot to let them FULLY dry. Otherwise, you may just encourage more mildew build-up.
Other Uses For Your Pressure Washer
While those are the ways that we currently use our pressure washer, there a TONS of other ways they can be useful around the house. Here are some previous posts we’ve written about other pressure washing adventures:
Putting Your Pressure Washer Away
Once you’ve finished your cleaning, disconnecting and storing your pressure washer is even easier than setting it up. You’re basically reversing the steps:
Turn it off and unplug it
Turn off your water
Spray the wand for several seconds to release the water pressure (it will make disconnecting the hoses easier)
Disconnect your garden hose
Disconnect your high-pressure hose from the pressure washer (we leave it attached to our spray wand, but you can disconnect that end too)
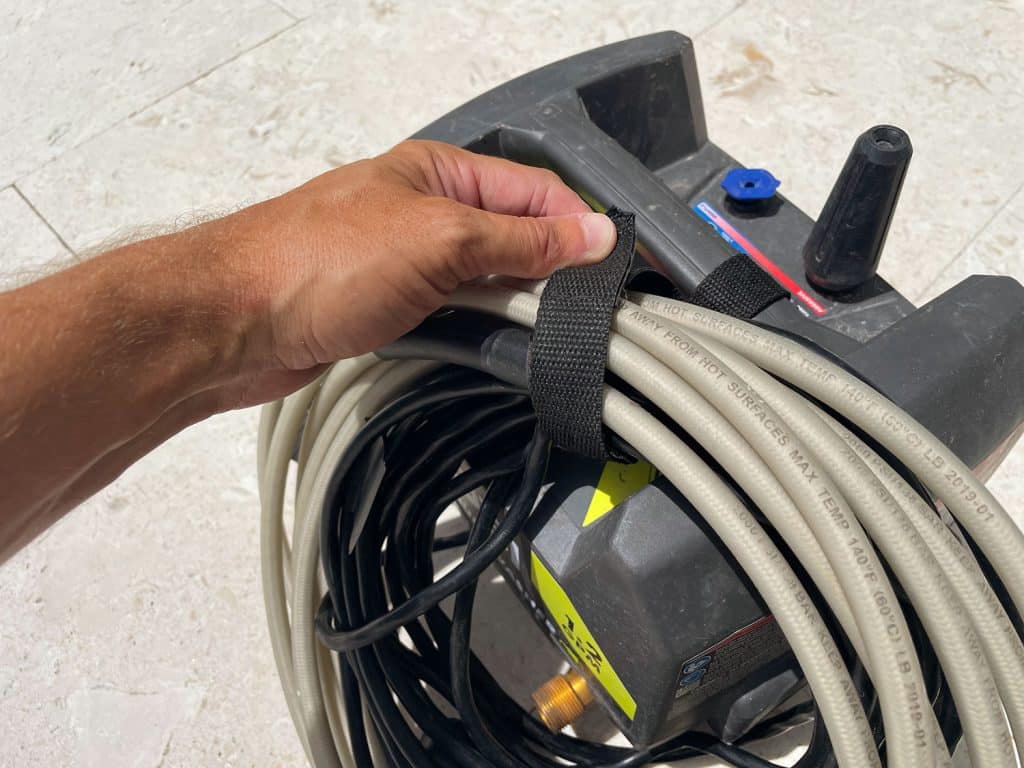
Once everything is disconnected, there’s a handy velcro strap on the handle of the machine to help you wrangle all of your cords and hoses. It’s one of our favorite features because it makes storing it so much easier! You can see it in action in the video 😉
So, there you have it. All the info I can possibly think of on the topic of pressure washing. I hope it leaves you feeling confident that you can tackle this project yourself (you can!). I’m ridiculously glad that we tried one out many years ago and have never regretted owning one since!
Sidenote: we finally better-categorized and updated our Amazon shop to include a lot of the more recent things we have been loving – like Sherry’s beloved robot vacuum, some new favorite family board games, our tried and true beach gear, favorite recent reads, etc – so that’s all right here.
*This post contains affiliate links, so we may earn a small commission when you make a purchase through links on our site at no additional cost to you.
You know I love writing a spare-no-details product review (like this one and this one), so when enough people pointed out that when they search the blog for info about our beloved air purifier, nothing really comes up, I thought… I shall remedy that today.
I know. I’m a hero.
I feel like I should also point out that we bought these ourselves with our own money and nobody at their company knows us from Adam.
Sherry has always suffered from bad seasonal allergies, so we were thrilled to find a home air purifier that finally gave her the allergy relief that so many companies promise. The allergy difference that it makes for Sherry is night and day. So much so that when they were packed in the pod while we were moving she was like “WHY ARE MY ALLERGIES KILLING ME?!?!” and then we were like…. “oh, we packed the air purifiers in the pod… this is what life is like without them.”
She even notices an uptick in allergy symptoms whenever we travel and stay at an Airbnb or a hotel, because… you guessed it… the air purifier isn’t there to relieve her. So yeah, it makes a real difference in her life and her sleep and her stuffiness (or lack thereof). So she travels with allergy medicine but doesn’t actually have to take any when we’re at home.
And since this particular purifier is easy on the eyes as well as extremely effective, we recommended them to pretty much anyone who will listen – hence this post.
How Do You Choose The Best Air Purifier?
After buying a more expensive “designer purifier” (the trendy and pricier Molekule – which Sherry bought, noticed zero difference in her allergies, and subsequently returned) – we now swear by the Blueair Blue series of home air purifiers. Because after you buy something expensive and notice zero difference and then google it only to see tons of complaints about that company/product, Sherry was feeling pretty sheepish (see this article, and this article for example).
So she did tons of research and looped me in on it too (you know I love research). We wanted something that would WORK HARD and help her sleep easier and wake up a lot less congested. And when you do the research the choice actually gets pretty easy. Our beloved Blueair Blue Pure 211+ purifier is consistently included on lists of “the Best Air Purifiers” including these from Good Housekeeping, Wirecutter, CNet, and the holy grail that is Consumer Reports. And this article is especially stunning when you look at the graphic that shows how much it beat out the other purifiers – including the $800 Dyson!
Just like many of these articles point out, we find these Blueair purifiers to be:
Effective
Easy to use
Attractive
Affordable
We’ll get into each of these in more detail in a moment. They’re also Energy-Star rated and identified as one of the quietest air purifiers out there, which is definitely a plus. We leave ours on low 24/7 and it’s as low of a hum as when our house’s heat runs – even softer than that. If you’re not standing right next to it, it’s hard to tell it’s on (except for how you feel).
What Blueair Models Do We Own?
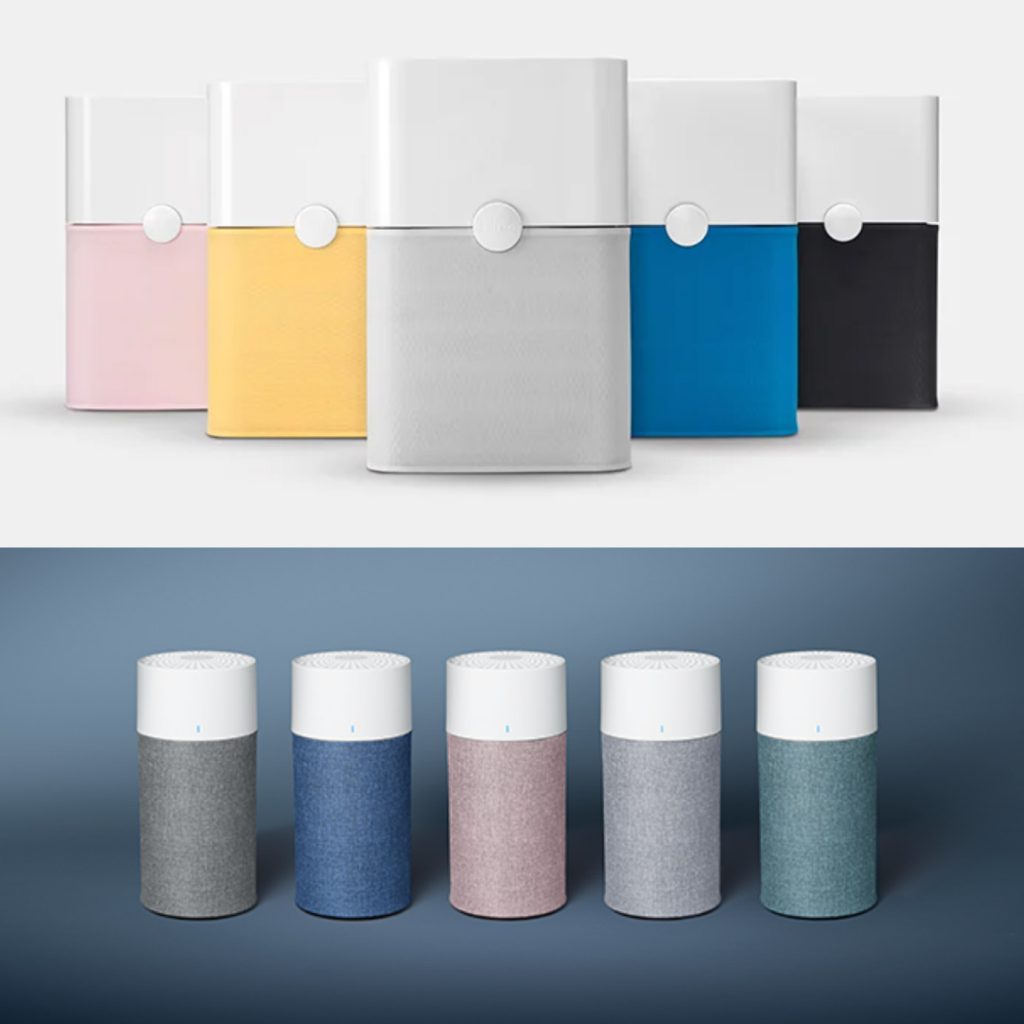
Within Blueair’s Blue series, there are four sizes designed for small rooms (100-250 square feet), medium rooms (250-400), large rooms (400-600), and extra-large rooms (600+). About four years ago we bought two of the large-room-sized Blue Pure 211+ purifiers, which have worked great for us ever since. We use one of them to cover our entire upstairs living room, and another one downstairs in our bedroom, which also covers the nearby hangout spot by our front door as well as our kitchen.
More recently – around 2 years ago – we also bought one of the small Blue Pure 411 purifiers for each of our kids’ rooms, which have also been great. Zero issues with any of them.
Does It Really Work?
Along with our anecdotal evidence about how much of a difference it makes for Sherry’s allergies, she has also heard from other people who got the same one and said it helped with everything from keeping their homes smoke free during the California and Oregon wildfires to helping someone with severe asthma to avoid hospitalization and steroids (which used to occur 2-3 times a year for her before she got the purifier).
Someone else wrote to say that she had chronic hives from an unknown allergen which resolved within a week of getting the air purifier. A mom of an 8-year-old with asthma that doesn’t respond well to steroids bought one and said he not only didn’t need a rescue inhaler anymore, he doesn’t even need his daily maintenance inhaler since getting the purifier. Lots of others also said their snoring (or their partner’s) completely resolved after getting one. And there were many stories about how someone thought they had a cold with a drippy nose and then discovered their purifier was unplugged, so they plugged it back in and that was the end of their sniffling. Note: You can read more about what other people said after getting one by clicking the archived circle that’s called “Air Purifier” on our Instagram profile page (you might have to scroll to the right to find it).
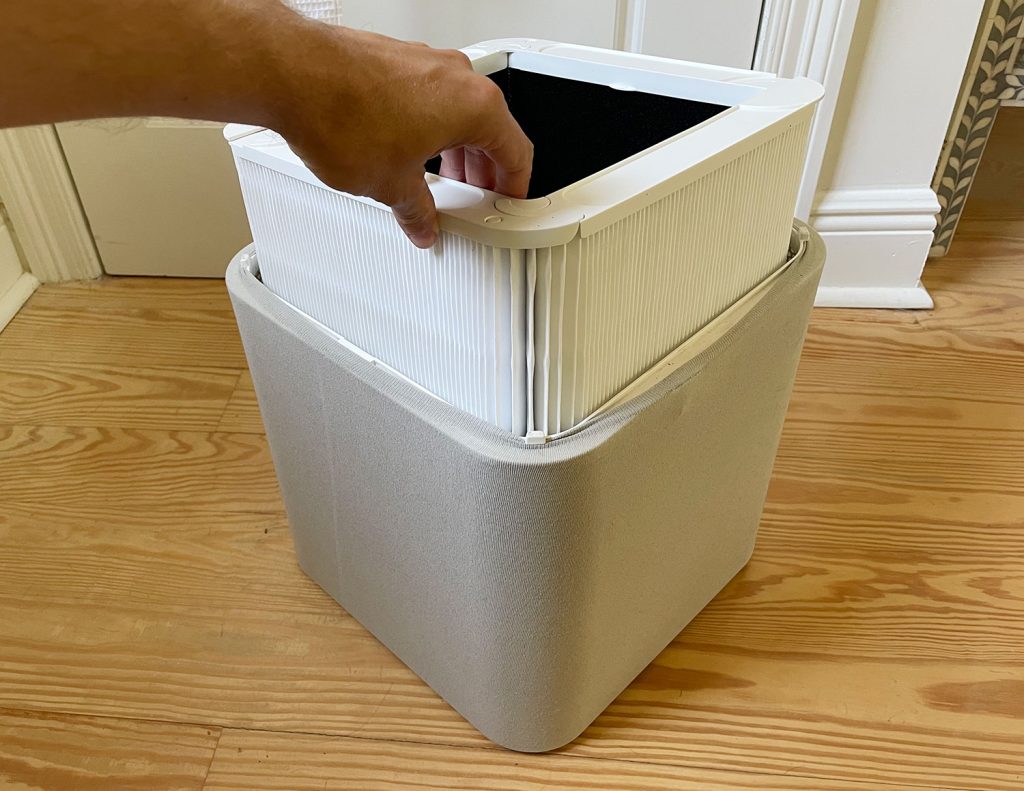
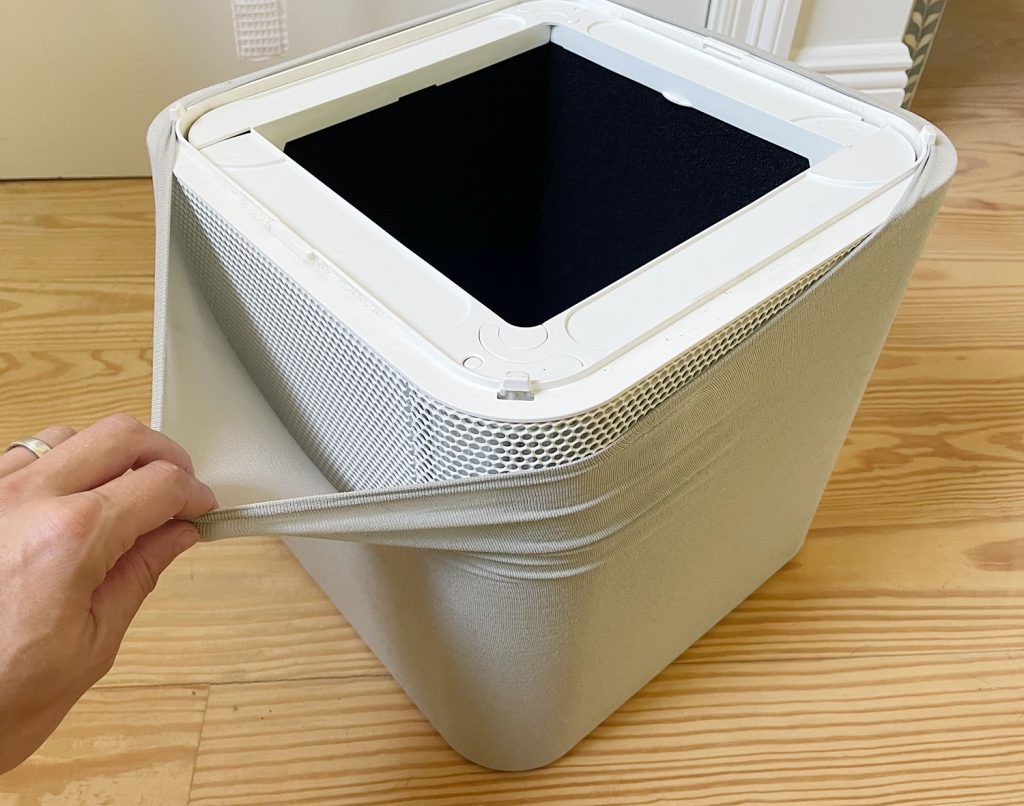
We also get some definite visual evidence that tells us our Blueair purifiers are working. Before I show it, I should explain how the Blueair Blue purifiers are designed. They’re basically made with 3 layers of filtration to capture a smorgasbord of nasties:
An outer fabric “prefilter” cover to trap large particles like dust bunnies, hair, and pet fur
A standard particle filter (similar to what you have in your HVAC unit) to catch pollen, dust, dander, and mold
An inner activated carbon lining to absorb odors, gases and VOCs
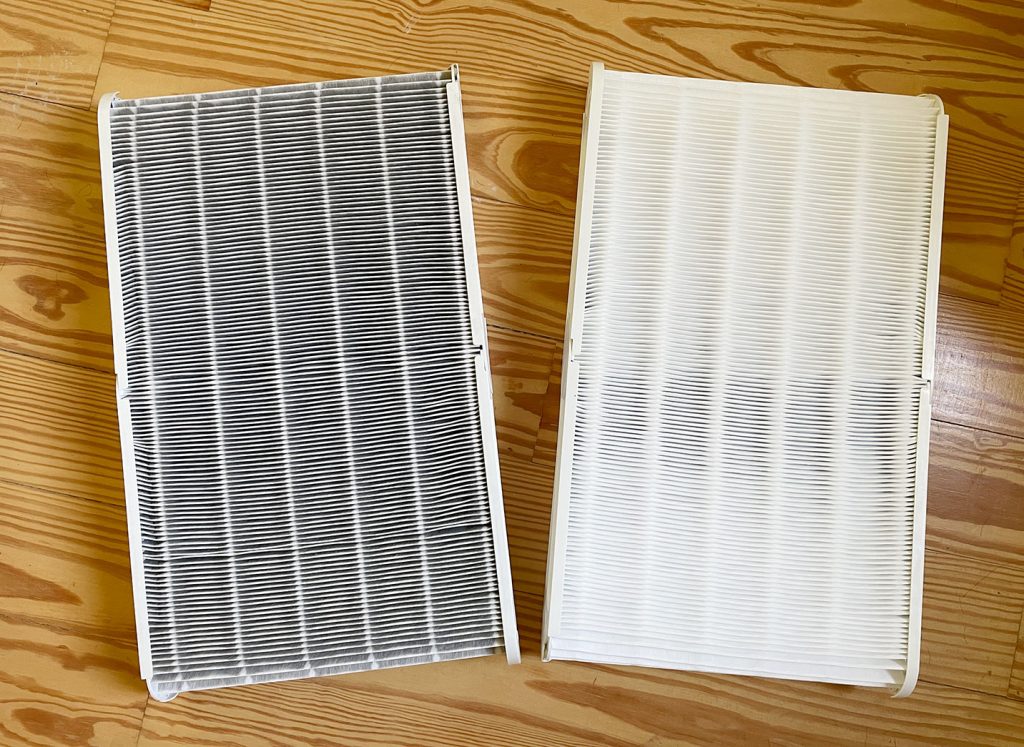
And while I can’t inspect the charcoal lining for VOCs, it’s easy to see the other two layers hard at work. Take the side-by-side below, which shows an old filter (left) that we’ve taken out to replace it with a new filter (right). See how black the old one is? Yuck!
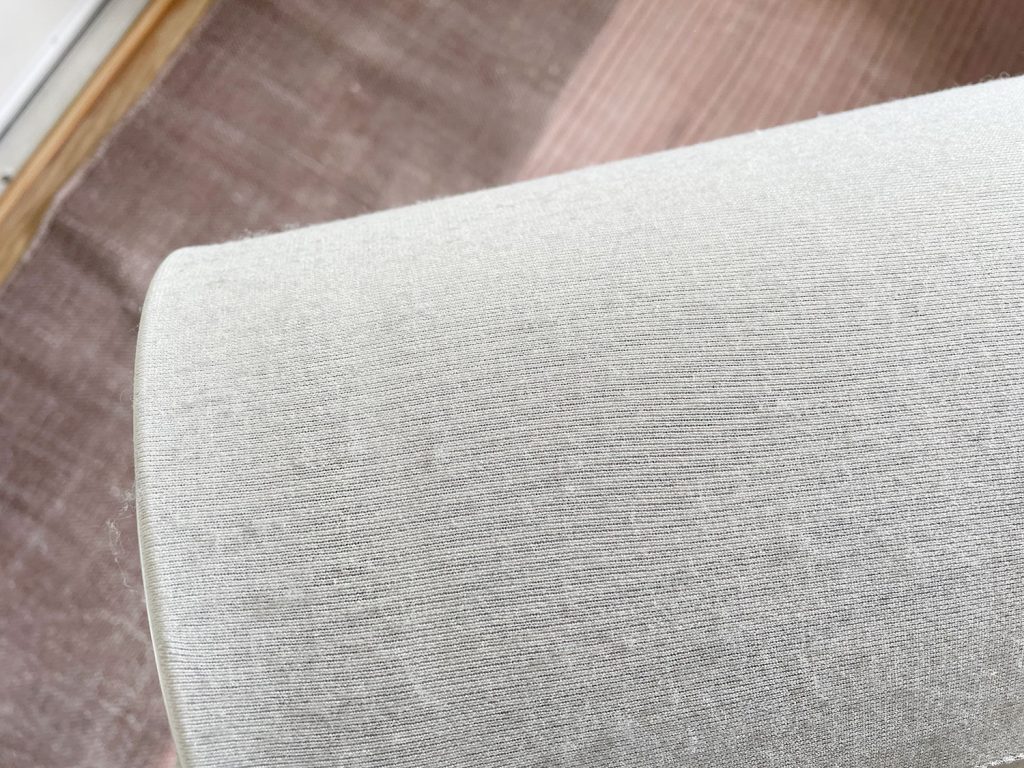
The outer “prefilter” layer also gradually becomes a dust bunny convention, as you can see below. Not only does that fabric layer grab dust and hair, it also stops it from entering the device, which helps extend the life of the filter inside.
And if you see all that dust and worry that this puppy is a lot to maintain, it’s not, so let’s dive into that.
How Do You Operate & Maintain It?
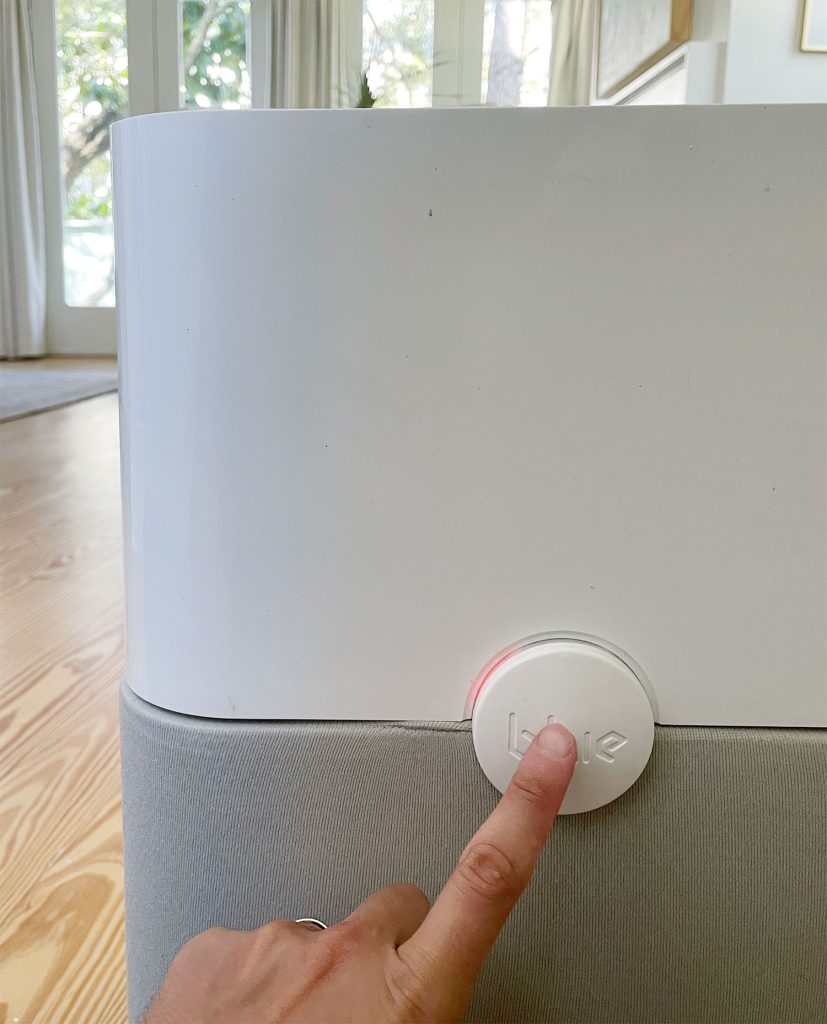
Another thing we love about these air purifiers is that they’re super user-friendly and totally uncomplicated. Both models (again, we own two of these, and two of these) have a single button that reacts to the touch (not push) of a finger.
Adjusting The Fan Speed
With each tap it cycles through four speeds: off, low, medium, and high. A soft white light indicates which speed you’re on (although you can also tell by how loud the fan is).
Filter Replacement Light
This same light even turns colors (orange) when it’s time to order a new filter and (red) when it’s time to replace it. That way you don’t have to mark anything in your calendar or set a reminder on your phone. Once the new filter is installed, just hold your finger on the button until the light resets to white again.
Replacing The Filter
The filters come flat packed in a box and fold out to fit the shape of the purifer. Just lift off the fan motor (the top portion of the unit) and slide the new filter into place.
Cleaning the Prefilter
The fabric prefilter can get pretty dusty, like I showed you earlier. It’s literally just a big spandex-like sock that stretches over the bottom portion of the air purifier.
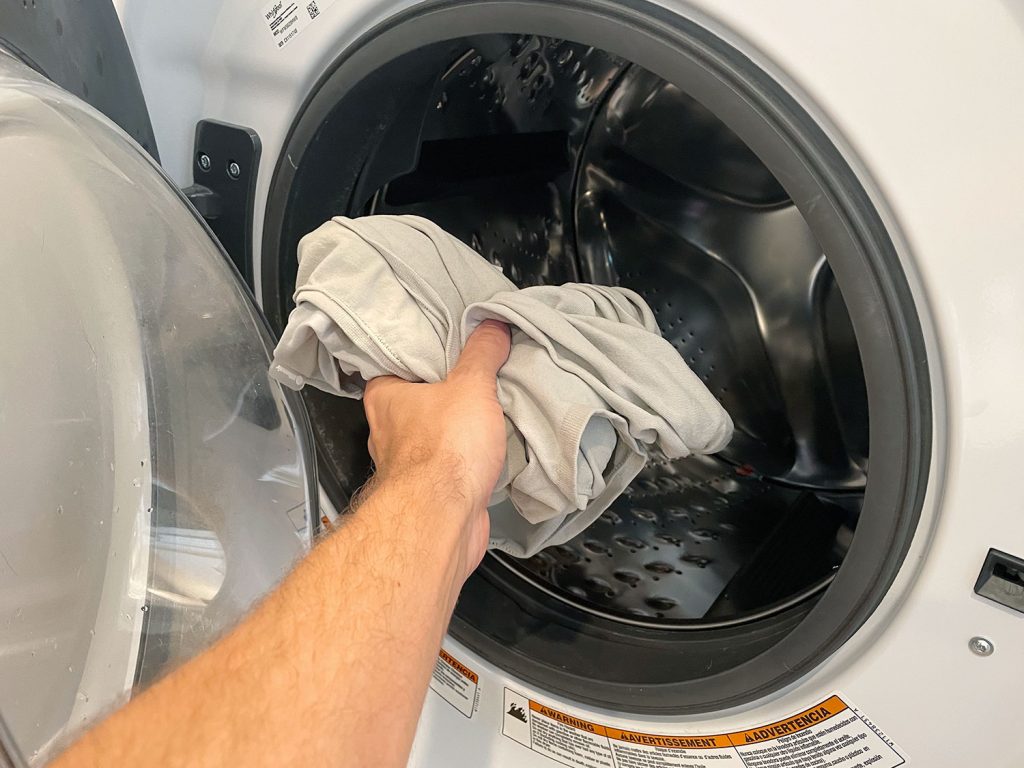
So while you can vacuum the dust off in place for a quick touch-up, when it gets really dusty we like to remove the outer covers entirely, shake them off outside, and throw them in a quick wash cycle. That’s all four of our prefilter covers in my hand below, so they’re really small when they’re not stretched out.
The other cool thing about the prefilter covers is that they come in different colors! The bright blue and medium gray covers that came with ours were a little bolder than we liked, so we purchased new ones in their lighter “Lunar Rock” color to help them blend in better. But they also come in more colorful options as well as some with more of a heathered texture.
I know, I know. It sounds silly and expensive to be buying new fabric covers just because we didn’t love the color, but they were around $9 and make Sherry weirdly happy. Let her have her $9 fabric air purifier covers, ok?
Now let’s talk about how much this whole operation costs.
Affordability: How Much Do They Cost?
Obviously, affordability is relative, and buying no air purifier is clearly cheaper than buying one. But after shelling out over $1000 for two pricier brand air purifiers (don’t worry, we got our money back) we were pleased to spend just $280 for each of our large 211 models (we ordered this 2-pack) and $119 for each ofthe smaller 411 versions. In the end, we got TWICE the number of air purifiers for more than $200 less than we had originally spent.
Of course, there are ongoing filter costs to consider as well, but thankfully ours last us a good long time – especially since we wash the outer covers to extend the life of the inner filter and run everything on low 24/7 (the frequency of replacement depends on your home and what speed you run your purifier). Based on my order history, it looks like a 211 filter usually lasts us around 9 months and a 411 filter goes a full year before it needs to be replaced for us.
One thing to note is that the air purifier will show you an orange light when the filter is winding down and will need replacement soon. This orange light doesn’t mean to change it then – that’s usually just when we order a replacement filter. We wait for the purifier to change that orange light to red – and that’s when we actually replace the filter to get the maximum life out of it.
It helps to know that we’re getting every last bit of use from each filter, and we like that each purifier tells us (first with an orange warning, and then a true red light for when to actually change it) so we don’t need to remember when it’s time to replace them (the larger 211 filters with carbon are $70 and the smaller 411 filters with carbon are $22 to replace).
What Do They Look Like Around The House?
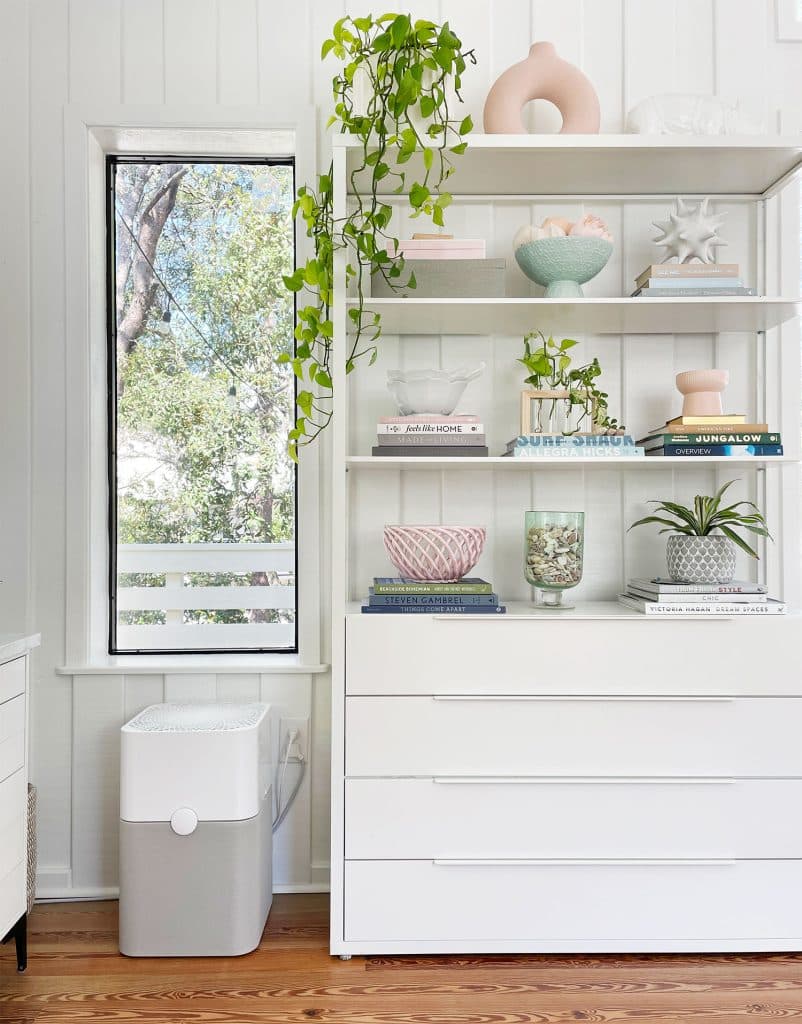
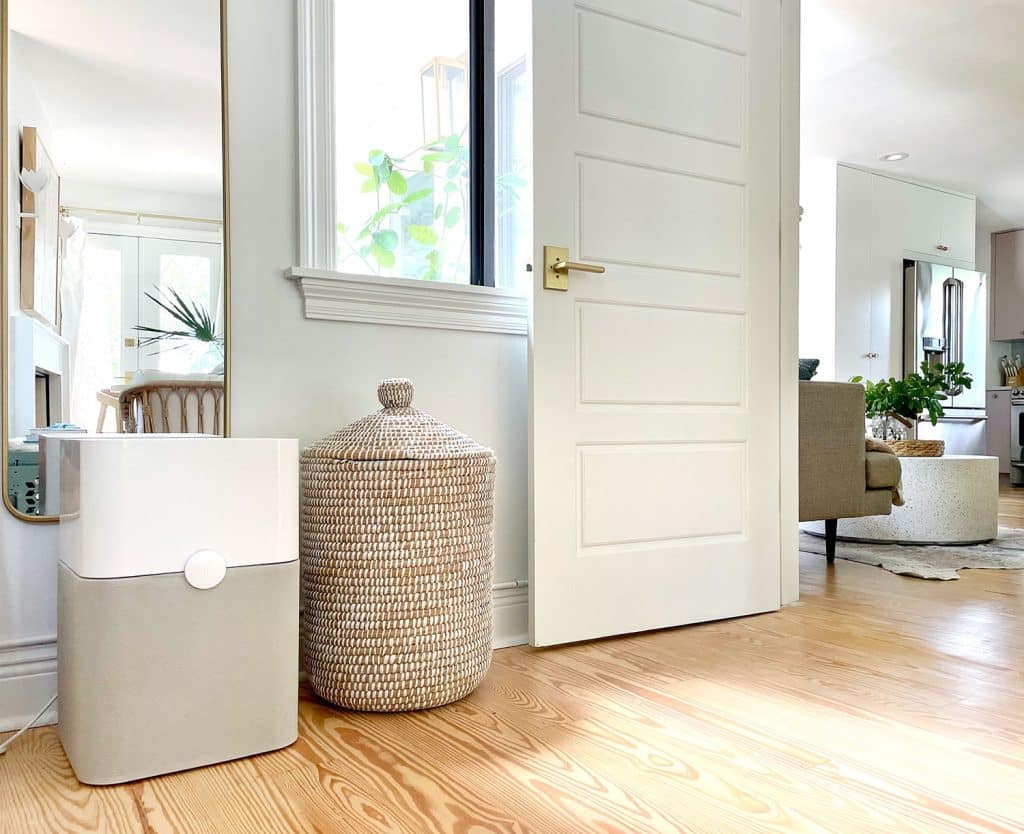
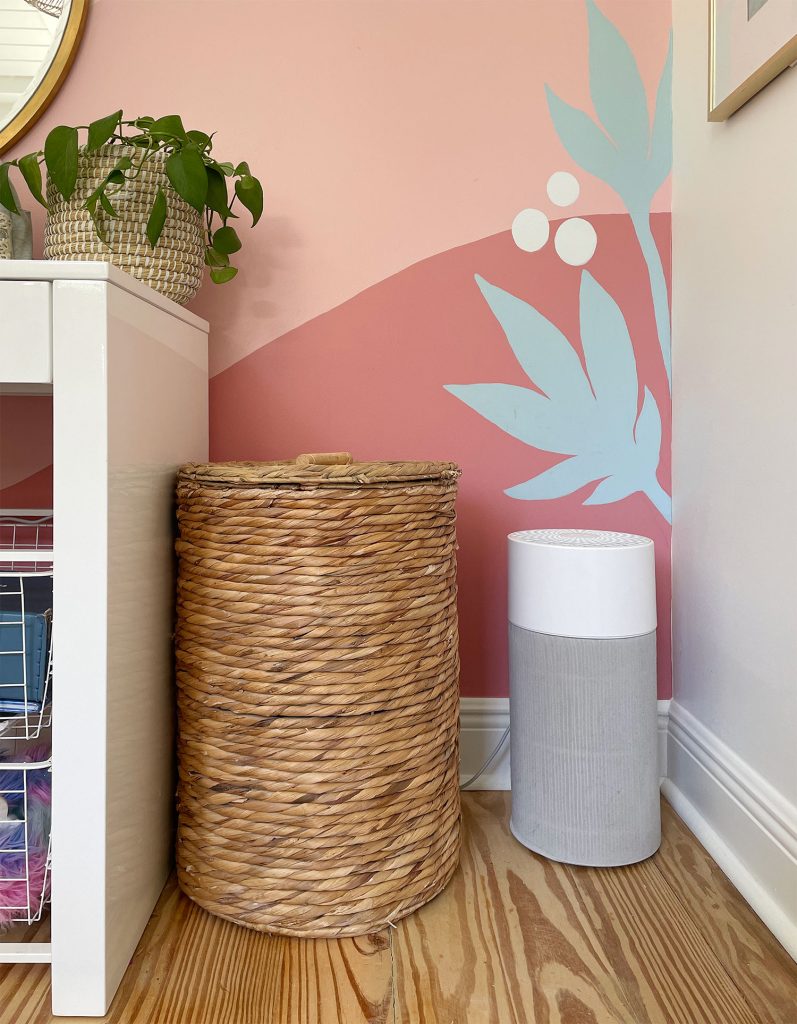
As mentioned, we have four – two big ones and two smaller ones in the kids rooms. Our main objective was that we wanted air purifiers that performed well, so it’s truly a bonus that they’re easy on the eyes. I mean, we have a home with six rooms and we own four air purifiers. We like them with our eyeballs and our sinuses. They really do seem to fit right in.
So many others on the market look like compact HVAC units or a futuristic fan on steroids, and if that’s what it took to get a good working purifier we’d do it – but dang it’s nice that they don’t scream “I’M AN AIR PURIFIER.”
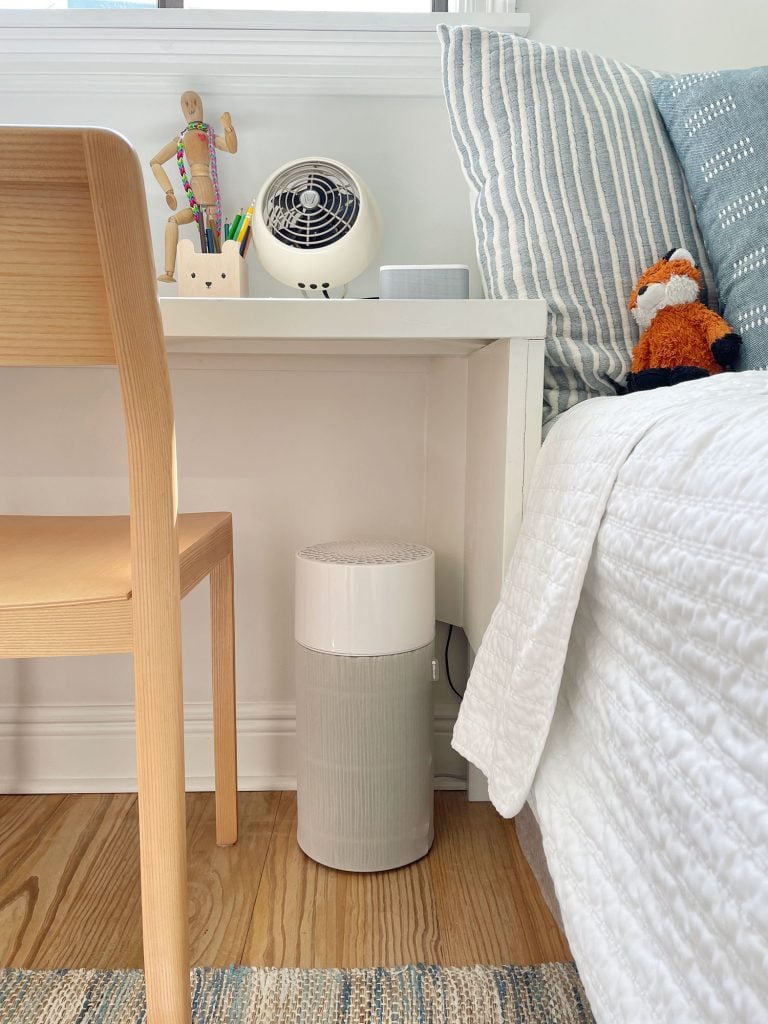
The smaller 411 models are compact enough (17″ high, 8″ diameter) that they tuck nicely into corners of our kids’ rooms. Our son’s even fits under his desk and he appreciates the soft white light on the button as a nightlight of sorts. The larger 211 models are bit bulkier (21″ high, 13×13″ square) but they’re still low enough to not draw too much attention to themselves (you can see that in the photo above).
They also don’t draw much attention to themselves in the noise category. Again, we operate ours on low pretty much 24/7 and the fan volume is virtually indetectable. Like a barely-there white noise that’s only heard when you’re really listening for it or standing right next to it. If you crank it up to medium or high speeds, you’ll probably notice it more. To me, the medium speed is like having a tabletop oscillating fan running on low and the high speed is like running the exhaust fan in your bathroom. So nothing too crazy or annoying, but definitely more detectable than the low speed.
Ok, I think that’s literally everything you could ever want to know about our air purifiers. I mean what else could you be wondering? Are they fun to cuddle? Negative. Very bad at being either the little or the big spoon. But they are very entertaining to kids if you place a balloon above them. Thank me for that tip later…
If you want to read a few other product reviews by yours truly, here you go:
*This post contains affiliate links, so we may earn a small commission when you make a purchase through links on our site at no additional cost to you.
Anyone who lives in a small-ish space knows that thoughtful storage can upgrade so many aspects of your life at home when it’s done right (and it can be a daily frustration when it’s not done well or at all). No matter how big your rooms are or how many you have, you just want to be able to access things easily & keep them in a smart spot – and downsizing from our 3150 square foot house to this 1400 square foot home last year definitely challenged us to be even more mindful about how we incorporate the most useful storage systems into our home. Suddenly we were living in 6 rooms (down from 14!) and we also no longer have a garage, an attic, a big outdoor shed/workshop, or even a closet in most of the bedrooms (of our 3 bedrooms, only 1 had a closet when we bought this house!).
So over the past 16 months, we’ve found some especially awesome double-duty storage pieces that answer a pretty common question that we get around here, which is “I need specifics! Tell me exactly what you’re usingto make your smaller home fit everything you need and use every day.” Whelp, this post is attempting to answer just that (along with some links to previous posts at the bottom for anyone who wants an even deeper dive). So here are seven of our favorite storage pieces, including why we chose them and some alternate options if you’re also looking to add some extra storage to your life.
1. A Hidden-Storage Coffee Table
Problem: Not enough entryway storage near the front door
Solution: A deep-drawered coffee table with tons of concealed space to stash stuff
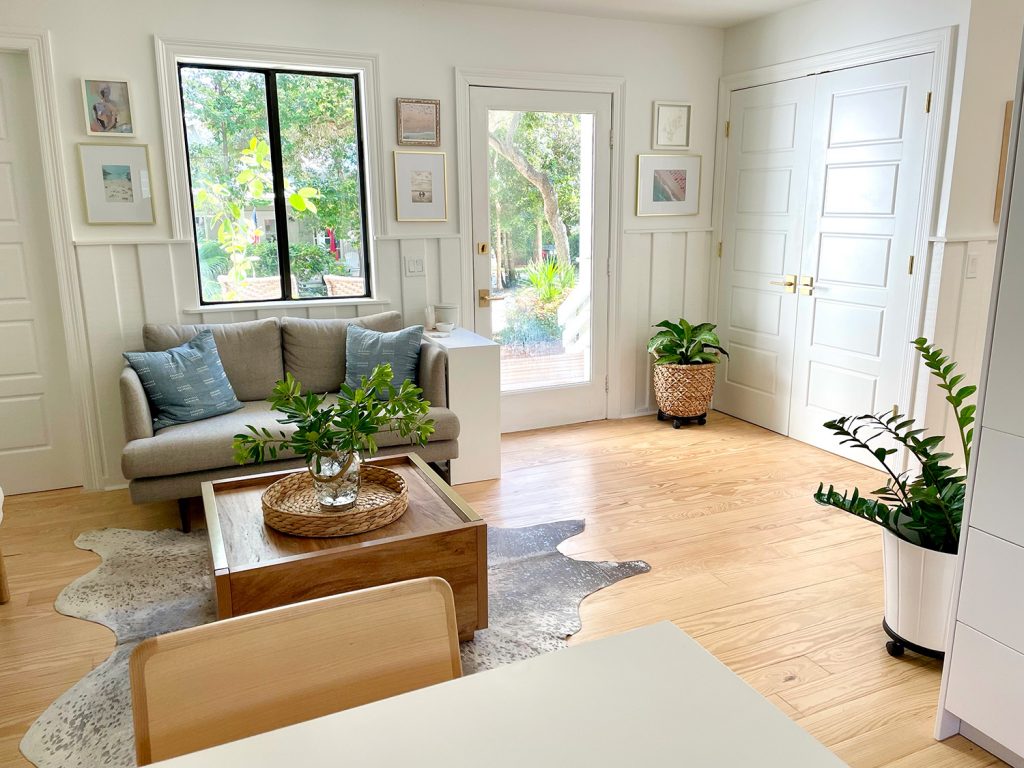
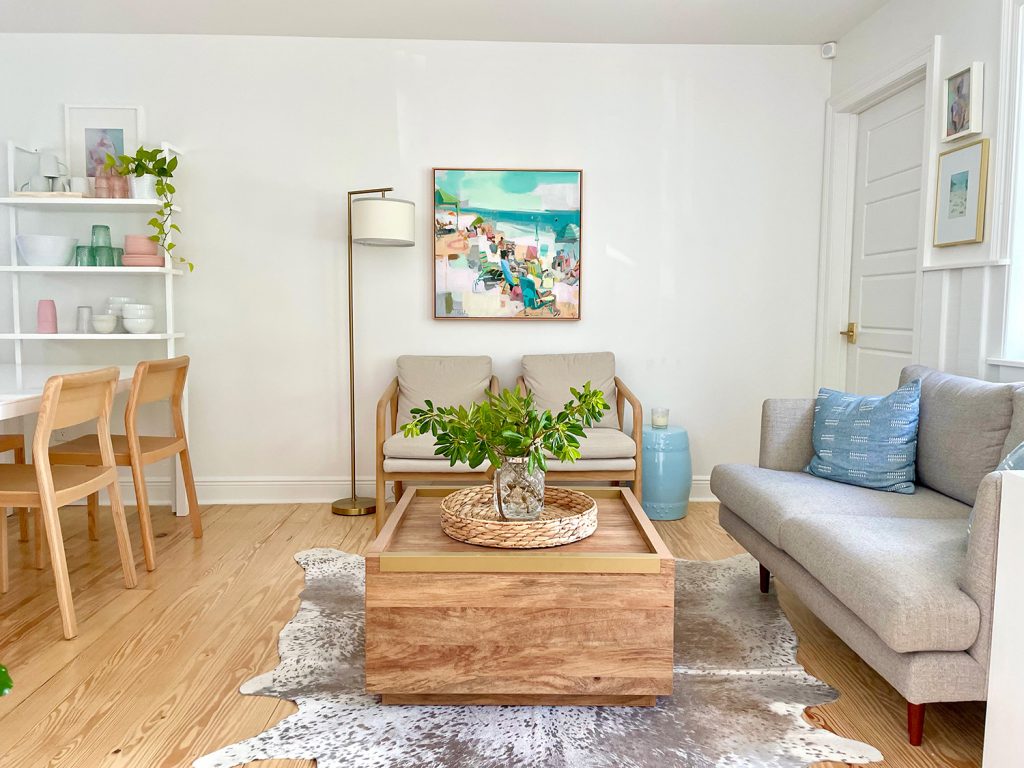
Since our front door opens right into a little sitting area, we don’t have a traditional foyer or mudroom situation. We definitely maximized our nearby laundry closet (the double doors can be seen above) for hoodies and backpacks, but it can’t handle everything. Which is where this deep-drawered coffee table came into play.
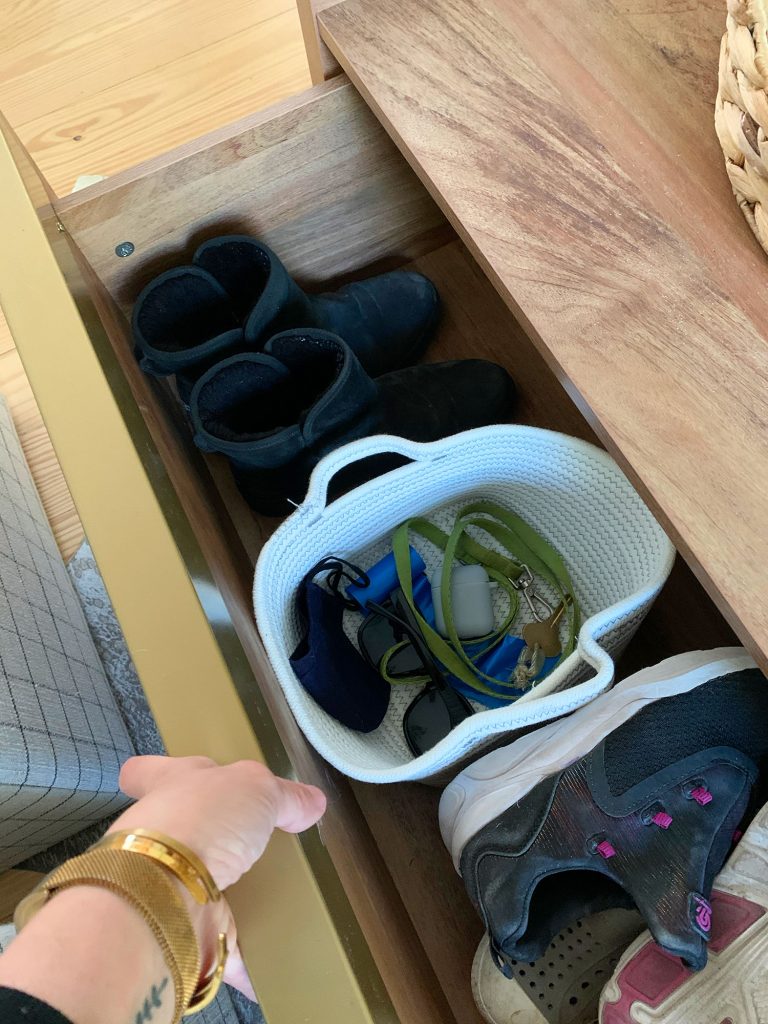
We love it because it has TONS of storage, but doesn’t really look like a storage piece. Like, at first glance, it might just look like a solid wood coffee table (there aren’t very obvious handles). But, surprise! – both sides pull open to reveal a total of two wide deep drawers that slide really easily. On one side we’ve got extra shoes (beyond our flip flops that just stay out on the front porch) and a basket with miscellaneous items that we often grab before heading out the door (keys, Burger’s leash, sunglasses, etc).
The drawer on the other side stores our lesser-used or out-of-season jackets… which you’d never guess are in the coffee table. Mission accomplished!
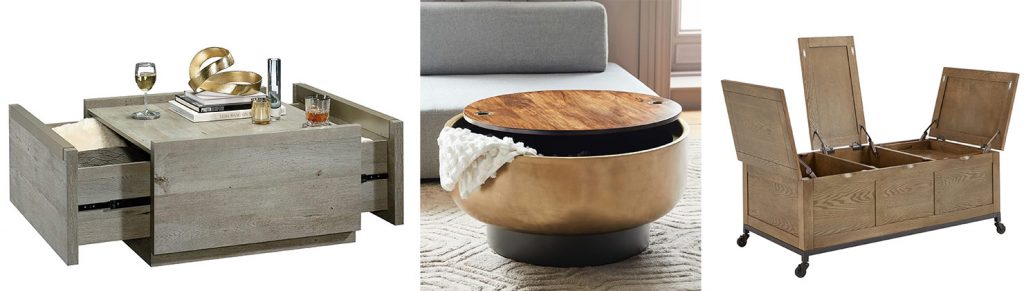
Other Hidden Storage Coffee Table Options
Coffee Table In Context Of The Whole Room
Also, if you want to see how the coffee table looks in the whole space (and catch one other item in this list), check out this quick video tour that we shared a couple of weeks ago:
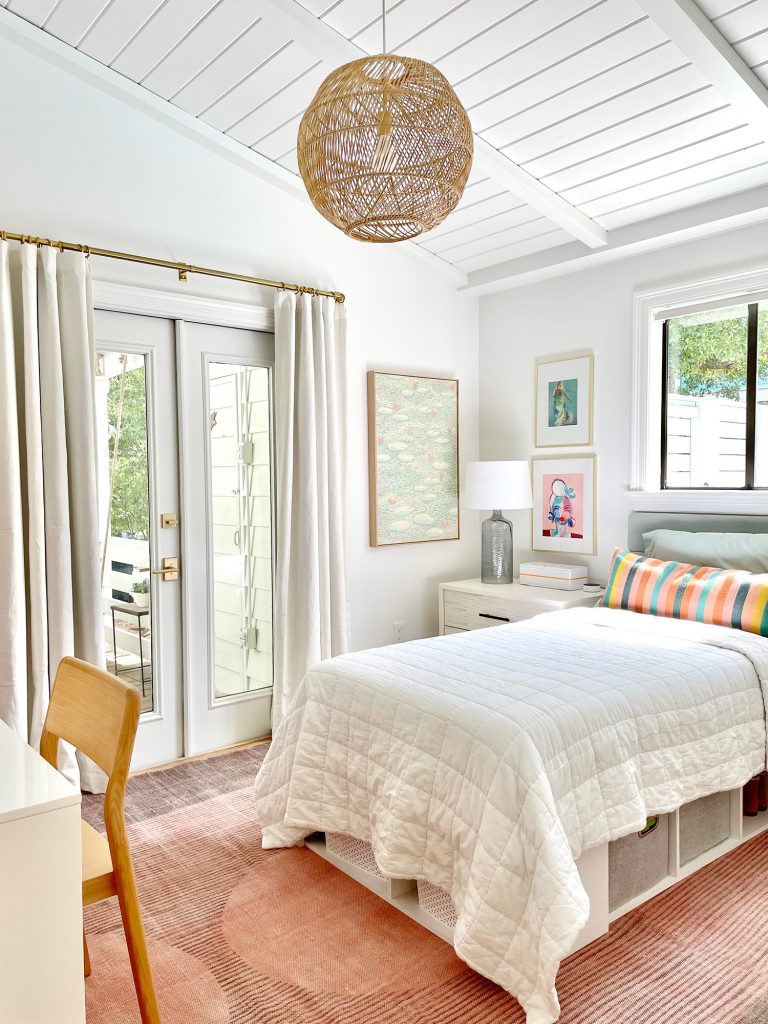
Solution: A platform storage bed that keeps books & toys accessible, while using space that’s often wasted
We thought a lot about the beds that we purchased for this house, knowing full well that it would be smart to utilize them for under-bed storage. And our daughter’s bed has done the job especially well. She has an ever-growing collection of books and four large baskets full of legos and other toys, but a bookshelf or some larger storage cabinet would have stolen space from a few other things that she wanted in the room (mainly a desk that she requested we add, which we now have set up across from the bed along the mural wall – as well as the dressers which perform double duty as nightstands). That’s why we appreciate this platform bed with under-bed cubbies so much. It really holds A TON of stuff (which can’t get pushed under the bed and lost).
Note: It goes in- and out-of-stock at various places, so I’ve linked some that seem to work now. There’s this link to it and I also found it here.
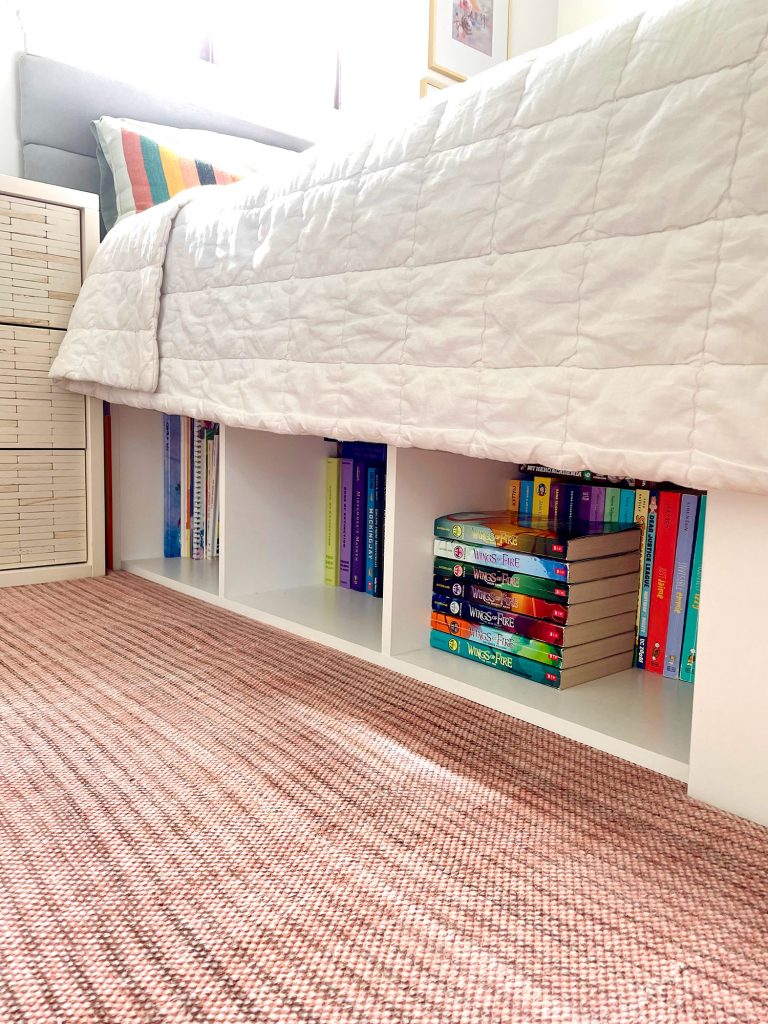
We have the twin-sized version and it provides 8 total cubbies (3 on each side, and 2 larger ones at the foot of the bed, where she has some giant bins full of legos). She’s fully in charge of what goes where, and since she is the one who sets each cubby up, she knows where everything is – and she loves being able to grab something easily from bed at night while hanging upside down (what kid doesn’t love that?). The bed came with two fabric bins, which she uses for toys and stuff on the other side of the bed, seen above). And we found these larger plastic ones from Target that fit in the two larger cubbies at the foot of the bed (those are the lego ones).
I’ll admit that I was skeptical of the cubbies at first. Everyone must sell under-bed drawers for a reason, right? Well, we learned with our son’s bed that drawers can sometimes just be toe-killers, and they require a clear floor to open easily (empty floors can be hard to come by in kid rooms). We actually ended up removing our son’s drawers and just use our own, smaller, less cumbersome thick felt baskets under there now instead. So consider us cubby converts!
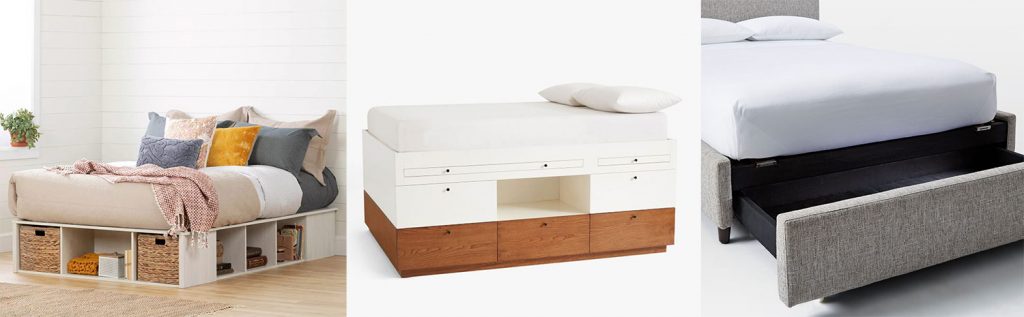
Other Under Bed Storage Buying Options
Left: The full and queen-sized version of our daughter’s bed has wicker baskets included (twin seems to be sold out at the moment)
Right: An upholstered bed with a disguised drawer in the footboard seems like it wouldn’t hurt toes like our wood ones did – and it comes in several fabric options
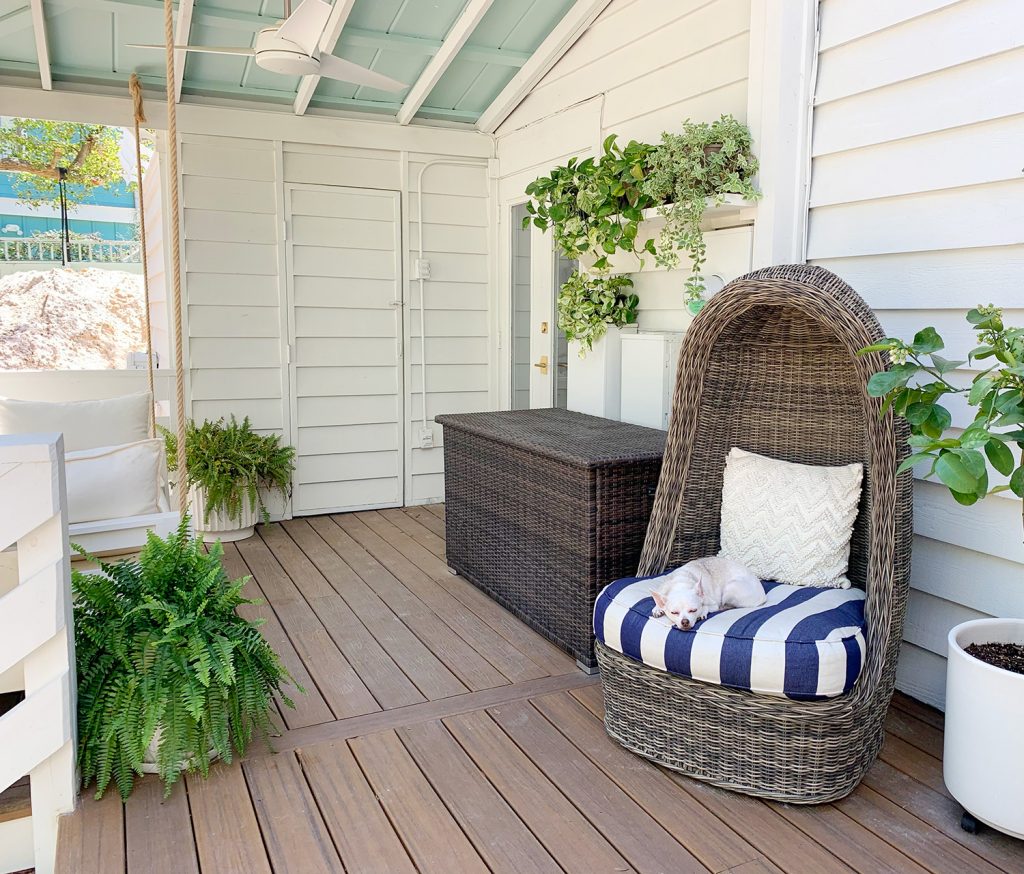
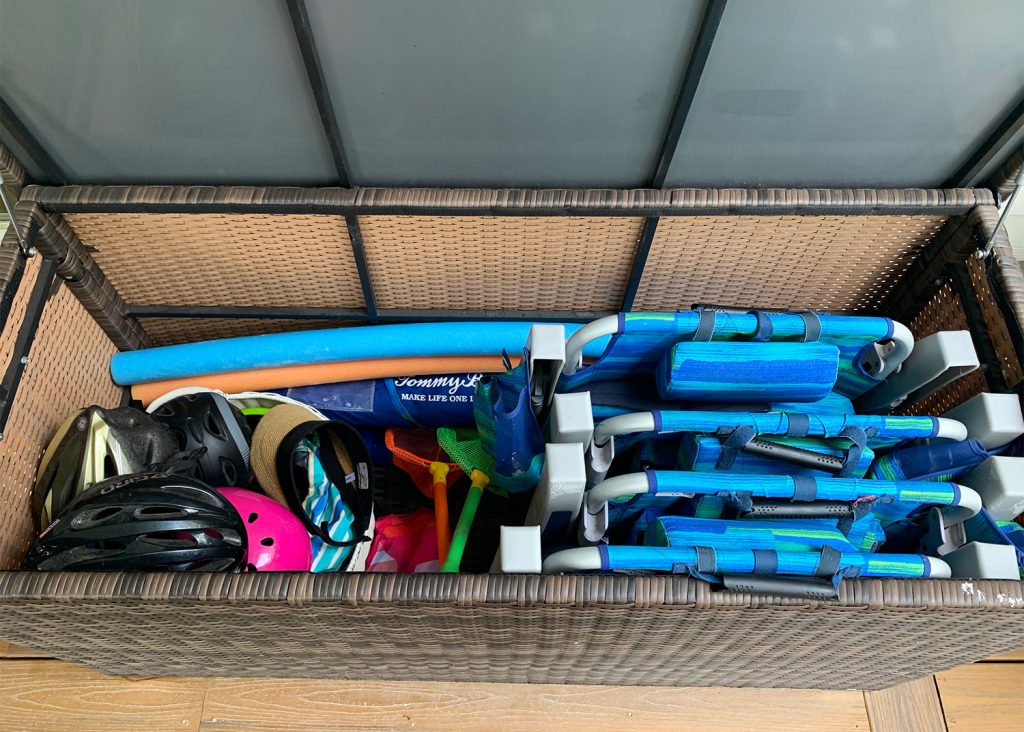
3. A Large Weatherproof Outdoor Bin
Problem: Limited storage for outdoor gear, like beach stuff and bike helmets
Solution: An oversized wicker storage bin that lives on our porch
Storage-wise, one thing we definitely had to adjust to after moving here was not having a big garage or shed that we just got to fill with things that we didn’t want in the house (think sandy beach chairs and umbrellas or outdoor toys, etc). Although it was that willy-nilly tossing of things into our previous garages and sheds that constantly had us dedicating weekends to garage clean-outs and organization, so we definitely don’t miss that! (More on that phenomenon here). But now that we’ve got that stuff tucked neatly inside this faux-wicker outdoor storage bin on our covered porch, we don’t feel that squeeze of “where does this go?!” anymore.
We like it because it conceals lots of stuff while also blending pretty nicely with the rest of our furnishings (it also helps us hide some ugly pipes – more on that here). Even better, it holds A LOT more than we expected. We carefully measured it before ordering to make sure it would hold our beach chairs and umbrellas (inside it’s 64″ long, 30″ wide, and 34″ tall) but we were pleasantly surprised that we also had room for beach toys, bike helmets, and even sports balls and stuff.
The only lesson we learned the hard way is that while the top is waterproof, the sides aren’t perfectly watertight on their own – which wouldn’t have been an issue if we had saved the waterproof bag/liner that velcros inside (which was included with our purchase – doh!). We opted not to use it because we store our bin under a covered porch, but upon some reflection, we wish we had saved it just in case we ever want to move this somewhere that isn’t covered. So I wanted to mention that in case it helps someone else out there. Just wish we tossed it into the bottom of the bin for safekeeping before loading all of our stuff in.
Other Outdoor Storage Bin Options
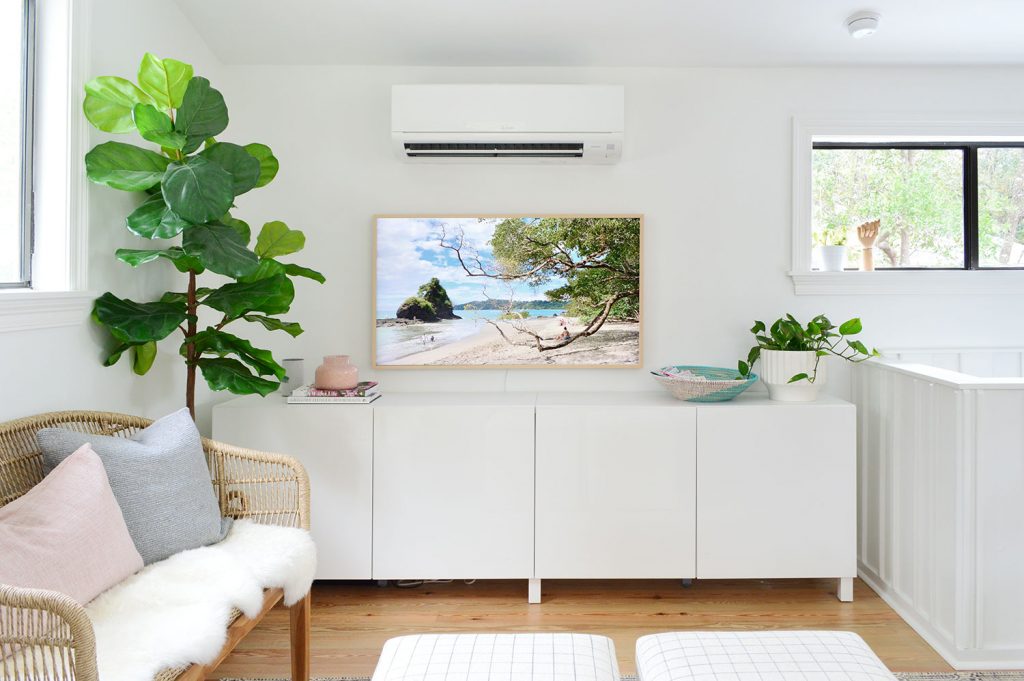
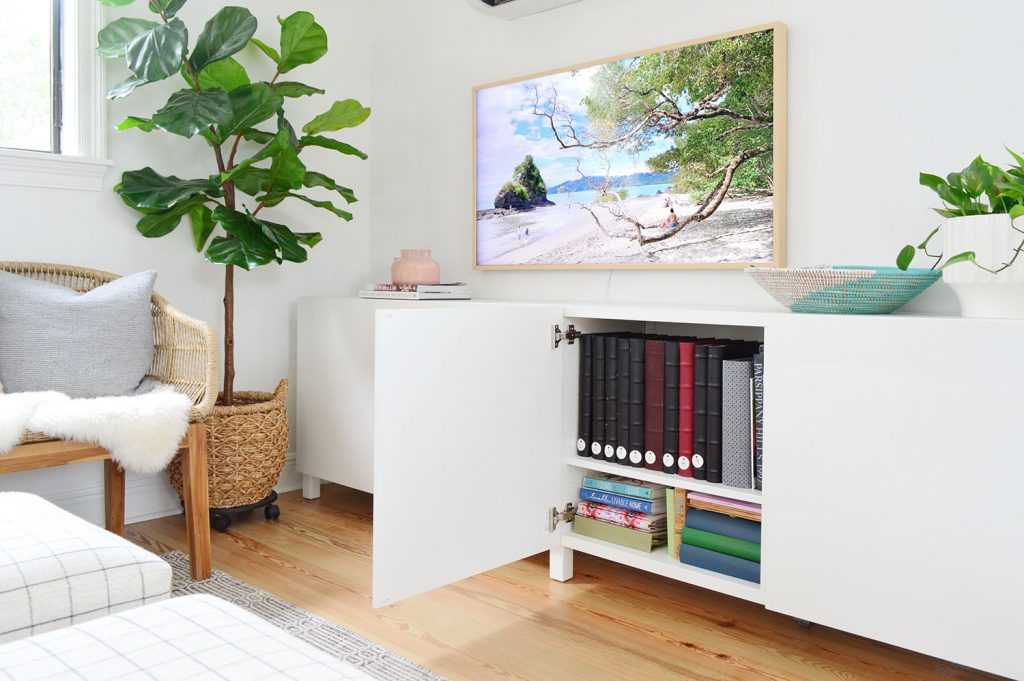
4. A Long TV Credenza-Style Media Cabinet
Problem: Hoping to maximize media and game storage in one area of the family room
Solution: Skip the media cabinet and work in an extra-long cabinet that fills almost the entire alcove
Our TV is hung on a pretty long wall in our upstairs living room. In the past, we’ve always used some sort of furniture piece underneath our TV, but one of those would’ve shortchanged us in this situation because most pieces sold as “media cabinets” or “media consoles” are often low to the ground and not nearly as wide as what we had space for. That’s why we opted to customize a long credenza that we created with two wide Ikea Besta cabinets that we installed to look like one long cabinet (you can read more about how we did that here).
If we’d chosen to float it off the ground, it would’ve been what the cool kids call a “fauxdenza” – but we opted to keep the legs for now (although we nixed what would have been double legs in the middle for a more seamless look – you can read how we did that here). We still plan to customize it a bit more (probably by adding a thick wood countertop or maybe even a stone one) but this is where we are now… and the storage is GLORIOUS. It’s nearly eight feet long and stores every last one of our old photo albums, newer photobooks, board games (and we have A LOT of board games) as well as miscellaneous keepsakes like yearbooks, etc). It feels so, so, soooo much better than any of those short and narrow media cabinets that we could’ve bought.
As for our actual media stuff, like cable boxes and cords…. well right now all we have is the small box that came with our Frame TV and it just sits under the Besta, tucked against the wall where no one can see it. We stream all of our TV, so there’s no cable box or DVD player to deal with (you can read how we cut the cord a few years ago here).
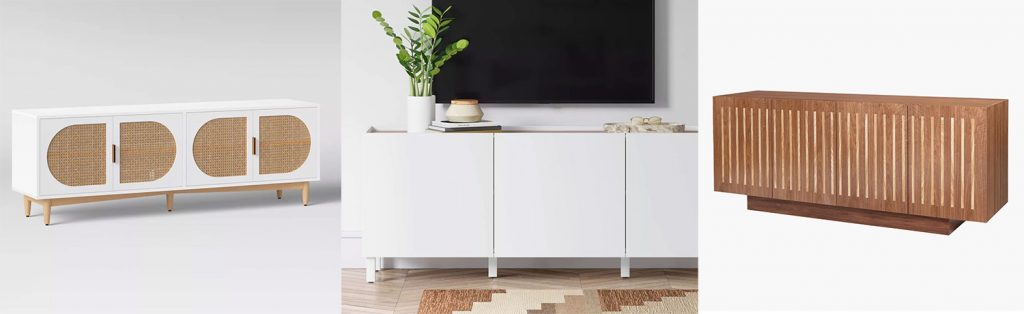
Other TV Credenza Buying Options
5. An Under-Desk Drawer System
Problem: We built in a desk but wanted to add some under-desk storage that’s actually useful
Solution: A small freestanding drawer system that slides right in
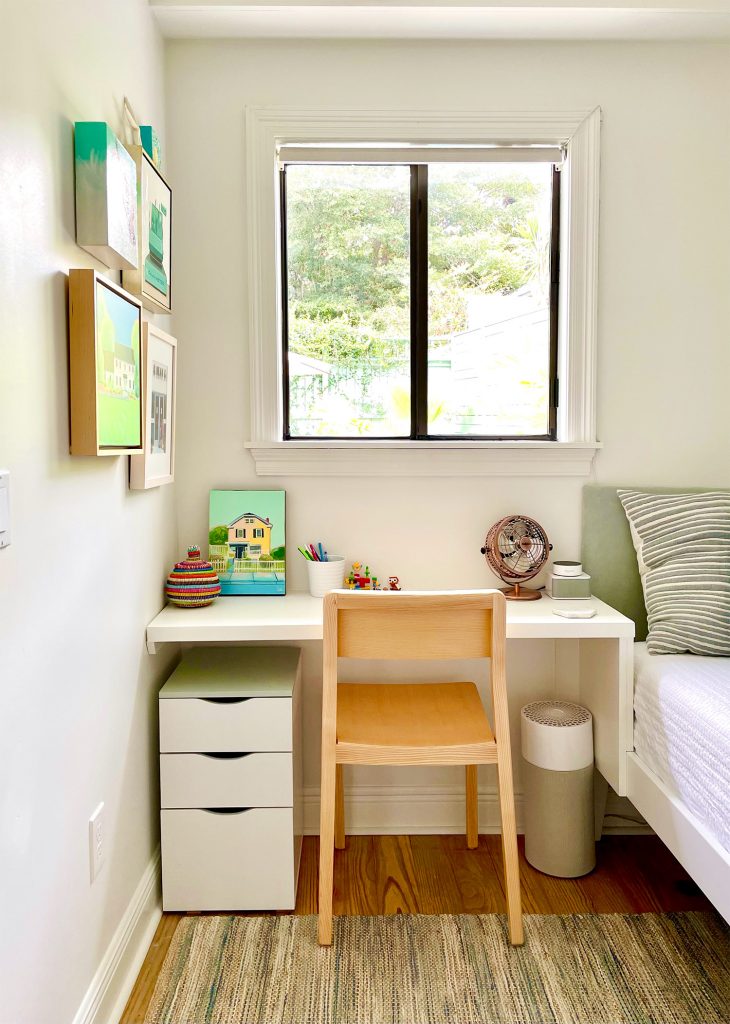
Earlier this year our son requested a simple desk for his room (what’s with our kids requesting desks? they now have a big joint one upstairs where they do crafts/art/larger school projects plus they each have smaller ones in their rooms). I’m not complaining because he uses it often to draw or build those small Lego sets… it’s just that nobody told me when you have kids their currency might be desks.
Anyway, we couldn’t find anything that fit his space perfectly, so we opted to build in our own desk, and even connected it to his bed so it floats completely off of the floor (it’s supported by simple wood braces along the side wall and the back wall as well as being secured to the bed). We debated adding some functional drawers or creating some cubbies under the desktop but it seemed smarter to use the extra area under the left side of the desk for storage instead of stealing a skinny slice below the entire desktop (you can’t make that too big or legs in a chair won’t fit under it… or the desk gets awkwardly high and hard to use). So we just shopped around for a nice under-desk file drawer that we could add. It even has soft close drawers!
We ended up taking off the included wheels because they made it look a little cheaper – plus it gave him bonus storage on top that way. Sherry also ended up priming & painting the faux-wood top with leftover paint from his mural (since the wood color was darker and redder than his desk chair). He loves it because he has a spot to stash his papers, extra art supplies, and some coloring and activity books. And we love it because it helps keep his desk clean and ready to work on (and we see zero of the chaos behind those drawers).
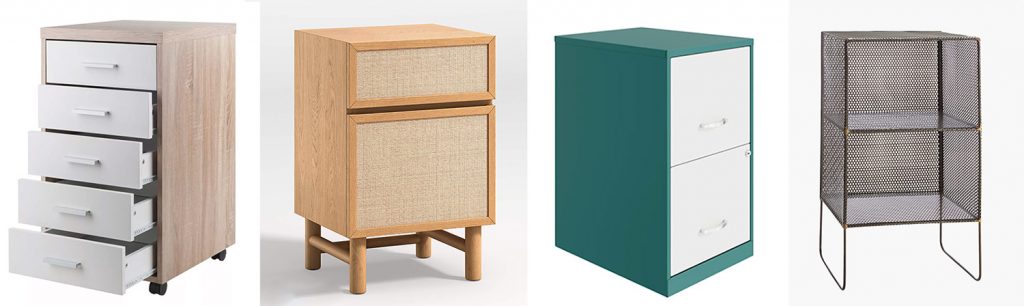
Other Under Desk File Cabinet Buying Options
6. Bookcases With Display Space + Drawers
Problem: Wanting to stash away ugly things while displaying pretty stuff
Solution: Our favorite customizable bookshelves from Ikea (some stuff = concealed & some stuff = revealed)
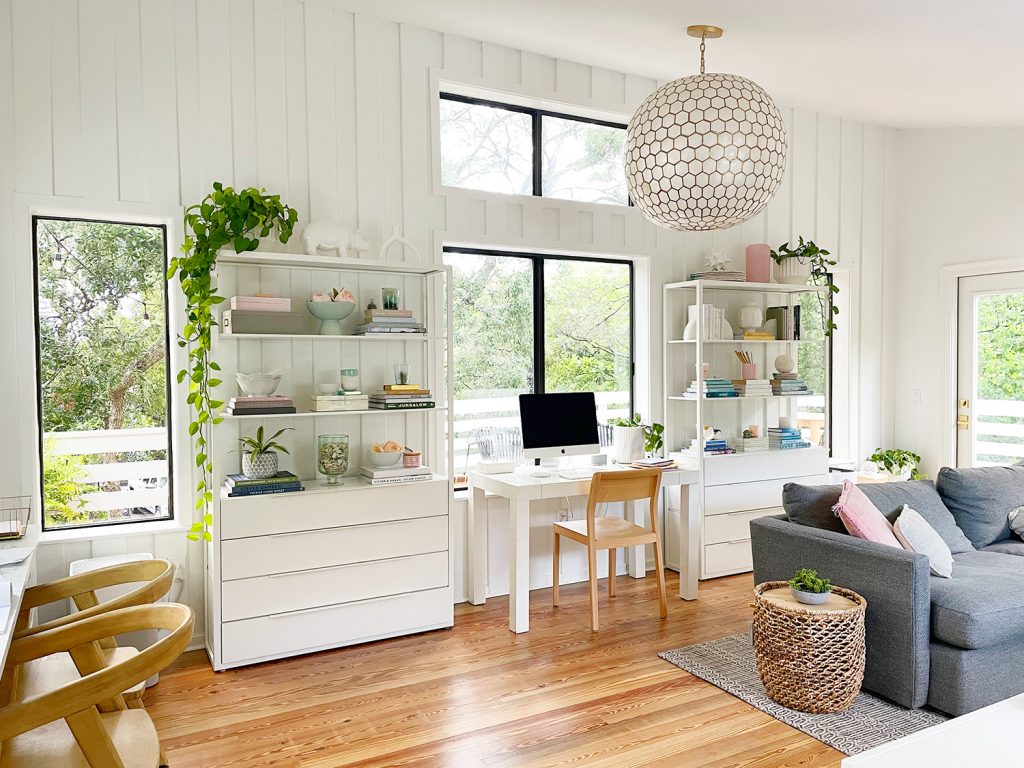
We couldn’t make a list like this and not include the true storage MVP of our small house: our Ikea Fjalkinge bookcases. We first got them for our home office in Richmond. And when we moved to Florida, at first they were storage workhorses in our kitchen (below) before we moved them upstairs to our family room (that picture is below this one). What can I say? We just can’t quit their powerhouse combo of some-stuff-is-hidden and some-stuff-is-out-and-about.
You can customize these bookcases with your preferred combo of shelves and drawers, and can even set the shelves at your preferred height and put the drawers where you want (they always show them in the middle for some reason on the Ikea website, but we love four on the bottom). This perfect split of 4 drawers for storage + 3 shelves for display space has been awesome for us in both locations. In our kitchen, we kept bowls, cups, and mugs out and easy to grab while using the drawers mostly for food and snacks you’d usually stash in a pantry. Now that we’ve added an actual pantry cabinet (more on that here) they’re living it up in the family room, where books and decor objects are on the shelves with files, camera equipment, paperwork, and random work stuff in the drawers.
Like most of the stuff we’ve been highlighting so far, we love that bookshelves like these work hard AND look good while doing it.
Other Bookshelf Storage Buying Options
7. A Wall-Mounted Spice Rack
Problem: No drawers that could fit all of our spices (and we didn’t want them all over the counter)
Solution: A clean wall-mounted spice rack right near the stove that takes up zero floor or counter space
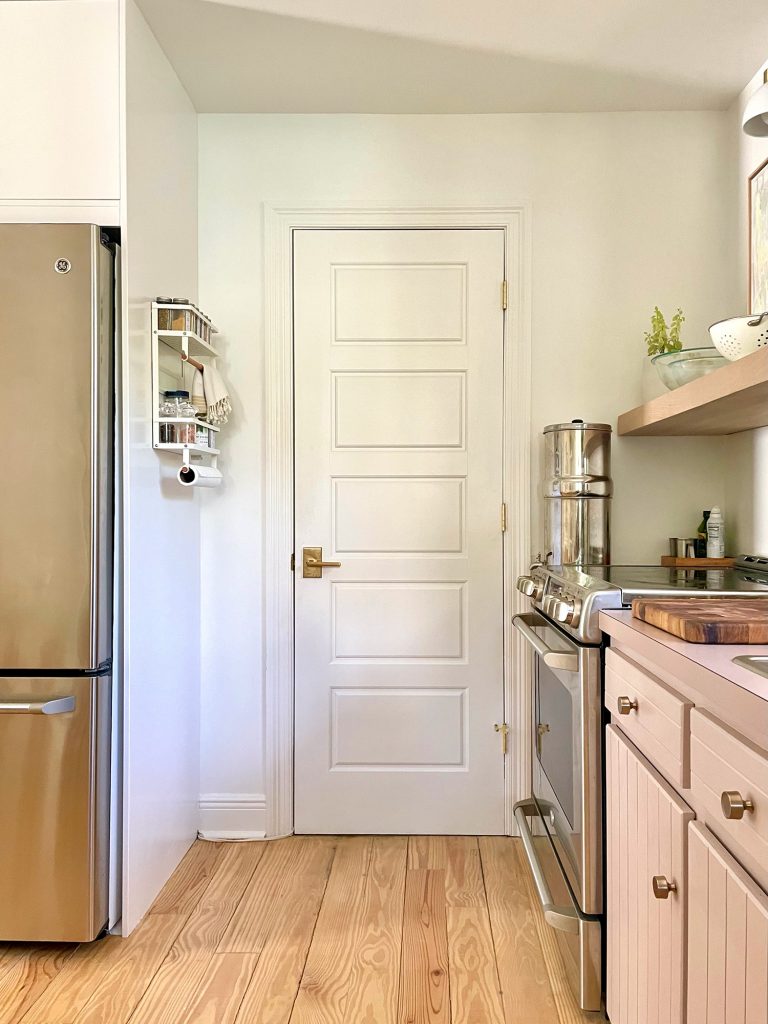
We’re ending with our newest storage favorite, which is small but oh so mighty. You may have already seen it In our kitchen pantry update post, but it has been too helpful to not include in this roundup – especially if you don’t have lots of floor space for a new piece of furniture, but do have the back of a door or a small slice of wall or the side of a fridge to incorporate this. After we built in the fridge we realized we had an empty wall right near the stove, precisely where we could easily reach all of our spices. We have loved this small spice shelf so much. Plus it holds paper towels and a dishtowel (and it can be secured to a wall or the side of a cabinet OR stuck right to the side of your fridge because the back is magnetic).
You’ve probably seen a million solutions like this, and getting your spices (or your knives or your paper towels) out of a drawer, off the countertop, and on your wall isn’t new – but it’s new to us, and we love it. We also bought this set of matching spice containerswith preprinted labels for more spices than I’ve ever heard of (plus some blanks too). They fit nicely in two rows on the wall shelf (so we have 18 of them on this small shelf – with room for more – we just store some large salt containers along with our salt & pepper grinders). Also Sherry is wild about the crisp white color mixed with the wood dowels. Like she talks about it every time she changes the paper towels.
Other Spice Rack Buying Options
Ok, that’s it. That’s the post. I hope it helps any and all of you looking for exact specifics about what we use and where we used them. The good thing about storage is that there are SO MANY OPTIONS, so you can just go with whatever makes the most sense for your family, your room, and what you need to store. And if you don’t want this storage-palooza to end, the posts below might shed even more light on maximizing a small home:
*This post contains affiliate links, so we may earn a small commission when you make a purchase through links on our site at no additional cost to you.