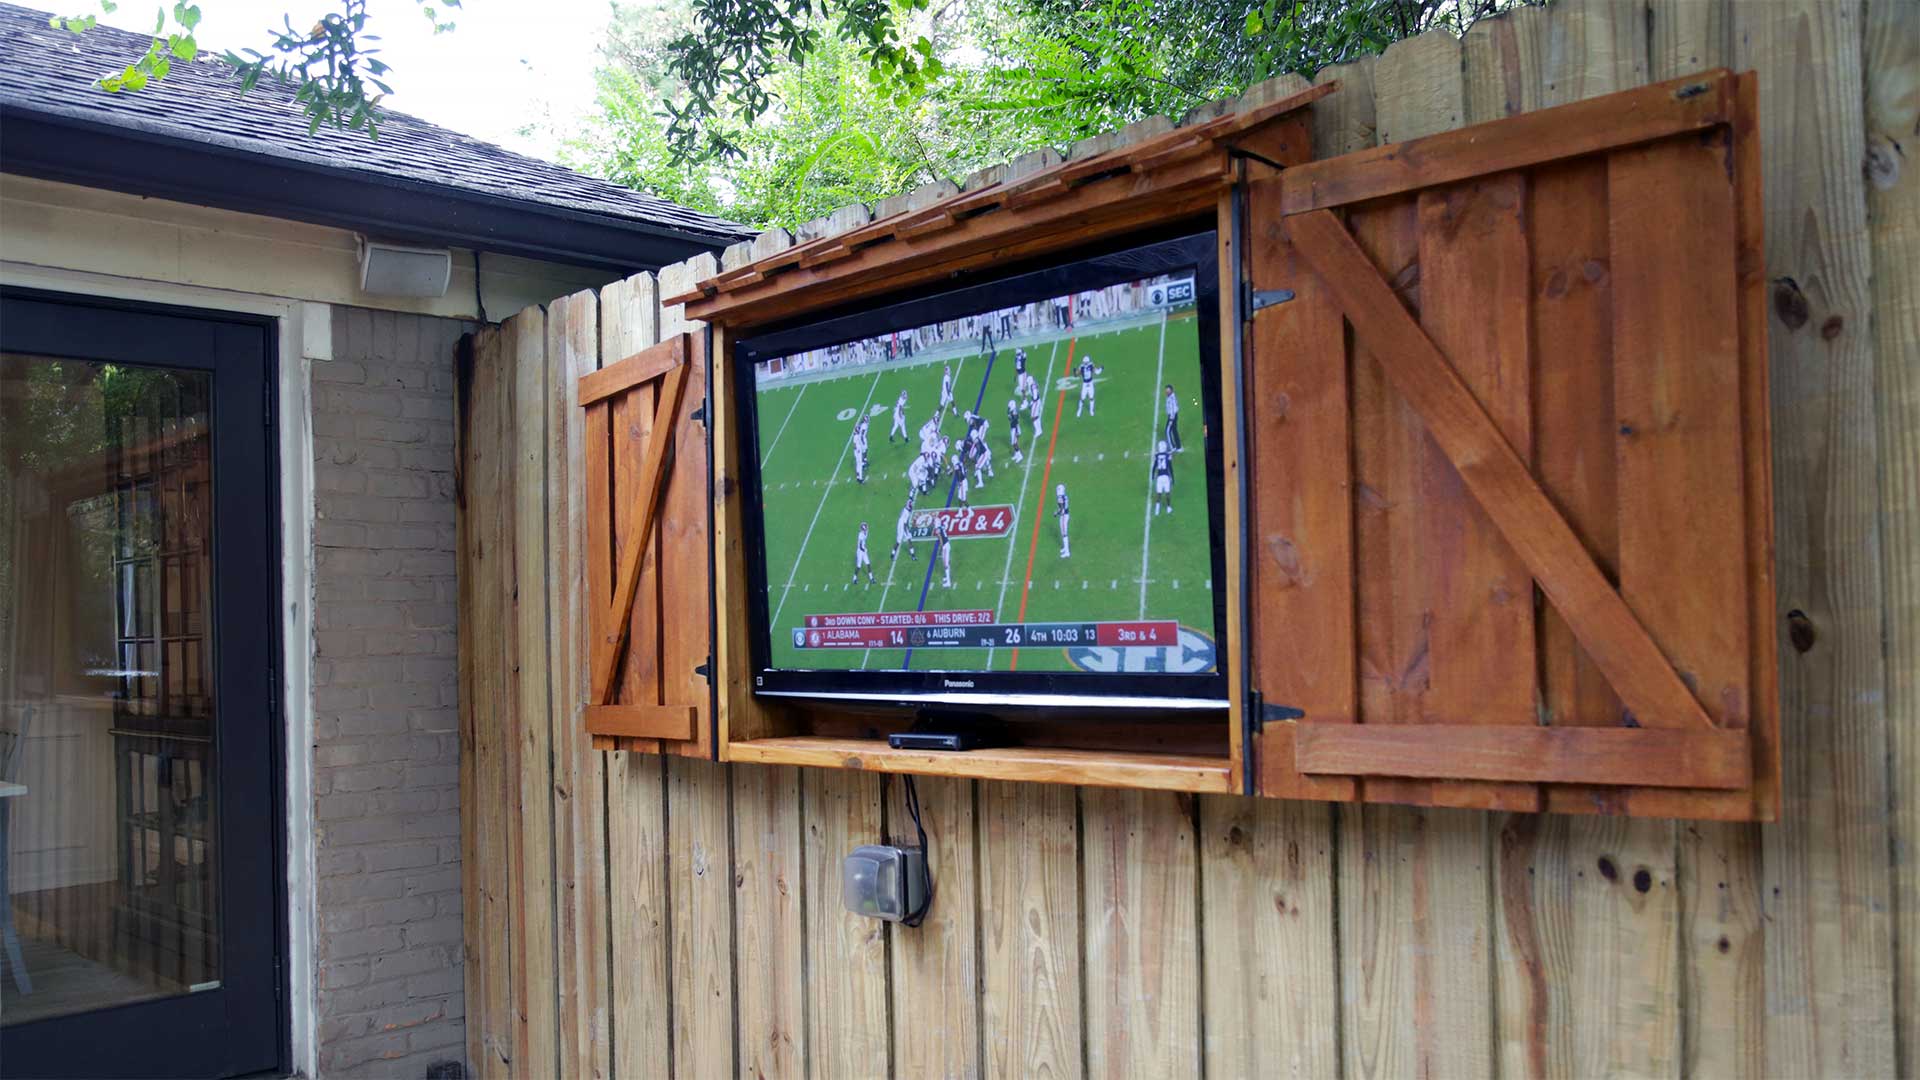
Building an outdoor TV cabinet isn’t hard at all. And the result is more than worth the effort. Best of all, you’ll be able to watch the game — or anything else — while dining or lounging on your deck or patio.
Materials
Half-inch treated plywood
Pressure-treated 2-by-6s
Coated deck screws
TV mount and hardware
Drill
Level
Wood glue
Galvanized nails
Fence boards
Gate hinges
Peel-and-stick roofing starter strip
How to Build an Outdoor TV Cabinet
Before you attempt any woodworking project, always wear safety glasses. In addition, take necessary precautions to ensure a hazard-free project area.
1. Install the back. Start with a piece of half-inch pressure-treated plywood. This board attaches to the fence or wall on the back side and it’s where you’ll install the TV mount on the front side.
This plywood also forms the back of the cabinet’s ‘box.’ The piece’s dimensions are determined by the size of the TV. Just allow a few inches of extra space on each side.
2. Install the sides. On either side of the plywood, attach pressure-treated 2-by-6s by driving coated deck screws at an angle into the fence. These 2-by-6s serve as the four sides of the outdoor TV cabinet. However, a deeper TV may require wider material.
3. Screw in the TV mount. Install the TV mount on the plywood, as directed on the mount’s package. Allow space for the TV to hang on the rails.
4. Build the cabinet doors. We’re making cabinet doors from pressure-treated fence boards. This will mimic the pattern of the fence behind the cabinet. The boards overlap each other by about an inch. We’re using waterproof wood glue and galvanized nails to secure everything together.
5. Add reinforcement. On the back of each door, we attach a horizontal piece at the top and bottom, with a diagonal piece running between to add strength.
6. Install hinges. Attach the doors to the cabinet using ordinary gate hinges.
7. Add water resistance. To keep out the rain, we apply peel-and-stick roofing starter strip to the top of the cabinet. Make sure it overlaps the front edge. Then we cover that edge with a strip of the fence material to create a shed-style roof for the cabinet with the scraps from our fence boards. Again, we use 1-inch overlap patterns.
8. Stain it. Once we coat the cabinet with stain to protect it, we’re ready to mount this outdoor TV cabinet and begin enjoying it!
Moving water from gutters to the ground in a controlled fashion is a necessary chore, but rain chains are the perfect blend of form and function because they do it with style.
Rain chains come in all kinds of materials to match just about any home. From black powder-coated aluminum to hammered copper, and everything in between, there’s bound to be something that fits your home’s style.
And that’s the point. You need something that carries rainwater from your roof to the ground level, but you don’t need an ugly pipe to do it!
This downspout alternative will add charm and character to your home, compared to its more industrial-looking counterpart.
Two-step installation is easy, and anyone can do it with simple tools.
Remove the downspout from the gutter. You’ll need a power drill to remove the rivets and metal screws. Then pull the joints apart.
2. Attach the rain chain to the opening in the gutter.
As water leaves the gutter, it cascades down the chain, slowing the flow and creating a beautiful waterfall in the process.
Backyard life is brought to you by Exmark, the official mowers of the backyard Life.