Ready to decorate your apartment for the holiday season? Don’t let worries about how you’ll make it work take away from the magic and wonder. While rentals may come with limitations like skipping nails for garland or avoiding a real tree, that doesn’t mean decorating has to be boring. Apartment Christmas decorations can still sparkle with plenty of charm, and the compact space can even make it feel even more inviting.
We’ve taken out the guesswork with some creative ideas we think you’ll love. So grab a hot chocolate, take notes, and get ready to turn your rental into a festive wonderland.
.tasty-pins-banner-container{display:block;margin-bottom:20px;position:relative;width:-moz-fit-content;width:fit-content}.tasty-pins-banner-container a{cursor:pointer;display:flex;font-size:14px;font-weight:700;letter-spacing:1px;line-height:1.8em;text-transform:uppercase}.tasty-pins-banner-container a:hover{opacity:1}.tasty-pins-banner-container .tasty-pins-banner{align-items:center;bottom:0;cursor:pointer;display:flex;justify-content:center;left:0;padding-bottom:1em;padding-top:1em;position:absolute;right:0}.tasty-pins-banner-container .tasty-pins-banner svg{margin-right:4px;width:32px}.tasty-pins-banner-container .tasty-pins-banner span{margin-top:4px}.tasty-pins-banner-container a.tasty-pins-banner{text-decoration:none}.tasty-pins-banner-container a.tasty-pins-banner:hover{opacity:.8}.tasty-pins-banner-container a.tasty-pins-banner-image-link{flex-direction:column}.tasty-pins-banner-container a img{margin-bottom:0}.entry-content .wp-block-image .tasty-pins-banner-container img{margin-bottom:0;padding-bottom:0}#et-boc .et-l div .et_pb_image_wrap .tasty-pins-banner-container .tasty-pins-banner{padding-bottom:1em!important;padding-top:1em;text-decoration:none}#et-boc .et-l div .et_pb_image_wrap .tasty-pins-banner-container a.tasty-pins-banner{cursor:pointer;display:flex;font-size:14px;font-weight:700;line-height:1.8em;text-transform:uppercase}#et-boc .et-l div .et_pb_image_wrap .tasty-pins-banner-container a.tasty-pins-banner span{letter-spacing:2px;margin-top:4px}.et-db #et-boc .et-l .et_pb_module .tasty-pins-banner-container a:not(.wc-forward){padding-bottom:0}Photo by Jasmin Ne
Apartment Christmas Decorations that Are Festive and Affordable
If you’re renting, you probably aren’t ready to invest in expensive holiday decor (yet). Maybe it’s not your vibe or you’re on a budget.
Whatever the reason, decor for small spaces allows you to decorate without worrying about breaking the bank. No, this doesn’t mean your place will be riddled with tacky plastic ornaments that say “Live, Laugh, Love,” but it does mean your hard-earned money can go towards smaller (and thus more affordable) apartment Christmas decorations.
Here are a few ideas for affordable and simple Christmas decorations that you can feel good about.
Turn your bar cart into a holiday spirit command station
More and more bar carts are being used as a platform for holiday decor. And why not? They’re affordable, stylish, and they hold alcohol – talk about the holiday spirit(s)! Hone in on a color scheme or theme, and use objects of varying heights to style the top of your bar cart.
Try candles, bottles of spiced booze, and small knick-knacks. Drape a garland or a festive banner over the railing, and style some mule mugs underneath.
Let your walls do the work
The easiest way to get the most bang for your buck with simple Christmas decorations is by using walls to your advantage.
And don’t worry, there are several hacks for hanging without creating a ton of holes (like Command hooks and strips, thumb tacks and a few more that we’ll suggest later, so yep, keep reading).
The best perk about vertical decor is it makes a small room appear taller – so look up to walls, windows, arches and door frames for inspiration.
Deck the walls, not the halls
Speaking of walls and windows…
Maybe you have space for a tree, but those faux gift boxes won’t work, or you have tabletop space for just a centerpiece but now the charging plates and holiday printed dishware look cluttered.
If you already have a decor theme, give it a festive twist by swapping out a few pieces. For instance, pillows with replaceable covers can be changed to match a holiday theme.
Throw blankets, napkins, placements and hand towels are also easily replaced without needing a lot of storage.
Make magic with existing furniture
If your apartment doesn’t include traditional railing or supportive structures like a mantel or a bannister, that’s ok! There are other ways to spread holiday cheer throughout your home, and all you need is your existing furniture.
Grouping decor pieces is a great way to make items feels more intentional, stylish and save on space. Consider tricks like adding a collection of vintage ceramics, a candle centerpiece, or even a bowl full of pinecones as a beautiful tabletop display or coffee table vignette to tie everything together.
Spend big on a dollar store budget
A dollar goes farther when you’re shopping at the dollar store, and just because it cost less doesn’t mean it won’t stand the test of time.
Whether it’s the dollar bin of your local Target or thrift store, or your favorite Dollar Store chain, there’s lots of affordable options. Since ornaments can add up quickly, we recommend starting here first.
How to Decorate (And Keep Your Security Deposit)
Living in a rental means there most likely was a security deposit paid at move-in. And of course, you want to get that money back when it’s time to move out.
You can still deck your place out with holiday flair by hanging decorations that won’t cause permanent damage. Let’s meet some of the other players in the nail-free game:
How to hang a stocking in a rental
For those lucky enough to have a mantel over a fireplace in your apartment, you can avoid adding nail holes by adding a sturdy stocking holder (like this one) to the top of your mantel.
You can also hang stockings with a dressmaker pin by lightly hammering them in place – they are heavy enough to hold lightweight stockings and light enough to avoid a giant hole in your wall.
Never underestimate the magic of this simple tool: tape! If you’re a stationery lover, chances are you already have washi tape tucked away in a drawer.
It’s easy to use and comes in playful patterns and colors you can mix and match to add personality to your holiday décor.
Washi tape can be used to hang holiday cards, make unique festive graphics, or frame and highlight existing apartment Christmas decorations.
The paper clip trick
Hanging decor doesn’t get easier than using a paper clip. All you need is a small magnet and a piece of masking tape – seriously, it’s that easy. Click here for the visual instructions.
What kind of Christmas tree should I get for my apartment?
Should you opt for the fresh pine scent of a real tree or opt for a fake one? Well, it could be dependent on the conditions of your lease. While some places don’t mind, others might have restrictions, so make sure to either ask your manager or review your leasing contract.
Space is one of the biggest considerations here. A faux tree is great to reuse year after year, but it could be a pain if you’re limited on space.
As you’re deciding, there are some smaller alternatives which could give you the best of both worlds: a super cute Christmas tree and space. There are a few solutions to consider, like mini tabletop tress (here’s a Charlie Brown version!), tree-alternatives, and half and quarter trees.
How to decorate an apartment door for Christmas
The easiest way to add holiday whimsy to your apartment is to start at the entrance. Decorating your apartment door is not only renter friendly, it spreads holiday cheer and your decor is safe from outdoor elements.
Or go traditional with a handmade wreath (using a Command hook to hang, of course!).
One Final Tip: Keep It Cozy
One of the best things about a small space is its cozy charm! Add warm touches like glowing candles and oil warmers with holiday scents such as vanilla, cinnamon, and citrus.
Layer in texture with soft furs and flannels, and sprinkle natural elements like branches, pinecones, and cranberries throughout your home for an affordable, festive feel. You don’t need to buy all-new decor to make your feel space merry.
Simply focus on creating a warm, inviting space you’ll enjoy all season long.
Share these simple Christmas decoration ideas on Pinterest!
Moving house, your business premises, or just a sofa down the road to your storage unit can pose a real challenge. Thankfully, there are plenty of removal van companies out there to help, no matter how big or small your moving challenge may be.
Here in the UK, there are options available, all of which are long-established and have great services on offer to help with your moving requirements. Whether you’re moving across the country or beyond, this guide shares five of the best removal van companies that are worth using in the UK.
1. AnyVan
As a service provider, AnyVan helps move anything, anywhere, both easily and affordably. Established back in 2009, AnyVan enables homeowners, business owners and everyone who requires removal or moving services, the accessibility needed to move their items safely and securely.
AnyVan provides an appropriately-sized van and the best movers, whether you’re shifting a few items in or out of storage to moving your family across the country.
Offering value and expertise without needing to pay premium prices, AnyVan has over 150,000 5-star reviews to date and has helped over 3 million customers with their moving requirements.
They utilise a nationwide network of transport partners, all vetted and qualified in providing affordable and trustworthy removal van services. There’s a lot of flexibility on offer too, from 48-hour cancellation for plans that are changed last minute, to the best availability for moving dates.
There’s a live driver tracking feature that provides you peace of mind when keeping an eye on your belongings on the road, to customer service support available seven days a week. If you’re looking for a highly reliable and affordable service, AnyVan is certainly the one to try first.
2. Abels
Abels is considered to be one of the premium services available for moving services. Whether it’s a UK move or an international one, it’s elegant and high-quality in its services every time.
They continuously invest in their movers and the logistics that enable them to provide a top-tier service. As such, they’re the first moving company to have attained The Royal Warrant in Removals and Storage Services.
Professionals are skilled and efficient in removing and moving furniture, whether it’s a small room’s worth or a whole house or storage unit.
Founded in 1958, they’re a relatively young company in comparison to some on this list, but they still provide plenty of experience and knowledge.
Committed to delivering the highest quality of services, along with modern innovation, it makes for a winning combination.
If you’re looking for the best removal van services to use in 2025, there are plenty of great picks to choose from. No matter how big or small the scope of the moving project may be, you’ve got plenty of choices.
3. Bishop’s Move
Bishop’s Move is a highly rated company, offering national coverage to those who want a stress-free moving and storage service experience.
They’ve got a whopping 170+ years of experience and are a helpful option for those who are looking to relocate their business or home, whether it’s in the UK or overseas.
Founded in 1854, it’s grown into one of the UK’s leading removals and storage companies. The services available are tailored to suit your needs and requirements. No job is too minor or complex it’s nature, and they have a wide range of previous clientele that makes them an attractive option.
From helping celebrities with their moves to archbishops and prime ministers, they’ve helped a lot of people with their possessions and getting them from A to B safely.
All of the staff have been professionally trained to a high standard and have over 20 UK locations. The delivery of resources and expertise makes this one of the most established, successful national removals companies that you could use here in this country to date.
4. Pickfords
Considered as one of the largest removal companies in the UK, Pickfords provides both UK and international services for both small and complex moves.
With years of experience and as members of the British Association of Removers, they’ve been helping many people move homes for many generations.
They’ve got a commitment to delivering a high-quality and local service, providing removals and storage services to customers, clients and employees across the country.
Pickfords provides a comprehensive range of moving and storage solutions to tailor their services to the individual’s requirements. As a multi-award-winning service for Best International Removal, it has been awarded the title by many different industry associations from 2019-2022.
For businesses, Pickfords offers a great range of business moving services. From restructuring to relocating, there are several options, from asset management to recycling and reuse services for office furniture and IT equipment.
5. Holdem Removals
Holdem Removals is considered a great option due to its large number of reviews on Trustpilot. The high ratings make this local, Northampton-based company a key player on this list. Not only does it serve this area, but it also caters to the rest of the UK.
They aim to help their customers save money without any hidden charges or fees when it comes to paying. A fast and reliable service is what you can always expect when using Holdem Removals.
They’re a company that understands how time-consuming and stressful moving can be. Regardless of how small or large your move is, Holdem Removals is available seven days a week and even a short notice. They help provide all the boxes, organise your items and offer the support so that you don’t need to stress or worry.
From residential to corporate removals, to local experts who can help navigate removals with ease, you’ve got plenty of benefits to using a company like this one.
If you’re looking for removal companies that offer plenty of care and attention for your needs and belongings, then all of these companies are a worthwhile selection. Take a look at each one and consider which is the best for your removal and moving needs this year or in the near future.
If you’re anything like me, your pets aren’t just animals, they’re full-fledged family members who deserve to be part of every holiday tradition. And what says “you’re part of the family” more than their very own Christmas stocking hanging alongside everyone else’s?
Making animal Christmas stockings is easier than you might think, and the best part is personalizing them to match your furry friend’s unique personality.
.tasty-pins-banner-container{display:block;margin-bottom:20px;position:relative;width:-moz-fit-content;width:fit-content}.tasty-pins-banner-container a{cursor:pointer;display:flex;font-size:14px;font-weight:700;letter-spacing:1px;line-height:1.8em;text-transform:uppercase}.tasty-pins-banner-container a:hover{opacity:1}.tasty-pins-banner-container .tasty-pins-banner{align-items:center;bottom:0;cursor:pointer;display:flex;justify-content:center;left:0;padding-bottom:1em;padding-top:1em;position:absolute;right:0}.tasty-pins-banner-container .tasty-pins-banner svg{margin-right:4px;width:32px}.tasty-pins-banner-container .tasty-pins-banner span{margin-top:4px}.tasty-pins-banner-container a.tasty-pins-banner{text-decoration:none}.tasty-pins-banner-container a.tasty-pins-banner:hover{opacity:.8}.tasty-pins-banner-container a.tasty-pins-banner-image-link{flex-direction:column}.tasty-pins-banner-container a img{margin-bottom:0}.entry-content .wp-block-image .tasty-pins-banner-container img{margin-bottom:0;padding-bottom:0}#et-boc .et-l div .et_pb_image_wrap .tasty-pins-banner-container .tasty-pins-banner{padding-bottom:1em!important;padding-top:1em;text-decoration:none}#et-boc .et-l div .et_pb_image_wrap .tasty-pins-banner-container a.tasty-pins-banner{cursor:pointer;display:flex;font-size:14px;font-weight:700;line-height:1.8em;text-transform:uppercase}#et-boc .et-l div .et_pb_image_wrap .tasty-pins-banner-container a.tasty-pins-banner span{letter-spacing:2px;margin-top:4px}.et-db #et-boc .et-l .et_pb_module .tasty-pins-banner-container a:not(.wc-forward){padding-bottom:0}
Whether you have a playful pup, a curious cat, or another beloved companion, I’m going to show you how to create adorable paw-shaped stockings that’ll make your pet feel extra special this holiday season.
Why Make DIY Animal Christmas Stockings?
Before we dive into the how-to, let’s talk about why handmade animal Christmas stockings are worth your time.
First, there’s the cost factor. Custom pet stockings can run $30-50 or more, while making your own costs just a fraction of that.
You’ll have complete control over the colors, fabrics, and details, so you can match your pet’s coloring or coordinate with your existing holiday decor.
These stockings also make incredibly thoughtful gifts for the pet lovers in your life. Imagine giving your friend a personalized stocking for their new puppy or their beloved senior cat.
It’s the kind of heartfelt present that shows you really get what matters to them.
Plus, let’s be honest, there’s something wonderfully satisfying about creating something with your own hands, especially when it becomes part of your family’s holiday traditions.
Years from now, you’ll smile remembering the afternoon you spent sewing that first stocking for your four-legged family member.
Materials You’ll Need
Gathering your supplies is the first step to success. Here’s everything you’ll need:
Faux fur fabric (½ yard is plenty for one stocking)
Felt in coordinating colors (for paw pads and cuff)
Fabric scissors (sharp ones make all the difference!)
Sewing machine or needle and thread
Sewing pins
Pen or fabric marker
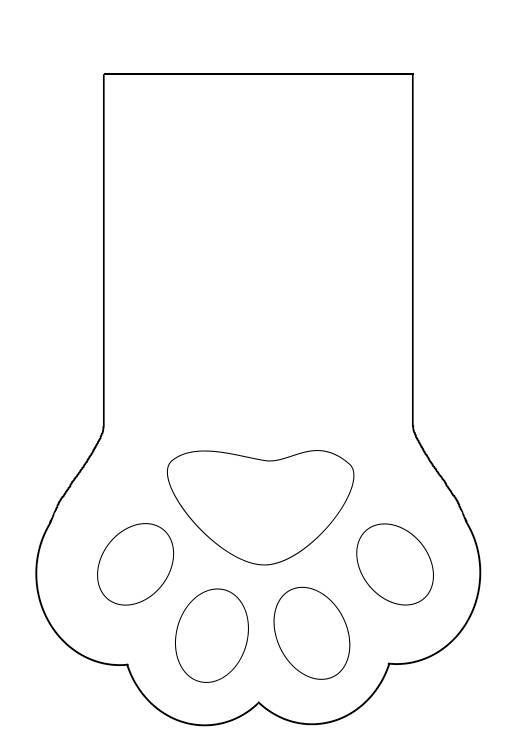
Paw template (download link)
Optional: iron-on letters, embroidery supplies, or fabric paint for personalization
You can find faux fur fabric at most craft stores or online. I love choosing colors that match my pets—brown for my chocolate lab, gray for my tabby cat.
Felt comes in every color imaginable, so you can get creative with the paw pad colors. Some people like realistic black or pink paw pads, while others go bold with red or green for a festive touch.
If you’re working with a tight budget, check the remnant bins at fabric stores. You often need less than half a yard of faux fur, so remnants are perfect and usually discounted!
Step-by-Step Instructions
Now for the fun part—let’s make some stockings! I’ll walk you through each step, and trust me, this is more straightforward than it looks.
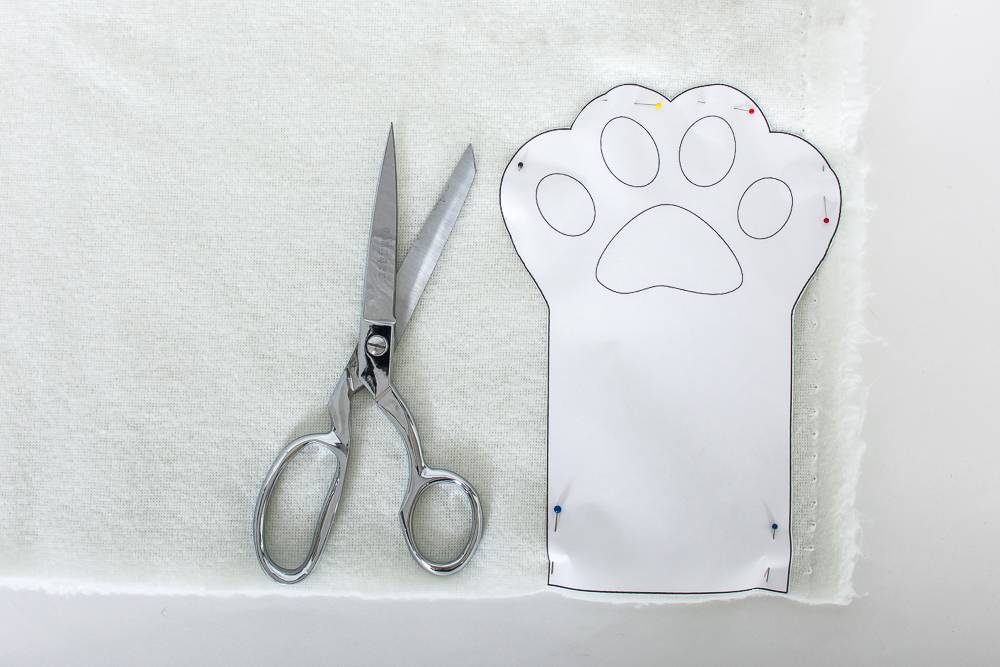
Download and Prepare Your Template
Start by downloading the paw template and printing it at full size. The template should create a stocking that’s approximately 12 inches tall. This is perfect for most dogs and cats.
If you have a smaller pet like a guinea pig or ferret, you can scale down the template when printing (try 75% for a 9-inch stocking). For larger dogs, scale it up to 125% for a 15-inch stocking.
Once printed, carefully cut out the template. You’ll notice it includes the main paw shape and separate paw pad pieces. Keep all the pieces together—I like to put them in a large envelope so nothing gets lost.
Cut Your Fabric Pieces
This is where your fabric scissors come in handy! Fold your faux fur fabric in half with the fuzzy side (the pile) facing inward. Place your paw template on top and pin it securely.
When cutting faux fur, here’s a pro tip: cut through just the backing fabric, not the fur itself. This prevents creating a choppy edge and minimizes shedding.
Pay attention to the direction of the fur pile—you want it running downward on your finished stocking for the most realistic look. Cut out two identical paw shapes.
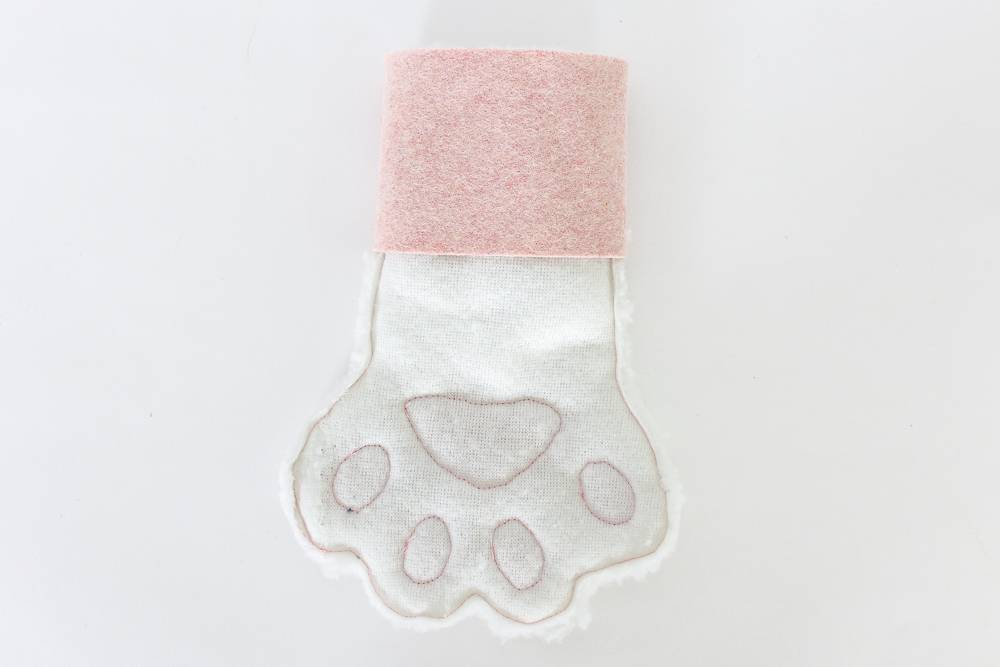
Next, place your paw pad template pieces on your felt and trace them.
You’ll need one large center pad and four smaller toe pads. Cut these out carefully.
Felt is much easier to work with than faux fur!
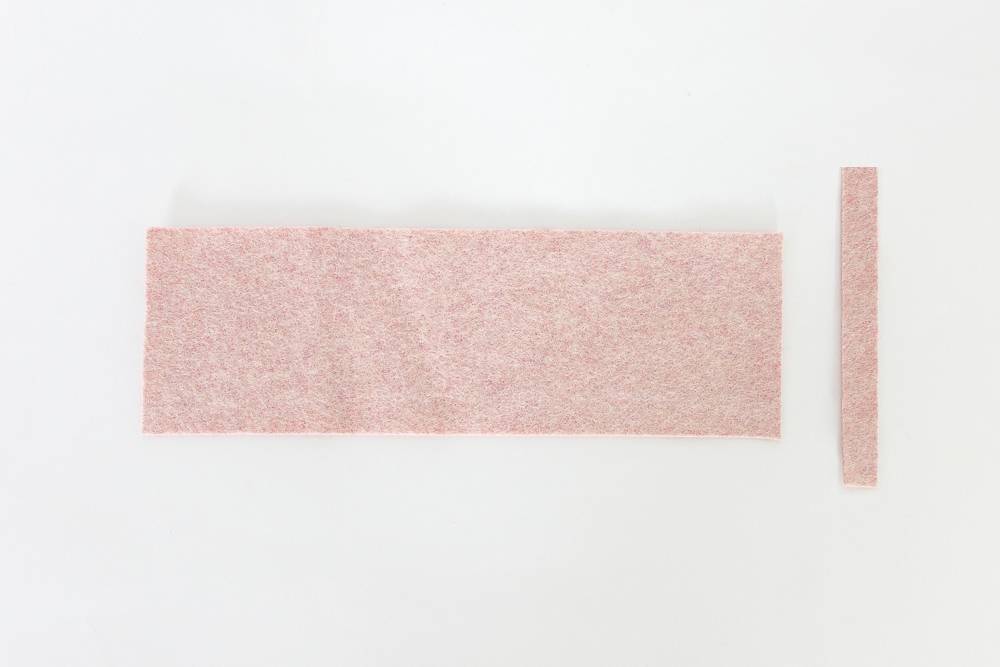
Finally, measure and cut two rectangles from your felt:
One piece 9½ inches by 3 inches (this becomes your cuff)
One piece 4½ inches by ½ inch (this becomes your hanging loop)
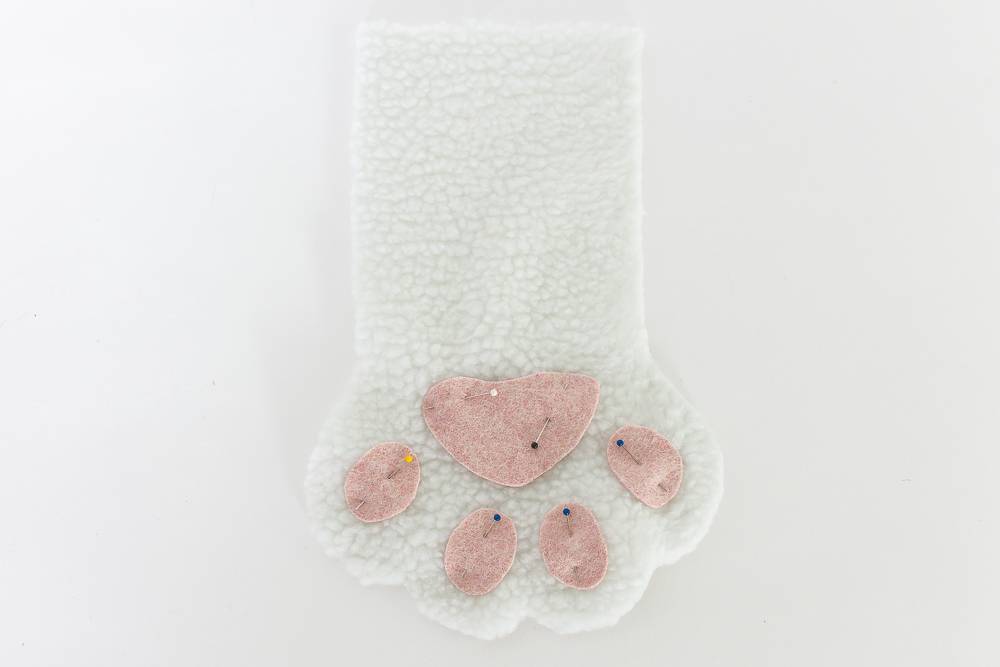
Create the Paw Pad Details
Now we’re adding those adorable paw pads that really make these stockings special! Lay out one of your faux fur paw pieces with the fuzzy side facing up (this will be the outside of your stocking).
Arrange your felt paw pads in position – one large pad at the bottom center and four smaller pads arranged above it like toes.
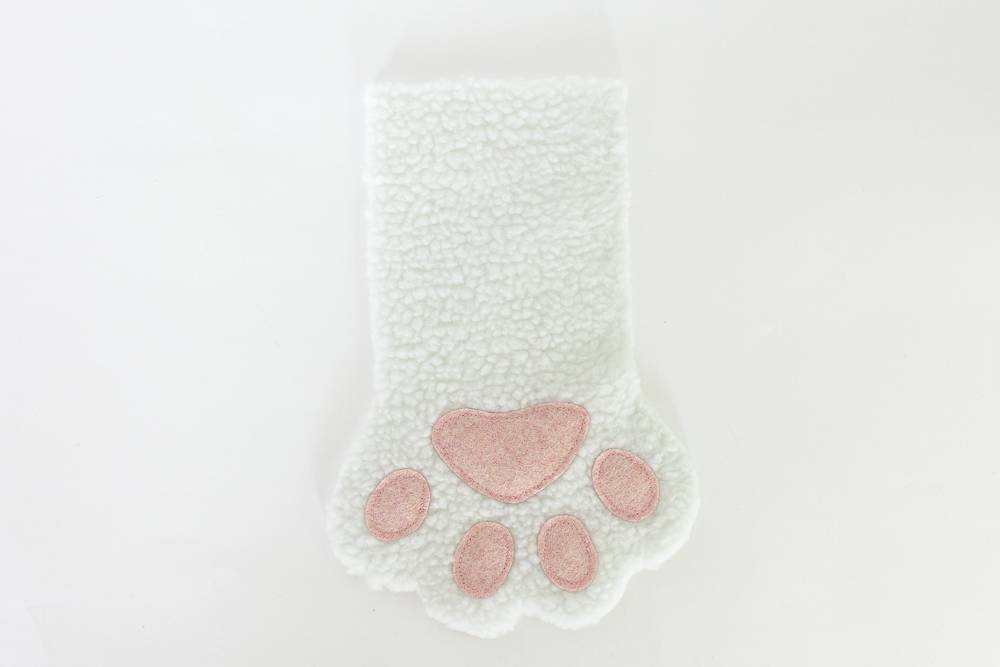
Take your time getting the placement just right before pinning everything in place. Once you’re happy with how it looks, sew each paw pad down using thread that matches your felt color.
You can do this by hand with a simple running stitch or whipstitch, or use your sewing machine with a straight stitch close to the edge of each pad.
I find that going slowly and pivoting carefully around the curves gives the neatest result. Don’t worry if your stitches aren’t perfect – remember, this is a handmade creation, and those little imperfections add character!
Assemble the Stocking
Here’s where your stocking really starts to take shape. Place your two faux fur paw pieces together with the right sides (fuzzy sides) facing each other.
The paw pads should be on the inside, hidden between the layers. Pin all around the edges, leaving the top straight edge open.
Using a ⅛-inch seam allowance, sew around the entire paw shape. Take your time around the toe curves and the space between the toes—these tight corners can be tricky.
If you’re sewing by hand, use a backstitch for strength. If you’re using a machine, go slowly and pivot with the needle down when turning corners.
Once you’ve sewn all the way around, carefully trim any excess fabric from the curves and corners, being careful not to cut into your stitches. This helps the stocking turn right-side-out more smoothly.
Add the Cuff
Take your 9½-inch by 3-inch felt rectangle and sew the short ends together with a ⅛-inch seam allowance. This creates a tube that will become your cuff. Now turn your stocking inside-out (if it isn’t already) so the paw pads are hidden inside.
Slip this felt tube over the top of your inside-out stocking, with the seam of the tube aligned with the back seam of your stocking. Pin the raw edge of the felt tube to the raw edge at the top of your stocking, making sure everything is even all the way around.
Sew around this top edge to attach the cuff to the stocking. This seam will be hidden when you fold the cuff down, so don’t worry too much about making it perfect.
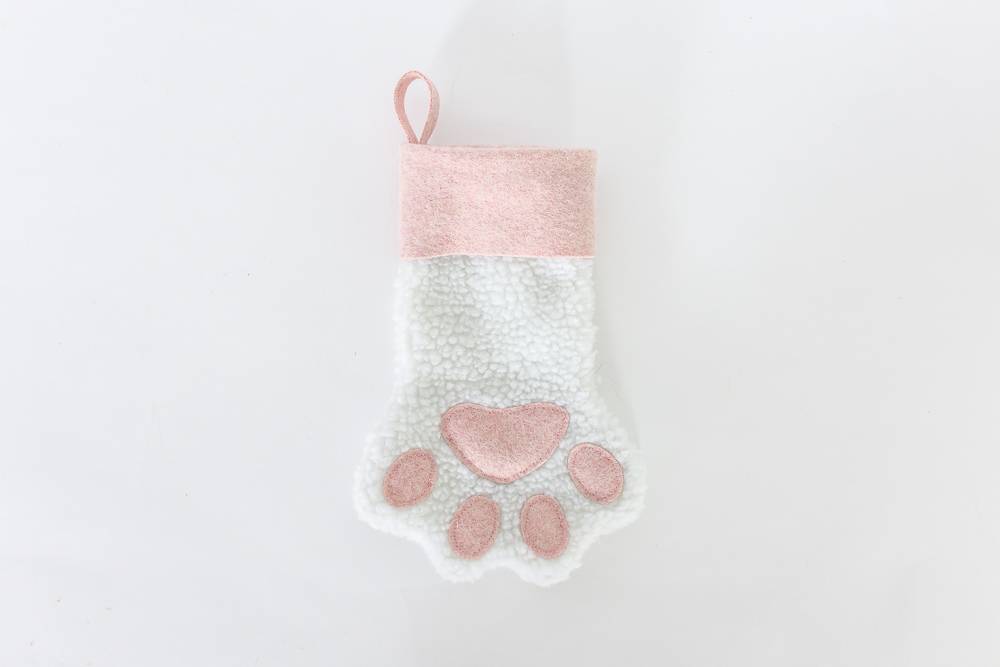
Create Hanging Loop and Final Touches
Almost done! Turn your stocking right-side-out through the top opening. Give it a good shake to fluff up the fur, and use your fingers or a blunt tool to gently push out the toe shapes so they’re nice and rounded.
Fold the felt cuff down to create that classic stocking look. Now take your 4½-inch by ½-inch felt strip and fold it in half to create a loop. Position this at the top back corner of your stocking (on the cuff) and hand-sew it securely in place.
Make sure to stitch through both layers of the cuff for a strong attachment. You don’t want this falling off when it’s stuffed full of treats!
If you’re adding personalization like your pet’s name, now’s the time to do it. Iron-on letters work great on the felt cuff, or you can embroider names for a truly custom touch.
Personalization Ideas
This is where you can really let your creativity shine! Here are some ideas I love:
Match Your Pet’s Coloring: Use brown faux fur for chocolate labs, gray for tabbies, white for Westies, or spotted fabrics for Dalmatians. Getting that color match makes the stocking feel extra special.
Add Their Name: Iron-on letters are the quickest option and come in tons of fonts and colors. If you’re handy with embroidery, stitching their name adds an elegant touch. Fabric paint works too, but test it on a scrap first to make sure you like how it looks.
Size It Right: The standard 12-inch stocking works for most pets, but don’t be afraid to adjust. I made a tiny 6-inch version for my friend’s hamster, and it was absolutely precious hanging on her mantel!
Festive Embellishments: Consider adding small bells, ribbon bows, or holiday-themed appliques. Just make sure anything you add is securely attached if your pet might try to “help” remove it later.
Coordinate With Your Decor: If your holiday color scheme is gold and white, use cream faux fur with gold felt accents. Love traditional red and green? Go for it! These stockings should fit seamlessly into your existing holiday setup.
Tips for Success
Working with faux fur can be a little tricky if you’ve never done it before, so here are my hard-won tips:
Minimize the Mess: Faux fur sheds during cutting. Work over a trash bag or old sheet you can shake outside afterward. A lint roller is your friend for cleanup!
Cutting Technique: Always cut from the backing side, not the fur side, using just the tips of your scissors. This prevents cutting the actual fur fibers and reduces shedding.
Sewing Through Thick Layers: When sewing the cuff to the stocking, you’re going through several layers of fabric. If you’re using a machine, go slowly and use a heavy-duty needle. Hand-sewing? Use a thimble to save your fingers!
Test First: If you’re trying a new technique like fabric paint or embroidery, practice on felt scraps first. It’s much better to make mistakes on scraps than on your finished stocking.
Keep Pieces Organized: As you cut out your paw pads, keep them arranged in position so you remember which piece goes where. I learned this the hard way when I mixed up all my toe pads!
Common Mistakes to Avoid: Don’t skip the step of pinning everything before sewing—it really does make a difference in your final result. Also, resist the temptation to use a seam allowance larger than ⅛ inch, as this will make your stocking noticeably smaller than intended.
What to Fill Your Animal Christmas Stockings With
Now that you’ve created these adorable stockings, what should go inside them? Here are some ideas that’ll make your pet’s tail wag (or purr with contentment):
For Dogs
Favorite treats or training rewards
New tennis balls or squeaky toys
Dental chews
A new collar or bandana
Puzzle toys filled with peanut butter
For Cats
Catnip toys
Feather wands or crinkle balls
Freeze-dried treats
A new collar with a bell
Small plush mice
For Other Pets
Species-appropriate treats
New hideaways or tunnels
Chew toys
Grooming supplies
Food puzzles
Remember to consider your pet’s size when filling their stocking. You don’t want it so stuffed that it falls off the mantel!
I like to include a mix of treats they can enjoy right away and toys that’ll keep them entertained throughout the holiday season.
Variations and Adaptations
While the paw-shaped design is classic, there’s room for creativity:
Different Paw Prints: Cat paws are smaller and more delicate than dog paws. You can modify the template to create species-specific shapes. Rabbit paws are longer and narrower—perfect for your bunny friend!
Traditional Shape With Animal Details: Not comfortable with the paw shape? Make a traditional stocking pattern and add paw pad appliques to the front, or use animal-print fabric.
No-Sew Options: If sewing isn’t your thing, you can create stockings using fabric glue instead of stitching. It won’t be quite as durable, but it absolutely works for decorative purposes.
Bone-Shaped for Dogs: Instead of a paw, why not make a bone-shaped stocking? Use the same construction technique with a bone-shaped template instead.
Mini Stockings: Create tiny versions (4-6 inches) for small pets like birds, hamsters, or fish. They’re quick to make and absolutely adorable!
Frequently Asked Questions
What fabrics work best for animal Christmas stockings?
Faux fur is my top choice because it’s soft, festive, and comes in colors to match almost any pet. However, fleece, flannel, or even quilting cotton work beautifully, too.
For outdoor dogs who might actually interact with their stocking, machine-washable fabrics like fleece are practical.
Can I make this without a sewing machine?
Absolutely! Hand-sewing takes longer, but it’s completely doable. Use a backstitch for strength along the seams, and a whipstitch or running stitch for attaching the paw pads.
Plan for about 2-3 hours of sewing time, rather than 30-45 minutes by machine.
How do I adjust the size for different pets?
The easiest way is to scale the template when printing. Print at 75% for a 9-inch stocking (perfect for cats and small dogs), 100% for a 12-inch stocking (most dogs), or 125% for a 15-inch stocking (large dogs). Remember to adjust your felt cuff measurements proportionally, too.
What’s the best way to add my pet’s name?
Iron-on letters are quickest and look clean and professional. You can find them at any craft store in multiple fonts and colors.
For a more personal touch, hand-embroidery using backstitch or chain stitch creates beautiful results. Fabric paint or markers work too. Just be sure to let them dry completely and heat-set them if required.
How do I wash handmade pet stockings?
Spot-clean when possible using a damp cloth and mild soap. If you need to fully wash it, turn it inside-out, place it in a mesh laundry bag, and use cold water on a gentle cycle.
Air dry completely. Never put faux fur in the dryer, as heat can damage its fibers. If you made yours from fleece or cotton instead, machine washing and drying is usually fine.
Yield: One 12 inch stocking
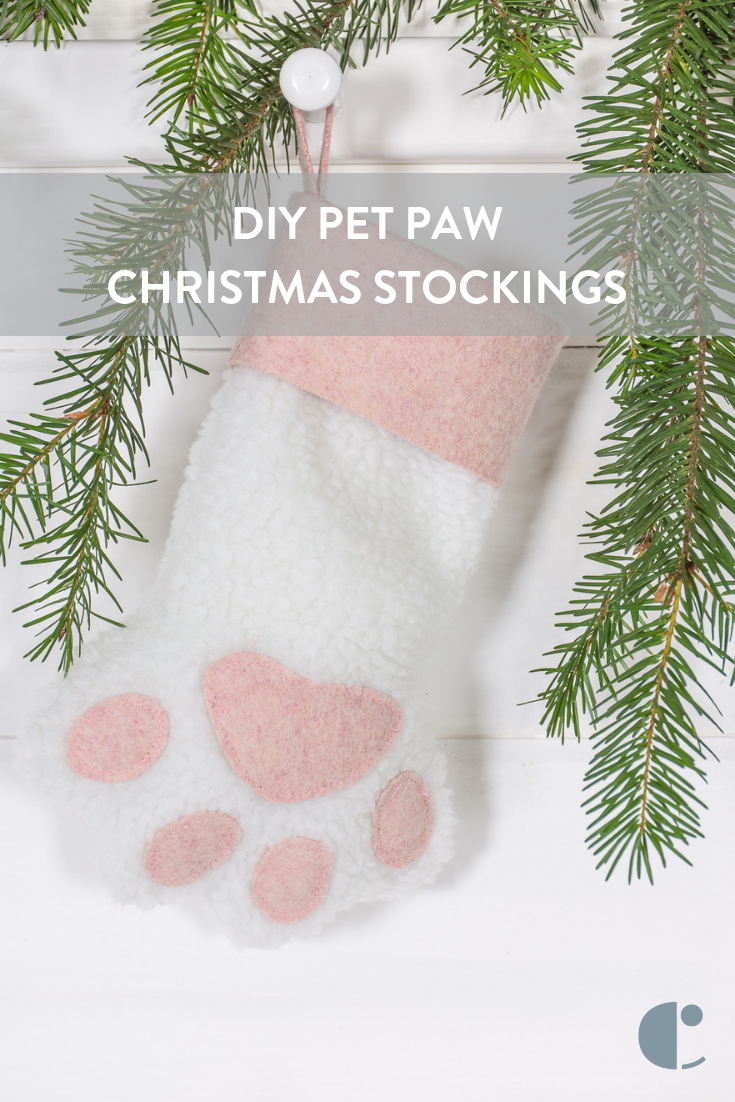
DIY Pet Christmas Stockings
Learn to sew adorable paw-shaped Christmas stockings for your furry family members! This beginner-friendly tutorial shows you how to create personalized animal christmas stockings using faux fur and felt. Perfect for dogs, cats, and other pets, these handmade stockings add a special touch to your holiday traditions. Customize with your pet’s name and favorite colors for a one-of-a-kind decoration they’ll love seeing filled with treats each year.
Our homes have evolved into more than just living spaces —they’ve become sanctuaries for mental clarity, physical well-being, and creative inspiration. Enter Biophilic Design 2.0, a revolutionary approach that combines nature, technology, and human-centered design to create living environments that promote both wellness and innovation.
This modern take on biophilia isn’t about filling your home with a few potted plants. It’s a holistic philosophy where design, materials, and digital tools come together to nurture the connection between humans and the natural world — all while embracing the conveniences of smart living.
Understanding Biophilic Design 2.0: A New Era of Natural Connection
The term biophilia means “love of life” and is a concept first introduced by biologist Edward O. Wilson. Traditional biophilic design focused on incorporating natural materials, sunlight, and greenery into built environments. But in the 2020s, the movement has evolved.
Biophilic Design 2.0 integrates digital innovation and sustainability into every corner of the home. It’s about creating spaces that balance organic warmth with technological intelligence, blending physical comfort with mental rejuvenation. Imagine natural light automatically adjusting to your circadian rhythm, air quality sensors syncing with ventilation systems, and wall art dynamically responding to your mood, all while surrounded by calming textures of wood, stone, and greenery.
This fusion of nature and technology is no longer futuristic — it’s here, redefining the way we live, work, and recharge.
The Three Pillars of Biophilic Design 2.0
1. Nature-Integrated Architecture
Modern architects are moving beyond superficial green aesthetics and designing homes that breathe with the environment. Green walls, vertical gardens, and living roofs not only purify the air but also enhance energy efficiency by regulating indoor temperature.
Windows are now positioned strategically to maximize natural daylight and views of outdoor landscapes. Water elements, such as indoor fountains or aquaponic systems, introduce calming sensory experiences that reduce stress and improve cognitive focus.
Digital visualization tools, often used by leading design professionals, help simulate how natural light interacts with space before construction begins. This allows homeowners to choose layouts that truly enhance both beauty and well-being.
2. Smart Tech for Sustainable Living
The second evolution of biophilic design comes from its partnership with smart home technology. Today’s sustainable homes leverage automation to make eco-conscious living effortless.
Smart lighting systems mimic sunlight patterns, adjusting brightness and hue to improve sleep quality and productivity.
AI-driven thermostats learn your preferences to optimize comfort while minimizing energy waste.
Smart irrigation systems nurture indoor plants and gardens precisely when needed, conserving water and resources.
These innovations make biophilic living not only beautiful but also practical — merging modern efficiency with the soothing rhythms of nature.
3. Designing for Mental Wellness
A home that feels connected to nature also deeply supports emotional health. Research shows that exposure to natural materials and patterns lowers blood pressure, reduces anxiety, and enhances creativity.
Interior designers now use textures that are natural or mimic organic surfaces, such as linen, cork, and bamboo, to cultivate tactile comfort. Meanwhile, colors inspired by earth, sky, and foliage stimulate calm and balance.
Digital art and immersive media installations are also playing a role. Many homeowners curate interactive visuals that change with time or respond to environmental cues. For example, a large digital frame could display animated landscapes that adapt to your local weather — rain, sun, or snowfall — creating a sense of harmony between indoor and outdoor life.
The Digital Dimension of Modern Home Design
Biophilic Design 2.0 thrives at the intersection of creativity and technology. And digital creation tools are now making it easier for homeowners to conceptualize, customize, and visualize their dream spaces with professional precision.
These platforms help users explore how natural light interacts with design choices, how textures complement each other, and even how their decor choices affect mood. The same creative software that professionals use to edit photos, design layouts, and craft visual stories is now empowering everyday homeowners to express their own aesthetic and emotional connection to nature.
For those looking to add a playful or personal touch to their design journey, tools like a meme editor offer a lighthearted way to blend humor and creativity into home inspiration boards, mood trackers, or digital art pieces. It’s a reminder that creativity and design are not limited to architects — anyone can take part in shaping the modern living experience.
Bringing Nature Indoors: Practical Steps to Start
If you’re ready to integrate biophilic principles into your own home, here’s how to get started:
Start with Light. Natural sunlight is the foundation of wellness. Remove heavy curtains, use sheer fabrics, and position mirrors to reflect daylight deeper into rooms.
Add Layers of Greenery. Incorporate indoor plants that suit your lifestyle — from low-maintenance succulents to air-purifying species like peace lilies and snake plants.
Choose Natural Materials. Replace plastics and synthetics with materials like reclaimed wood, clay, and linen for an earthy aesthetic and tactile warmth.
Bring in Nature Sounds. Use subtle background audio featuring rainfall, ocean waves, or forest ambiances to reduce stress and boost focus.
Balance with Smart Tech. Introduce automation that enhances — not interrupts — natural harmony. Smart lighting and air systems should support your daily rhythm rather than dominate it.
Personalize with Creative Expression. Digital platforms allow you to visualize, document, and refine your ideas before implementing them. Experiment, adapt, and let your space evolve naturally with you.
A Vision for the Future: Digital Nature and Emotional Wellness
The future of interior design lies in balance, between the tactile and the digital, between aesthetics and emotion. Biophilic Design 2.0 represents a new mindset: it’s not about replicating nature, but reestablishing a relationship with it through thoughtful, human-centered design.
As technology continues to evolve, our connection to nature doesn’t have to fade. Instead, it can deepen — through intelligent systems that support sustainable living, creative digital tools that amplify imagination, and living spaces that nurture both body and mind.
In the end, biophilic design is not just about decorating your home — it’s about redefining how you live within it. A space that breathes with you, learns from you, and inspires you to live in harmony with the world around you, that’s the true beauty of Biophilic Design 2.0.
Beautiful, charming, whimsical: a cottage garden offers it all. Originating from rural England, this gardening style features a blend of flowers, herbs, and vegetables in small, informal plots around their cottages.
What sets them apart from traditional gardens? They aren’t as tied to symmetry or structure, but more free-flowing in design with dense plantings that feel romantic, wild, and intentional.
Cottage gardens celebrate the art and beauty of gardening with a more relaxed approach.
Typically, you’ll see plants spilling over borders, reaching trellises and pathways that flow through a sea of colorful blooming florals.
This style is not about perfection – it’s all about letting the space feel abundant and flowy.
.tasty-pins-banner-container{display:block;margin-bottom:20px;position:relative;width:-moz-fit-content;width:fit-content}.tasty-pins-banner-container a{cursor:pointer;display:flex;font-size:14px;font-weight:700;letter-spacing:1px;line-height:1.8em;text-transform:uppercase}.tasty-pins-banner-container a:hover{opacity:1}.tasty-pins-banner-container .tasty-pins-banner{align-items:center;bottom:0;cursor:pointer;display:flex;justify-content:center;left:0;padding-bottom:1em;padding-top:1em;position:absolute;right:0}.tasty-pins-banner-container .tasty-pins-banner svg{margin-right:4px;width:32px}.tasty-pins-banner-container .tasty-pins-banner span{margin-top:4px}.tasty-pins-banner-container a.tasty-pins-banner{text-decoration:none}.tasty-pins-banner-container a.tasty-pins-banner:hover{opacity:.8}.tasty-pins-banner-container a.tasty-pins-banner-image-link{flex-direction:column}.tasty-pins-banner-container a img{margin-bottom:0}.entry-content .wp-block-image .tasty-pins-banner-container img{margin-bottom:0;padding-bottom:0}#et-boc .et-l div .et_pb_image_wrap .tasty-pins-banner-container .tasty-pins-banner{padding-bottom:1em!important;padding-top:1em;text-decoration:none}#et-boc .et-l div .et_pb_image_wrap .tasty-pins-banner-container a.tasty-pins-banner{cursor:pointer;display:flex;font-size:14px;font-weight:700;line-height:1.8em;text-transform:uppercase}#et-boc .et-l div .et_pb_image_wrap .tasty-pins-banner-container a.tasty-pins-banner span{letter-spacing:2px;margin-top:4px}.et-db #et-boc .et-l .et_pb_module .tasty-pins-banner-container a:not(.wc-forward){padding-bottom:0}Photo by @clark.cottage.gardens
The key features of a cottage garden include:
A beautiful mix of florals and plants like annuals, perennials, herbs, and vegetables
Climbing plants for vertical appeal, like clematis and wisteria
The use of natural materials like gravel and wood
Pollinator-friendly plants to attract bees, butterflies, and birds
The beauty of cottage gardens is that they can work in a variety of spaces, whether you have a large sprawling backyard or a small urban plot. They are also perfect for gardeners who love diversity and beauty, and who don’t mind a little disarray.
Navigate This Post
Why Choose a Garden Cottage?
If you’re a dreamy, non-traditional garden lover, the winding paths and overflow of a cottage garden are probably perfect for you. With this type of garden, you can embrace your wild and free side as you opt for growing a large variety of flowers, herbs, and vegetables.
Another plus? You get to turn your garden into the perfect escape. Whether you’re starting from scratch or sprucing up a corner of your yard, cottage gardens offer a space to let your garden fantasies run wild. All you need is the right mix of plants, materials, and some design magic to get started.
Designing Your Cottage Garden
Cottage gardens typically shy away from being really structured – this is where your plants and imagination can run free. Start planning for a layered look, where you allow plants to spill over borders.
Here are some key elements to consider:
1. Layout & Pathways
Gravel, brick, or mulch can be used to create charming winding paths
Arches, trellises, and picket fences are great for defining spaces and supporting climbing plants
Bird baths, benches, or vintage flowerpots add beautiful points of interest
2. Soil & Mulch
Test your soil first to understand what your garden needs
Improve soil quality by utilizing organic matter like compost, leaf mold, or bark
Organic mulch or wood chips can help retain moisture (and suppress annoying weeds)
3. Vertical Interest
Climbers like wisteria, sweet peas, and clematis add a beautiful touch to trellises and archways
Get “just a little” structured – for instance, using garden cloches or obelisks adds and supports height without looking too exact.
Cottage Garden Plants and More
Cottage gardens are all about displaying a unique and rich variety of plants. So instead of sticking to one type or style, this is where you can let several of your favorites shine from different colors, heights, to textures. Diversifying plant species can actually help your plants grow, attract pollinators, and keep pests and disease in check.
Here are a few of our top recommendations:
Annuals
Annuals complete their life cycle in one growing season, meaning they sprout, bloom, and die all within a year. Since they flower pretty often, they can offer vibrancy and color to your garden.
Why add them? To fill gaps and enhance seasonal variety.
We think you’ll love: Sweet peas, zinnias, cosmos, nasturtiums, marigolds
Perennials
Perennials return year after year, often growing stronger and fuller with time. Some perennials live a couple of years, while others can have a lifespan lasting decades. We consider these the backbone of a cottage garden, giving it structure and consistency.
Why add them? They’re low-maintenance and long-lasting.
We think you’ll love: Peonies, daisies, lavender, foxgloves, coneflowers
Herbs
Herbs are easy to grow, beautiful, fragrant, and add a different texture to your garden. Many herbs are also pollinator-friendly and repel pests. Herbs can be used in a variety of ways, like cooking, teas, or natural remedies.
Why add them? They smell great and are often drought-tolerant.
We think you’ll love: Rosemary, thyme, sage, mint, chives
Vegetables
Use your garden cottage to create your own abundance. Vegetables bring a functional element to your garden (visually and as a food source) – also, many vegetables like tomatoes and beans can be trained to climb.
Why add them? Fresh food (need we say more?).
We think you’ll love: Lettuce, kale, tomatoes, pole beans, squash
By combining these plant types, your charming cottage garden will not only look beautiful but will also be resilient and bountiful. Plant diversity helps prevent pests, attracts helpful insects, and gives your garden everything it needs to thrive throughout the changing seasons.
Pollinators and Birds
Cottage gardens are perfect for attracting pollinator insects. To get them buzzing their way into your garden, be sure to add nectar-rich plants like lavender and coneflowers. The goal is to create a safe environment for these helpful friends to thrive, so be sure to avoid using pesticides.
For birds, try adding a shallow bird bath so they can clean, swim, and gather. Water features create an inviting space for feathered friends and add to the overall ambiance. In addition, consider adding nesting boxes tucked among climbing roses or ivy-covered trellises to give them a cozy home when visiting.
Styling Tips and Tricks
Styling your cottage garden is all about letting your blooms run wild. Natural materials, flowing plants, and a little free-spiritness will go a long way.
Use natural materials like wood, stone, and terracotta
Let plants do their thing – specifically, allowing them to spill over paths freely.
Add whimsy with vintage garden tools or painted signs
Low-Maintenance Tips
There are a few ways you can make maintaining your cottage garden an easeful experience, like choosing resilient plants and maintaining soil with natural solutions.
Drought-tolerant plants are great for reducing watering (and saving money)
Group plants! Arrange them by soil moisture levels and sunlight needs
Compost is your friend – use compost and organic soil to feed plants naturally
Use dense planting and mulch to keep the weeds away
Cut Flowers for Celebrations
Whether you’re celebrating a birthday or a major holiday, your cottage garden will save you a trip to the local florist. Just head right to your yard and pick out your favorite florals to create your unique arrangement. Also, as you learn more about your plants’ growing patterns, you’ll know which flowers are in season for special celebrations.
With a little planning, you can have blooms throughout the growing season for DIY bouquets (or starting a local flower delivery).
It doesn’t matter if you’re a seasoned gardener or just starting out, a cottage garden is all about creating a space that brings you joy. So don’t worry about being perfect! With the right plants, layout, and a touch of free flowy creativity, your cottage garden can become the perfect sanctury for wildlife, and you.
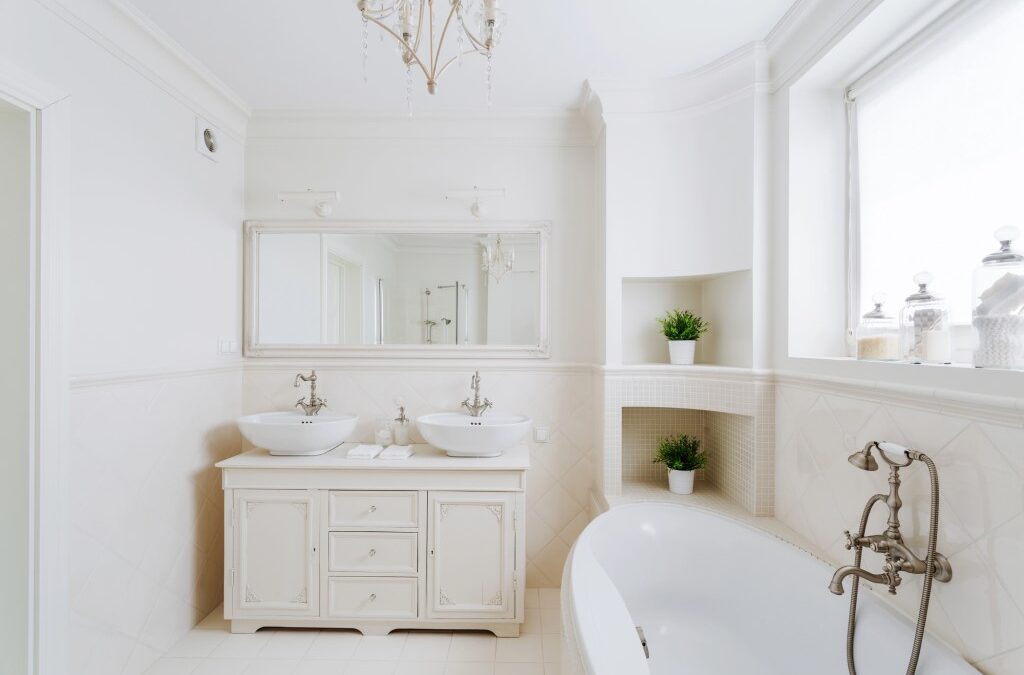
Transforming a small bathroom into a functional and visually appealing space is a common challenge for homeowners. With new design strategies and clever renovations, it’s quite simple to create an illusion of space and luxury. Implementing these tips can drastically improve the ambiance, making it a serene retreat rather than a cramped utility space.
Light Colours and Reflective Surfaces
Utilizing light colours on the walls can significantly affect the perception of space in a small bathroom. Soft hues like whites, light grays, and pastels enhance brightness and create an airy feel. Painting the ceiling a lighter shade than the walls can visually raise the height of the room, further amplifying the spacious effect.
Incorporating reflective surfaces, like high-gloss tiles or mirrored accents, can contribute to this illusion. Mirrors can provide two benefits: they reflect light and make the room appear larger. Placing a large mirror above the sink or on one wall will make your bathroom feel open and add a touch of elegance.
Including glass elements, such as a glass shower door instead of a fabric curtain, keeps visuals clear and unobstructed. The cost of a bathroom remodel largely hinges on material choices, so mixing high-quality reflective and light-colored materials can yield a luxurious finish without breaking the bank. Adding small metallic accents, like chrome fixtures or brushed nickel handles, can subtly enhance the sense of brightness.
Layering different lighting sources, such as wall sconces and recessed lights, can further open up the space. Incorporating minimal clutter on counters ensures that reflective surfaces maintain their visual impact. Selecting light-colored towels and accessories complements the design. Even small pops of pastel or soft hues can add personality while keeping the room feeling expansive.
Clever Storage Solutions
Maximizing storage options is vital in a small bathroom. Clutter can make even the largest bathrooms feel confined. Think about built-in shelves or cabinetry that utilizes vertical space efficiently. This not only adds storage but keeps countertops clear, promoting a more open environment.
Wall-mounted cabinets can bring functionality without taking up floor space. Utilize baskets or decorative bins within cabinets to organize toiletries, towels, and cleaning supplies neatly. Another effective approach is to use the back of the bathroom door; a hanging organizer can store a variety of items without taking up valuable bathroom real estate.
Smart Lighting Choices
Strategic lighting can dramatically alter the mood of a bathroom. Instead of harsh overhead lights, layer different light sources. Use wall sconces for ambient lighting and a statement chandelier or pendant for added elegance. Dimmer switches are a quick fix to adjust the brightness according to your needs.
Natural light is very important. Add larger windows, skylights, or even frosted glass panels that allow daylight while ensuring privacy. If natural light is limited, choose warm white bulbs that simulate daylight and create a welcoming environment.
Accent lighting around mirrors can enhance both functionality and style. Recessed lighting in shower areas ensures safety while maintaining a clean look. LED strips under cabinets or vanities add a modern touch and highlight design features. Task lighting near sinks or vanities improves visibility for grooming routines. Combining multiple lighting layers allows you to customize ambiance and functionality effortlessly.
Declutter and Personalize
Being minimalist in design can create the illusion of a larger space. This doesn’t mean devoid of personality. Instead, think of incorporating personal touches that require fewer items. Selective décor pieces and art can act as focal points. A simple piece of wall art or a framed photograph can infuse warmth without overwhelming the senses.
Keep decorative items to a minimum; one statement piece often works better than several smaller items competing for attention. Trim down your toiletries and cleaning agents to the important ones you use daily, thus keeping visible items to a minimum.
Utilize hidden storage options like drawers or cabinets to maintain a clean look. Choose multipurpose items, such as a mirror with built-in shelving, to reduce clutter. Incorporate soft textiles like a bath mat or towels in coordinating colors for subtle personalization. Limit patterns and busy designs to avoid visual chaos. Even a few carefully selected scented candles or plants can add personality while keeping the space serene.
Stylish Fixtures
Credit: Shutterstock
Choosing sophisticated fixtures can impact both form and function in a small bathroom. Opt for sleek, modern faucets and fixtures that make the space feel upscale. It’s vital to match the finishes of your fixtures for a cohesive look, chrome, brushed nickel, and matte black can complement strongly designed elements.
Another stylish option is a wall-mounted sink, which helps create more floor space and achieves a clean, modern aesthetic. Towel racks or hooks in a unique design can serve both function and style. Think about adding heated towel racks that add a luxurious touch.
Select a statement showerhead or rainfall fixture to create a spa-like feel. Incorporate matching cabinet handles or drawer pulls to unify the design. Add a small, elegant backsplash behind the sink to enhance texture and visual interest.
Luxurious Textures and Finishes
Incorporating varied textures can elevate a small bathroom, making it feel comfortable and layered. Adding textiles like plush towels, a thick bath mat, or a textured shower curtain can introduce a sense of luxury. Choose materials like faux fur or high-quality cotton for towels to provide a sensory element that enhances comfort.
Likewise, choosing high-quality materials for countertops and tiles, such as marble or quartz, can provide a high-end feel. Even on a smaller scale, these luxurious textures can dramatically upgrade the look.
Utilize Vertical Space
Maximizing vertical space helps optimize a small bathroom without encroaching on its footprint. Think tall shelving units or stacked storage solutions. A floor-to-ceiling shelf can provide storage without being bulky. A ladder shelf can offer an appealing aesthetic while being practical.
Incorporate tall plants or decorative elements to draw the eye upward. Elements like these can create a more inviting atmosphere while breaking the monotony of plain walls. The use of vertical lines in wallpaper or wall tiles can enhance this effect, further making the space appear larger.
Optimally designed small bathrooms are about more than just aesthetics; they are about creating a delightful atmosphere that feels both spacious and luxurious. With careful planning and smart design choices, even the smallest spaces can transform into quiet retreats.


