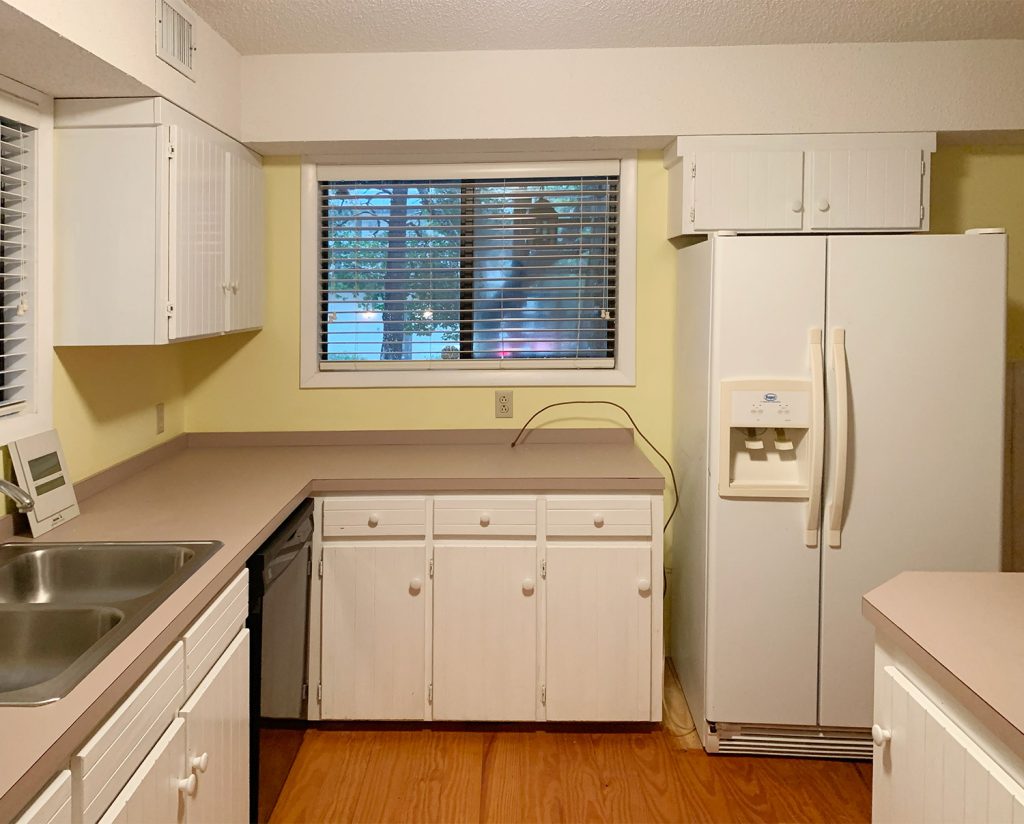
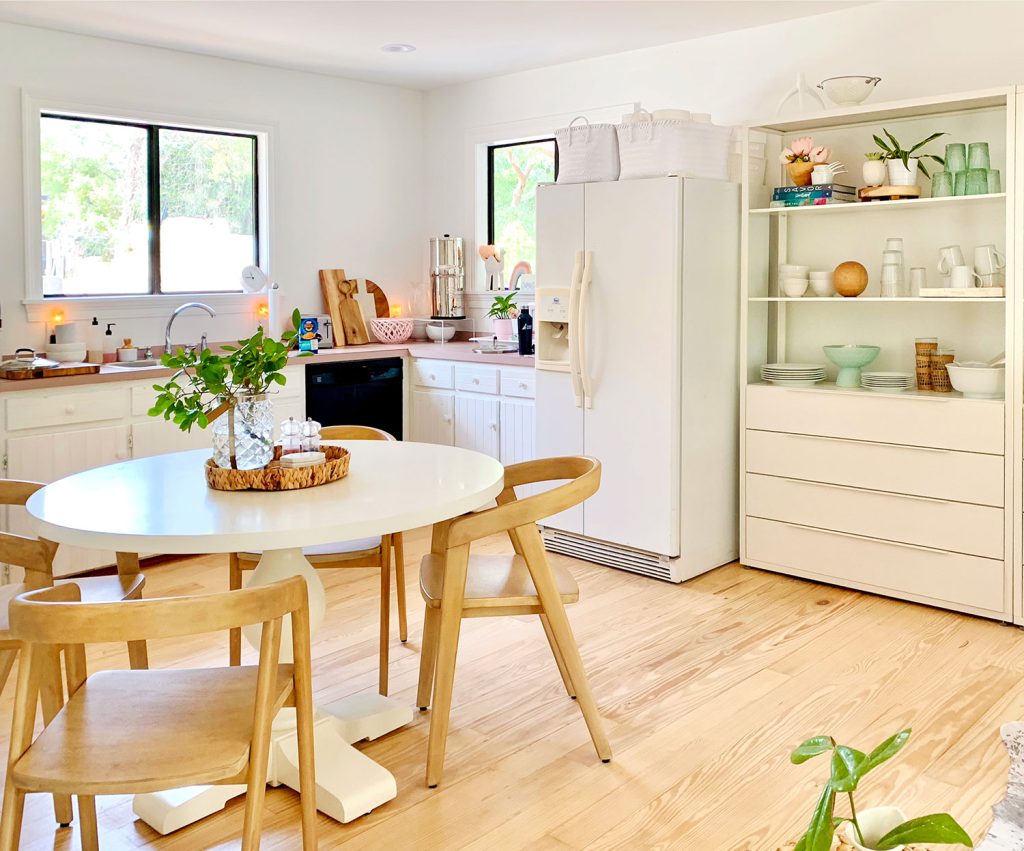
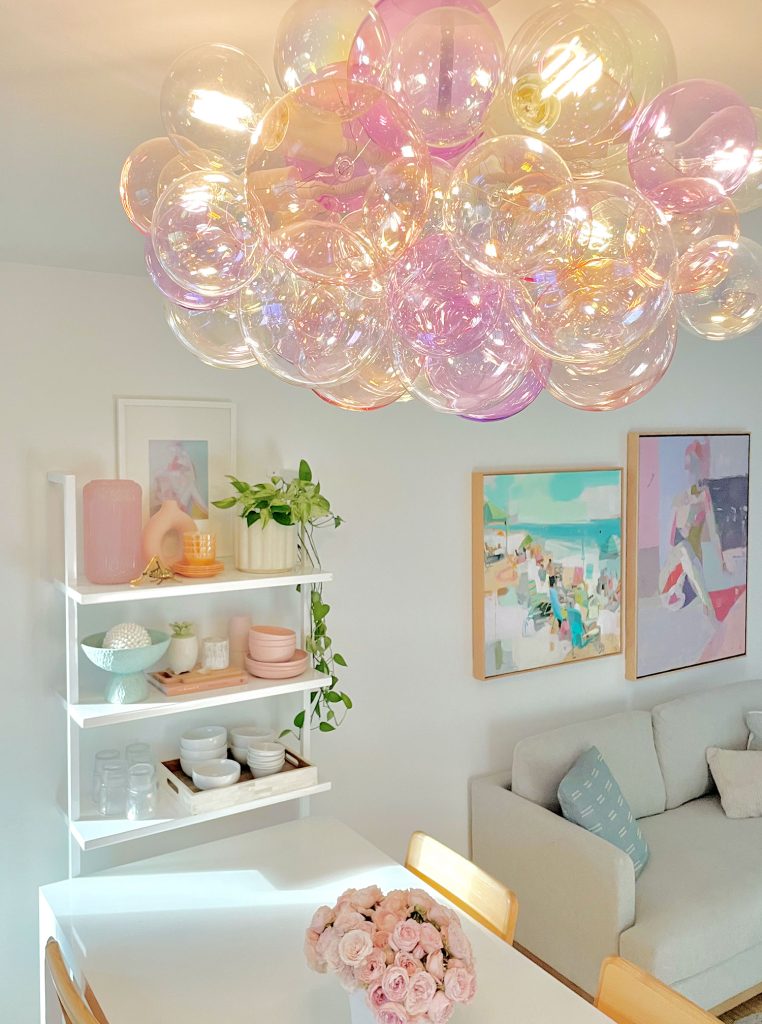
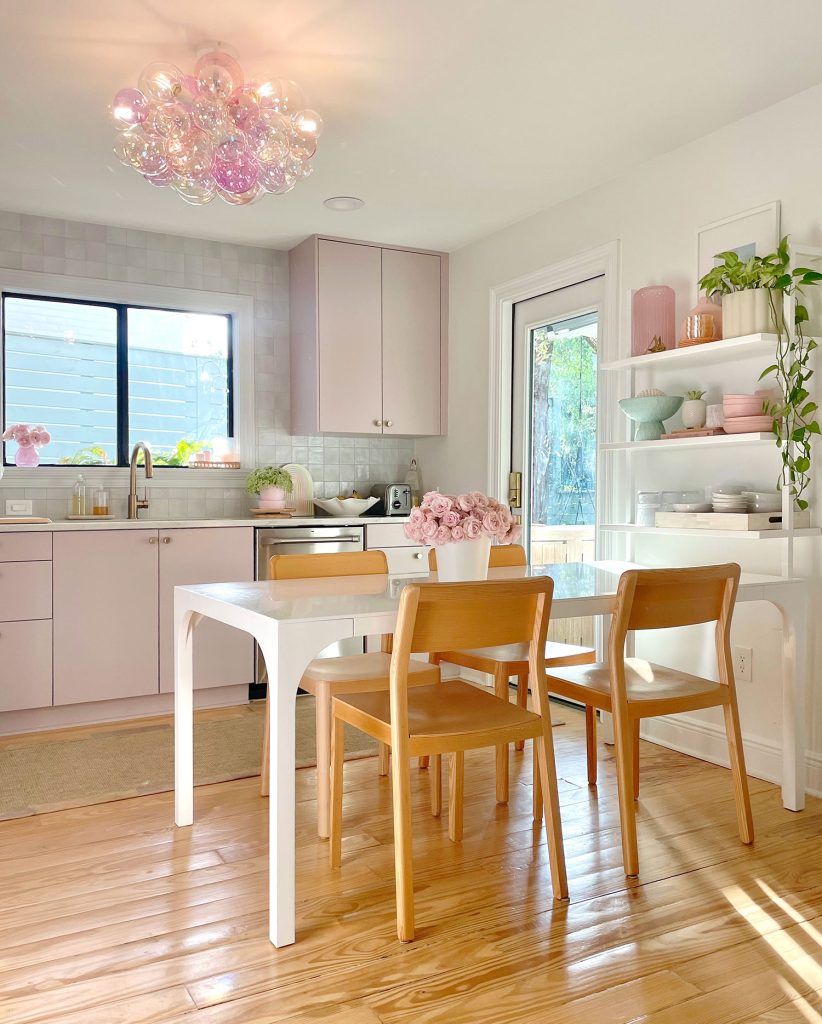
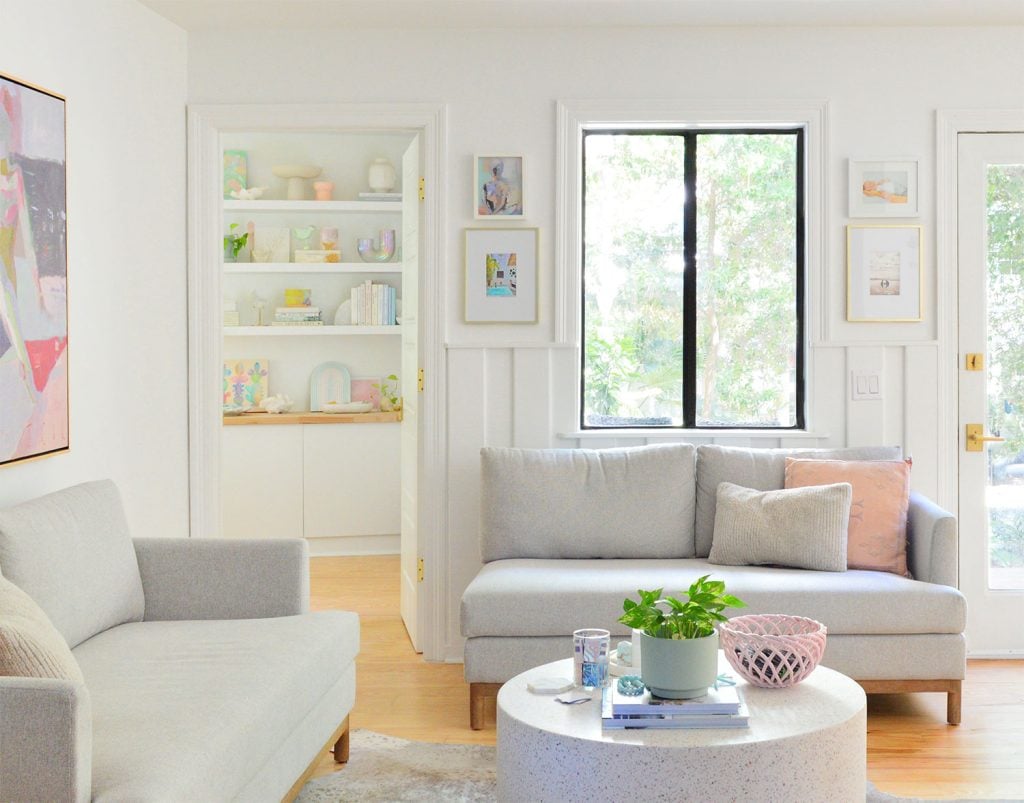
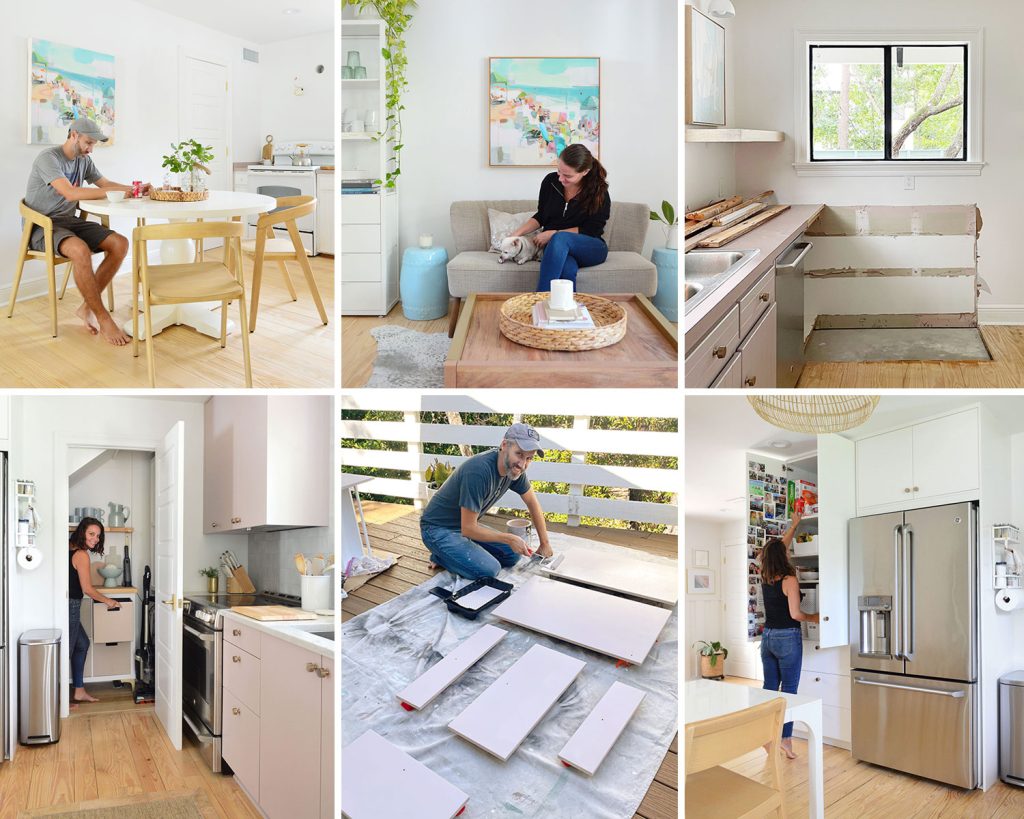
By now you know that we deeply believe that a house always evolves to work with a family’s changing needs, but I’d say this kitchen and attached sitting area are as close to absolutely done as ever. In fact over the last two years they’ve held pretty steady – we did update the kitchen light to my dream chandelier that looks like bubbles at a beach sunset. And before that we finally settled on the right seating that fit perfectly into the seating area. But yeah, since then… settled! Blissfully so! Other than a few tiny accessory changes like a new toaster that I got for Christmas. We shot the photos for this post before that… yes it takes us half a year to write these big posts sometimes.
Since our old kitchen posts don’t reflect those updates, we figured this updated kitchen rundown made sense. We also thought sharing what works for us might help others with a similar space because it feels remarkably efficient for our family. We spend so much time in this room, and it meets SO MANY functions (hanging out before school, eating and cooking meals, storing all the cooking & serving stuff, a place for the grown ups to hang when we entertain while the kids run upstairs and do crafts, play games, or watch a movie, etc).
Video Tour
And because a video truly feels like it’s worth a thousand words (and still photos!), since you can so much better visualize walking through the space, here’s a video walk-through of our small kitchen with the attached living area. It feels so good to have two loveseats in there after wrestling with how to best handle the sitting area for the first few years of living here. It’s that dang bedroom doorway (and front door) in the middle of the sitting area that made things tricky for a while.
A Truly Multi-Function Space
It’s fitting that they call the kitchen the heart of the home, because ours is truly in the middle of our floor plan and it really is the spot where we all gather at the beginning of the day and the end of the night (usually lounging on the sofas or playing a family game at the kitchen table). Not to mention coming together for meals in here too.
This room is also the main entry point for our family – no formal foyer here! It even has our laundry areaand houses all the backpacks and jackets too – no laundry room or mudroom either! The porch off the kitchen comes in clutch for us by holding all of our outdoor cooking supplies and our grill (as well as a closed cabinet for a bunch of our shoes). Here’s a full tour of our kitchen porch.
So yeah, it’s a workhorse of a space and we are very grateful for all the uses it fulfills.
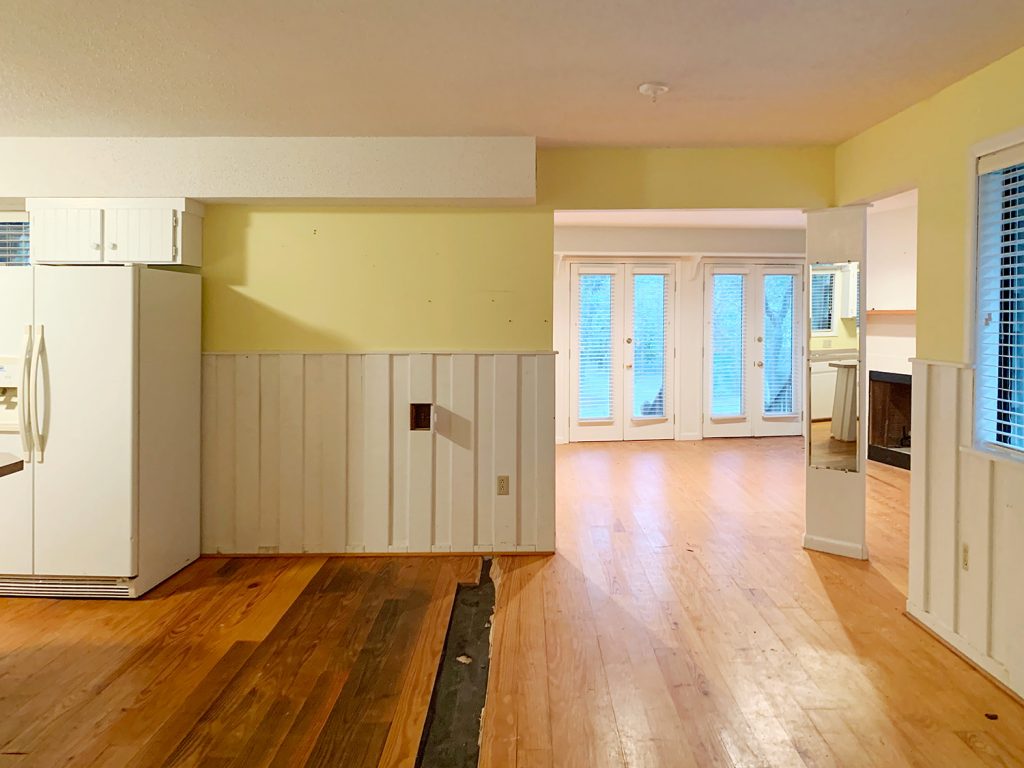
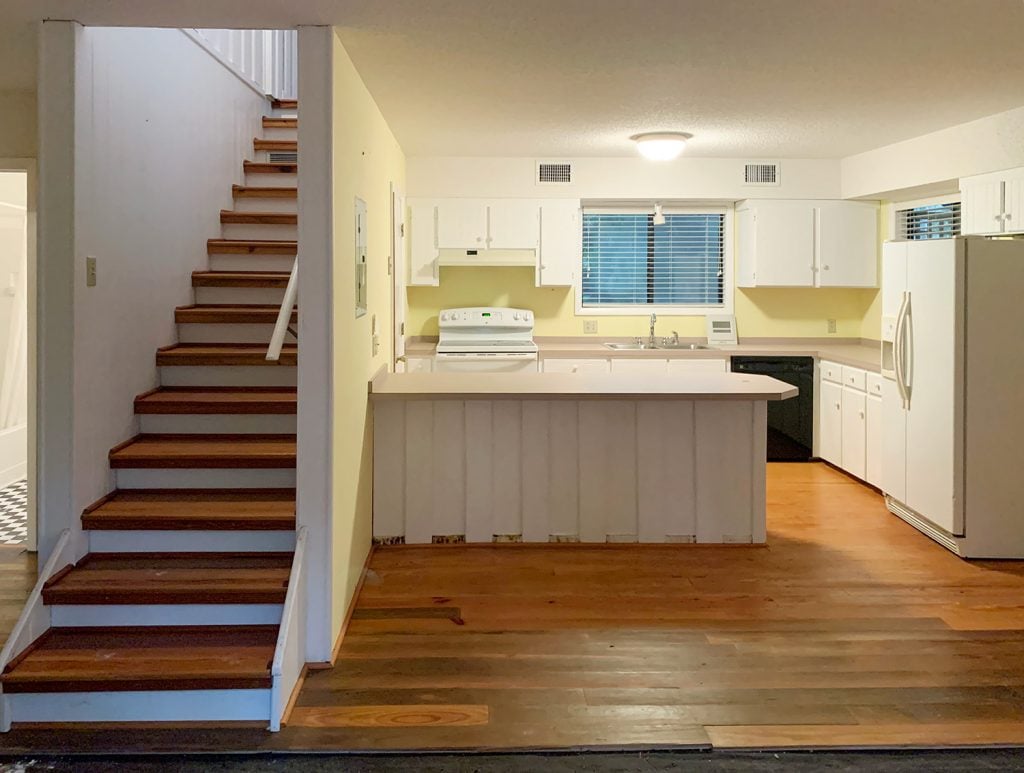
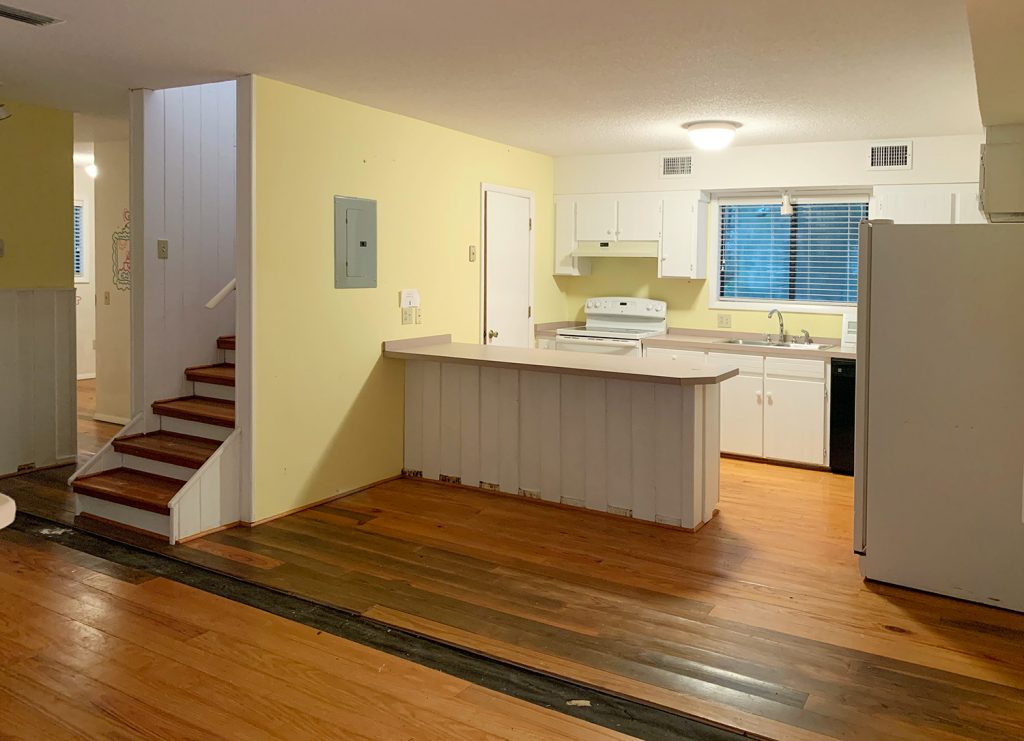
If we want to rewind to the first few weeks of living here, this is how we placed things when we initially landed. It wasn’t great, but it worked while we gained our bearings and learned more about what we wanted from the space.
One more, just because we can’t resist. It really has come a long way in here:
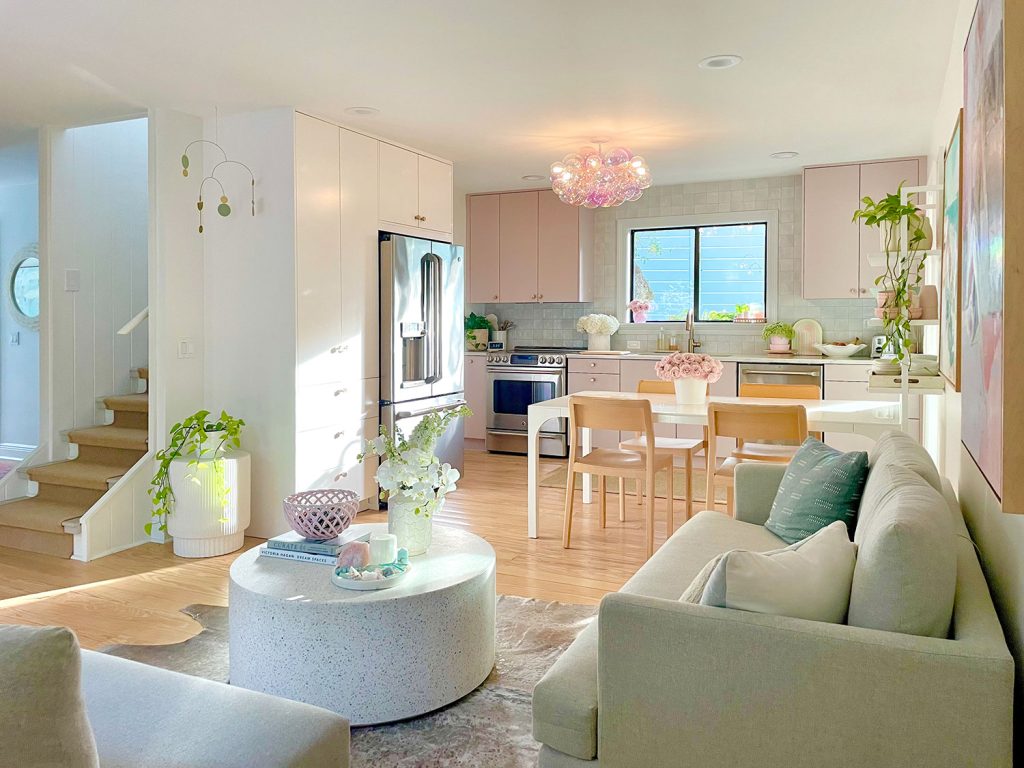
This shot isn’t as wide (sorry stairs!) but here is an after photo from that same angle:
We really love how the sitting area is fully open to the kitchen. I can’t tell you how often there are people hanging around while someone else cooks and we all chat). We also really like having a dining table instead of an island (we had island seating in many of our previous homes and really like sitting in actual chairs and looking at each other’s faces instead of all sitting in a line facing the same way).
Truly all of that is subjective, so I mention those factors not to say they’re any better than another way of doing things, but just to remind you: it’s not weird to consider how you want to live and eat and interact in your home and make it work for that. Yes, even if the rest of the world loves a kitchen island and might tell you you may be “hurting your resale value” by forgoing it for a table. Trends come and go (remember when two islands were trending?! It really does get wild), but figuring out how you want to live in your own home really is priceless. Speaking of which…
A New Chandelier
Moment of silence for the chandelier that found me on Pinterest. Truly, that algorithm is unmatched.
We took these photos ages ago – literally more than a year ago I think! We found all of these flowers discarded on the ground in a public walking path behind a wedding venue near our house. So we grabbed a bunch and texted all of our friends to come rescue them too!
And naturally, we couldn’t resist snapping a bunch of photos and video with our kitchen all decked out with fresh florals!
Patience Pays Off
I still remember so many neighbors stopping by after we bought our house and saying “we walked through this house! We just couldn’t see how to make it make sense!” I am so grateful that we walked in and immediately felt the pull to fix up this house. We just felt like it oozed with potential – even with before shots like this:
This is the same view now. Small houses can definitely live larger with a little rearranging, brainstorming, and of course that priceless gift of time! We didn’t settle on the right spots for everything right away (like this awkward stage the sitting area went through). It took us 2 years to finally start a proper kitchen reno, but now at year 5 here, we’re fully settled and feel like we are coasting.
So give yourself some time and absolute permission to see how things work for you over the months and years that you live somewhere. Truly, our biggest piece of home advice would be: never rush into a kitchen reno! That time to really be thoughtful about how you want a room to function for you, and what you’ll actually use (versus what the world tells you “should be in a kitchen or sitting room”) really is priceless.
Looking Beyond The Kitchen
One last thing! Another challenge that we encountered with this kitchen is that it looks right into our bedroom. To avoid awkwardly looking at a bed or closet, we added storage and floating shelves so it would look like an extension of a living area.
I know I covered a lot today, so here are all of the links related to this multi-year (and multi-room) renovation:
*This post contains affiliate links, so we may earn a small commission when you make a purchase through links on our site at no additional cost to you.
What the heck is Serenbe? That was our first thought when we heard about it a few years ago. A local friend named Kelly was moving to this “wellness community” outside of Atlanta and told us it’s a great place for a quick getaway with the kids. And soon after that conversation, we learned that our friends Vern Yip and Craig Koch are also building a home there. So, fast-forward 5 years, we finally visited over Spring Break and had a great time.
Ok, so now let’s answer that initial question.
What Is Serenbe?
Serenbe (rhymes with “Heron B.”) is a small “New Urban” community about 45 minutes south of Atlanta in a rural town called Chattahoochee Hills. It’s sort of a mix of an upscale-feeling suburban development and an eco-conscious resort in the countryside. There is a focus on well-being and connection to nature, including on-site features like an organic farm, several farm-to-table restaurants, and 16 miles of nature trails.
We didn’t know if we should expect sprawling farmland or dense town centers and honestly, it’s kinda both. The main attractions are these quaint “hamlets” with shops, restaurants, and homes within walking distance of one another. But between them are horse pastures, wooded trails, and larger lots called “farmettes” that still give you a sense of remoteness. There’s a wide range of home sizes and styles, from modern condos to retro bungalows which makes for lots to look at when you drive around (in a golf cart, which is the preffered method of transportation for locals and visitors alike).
There is an Inn you can stay at, as well as several Airbnbs, but overall Serenbe felt more full-time and residential than we expected. We asked a local and they said about 70% of its occupancy is full-time, which differs a lot from our beach down (which is more like 50/50 or even lower depending on the area). We also came in their off-season (mid-March) so perhaps it has a more tourist-y vibe during the summer. Either way, it was great for us because we live in a vacation destination that gets quite busy over spring break, so the slower pace was actually really nice.
Where To Stay In Serenbe?
The Inn at Serenbe is the only hotel but you can also find rentals through sites like Airbnb and the official Serenbe Vacation Rentals website. Some Airbnb results may show up as “Palmetto, GA” and some may not be within Serenbe proper, so be sure to check the listing if that’s important to you. Being on site will give you easier access to trails & shops, and you’ll also be able to golf cart between hamlets more easily.
We ended up being extremely lucky that Vern & Craig let us stay in the condo they have (which is where they stay while their Serenbe home is being constructed, since they live full time in Atlanta). Sherry had texted them for Serenbe tips when we started planning our trip and they insisted that we stay at their place, since it wasn’t being used. They are seriously the kindest humans on the planet.
What To Do In Serenbe
Our 3 days in Serenbe were a wonderfully chill experience filled with – as cheesy as it sounds – great opportunities to slow down and connect with nature and each other.
Get Outside
Serenbe offers a lot of excuses to be outside: trails, playgrounds, even waterfalls. And much to our surprise, the main activity our kids requested each day was playing in a nearby stream. Our kids are 10 and 14 and we were pretty surprised to realize that this little stream would be a big draw for them. But it kept them busy for a couple hours each day – just playing with rocks and mud (our daughter made legit pottery with clay from the riverbed), walking across fallen logs, skipping stones, etc.
The trails & streams were very reminiscent of the Virginia suburb I grew up in, so I’m not sure every kid would find Serenbe’s babbling brooks as captivating as our kids did. But I guess it was novel enough compared to the sandy beaches they’re used to in Florida.
Beyond the nature trails, our kids also loved the little playgrounds peppered throughout the community (again, something reminiscent of the suburb I grew up in – and something we wondered if they had outgrown). But Serenbe’s playgrounds seemed intentionally retro and simple – basic swings & slides vs elaborate plastic playplaces – which totally charmed our kids. They even ended up playing in this little lean-to made of sticks for a while.
The coolest “modern” playground features in Serenbe are a couple of in-ground trampolines, including one atop a hill called “Sunset Point” that overlooks the stables. They loved them.
Overall, there wasn’t anything specifically elaborate or unique about these various outdoor amenities, but there seemed to be some magic in the old-fashioned simplicity of them, and the fact that they were scattered around Serenbe (to the point that many kids would “trampoline hop” to each spot after dinner in the evening).
Ride Horses
With all of the stables and pastures around, it seemed only natural to splurge on a family horseback ride. Plus, it was Sherry’s birthday – so why not spend it atop a horse?
We booked a 1-hour excursion through Serenbe Trail Riding, which was perfect for novice riders like us. My daughter and I had done something similar last summer on our trip to South Dakota, but this was our son’s first time on a horse! He was nervous, but Crystal (our guide) and Dakota (his horse) were awesome. By the end, he said it was his favorite part of the entire vacation!
The ride took us along some of the Serenbe trails with enough sights (a waterfall! cool houses!) and terrain (steep-ish hills!) to make it engaging & relaxing at the same time.
Hit the Spa
Sherry’s other birthday present while we were there was a relaxing trip to the Spa at Serenbe with our daughter. When we called to book, the woman on the phone gushed so much about the Reiki treatment over a typical massage that Sherry took her advice and that’s what they each enjoyed for an hour (along with hanging out in the infrared sauna before and after the treatment, and ordering some macarons). But both our daughter and Sherry ranked their spa experience as their favorite part of the trip!
Rent Bikes or A Golf Cart
You can easily get around Serenbe without a car. We only used it one day when we ventured out to a nearby park. Our friend Kelly – the one who moved there full-time a few years ago – loaned us her golf cart and our kids loved that we could all scoot around town in it. Had we been there longer, I definitely would have brought our bikes (or rented them), although it is fairly hilly so getting around could be a bit of a workout.
Go See A Waterfall
Okay, so this one is technically outside of Serenbe, but it was definitely worth the 15-minute drive (there are a couple of smaller waterfalls in Serenbe too). We went on a 2-mile-ish hike at Cochran Mills Park that took us past numerous waterfalls, including this impressive cascade right at the start. It was a little steep and overgrown at parts, but our chihuahua did it, so I wouldn’t say it was too challenging!
FYI – the trails we took (the Orange trails) are across the main road from the parking lot.
Shop the Stores
We had a fun afternoon of exploring some of the shops in Serenbe, although they are fairly limited – especially when it comes to things that kids enjoy. So the shops didn’t take up much time, but they were nice pit stops on our walks.
Probably our two favorites were Typo Market and the Hills & Hamlet Bookshop. They’re both charming & quaint, and Typo Market packs a lot of cute curiosities (stationery, decor, toys, etc) in a small store! Sherry also ducked into an upscale home decor store called Mister & Mrs Sharp to oogle the goods. She left with two little gold fortune cookies (one for each of our kids) that hinge open, and you can write a little note for them inside. Here’s an affiliate link to a version of what she got that you can get engraved on Etsy.
Where To Eat in Serenbe
Much like the shopping options, the dining options in Serenbe aren’t numerous, but we enjoyed every meal we had – especially from the place we ate three times!
Blue Eyed Daisy
Blue Eyed Daisy is a casual spot that was a short walk from our condo and we ate breakfast, lunch, and dinner there (not all on the same day). They only serve dinner a couple of nights a week and we caught their weekly “Burger Night” on Monday, which Vern and Craig said we couldn’t miss. My Dubliner burger was the best burger I’ve had in a while.
Halsa
Halsa is a Swedish-inspired restaurant that definitely had our favorite “vibes” of all the restaurants. It’s a little pricier, and the “clean” and “vegetable-forward” menu might not be every kid’s favorite, but we liked our lunch so much that we came back the next day for breakfast!
The Hill
The Hill is a slightly nicer, but still casual dinner spot where we ate on our last night. Like the other restaurants, it boasts local farm fresh ingredients and would be a good date night option too. Our kids shared a pizza, Sherry crated her own “tapas” from the apps & sides, and I thoroughly enjoyed my “beef stack” that ended up being code for a burger.
Nigel’s Fancy Bananas
We’ve been big fans of this frozen banana & gelato shop ever since a mutual friend of ours & Kelly’s opened her first one in Florida a few years ago. Serenbe is its third location, so of course we had to stop in. It never disappoints and the chocolate-covered bananas sprinkled with things like graham crackers & marshmallows or a melted peanut butter drizzle are great. We counted this as lunch once day (at home every once in a while, it’s dinner, along with some other random snack that we eat afterwards).
Other Places To Eat
Another popular dining spot is The Farmhouse at the Inn, but we were told it’s a bit dressier and we didn’t pack for the occasion. There are also coffee shops like Birdhouse Coffee Room and Minro Studio that is a cafe and ceramics studio where you can take pottery workshops (but that was closed while we were there). There’s also a pizza place called Radical Dough that we would’ve loved to try, but it was also closed while we were there.
A Trip to Serenbe: A Summary
We had a great time in Serenbe. We didn’t really know what to expect, other than it always being referred to as having a “farm” feeling and being a nice slow place to relax. It lived up to the chill, connect-with-nature vibe we’d heard about – and I think its contrast to our daily environment was especially fun for our kids. Our daughter is already asking to go back and try goat yoga!
Anyways, here’s a quick rundown of our trip in bullet form:
Where to Stay:
What to Do:
Shopping & Dining:
More Family Trips We’ve Taken
If you’re interested in our take on other destinations or are in search of family-friendly trips, you might also enjoy these posts:
Hands up if you want to do some easy DIY home projects this weekend that can transform your home without breaking the bank? Right? There’s something incredibly satisfying about ticking off a home project. Especially when it doesn’t require a full-blown renovation, a team of tradespeople, or a massive budget. Often, people, including me (…definitely me), are put off from doing home renovations due to the immense effort and budget that is involved. I want to do so much in my home but when I think about what needs doing it can feel really overwhelming and disruptive. But there are lots of affordable home improvement projects that can be done easily in just a weekend. All that is needed is just a little time, money, a bit of creativity, and a few clever tricks can make a huge difference to how your home looks and feels.
So, if you’ve been itching to give your space a bit of a refresh, these easy DIY home projects are perfect for a weekend makeover. From simple home upgrades to quick style swaps, they’re the kind of improvements that are totally doable when you’re feeling inspired on a Saturday morning.
Reflect Light and Style with a Statement Mirror
Arch mirror from Neutypechic
You can transform your home with a statement mirror. Adding a mirror is one of the easiest ways to instantly elevate a room, because mirrors have a way of changing the way a room looks. A mirror not only reflects light and makes the room feel brighter, it can also help to create a sense of space and make a room feel bigger. Try positioning a mirror opposite a window to bounce soft natural light around the room.
And if you choose something with personality—a bold frame, an antique finish, or an organic shape—it can double up as a piece of art. Adding statement mirrors is one of those simple DIY home upgrades that has a big impact with minimal effort and minimal cost.
Play with Peel-and-Stick Wallpaper
Neutral Botanicals Removable Wallpaper Mural Available At Wallsauce.com
If you’ve ever stood in front of a paint chart feeling overwhelmed, peel-and-stick wallpaper might be your new best friend. It’s a fun, low-commitment way to experiment with colour, texture, and pattern. And the best part? You can remove it without leaving a trace.
Use it to create a feature wall in a living room or bedroom, line the inside of open shelving, or even add interest to a plain hallway. This is one of the most budget-friendly home improvements you can make—and it’s a great way to explore your personal style without committing to anything permanent.
Transform Your Front Door with a Pop of Colour
A beautiful front door entrance. Image c/o Yesterhome
Your front door is one of the first things people notice about your home and it really sets the scene for how you want to feel as you step inside when you return after a hard day. Giving it a fresh coat of paint can completely change the tone and character of your exterior. It really is one of the easiest ways to upgrade your home exterior for maximum impact.
Try painting a few swatches onto card and taping them to your door so you can see how the colour shifts in different light. Whether you go bold with teal or yellow, or keep it classic with black or sage green, it’s an easy DIY home project that delivers an instant boost in curb appeal. And if you’re feeling adventurous, paint the inside of the door too—why not let that cheerful colour greet you on your way out and in?
You’d be amazed how something as small as a cupboard handle can transform a space. Swapping out tired or mismatched hardware on kitchen cabinets, bathroom drawers, or even internal doors is a simple home upgrade that brings everything together.
Choose hardware that works with the overall mood of your space—brushed brass for warmth, matte black for contrast, concrete door handles for an industrial feel or mix and match for an eclectic look. Don’t forget areas like towel hooks, door hinges, and light switch plates—small details matter.
If you’re lucky enough to have a fireplace, treat it like the focal point it is. Whether it’s brick, tile, or wood, painting your fireplace can make a huge difference to how the room feels.
Stick to paints that are heat-resistant and suitable for fireplaces, and think about the atmosphere you want to create. A dark, moody shade can feel dramatic and cocooning, while a soft neutral can make the room feel light and modern.
Painting the fireplace is one of those easy DIY ideas for home that feels bold but is surprisingly quick to do.
Switch Things Up with Designer Light Switches
Light switches are one of the most overlooked elements in interior design—and yet we touch them every single day. They’re like punctuation marks in a room, quietly doing their job, often unnoticed. But what if they could be more than just functional? What if they could be beautiful too?
This is where designer switches come in. Gone are the days of basic plastic toggles—today’s light switches are tactile, stylish, and beautifully engineered. Think matte black dimmers with knurled finishes, brushed brass rockers that feel weighty in the hand, or sleek, sculptural plates that sit like jewellery on the wall.
Swapping out old, discoloured switches for something more intentional is one of those easy DIY home decor projects that makes an unexpectedly big impact. It’s a subtle but powerful detail that instantly elevates a room. Whether you prefer a minimalist vibe or something with bold contrast, there’s a finish and style to suit every interior.
And if you really want to dial up the luxe factor, opt for a coordinated set of switches, sockets, and dimmers throughout your home—it’s like a well-curated outfit for your walls.
Raise Your Curtain Game
Clarke & Clarke Congo Velvet Amber Curtains from Blinds2Go
One of the simplest ways to create the illusion of height and elegance is by adjusting your curtain rods. Instead of hanging them just above the window frame, raise them to just below the ceiling and use full-length curtains to draw the eye upward.
This easy DIY project for the home can make ceilings feel taller and rooms feel more luxurious—without spending a fortune. You might need to let out a hem or invest in longer curtains, but the impact is worth it.
With these easy DIY home projects, you can begin to update your home today. All it takes is a bit of time, effort and budget, and you will have an appealing home to enjoy. Incorporate statement mirrors, paint, and new hardware to add personality and charm one room at a time.
The thought of renovation mistakes brings me out in a cold sweat and this is what has put me off renovating my own home to the extent that it needs it. Mistakes are costly and some can be irreversible and the idea of getting it wrong scares me. Sure, renovating a home is exciting, but it’s also a totally overwhelming process. It’s easy to get caught up in the vision of your dream space, (just check out my Pinterest account if you’re in any doubt just how caught up I am with teh vision!) but without careful planning, small mistakes can quickly turn into expensive problems. And I ain’t got time or energy for expensive problems. From budget miscalculations to structural surprises hiding behind walls, home improvement projects can go off track in an instant. So how do we avoid the common renovation mistakes and save ourselves, time, stress and a whole heap of money? Let’s find out!
1. Cutting Costs on Renovation Materials
There’s a big difference between being budget-conscious and cutting corners. While it’s tempting to save money wherever possible, choosing the cheapest materials is one of the most common renovation mistakes homeowners make.
The reality? Low-quality materials wear out faster, need replacing sooner, and can even compromise the structural integrity or overall finish of your renovation. That bargain kitchen worktop might seem like a win—until it starts chipping after a few months. Cheap laminate flooring? It won’t hold up to heavy foot traffic for long.
Instead of opting for the cheapest option, focus on value and longevity. Prioritise high-traffic areas like flooring, countertops, and fixtures, where durability really matters. If budget is a concern, look for smart swaps—engineered wood instead of solid hardwood, quartz over marble, or a high-quality second-hand kitchen instead of a brand-new budget one.
2. Ignoring Structural Issues
Nothing derails a successful home renovation faster than discovering major structural problems after you’ve already started the finishing touches. Peeling back layers of an older home often reveals hidden issues—damp, crumbling plaster, faulty wiring, or even load-bearing walls that need reinforcement.
It’s frustrating (and expensive) to have to rip up brand-new flooring because a plumbing leak was ignored. That’s why structural repairs should always come first. Before picking out paint colours and cabinetry, invest in a thorough home inspection. Addressing foundational concerns, electrical updates, and plumbing repairs early on will save you from costly headaches down the line.
If your plans involve renovating a garage—whether as a workshop, utility room, or home gym—it’s essential to assess both the structure and the access points. Replacing an old or damaged door with one from a reputable overhead door company can improve insulation, boost security, and prevent issues like leaks or warping from costly water damage that could compromise your renovation efforts.
It is always worth organising a professional home inspection if you are in any doubt as to the structural integrity of your home.
3. Over-Renovating in Pursuit of Perfection
We all want our homes to look their best, but there’s a fine line between thoughtful improvements and over-renovating. Some of the most charming features in older homes—original beams, slightly uneven wooden floors, or period fireplaces—can get erased in the quest for ‘perfection.’
Over-renovating can also mean making changes that don’t align with the rest of the home’s character or neighbourhood. If you pour thousands into high-end renovations that outprice similar homes in your area, you may struggle to get a return on investment if you ever sell. This is when you need to decide whether it’s a better call to renovate or relocate.
The key? Enhance rather than erase. Preserve period details where possible, focus on timeless updates, and avoid ultra-trendy changes that could date quickly.
4. Neglecting Plumbing, Electrical, and Roofing Upgrades
It’s easy to focus on what you can see—beautiful tiles, sleek kitchen units, or stylish lighting—but what’s beneath the surface matters just as much. Ignoring essential upgrades to plumbing, wiring, or roofing can lead to expensive and disruptive problems down the road.
If your home has outdated plumbing or faulty electrics, these should be addressed before you start the aesthetic work. Ripping up brand-new flooring to replace faulty pipes or rewiring after plastering is the kind of renovation nightmare that’s best avoided.
Similarly, if your roof is in poor condition, investing in roof repairs now will protect your entire home from leaks, dampness, and heat loss. A good rule of thumb: focus on function before form—it’s much easier to add stylish details later than to redo major structural elements after finishing work is complete.
5. Choosing to DIY Over Calling in Experts
A DIY approach can be a great way to save money—but only if you know what you’re doing. While easy DIY home decor tasks like painting walls or installing shelving might be manageable, certain renovation tasks should always be left to the experts.
Electrical work, plumbing, and structural changes require specialist knowledge and certification—botching these jobs can be dangerous and, in some cases, illegal. Even seemingly simple jobs like tiling or flooring can cost double if mistakes need professional correction later.
If you’re determined to DIY, be honest about your skill level.Start with small projects and research thoroughly. But for major renovations, hiring experienced tradespeople will save time, money, and stress in the long run.
How to Avoid Common Renovation Mistakes
Avoiding common renovation mistakes isn’t just about knowing what not to do—it’s also about planning smart from the start. Here are some tips for a smooth, successful home renovation:
Set a Realistic Budget Always include a contingency fund for unexpected costs (10-20% extra is a good rule).
Prioritise Structural Work Plumbing, wiring, and roofing should be tackled before cosmetic updates.
Invest in Quality Choose durable materials for high-use areas to avoid costly replacements later.
Work With Skilled Tradespeople If a task requires expertise, hiring professionals is always the best option.
Don’t Rush Thoughtful planning will always yield better results than last-minute decisions and slow renovating gives you time to work out how you want to use your home and how you want your home to feel.
A well-planned renovation can transform your home without unnecessary stress or costly mistakes. By learning from these renovation mistakes, you can make confident choices that lead to a beautiful and long-lasting result.
Succulents are some of the easiest houseplants to propagate because there are several ways to do it. Today we’ll show how one succulent can be turned into many (even a dozen or more!). So whether you’re looking to grow your own collection or gift some plants to friends, this is a fun and easy process to try!
And as you’ll see, propagation is also a helpful way to care for your succulent collection. Pruning is a necessary part of houseplant maintenance and these techniques will help you turn an overgrown plant (or one with an awkwardly tall offshoot) into a bunch of fresh new plant babies.
What Is Plant Propagation?
Propagation is the process of growing new plants from parts of an existing plant such as its leaves, stems, roots, or seeds. You can propagate just about any houseplant yourself, although the techniques vary depending on the plant. Popular methods include water propagation (where you can watch new roots grow in water) and soil propagation (when new roots develop directly in a pot of soil). Succulents can also be propagated in the air! In all cases, after the cuttings sprout healthy new roots, they can be potted in soil and cared for just like the parent plant.
Succulent propagation is best done in the spring and summer, during the plant’s active growing season. It can be successfully done any time of the year, though. Results may just take longer to show in the fall and winter. So don’t fret if you are starting your propagation out of convenience or when your succulent needs pruning. In fact, pruning prompted the propagation of the succulent you’ll be seeing today!
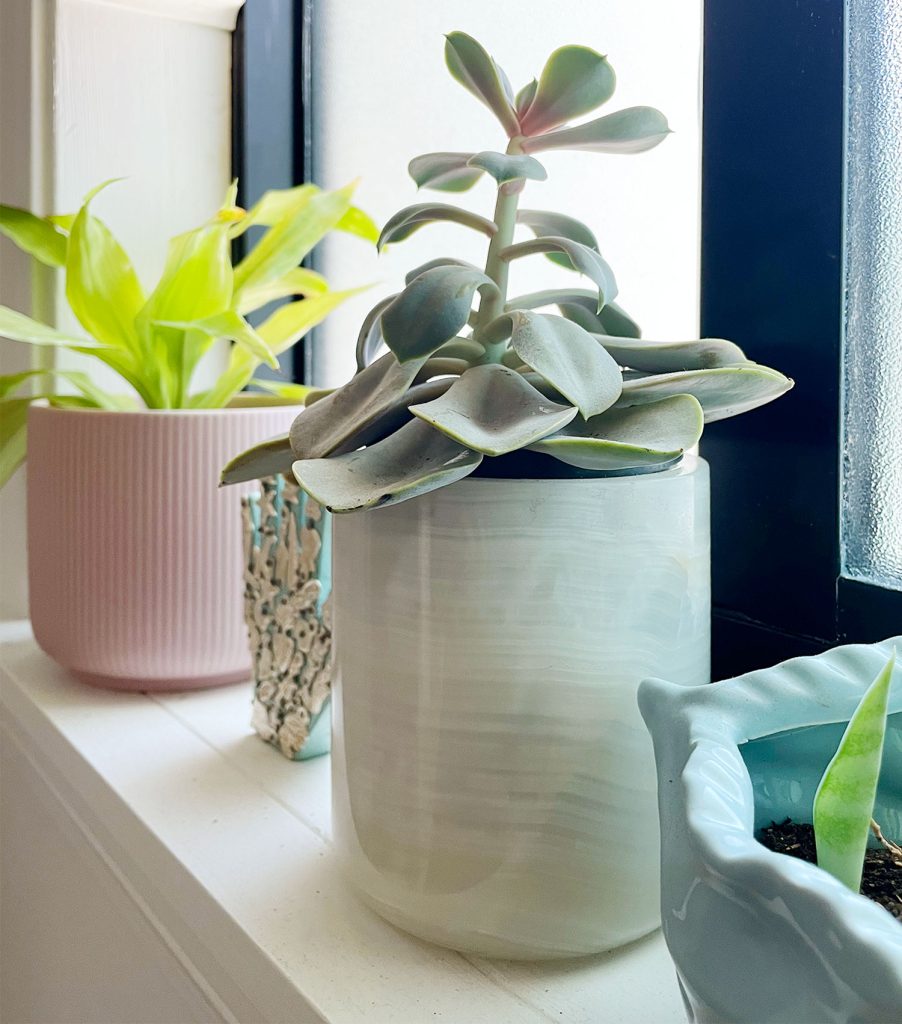
This Echeveria sits in our bathroom window, which is somewhat shaded. The limited sunlight caused the succulent’s stem to stretch out and look “leggy” as it reached for more light (a process called “etiolation”). We don’t mind how it looks, but we realized this etiolated succulent would be a great opportunity for multiple propagations! Yes, we got more than ten new succulents from just this one leggy stem!
Methods To Propagate Succulents
People love propagating succulents because you can use many parts of the plant and many different techniques, sometimes producing dozens of new plants from a single succulent! We’re not going to go through all of them today in detail, but here’s a quick overview:
Leaf propagation: Remove individual leaves and place in the air, soil, or water to grow new roots and pups (small new, baby plants).
Stem propagation: Place a bare stem cutting in the air, soil, or water to grow new pups where old leaves had been.
Root propagation: Cut off everything above the soil line and allow roots to grow a new plant in the existing pot.
Soil propagation: Place succulent leaves or stems in or atop well-draining soil and allow new roots to develop.
Water propagation: Submerge the tips of leaves or stems in a jar of water and allow new roots to develop before transferring to soil.
Dry or air propagation: Lay or hang leaves or stems with no soil or water, and allow new roots to develop before transferring to soil.
Succulent Propagation Steps
As an overview, here are the basic steps for this propagation tutorial. The process takes a few days upfront and then several weeks of waiting (and occasional watering) until new growth develops. So be sure to review all steps before beginning.
Water your parent or mother succulent, wait 3 days.
Cut stem at the soil line
Remove bottom leaves
Let all of the cut/removed pieces callous over for 3-5 days
Replant bare stem in new soil
Lay, hang, or plant leaves
Place in bright indirect sunlight
Keep propagating pieces lightly watered
Pot any rooted plants in new soil
Propagation Supplies
Luckily, it takes very few supplies to propagate your succulents. Here’s what you should have handy before you start:
Step 1: Water Your Succulent
Water your mother plant and wait about 3 days before cutting anything. Succulents store water in their leaves, and giving them one last drink beforehand helps fill them up with moisture and nutrients for the “journey” ahead. As with any time you water your succulent, make sure any excess water is able to drain out the bottom of your pot.
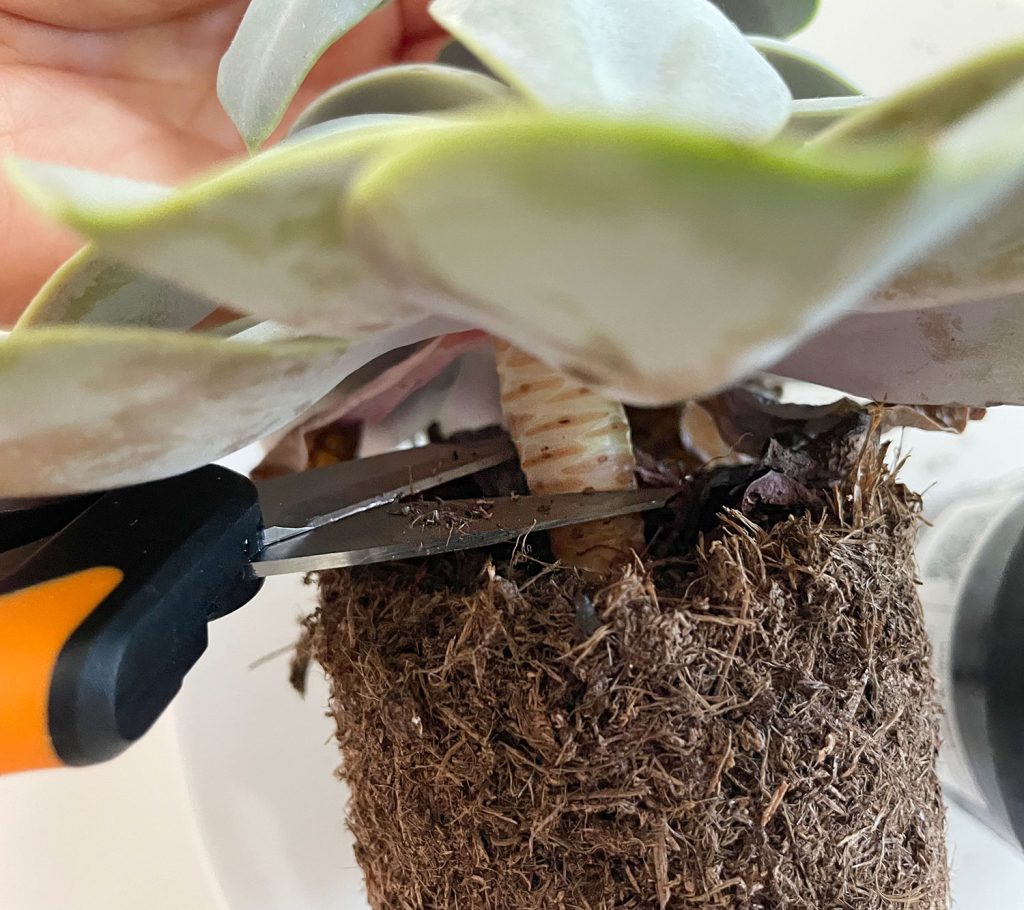
Step 2: Cut The Stem At The Soil Line
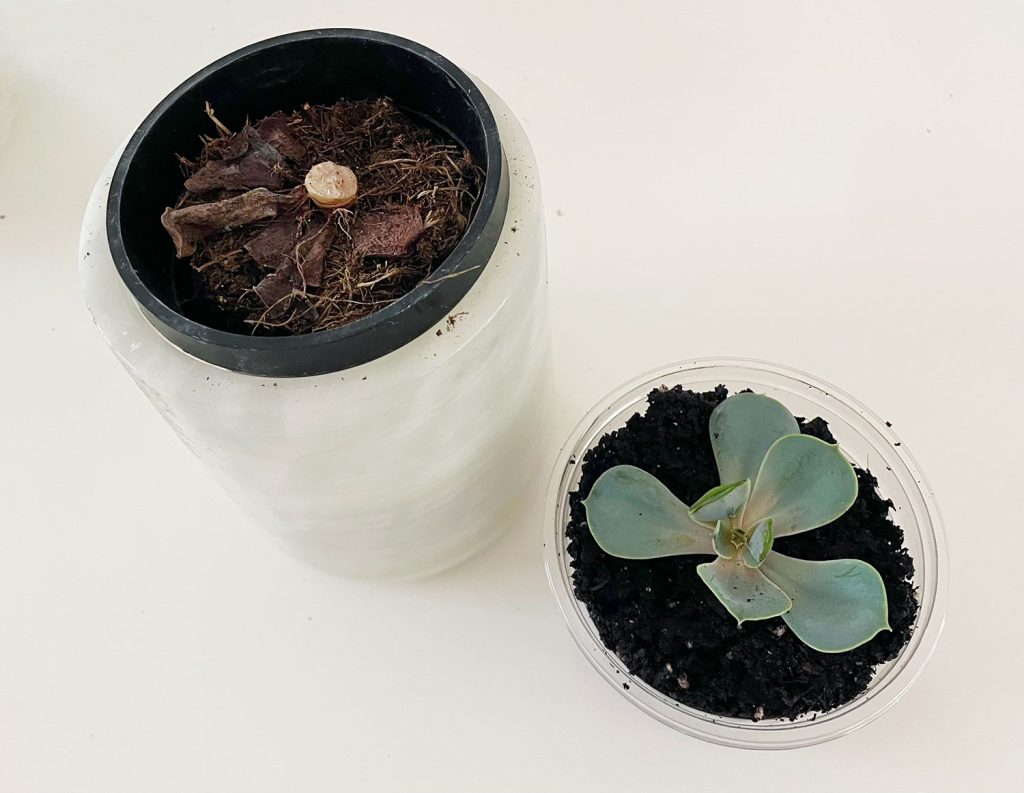
Start by cutting your succulent’s stem right at the soil line. Always use clean sharp scissors or snips when pruning your houseplants. Cleaning them first (a spritz or wipe of rubbing alcohol is great) helps prevent the spread of bacteria. Your pot will suddenly look very bare. Don’t worry!
Your existing pot isn’t trash. The roots can grow the first of many “new” plants you’ll get from this process. Place this pot in a spot with bright indirect light and continue to care for it as you had before. After a few weeks you should see new pups developing near the cut end of the leaves.
Step 3: Remove Bottom Leaves
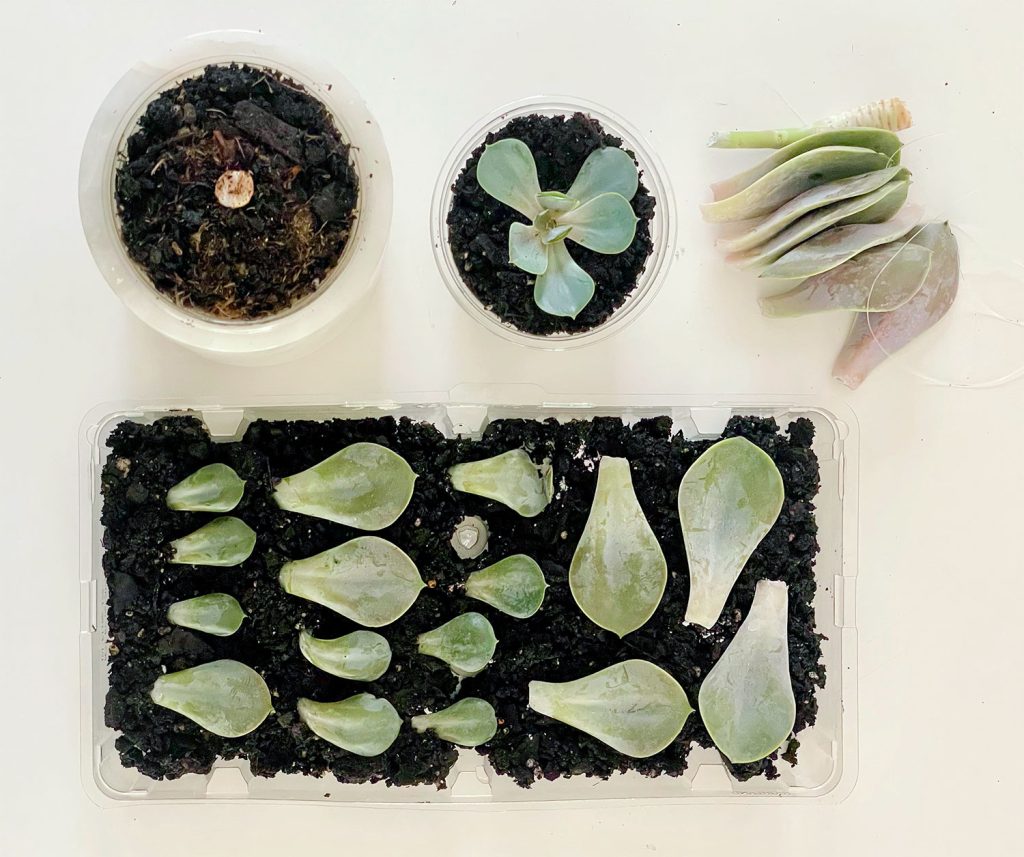
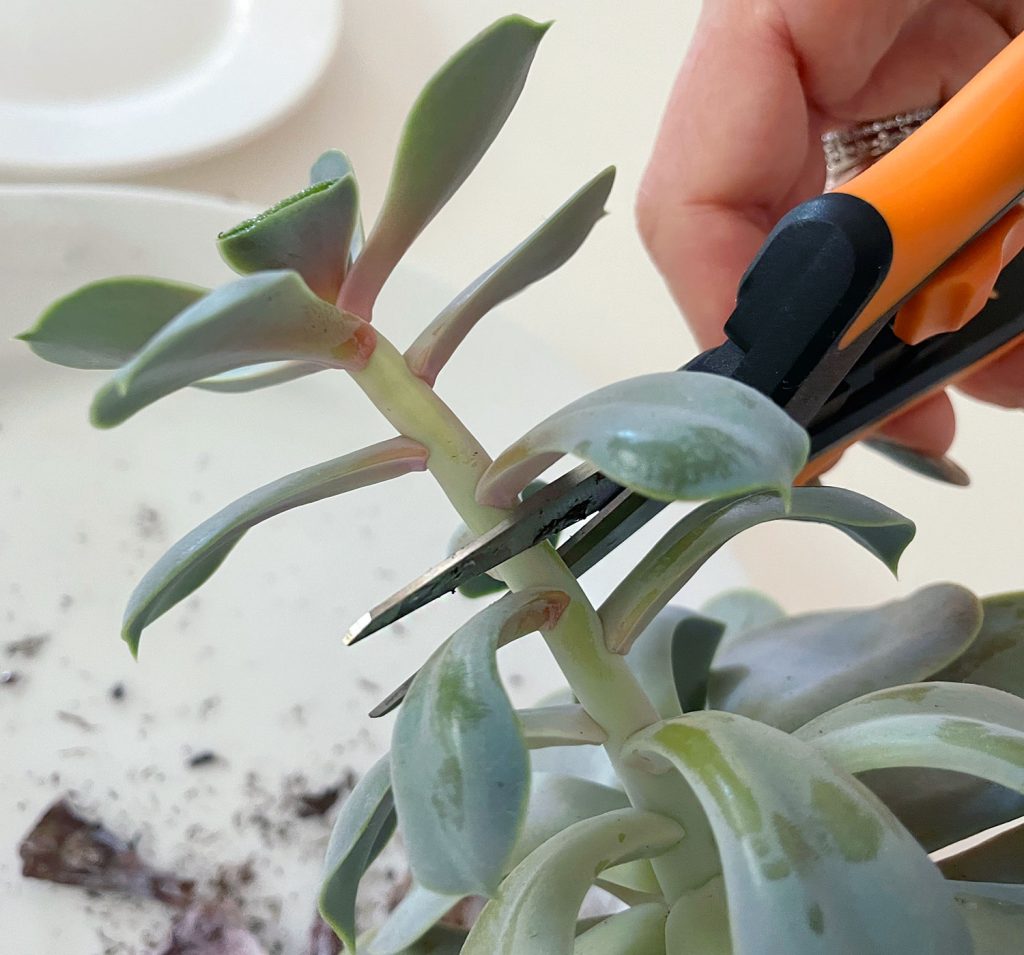
Next, turn your attention to the plant you just cut off. Our stem was so long, we actually cut it again a little further up to create a small piece to work with at this step. But this may not be necessary for your succulent.
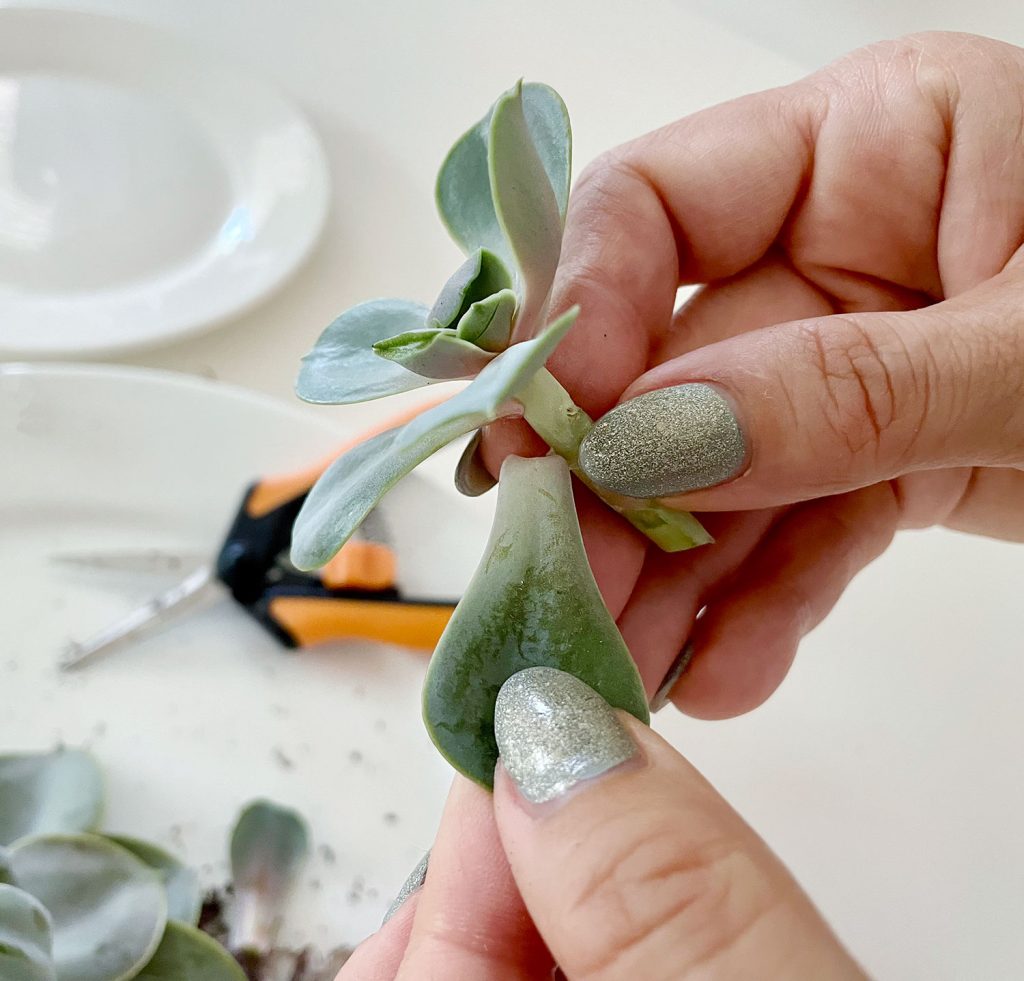
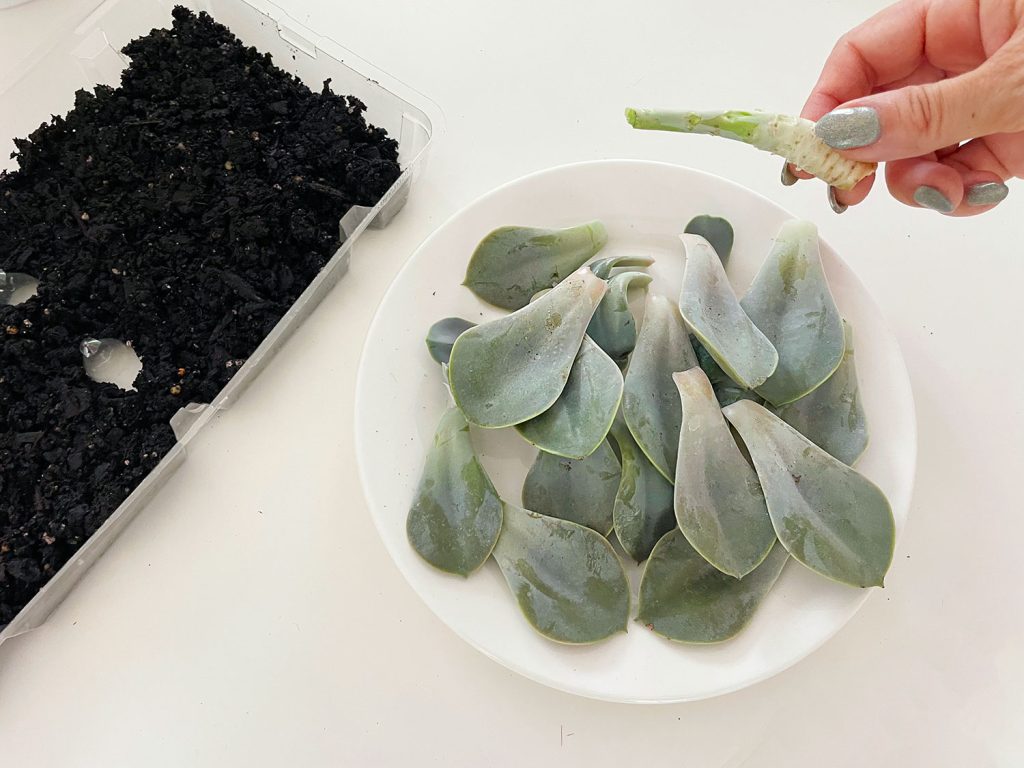
With our smaller pieces, we removed leaves from the bottom up. To remove a succulent leaf, gently move or twist it side-to-side at the base.
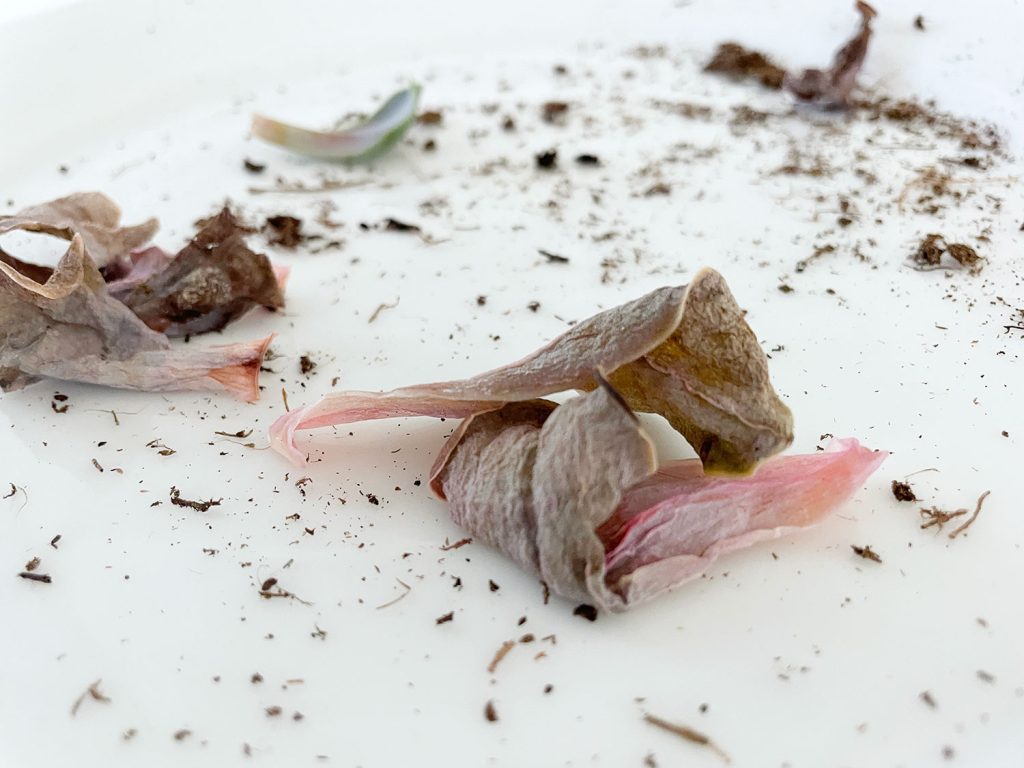
Most should break off easily, but take your time. It’s important to get a clean break from the base because ripped leaves cannot be propagated. Any yellow, brown, or mushy leaves won’t be healthy enough to propagate either.
If you’re replanting the top of the cut stem, leave a few layers of the rosette at the top. We’ll be replanting this portion in soil, which should give us our second “new” succulent. And thanks to this pruning, it won’t look leggy anymore!
Also, depending on how long leggy your stem is, you can also cut your bare stem into small pieces and propagate the stem clippings. If so, just treat those stem pieces the same as the leaves.
Step 4: Let Pieces Callous
Before you continue, you’ll need to give your leaves and cut stem a few days to callous over. After 3-5 days, the ends should become hard and dry. This is important because otherwise, these ends will absorb too much moisture in the next steps, causing your pieces to rot and ruin your propagation. So always err on the side of more callous than less, maybe giving everything at least a week before you move on.
Step 5: Replant Your Bare Stem
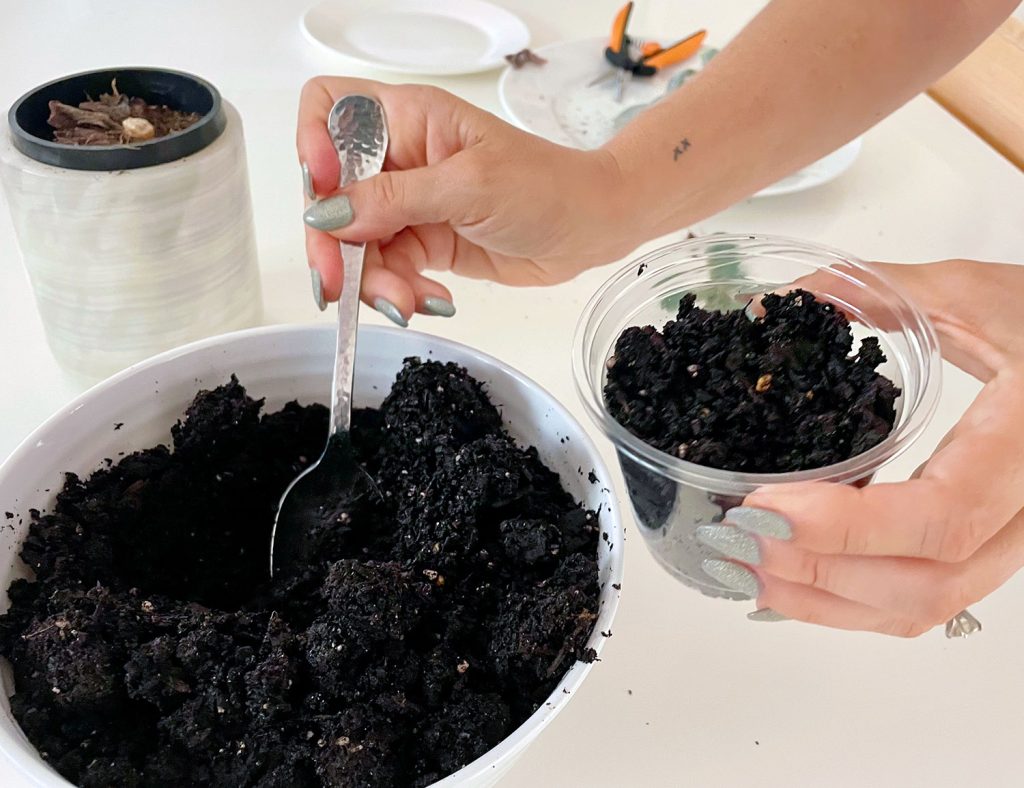
Next, let’s take care of the cut stem. Using soil or water propagation, the bare portion of this stem should develop new roots. We picked the soil method because it’s an easy way to get a “finished” looking succulent quickly. To do this, fill a new nursery pot with well-draining potting soil. A cactus or succulent mix works great, or try a standard potting mix with extra perlite mixed in. Make sure your pot isn’t too big. Succulents like to be snug!
Use a finger or chopstick to poke a hole in the center of the soil, and plant your cut stem inside. You can also dip the end in rooting hormone first, but it’s not necessary. We did that because we had some on hand already – and it seemed to help. Once planted, shake or squeeze the pot to allow the soil to fill in around the stem. The dirt and the stem need to make contact for this to work.
Once it is firmly planted, set it aside and move on to the leaves.
Step 6: Lay, Hang, or Plant The Leaves
Here’s where the real magic starts! Each leaf has the potential to become a new succulent. There are a few ways to accomplish this. We experimented with 3 methods this time around, just for fun.
The only method we skipped was water propagation. You have to carefully suspend the leaves over a glass of water so only the tips stay wet, which always feels unnecessarily complicated – especially considering how easy the other methods are!
Planting Succulent Leaves In Soil
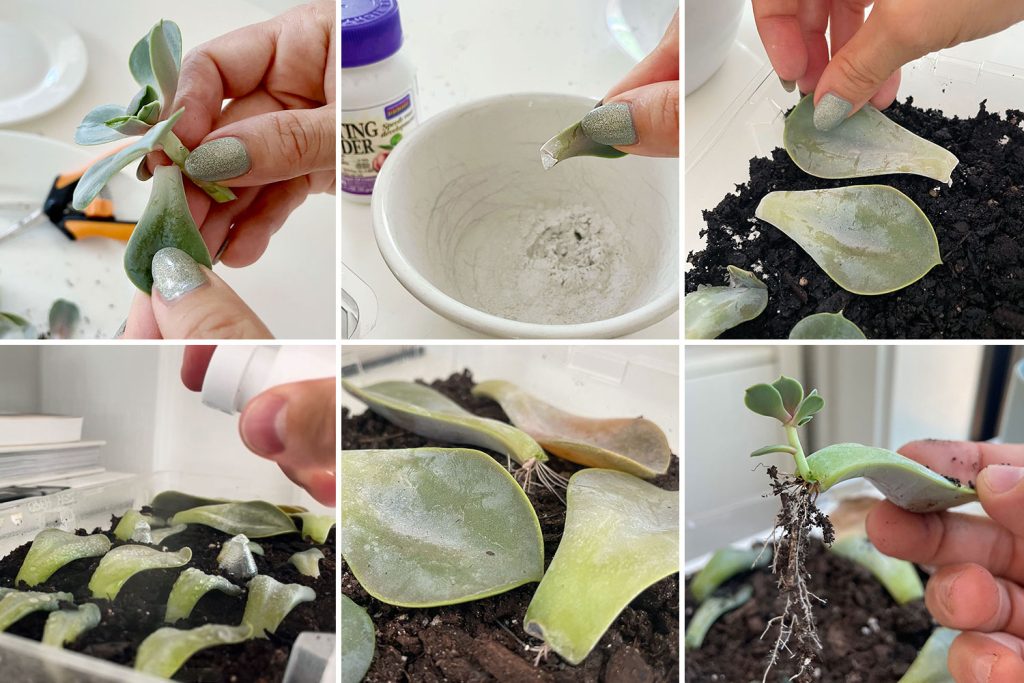
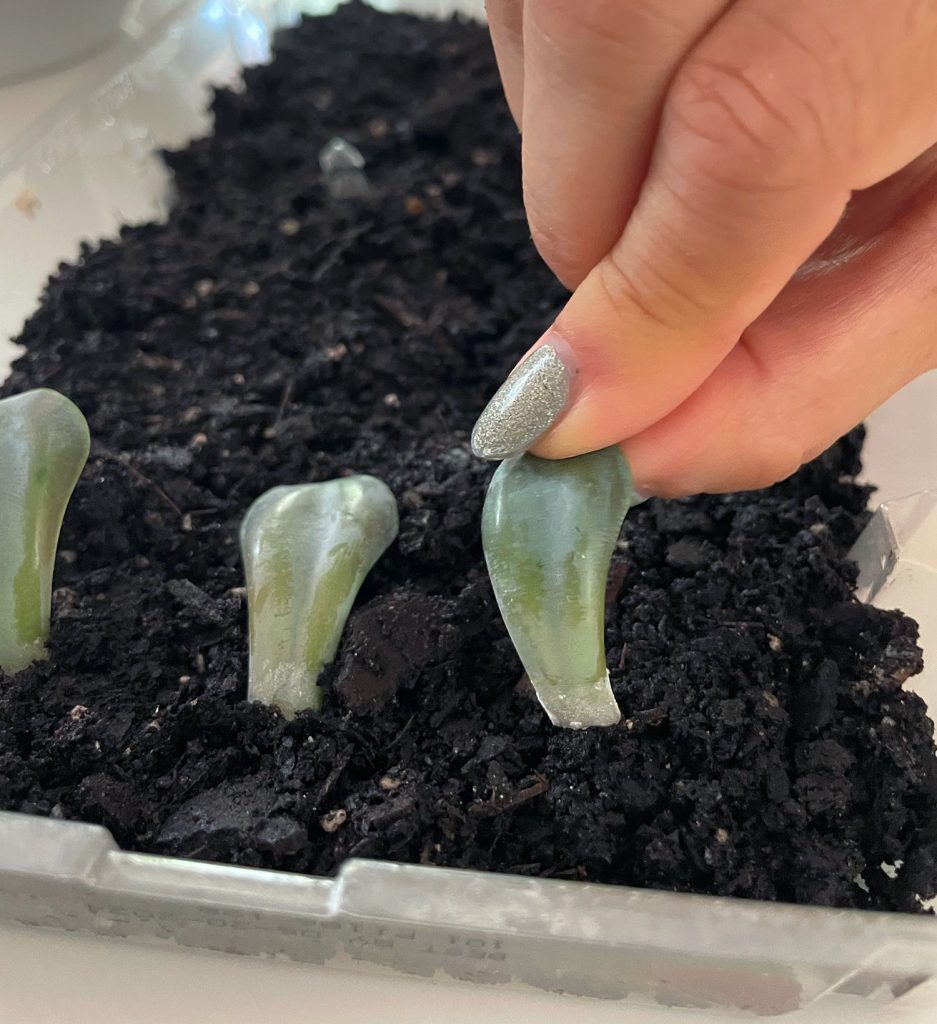
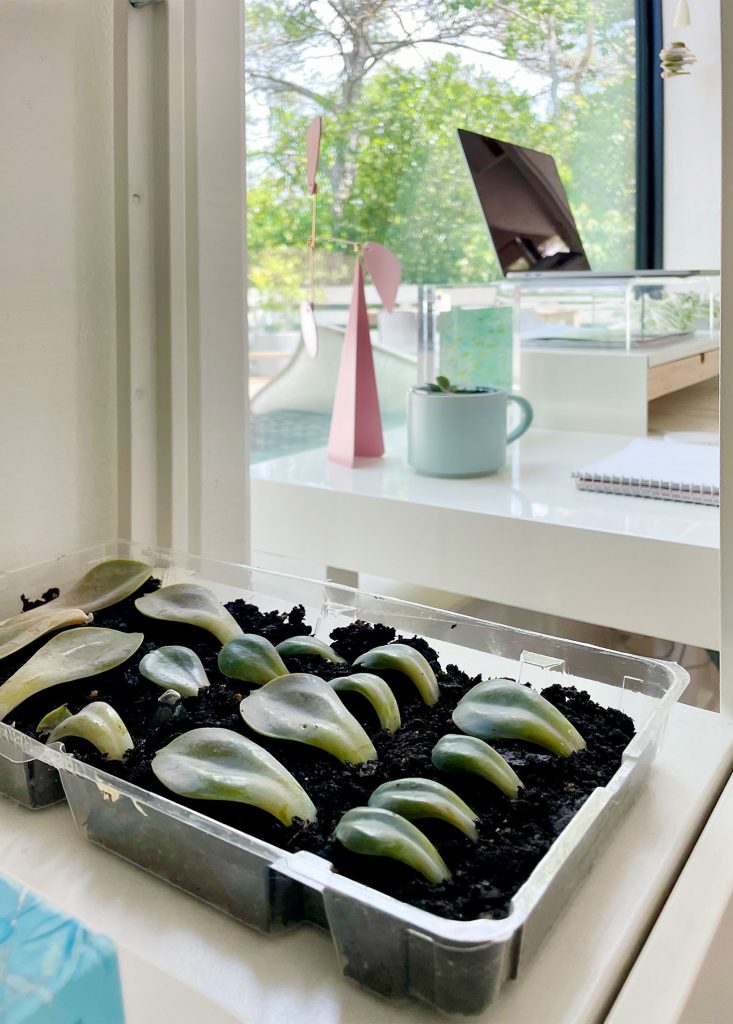
Fill a shallow tray, dish, bowl, or small nursery pot with potting soil. Mist or water the soil so it’s damp, not soggy. Stick the calloused end of each leaf into the soil at a slight angle. It only needs to go deep enough to keep it stuck in place.
Laying Succulent Leaves In Soil
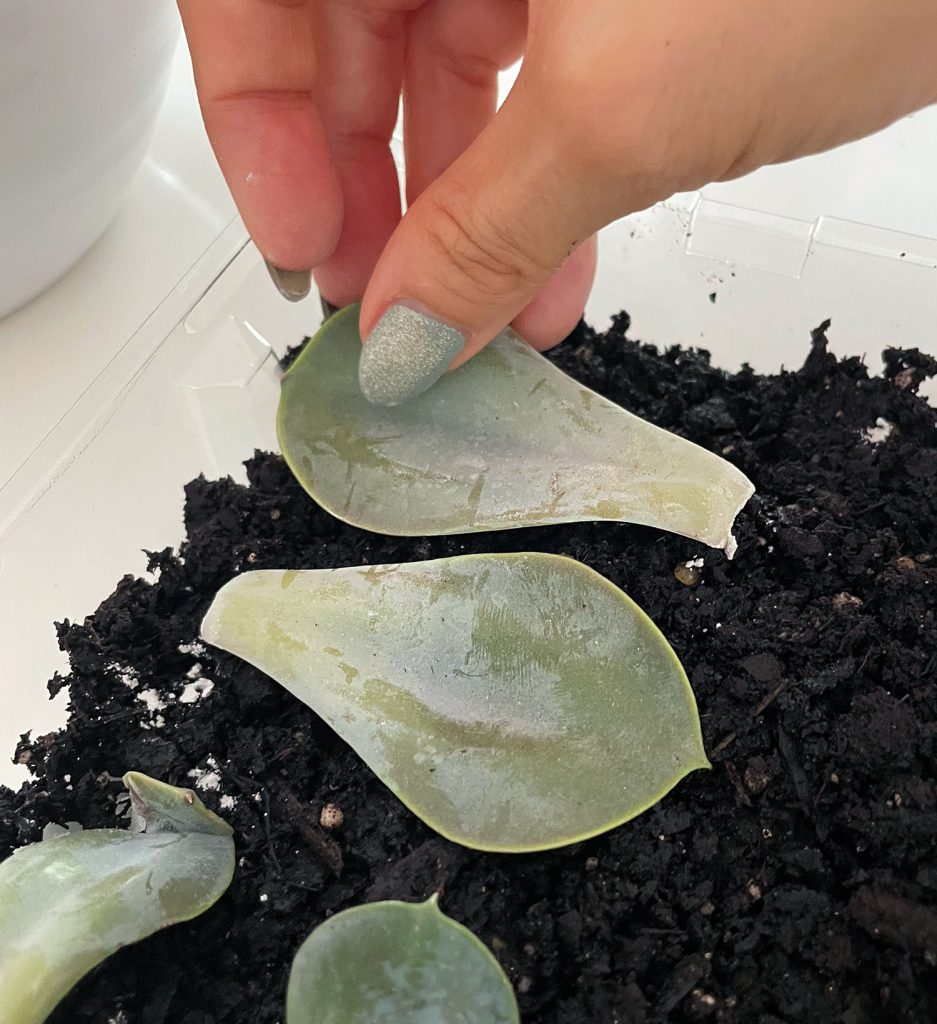
Alternatively, you can simply lay your callous leaves atop the moist soil. Many prefer this method for its simplicity and because it makes it easier to see new roots develop.
Hanging or Air Drying Succulent Leaves
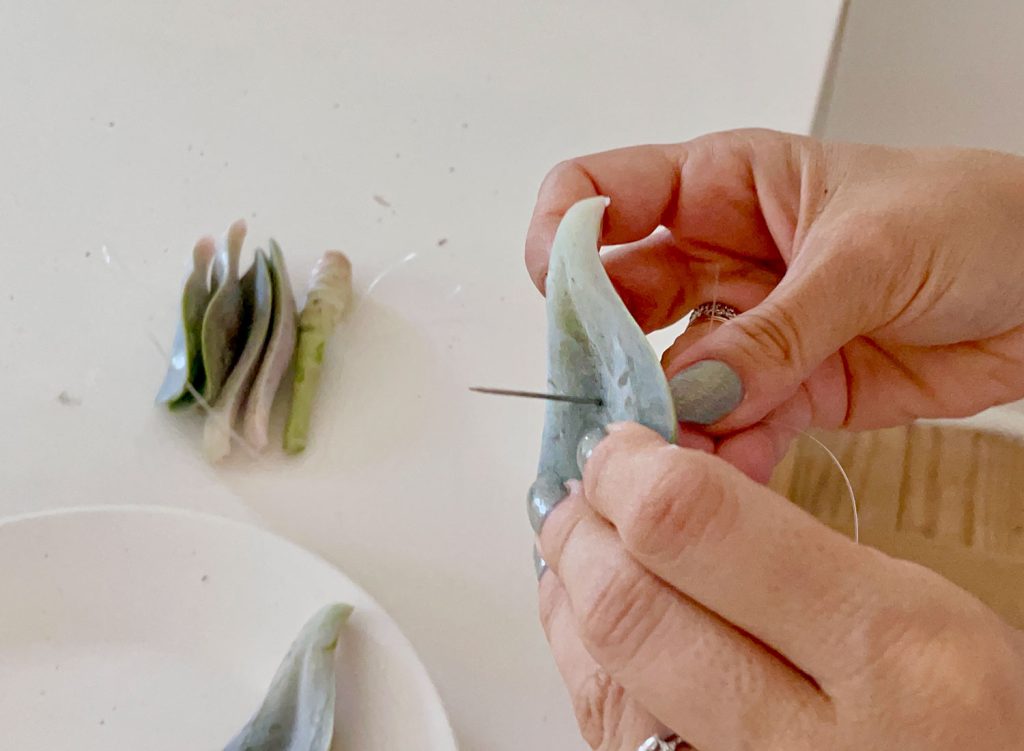
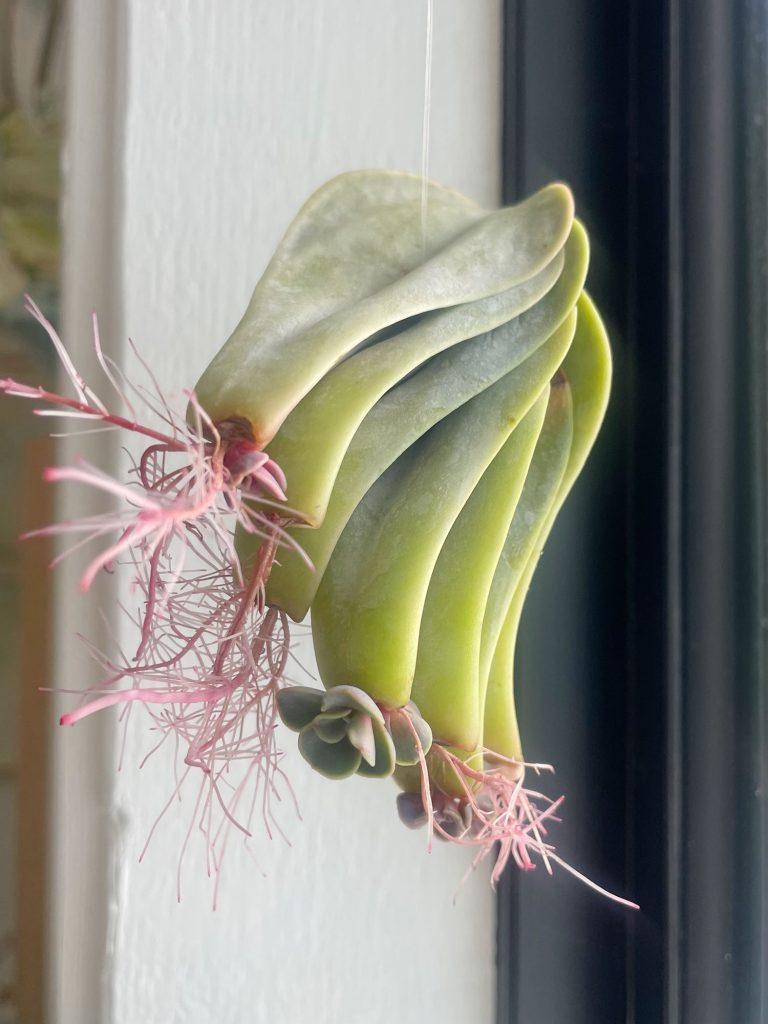
Believe it or not, succulents can also grow roots and pups without soil. For this method, find a dish or tray to lay them on… or string them up on fishing wire or thread. This method can be finicky, but we thought it would be fun to try!
We started by tying fishing wire around the stem scrap, which would ensure the leaves wouldn’t slide off. Then, we used a sewing needle to thread the leaves together, just like a popcorn garland.
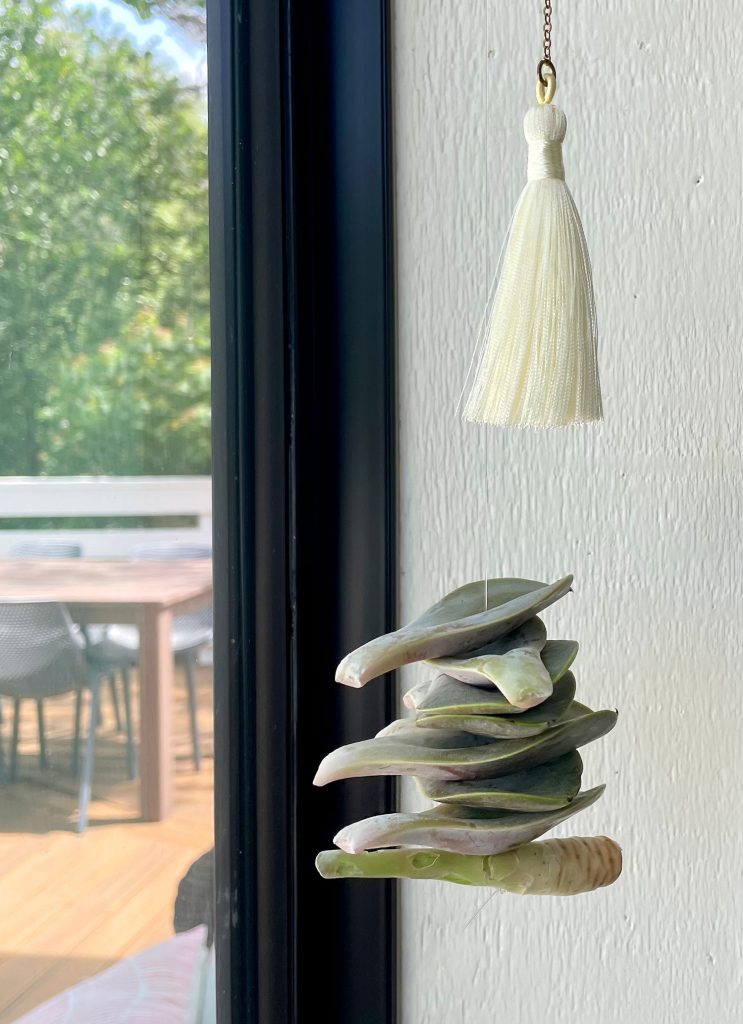
Once everything was strung together, we tied a loop at the top to hang it from a small cup hook by a window.
Step 7: Place In Bright, Indirect Sunlight
No matter what portion of the succulent you are propagating – the original roots, the repotted stem, and the leaves – you’ll want to find a spot in your home where they will get several hours of bright indirect sunlight each day. Windowsill, bookshelves, or side tables are great spots – just make sure it’s not burning with tons of direct sunlight.
We hung our string of leaves in a windowsill that got strong morning sun, making sure it was bright but not as hot and direct as strong afternoon light.
Step 8: Keep Everything Lightly Watered
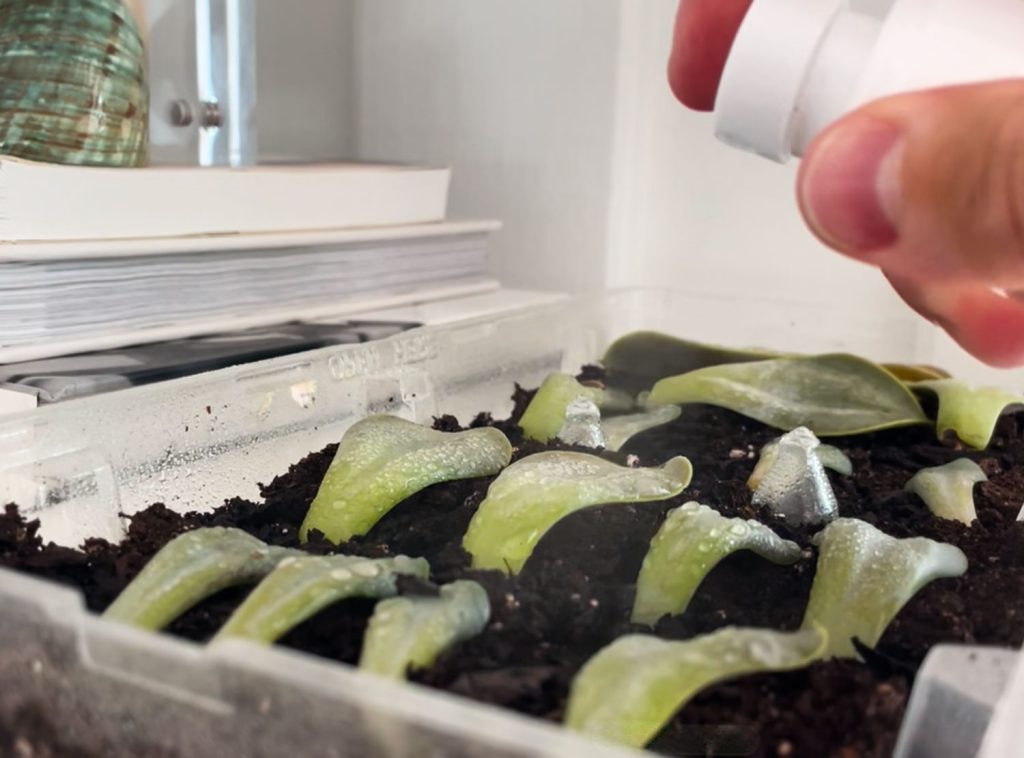
Water regularly (every 2-3 days) to keep the soil moist, but not soggy, while your leaves are propagating. This is different than grown succulents whose soil should fully dry out between waterings (every 1-2 weeks). The timing and amount of water may vary depending on their location in your home. I found my tray was drying out quickly, so I usually sprayed them every day or two.
We found it easiest to mist our leaves using a small spray bottle. This kept us from overwatering and also made it easy to mist the strand of leaves hanging in the window. You can see that in action in our video as well.
Step 9: Pot Rooted Plants
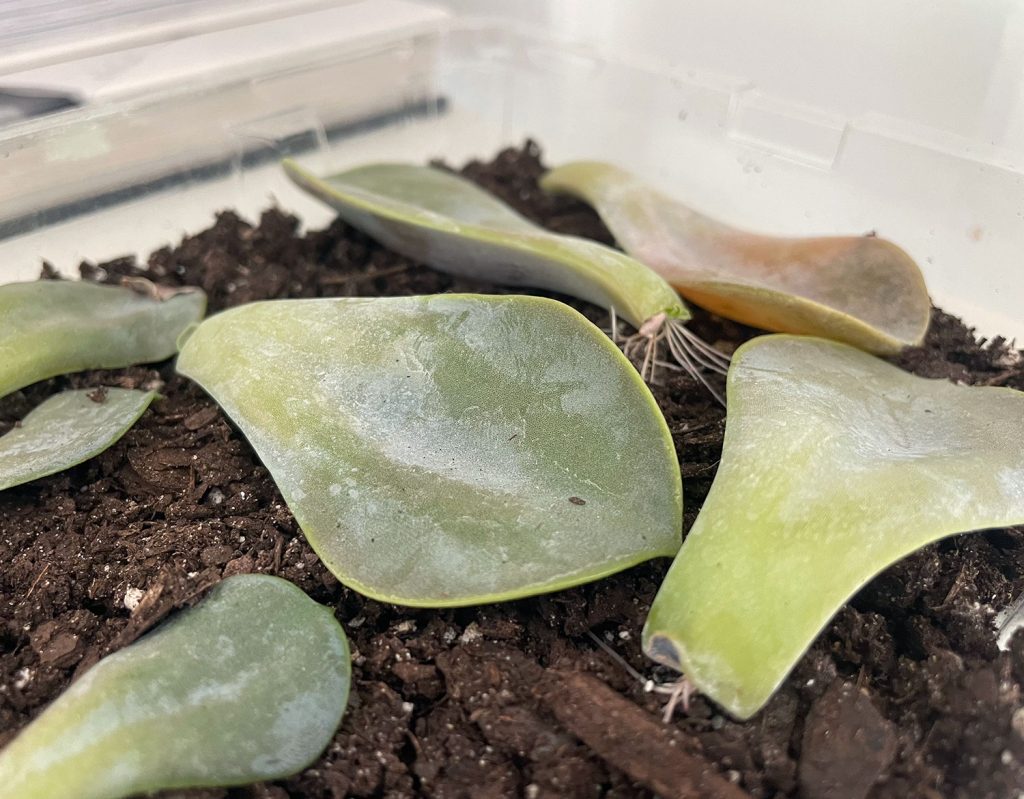
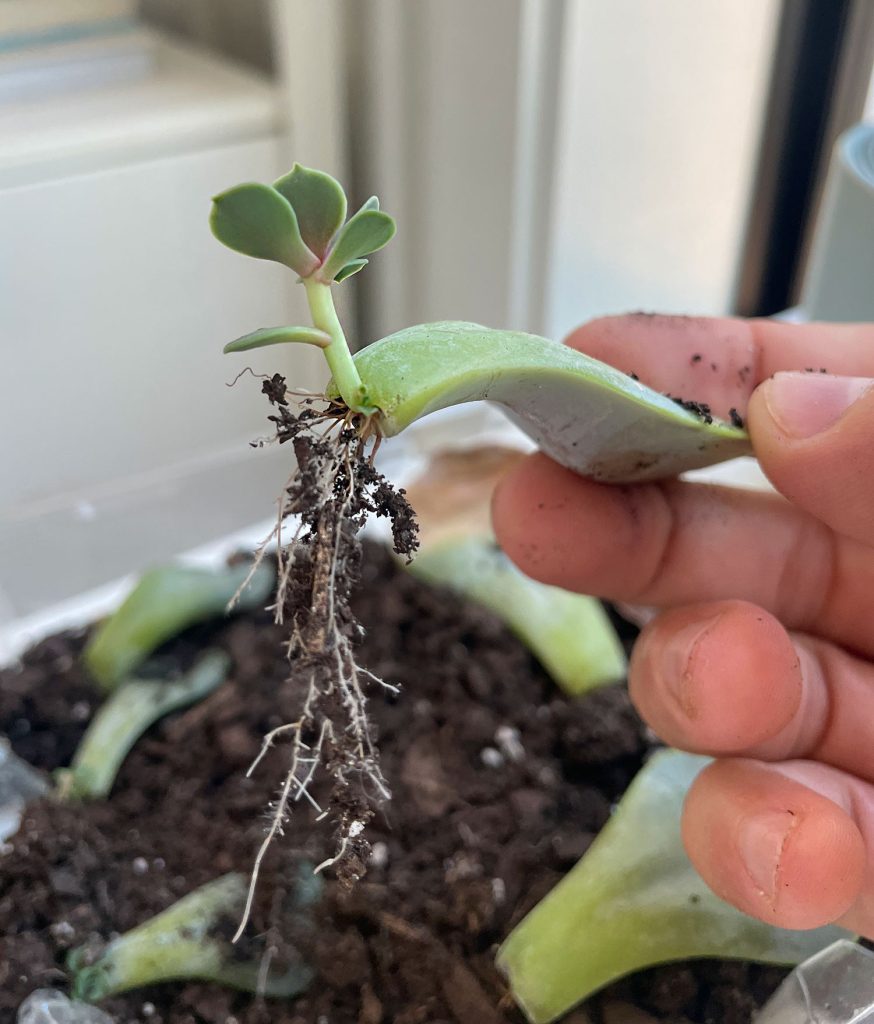
It will take several weeks for your succulents to show signs of growth, depending on your conditions. You will gradually begin to see signs of new roots as well as new plants (called pups) beginning to form at the end of each leaf.
Here is some of our progress 1 month into propagation:
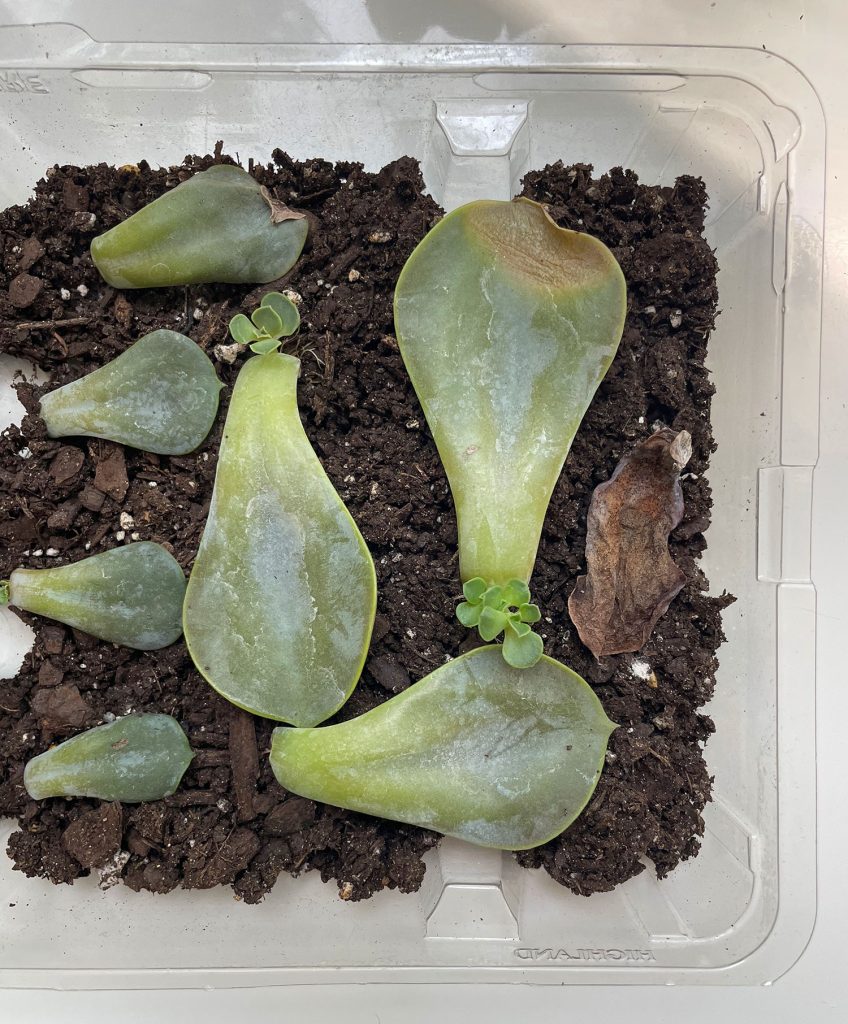
Here are the same leaves after 2 months. Note how some leaves are growing faster than others. Some – like the one on the end – didn’t take at all and quickly withered!
We waited a full 3 months before transferring our new plants into their own pots. To do this, we carefully removed the leaf from the soil and, if possible, gently broke the pup free from the mother leaf. Not all were ready to be detached yet, so you can just leave the ones that didn’t want to break off alone – so they can grow a little bit longer. Or you can proceed to the next step with the leaf still attached.
We had similar progress on our hanging leaves after 3 months. It’s hard to say if the results were better or faster using this method, or if they were just easier to see when they were hanging in the air.
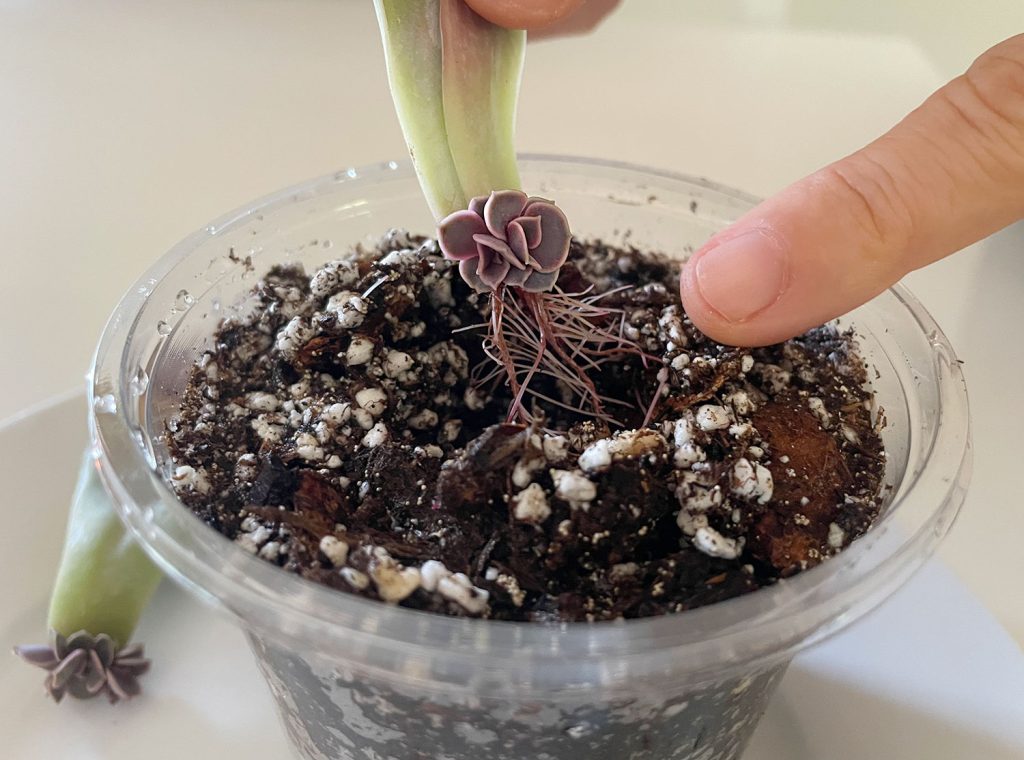
To plant our new roots, we prepared a small pot with fresh moist soil and made a small hole to place the new roots in.
Once the new roots were planted, we cared for the pup the same way we cared for the parent plant – which means we kept it in a spot with lots of indirect sunlight and watered it whenever the soil dried out.
What’s the Best Method to Propagate Succulents?
It’s hard to pick our favorite propagating method because each one was pretty simple and successful and there were pros & cons to each.
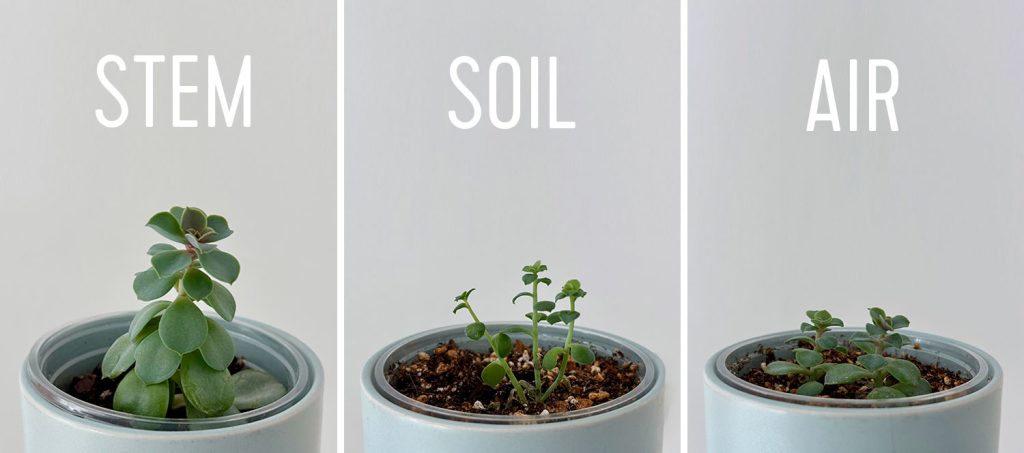
The trimmed stem had the most dramatic growth, but that’s to be expected because it had a big head start. It’s ready to trim and propagate again into ten more plant babies!
The leaves placed on soil produced taller thinner growth and overall seemed to produce more successful new pups than hanging the leaves in the air.
The leaves hanging in air produced smaller but thicker rosettes. This process produced fewer successful pups, but was the most fun to watch!
Overall, it’s helpful to remember that succulents aren’t fast growing plants, so you won’t see results as quickly as you might when propagating plants like pothos.
More Plant Guides
If you’re looking for more information on some of our favorite plants, check out some of these posts below:
*This post contains affiliate links, so we may earn a small commission when you make a purchase through links on our site at no additional cost to you.
Never heard of Ocean Springs, Mississippi? Neither had we! But it caught our eye on round-ups like Southern Living’s 15 Most Adorable Small Towns and USA Today’s 10 Best Coastal Small Towns where it ranked #1. So a few months ago our family decided to check it out for ourselves. It did NOT disappoint! We actually considered detouring through Ocean Springs on our weekend trip to New Orleanstwo years ago. But now we’re glad we didn’t shortchange it with a quick pitstop and gave it a full trip of its own.
Ocean Springs lived up to the hype of being an adorable, small, historic town with lots to explore. In fact it reminded us A LOT of Cape Charles, the little Virginia beach town where we renovated two homes. Both places are super walkable, have a bunch of fun shops and restaurants, and sit on a quiet bay with shallow water for kids to play in.
We visited Ocean Springs in late November during our kids’ Thanksgiving break, so we didn’t spend time on the beach (although it did get into the low 70s each day). But even without enjoying the water, we found plenty to do in Ocean Springs.
Where is Ocean Springs, Mississippi?
Ocean Springs is located on the Gulf Coast of Mississippi, right across the Biloxi Bay from, well, Biloxi. It’s about 3 hours west of our home in Northwest Florida and just about 90 mins east of New Orleans.
We spent most of our Ocean Springs visit walking around and exploring the historic downtown and beachfront. We literally didn’t get in our car once thanks to renting an Airbnb in a super walkable area! We hit up parks, shops, restaurants, toy & candy stores, and – of course – poked around some charming neighborhoods too. It was the perfect laid-back, slow-paced family getaway.
Where to Stay In Ocean Springs
Ocean Springs has lots of short-term rentals as well as boutique hotels and B&Bs, so there are a lot of lodging options – including trendy ones like the modern cabins at the Beatnik Motel.
We stayed at a dog-friendly Airbnb right off of one of the main downtown streets, which was clean and well-stocked, but after walking around many areas there, we wouldn’t recommend that specific spot, so I’m not going to link it here. It was a little loud from some adjacent restaurants, but there were some very charming areas south of Government Street that we would pick to stay in next time. This one called Gaslamp House is a little pricey, but it always catches my eye!
But again, there’s also no shortage of cool hotels. We walked by The Roost Boutique Hotel, which looked like an updated old farmhouse. The pool area looks awesome on the website too!
Slightly closer to downtown is The Springs Hotel, which also houses a cool floral and gift shop called Palmette (more on that later). That’s why Sherry is marching so determinedly into the hotel below!
I stayed outside with the dog, but Sherry got to sneak some peaks of the inside of the hotel while shopping. It was super well designed!
I mean, just look at the bathroom!
We were definitely pleasantly surprised by the level of lodging options in Ocean Springs.
Where To Eat in Ocean Springs
We wouldn’t call ourselves foodies (zero refined palates here), but somehow our vacations always revolve around food! Ocean Springs had tons of great restaurant options that are both kid & dog-friendly. In our 48 hours there, we had 2 breakfasts, 2 brunches, and 2 dinners… plus some desserts! Here’s a list of where we went, with more info and pics below:
Bright Eyed Brew Co
The TatoNut Shop (donuts)
Fat Spoon Cafe
Lady May
Glory Bound Gyro Co
Pop Brothers (popsicles)
Candy Cottage
We also ate a great brunch at the Fat Spoon Cafe, but didn’t take any photos!
Lady May
We loved Lady May so much that we ate there twice – once for dinner and then the next morning for brunch. They had a great patio and the menu had crowdpleasers from flatbread pizzas and burgers to omelets and waffles.
Glory Bound Gyro Co
Our first dinner was at Glory Bound Gryo Co which, we later learned, is a sister restaurant to Lady May. It also had burgers, salads, and pizzas but also tons of gyros with different topping and sauce combinations. It wasn’t fancy, but it was SO GOOD we almost ate there the second night (but ended up at Lady May instead).
Pop Brothers
After a long walk, we treated ourselves to some gourmet popsicles at Pop Brothers. It’s located in “Cash Alley” which is adorned with colorful umbrellas overhead and graphic sidewalk art below. There are dozens of artisan popsicle flavors to choose from (I did Vietnamese Coffee and Sherry did chocolate peanut butter). We highly recommend paying the extra dollar to have it dipped in chocolate!
Sadly we missed getting a New Orleans-style snow cone at nearby Caboose Cones, which had closed for the winter season. But I imagine it’s an iconic place to cool off in the summer.
We also enjoyed some novelty candy at the Candy Cottage, which is right next door to Lady May. It had TONS of custom chocolate creations, plus the usual favs.
What To Do in Oceans Springs
The beach is certainly a big draw for Ocean Springs, but even in November we found plenty to keep us busy out of the water. Mostly it involved walking around, exploring, dropping into shops, and taking in the beautiful neighborhoods.
A lot of Historic Downtown Ocean Springs looks like the streets pictured above and below. Cozy sidewalks, massive oak trees, and fun little shops, parks, and homes along the way.
Ocean Springs seems to have a vibrant art scene too, with one popular stop downtown being the Walter Anderson Museum of Art. A lot of people also talk about Shearwater Pottery, but we unfortunately didn’t make it there during open hours.
The next block down is the aforementioned Springs Hotel, which is also home to a floral and art shop called Palmette.
I stayed outside with Penny while Sherry and the kids shopped. Based on the amount of time spent, I could tell it was one of their favorite stops!
Sherry bought this brass tiger pendant there and loves it endlessly.
I don’t remember the name of every little store we stopped into, but that was kind of the fun of it. There was always something interesting to see.
My only wish is that Ocean Springs had a local bookshop (we love checking out independent bookstores on vacation). We did come across several Little Free Libraries, so I guess that was a close second!
It was also fun being downtown as things were starting to get decked out for the holidays. We even got to see the toy store actively hanging theirs!
In addition to shopping the downtown, we also enjoyed walking down some of the neighborhood streets to admire the homes. I’ve never thought much about what a “quintessential coastal Mississippi” neighborhood might look like, but somehow Ocean Springs is exactly that. It definitely had a lot of New Orleans vibes, with beautiful old homes, local shops, and tree-lined streets.
There were lots of sprawling porches, picket fences, and huge mossy oaks.
Possibly the best part about our visit to Ocean Springs is that we left wanting to come back. While I think we hit a lot of highlights in our short visit, it feels like we could use more time to soak it in, fully relax into its laid-back vibe, and maybe bike around town or hang out at the beach on a summer day.
Oh, and I really want one of those snow cones from the train caboose.
Ocean Springs, Mississippi: A Recap
If you’re looking for all the things we mentioned in one spot, here ya go!
Where to Stay:
Where to Eat
Where to Shop & Browse
More Family Trips We’ve Taken
If you’re interested in our take on other destinations or are in search of family-friendly trips, you might also enjoy these posts: