We love having friends over to our backyard fire pit, which means we eat A LOT of s’mores. It also means we have A LOT of opportunities to try unique twists on the traditional recipe. There’s nothing wrong with a tried-and-true s’more, but test-testing new ingredients and combos keeps things fun – and we’ve definitely hit on some combos that we think are even more delicious than the original! So here are 5 of our favorite “upgraded” s’more ideas for your next backyard fire pit gathering (or beach bonfire!).
All of these are simple to execute and still involve the fun “roasting over an open flame” part. So don’t feel like you need to do a lot of extra work or be a fancy home chef to pull them off (we definitely aren’t!).
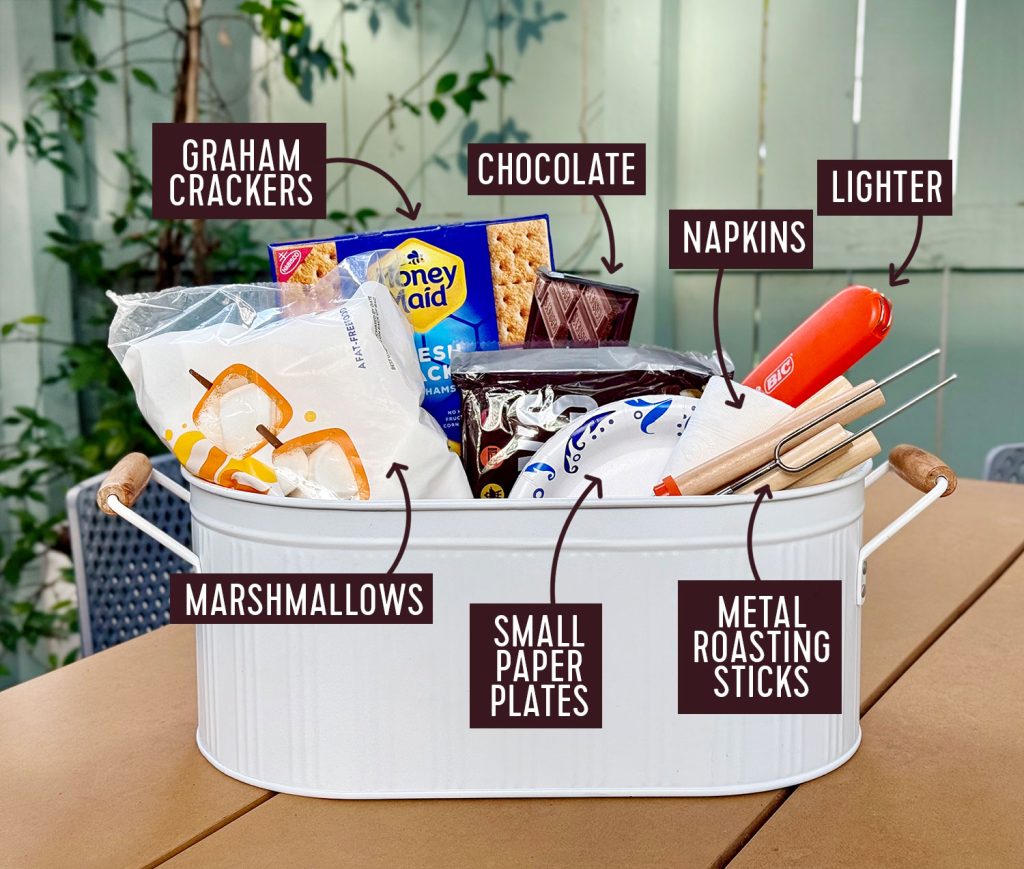
S’more Night Firepit Supplies
Before we dive into the “recipes,” let’s cover some basics about our backyard fire pit set-up. Here are the exact items we have & love (nothing sponsored, all purchased with our own money).
We also have a metal storage caddy (we linked a similar one since ours is 5+ years old) with basic s’mores supplies in the cabinet above our fridge. This makes it MUCH EASIER to bring everything out to the fire in one trip. Here’s what’s in ours:
Standard s’mores ingredients: graham crackers, chocolate bars, & marshmallows
Quick tip for the metal roasting sticks: They often have crispy burnt marshmallow bits left on them at the end of the night. Soak that end in water overnight to make cleaning much easier in the morning!
Five S’more Upgrades
Ok, we’ve made it to the fun part. Here are the 5 “fancy” s’mores we’ll cover today:
Savory s’mores
Chocolate swaps
Cracker swaps
Adding fruits or spreads
Fluff dips
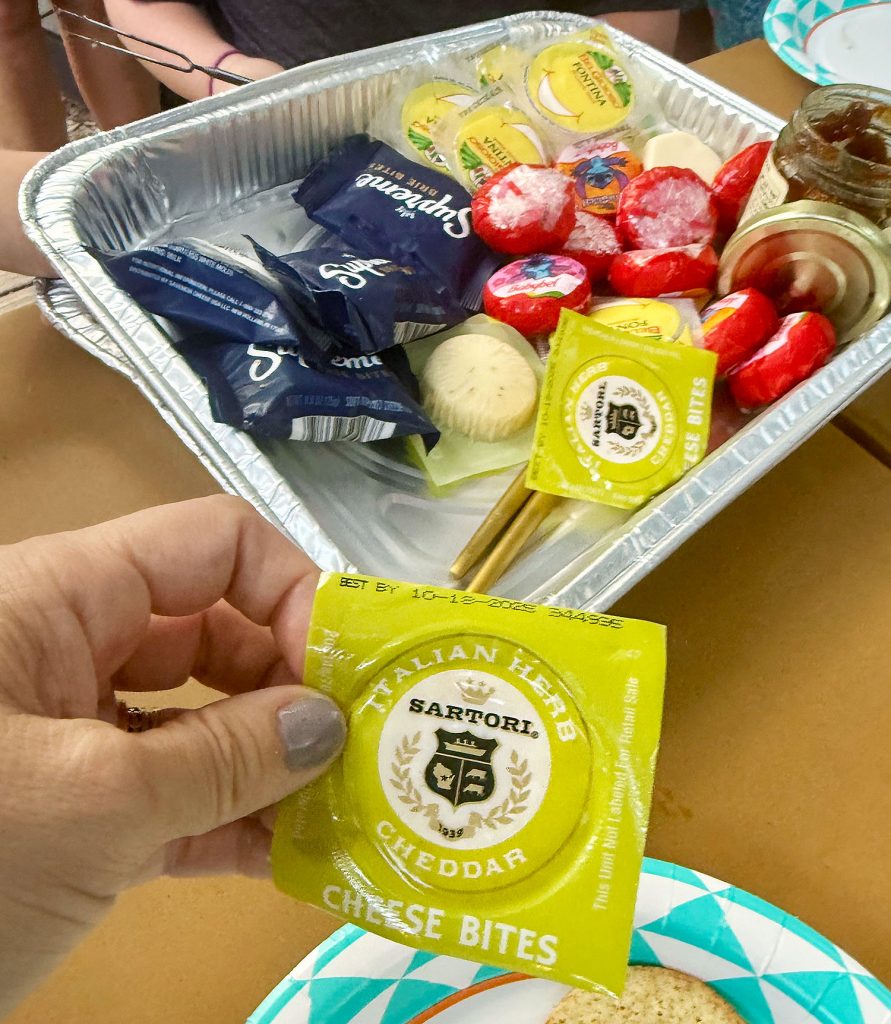
1. Savory S’mores
What if s’mores had a baby with a charcuterie board? That’s the idea here (which made the rounds on TikTok about a year ago and inspired us to give it a try). The gist is: instead of a marshmallow, you’re roasting bite-size cheeses over an open a flame. And then you swap the chocolate for something like salami, add some fancy jam, and any other savory ingredients you’d like (we LOVE hot honey on them).
Like any meat & cheese platter, it’s fun to have a spread of options for guests to try. Just be sure to have 3 basic categories covered – cheeses, crackers, and toppings. Here are some of our favorites:
Snacking Cheeses:
Savory Crackers:
Toppings:
As much as we love the look of the fancy cheeses like brie, we’ve found the Babybel to be a crowd favorite!
We’re still working on our “presentation” of savory s’mores because, unlike a fancy cheese platter, we like to keep the snack cheeses wrapped & chilled until they’re ready. We have had luck keeping them cold while they sit outside with us near the fire by freezing a layer of ice in a dispoable baking pan and then nesting another pan on top to corral our ingredients.
The absolute best part? You can have savory s’mores for dinner and then follow up with dessert s’mores later the same evening! Nobody has to be back in the kitchen preparing food while others hang outside. Zero dishes to wash. Absolutely a fun DIY dinner for everyone involved.
2. Chocolate Swaps
The easiest way to mix-up your classic s’more recipe is to sub out the standard Hershey’s bar for other chocolate candies. Just like the savory s’more spread above, it’s a simple & fun way to let your kids or guests experiment. Just pick up a few bars or bags of other chocolate-based treats. Here are our favorites:
You can use just about any snack or mini size chocolate bar (Snickers, Mr. Goodbar, etc). In our experience, the thinnner the better. But it’s all personal preference, so we suggest experimenting! Sherry and I both agree the Andes mint version is underappreciated in the s’mores world and like them better than the original Hershey’s bar.
3. Cracker Swaps
Similarly, you can also trade out your classic graham cracker base for a new twist on a s’more. Just be careful whatever you’re using it large & sturdy enough to support your other ingredients. Here are some cracker alternatives to try:
You might be surprised by how much these alterations can change the whole flavor of your s’more. And shockingly, the Saltine is one of our favorite swaps. That little hint of salt is *chef’s kiss*. Truly, try it with a toasty marshmallow and Andes mints instead of Hershey’s chocolate. We are awaiting our Michelin Star, it’s that good.
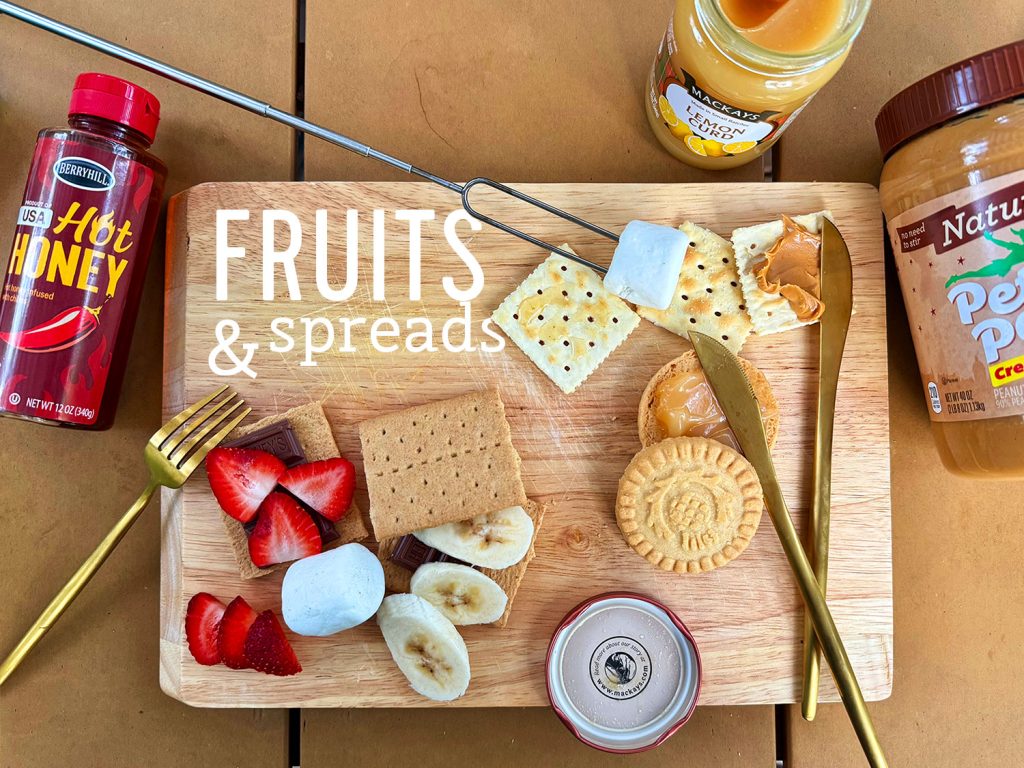
4. Add Fresh Fruit or Spreads
One of our favorite recent discoveries is adding a hit of fresh fruit to our s’mores. It does take a smidge more prep, but regular s’mores now seem almost boring by comparison. These ingredients can be used in addition to OR in place of chocolate:
Strawberries, sliced thin
Bananas, sliced thin
Green applies, sliced thin
Peach wedges
Nectarine wedges
Pear wedges
Whole blackberries or raspberries
Another way to get that fruit flavor but with less prep is using a fruit spread or jam, which we do OFTEN! It tastes so good, and makes it really fun and customizable for your family and guests. Just spread one (or two!) of these on your base cracker first:
Be creative with your combinations of these various categories to create a truly custom s’more. For instance, a shortbread cookie + fresh strawberries + toasted marshmallow can give you an almost strawberry shortcake-like flavor.
5. Fluff Dips
Skip traditional marshmallow and grab a container of marshmallow fluff instead. Just put one of the base ingredients below onto your roasting stick and dip it directly into the fluff. You may need a spoon to help apply the fluff evenly. Then toast the whole thing over your flame.
After you’re done toasting, you can eat it off a plate with your fingers or a fork – or squish it between two crackers for a traditional sandwich-style s’more. Also consider adding a drizzle of melted chocolate or honey on top! Don’t sleep on a whole strawberry + marshmallow fluff (seen in the photo above). We recently tried them with friends and couldn’t get enough. The fluff gets this toasty crunchy char on the outside and the inside of the strawberry is warm and goey like pie.
Our Favorite Combos
I know we just threw a lot of options your way, so we’ll leave you with our top 3 combinations:
John’s Top 3 S’mores
Traditional s’more + sliced strawberries on graham crackers
Savory s’more with fig jam, proscuitto, and fontina cheese on rosemary cracker
Saltine + lemon curd + marshmallow (no chocolate) on shortbread cookies
Sherry’s Top 3 S’mores
Traditional s’more, sub Hershey’s chocolate for Andes mint on saltines
Savory s’more with hot honey, salami, and Babybel on saltines
Whole strawberry dipped in marshmallow fluff (no cracker)
Happy s’mores-ing everyone! And we solemnly vow to keep trying new s’more combinations. It’s a tough job, but someone’s gotta do it.
Other Posts You Might Enjoy
If you’d like more information about how we transformed our backyard, check out some of these posts below:
*This post contains affiliate links, so we may earn a small commission when you make a purchase through links on our site at no additional cost to you.
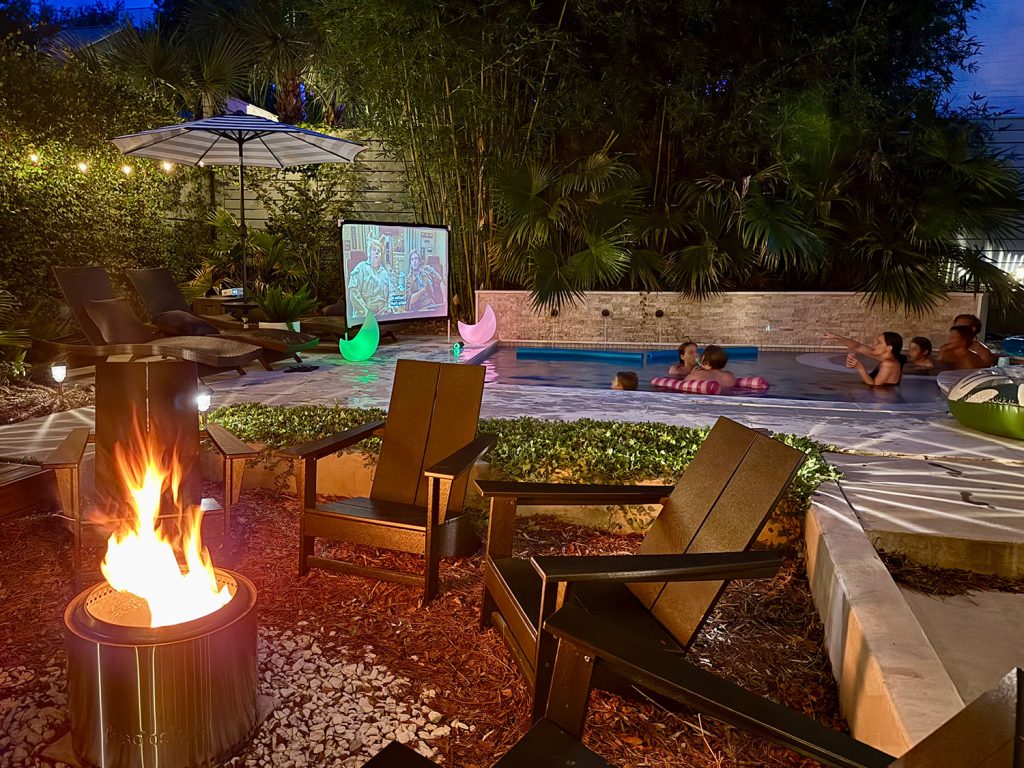
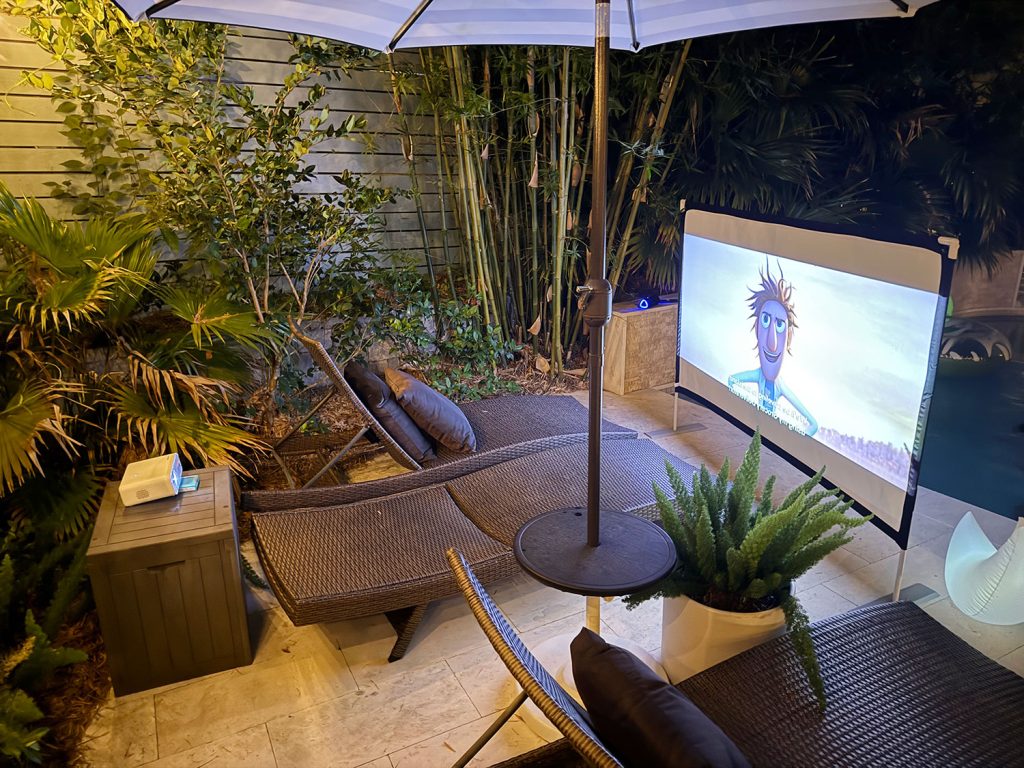
I’ve daydreamed about buying a backyard movie set-up (projector, screen, etc) for several summers now. But the logistics and potential expense always stopped me… until last month!
And now I feel silly for waiting, because we pulled it off with just 3 pieces of equipment that cost less than $200 total. That’s cheaper than the cost of some projectors alone… or a few family trips to the movie theater.
In addition to not spending a lot, we also wanted equipment that would be easy to set up. So in this post we’ll cover:
The 3 items we purchased (one is optional!)
How to set up your outdoor movie night
Tips we learned along the way
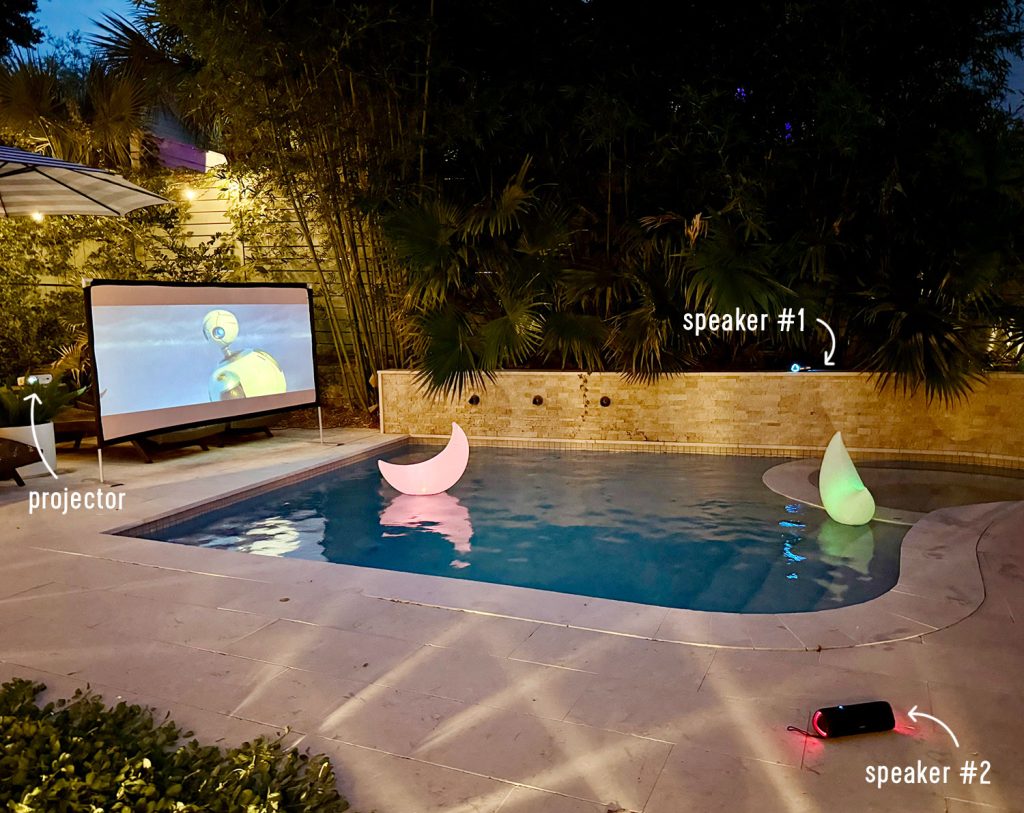
Equipment For An Outdoor Movie Night
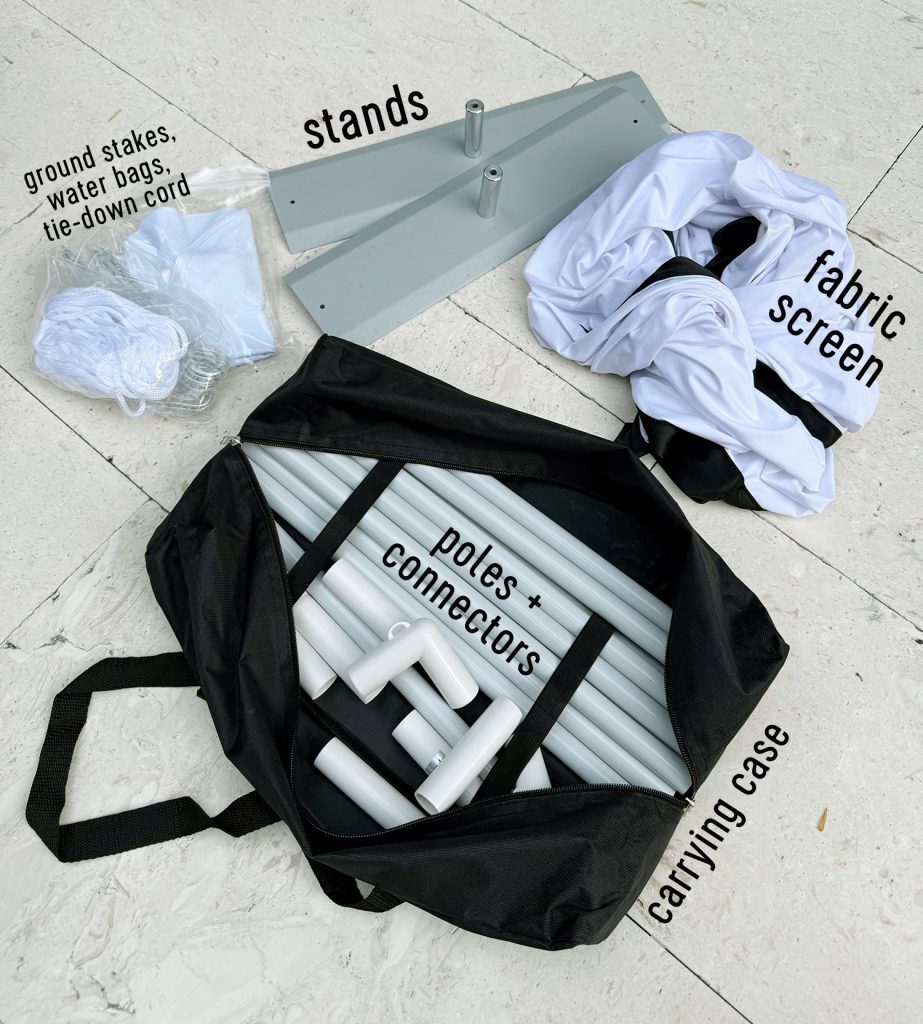
Here are the 3 pieces of equipment we purchased – and how much we paid! – to set-up an outdoor cinema in our backyard:
*The speakers are optional because the projector has built-in speakers. However, connecting portable speakers will give you more flexibility over your setup, including creating a “surround sound” effect.
You can watch how fast it is to set everything up in this time-lapse video we filmed the other night. I had the screen assembled in less than 3 minutes! Don’t worry, we still sped it up for you…
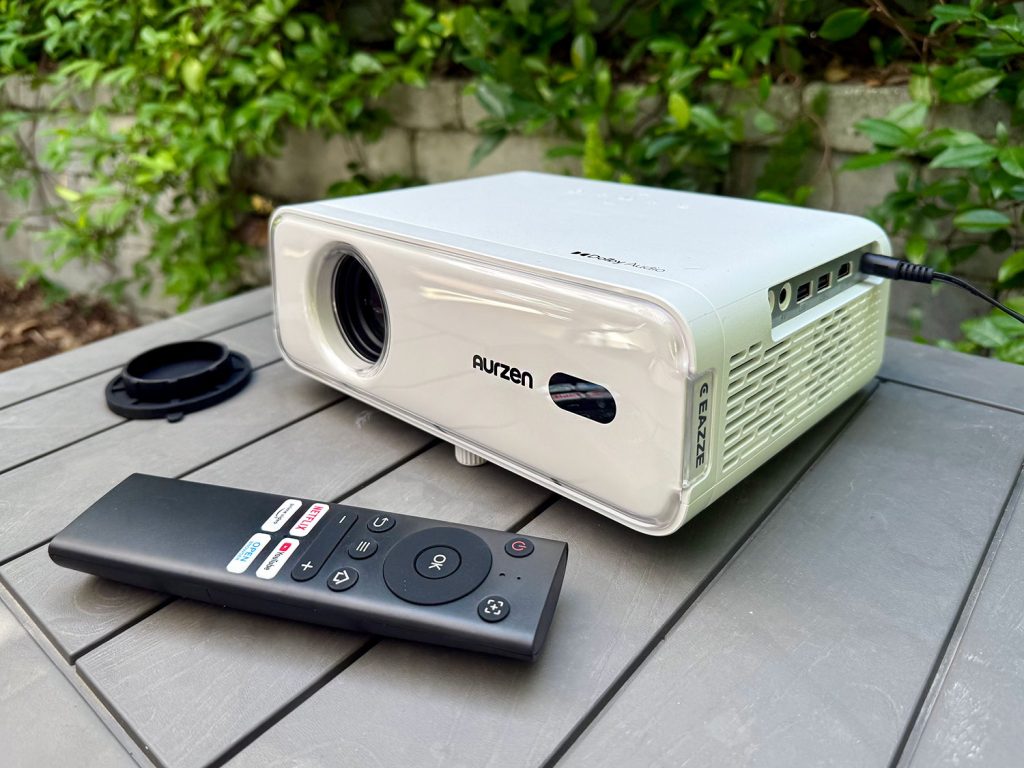
We chose the Aurzen EAZZE D1 Smart Projector, which was marked down from $149 to $99 when we purchased it. I came across cheaper and pricier options in my research, and landed on this middle-ground option for a few reasons:
It’s WiFi-enabled, meaning it can stream services like Netflix without having to connect other cords or devices.
It’s Bluetooth-enabled, allowing you to enhance your audio experience with external speakers.
It auto-adjusts the picture, meaning things like focus and keystoning (when the image looks skewed) are adjusted for you. You can manually adjust them as well.
It can project from in front OR behind the screen, which gives you more placement options.
These 4 features were important because I wanted the setup to be flexible, low-stress, and not involve a lot of extra cords. And overall, we’re EXTREMELY PLEASED with this purchase. There are some minor drawbacks (which I’ll share in the “tips” section) but they’d be issues with any projector, and they’re easy to overcome.
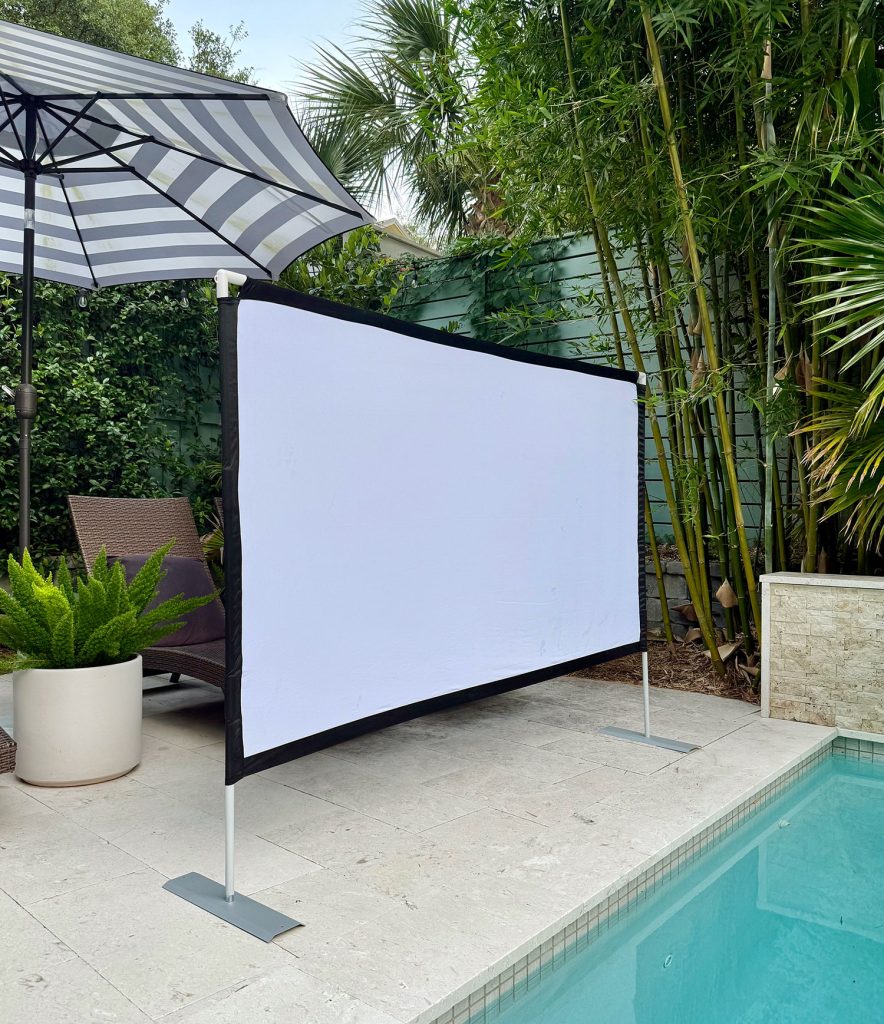
2. Collapsible Outdoor Movie Screen
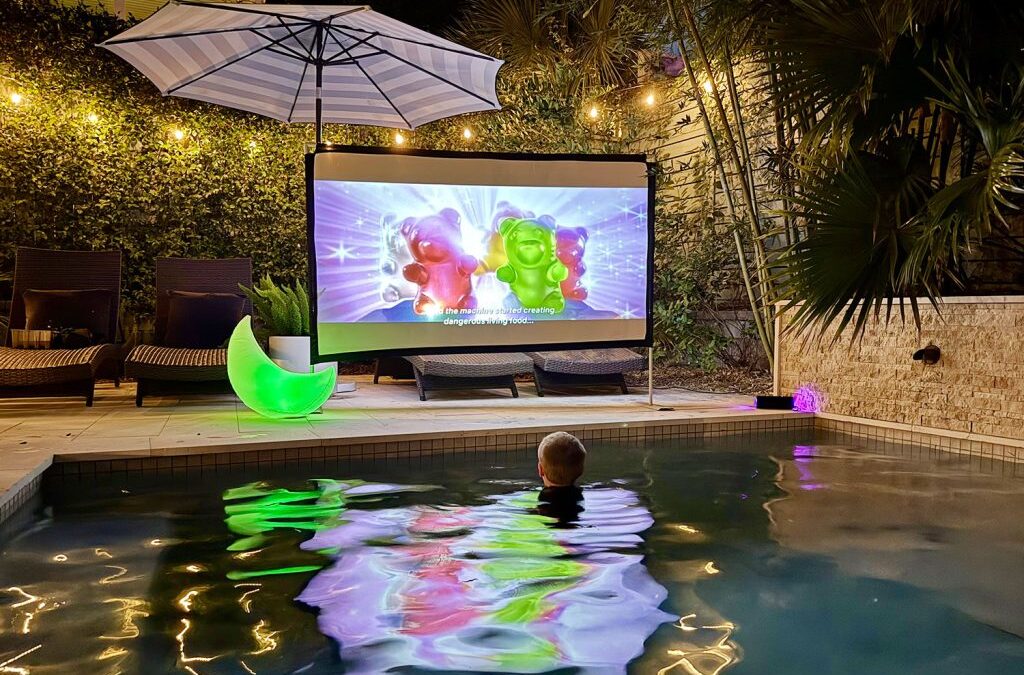
We considered a DIY screen made from PVC and a bed sheet or drop cloth, but decided to “splurge” on this $39 outdoor projector screen instead. We chose the 80″ size (measured diagonally), but it also comes in 100″, 120″, and 150″ versions. Depending on sales, the larger versions are sometimes cheaper! So just go with what you think will fit your space the best.
We chose this type of screen because:
It’s freestanding, so no need to put hooks or holes in your house
It’s straightforward to assemble
It fits into a zippered storage case when collapsed (see below)
It also comes with ground stakes, water bags, and tie-down cords to help anchor it in place. We haven’t needed any of these yet.
We had a few ideas about where we’d set everything up in our yard, and none involved projecting onto a wall or surface where we could hang something. So having a freestanding screen on a stand allowed us to easily test out a couple of arrangements.
Plus, when the summer months pass, we love the option of positioning the screen around the firepit instead of the pool. I’m already excited about cozy movies with blankets and a roaring fire!
3. Bluetooth Speakers
After our first few nights using the built-in speaker on the projector, we decided to buy two of these budget-friendly Bluetooth speakers ($23 each at the time). The built-in speaker wasn’t bad. In fact, it was quite loud (and easily adjustable) – so these are definitely not required.
Why’d we buy them then? Keeping the projector within earshot of the pool meant a greater risk of it getting splashed, walked into, or stood in front of. So switching to wateproof Bluetooth speakers allows us to place the projector out of the way, while not sacrificing our ability to hear the movie.
We chose these specific speakers because they can pair with each other, meaning we can create a surround sound experience (without spending big money on a Sonos system or another more pricey option). They also give us lots of placement flexibility depending where we are and what we’re doing. For example, we could move one next to the hot tub or even by the firepit if some people are staying dry that night.
One thing to note is that connecting Bluetooth speakers disables the projector’s built-in speakers, so don’t expect it to be a third sound source in this set-up. Two speakers has been plenty of us, so that’s just a heads up!
Setting Up A Backyard Movie Night
Our goal was to keep the setup process easy and painless, because we knew anything complicated would discourage us from actually using it. So here’s a quick rundown of what we do:
Step 1: Assemble The Movie Screen
First, you want to set-up your screen. That way you’ll have your projection surface ready when it comes time to adjust the picture on the projector.
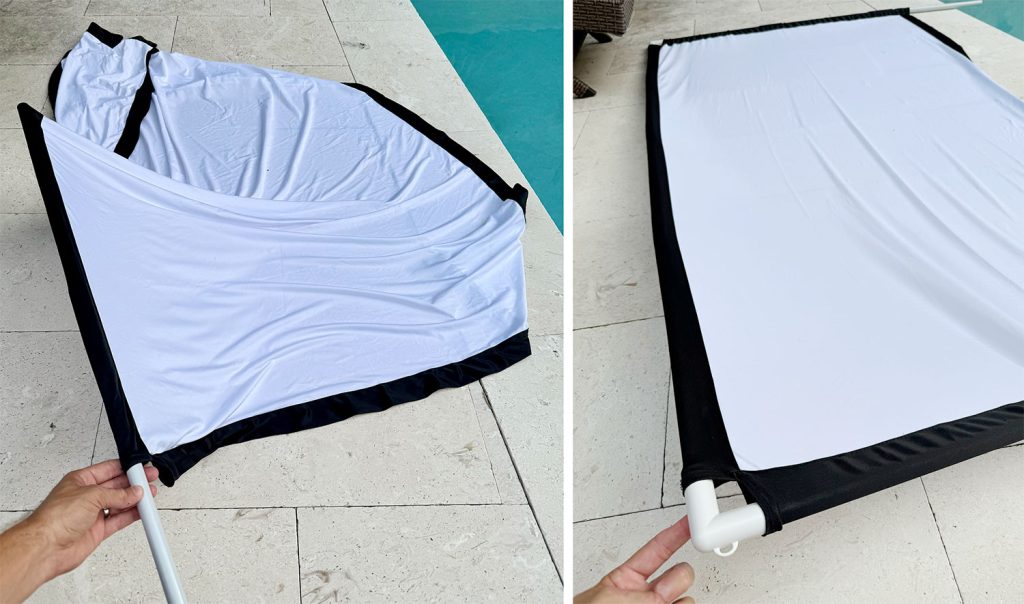
Screen assembly takes less than 5 minutes. It’s kind of like putting up a tent – only much easier! The frame is made from PVC pipes that pop together with the provided connectors. Slide each section through the fabric sleeves on the edges of the screen, connect the corners, and set it onto the metal stands. That’s it.
We left off one section of PVC on each vertical side so that our screen sits closer to the pool level. That’s why ours looks shorter than what’s pictured online. We found that to be the more comfortable viewing from in the pool.
Step 2: Position & Power Up Your Projector
Next, find a good spot for your projector. This may be straightforward for some, and more challenging for others. But here are some things to keep in mind:
Know your power source (we use an extension cord plugged into an exterior outlet).
Make sure your cords don’t become tripping hazards in the dark.
Place the projector on an elevated, flat surface, like a side table or sturdy box (we temporarily move our pool toy storage box).
There is an adjustable foot under the front of projector, but you may also need a book or other object to angle it to the right height.
Consider projecting from behind your screen to minimize obstructions & hazards.
Your projector does NOT need to be exactly straight on, thanks to keystone correction in the settings. This is EXTREMELY HELPFUL!
Once it’s generally in the right spot, turn on your projector so you can calibrate everything more precisely.
Step 3: Adjust Your Picture
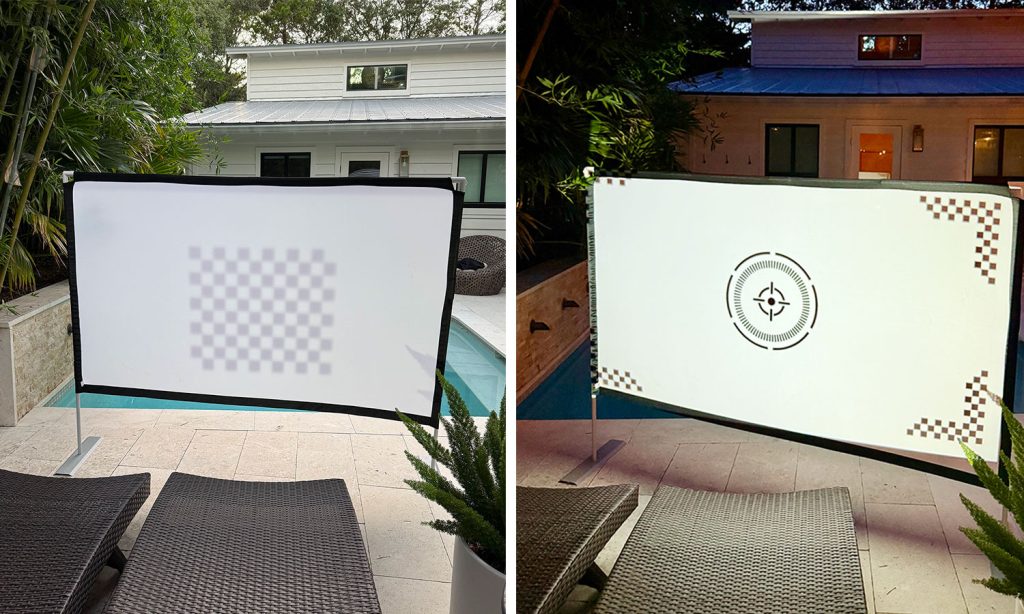
The projector we bought automatically adjusts focus and keystone as soon as it turns on. You can reset or fine-tune these later if needed, but we found this feature to be very helpful! It works better when it’s dark enough outside, so you may need to be patient.
If the projector does not take you to a set-up menu, you can access it in the top corner of the home screen. Here’s where you can find important settings like:
Wifi Connection
Bluetooth Pairing
Zoom
Front or Rear Projection (rear projection will mirror the image)
Keystone (manual adjustments OR redo the auto-adjustments)
Focus (manual OR auto)
The projector comes with a standard remote control to navigate. Also, any time the projector detects that you’ve shifted its placement, it will redo the auto-focus and auto-keystone. My only complaint is that when that happens, it undoes any manual settings (like zoom).
Step 4: Connect Your Speakers
This step isn’t necessary if you’re using the projector’s built-in speakers. But if you’re connecting a Bluetooth speaker – like the pair we bought – you’ll need to connect them to the projector from the Settings menu.
With these specific speakers, you’ll need to pair them to each other before pairing them to the projector. That’s how you’ll be able to achieve a “surround sound” style by placing each speaker on opposite sides of the viewing area.
Step 5: Stream Your Movie
Because of the projector’s built-in Wifi, you can easily sign into your Netflix, YouTube, or Prime Video accounts and stream directly from the projector.
However, if you want to stream from other services like HBO Max, Hulu, Disney+, etc, you’ll need to connect a separate device (like your phone, laptop, Roku or Fire TV stick). This is due to licensing restrictions, and the projector manufacturer only has authorization for Netflix, YouTube, and Prime Video. The projector has 2 USB ports and 1 HDMI port.
The projector comes with a short HDMI cable, so you can use something like this $10 adapter cord to connect a laptop. You also may be able to screen mirror some videos from your phone, but we didn’t have luck with that.
Step 6: Enjoy!
Grab your chairs, floats, drinks, popcorn, or whatever else and enjoy!
Step 7: Pack It Up!
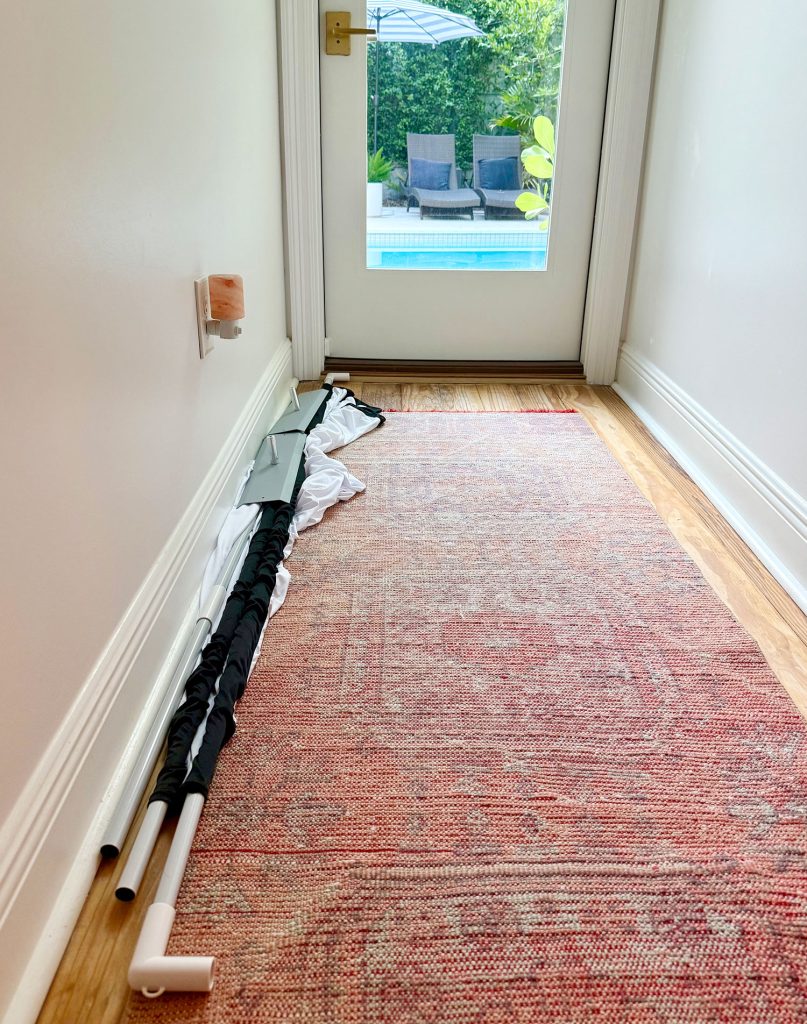
Being able to break down quickly was another big must for us. Especially since we’re usually tired by the end of the evening (can’t start the movie until it’s dark, so movie nights often end pretty late!). But we also don’t want to leave stuff out overnight to get wet or dewy.
The projector is easy to put away – just turn off and unplug! Same with the speakers. The screen takes a little more time to disassemble and arrange back into the carrying pouch, so we often just pull the screen apart at the corners so it can be tossed inside for the night (shown below). Then in the morning we can carefully pack it away when we’re more awake!
It really does collapse down to be very small and easy to store. Everything fits nicely in my closet when not in use.
All in all, we’d say set-up takes around 15 minutes (depending on how much futzing you need to do with your picture) and less than 5 minutes to break down.
Helpful Tips / Things to Know
Here are a few things that we wish we knew upfront about this outdoor movie set-up.
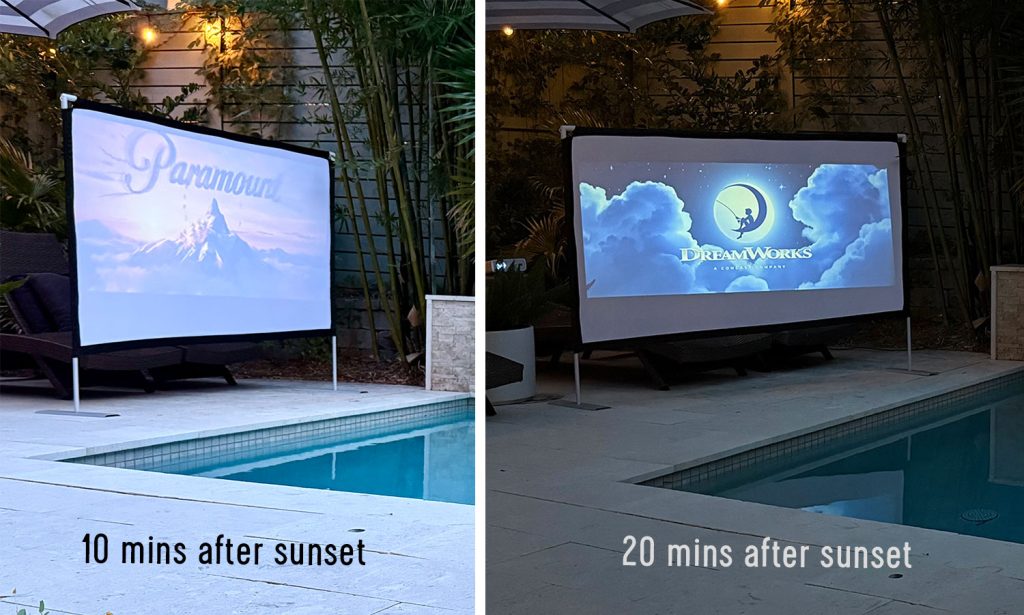
Wait for a dark sky
With late summer sunsets, it’s tempting to get started as soon as the sun is down (if not sooner). But unless your screen sits under a covered porch, we suggest waiting for full darkness for the best picture experience. Here’s an idea of how much clearer the picture is by just waiting 10 minutes.
Keep this – plus the length of your film – in mind when planning your outdoor movie night. We were out until nearly 11pm the first time!
The auto adjustments are helpful, but not perfect
While I’m really grateful for the auto-focus and auto-keystone features, I usually fine tune both manually. It’s fairly easy to do from the settings menu. Once you make your manual adjustments, you may want to turn off the automatic features because any movement – say someone bumps into the projector or the wind blows your screen over – will trigger the auto-adjust and reset your manual settings.
Your first set-up is the slowest
Setting up took me about 40 mins the first time and maybe 25 minutes the second time. But I have become more efficient each time as I refine my arrangement & streamline my process. You’ll learn the best spot for your projector, the perfect angle of your screen, and optimal speaker placements over a few movie nights. So be patient with yourself. Now I’ve got it down to about 10 mins!
Be open to renting your movie
The biggest drawback to this projector is not being able to stream services like HBOMax, Peacock, or AppleTV. Yes, I can connect my laptop via USB or HDMI adapter. But that’s an extra step (and extra cords) I’d rather not bother with most nights. So even if I can access a movie for free on one of those services, we usually spend the $4 to rent it through one of the built-in apps like Amazon Prime or YouTube instead.
Think about seating options / viewing angles
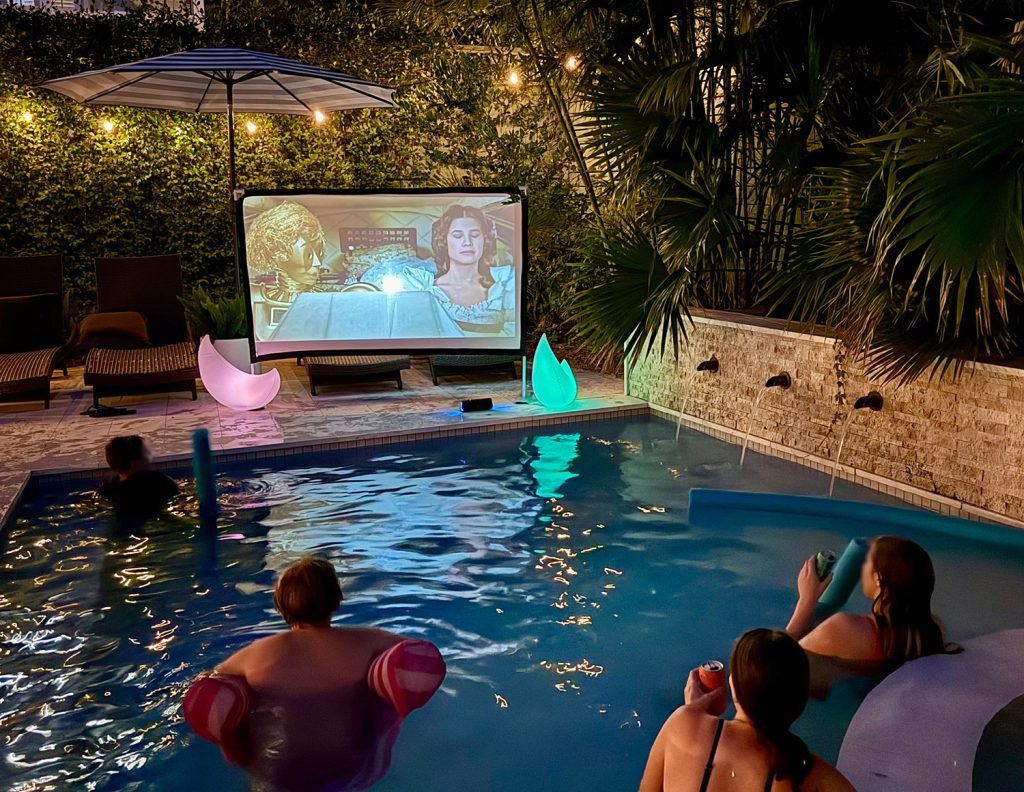
We’ve only used this in the warm summer months, so the pool has been the favorite viewing spot so far. But we still angle the screen so folks can watch from dryer / warmer spots, like by the fire pit. As the weather cools we’ll probably move the screen closer to the fire (or hot tub!) and will bring out some cozy blankets to cuddle up with. Actually can’t wait for that.
So far, the only regret we have is not buying these supplies a few summers ago!
Other Posts You Might Enjoy
Here are some related posts you might find helpful – from more technology we love to details on our backyard pool makeover.
*This post contains affiliate links, so we may earn a small commission when you make a purchase through links on our site at no additional cost to you.
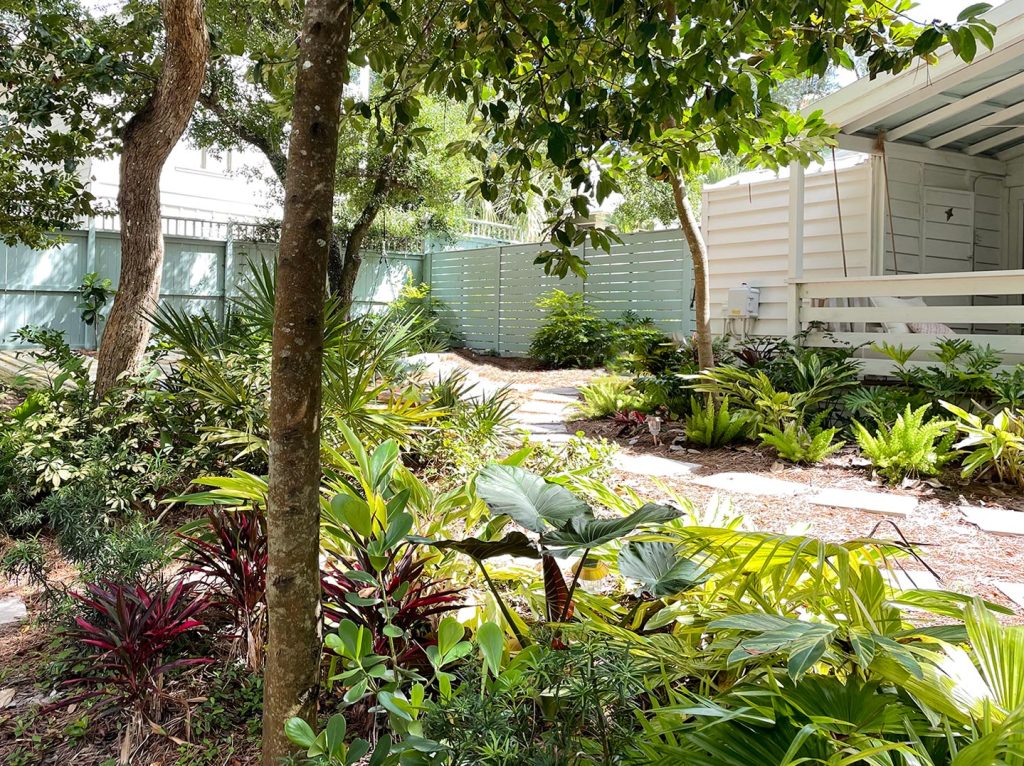
Last month’s arctic blast brought surprisingly frigid temperatures to Florida. We had three consecutive nights with temperatures in the low 20s – and an ultimate low of around 18 degrees! A lot of our outdoor plants aren’t built for that kind of freezing weather (in the 3 winters we’ve spent here we can remember one other low of about 32-degrees, but things went right back up to our more normal lows of around 45 degrees within a few hours). They’re calling our recent deep freeze a “once-in-a-century event” here in Florida. In other words: the ultimate test. So here are the steps we took to protect our plants, including a few things that worked better than others.
It should be said that there are definitely bigger things to worry about during extreme cold weather events – like protecting people, pets, and pipes. But you’ll often see plants as the 4th “P” on that list of things to check on in freezing weather. And since we’ve spent a good amount of time and money on our landscaping, we figured it was worth the effort to protect what we could, especially if some up-front effort could save us the time and money of replanting things that would otherwise die without a little help.
Tip 1: Identify Plants Vulnerable To Freezing
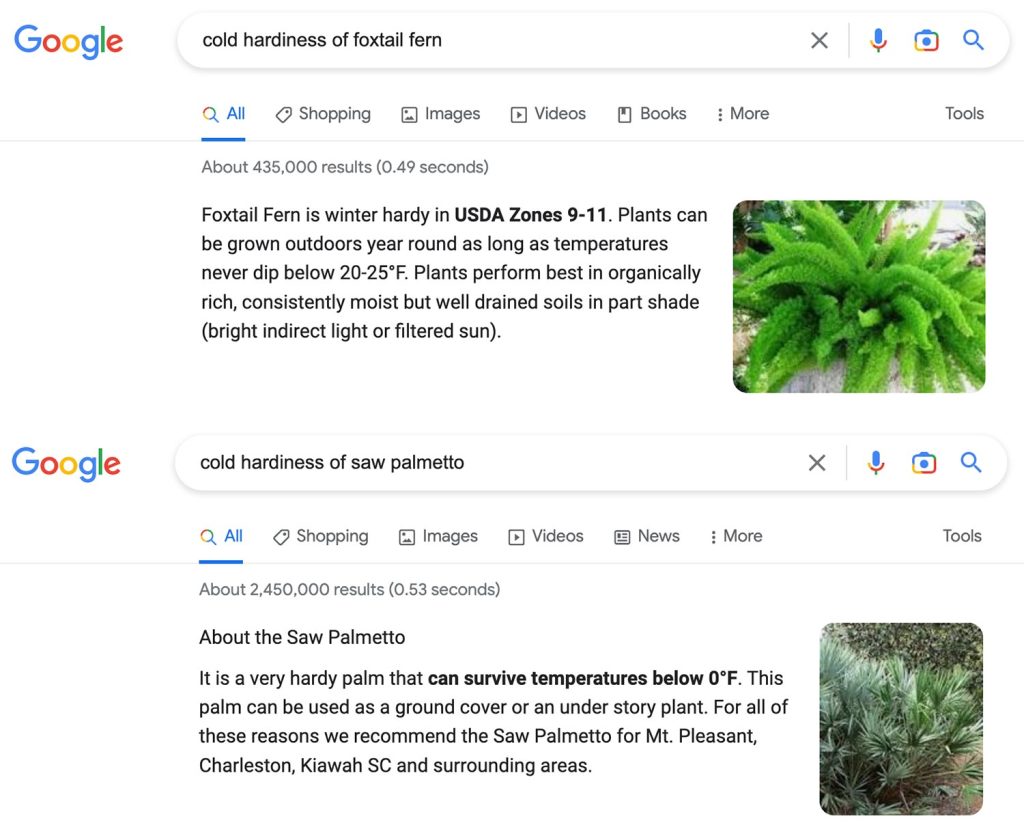
To prioritize your efforts, try to learn which plants are the least capable of surviving in your forecasted temperatures. Presumably, most of them are designed to survive in your growing zone (find your zone here). However, that might not be enough information if the weather is expected to be abnormally cold – especially for 3-4 days in a row. Going into this “hard freeze” we googled “cold tolerance” or “cold hardiness” along with the name of each plant we had outside.* It’s a great starting point for learning which plants we should focus on, and which would hopefully be just fine. For example, we learned that our saw palmettos wouldn’t need our help, but our foxtail ferns might.
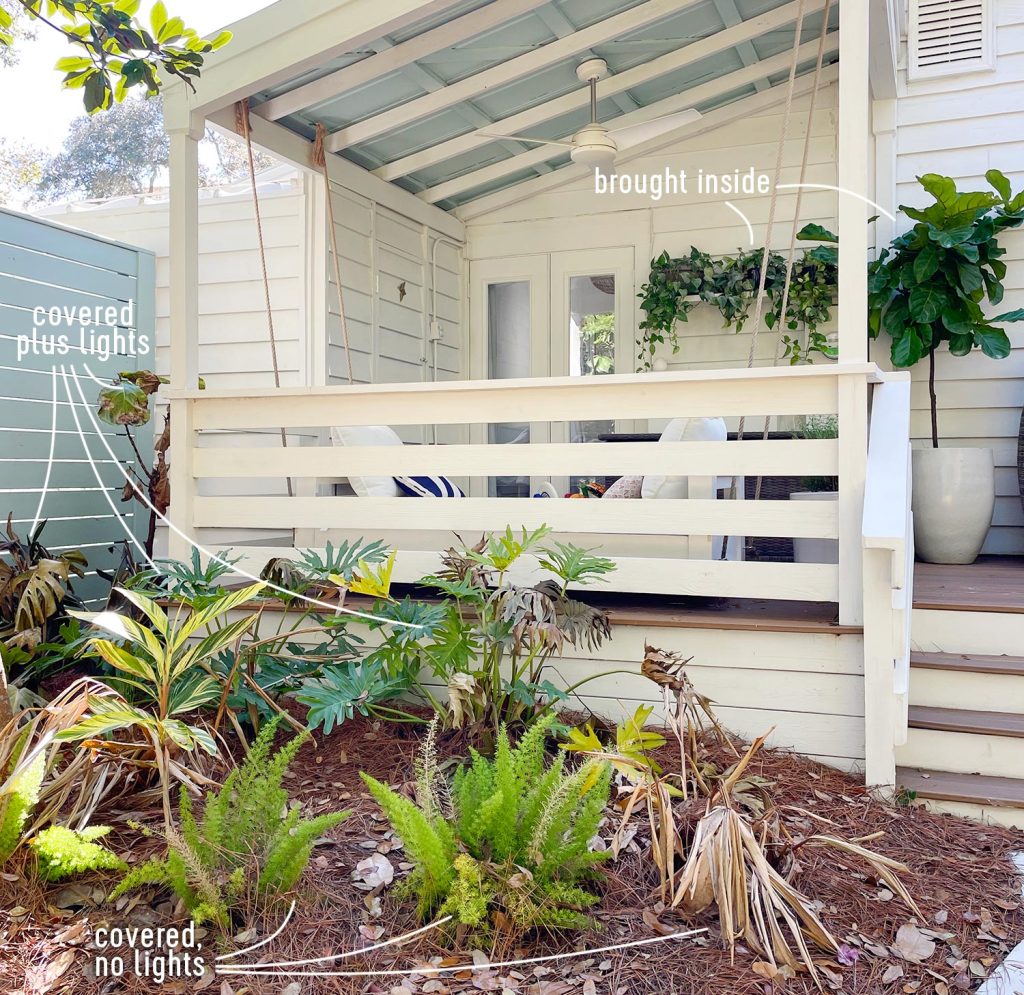
The surest way to keep your plants from getting too cold is to bring them inside where it’s warm. Of course, this is easier said than done. Many plants might be dug in the ground, too heavy to move, and/or too big to fit indoors. But things like small-to-medium pots or hanging planters are good candidates for transporting inside. You’ll have to be the judge of what’s reasonable for your home.
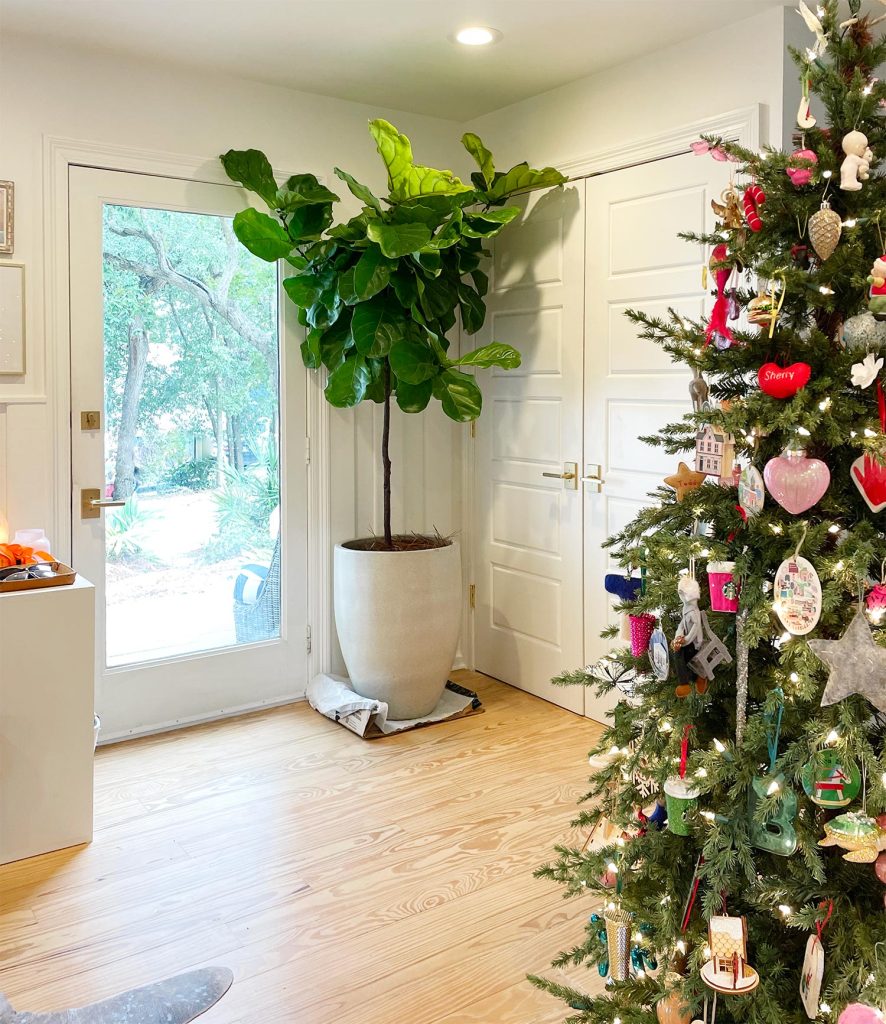
As you’ll see in these pictures, we have A LOT of potted plants outside. Some might call us crazy for bringing so many inside – especially considering we’ve got a small home and this freeze was happening while we were celebrating Christmas. But we laid out some tarps by a couple of lesser-used doorways and crammed as many pots as we could onto them. The tarps protected the floors from dirt and any residual water in the soil (remember that outdoor pots have drainage holes on the bottom). It was slightly inconvenient for a few days, but this turned out to be the only method that had a 100% success rate.
By bringing so many pots inside, we probably saved over $500 in plants that we might’ve had to replace otherwise. It was definitely worth it. Even if it did mean breaking out a dolly to drag our big fiddle leaf fig off the front porch and into the kitchen! It actually doesn’t look half bad in here… except for the fact that it made getting into the laundry closet kinda tight.
If bringing your plants indoors to your heated space isn’t possible, even relocating them into a protected area like a garage, basement, or attic could be enough to keep them alive. Potted plants are especially vulnerable to cold because their soil is less insulated than those dug into the ground. And getting them out of the wind helps to minimize heat loss.
Tip 3: Add Pine Straw Or Mulch
For plants staying outside, your main strategy is helping them stay as warm as possible. One technique is to add a layer of fresh mulch to your plant beds, especially around the bases of your plants. Mulch actually helps trap air around your plants – particularly when using a light material like straw or pine straw – which insulates them against dramatic drops in temperature. It can also help retain moisture and, surprisingly, wet soil actually retains more heat than dry soil.
Mulching does require a bit of time, effort, money, and planning. Luckily, we already had plans to add fresh pine straw to our yard because we had guests visiting for the holidays. We wanted the clean look of freshly mulched beds and the cold protection was a nice bonus! It’s also a great tip to water all of your freshly mulched plants before the cold. As I said above, we were surprised to hear that as a tip from a lot of local garden centers – but wet soil retains more heat than dry soil. So sprinkle away.
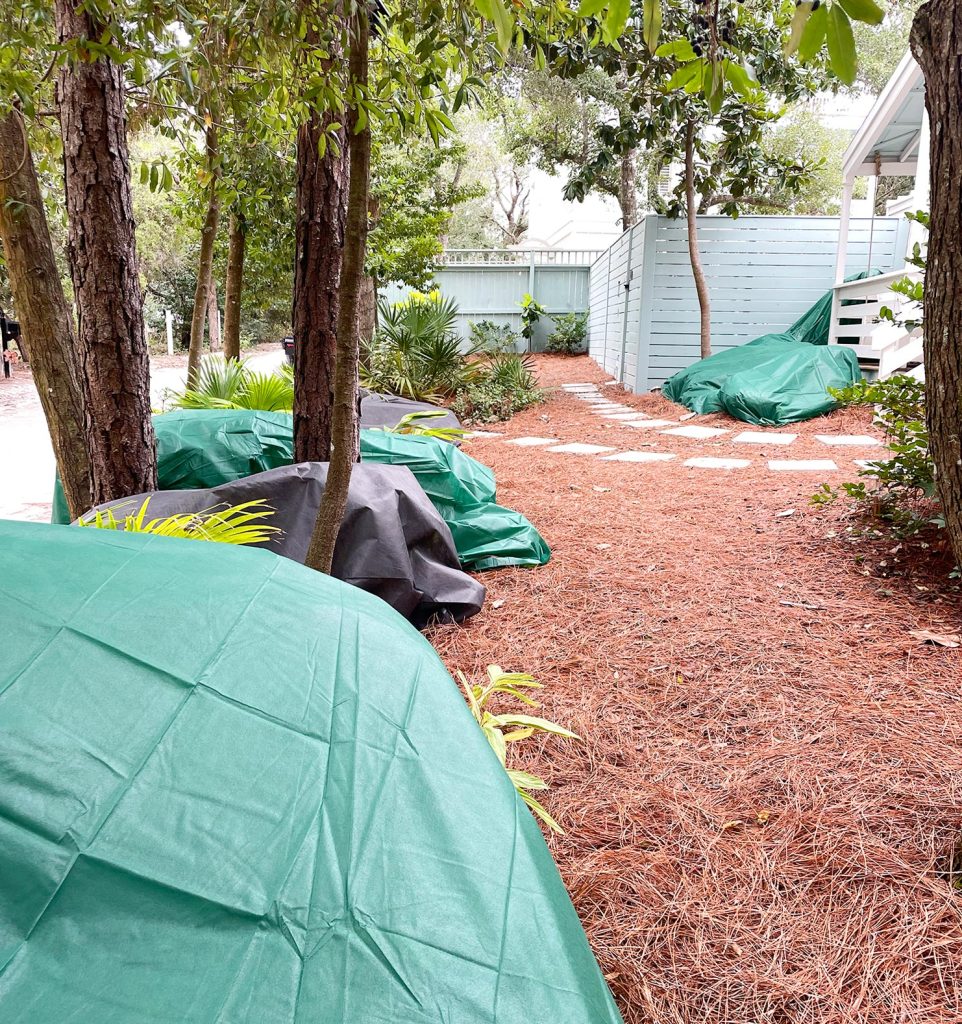
Tip 4: Cover Plants With Breathable Fabric
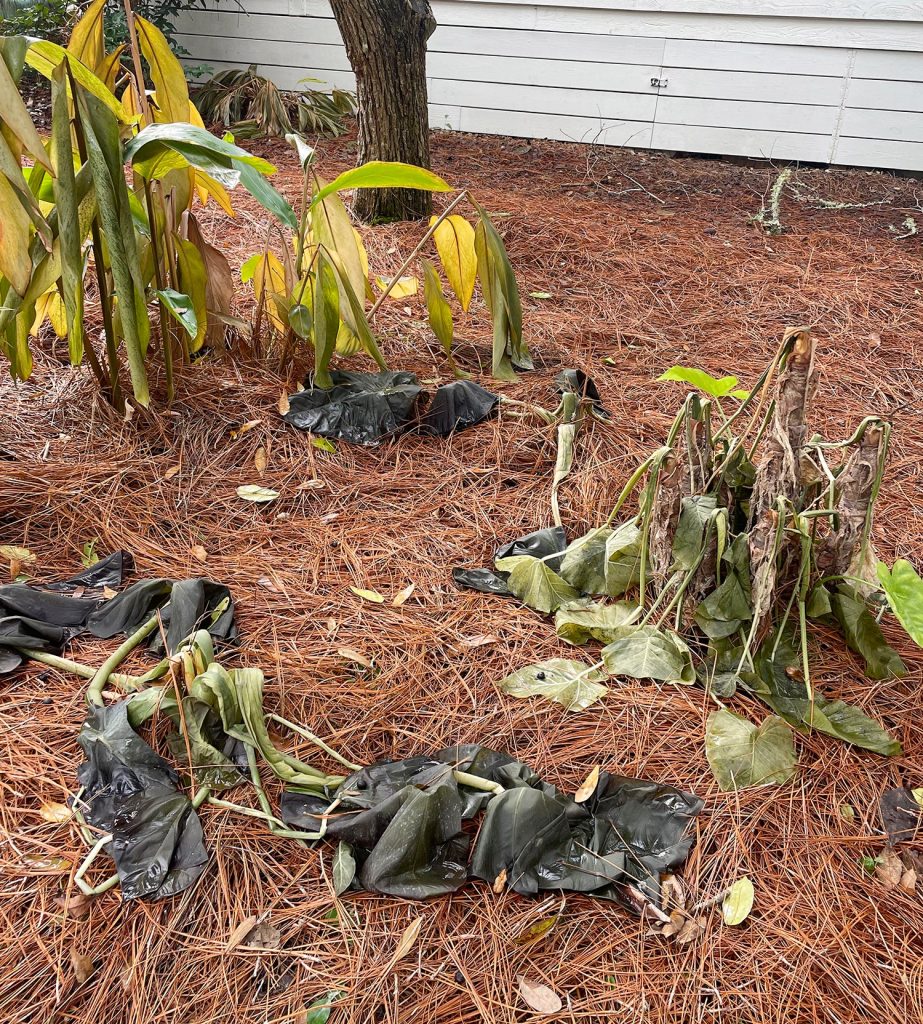
If you’ve ever seen someone throw a blanket, towel, or sheet over their plants, that’s another popular way to try to keep some heat around your plants. The cover traps warm air around the plant in the same way that a blanket keeps us humans warm – but instead of trapping body heat, it retains the heat that’s coming off the plant and soil. We figured it wouldn’t be foolproof with such low forecasted temps, but we knew even if it saved half of what we covered it would be worth it. And we picked up some tips to make it as successful as possible that we’ll share with you below.
Use breathable fabric, not plastic
It may sound counterintuitive but using breathable fabric so air can still flow around the plant was the number one tip from local nurseries and online plant experts alike. We read over and over again that a plastic drop cloth or plastic bag can be worse than no protection in many cases, since it can hold moisture against plant tissues and cause more serious freeze damage. Just think about how you’d feel covered in plastic vs fabric. Not fun, right? That’s why things like spare bedsheets or towels are good solutions that you may already have around.
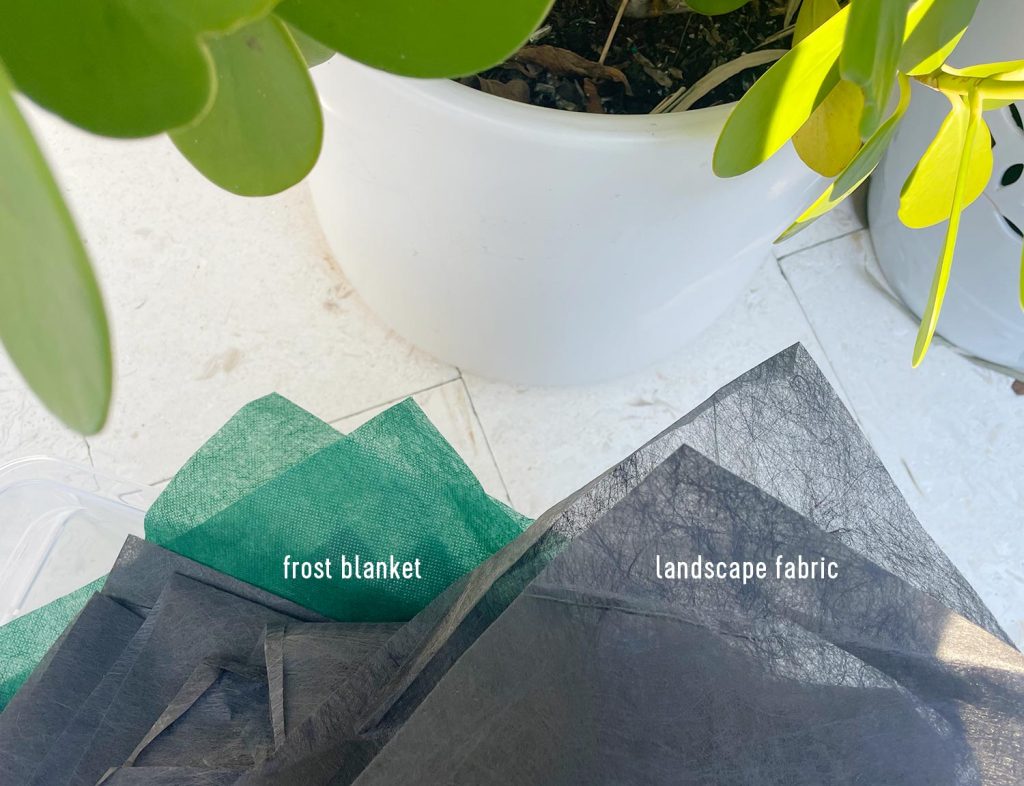
If you can’t find frost blankets, try landscape fabric instead
We don’t have many spare sheets, so we bought several of these Frost Blankets when we first saw the forecast. But a few days later, when we went back to grab a couple more, the store was completely sold out. Thankfully, someone there told us that landscape fabric – the kind meant to block weeds – is a similar material, making it a suitable substitute. We found it to be a little thinner than the Frost Blankets, but it was also less expensive. And in the end, they both seemed to perform about the same.
Don’t “lollipop” your plants
Make sure your blankets go all the way to the ground. Your soil is the main source of the heat that the blanket will be trapping, so just wrapping the leafy top (like a lollipop wrapper) isn’t as effective. When draping bushes or small trees, think more about making “ghosts” where your cover makes contact with the ground on all sides. Also, don’t forget to buy some garden stakes or landscape pins to keep your covers held down – especially if it’s going to be windy!
Tip 5: Add An Ambient Heat Source
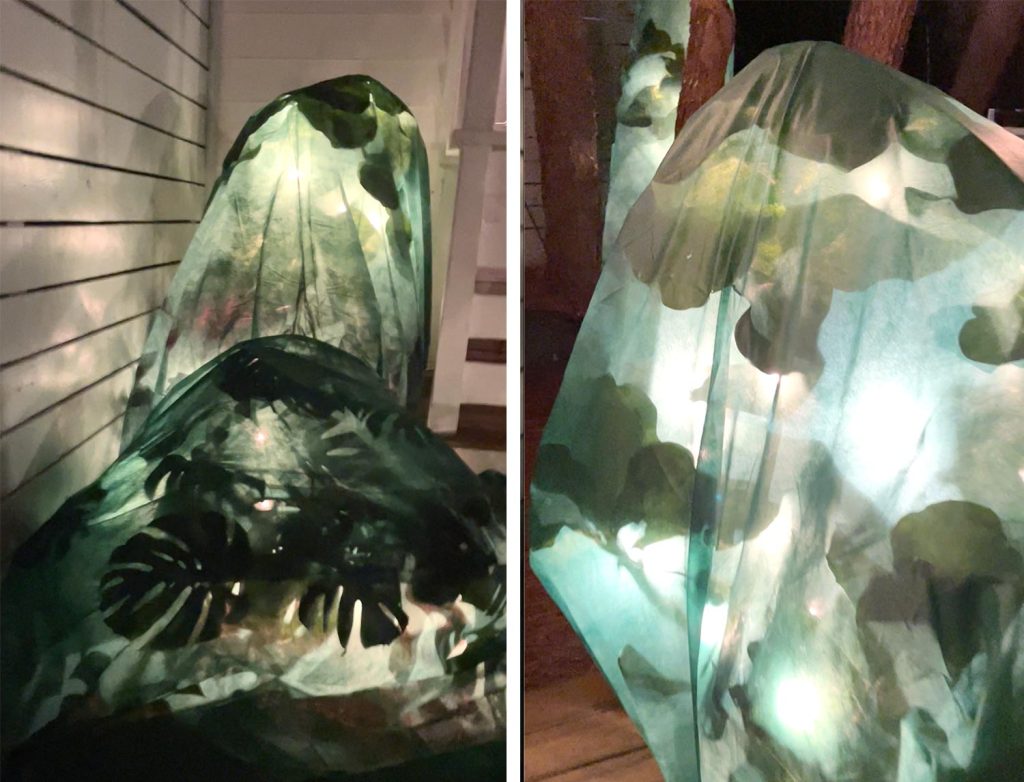
To increase the amount of warm air your blanket will trap, you can also introduce another heat source. Someone tipped us off that wrapping incandescent Christmas lights around your plant or through your plant beds is a great way to do this. LEDs won’t work because they don’t give off heat, but the old-school ones – specifically the larger C9 bulbs – are slightly warm and known to work well. Just be careful not to overload your breakers with too many strands. Here’s what ours looked like before we covered them.
And here’s what they looked like after we put the frost blankets over them. I was kinda pretty, in a spooky sort of way!
We’ve also heard of people filling milk jugs with hot water and placing them near their plants. The same principle is at work, but this sounded like a more labor-intensive technique. Plus, since this was happening on Christmas weekend for us, we had no trouble finding plenty of discounted C9 bulbs at the store. We got 4 boxes for the price of 1!
How Did Our Plants Fare?
After taking all of the above actions, I’d love to say that our landscaping looks as good as it did before the cold snap (see how it looked this fall here). It definitely does not. Despite our efforts, we, unfortunately, have a lot of plants – namely tropicals – that just aren’t built for the extreme sustained “hard freeze” that we experienced for 3 solid days in a row.
I wish there was a clear takeaway like “blankets work” or “C9 bulbs are amazing every time” but our results were too mixed to draw such decisive conclusions. Some covered plants did great (as in, they looked pristine when we uncovered them) and some didn’t. It’s likely that many if not all of our covered plants might come back based on the base/root seeming to be unaffected and only the leaves looking limp (typically leaves can come back if their root/stem is ok) but they don’t all look great right now. We’ll have to update you on how things fare, so stay tuned for that.
But our overview is that while some covered plants had lights and some didn’t, both groups had some plants that looked great upon uncovering them and some really wilted ones (which again might completely come back, but they don’t look great now). Once again: bringing plants inside was the only 100% success rate we had.
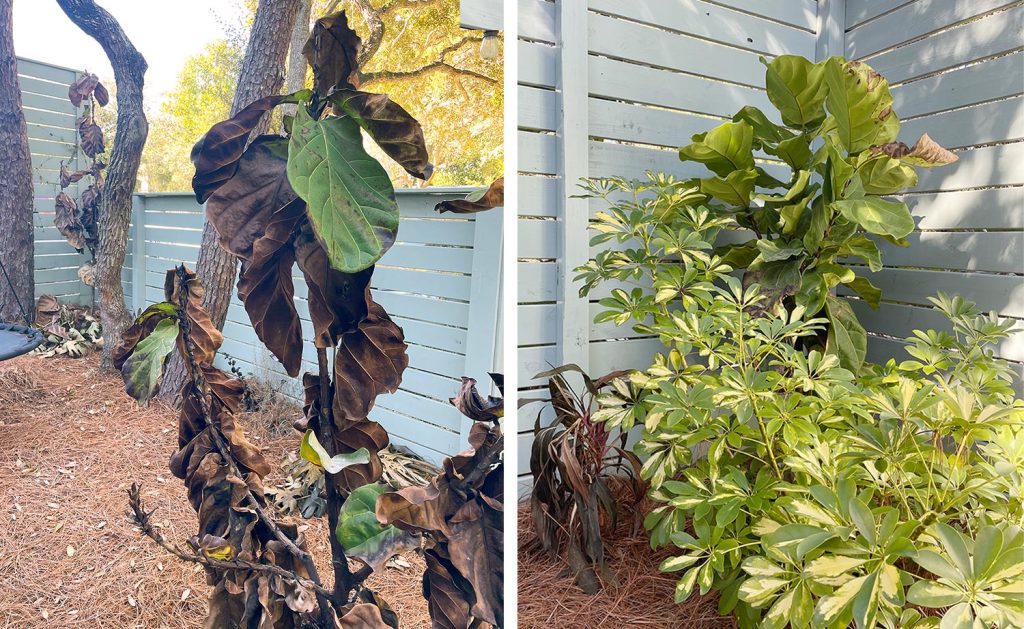
We think a lot of this “varied result” could be related to specific plant species and planting locations. For instance, one of our lime trees looks completely fine (see below) and the other is basically covered in brown leaves and all the fruit dropped off. Both were mulched and covered, but without C9 bulbs. Our best guess is that one was a lot more exposed to the wind than the other one since the happier one (seen below) was in a corner where there were two fence sides as wind breaks. Most of our more tropical plants like monsteras, elephant ears, and gingers got entirely limp, but our philodendrons fared okay with at least a few happy-looking leaves and a base that’s already shooting up new healthy leaves.
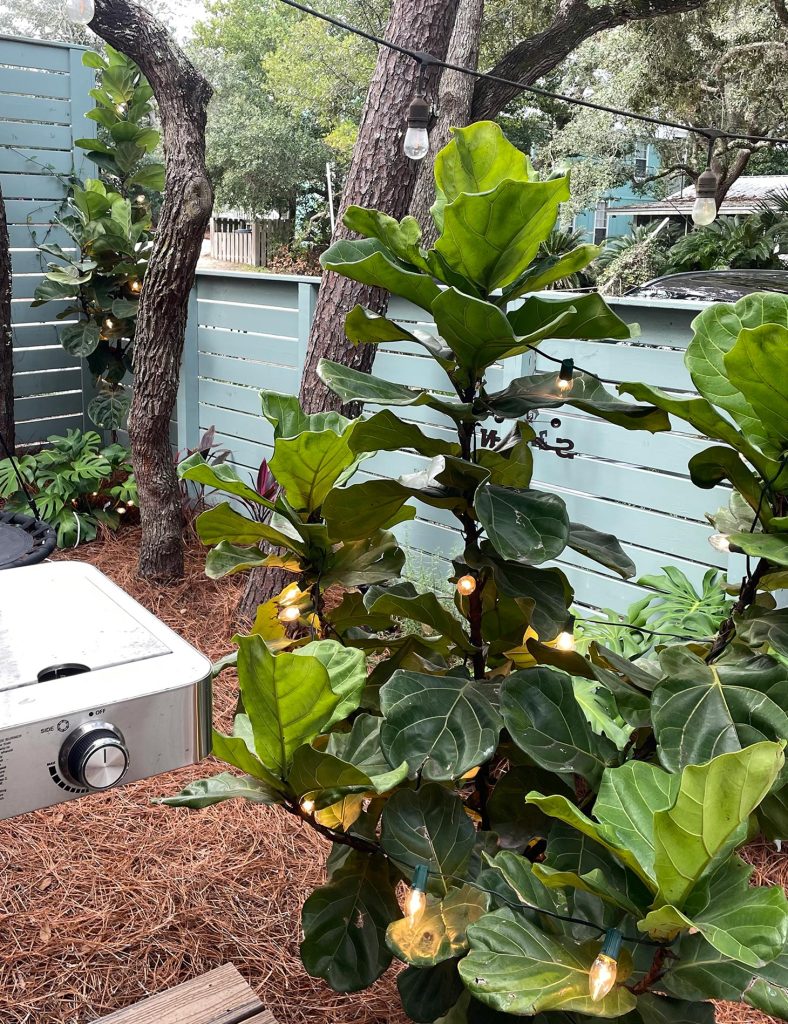
We have several fiddle leaf figs planted outside because we’ve had better luck with them outdoors here than inside. Over the past 3 winters they’ve been outside & very happy, so we brought in the potted one that we could, and for the ones that were planted in the ground, we covered, mulched, and wrapped them in Christmas lights. The results? One one came out completely unscathed (below right). And, to our surprise, it was the smallest and most recently planted of the whole bunch. In fact, that whole bed it was in did pretty well. So maybe it was just in a warmer corner of our yard which once again had two fences meeting to form a wind break around it?
The only reason we feel ok about the other figs looking so bleak is that we have seen a fiddle leaf fig completely die inside of our house (dropped all leaves, was a dead-looking stick) and when we put it outside it completely regrew into a super huge and healthy tree. So we are holding out hope that happens again with these. Will keep you posted for sure.
So, again, it’s hard to draw clear conclusions about what of this effort worked… at least not yet… but it feels safe to say that it didn’t hurt to try and we have high hopes for many things coming back this spring. (*crosses all fingers and toes*)
What’s The Good News?
As I’ve mentioned when it comes to limp plants or brown leaves, all hope is not lost. There’s a huge difference between a dead leaf and a dead plant, so just because lots of our leaves are brown and wilted, doesn’t mean the whole plant’s a goner. They may just need time to shed their frozen bits and regrow new ones when the weather heats up again. Which leads us to…
Tip 6: Don’t Prune Right Away
As antsy as we are to clean up all of the dead-looking plants in our yard, many of the experts we googled (and chatted with locally) say that our plants will actually do better if we wait. Recommendations differ slightly from plant to plant, but in general, here are some reasons to put your shears away (for now):
You might cut off healthy branches or dig up healthy plants
You probably won’t know what parts of the plant are truly dead right away. Some damage may not appear immediately, while some rough-looking plants may bounce back in a few days. Still, others won’t sprout again until the spring. You wouldn’t judge the health of a tree based on its empty branches in the winter, right? So by waiting for things to start greening up again, you’ll have a much clearer idea of what plants (or parts of your plants) didn’t survive.
Dead leaves can still protect your plant
Until you’re past your area’s last possible frost (check your frost dates here) there’s always a chance you’ll experience another cold snap this season. That dead material can still offer some insulation to the living parts of the plant, whereas removing them leaves each plant more exposed to cold and wind than before.
You don’t want to stress your plant more
After a freeze event, your plant focuses its resources on keeping its core alive and healthy. That’s what you want it to do. Cutting branches or removing leaves too soon might trigger a growth response, which might unnecessarily “distract” its resources. Plus, if pruning does result in new growth, those new leaves become even more vulnerable to future freezes this season if another cold front rolls around.
Generally, we’ve followed the rule of letting damaged leaves and flowers fall off on their own (even if it means waiting for new growth to push them off in the spring). But for anything that is mushy or gross, which tends to happen on some tropicals (see above), we remove that sooner to prevent rot. This happened to one of our biggest elephant ears last year during our one and only brief frost, but it grew back just as big this year. Fingers crossed it does that again!
So even though our yard doesn’t look quite the way we want it to right now, we’re reserving final judgment on what worked and what didn’t until spring and summer rolls around. We’re hopeful that more things survived than it seems and, if not, we’ll reevaluate if we want to risk replanting the same thing in its place. A neighbor of ours said she likes to look at these moments as an opportunity for things to come back hardier and stronger, so we’re hoping that holds true for our plants.
Additional Freezin Weather Preparation
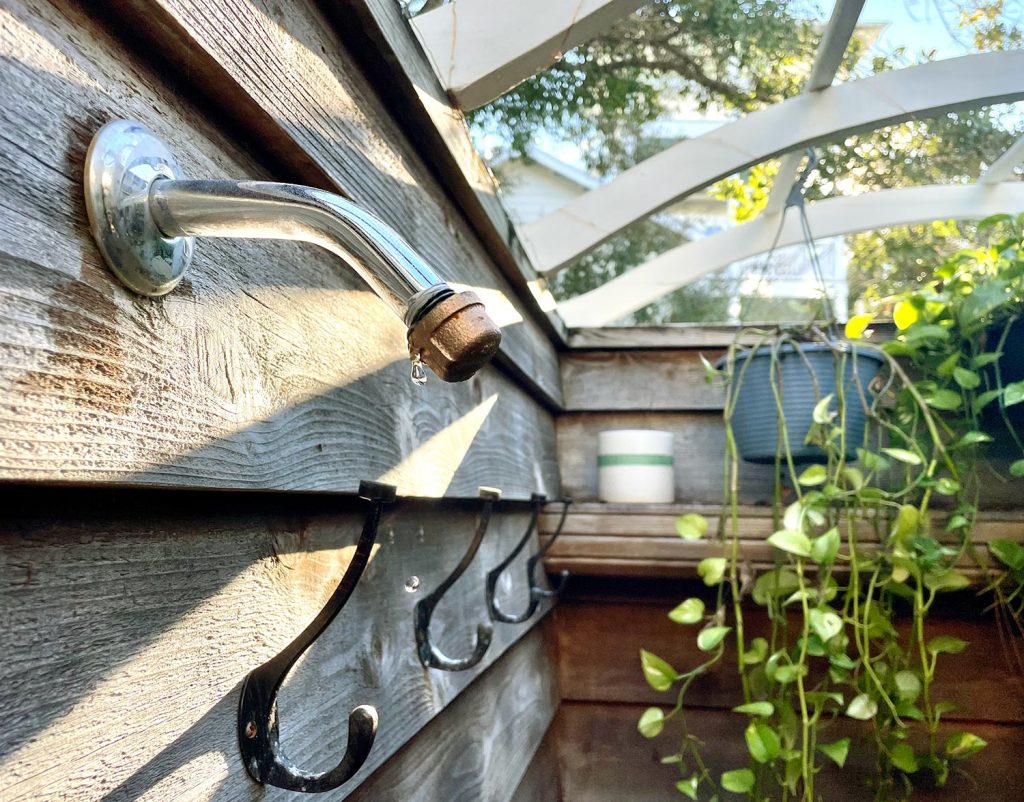
Our plants weren’t the only thing we took steps to protect during this recent cold snap. Since it was our first time having such low temperatures in our Florida house, we protected our pipes from freezing too. Several of our neighbors experienced burst pipes – especially in their outdoor showers. But luckily the steps we took spared us from having the same trouble!
*This post contains affiliate links, so we may earn a small commission when you make a purchase through links on our site at no additional cost to you.
I’ll start this post with a confession: I resented our kitchen porch when we finished it last fall. Resent is a strong and, admittedly, strange word to use for a porch. But I’ll explain it later on in this post. The good news is that I no longer harbor any ill will toward it. In fact, it has become one of the spaces I’m most grateful to have in our smaller home. Especially after some functional additions that we’ve made to it over the last year since you saw it.
I love this space so much, that I’m actually writing this post from it right now. Call it Method Blogging. I’m fully immersed in my character.
A Kitchen Porch Renovation Recap
You can read a full post of this porch’s previous updates, but the quick version is: this used to be a porch off of our bedroom, which had 8 glass doors leading outside (yes, eight whole doors in one room). We closed off two of the doors that led to this porch, which you see in the photo below (which also created a wall for our bed). Then we swapped that black window for a door that connects this porch to our kitchen.
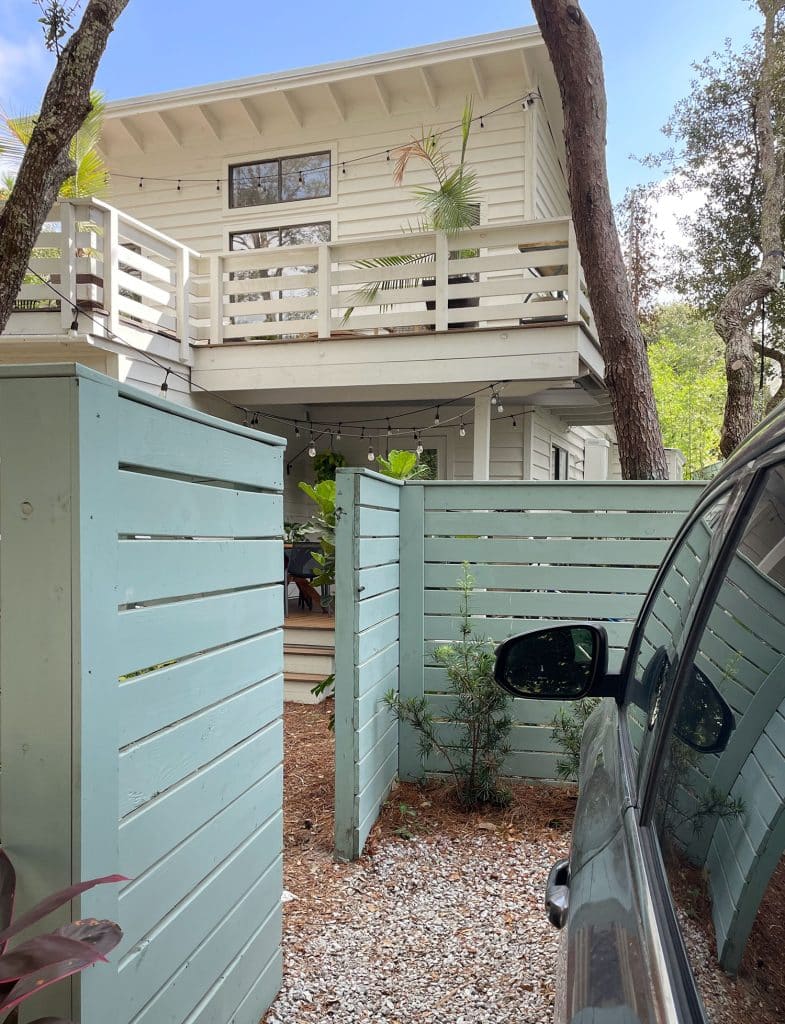
Taking this from “unused bedroom porch to “heavily used kitchen porch” has been a complete game changer. We love that this update created a quick path from our driveway to the kitchen, which makes bringing in groceries a whole lot easier.
You can see below how we park our car just outside the gate beyond this porch. There are still parking spots for guests in the front yard (they get to walk up our pretty front porch and enter into the sitting area, which feels nice for people visiting), but this little side yard parking spot has been so great for us. It’s a much more direct route into the house, and the porch is covered, so it’s a dry spot to run under if we’re coming home in a downpour.
We also love the easy access to our outdoor grill that’s just steps away from our kitchen’s cooking area.
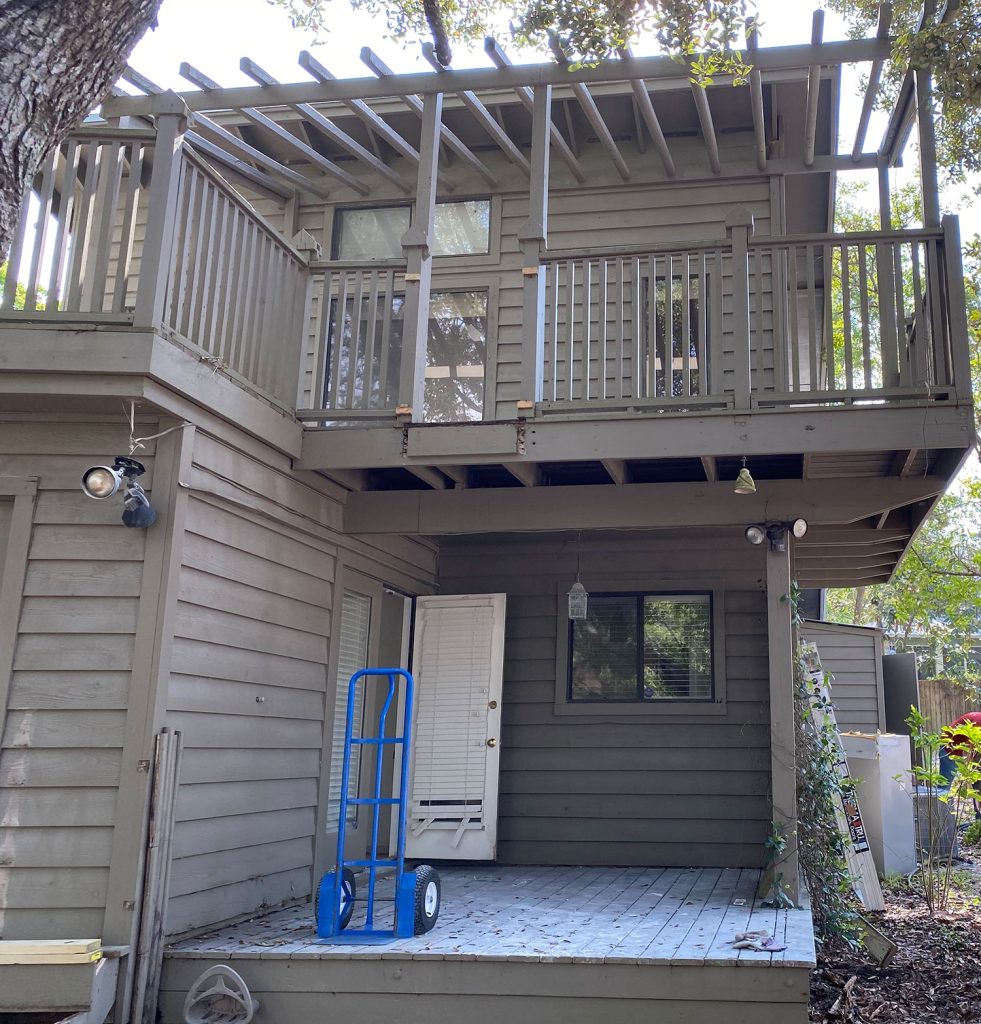
By comparison, this is what we had going on when we bought the house:
It’s hard to articulate how much convenience this setup has added to our lives, but again, game-changer is the word that keeps coming to mind.
So How Did We Improve It?
To see the changes we’ve made over the last year, and to get a sense of how functional this has become for us, you can watch this quick video tour Sherry filmed (keep an eye out for my cameo). It’ll give you a better sense of the flow and you can see some of the added function in action:
As you saw in the video, the biggest improvement we’ve made since you last saw it was the addition of these two cabinets. They’re specifically made to be outdoors and they slip perfectly into the space, in a spot that used to be taken up by a wicker console table that Sherry found on the curb, which was pretty but offered us about 89% less function (zero concealed storage and a woven rickety top).
The #1 thing these outdoor cabinets do is provide convenient outdoor shoe storage. Since we don’t have a mudroom or a foyer, having not one but two places where we can keep our shoes has been really helpful (we have a cube cabinet next to the front door with baskets where we also store shoes).
I know keeping them outside may seem like a recipe for disaster, but it has been several months (some of the hottest/most humid) and we’ve had zero issues with bugs/smells/moisture. Sherry jokes that the bugs would rather be in our lush plant-filled yard, and our shoes get some nice ventilation through the tiny cabinet slivers that are built in for airflow (again, these are made to be outside, so that bit of moving air is likely why they don’t swell/warp/fall apart). You can see more about that if you watch the video tour Sherry made that I shared earlier in the post, which is also where you can see Sherry open the other cabinet to show you what’s in that one.
The nice thing is that this is BONUS shoe space thanks to also having that indoor storage in our cubby by the front door. Plus, keeping our shoes outside helps minimize the amount of sand and dirt that gets tracked in.
The cabinets also create bonus counter space, which has been especially useful as a prep area whenever we’re grilling (you may have noticed my case of grill tools stored above the shoes). And the wood-framed concrete counter has proven to be very durable and weatherproof so far.
Beyond their function, they just fit so nicely in this space and we love that they look like an outdoor extension of the cabinets inside. It’s like our kitchen counter got lengthened by five and a half feet (and since the porch is covered, it’s usable year-round).
Adding A Water Feature
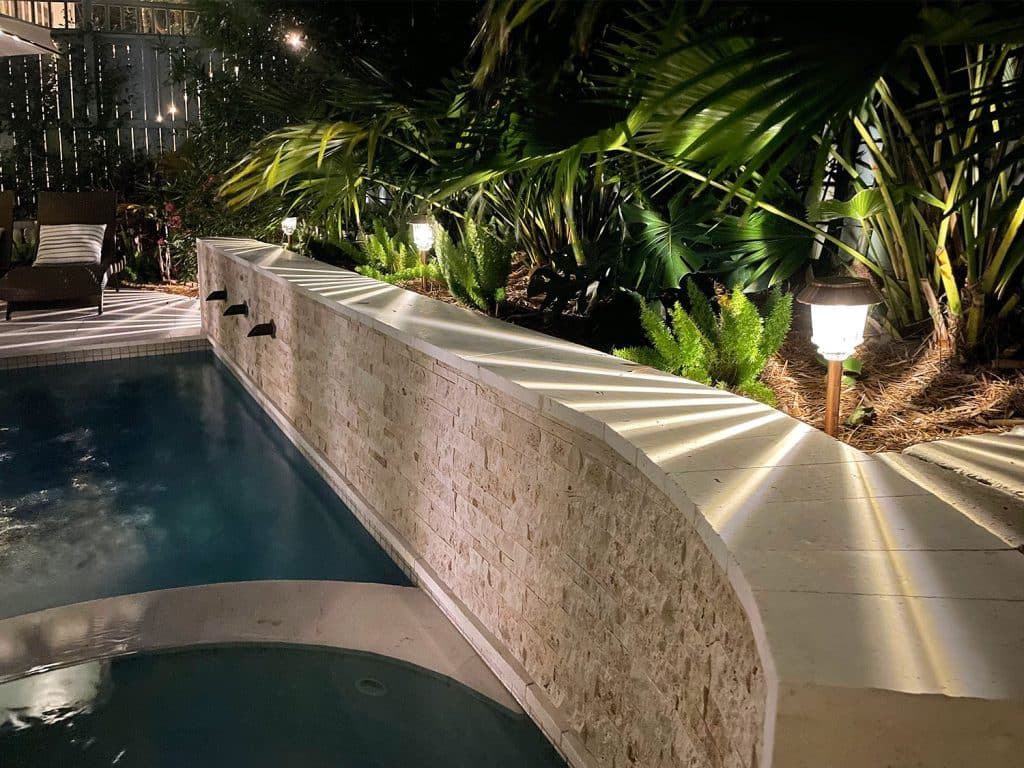
Maybe “water feature” is a bit of an oversell, but we’ve grown to appreciate the running water sound by our pool so much that we wanted to try to incorporate something that sounds nice on this side of the house too.
So we bought this water fountain as a self-contained, all-in-one kit (you literally just put the ball on top, fill it with water, and turn it on). Super easy. We especially like that the green patina ties into our copper rain chains and the sound is really nice (you can hear it in the video).
We’re considering moving it down into the yard at some point, we just have to figure out the electrical situation first. But for now, it’s just plugged into the outlet up here.
Creating A Hammock Zone
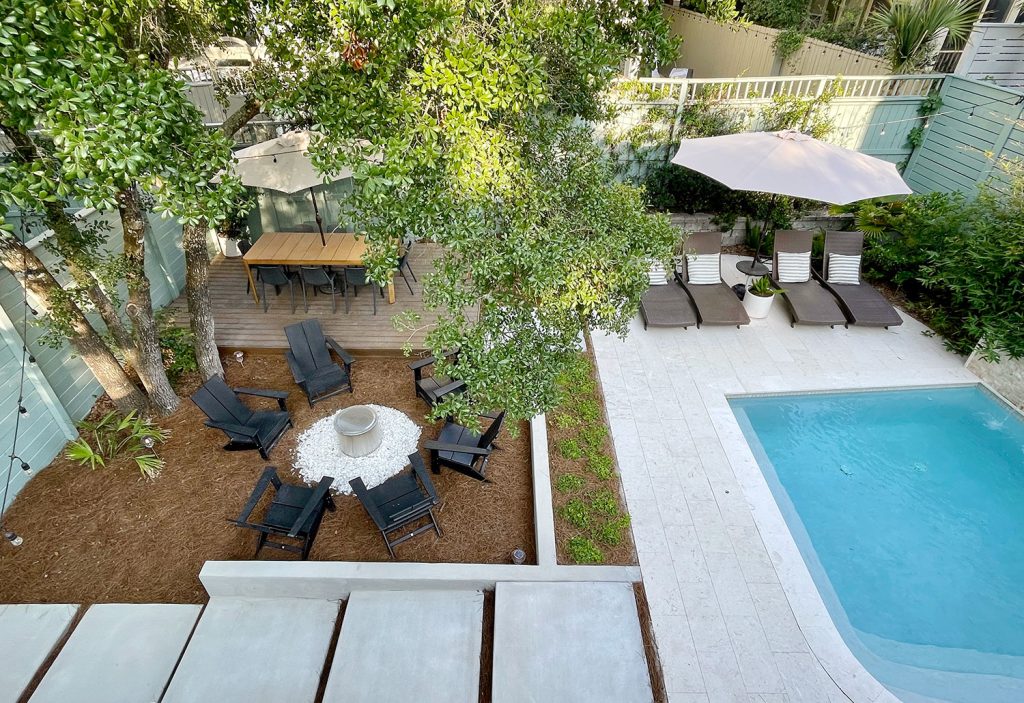
Sherry mentioned on Instagram that we doubled our backyard pool area by shifting the fence back (we’ll write a post about that as soon as it’s more settled). And as soon as we earned that much bigger pool yard, we moved our firepit over there, which means we can do more entertaining all in one spot. Think kids swimming while adults enjoy a fire, which we often do at our friends’ houses so we knew we’d like it.
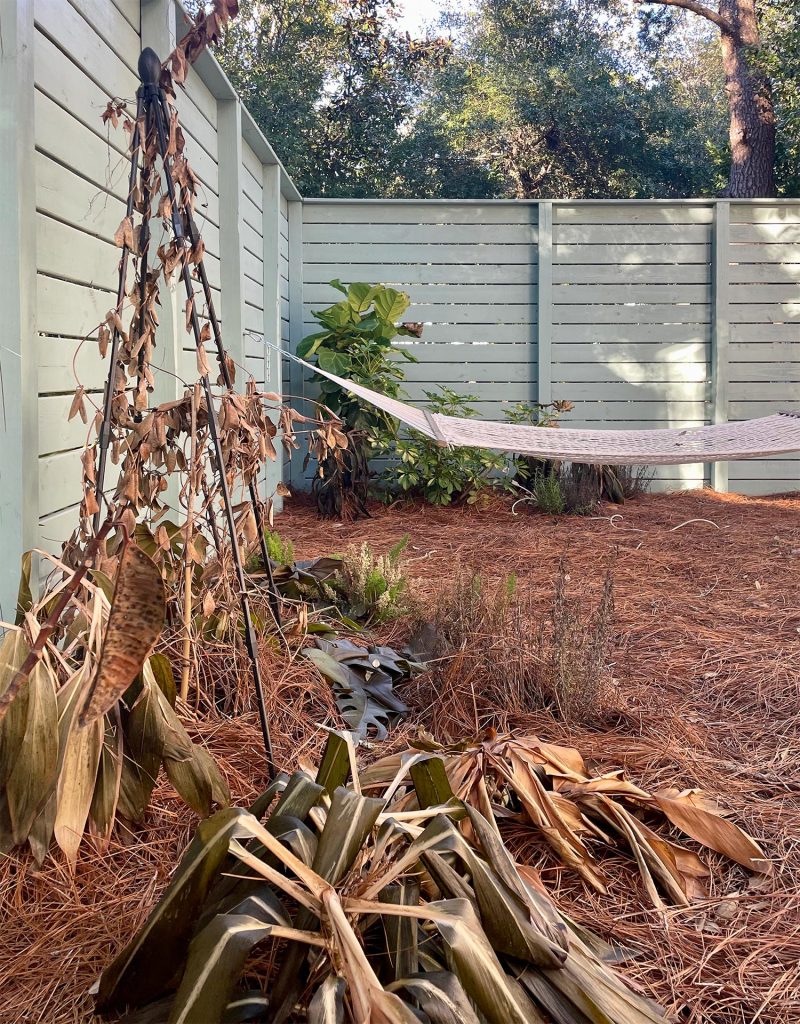
Moving the firepit left an unused zone in our side yard – which is just beyond the kitchen porch. The kids have been excited to have a hammock, so we bought one and it fit perfectly right in the old firepit spot.
Actually, we bought two hammocks. The fabric one we ordered first turned out to be really uncomfortable (IMO, at least – your back can’t arch very much so you feel like you’re splayed out and kind of flat) so we returned it and got a much-cheaper-yet-superior traditional rope hammock instead. It has quickly become a favorite reading spot for all of us (and a stellar napping spot for me). The only downside is that I feel like I’m cheating on our outdoor daybed, which used to be my go-to spot for such leisurely activities.
It has been especially great these last several weeks thanks to the fall weather around here. There’s like no humidity, but it still gets into the 70s and 80s each day. But even when it’s on the hot side, the hammock gets some great shade!
I know it sounds like I’m gushing (bragging?) but again, we’ve just been really happy with how this whole side of the house has come together. Next on our list is to get some more permanent walkways and then just continue to turn it into a plant-filled haven (as you can imagine, Sherry is ON IT every time we go anywhere near a plant store).
So Why Did I Resent This Porch At First?
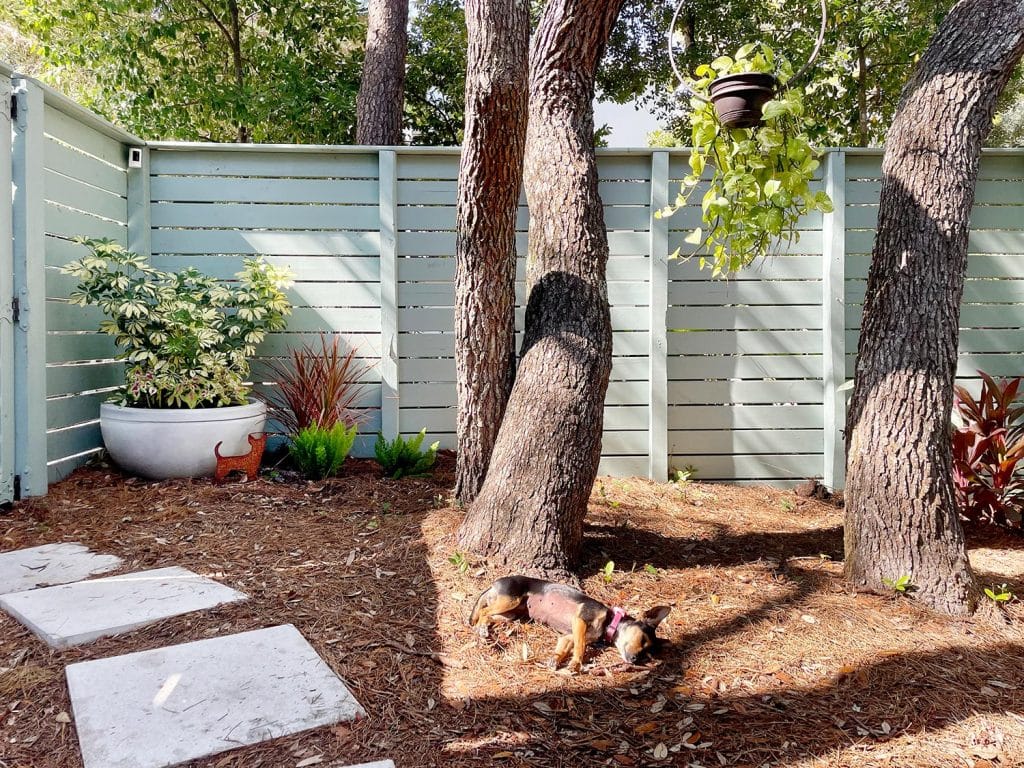
Okay, back to my confession about having mixed feelings about this space at first. It really had nothing to do with the space itself, just the timing of… things. Part of the reason we embarked on updating this zone – fencing the side yard, adding the new door, redoing the porch, etc – was for our 15-year-old dog, Burger. We wanted to create a fenced area where he could easily go to be outside, sleep in the sun, go to the bathroom, etc. Up until then, he’d been using the front door for those “activities” and, since that yard wasn’t fenced and was right by the street – it always required supervision. And, in the case of bad weather, also an umbrella.
Yes, I was the Fonzworth Bentley to Burger’s P Diddy. Or should I say his Pee Diddy?
Anyway, renovating this porch was definitely for us human Petersiks too, but it was also specifically for Burger. Sadly, he died less than a week after we finished it. We’re grateful he got to use it for a few days (look how happy he is in the photo below) but somewhere in the grief of his passing, I felt like I hated this porch sometimes. I don’t know if I was mad at us for not renovating it sooner, or at the universe for the cruel timing of it all. I’m fully aware that the feelings were misdirected, but that’s the best way I can explain how it felt at the time.
It’s been over a year now and thankfully my feelings have sorted themselves out. We still love and miss Burger every day, but it’s easy to fully appreciate how vital this space has become for our family every time we walk out there – the convenient door, the added storage, the extra counterspace, the grill near the kitchen, the closer path to the car, etc. We also find a lot of comfort in how much our dog Penny enjoys the space. It has been great seeing her use it in all of the ways we had hoped Burger would. Especially when they hang out “together” (note the little metal chihuahua we put in the corner in Burger’s honor).
I hope that’s not a bummer way to end this post (about a simple porch, no less!) but it feels nice to be able to appreciate how hard this area works for our family, and to reflect on how much we all enjoy it now (even if it took me some time). This whole side of our house was pretty useless when we moved in, so we’re proud of how it has come along. Now if you’ll excuse me, I have a nap to finish in the hammock.
*This post contains affiliate links, so we may earn a small commission when you make a purchase through links on our site at no additional cost to you.
Some people are surprised to hear that we illuminate our entire pool area using nothing but solar LED landscape lights. As in: the sun provides free evening ambiance with zero effort on our part. Nothing has to be plugged in. Our electric bill feels zero impact from softly illuminating this entire area of our house. So today I wanted to share the 3 solar products we use in case you want to give your own outdoor space a literal glow-up.
Technically we have a porch light and in-pool lights too, all of which use traditional electricity, but we almost never turn them on. Honestly, they’re a little blinding and we like a soft glow that doesn’t block out our view of the stars. Instead, day-to-day (or night-to-night?) we just rely on our solar-powered LED lighting for that oh so charming come-hither glow.
I used to think solar-powered landscape lighting was a lackluster substitute for traditional, wired landscape lights (which, btw, we found very easy to install ourselves at our last house). But now we’re huge fans of solar lights, and I’ll tell you why.
Why We Love Using Solar Lights
One common reason for using solar lights is to avoid the wiring necessary for plug-in or electric-powered lights. And honestly, that’s one of the reasons we initially used them here – almost as a placeholder until we had time to install a more permanent lighting plan.
But since adding them, we’ve discovered there are TONS of pros to relying on solar lighting in your yard:
Easy to install: No wiring necessary! Just find a sunny spot for your solar panel.
Placement Flexibility: You’re not constrained by wires or proximity to a plug, put ’em anywhere!
Affordable: They’re not very expensive to buy and they’ll never add to your electric bill.
Set & Forget: They’re dust-to-dawn, so there are no switches or timers to worry about.
Eco-Friendly: Renewable resources FTW!
I even filmed this short little time-lapse video to show you how our pool area automatically transitions from day-to-night, without us having to do a darn thing!
Now, of course, the main drawback to solar lights is that they rely on sunshine, so they don’t glow as long on cloudy days – but generally they have surprised us by shining longer than we’d think they should on especially gloomy days (they might come on at dusk and shine until 11 or 12 instead of 3 or 4 like they do on a normal sunny day. Very occasionally if we’ve had a string of gloomy days they might only glow a tiny bit or not at all, but in those cases we always have that porch light and our in-pool light if we really need them.
Typically whenever we have friends over after dark, we hang around our firepit area or upper deck anyways, both of which are illuminated by plug-in LED outdoor string lights. So that pool ambiance you see in the video is mostly enjoyed by mom & dad in the hot tub, where it easily provides enough light to make sure nobody misses a step getting in, but not like a search-light level blast of light like a UFO is above us trying to beam us up.
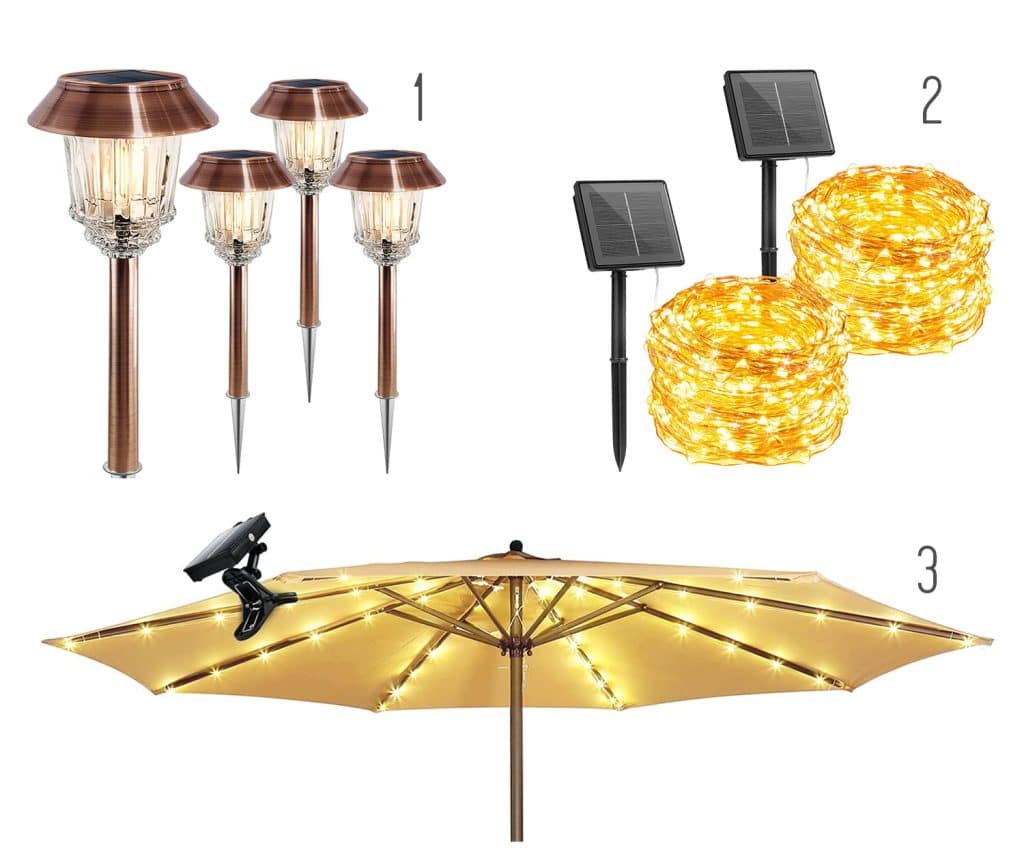
The 3 Outdoor Solar LED Lights We Use
I’ll talk about each of these in a bit more detail, but for a quick rundown, here they are:
They all include the necessary solar panels, so you don’t need to buy any extra equipment. Everything is ready to go right out of the box. They are also all WARM WHITE, which helps them put off a pleasing glow, not a harsh fluorescent-colored light or anything too weirdly blue.
Solar-Powered Pathway Lights
Sherry has mentioned these solar pathway lights a ton on Instagram and I feel like they’re already building up quite a voracious following – and for good reason! So many of you have sent photos of them in your yards, and from seeing them in snow or other tropical places or just lining a front walkway in the suburbs or the city, they always look great. They’re attractive during the daytime and SO easy to install (just turn the switch in the cap on, stake them into the ground, and you’re done). The solar panel is built right onto the top of the light, and those starburst reflections shine down on the ground around them when they glow.
At dusk they automatically come on, casting a surprising amount of light that creates this cool pattern on the ground. Almost like rays of the sunshine beaming out onto your patio, path, driveway, or wherever. We’ve actually got them on all sides of our house – probably about 16 in total! We get asked if they work in the snow and colder climates and have definitely heard from people who have them and love them there – our only advice is don’t put them somewhere that gets zero sun – because, duh, they’re solar. So like under an awning that’s always shaded won’t work nearly as well as out in a garden, along a path leading to the door, etc.
I haven’t created an Excel spreadsheet to see how long they last every night to provide you with the mean, median, and mode (doesn’t that sound like something I’d do?) but the important part is that most of them are still on by the time we go to bed – so they’re functional for the time we need them to be functional. And I say “most” just because one or two of ours behind our pool wall don’t get as much sun thanks to the plants overhead, so they might fade a little faster.
Thankfully they collectively cast more than enough soft light for us to get around out there and soak up that ambient glow until around 11 or 12, we’re usually inside & sound asleep by then. There are definitely nights when Sherry’s randomly up at 3 or 4am for a glass of water or whatever and says she still sees them glowing softly out there after a sunny day.
Note: when you get them, turn them on under the cap. They have two brightness settings there as well, so you can experiment to see which one you like best. We have ours on the brightest setting and it’s still very soft and not harsh or in-your-face at all.
Solar-Powered Fairy Lights
Last summer we decided to give these solar fairy lights a try and I’m so glad we did. We didn’t really have a plan for them at first, but quickly decided to run them under the eave of our house and along our fence.
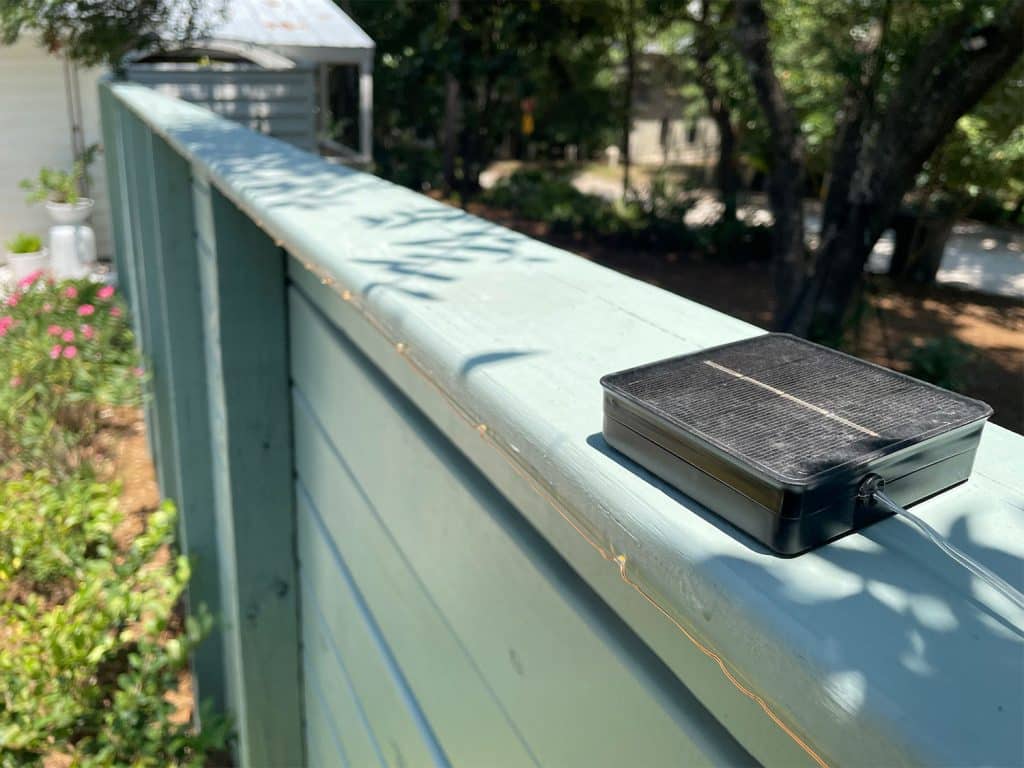
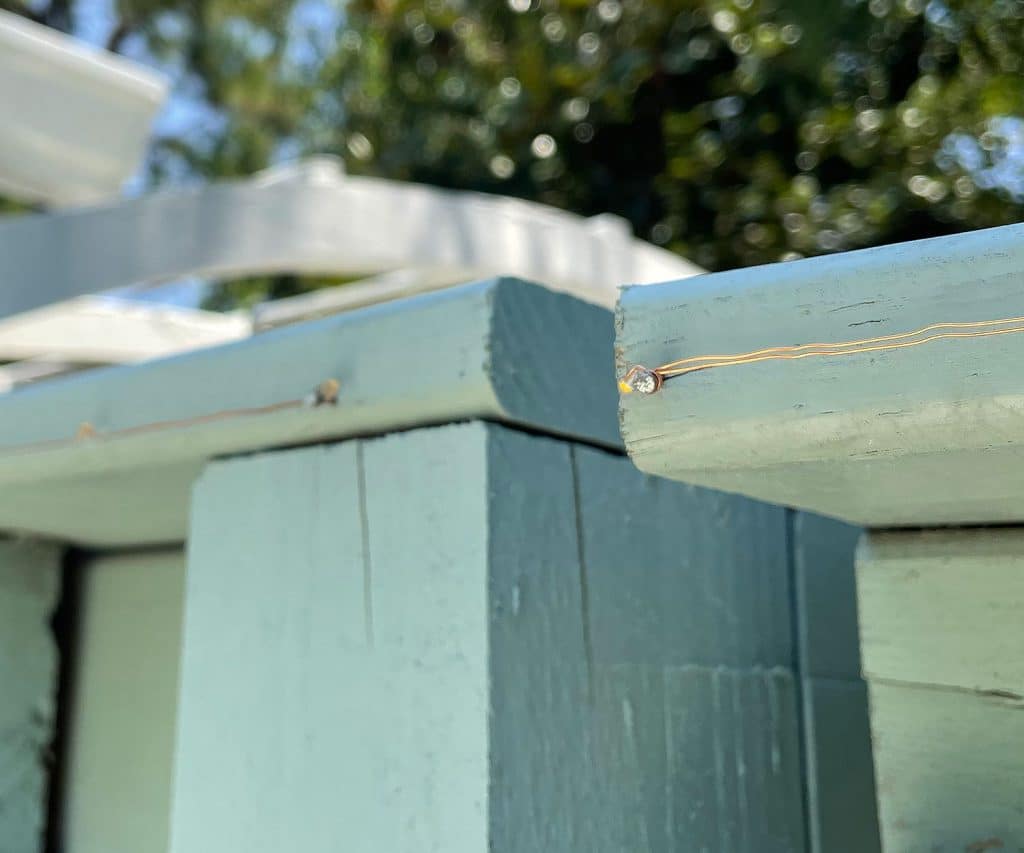
They too are easy to install. It just tacked in some small nails along the fence and wound the copper wire tightly around each nail. And instead of staking the solar panel into the ground, it literally just sits on top of the fence collecting all that beautiful free electricity from Mr. Sun. Can’t even see it from the ground (I’m standing up on a ladder for this shot).
One strand is 33 feet long, which worked out perfectly for us. We have two, and each strand starts on either side of the gate (which is how we were able to make sure the gate still swings open freely). So the one on the right side of the gate opening runs along the fence, while the one on the left of the gate opening runs the other direction across the house.
The solar panel on the other end of that strand that runs along the house just sits unceremoniously on the corner of our roof. You can’t really see this one from the ground much either from most angles, thanks to some greenery that obscures that corner and the inherent over-your-head factor (I’m up on a ladder to get this shot too).
You can see what I mean about the greenery in that corner that obscures the view of the solar pad on the roof here (it’s in that far left corner that you can’t see):
The LEDs don’t give off much heat, so a lot of people also use them more “organically” in bushes or other landscaping. They’d also be great for outdoor holiday decorations, like bunched up in a jack-o-lantern or as part of a Christmas display. Oh and if you’re hosting a disco dance party they also have various lighting modes – like flashing, twinkling, or fading in and out. We just use the solid “on” setting.
From certain angles it’s hard to see the ones under the house (thanks to the gutter) so it’s sort of like an under-cabinet glow that washes down the side of the house – and we often catch them in the pool reflection, like in the photo above. Actually, the reflection of these lights are one of my favorite things about them! Speaking of which…
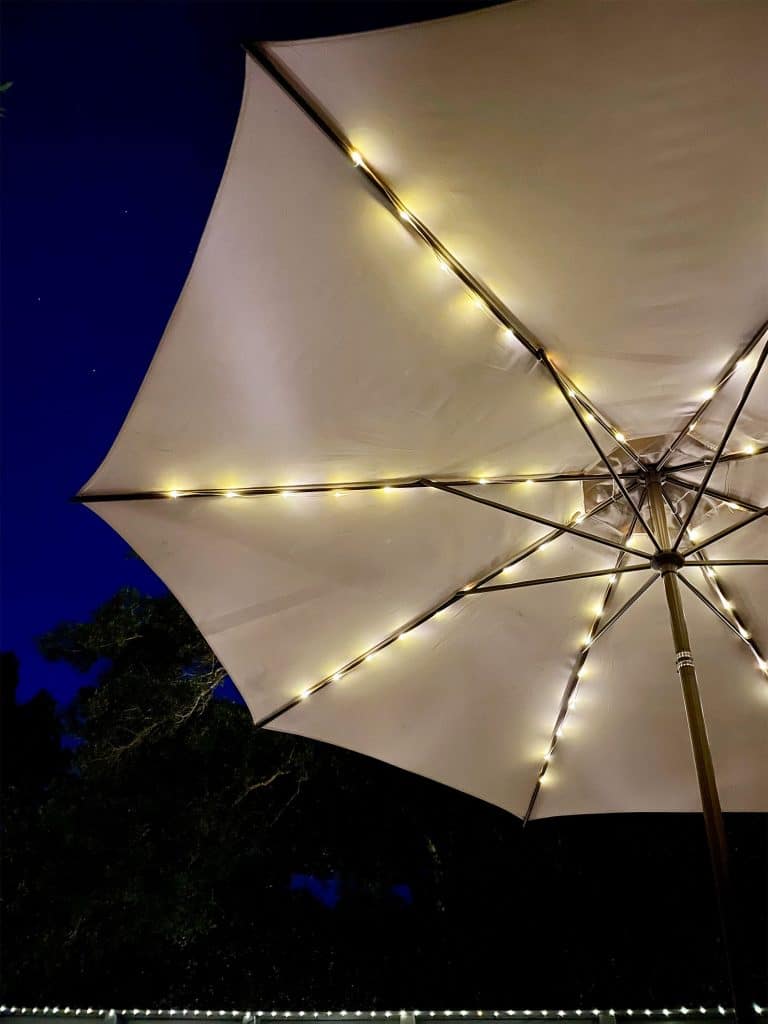
Solar Patio Umbrella Lights
After the success of the fairy lights, I sought out some other places to add them. That’s when I came across these umbrella fairy lights specifically designed to go on the spokes of a patio umbrella.
Instead of a strand of lights that run in a straight line, these fairy lights are laid out almost like an octopus – with 8 shorter lengths of wire spidering off from a center ring. This makes it perfect for any umbrella with an 8-rib design, between 7ft – 10ft in length. We actually have this 11ft umbrella, so the lights don’t technically go to the ends, but you can see when you scroll up or watch the video it still looks really charming.
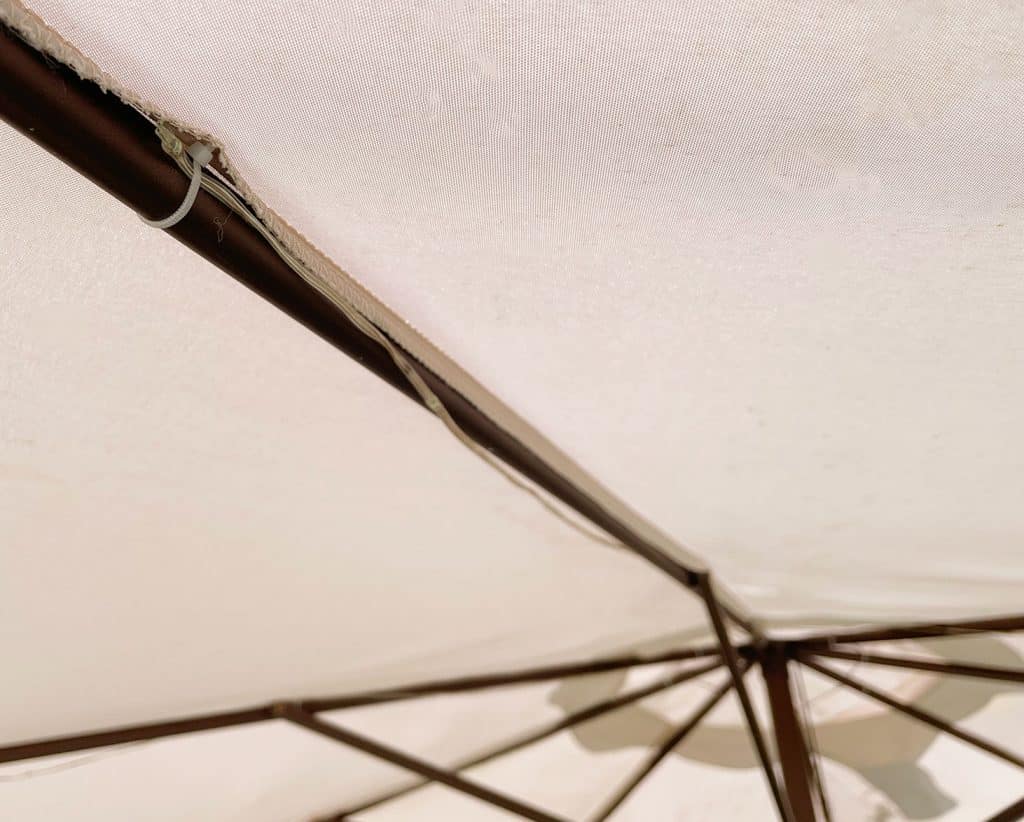
The kit comes with a bunch of small zip ties to hold the fairy lights in place on your umbrella. We also chose to wrap ours around the spokes too, because I found it required fewer zip ties (we just have one on each end) and holds the wires in place when we put the umbrella down and back up again.
The listing shows the solar panel mounted on the outer edge of the umbrella, but that made the umbrella lean a little to one side. So we just clip ours near the top of our umbrella instead – to that loose fabric around the top vent. The panel is literally like a giant chip clip, so you’ve got a lot of options for where you want to put it.
It doesn’t give off a giant amount of light (I wouldn’t be able to read a book by it, for example), but that’s not our goal here. We generally like enough light not to fall into the pool or hot tub and be able to see if we drop something but there isn’t “evening reading time” under the fairy lights. They just layer more glow into the backyard and reflect beautifully in the water of the pool.
Overall, we have found this assortment of solar-powered outdoor lights to be the perfect mix for us. We take evening hot tub dips a few nights a week (hot tubs are the best at night!), and we love that these lights offer a zero-effort, electricity-free way to make the backyard look cozy and inviting.
Oh, and one more thing, because it’s also solar. But it’s in a totally different area of our house:
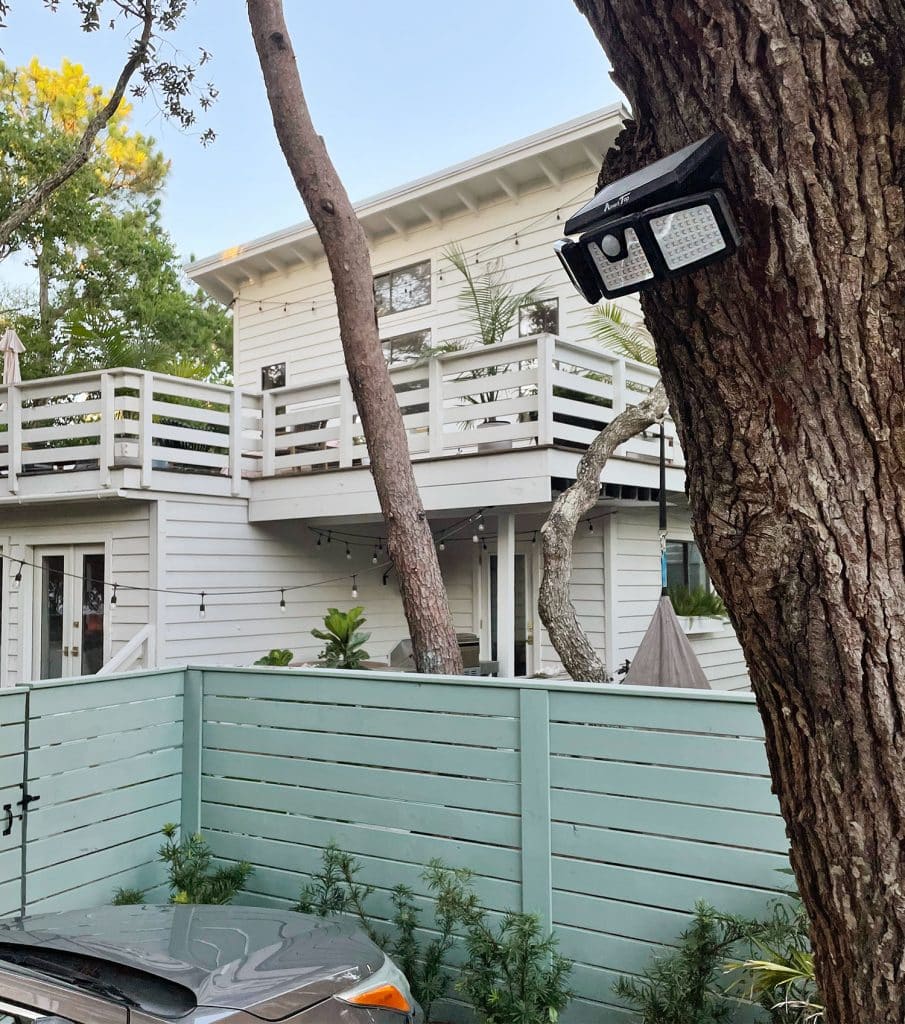
BONUS: Solar Motion-Activated Flood Light
I’m switching gears a bit, I couldn’t tie up this post without mentionig the 4th type of solar light that we love: these motion-activated flood lights (a 2 pack is currently $30). They’re not really going to add any ambiance, but boy are they surprisingly bright for being solar-powered!
We put them in a couple of dark corners of our yard, including near our driveway to give us some extra light after dark if we’re getting out of the car and we’ve been really impressed by them. We’ve got ours mounted on trees and, since every part of the device pivots, you can adjust it to make sure it’s detecting motion where you want AND shining in the right direction. Again, they’re surprisingly bright!
So we hope this post encourages you to give some solar-powered lights a try somewhere in your yard or patio. And if you’re looking for some other outdoor updates you can do yourself, here are a few ideas:
Note: We get a lot of source questions, like “where did you get those lounge chairs by the pool?” or “what’s the link to that porch lamp?” so we created a spot with all that info (and our paint colors!). This page has any and all sources for things that are outside or inside our home.
*This post contains affiliate links, so we may earn a small commission when you make a purchase through links on our site at no additional cost to you.